Mastering conditional formatting dates in Microsoft Excel can transform your data analysis by bringing attention to crucial time-related information. By learning to create custom rules and using pre-built options, you can effortlessly highlight weekends, holidays, and specific date ranges like 30 days from today, improving both the functionality and aesthetics of your spreadsheets. This guide will take you through the versatile uses of date-based conditional formatting and elevate your Excel skill set to new heights.
Key Takeaways
- Utilize Excel’s Conditional Formatting feature to automatically differentiate dates, such as highlighting 30 days from today, due dates, or weekends for easy identification.
- Create multiple rules for the same set of cells to color-code dates based on time frames, like using red for current month dates and green for the next month.
- Make use of pre-set Quick Conditional Formatting Date Rules for a fast setup or craft a Custom Conditional Formatting Date Rule for tailored date management.
- Conditional formatting dynamically adjusts to changes within cells, ensuring that any edits to date entries automatically update the highlight or format as per the established rules.
Download the Excel Workbook and follow along with the tutorial on How to Highlight 30 days from Today in Excel – download excel workbookConditional-Formatting-Dates.xlsx
Table of Contents
Introduction to Excel and Conditional Formatting
Unraveling the Power of Excel for Data Management
Have you been juggling with data and finding it tough to keep track of critical dates? Well, Excel might just be your knight in digital armor. Microsoft Excel is so much more than a simple spreadsheet; it’s a robust tool for organizing and analyzing data. With its rich features and functionalities, Excel enables you to manage information, perform complex calculations, and visualize data, transforming numbers into actionable insights.
The Magic of Conditional Formatting in Date Tracking
Have you ever dreamed of making important dates stand out automatically in your sea of data? Conditional Formatting in Excel does just that—it’s like a set of smart highlighters for your spreadsheet. Whether it’s marking past due invoices or upcoming birthdays, Conditional Formatting turns Excel into a dynamic dashboard that visually communicates the story behind your dates. Say goodbye to missing deadlines—it’s time to let your dates shine and speak directly to you!
Navigating Through Time with Excel’s Date Functions
Discover Excel’s Built-In Calendar Capabilities
Picture this: a calendar that calculates and updates itself. That’s the caliber of Excel’s built-in date functions. From generating today’s date with a simple formula to creating complex automated calendars, Excel has it covered. These functions can effortlessly act as your project timeline’s backbone or as your personal reminder system within your spreadsheets. See how seamlessly they integrate with your data, making Excel not just a tool for calculation but also a guardian of your time-sensitive tasks.
Transform How You Work with Dates in Spreadsheets
Revolutionize your workflow with Excel’s date maneuvers! Gone are the days of manually updating spreadsheets for each calendar change. Excel’s date functions allow you to perform additions, subtractions, and even complex calculations that automatically adapt as dates shift. By capitalizing on these capabilities, you’ll save time and reduce errors, making your spreadsheet a dynamic and responsive ally in time management. Embrace Excel’s clever date functions, and watch your productivity soar!
Elevating Your Excel Game: Advanced Date Hacks
Highlight 30 days from today
To highlight dates that are 30 days from today in Excel, you can use Conditional Formatting with a custom formula. Follow these step-by-step instructions:
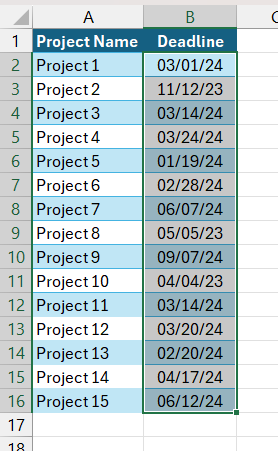
STEP 1: Select the column or cells that contain the dates you’d like to format.
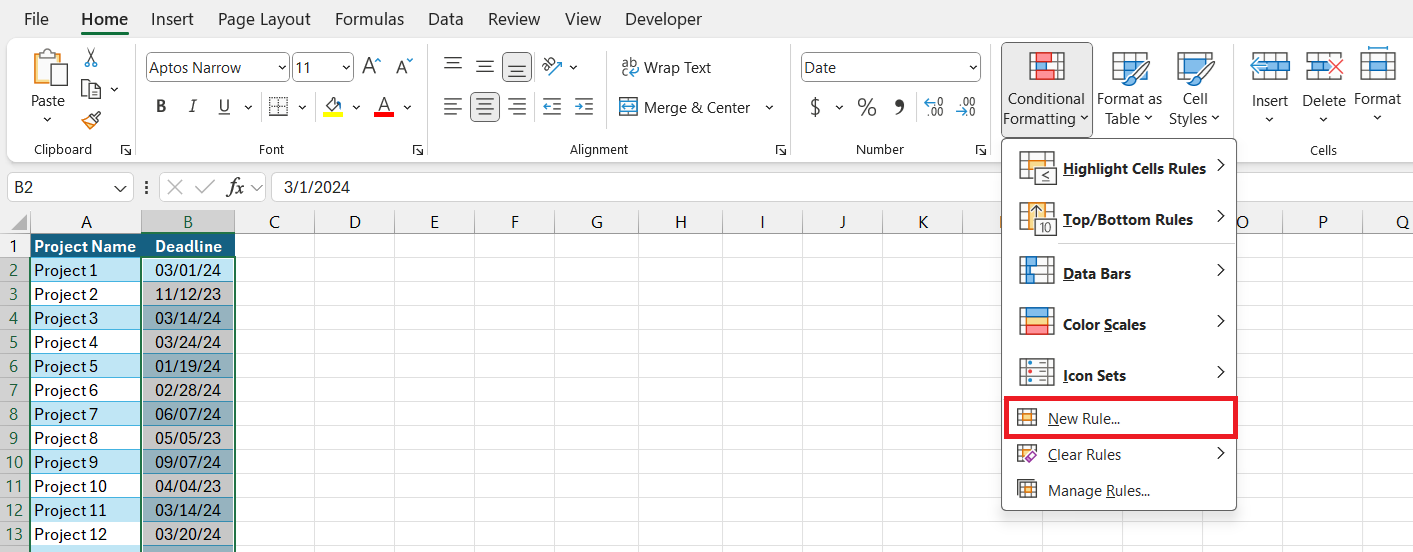
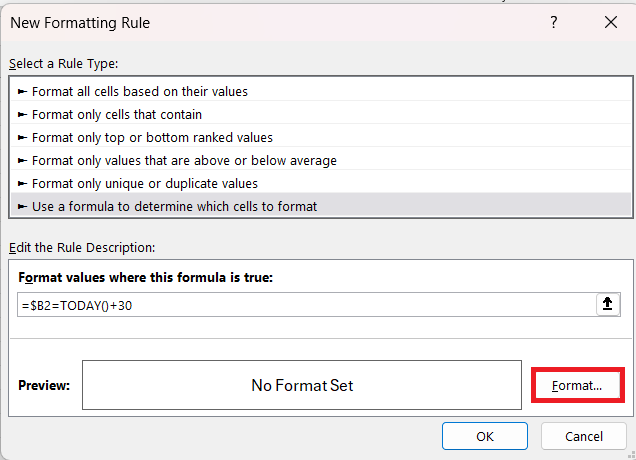
STEP 2: Navigate to the ‘Home’ tab in Excel’s ribbon. Click on ‘Conditional Formatting’ in the ‘Styles’ group and from the drop-down menu, choose ‘New Rule…’ to open the New Formatting Rule dialog box.
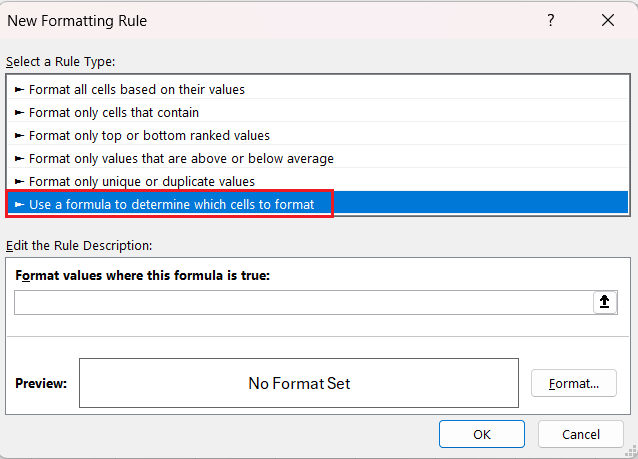
STEP 3: In the dialog box, select ‘Use a formula to determine which cells to format.’
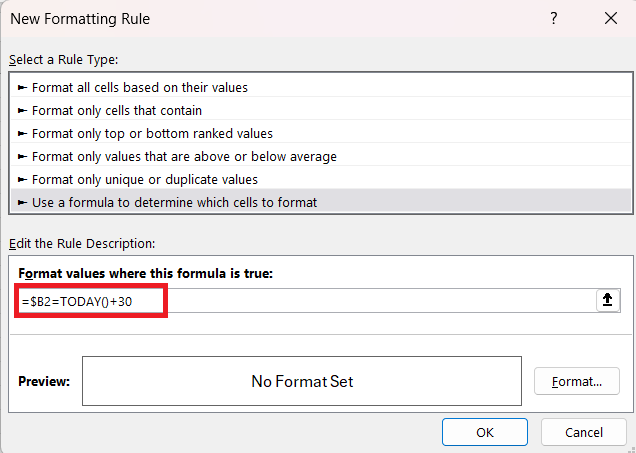
STEP 4: Enter the following formula in the formula field: `=$B2=TODAY()+30′
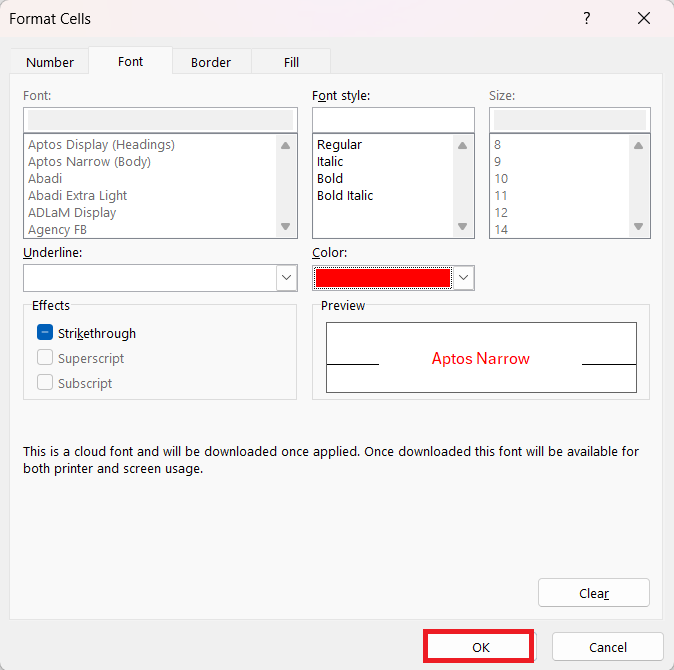
STEP 5: After entering the formula, click on the ‘Format…’ button to set the formatting options such as the background color, text color, or font style that will be applied to cells meeting the condition.
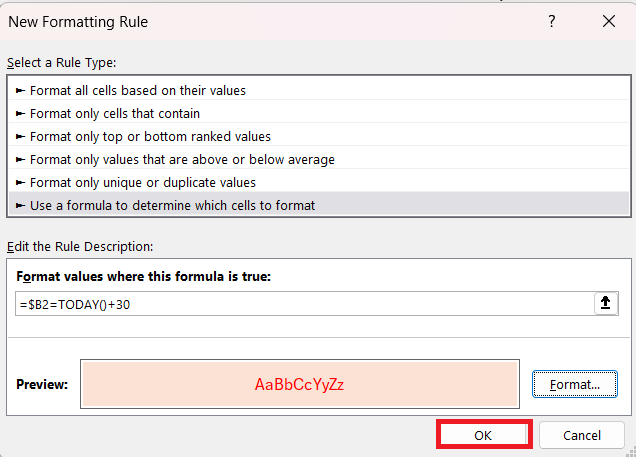
STEP 6: Once you have chosen the desired formatting, click ‘OK’ to close the Format Cells window.
STEP 7: Click ‘OK’ again in the New Formatting Rule dialog box to apply the conditional formatting to your selected cells.
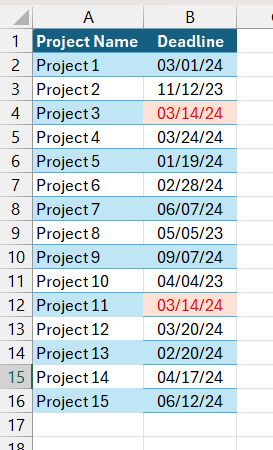
Your cells with dates that are 30 days from today’s date will now be highlighted based on the formatting options you have chosen.
Spotlight Overdue Tasks Using Date Formulas
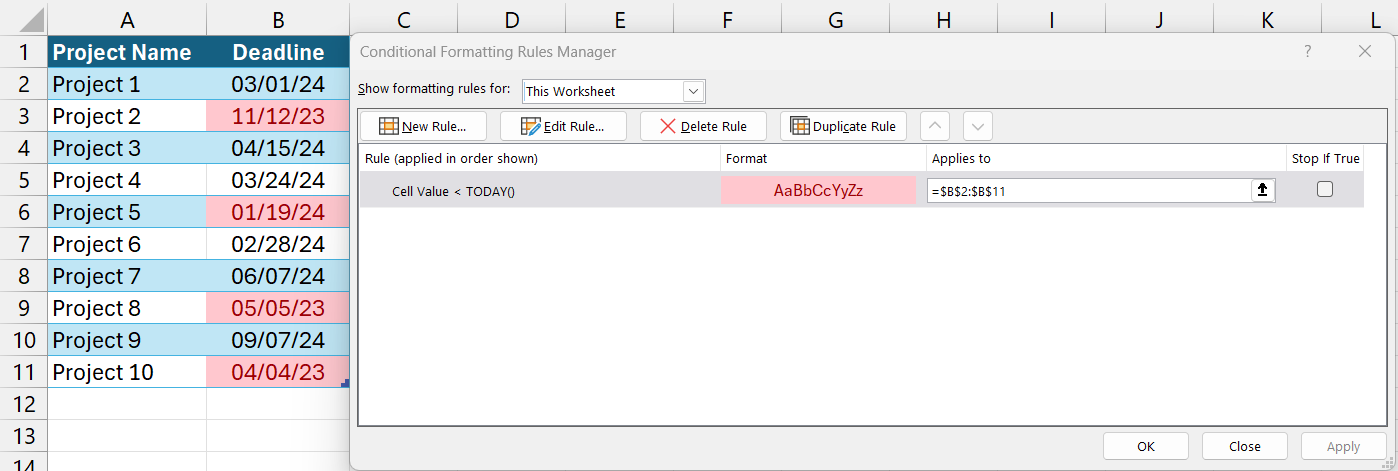
Stay on top of your deadlines with a glance by spotlighting overdue tasks using Excel’s conditional formatting paired with date formulas. Configure conditional formatting to change the appearance of a task’s due date to a striking red if it falls before today’s date. Simply use the TODAY() function in your formatting rule, and Excel does the rest, keeping everything current without the daily hassle of updates. Your sheet will not only look organized, but it will also become functionally intuitive, instantly signaling which tasks need immediate attention.
Visual Cues for Project Timelines with Custom Rules
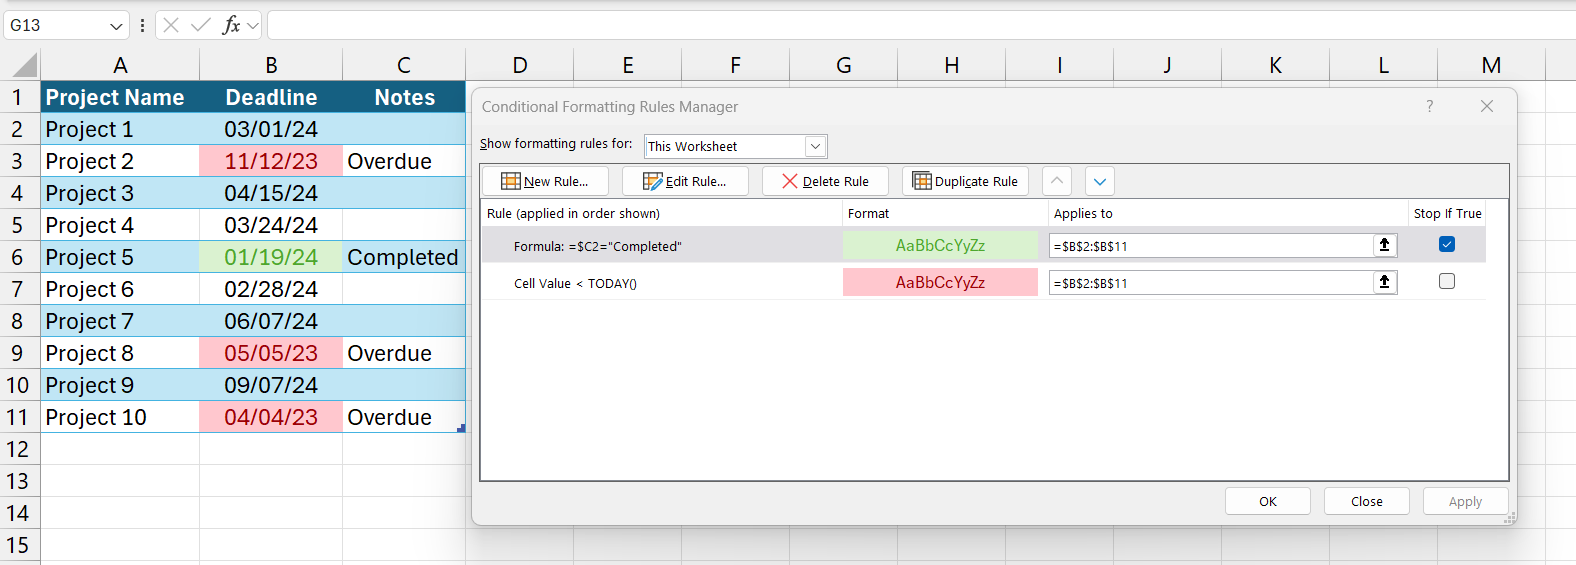
Project timelines can turn into a navigational nightmare without the right visual aids. Excel’s custom rules in conditional formatting breathe life into your project plans. Craft rules to color-code everything—from impending deadlines to milestones achieved—based on the dates you’ve set. It empowers you to quickly assess the status of various aspects of a project at a mere glance. The visualization becomes a robust communication tool for teams to stay aligned and for you to dazzle during presentations.
Conditional Formatting for a Range of Dates
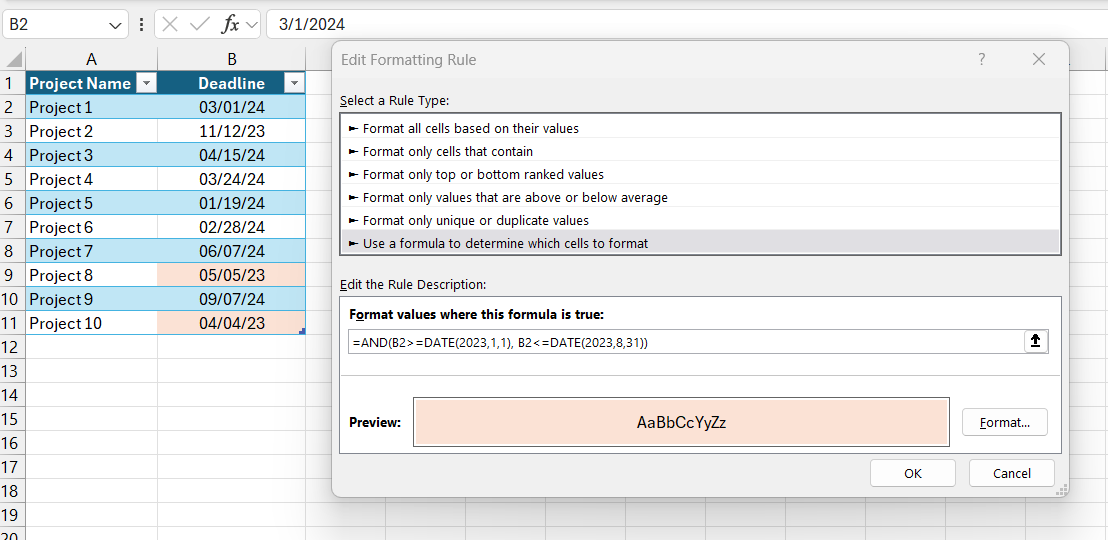
To set up conditional formatting for a range of dates in Excel, select the cells you wish to format. Go to the ‘Home’ tab and click on ‘Conditional Formatting’. Choose ‘New Rule’, then ‘Use a formula to determine which cells to format’. Enter the custom formula based on the range you want, such as =AND(A1>=DATE(2023,1,1), A1<=DATE(2023,8,31)) for dates in the year 2023. Click ‘Format’ to choose your formatting style and press ‘OK’ to apply.
Highlight Weekends in Excel
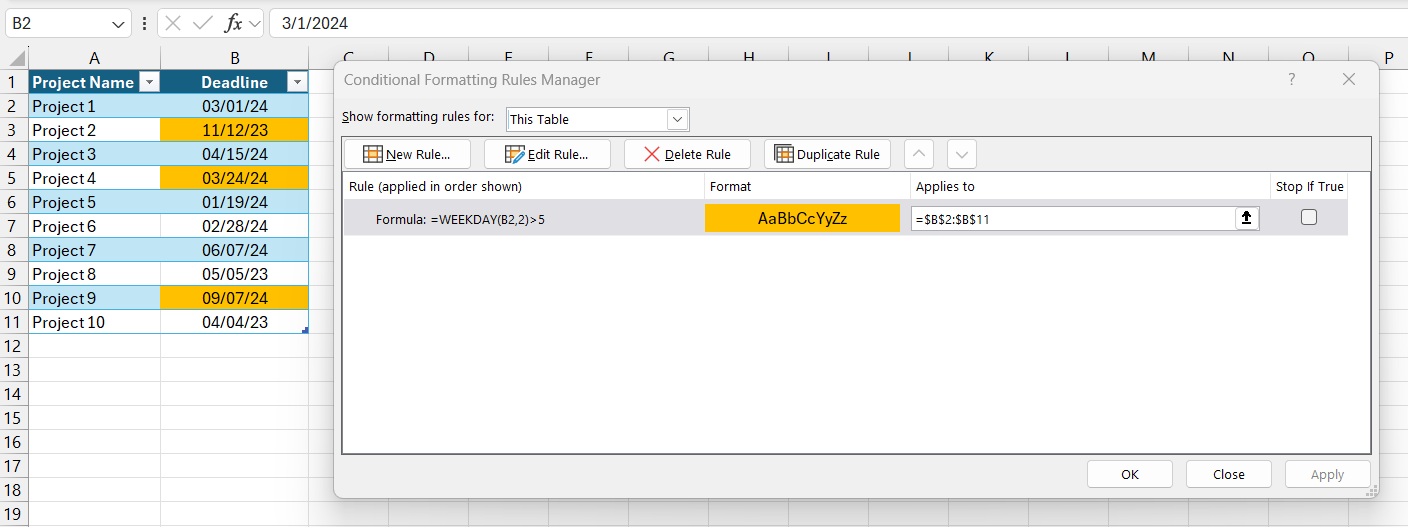
To highlight weekends in Excel, use the WEEKDAY function in conditional formatting dates. Select the date range, then choose ‘Conditional Formatting’ > ‘New Rule’ and ‘Use a formula to determine which cells to format’. Enter =WEEKDAY($B2,2)>5 to highlight Saturdays and Sundays.
Best Practices for Managing Dates in Excel
Keeping Your Data Accurate and Up-To-Date
Accuracy is your spreadsheet’s best friend. Ensuring your dates are correct keeps everything running like a well-oiled machine. Regularly check your date inputs for accuracy and watch out for those pesky leap years. Incorporate validation rules to prevent impossible dates from sneaking in. And remember, consistency is key—stick to a date format throughout your sheets to maintain clarity. When your data is accurate and current, your Excel sheet not only reflects professionalism but also becomes a reliable resource for decision-making.
Tips for Efficiently Organizing Date-Sensitive Information
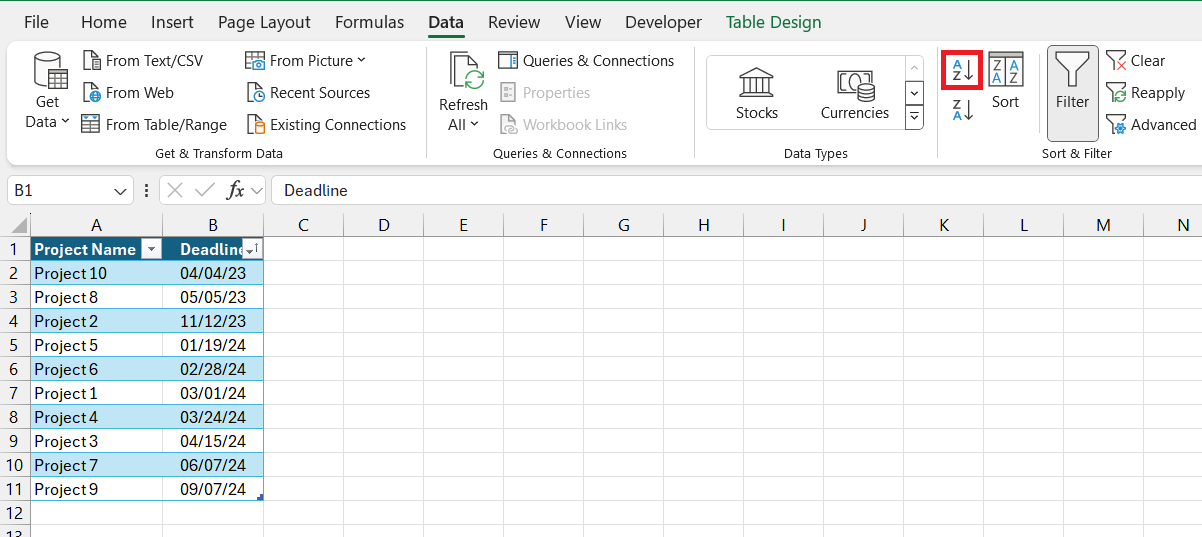
When dates are the key to your data’s relevance, organizing efficiently becomes non-negotiable. Start by sorting your data chronologically for instant timeline visualization.
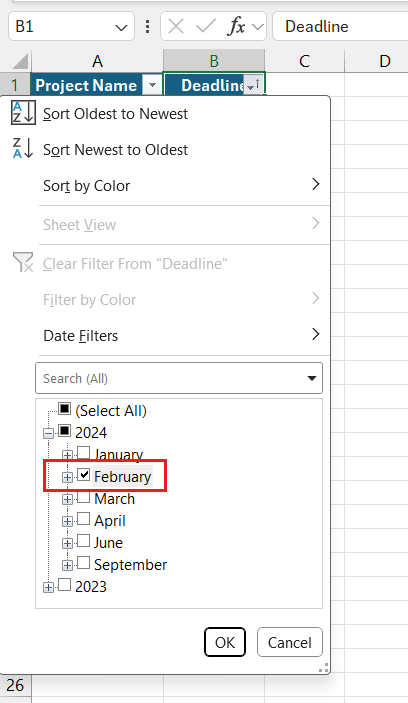
Use filters to isolate periods or specific date ranges—you’ll get that report ready in no time.
Group related dates into separate tabs or tables for a cleaner look and focus. Efficiency isn’t just about working faster; it’s about working smarter with Excel’s date-organizing capabilities.
Real-World Applications: Conditional Formatting Case Studies
Financial Reporting: Tracking Payment Deadlines
In the financial world, deadlines are more than just a date—they’re a beacon for cash flow management. Excel’s conditional formatting is a game-changer for tracking payment deadlines. It allows financial professionals to set visual priorities, highlighting payments due today or flagging overdue accounts. You can create a color-coded system that intuitively categorizes due dates, giving a quick overview of the financial landscape. These real-time visual cues help ensure that no deadline slips through the cracks, safeguarding your company’s financial health.
Resource Planning: Highlighting Milestone Dates
Effective resource planning hinges on the careful monitoring of milestones. With Excel, you can highlight these pivotal dates using conditional formatting, turning your spreadsheet into a powerful planning tool. Set rules to color-code project milestones based on proximity or completion status, so they pop out at you. This visual aid not only keeps your team on track but also provides stakeholders with a clear view of progress. When milestones stand out, planning becomes proactive rather than reactive, allowing for better allocation of resources and smoother project flows.
Ensure Your Data Stands Out: Design Techniques
Applying Color Scales to Reflect Date Proximity
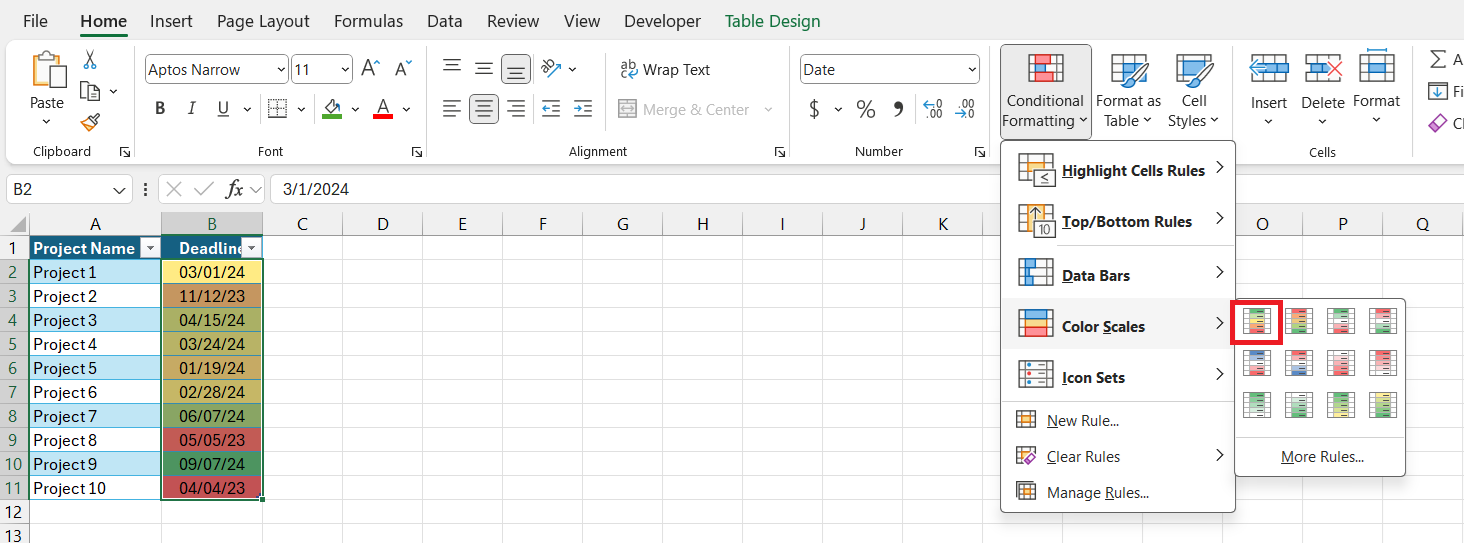
Envision a spreadsheet where you can gauge the urgency of tasks just by the colors you see—that’s the mastery of color scales in Excel’s conditional formatting. By setting a gradient, such as green for far-off dates, white for neutral, and blue for imminent deadlines, you create a visual heatmap of your timeline. Dates nearing the current day can gradually transition in color intensity, offering an intuitive sense of proximity. This smart formatting hack turns your spreadsheet into a remarkably easy-to-read dashboard, amplifying productivity and focus.
Benefits:
- Swift identification of priority items
- Enhanced visual communication for teams
- Reduction of missed deadlines
- Streamlined data review process
- Quick setup saves long-term time and effort
Cons:
- May become confusing with too many color gradients
- Potentially distracting if overused
Best for: Project managers and anyone tracking time-based activities or deadlines looking for a quick visual reference to date proximity.
Icon Sets and Data Bars that Communicate Urgency
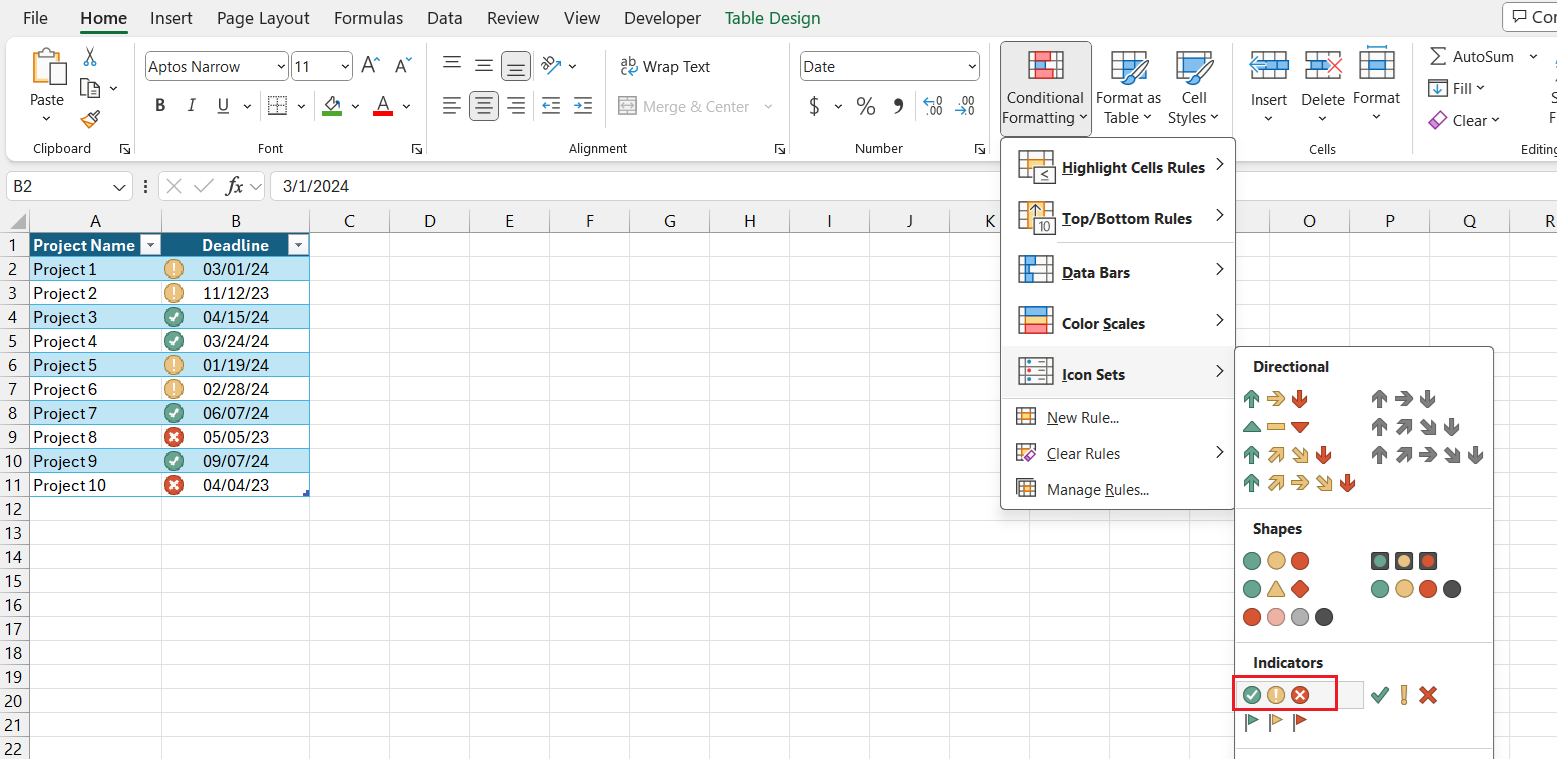
Take your date tracking to the next level with icon sets and data bars in Excel. These features let you infuse your spreadsheet with visual indicators that scream urgency without a word. An arrow icon pointing up could mean an approaching deadline, while a flag might represent a milestone. Data bars expand right alongside your timeline, offering a proportional representation of elapsed time. By using these tools judiciously, you harness their power to turn complex timelines into simple, proactive visual cues that demand attention.
Benefits:
- Instant understanding of task status
- Quick assessment of project progress
- Emphasizes key points on a busy spreadsheet
- Visually appealing and easy to interpret
- Enhances ability to meet critical deadlines
Cons:
- Overuse can clutter and overwhelm the visual layout
- May require an initial learning curve for setup
Best for: Any team member or manager who thrives on visual management, especially in high-pressure environments where understanding task priority at a glance is crucial.
Gaining Mastery with Excel Shortcuts for Dates
Keyboard Shortcuts for Fast Date Entry and Formatting
Speed up your Excel workflow dramatically by mastering keyboard shortcuts for date entry and formatting. Breeze through data input by using “Ctrl + ;” to insert today’s date instantly. Format cells swiftly with “Ctrl + 1” to bring up the Format Cells dialog, where you can set your preferred date style. Combine these shortcuts with others to navigate and manipulate your dates without ever reaching for the mouse. The faster you can enter and format dates, the more time you’ll have for the analysis that really matters.
Key shortcuts:
- Insert today’s date: “Ctrl + ;”
- Open Format Cells dialog: “Ctrl + 1”
- Quick navigation and selection: “Ctrl + Arrow keys”
Automating Repetitive Date-Related Tasks in Excel
Ditch the monotony of repetitive date tasks with Excel’s automation features. Harness the power of macros to automate complex date calculations and formatting across your spreadsheet. Make use of the ‘Record Macro’ function for tasks you frequently perform. If you’re comfortable with Excel’s programming language, VBA, you can craft scripts to control date functions with precision. Turn processes like monthly report generation into a single-click operation, and repurpose your valuable time towards more strategic activities.
Frequently Asked Questions
Can Conditional Formatting Automatically Update with New Data?
Yes, conditional formatting in Excel automatically updates when new data is entered. If you set a rule for a cell range, any edits or additions to that range will trigger the formatting to refresh based on the existing conditions. As long as the data falls within the rules you’ve set, the formatting will adjust without any extra effort on your part.
How can I use conditional formatting to spotlight overdue tasks in Excel?
Configure conditional formatting with date formulas, such as using the TODAY() function, to automatically highlight overdue tasks in red. This not only organizes your sheet but also provides instant visual cues for tasks needing immediate attention.
How can I visually communicate project timelines in Excel using custom rules?
Excel’s custom rules in conditional formatting allow you to color-code project timelines based on dates, providing a quick assessment of various aspects of a project at a glance.
How can I highlight weekends in Excel using conditional formatting?
Use the WEEKDAY function in conditional formatting, entering a formula like =WEEKDAY($B2,2)>5 to highlight Saturdays and Sundays in a selected date range.
John Michaloudis is a former accountant and finance analyst at General Electric, a Microsoft MVP since 2020, an Amazon #1 bestselling author of 4 Microsoft Excel books and teacher of Microsoft Excel & Office over at his flagship MyExcelOnline Academy Online Course.

