In Microsoft Excel, adding a precise time increment, such as 15 minutes from now is a common and useful task, especially for those managing schedules or time-sensitive data. This brief guide will introduce you to a straightforward method to accurately add 15 minutes to the current time, utilizing Excel’s powerful formula capabilities to enhance your data management efficiency.
Key Takeaways
- Utilize the SUM function to easily add 15 minutes to a specific time value in Excel.
- Implement the Excel TIME function for precise additions of minutes to any given time.
- Combine the TIME, HOUR, MINUTE, and SECOND functions for detailed time manipulation.
- Remember to adjust the cell format after using the SUM and NOW functions to display the added minutes correctly.
Download Excel Workbook and follow along with the tutorial on How to Add 15 minutes from now in Excel – Download excel workbook15-minutes-from-now.xlsx
Table of Contents
Grasping the Essence of Time in Excel
The Fundamentals of Excel’s Time Format
In Excel, understanding the time format is the key to efficient calculations and data manipulation. The way Excel handles time is quite distinctive and knowing the basics will save you from unnecessary errors and confusion.
Quick Overview of Excel Date and Time Functions
Excel’s date and time functions offer powerful tools for performing a variety of operations with dates and times. Here’s a condensed guide to some of the main functions you’ll use:
- DAY function: Extracts the day from a date, providing a result from 1 to 31.
- MONTH function: Returns the month from a date, with results ranging from 1 (January) to 12 (December).
- YEAR function: Retrieves the year from a date, beginning with 1900 onwards.
- HOUR function: Gives the hour from a time value, ranging from 0 (12:00 AM) to 23 (11:00 PM).
- MINUTE function: Returns the minutes from a time value, with results from 0 to 59.
- SECOND function: Extracts the seconds from a time value, also ranging between 0 to 59.
- WEEKDAY function: Provides the weekday of a given date, with default numbering from 1 (Sunday) to 7 (Saturday); this can be customized based on your start-of-week preference.
- TIME function: Combines separate hour, minute, and second values to create a time serial number, ideal for adding or subtracting time and performing complex time-related calculations.
These functions form the backbone of time manipulation in Excel and will be instrumental for tasks such as adding 15 minutes from now.
Instantly Adding Quarter Hours to Current Time
Step-by-Step Guide on How to Add 15 Minutes
Adding 15 minutes from now in Excel is a straightforward process that can be accomplished using simple formulas. Follow this step-by-step guide to master this Excel operation:
STEP 1: Identify the Cell with the Starting Time.
Either input the current time manually in a cell (let’s say A2) in the format hh:mm:ss, or use the NOW() function to capture the current date and time by entering =NOW() into cell A2.
STEP 2: Add the TIME Function to the Starting time.
In a new cell B2, use the TIME function to create the time increment. If your starting time is in cell A2, the formula to add 15 minutes will be =A1 + TIME(0, 15, 0). This adds zero hours, 15 minutes, and zero seconds.
STEP 3: Press the Enter Button.
After typing the formula, press Enter. Excel will calculate and display the new time, which is 15 minutes ahead of your initial time.
This step-by-step guide should help you effectively add quarter hours to any time mentioned in your Excel spreadsheet.
Streamlining Your Workflow with Time Calculations
Harnessing Formulas for Efficient Time Addition
To optimize your productivity in Excel, harnessing the power of formulas for time addition is vital. Here’s a guide to using formulas for time operations effectively:
- Leverage the TIME Function: The
TIME(hour, minute, second)function is indispensable. You specify the number of hours, minutes, and seconds that you want to add to a given time, and Excel does the rest.
- Use the
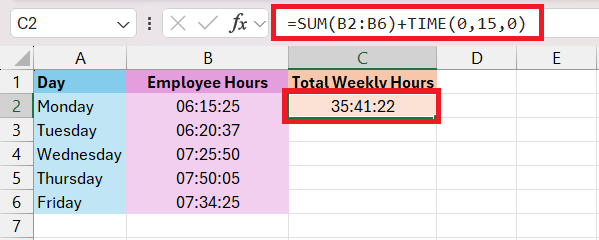
SUMFunction: This function is generally used to add numbers, but it also works well with time. To sum a list of times and add 15 minutes, your formula might look like this=SUM(range) + TIME(0, 15, 0).
- Employ Cell References: Rather than hardcoding the number 15 into your formulas, use cell references. For example, if B2 contains the number 15, the formula to add 15 minutes would be
=A2 + TIME(0, B2, 0). This allows for flexibility if the number of minutes you want to add changes.
- Dynamically Add to Current Time: If you want to add 15 minutes to the current time constantly updated, use
=NOW() + TIME(0, 15, 0). TheNOWfunction returns the current date and time.
- Copy Formulas Efficiently: To copy your formula to other cells without changing the reference to the original time, use
$to make your cell reference absolute, like so:=$A$2 + TIME(0, 15, 0).
By mastering these formulas and approaches, you’re not only ensuring efficient time addition but also setting up your Excel worksheets for flexible and dynamic time calculations.
Tips to Avoid Common Pitfalls in Time Manipulation
Time manipulation in Excel can be tricky, and it’s easy to run into common pitfalls if you’re not careful. Here are some tips to help you avoid these issues and ensure accurate time calculations:
- Understand Excel’s 24-hour Time System: Excel operates on a 24-hour time system when calculating time. One full day is equal to the numeric value of 1 in Excel. Therefore, adding anything that exceeds 24 hours could roll over to the next day.
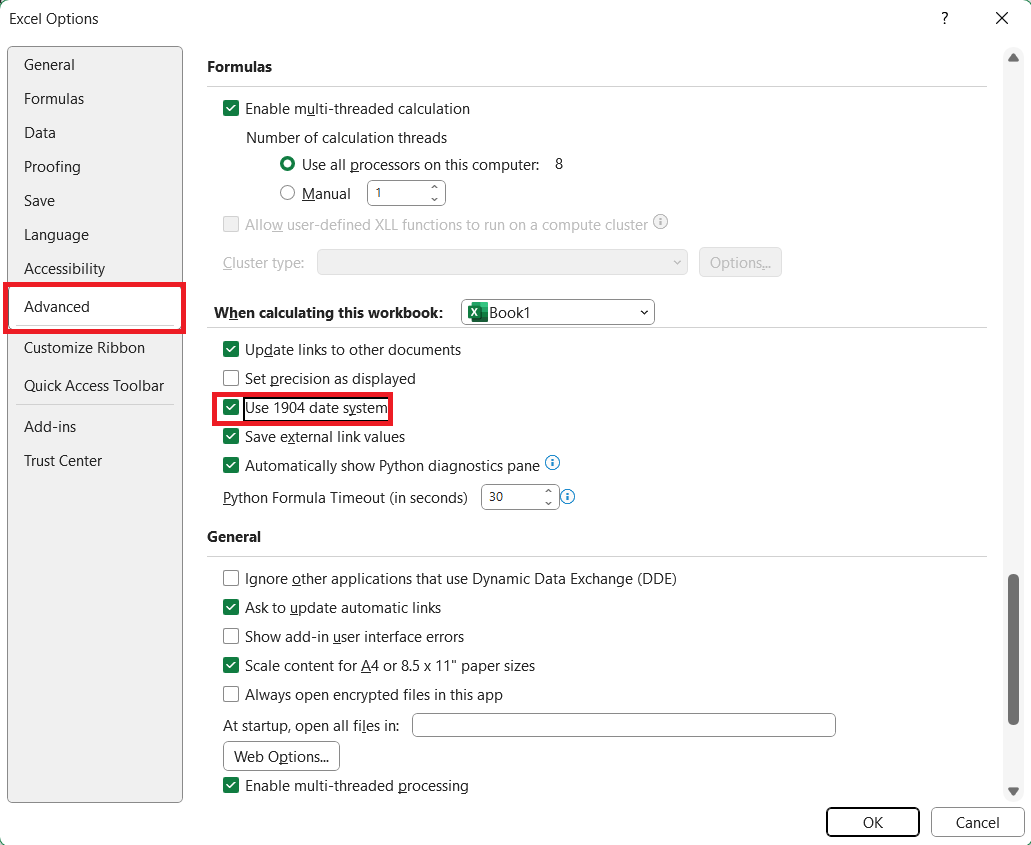
- Avoid Negative Time Errors: When subtracting times, ensure the result isn’t negative because standard Excel formats can’t display negative times. To handle negative times, you may need to adjust your Excel settings (go to
Options→Advancedand under “When calculating this workbook…” check the “Use 1904 date system” box).
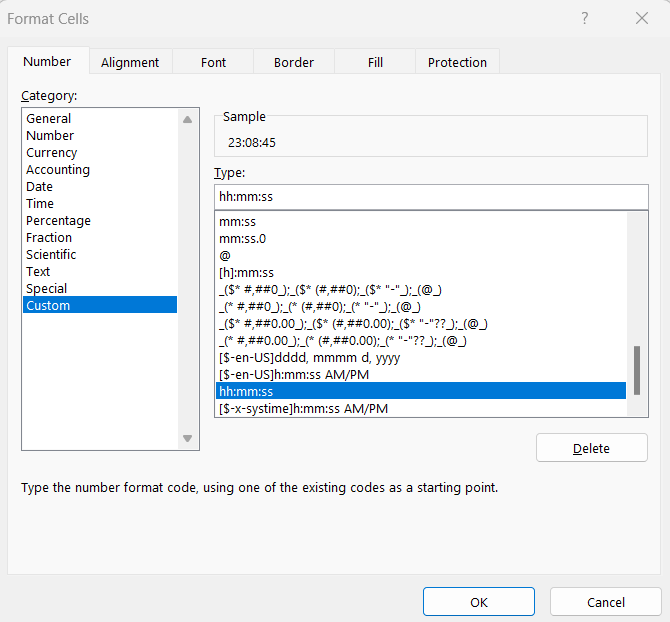
- Use Proper Time Formats: Apply a time format to cells to display results as actual times rather than decimal numbers. You can format cells (Ctrl+1) to a time format using the ‘Custom’ category if the default categories don’t meet your needs.
- Beware of Date Crossovers: When adding minutes to times late in the day, remember that adding too many minutes could cross over to the next day. This could impact date-sensitive data.
- Check AM/PM Entries: Be aware of AM and PM when entering times manually or performing calculations that involve crossing over noon or midnight.
- Precision in Time Value Entries: When typing in time values, be sure to use a colon to separate hours and minutes (e.g., 2:30) and not a period (e.g., 2.30), as Excel might interpret it differently.
- Avoid Circular References: If you’re using the current time as a basis for calculations (with the
NOW()function, for instance), ensure that you’re not creating circular references which can lead to incorrect calculations and can significantly slow down your workbook. - Watch Out for Time Zone Considerations: If you’re working with times across different time zones, make sure to adjust the added minutes according to the relevant time zones.
Following these tips will help you confidently manipulate time data in Excel, reducing the likelihood of errors and ensuring that your time calculations are accurate and reliable. Remember to always review your formulas and check your work, especially when dealing with extensive time data or complex time-based calculations. Excel can be an incredibly powerful tool for timekeeping when used carefully and correctly.
FAQs on Adding Minutes to Time in Excel
How Can I Quickly Add 15 Minutes to the Current Time?
To quickly add 15 minutes to the current time in Excel, follow these simple steps:
- Type the Current Time: Either input the current time manually in a cell (let’s say
A2) in the formathh:mm AM/PM, or use theNOW()function to capture the current date and time by entering=NOW()into cell A1. - Add 15 Minutes Using the
TIMEFunction: In the adjacent cell (B2), use the formula=A2 + TIME(0, 15, 0). This adds zero hours, 15 minutes, and zero seconds to the time in cell A2.
What Are Some Common Errors When Using Excel for Time Calculations?
When using Excel for time calculations, users can encounter several common errors like incorrect time format, ignoring the 24-hour time system, mixing date and time, etc. Recognizing and understanding how to correct these mistakes can ensure accuracy in your spreadsheets.
How do you round up to the nearest 15 minutes in Excel?
In Excel, if you wish to round up a given time to the nearest 15-minute interval, you can use the CEILING function. This function rounds a number up to the nearest multiple of a specified significance. For a time value, the significance for a 15-minute interval is “0:15” or you can use the mathematical equivalent, which is 1/96 of a day (since one day has 1440 minutes and 15 minutes is 1/96 of that total).
=CEILING(A2, "0:15")
Alternatively, you can use the numerical significance:
=CEILING(A2, 1/96)
How do I deduct 15 minutes from time in Excel?
To subtract 15 minutes from a given time in Excel, you can use the TIME function in a formula. The TIME function allows you to construct a time value by specifying hours, minutes, and seconds separately, and you can perform arithmetic operations with these values.
To deduct 15 minutes from time in Excel, you can use the formula =A2 – TIME(0,15,0), assuming the original time is in cell A2.
John Michaloudis is a former accountant and finance analyst at General Electric, a Microsoft MVP since 2020, an Amazon #1 bestselling author of 4 Microsoft Excel books and teacher of Microsoft Excel & Office over at his flagship MyExcelOnline Academy Online Course.


