Learn about Excel with our Free Microsoft Excel Online Course!
The Advantages of Using Picture Placeholders
The use of picture placeholders in PowerPoint presentations offers multiple advantages:
- Consistency and Alignment: Picture placeholders help maintain uniformity in the positioning and sizing of images across various slides. This results in a more professional and polished look.
- Time-Saving: Instead of manually adjusting each image, placeholders allow for quick and efficient size and position edits to meet the layout’s requirements.
- Layout Integrity: When images are swapped out, the overall layout of the slide remains unchanged, safeguarding the aesthetic integrity of the presentation.
- Ease of Use: With placeholders, adding and formatting new images become straightforward tasks, as the placeholders come with pre-set defaults tailored to the presentation design.
- Flexibility and Customization: Picture placeholders can be customized to fit the specific needs of the presentation, including adjustments in size, position, and layout.
- Improved Workflow: They streamline the process of updating or reusing presentations for different purposes or audiences by allowing for quick image replacements.
By incorporating these placeholders into your presentations, not only will the design process become faster and more intuitive, but the final product will convey a level of professionalism that holds the audience’s attention.
Table of Contents
Getting Started with Picture Placeholders
Opening a Blank Slide for Your Placeholder
To lay the foundation for adding a picture placeholder, you’ll need to begin with a blank slide in PowerPoint. Here’s how to open one:
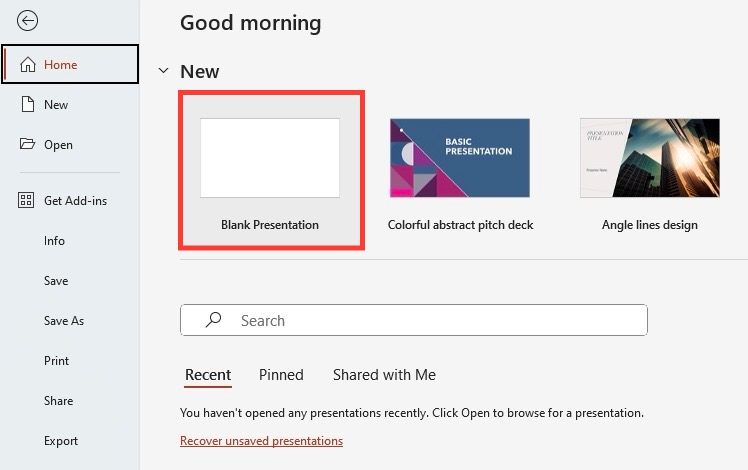
STEP 1: Launch PowerPoint and select “New” at the top-left corner.
STEP 2: Choose “Blank Presentation” and then click on “Create.”
Alternatively, for those who prefer shortcuts for efficiency, you can:
- On a PC: Press “Ctrl” + “M.”
- On a Mac: Press “Command” + “M.”
This instantly creates a new slide without the need to navigate through menus, saving you time, especially when working on complex presentations that require the addition of multiple slides.
Remember, starting with a blank slide is like having a clean canvas; it allows you to build your presentation with greater control over each element, including where and how your images will be displayed.
Navigating to the Slide Master for Custom Designs
To create custom designs that include picture placeholders, you’ll need to navigate to the Slide Master. This special view in PowerPoint allows you to edit slide layouts that will affect every slide in your presentation. Follow these steps to get there:
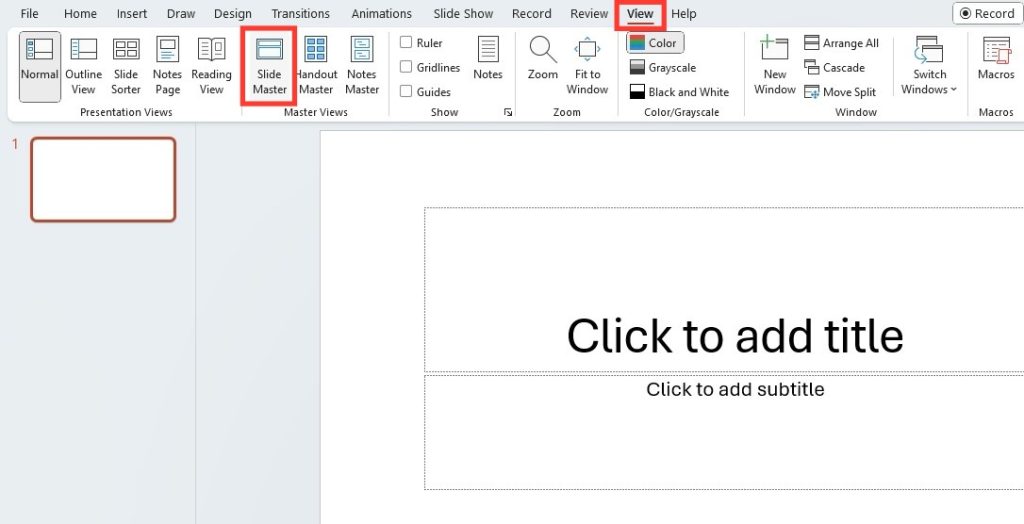
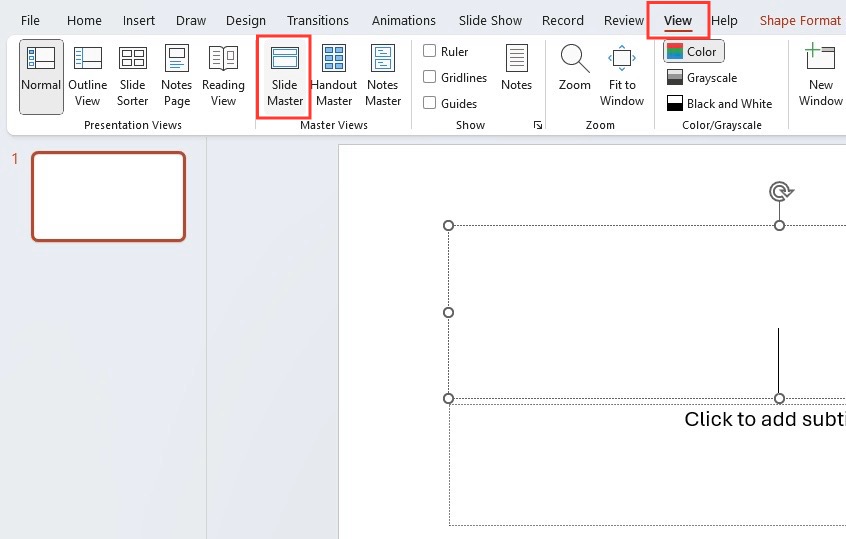
STEP 1: On the ribbon at the top, click on the “View” tab to reveal various view options.
STEP 2: Look for the “Master Views” group within the “View” tab.
STEP 3: Click on “Slide Master” to access the master slides.
By being in the Slide Master view, you have the authority to establish a consistent design framework that all your slides will adhere to. It’s like setting the rules for your presentation’s design, which the rest of your slides will follow automatically. This ensures that any changes you make to slide layouts, including the addition of picture placeholders, are applied consistently throughout your presentation, significantly streamlining the design process and ensuring cohesiveness in your slides’ appearance.
Begin by flexing your creative muscle in the Slide Master view – this will set the stage for a powerful, impactful presentation from start to finish.
Step-by-Step Guide to Adding a Picture Placeholder
Selecting and Inserting a Picture Placeholder
Once you’ve accessed the Slide Master view, adding a picture placeholder is the next step to customizing your slide layout. Here’s a concise guide on how to achieve this:
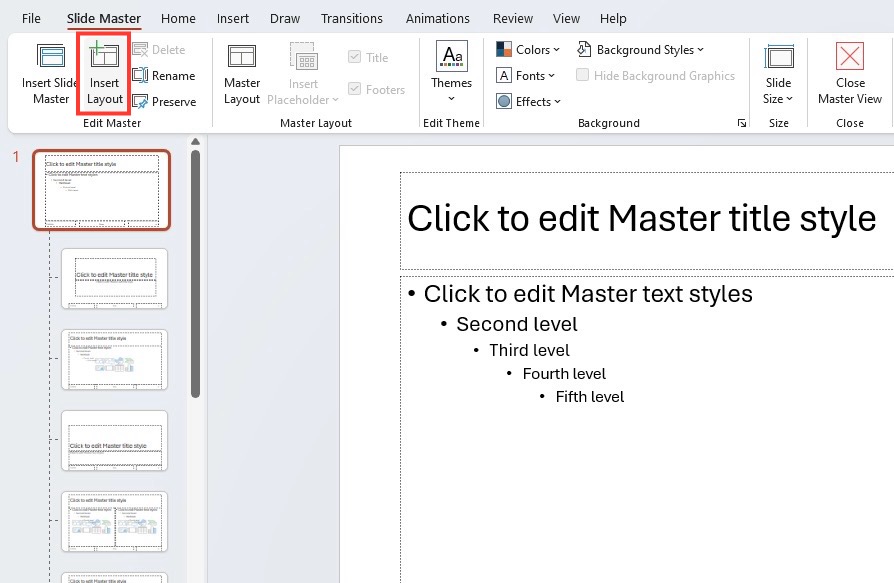
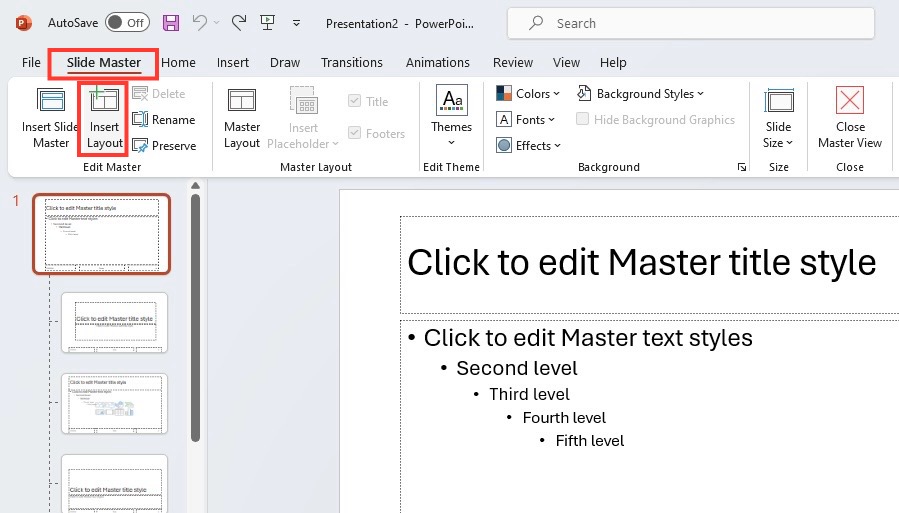
STEP 1: First, identify the slide layout within the Slide Master view where you want to insert the picture placeholder. If a suitable layout does not exist, you can create a new slide layout by selecting “Insert Layout” in the Edit Master group.
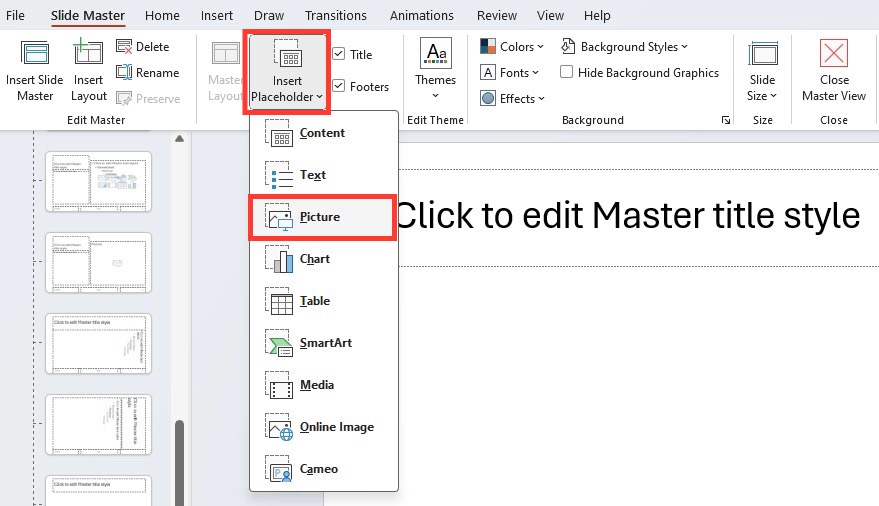
STEP 2: With the desired slide layout selected, look for the “Master Layout” group within the Slide Master tab.
STEP 3: Click on “Insert Placeholder,” and a dropdown menu will appear. From there, choose the “Picture” option.
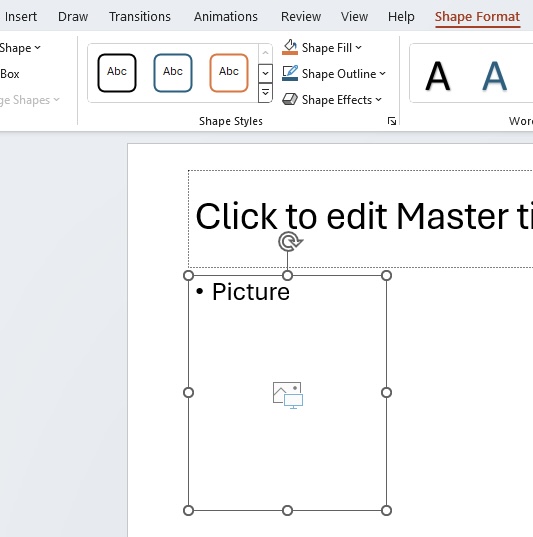
STEP 4: Click and drag your mouse cursor on the slide to create the picture placeholder. You can create it as large or small as needed, and you can place it wherever fits best within your layout.
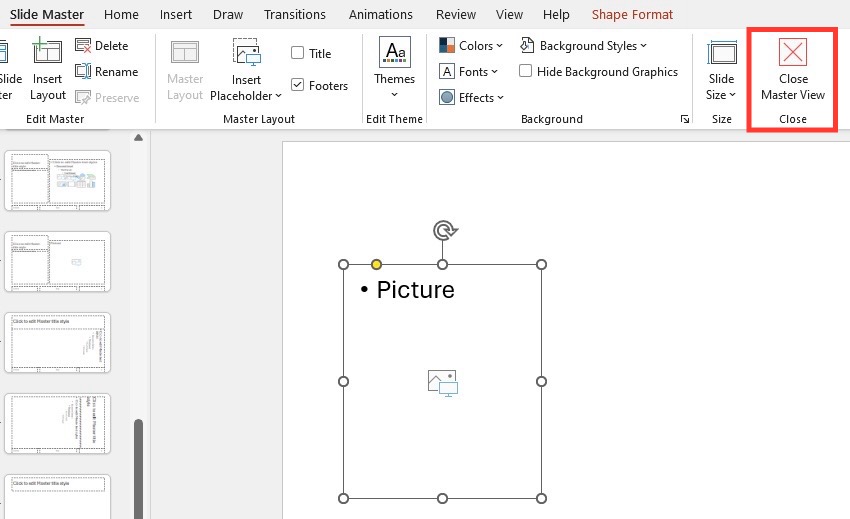
STEP 5: Go to Close Master View.
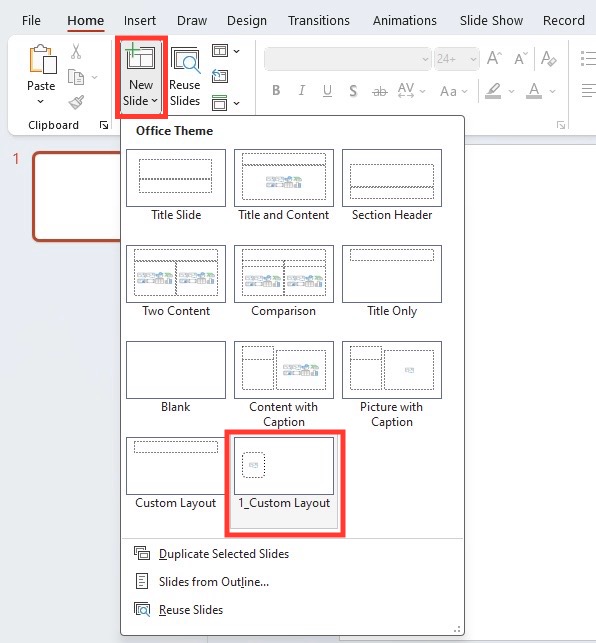
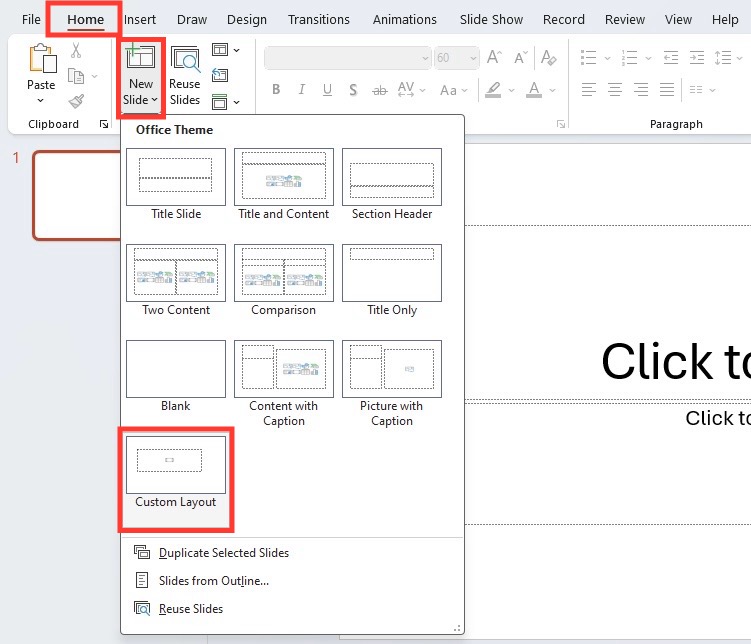
STEP 6: On the Home tab, go to New Slide and select the Custom Layout you just made.
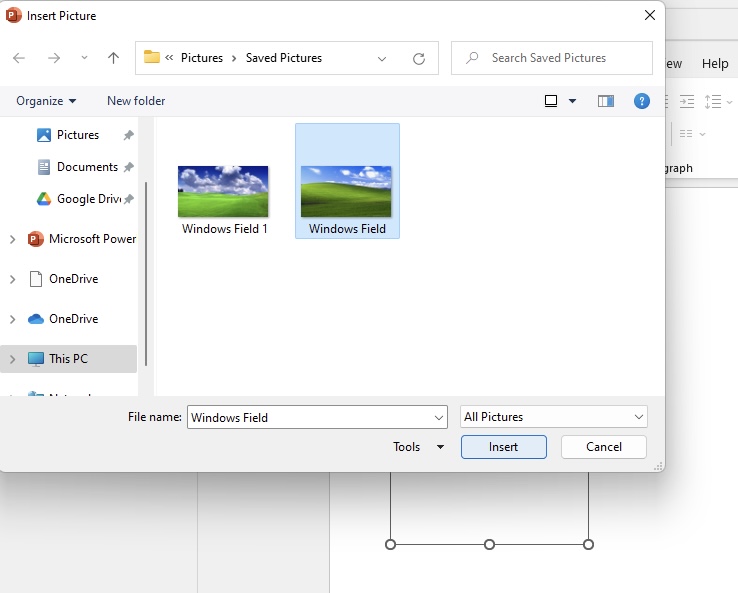
STEP 7: Click on the icon to add a new picture.
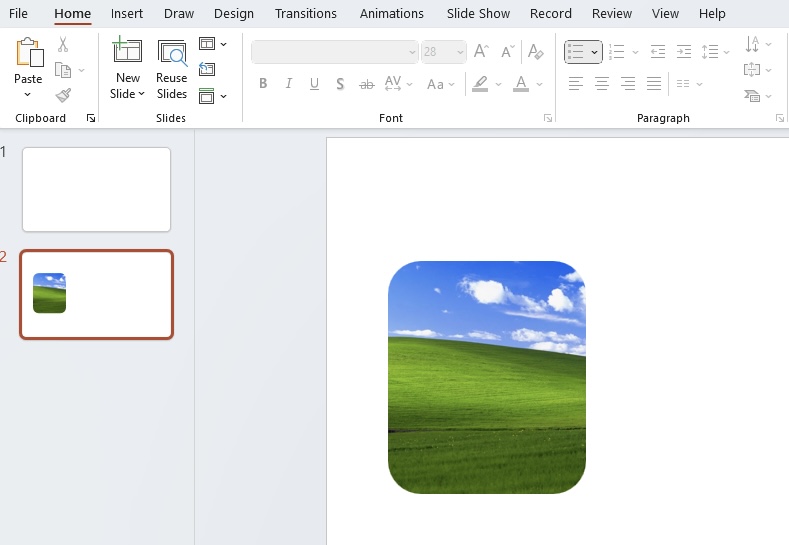
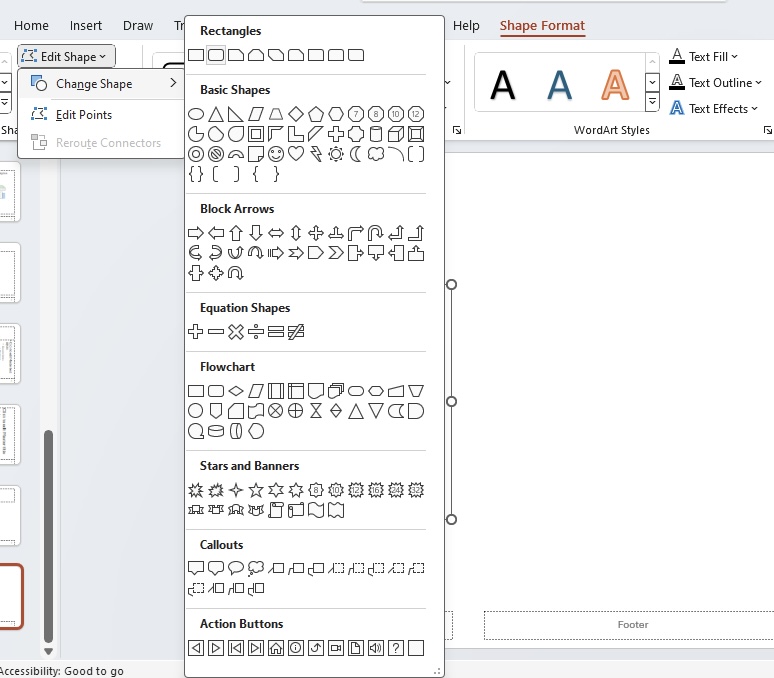
Remember, when dragging to create the size, the default shape is a rectangle, but you can modify this afterward if you need a different shape or arrangement.
Adding picture placeholders helps maintain a level of professionalism and uniformity in your presentation. Customizing these placeholders allows you flexibility in design while keeping the process of inserting and managing images in your slide deck simple and efficient.
Best Practices for Picture Placeholder Integration
Tips for Choosing the Right Layout and Images
Best Practices for Layout and Image Selection
Choosing the right picture placeholder layout and high-quality images can significantly impact the effectiveness of your presentation. Utilize these best practices to make an informed choice:
- Complement the Content: Pick a layout that harmonizes with the purpose of your slide. For instance, if you’re detailing complex information, consider a layout that allows for a combination of text and illustrative images.
- Audience Preferences: Contemplate what kind of layout and imagery will resonate with your audience. The design should cater to their interests and expectations, facilitating better engagement.
- Consistency is Key: Ensure that you use a unified layout throughout the presentation. Disparate layouts can be disorienting and give a disordered appearance to your slides.
- High-Quality Images: Select images that are crisp, clear, and relevant to your message. Consistently high image quality will add a professional touch and aid in conveying your message.
The right selection and layout of picture placeholders complemented by high-quality images are instrumental in crafting a compelling and memorable presentation. They assist in guiding the audience’s focus and enhancing their understanding of the topic at hand.
Ensuring Image Quality and Consistency in Presentations
Maintaining Visual Excellence
Ensuring top-notch image quality and uniformity across your PowerPoint presentation can make a difference in engaging your audience and conveying professionalism. Here’s how you can achieve this:
- Resolution and Size: Use images that are of high resolution to avoid pixelation when projected on larger screens. Ensure that they fit the placeholder without stretching, which might distort the images.
- Aspect Ratio: Be attentive to the aspect ratio of your images to maintain consistency; images should not seem squashed or stretched out of proportion.
- Relevance to Content: The images you choose should directly reflect and complement the contents of your slide. Irrelevant images can confuse your audience and detract from your message.
- Consistent Styling: Apply a consistent style to your images, such as a unifying filter or border, to create a coherent look throughout your presentation.
- Appropriate Licensing: Confirm that the images utilized are appropriately licensed or free to use for presentations to avoid copyright issues.
Following these steps will ensure that every image in your presentation reinforces your message, resonates with your audience, and contributes to a seamless and impactful visual experience.
Remember, consistency is not just about using the same image style or resolution. It’s also about the placement and formatting of your placeholders. Having a well-thought-out plan for your slide designs and the images that complement them will make your presentation stand out.
Troubleshooting Common Placeholder Issues
Addressing Insertion and Formatting Hiccups
Despite best efforts, issues may arise when inserting or formatting images in placeholders. Here’s how to address some of these common hiccups:
- Misfit Images: If an image doesn’t fit a placeholder, don’t stretch it; instead, resize the image to maintain the aspect ratio or use the ‘Crop’ feature to trim the image edges.
- Quality Concerns: Should an image look pixelated or blurry, ensure that it is a high-resolution image. If not, replace it with one that matches your placeholder size specifications.
- Placeholder Adjustment: In case your placeholder shape isn’t quite right, use the “Shape Format” tab to tweak its size or amend its proportions to better accommodate your images.
- Text Wrapping Issues: If text within or around an image placeholder isn’t behaving as expected, use the “Wrap Text” option to refine its flow around the image.
These steps should resolve most issues related to inserting and formatting images in placeholders. However, patience and attention to detail are key; some images may require individual adjustment to fit perfectly within your presentation’s design.
Keep in mind that effective presentations are a blend of content, design, and delivery, so taking the time to troubleshoot and finesse your images will support a more polished and compelling presentation.
Removing or Replacing Picture Placeholders Efficiently
Efficient Placeholder Management
Sometimes during the design process, you may need to remove or replace picture placeholders. Here’s how to do so without disrupting your PowerPoint slide’s layout:
Removing a Picture Placeholder:
STEP 1: Click on the placeholder you wish to remove to select it.
STEP 2: Press the “Delete” key on your keyboard.
As an alternative, right-click the placeholder and choose “Cut” from the context menu.
Replacing a Picture Placeholder:
STEP 1: If you’re simply looking to change the image within the placeholder:
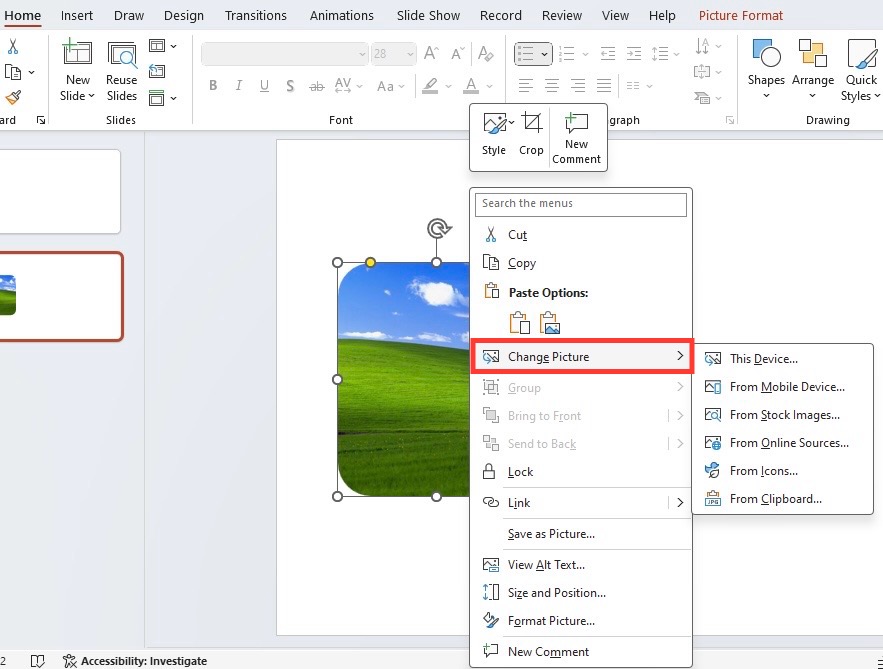
STEP 2: Right-click on the placeholder and select “Change Picture.”
STEP 3: Choose the new image from your files or online sources.
Quick Tip: To streamline the process, consider using the “Format Painter” tool for quick styling of new placeholders to match existing ones. This is particularly handy when working with multiple placeholders that need a consistent look.
When replacing or removing placeholders, it’s crucial to do so in a manner that keeps the overall design and layout of your slide intact. This ensures that your presentation remains visually cohesive and polished.
Remember, picture placeholders are powerful tools for maintaining a dynamic yet consistent design across your slides. Efficiently managing these placeholders will not only save you time but also enhance the effectiveness of your presentations.
Exploring Advanced Uses of Picture Placeholders
Working with Multiple Placeholders on One Slide
Strategically Managing Multiple Placeholders
Incorporating several picture placeholders on a single slide can effectively showcase various ideas or products. To maximize their impact, follow these guidelines:
- Group Related Placeholders: Cluster image placeholders that represent connected content to draw attention instantly to the most crucial visual elements.
- Avoid Overcrowding: Overloading a slide with too many placeholders can make it appear cluttered and overwhelm your audience. Stick to the number that clearly conveys your message without excess.
- Position with Purpose: Consider the arrangement and the flow of how the audience will view the slide. Placeholders should be positioned in a way that guides the viewer’s eye through the information naturally.
- Maintain Uniformity: For a clean and professional look, use placeholders of the same style and proportion unless a specific difference is intentional and adds to the slide’s effectiveness.
- Balance with Text: When using multiple images, balance them with text to provide context and aide in the story you’re telling with your presentation.
Using multiple picture placeholders on a PowerPoint slide requires a thoughtful approach that prioritizes audience comprehension and aesthetic balance. By keeping these strategies in mind, you can ensure that your multiple placeholders enhance rather than detract from your presentation’s effectiveness.
Always remember to step back and view the slide as a part of your entire presentation, ensuring that it fits harmoniously within the overall narrative flow.
Integrating Video Content with Picture Placeholders
Enhancing Presentations with Video
Integrating video content using picture placeholders can greatly enrich your presentation, making it more dynamic and engaging. Here’s how you can seamlessly introduce video:
Video Insertion:
STEP 1: Go to the “View” tab and click on “Slide Master.”
STEP 2: Click on “Insert Layout.”
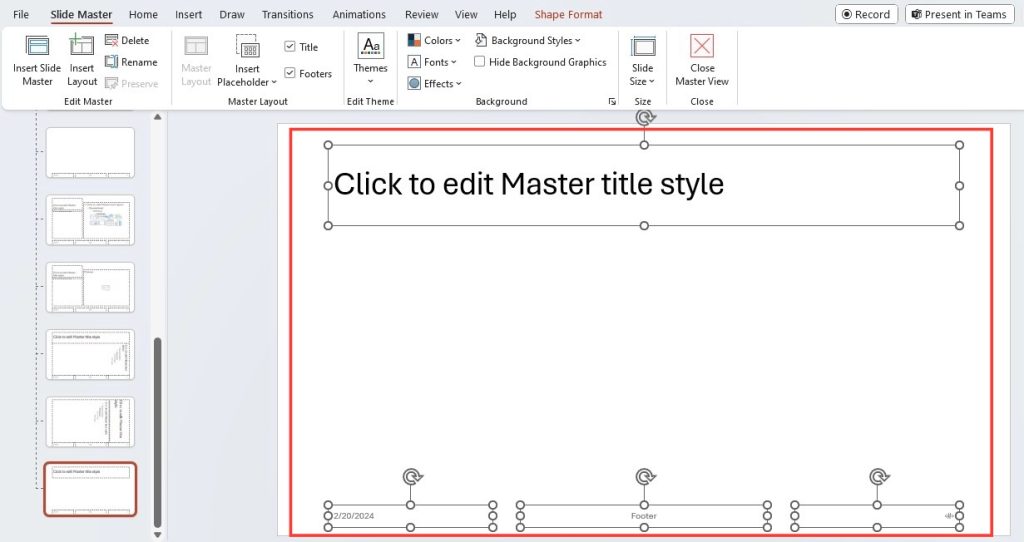
STEP 3: Select all the elements on the slide by clicking CTRL+A, then Delete.
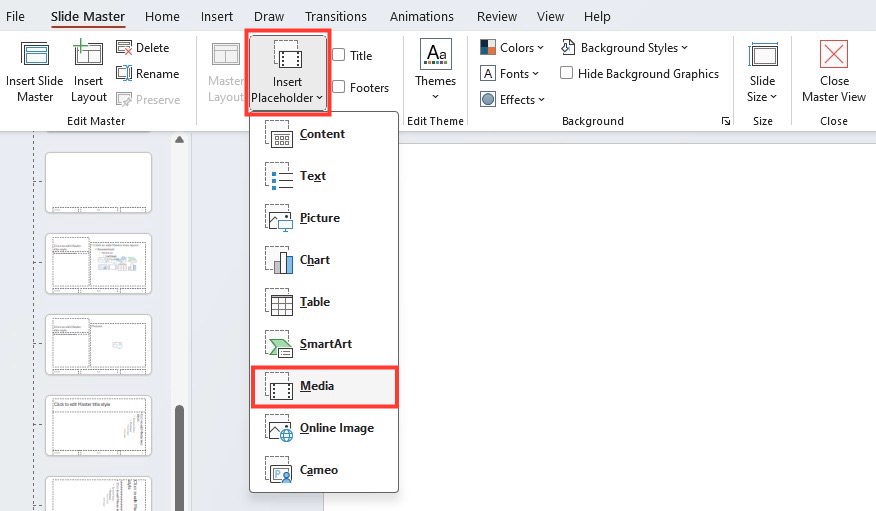
STEP 4: Go to “Insert Placeholder,” then “Media.”
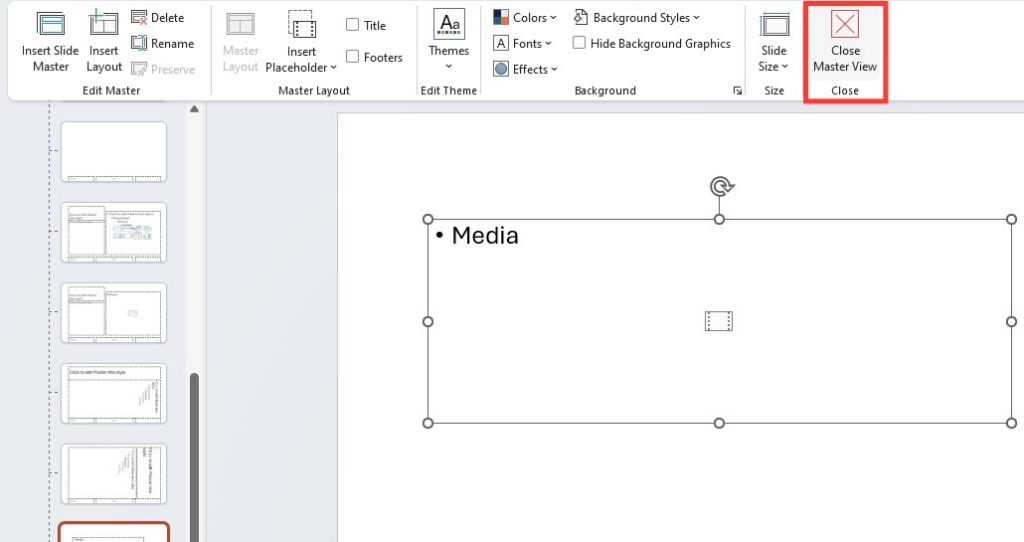
STEP 5: Exit the Slide Master view and return to the normal view.
STEP 6: On the Home tab, click on the “New Slide,” then click on the Custom Slide you just made.
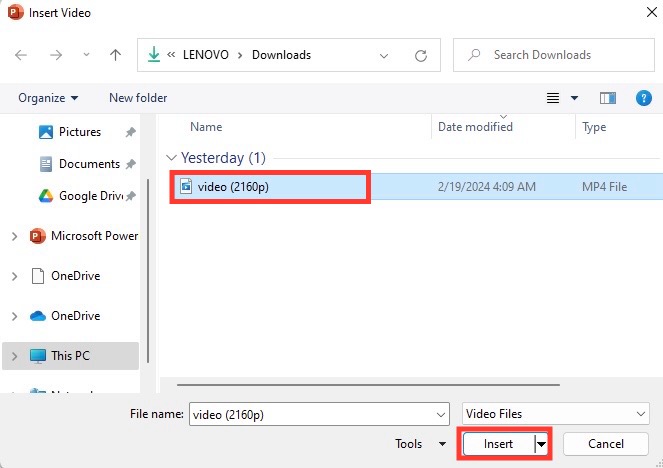
STEP 7: Choose the video file you wish to embed. The video will be inserted into the selected placeholder.
Video Adjustment:
- Resize the placeholder as needed to accommodate the video, ensuring it aligns well with other content elements on the slide.
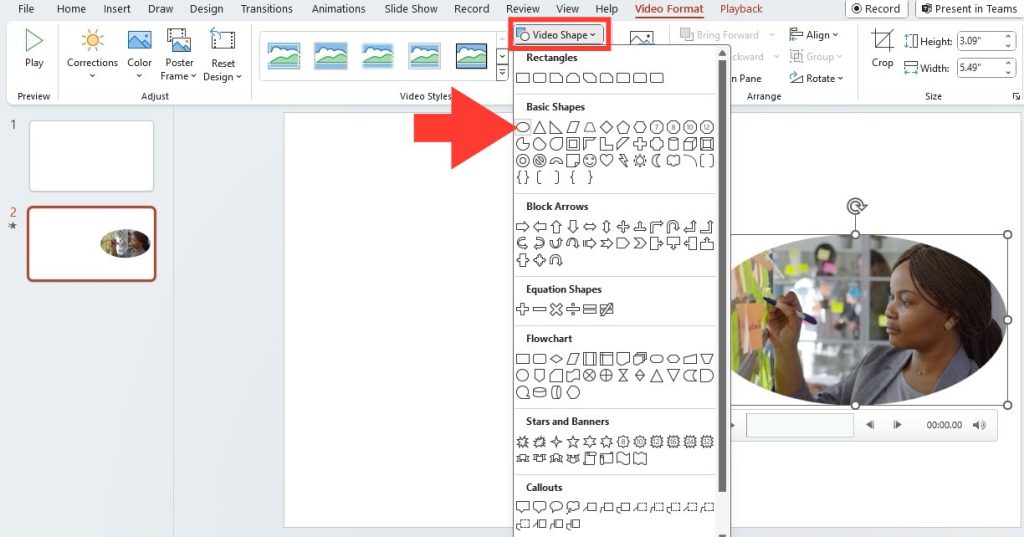
- Use the “Video Format” and “Playback” tabs to adjust the video’s format settings and playback options, respectively.
Consistent Design:
- Ensure that the style of the placeholder containing the video is aligned with the theme of your presentation for a consistent design aesthetic.
- If needed, use shape effects to further incorporate the video into your slide’s overall look.
By using these steps to incorporate video into your PowerPoint slides, you turn static presentations into interactive experiences that can effectively convey complex messages and keep your audience’s attention.
Remember that multimedia elements like video can be influential, but they should be used judiciously to complement and enhance your message instead of overwhelming it. The goal is to maintain a professional and cohesive narrative throughout your presentation.
Tips and Tricks
Utilizing grid and guide tools to align the placeholder
Precision Placement with Grid and Guides
To ensure your picture placeholders are perfectly aligned and well-proportioned, PowerPoint offers grid and guide tools that can be immensely helpful. Here’s how to utilize these tools:
Enabling Grid and Guides:
- Go to the “View” tab on the ribbon.
- In the “Show” group, check the “Gridlines” and “Guides” checkboxes; this will overlay a grid and guides on your slide for better alignment.
Using Guides for Alignment:
- Click and drag the guides from the ruler at the edge of the slide to where you want them.
- Position picture placeholders along these guides for precise alignment.
- Hold the “Shift” key while dragging to snap objects to the nearest guide.
Aligning with Gridlines:
- Objects will snap to the gridlines by default when you move them, aiding in the alignment.
- To adjust grid settings, right-click on a gridline and select “Grid and Guides.” Here you can change spacing or enable snap-to-grid features as needed.
Consistency Across Slides:
- Consistently use the grid and guides across all slides to maintain uniformity in the positioning of placeholders and other elements.
These alignment tools are essential for placing picture placeholders with precision and should be utilized to maintain a high level of design consistency within your presentation. Accurate alignment gives your slides a polished and professional look, which can help in making a positive impression on your audience.
Remember that while symmetry and precision are important, the flexibility offered by these tools also allows for creative layouts that can break the mold in a visually appealing and organized way.
Saving the template for future presentations
Creating a Reusable Template
Saving your presentation as a template with picture placeholders can be incredibly beneficial for future projects. It preserves your custom layout, styles, and overall design, making it easy to maintain consistency across your presentations. Here’s how to save your work as a template for future use:
Finalize Your Slide Design:
- Ensure all slide layouts are perfected, including adjustments to any picture placeholders and text boxes.
- Remove any specific content or images, leaving only the layout and placeholders intact to create a blank template.
Save as PowerPoint Template:
- Once your presentation is devoid of specific content, click on the “File” tab.
- Select “Save As” and choose a location you’ll easily remember.
- In the “Save as type” dropdown menu, choose “PowerPoint Template (*.potx).”
- Give your template a descriptive name and click “Save.”
Accessing Your Template for New Presentations:
- When you start a new presentation, click on the “File” tab and select “New.”
- Click on “Personal” or “Custom,” depending on your PowerPoint version, to access your saved templates.
- Choose your template, and a new presentation will open with your pre-designed layouts and placeholders.
By saving your presentation as a template, you can streamline the process for creating consistent, high-quality presentations in the future. This not only saves time but also ensures that your brand identity and design standards are upheld throughout all your corporate or personal PowerPoint projects.
With your master template stored, you’re always just a few clicks away from starting a new presentation with a familiar, polished, and effective design base.
Remember to update and back up your template regularly, especially if you refine your brand’s aesthetic or come up with improved designs. This ensures that your templates remain current and fully optimized for your presentation needs.
Wrapping Up Your Presentation with Picture Placeholders
Previewing and Saving Your Presentation
Final Steps Before Presentation
Before you’re ready to present, previewing and saving your PowerPoint is crucial to ensure everything runs smoothly. Here’s a step-by-step approach to finalizing your work:
Previewing Your Slides:
- Click on the “Slideshow” tab in the ribbon.
- To preview from the beginning, click “From Beginning”; to preview from a particular slide, select “From Current Slide.”
- This full-screen view will help you check the flow and transitions of your slides and ensure that the picture placeholders are functioning correctly.
Reviewing and Testing Placeholders:
- Confirm that all placeholders are properly sized and aligned.
- If you’ve inserted temporary images, verify that they are easy to replace without altering the layout.
- Make sure that the placeholders with videos or multimedia content are playing correctly.
Saving the Presentation:
- Click on the “File” tab at the top left of the screen.
- Select “Save As” and choose the desired location on your computer or network drive.
- Choose the “PowerPoint Presentation (.pptx)” format for regular saving.
- If you’re sharing the presentation with others for review or collaborative editing, consider saving and sending it as a “PowerPoint Show (.ppsx)” so it opens directly in slideshow mode for viewers.
Back-Up Your Work:
- It’s advisable to save a back-up of your presentation on an external hard drive or cloud storage service in case of any unforeseen technical issues with the primary device.
By meticulously previewing and saving your presentation, you can step onto the stage with confidence, knowing that all technical aspects have been polished to a shine. Regular saves during the design process also ensure that your hard work is preserved and that you are prepared for any situation, whether you’re presenting in a boardroom or at a conference.
Always keep in mind; your preparation is just as critical as the presentation itself. Your readiness to deliver is ultimately what leaves a lasting impression on your audience.
FAQ: Your Questions Answered
How can I replace placeholder images without altering the layout?
Efficient Image Replacement Techniques
To replace placeholder images in PowerPoint without impacting your meticulously crafted layout, follow these simple instructions:
Using the ‘Change Picture’ Feature:
- Right-click on the image within the placeholder that you wish to replace.
- Select “Change Picture” from the context menu.
- Choose the source of the new image; it can be from your device or online sources.
- Navigate to the desired image, select it, and click “Insert” to replace the old image while keeping the placeholder intact.
Drag-and-Drop Method:
- Open the file location with the new image in a separate window.
- Drag the image and drop it onto the placeholder you want to replace. PowerPoint will automatically adjust the new image into the existing placeholder’s size and cropping constraints.
By using these methods, you can swiftly replace images while preserving the original layout, aspect ratio, and formatting of your slides. This ensures that your presentation retains a consistent and professional appearance.
What should I do if my placeholders are not scaling pictures correctly?
Fine-Tuning Placeholder Scaling
If your picture placeholders in PowerPoint are not scaling pictures correctly, causing images to be either stretched or squished, you can resolve this issue with the following steps:
Check the Placeholder Settings:
- Click on the placeholder in question.
- Go to the “Picture Tools Format” tab that appears on the ribbon.
- Click on “Crop” to display cropping options.
- In the dropdown menu, select “Fill” to have the image fill the shape of the placeholder, or “Fit” if you want the entire image to be displayed within the placeholder, maintaining its aspect ratio.
Adjust the Picture Size Manually:
- If automatic settings do not resolve the scaling issue, you might need to manually resize the image within the placeholder.
- Click on the image and manually drag the cropping handles to adjust the visible parts of the image. Ensure you don’t drag the corner handles of the placeholder itself if you want to maintain its size and shape.
Check the Image Properties:
- Ensure the image you are using is of high resolution and the correct aspect ratio to fit your placeholder appropriately.
- If the source image’s aspect ratio is different from the placeholder, consider editing the image size with an image editing tool before inserting it into PowerPoint.
Reset the Placeholder:
- If formatting options don’t rectify the issue, it might help to reset the layout.
- In the Slide Master view, click on the specific slide layout, select the image placeholder, and choose “Reset Layout to Default Settings.”
Taking these steps should help ensure that your images scale correctly within the picture placeholders in PowerPoint, keeping them visually appealing and consistent with your presentation’s overall aesthetic. Remember to preserve the integrity of your design by choosing suitable images and using PowerPoint’s robust formatting tools to your advantage.
John Michaloudis is a former accountant and finance analyst at General Electric, a Microsoft MVP since 2020, an Amazon #1 bestselling author of 4 Microsoft Excel books and teacher of Microsoft Excel & Office over at his flagship MyExcelOnline Academy Online Course.

