Excel Solver is a powerful optimization tool that helps you find the best solutions for complex decision-making problems. By allowing you to set objectives, adjust variables, and apply constraints, Solver can tackle a variety of scenarios, from minimizing costs to maximizing profits. This user-friendly add-in enhances your analytical capabilities, making it an essential component of your Microsoft Excel toolkit for solving intricate problems efficiently.
Key Takeaways:
- Excel Solver is a powerful add-in that can handle linear, nonlinear, and some smooth non-smooth optimization problems, making it versatile for various decision-making scenarios.
- Despite its robust capabilities, Solver is remarkably user-friendly. Even those who are not data wizards will find it approachable, saving time and effort in solving complex problems.
- Solver uses advanced algorithms to process nonlinear problems, managing multiple constraints with ease and delivering optimal results for intricate functions that linear approaches can’t handle.
- Solver allows for precision and tolerance adjustments, enabling users to tweak outcomes to perfectly align with their requirements, thus tailoring models to represent real-world complexities accurately.
Table of Contents
Introduction to Excel Solver
Enhance Decision-Making with Excel Solver
Have you ever been faced with a complex decision problem that you need to figure out efficiently? Well, Excel Solver is here to save your day. It’s an invaluable add-in that helps you navigate through intricate scenarios to find the best course of action. By mastering Solver, you unlock a world of possibilities where optimal solutions are just a few clicks away, pushing your decision-making capabilities to new heights.
Key Features and Benefits of Mastering Solver
When you familiarize yourself with Solver’s capabilities, you’re essentially equipping yourself with a Swiss Army knife for data analysis. With its ability to process nonlinear problems, Solver tackles complex functions that linear approaches can’t handle. You’ll be taking advantage of sophisticated algorithms engineered to manage and deliver the best results possible.
Moreover, Solver doesn’t falter under the weight of multiple constraints – it handles them with ease. This means that you can tailor your models to represent real-world complexities accurately. Another plus is the flexibility in precision and tolerances, which lets you tweak outcomes until they align perfectly with your requirements.
But the cherry on top? Despite its robustness, Solver remains remarkably user-friendly. Even those who are not data wizards will find it approachable, saving you precious time and effort. By adding Solver to your Excel toolkit, you become proficient in solving a spectrum of business dilemmas, ranging from budget allocation to marketing strategies.
Getting Started with Solver
A Quick Guide on Enabling the Solver Add-in
Getting started with Solver is straightforward. Since it’s not enabled by default, you’ll need to switch it on first. Here’s how you do it:
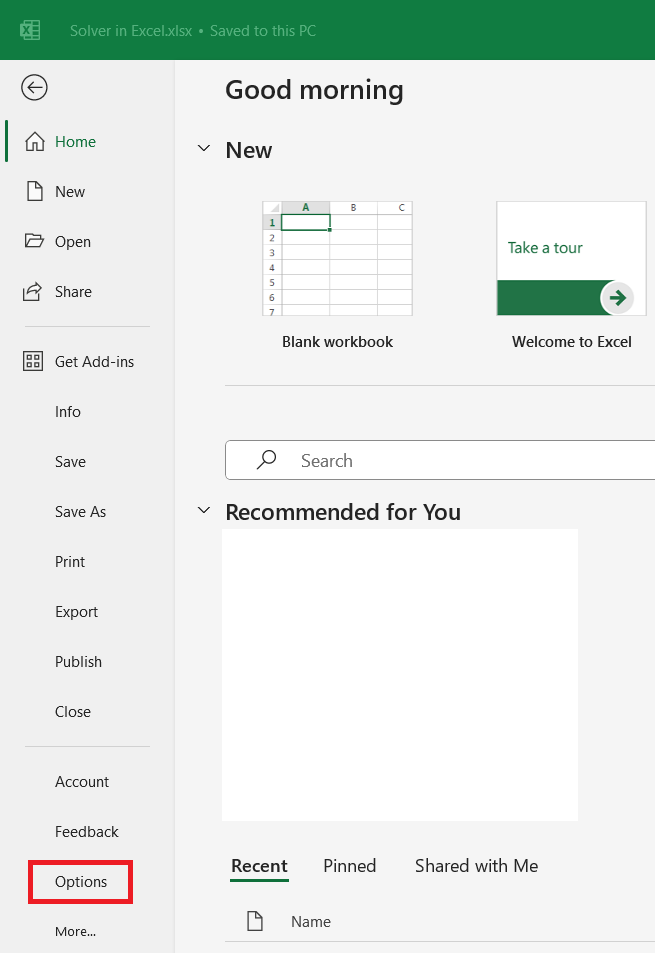
STEP 1: Firstly, dive into the File tab.
STEP 2: Navigate to Options.
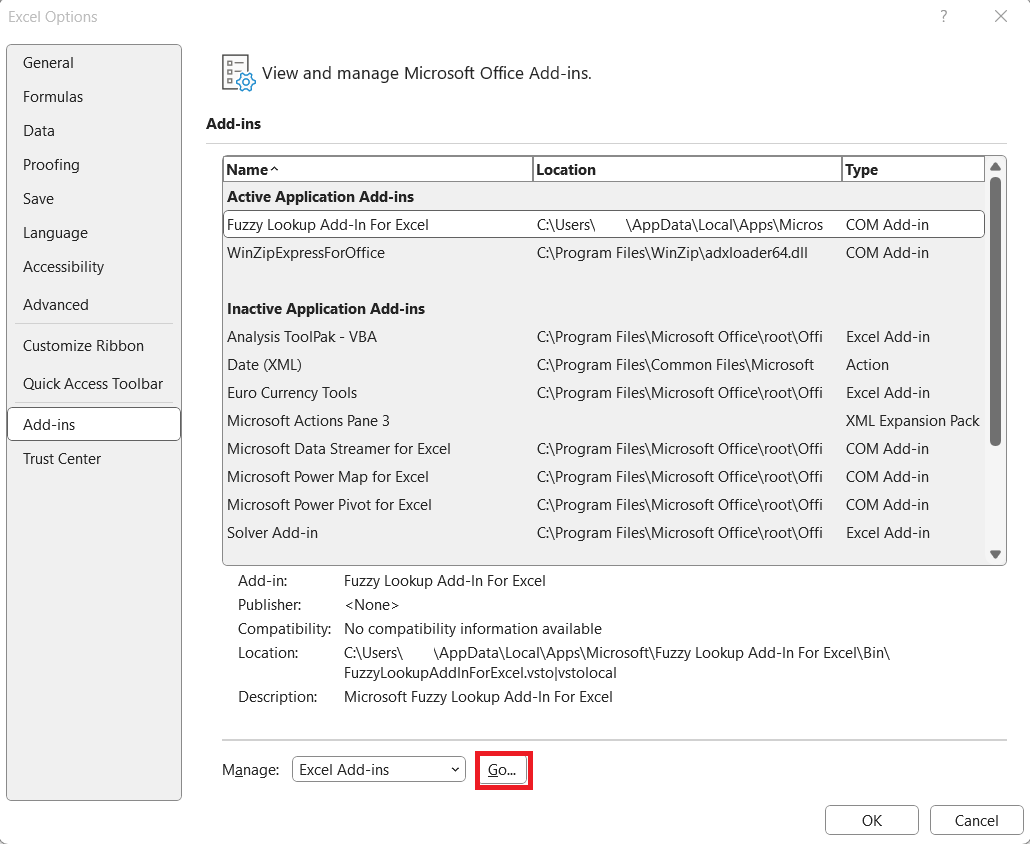
STEP 3: Within the Options menu, hop over to the Add-ins section. Now, here’s where the magic happens – select Solver Add-In and click on the Go button.
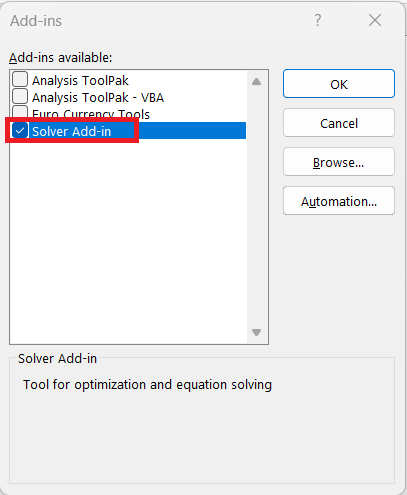
STEP 4: Then, like ticking items off your to-do list, check the Solver Add-in option and click OK. That’s it!
Your Data tab will now be graced with the Solver feature, all set for you to analyze and conquer.
Remember, Solver is like the secret ingredient in your Excel recipe book. Once you’ve summoned it onto your Excel ribbon, you’re ready to stir up some optimization goodness and get those numbers crunching.
Understanding the Solver Interface and Terminology
Before you dive into setting up your first Solver model, taking a moment to get comfy with the Solver interface and its terms can be really helpful. Think of it as getting to know the dashboard of a new car – where all the buttons are and what they do.
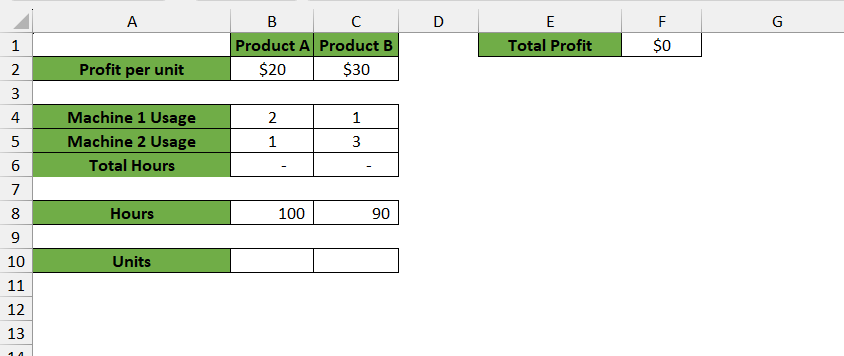
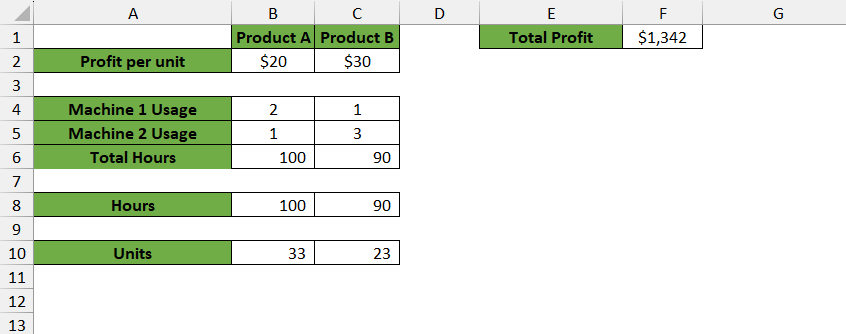
Suppose you run a small factory that makes two products: Product A and Product B. Each product requires time on two machines: Machine 1 and Machine 2. The goal is to determine how many units of each product to produce in order to maximize profit.
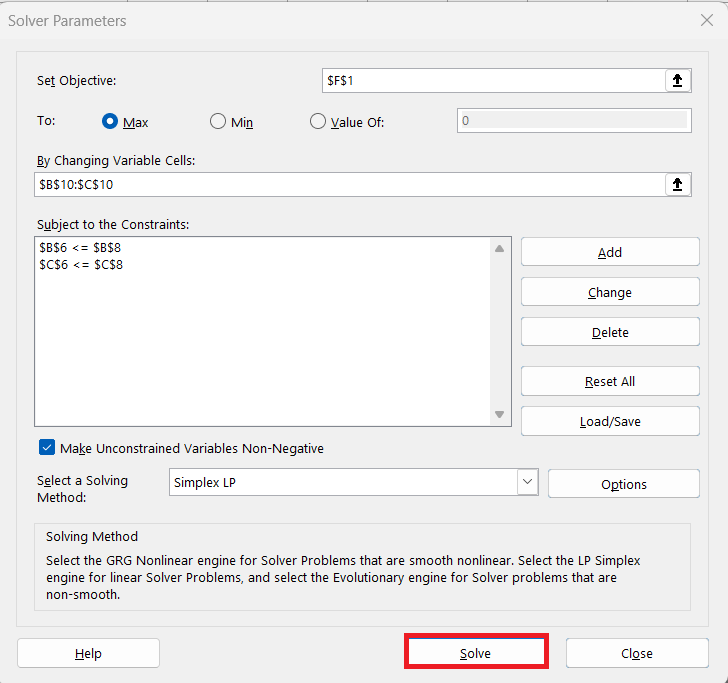
When you bring up the Solver Parameters dialog box, you’ll see sections laid out neatly for you:
- Set Objective: This is where you’ll enter the cell that contains your goal, be like hitting a sales target or minimizing costs.
- To: It’s decision time here – do you want to maximize, minimize, or hit a specific value? Your choice will steer the whole optimization process.
- By Changing Variable Cells: Here, you identify the cells that Solver can jiggle around to reach your objective. Think of these like dials you can turn.
- Subject to the Constraints: This bit is crucial. It’s where you lay down the rules of the game, setting the boundaries Solver has to work within.
- Solving Methods: Excel is smart and offers multiple solving methods because not all problems are cut from the same cloth. You’ve got ‘GRG Nonlinear,’ ‘Simplex LP,’ and sometimes ‘Evolutionary,’ each suited for different kinds of problems.
Get familiar with these terms, and you’ll be speaking Solver lingo like a pro in no time.
Crafting Your First Solver Model
Defining Objectives and Constraints for Optimal Results
When you’re ready to set the stage for Solver’s clever antics, you’ll need to pinpoint exactly what you’re aiming for – that’s your objective. It could be to minimize costs, maximize profits, or reach a specific volume of sales. Whatever your endgame is, it’s got to be crystal clear and sitting pretty in the Solver’s ‘Set Objective’ field as a formula.
Once your goal has a spotlight on it, it’s time to outline the rules of the game – these are your constraints. Constraints can encompass things like the number of hours a machine can run; essentially, they define the playground in which Solver can operate. Like setting up bumpers in a bowling alley, they guide Solver to knock down the pins without veering into the gutter.
Remember, well-defined objectives and thoughtful constraints aren’t just niceties – they’re necessities for Solver to work its magic effectively.
Step-by-Step: Solving the Model Efficiently
Ready to let Solver strut its stuff? Great, let’s walk through the steps for efficiently solving your model:
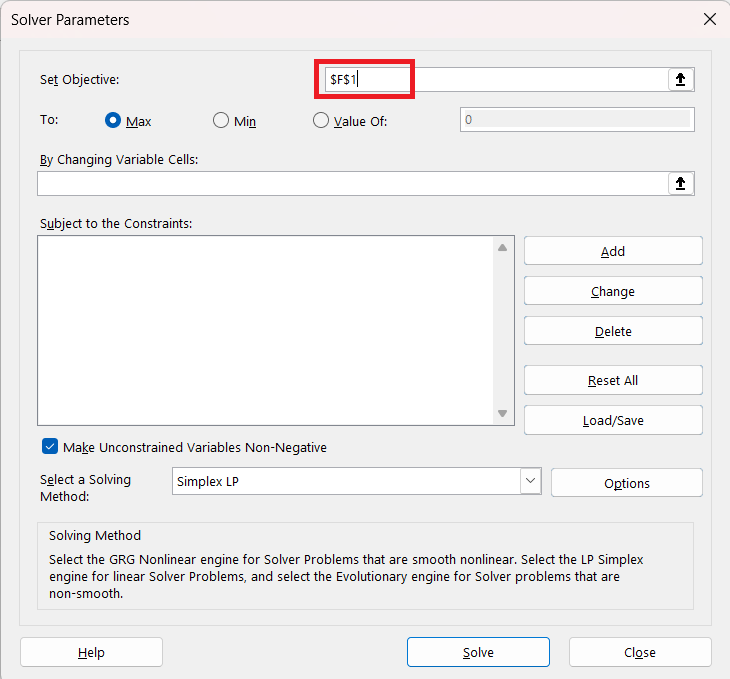
STEP 1: With your objective and variable cells lined up, kick things off by hitting the Data tab, then Solver. This summons the Solver Parameters dialog box to your screen.
STEP 2: Fill in the ‘Set Objective’ box with the reference to your goal cell – that’s where your target formula lives. Here, it is the cell containing the total profit.
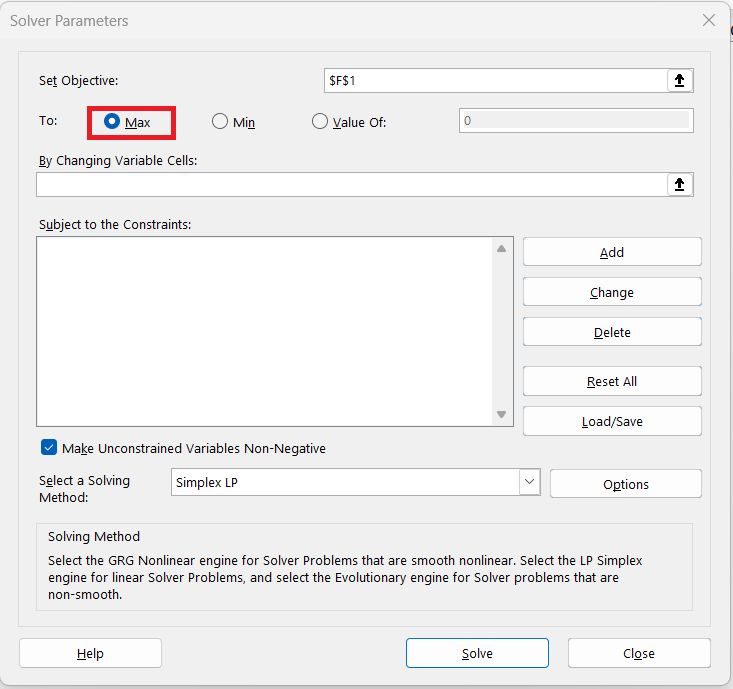
STEP 3: Choose whether you’re gunning to maximize, minimize, or nail a specific value for the objective by selecting the appropriate option. Here, we want to maximize profit so choose Max.
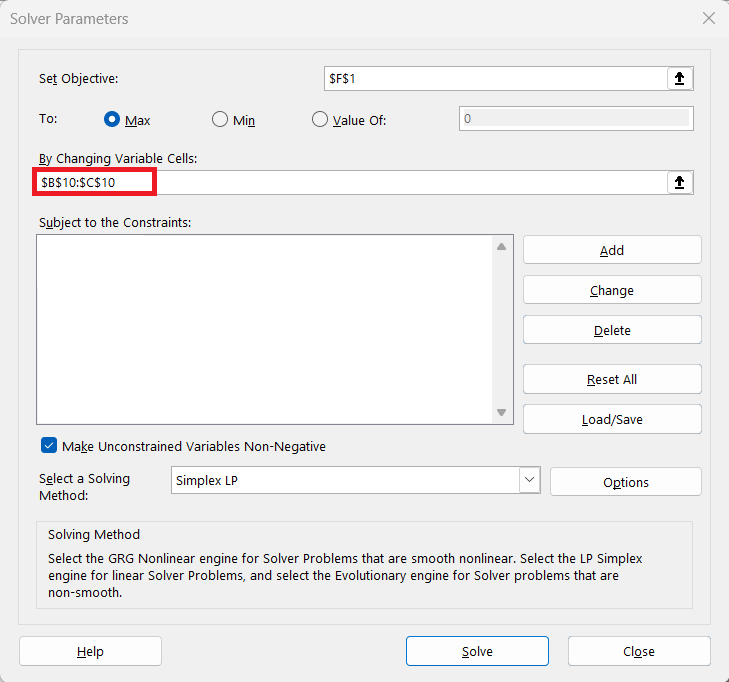
STEP 4: Enter your variable cells – these are the ones Solver gets to tweak – into the ‘By Changing Variable Cells’ box. Select the cells containing the number of units.
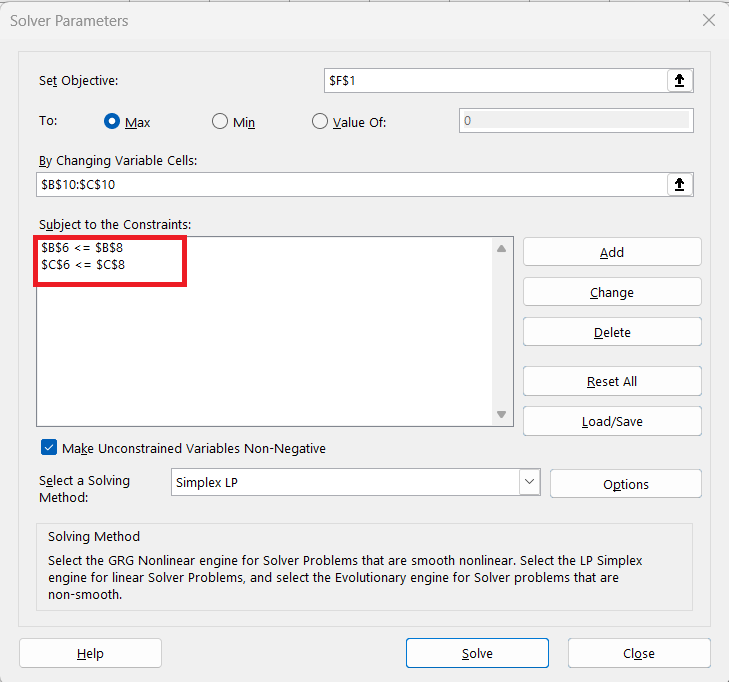
STEP 5: Lay out your constraints by clicking ‘Add’ and define them one by one, ensuring Solver doesn’t veer off the permissible path. The maximum capacity for Machine 1 is 100 hours and Machine 2 is 90 hours.
STEP 6: Decide on a solving method based on your problem type – ‘GRG Nonlinear’ for the curvy ones, ‘Simplex LP’ for linear leisure, or sometimes ‘Evolutionary’ for the trickier terrain. Click ‘Solve’.
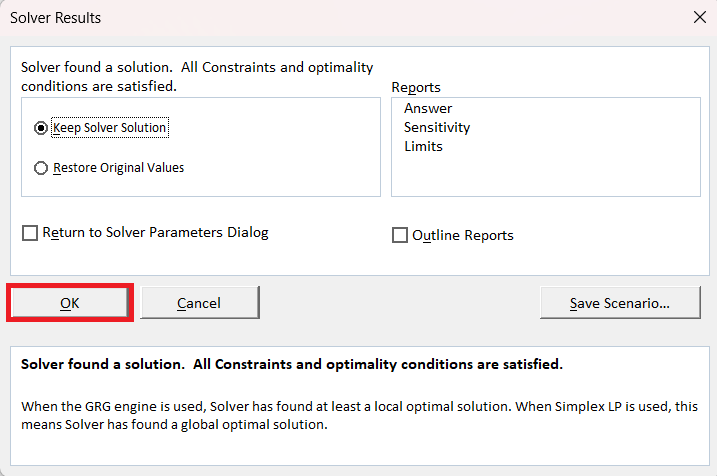
STEP 7: Click ‘OK’.
Watch Solver rev up its engine, searching tirelessly for the best possible solution.
FAQs
Can Excel Solver Be Used for All Types of Optimization Problems?
Excel Solver is pretty versatile, but it has its limits. It works wonders for linear, nonlinear, and some smooth non-smooth optimization problems. Solver excels when given problems with defined variables that it can manipulate to meet your objective while respecting your set constraints. However, for intricately complex issues, especially those that are non-deterministic or lack a clear objective function, Solver might not be your go-to tool. So, while it’s incredibly powerful, it’s not the solver of all things.
What Are the Differences Between Solver and Goal Seek in Excel?
Solver and Goal Seek are both iterative tools used for financial analysis in Excel, but they differ in complexity and capabilities. Goal Seek can adjust only one variable to meet a target value, whereas Solver can modify multiple variables simultaneously and impose constraints on these adjustments. Additionally, the Solver can seek an optimal solution, meet a maximum or minimum condition, and provide several different solutions that can be saved under various scenarios.
How Can I Troubleshoot if Solver Does Not Find a Solution?
To troubleshoot if Solver does not find a solution, you should first verify that your spreadsheet includes a properly set up equation or formula with a specific output cell to optimize. Secondly, consider adjusting the parameters or constraints you have set in Solver, as they may be too restrictive or conflicting, preventing Solver from reaching a solution. Lastly, ensure that the Solver add-in is correctly installed and activated in Excel, as this is necessary for the tool to function.
How do I use Solver in Excel?
To use Solver in Excel, first, ensure the add-in is enabled by going to the File tab and selecting Options, then Add-ins, and checking the box for Solver Add-in. Once enabled, you can access Solver in the Analyze category within the Data ribbon. To use it, input your desired outcome, set variable cells, and define constraints before clicking ‘Solve’ to find the optimal solution.
What is the shortcut for Solver Excel?
In Excel 2013 and later versions, the Solver tool can be accessed after it has been added by navigating to the “Data” tab and finding Solver in the “Analyze” group. There isn’t a direct keyboard shortcut to open Solver, but you can use Alt, A, Y2 (sequentially) to access it once it’s been activated in these versions.
Why is Solver not showing up in Excel?
Solver may not be showing up in Excel because it is an add-in that is not enabled by default in the application. To make it available, one must manually activate it either through the “Add-ins” option in the File menu or via the Developer tab, after enabling the Developer tab itself from the Options menu.
John Michaloudis is a former accountant and finance analyst at General Electric, a Microsoft MVP since 2020, an Amazon #1 bestselling author of 4 Microsoft Excel books and teacher of Microsoft Excel & Office over at his flagship MyExcelOnline Academy Online Course.


