When you want to make your emails stand out, adding tables with borders in Microsoft Outlook can be a great way to organize your information neatly. Whether you’re creating a simple data table, a price list, or structuring a complex email template, adding borders enhances readability and professionalism. In this guide, I’ll walk you through how to add table borders in Outlook, step by step.
Key Takeaways:
- Insert tables in Outlook by using the Insert tab and selecting the table size.
- Access the Table Design tab to customize table borders.
- Modify border styles, colors, and thickness for a polished look.
- Use Shading to add background color for enhanced readability.
- Preview your table in a test email to ensure it looks good across devices
Table of Contents
Introduction to Table Borders in Outlook
The Aesthetic and Functional Role of Table Borders
Creating tables within emails can often turn a cluttered mess into a clean, organized look that’s much easier for the reader to follow. It’s not just about aesthetics; table borders serve a functional role too. They delineate data, ensuring each piece of information is neatly segmented and more digestible.
Think of the difference between a sprawling, borderless spreadsheet and one where borders guide your eye from column to row seamlessly – this is the visual clarity that borders can bring to your Outlook emails.
Understanding Outlook’s Capabilities for Tables
Outlook offers an array of capabilities when it comes to inserting and formatting tables within emails. Whether you are using Outlook on the web or the desktop version, you have the flexibility to organize your data neatly through tables. From a simple grid to a more complex layout, you can insert tables with varying numbers of columns and rows and then customize them to suit your message’s needs.
You can right-click within a cell to access options such as inserting or deleting rows or columns, merging or splitting cells, adding a distinct style, or even removing the table entirely if necessary. This functionality transforms Outlook into a powerful tool for conveying complex information in an easily interpretable format.
Step-by-Step Guide to Add Table Borders in Outlook
Inserting a Table in Outlook
Before we add borders, we need a table to work with. Outlook makes it pretty easy to insert a table into an email.
STEP 1: First, launch Outlook and click on New Email. This opens the editor where you can start creating your message.
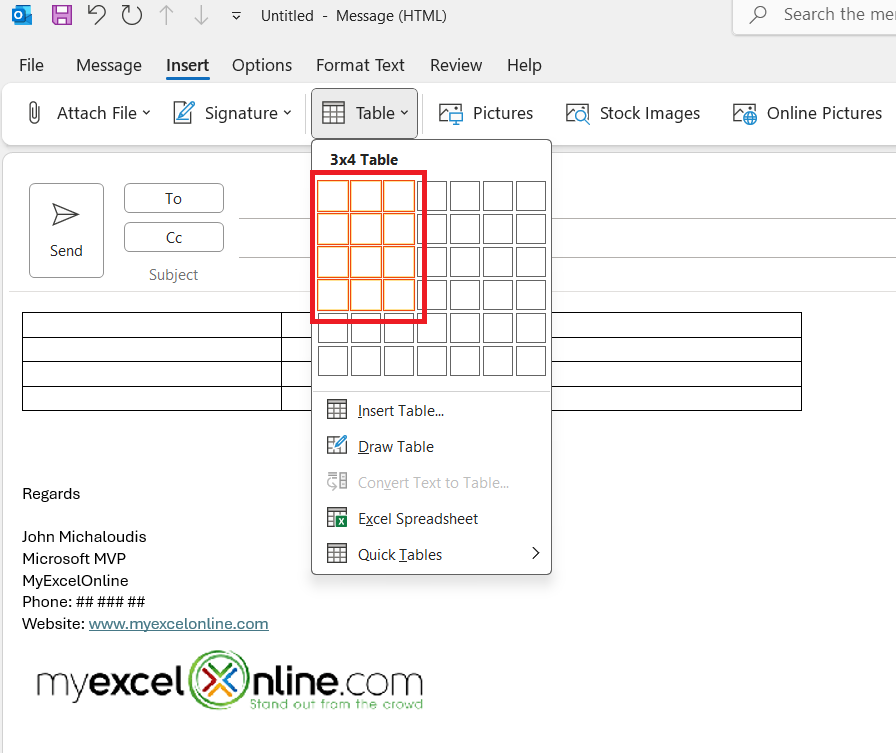
STEP 2: Once you’re in the email editor, click on the Insert tab in the ribbon at the top. Then, click on Table. A grid will appear allowing you to select the number of rows and columns. Hover over the grid to choose the size of your table.
For example, if you need a table that’s 3 columns wide and 4 rows deep, drag your mouse over the appropriate area.
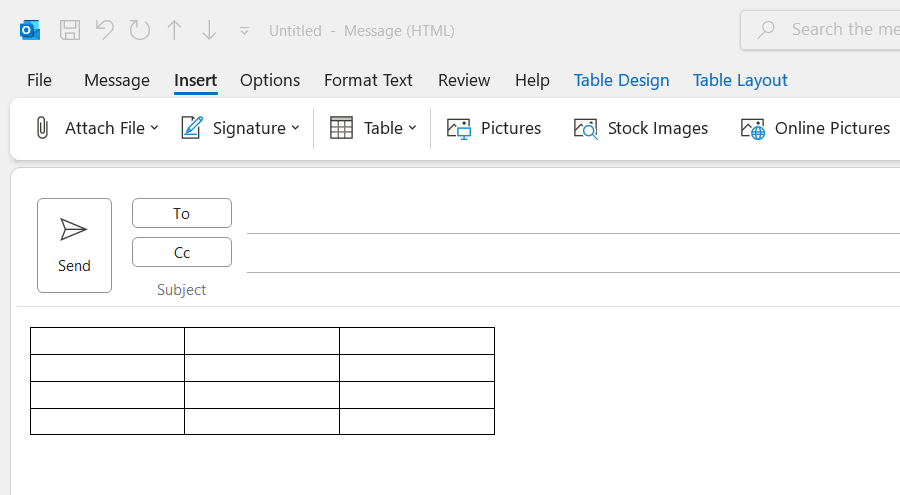
Once you’ve selected the dimensions, click, and your table will appear in your email body.
Now that we have our table, let’s get to adding some borders.
Accessing the Table Design and Layout Tools
Outlook provides some powerful formatting tools for tables, similar to what you’d find in Microsoft Word. These tools allow you to customize the borders, shading, and other aspects of your table.
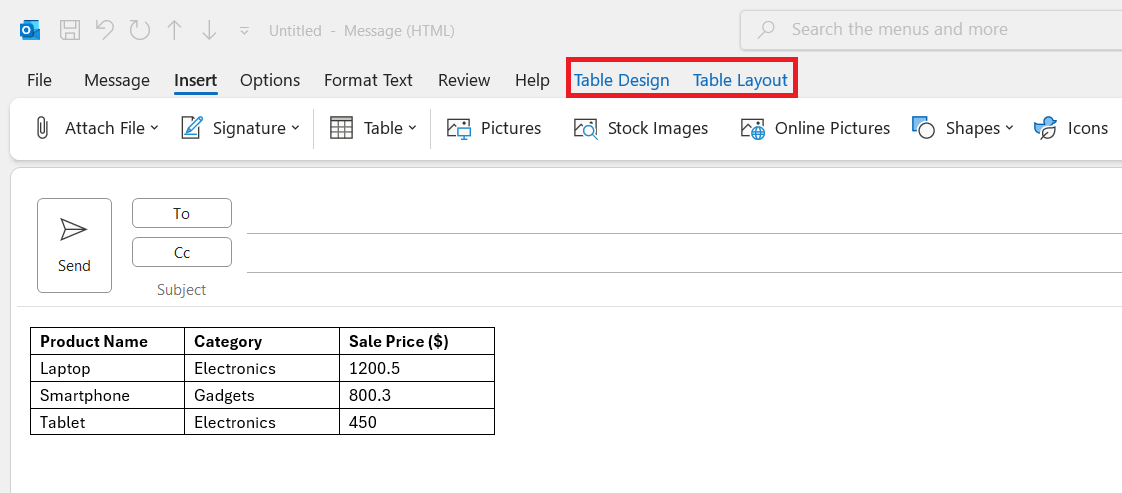
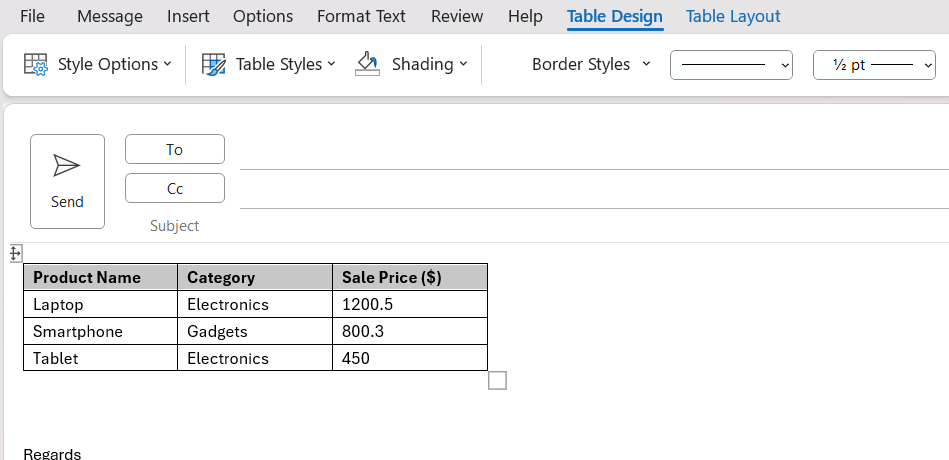
STEP 1: To modify the table’s appearance, click anywhere inside the table. This action will bring up two new tabs at the top of your window: Table Design and Layout.
STEP 2: In the Table Design tab, you’ll find options specifically for formatting your table, including the border styles, colors, and shading.
Customizing Your Table Borders
Now, it’s time to customize those borders.
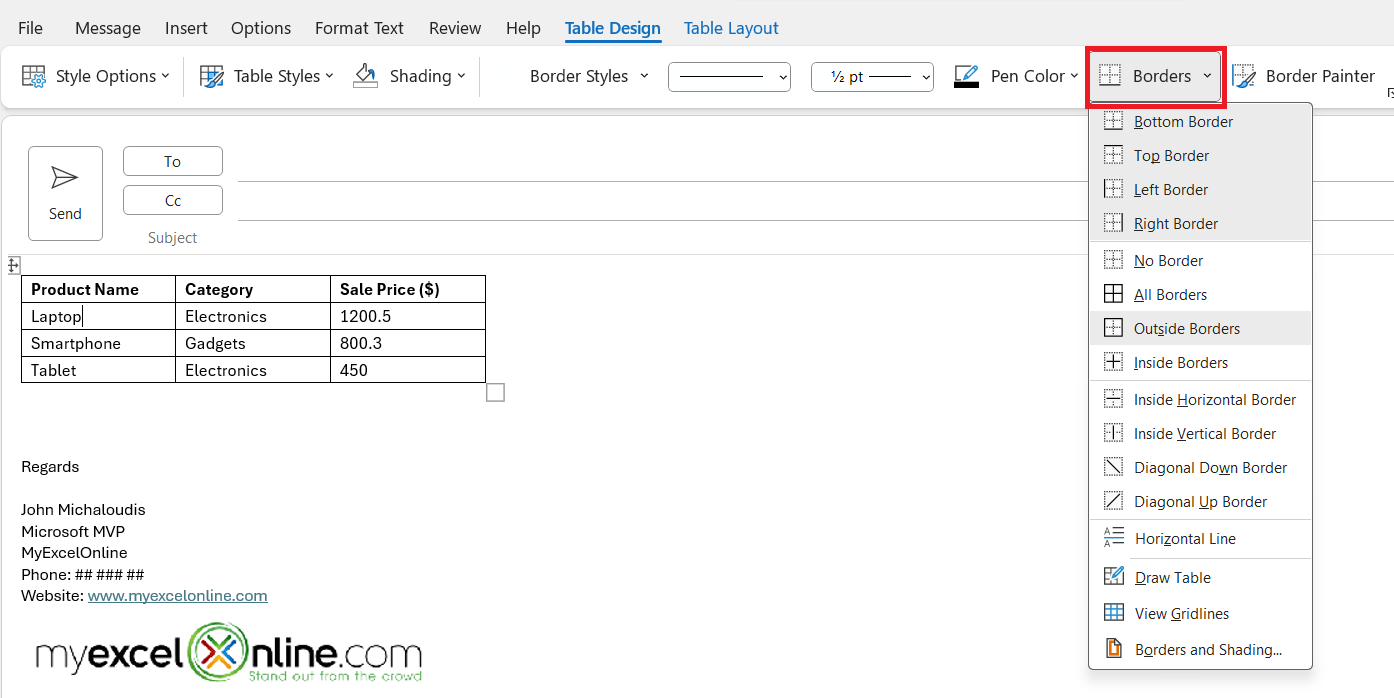
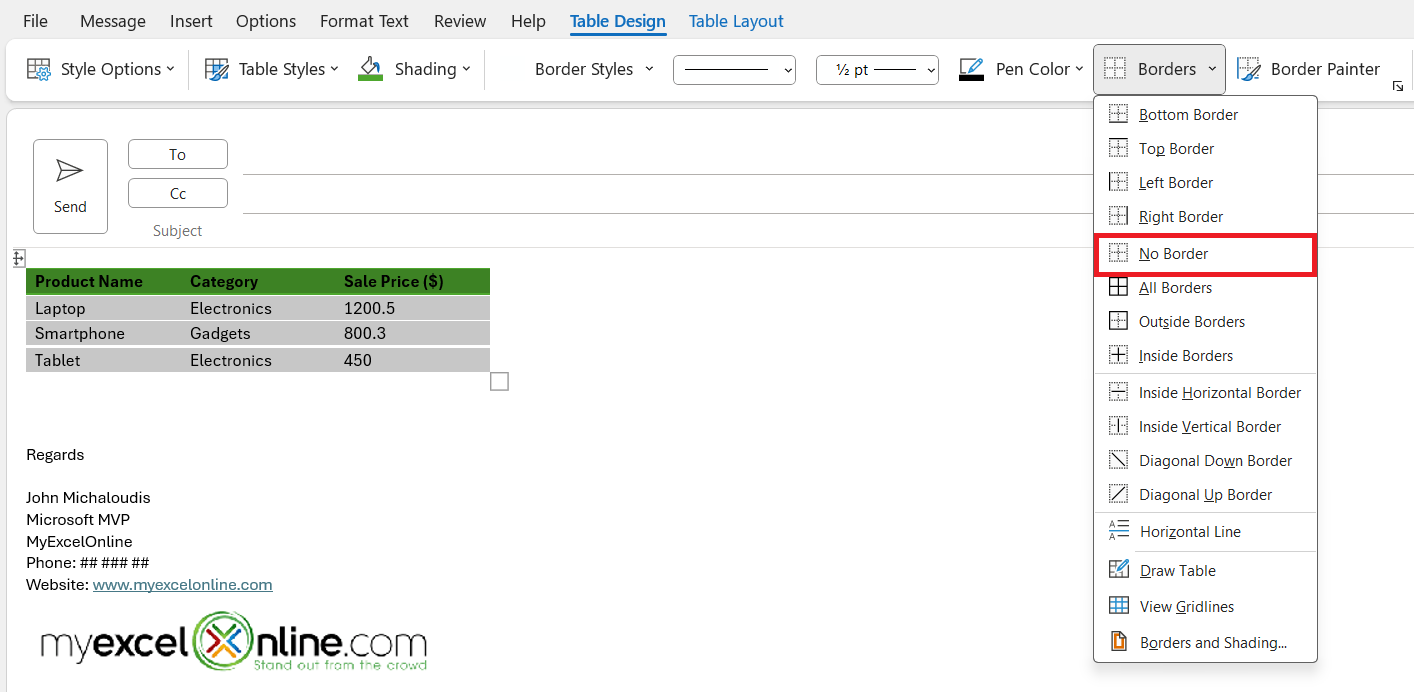
Open Border Styles: Look for the Borders section in the Table Design tab. Click the Borders dropdown arrow, and you’ll see several border options:
- No Border
- All Borders
- Outside Borders
- Inside Borders
- Top Border
- Bottom Border
- Left Border
- Right Border
These options allow you to control where borders will appear.
Set the Border Style: Next to the Borders dropdown, there is a section where you can adjust the line style, width, and color of your borders.
- Line Style: Click on this option to choose the style of your border. You can select from solid lines, dotted lines, double lines, or more decorative options depending on the look you want.
- Line Weight: This controls the thickness of the border. Choose a heavier line for a bolder look or a thinner one for subtle borders.
- Pen Color: This lets you pick a color for the border. Simply click the color option and choose from the color palette. You can match the color to your email’s theme or brand, or you can go with standard black for a professional look.
Adding Shading
Adding shading can complement your table borders by making the table’s content easier to read. Here’s how you can do it:
- Select the Table or Cell: First, highlight the cells you want to add shading to. You can shade the entire table or just individual rows, columns, or cells.
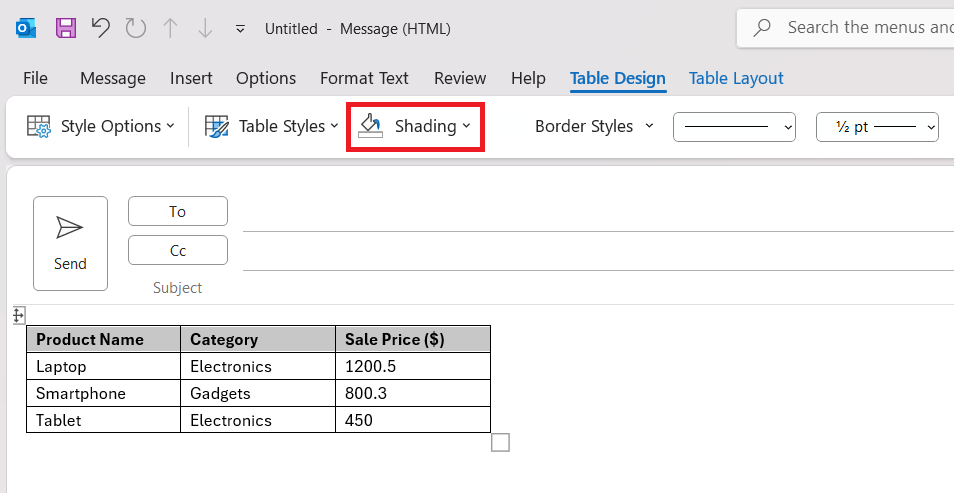
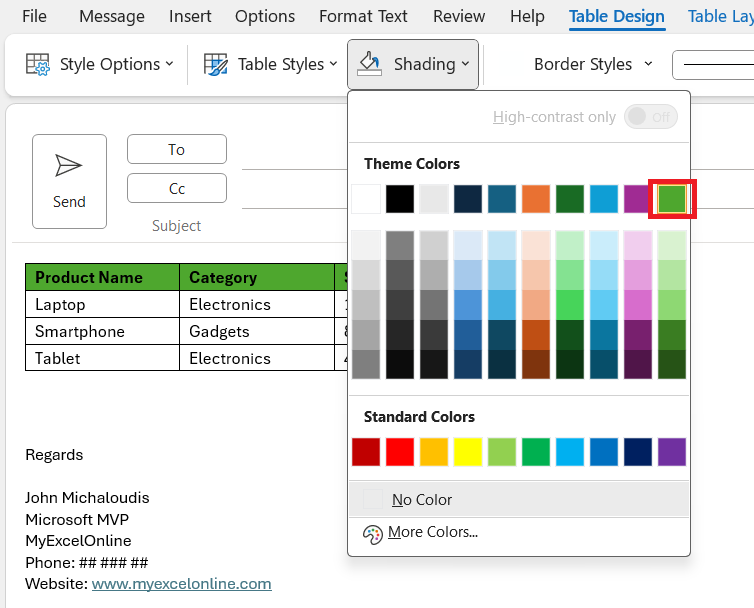
- Open the Shading Menu: Still in the Table Design tab, look for the Shading option. Clicking on this will open a color palette similar to the one used for borders.
- Pick a Color: Choose a background color for the selected cells. Lighter colors usually work best for readability, but you can experiment with different shades to see what fits your email style.
Editing and Removing Borders
If you need to make changes to the borders after applying them, it’s easy to go back and edit.
- To Edit Borders: Click back on the table, navigate to the Table Design tab, and adjust your border settings as needed. You can change the color, style, and thickness just like before.
- To Remove Borders: If you decide you don’t want borders anymore, select No Border from the Borders dropdown. This will remove all the borders from your table.
Once you’ve formatted your table, take a step back and look at the overall layout of your email. The borders should help break up the content and guide your recipient’s eyes to the important information.
If you’re working with larger tables, don’t forget to make sure your email is mobile-friendly. Sometimes, tables with lots of borders can look cramped on smaller screens. To mitigate this, use appropriate padding and test how the email appears on mobile devices.
Tips for Effective Table Border Use in Emails
Do’s and Don’ts When Bordering Tables
When bordering tables in your emails, there are some best practices to keep in mind:
Dos:
- Do use borders to enhance readability by separating content into distinct cells.
- Do align your table’s border color with the overall design and color scheme of the email.
- Do keep border width consistent throughout the table, unless you’re emphasizing specific data.
- Do test your email in various email clients to ensure your table displays correctly.
Don’ts:
- Don’t overuse borders or different styles as it can make the table appear cluttered and overwhelming.
- Don’t choose colors for borders that clash with text or background colors, making content hard to read.
- Don’t forget to preview your table in Outlook itself, as what you see in the draft may not be exactly how it appears to the recipient.
- Don’t ignore the ‘View in Browser’ feature to provide a full-fidelity view of your email, especially if your table is complex.
Best Practices for Professional Email Layouts
For professional email layouts, here are some best practices to ensure your message is both appealing and efficiently conveys your intended information:
- Maintain a clean and straightforward layout; avoid clutter which can distract or confuse the reader.
- Use tables to organize information logically, leading the reader’s eye in a flow that makes sense.
- Keep padding and spacing consistent within and between table cells for a uniform look.
- Select fonts and font sizes that are easy to read while being in line with the email’s formal tone.
- Pay attention to the alignment of the text within the table for a polished appearance.
Remember, the goal is to facilitate comprehension and present a professional image. With these practices, including the purposeful use of table borders, your email will not only look more refined but will communicate your message more effectively.
FAQs on Table Borders in Outlook
How do I format a table in Outlook?
To format a table in Outlook, create or select the table, then use the table tools to adjust elements like cell size, borders, shading, and alignment. Right-click in the table for additional options like inserting rows or columns. For more style options, explore the ‘Design’ tab in the ribbon under ‘Table Tools.’
How to display gridlines for the table?
To display gridlines for the table in Outlook, which are helpful for layout purposes but do not print, click inside the table. Then, under the ‘Layout’ tab in ‘Table Tools,’ find and click the ‘View Gridlines’ option. This will toggle the display of gridlines on or off in your email’s table.
How Can I Ensure My Table Borders Display Correctly in All Email Clients?
To improve the odds of your table borders displaying correctly across various email clients, stick to simple, inline CSS styles known for their compatibility. Additionally, test your emails with online preview tools to spot and address issues. If needed, include a ‘View in Browser’ link to ensure recipients can see the intended formatting.
Can I Save Custom Table Styles for Future Use in Outlook?
Unfortunately, Outlook currently doesn’t support the feature to save custom table styles for future use within the application itself. However, you can create a table template in a document and save it outside of Outlook, or use add-ins like Shared Email Templates to store pre-designed tables that can be inserted into your emails quickly.
How to make a table border invisible in Outlook?
To make a table border invisible in Outlook, right-click on the table and go to ‘Table Properties.’ Under the ‘Borders and Shading’ tab, select ‘None’ in the setting options for a border to make it invisible. Alternatively, you can set the border color to match the email’s background color.
John Michaloudis is a former accountant and finance analyst at General Electric, a Microsoft MVP since 2020, an Amazon #1 bestselling author of 4 Microsoft Excel books and teacher of Microsoft Excel & Office over at his flagship MyExcelOnline Academy Online Course.


