When I create professional Excel spreadsheets, I often need to add a touch of polish by including headers and footers. Whether it’s for identifying the document title, displaying page numbers, or adding my company logo, headers, and footers make my worksheets look complete and organized. Let me walk you through the steps I follow to insert a header and footer in Excel.
Key Takeaways:
- Header & Footer adds polish to Excel documents by including titles, dates, or logos, ensuring a more organized appearance.
- Inserting headers and footers is easy via the “Insert” tab or Page Layout view, making it accessible for all skill levels.
- Customizing headers and footers with dynamic elements like page numbers, dates, or specific formatting enhances document usability and presentation.
- Copying headers and footers to multiple sheets ensures consistency and saves time in managing large workbooks.
- Adjusting sizes and aligning headers and footers correctly maintains clarity, creating a polished, professional look throughout the document.
Table of Contents
Introduction to Excel Efficiency
The Importance of Headers and Footers
Headers and footers play a pivotal role in enhancing the professionalism of an Excel document. They are not merely ancillary features; rather, they serve as critical navigational and informational tools. Providing essential data like page numbers, dates, document titles, or a company logo, headers, and footers contributes significantly to a document’s clarity and cohesive presentation.
Their strategic placement at the top and bottom of pages makes it convenient for readers to identify the material, bolstering the document’s efficiency and user-friendliness.
Streamlining Your Workflow with Simple Excel Features
Streamlining our workflow with Excel’s simple yet potent features not only facilitates a smoother working experience but also immensely boosts our productivity. Excel’s interface is designed to promote an organized approach, with tools and functionalities that are intuitive to navigate.
Say, for example, we want to brand our document or add some specific reference notes; headers and footers are the go-to features for such purposes. These features not only save precious time but also ensure consistency across multiple documents, which is indispensable when we are working with a series of spreadsheets that require a uniform format.
The ease of implementing these elements allows us to maintain our focus on the more critical analysis and computation tasks at hand.
Getting Started with Headers & Footers in Excel
Basic Steps to Insert Headers and Footers
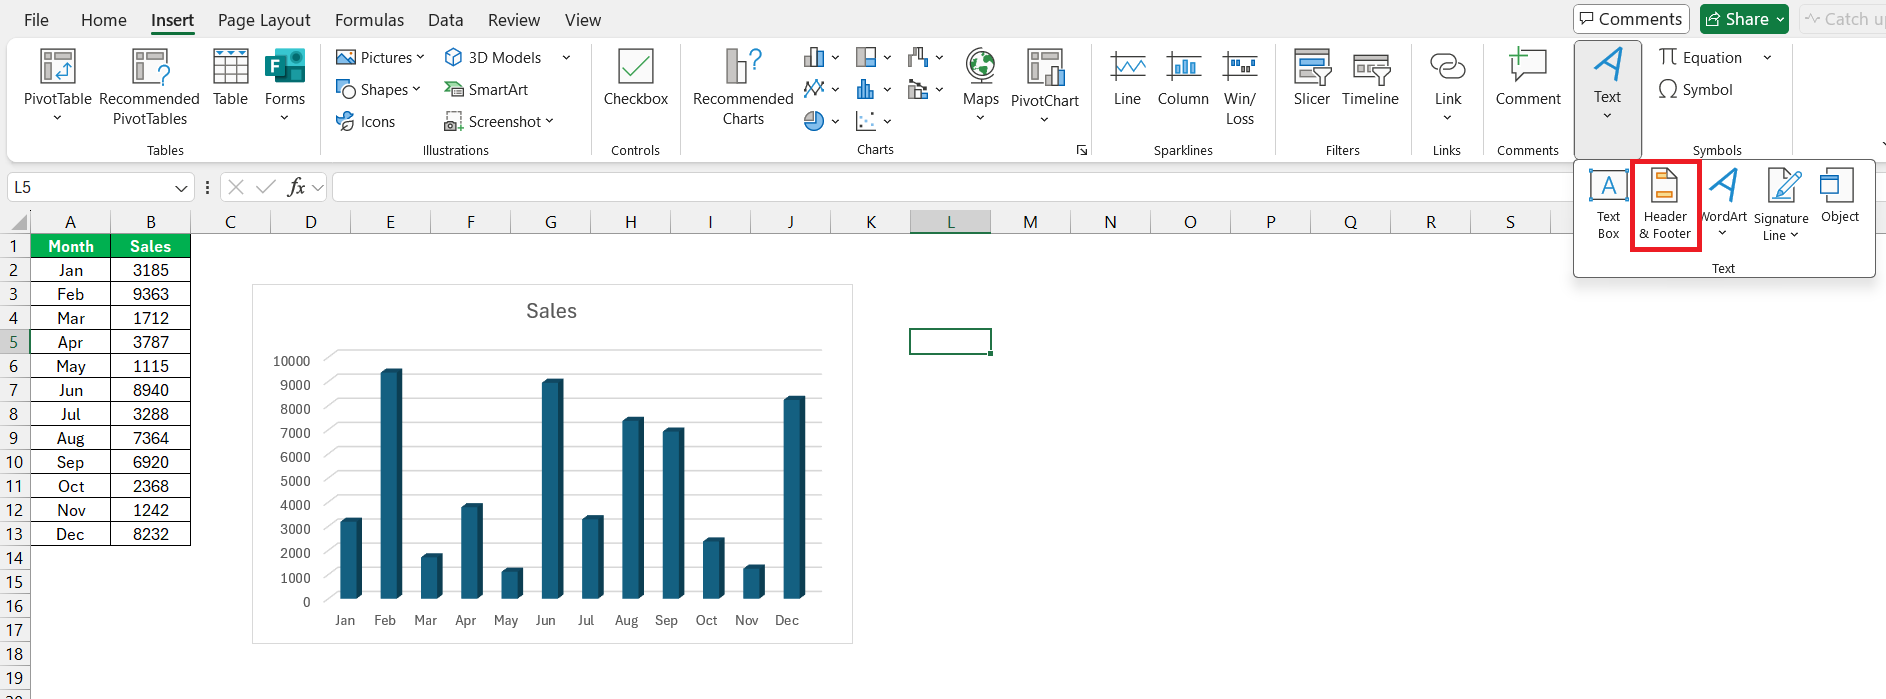
Inserting headers and footers in Excel is a straightforward process that can transform the look and functionality of our spreadsheets. To begin, we simply click the “Insert” tab on the ribbon. Following this, we locate the “Text” button and select “Header & Footer,” which shifts our view to where the header is active.
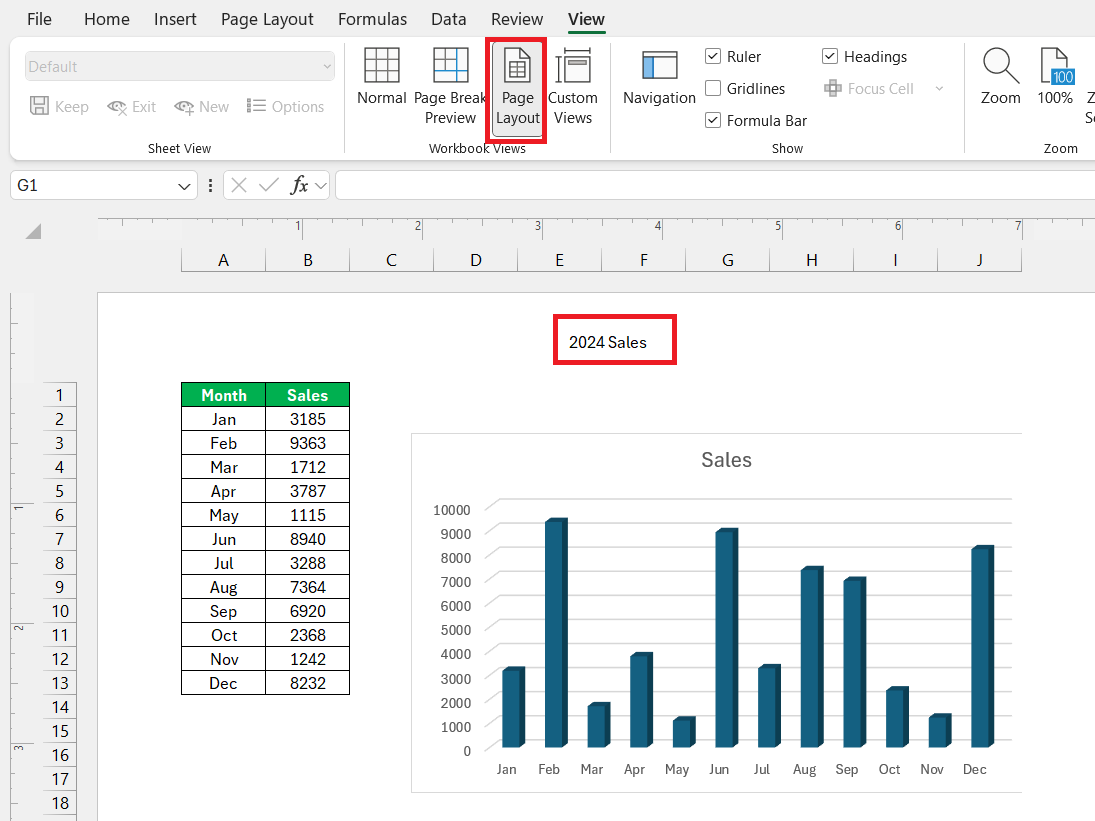
If we prefer another pathway, we can click the “View” tab and then select “Page Layout View.” Once we are in the correct view, clicking into the header or footer section is all that’s required to start adding the text or selecting a predefined option from the Header & Footer Elements group.
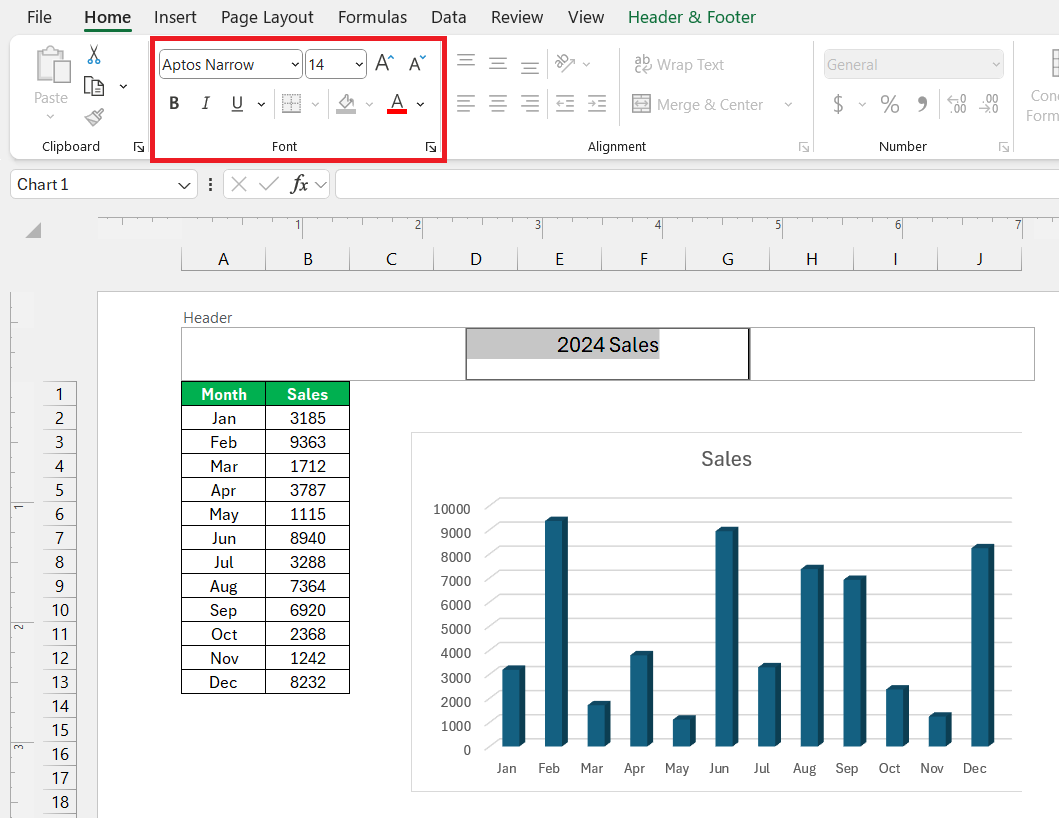
Here’s a nugget of advice: headers and footers can be spruced up using the commands in the Font group under the “Home” tab, allowing us to adjust the font size, style, and color, which can really make our document stand out.
Customizing Headers and Footers for Professional Documents
Customizing headers and footers is essential for crafting professional documents that encapsulate the essence of our brand or the specificities of a project. Once we’ve entered the header or footer area, we can mold them to reflect our organizational identity or the content’s purpose.
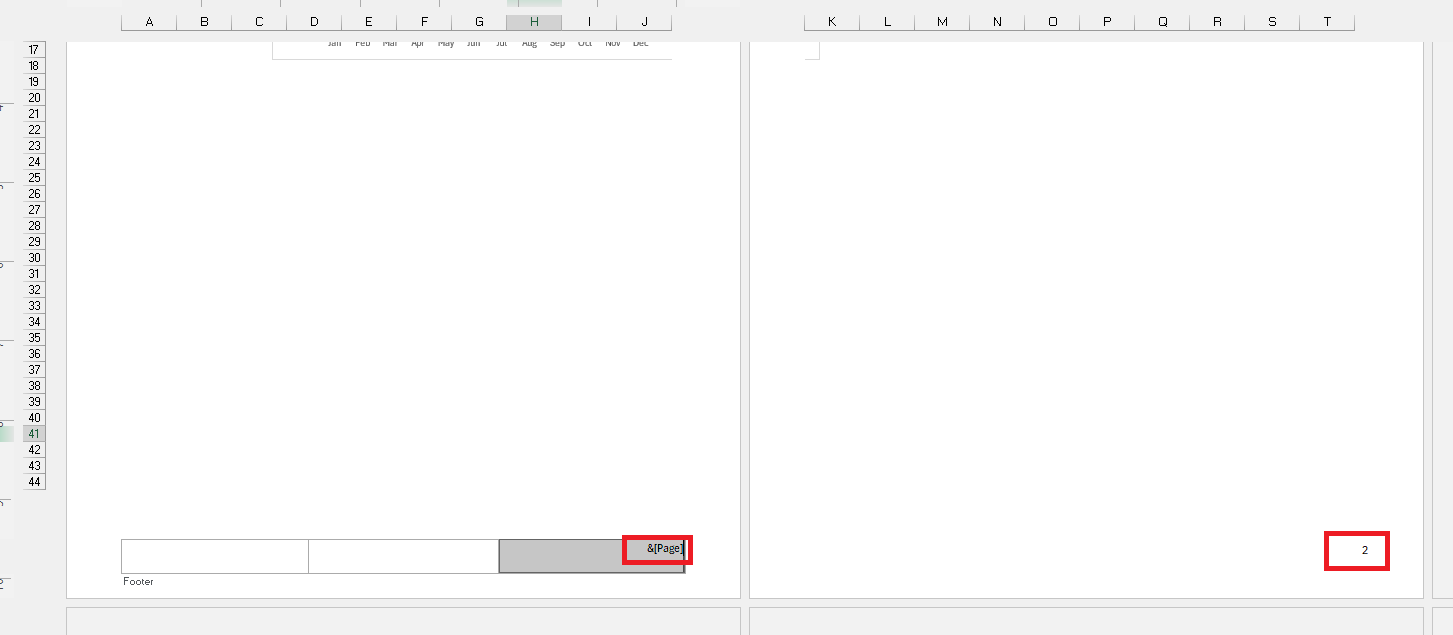
For instance, we can insert dynamic elements like the “&[Page]” code to automatically update page numbers, or “&[Date]” to display the current date. But our customization options don’t stop there.
We can also explore Excel’s “Design” tab, which appears once we’re in the header or footer editing mode. Here, we can play around with different fonts, add thematic elements, or insert file paths and sheet names for ease of document navigation.
It’s this kind of attention to detail in the header and footer design that establishes credibility and engenders a seamless reading experience.
Time-Saving Tips for Working with Headers and Footers
Copying Headers and Footers Across Multiple Sheets
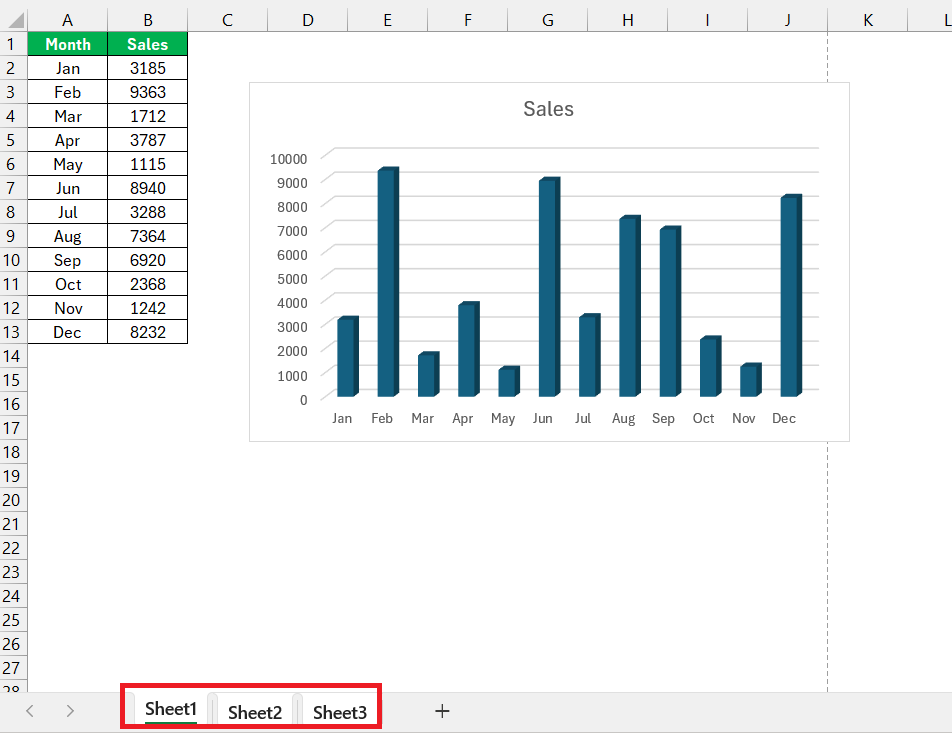
When we’re dealing with multiple sheets and we need to maintain a consistent look across all of them, copying headers and footers can significantly speed up the process. To do this, we start by selecting the multiple sheets where we want our header and footer applied.
If the worksheets are adjacent, we click on the first, hold the Shift key, and click on the last tab. For non-adjacent sheets, we hold the Ctrl key while clicking on each tab individually.
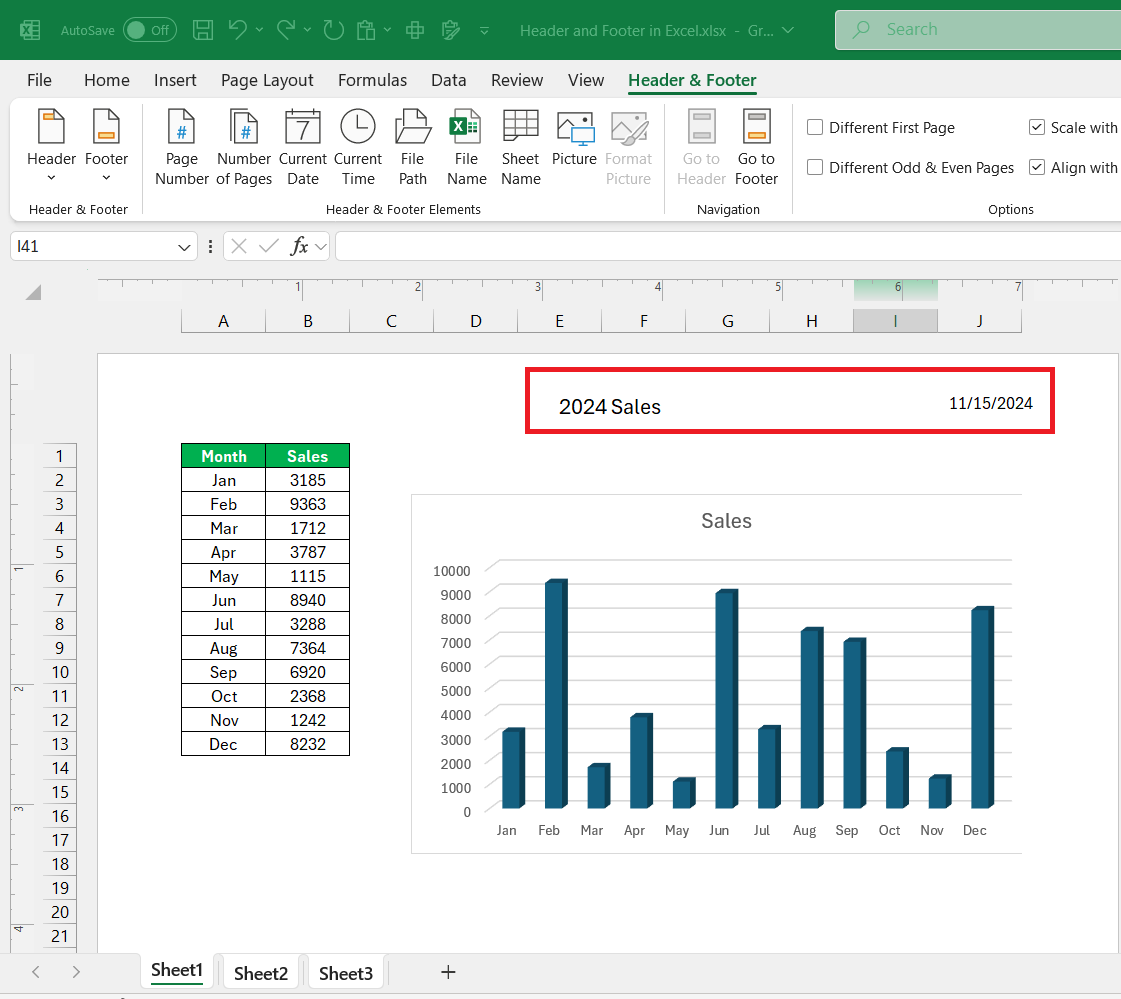
Once our sheets are selected, we go to the “Insert” tab, move to the “Text” group, and then click on “Header & Footer.” Here, we can enter our desired header or footer text or choose from presets.
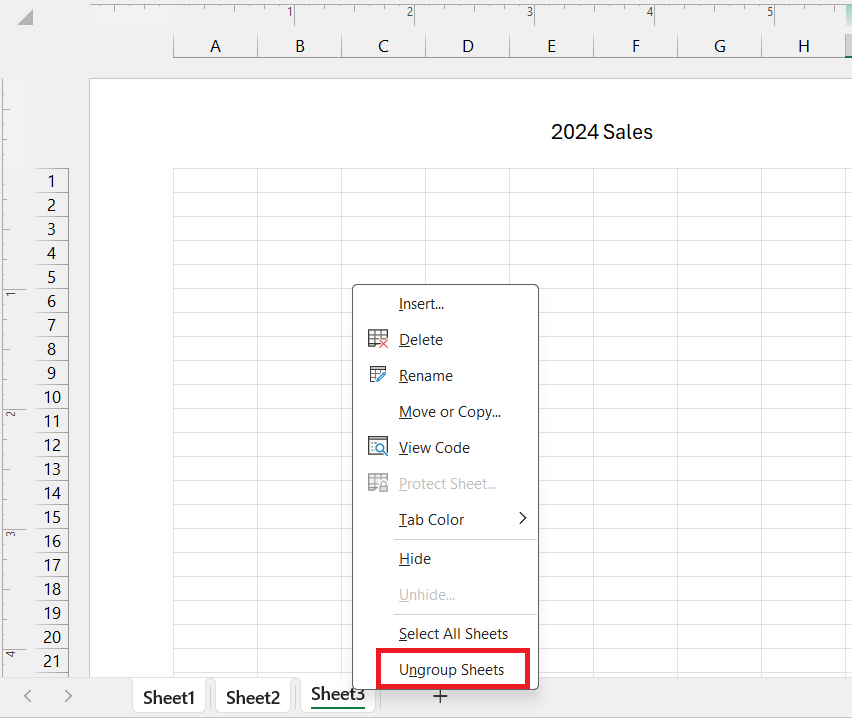
After we’re satisfied with our selection, we right-click any sheet tab and click on “Ungroup Sheets” to apply changes across all chosen sheets simultaneously.
This little trick is a huge time saver for those of us who often work with large Excel workbooks requiring a uniform header or footer across multiple tabs. It ensures that we don’t waste time manually updating every single sheet.
Advanced Excel Features for Headers and Footers
Adjusting Header & Footer Sizes for Better Readability
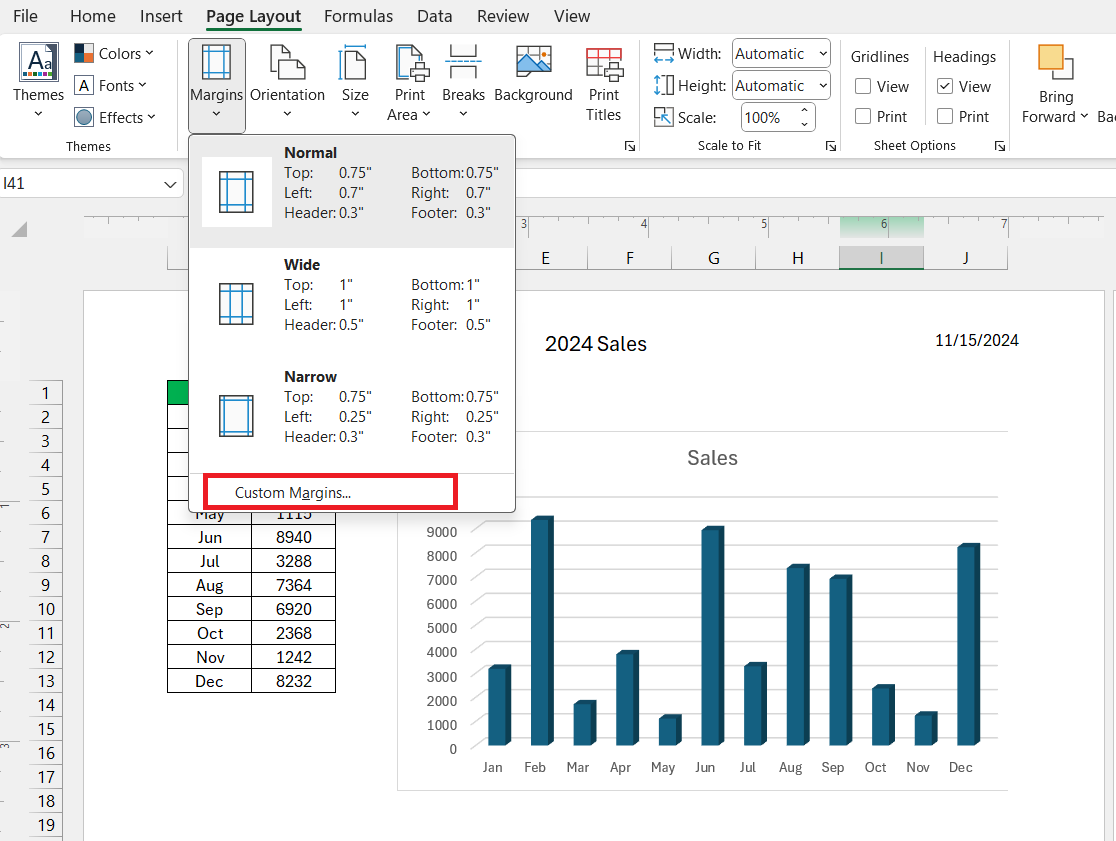
Ensuring the header and footer sizes are apt for better readability can be a tad tricky, but it’s certainly manageable. We have the option to adjust them based on the amount of content we plan to include. To begin adjusting, we first click on the “Page Layout” tab. From there, we drop down the “Margins” button and choose “Custom Margins.”
This opens a new dialog where we can manipulate the heights for both the header and footer separately.
Enter a new value for the header and/or footer until we attain the optimal size. Hitting “OK” saves our settings, and voilà, the document adapts instantly, ensuring our text is neither squished nor floating in too much space.
These adjustments help maintain the readability and aesthetic appeal of our spreadsheets, which is quintessential for professional and clear data presentation.
Ensuring Consistent Look Across All Pages
Ensuring a consistent look across all the pages of our Excel document lends it a professional and organized touch. This consistency can be achieved by carefully designing a header and footer that remain uniform throughout the document. We would typically include the same information, such as company name, logo, document title, and page numbers on each page.
A pro tip is to use the “Different First Page” option found under the Header & Footer Tools Design tab, should we need a unique first page without headers and footers or with different ones.
When setting headers and footers, making sure the ‘Scale with Document’ option is unchecked assures that the text size remains consistent, regardless of changes in document scaling.
By keeping these design elements consistent, readers can focus on the content of the pages without distraction, and we present data in a professional, branded format that’s easily identifiable.
Frequently Asked Questions
How do I insert a header and footer in Excel?
To insert a header or footer in Excel, navigate to the ‘Insert’ tab, select ‘Header & Footer’ in the ‘Text’ group, and Excel will switch to the ‘Page Layout’ view. Then, click inside the top or bottom area of your spreadsheet to start customizing your header or footer as desired.
Where are headers and footers visible in Excel?
Headers and footers are visible in Excel when you switch to the ‘Page Layout’ view or in the ‘Print Preview’ mode. They can be found at the top and bottom of the page, respectively, but won’t appear in the normal worksheet grid view.
How Do I Make Different Headers or Footers on Separate Pages?
To make different headers or footers on separate pages in Excel, go to the ‘Page Layout’ view and activate the header or footer area. Then, select the ‘Design’ tab and check the ‘Different First Page’ box for a unique header or footer on the first page. To vary headers or footers on odd and even pages, check the ‘Different Odd & Even Pages’ box.
Can I Use Excel to Create Dynamic Headers and Footers?
Yes, you can create dynamic headers and footers in Excel using code placeholders such as &[Page] for page numbers or &[Date] for the current date, which automatically updates as your document changes. This feature is perfect for data that evolves over time, ensuring your headers and footers always reflect the latest information.
What Are Some Best Practices When Adding Headers and Footers in Excel?
Some best practices when adding headers and footers in Excel include keeping them concise and relevant to the content, utilizing dynamic fields for updated information, ensuring readability by choosing appropriate font sizes and styles, and maintaining consistency in their design across all pages to establish a professional look for your document. Additionally, avoid overcrowding and always preview before printing to confirm the correct alignment and layout.
John Michaloudis is a former accountant and finance analyst at General Electric, a Microsoft MVP since 2020, an Amazon #1 bestselling author of 4 Microsoft Excel books and teacher of Microsoft Excel & Office over at his flagship MyExcelOnline Academy Online Course.

