As someone who’s spent countless hours working with data in Excel, I’ve learned that the Advanced Filter is a game-changer. It’s one of those features that, once you master it, you can’t imagine working without. Whether you’re managing large datasets, applying complex criteria, or extracting unique values, Advanced Filters can save you time and effort. In this guide, I’ll walk you through how to use this powerful tool.
Key Takeaways:
- The Advanced Filter in Excel helps manage large datasets by applying complex criteria, making data manipulation easier and faster.
- Data should be well-organized with clear column headers and consistent formats to ensure smooth filtering.
- Criteria ranges must match dataset headers, and you can use comparison operators to define specific conditions for filtering.
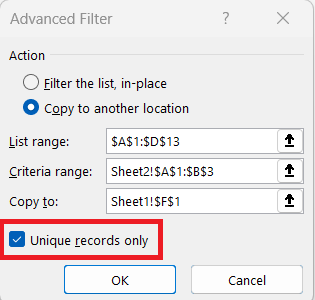
- You can filter data in place or copy it to another location, with an option to remove duplicates by selecting “Unique records only.”
- Common filtering issues include mismatched headers, overwriting data, and not checking the “Unique records only” box when needed.
Table of Contents
Introduction to Advanced Filtering in Excel
Unveiling the Power of Excel’s Advanced Filter
Excel, as a powerhouse tool, offers a plethora of features for data management—one of which is the Advanced Filter. This advanced functionality allows us to sift through large datasets based on complex criteria, transforming overwhelming data into actionable insights in just a few clicks.
Why Mastering Advanced Filters Can Change Your Data Game
Mastering advanced filters in Excel can be a game-changer for anyone who deals with data. By using advanced filters, I can examine my data in greater detail and apply multiple criteria to zero in on the information that truly matters.
This precision saves a significant amount of time that otherwise would be spent on tedious data sifting. The minimized margin for error and the ability to make well-informed decisions can have a profound impact on the efficiency and effectiveness of any project or business operation.
Advanced Filter Setup
Preparing Your Data for Filtering
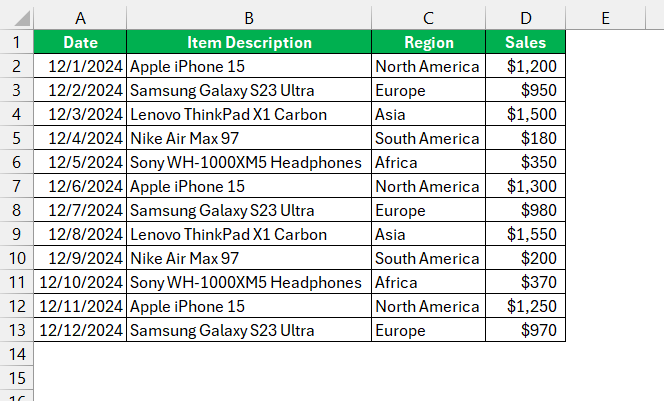
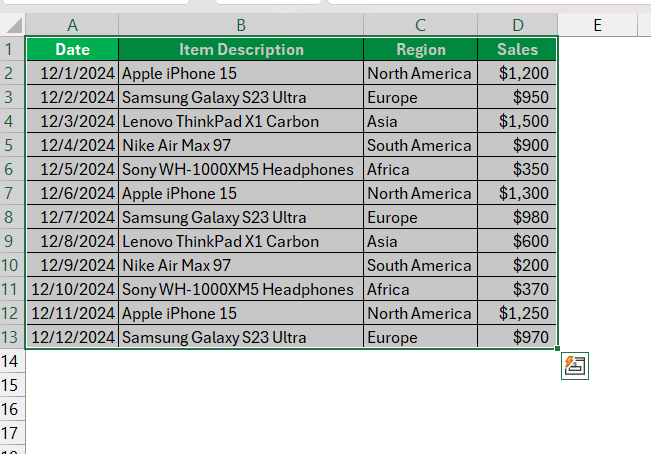
Before deploying advanced filters, it is crucial to ensure that the data is neatly organized with distinct column headers. Each column should reflect a specific attribute of the data, such as Date, Item Description, Region, and Sales.
Consistency in data entry, such as using the same date format throughout, is key to preventing any hiccups during the filtering process. Think of it as setting the stage for a performance—the better the setup, the smoother the show will run.
Accessing the Advanced Filter Dialog Box
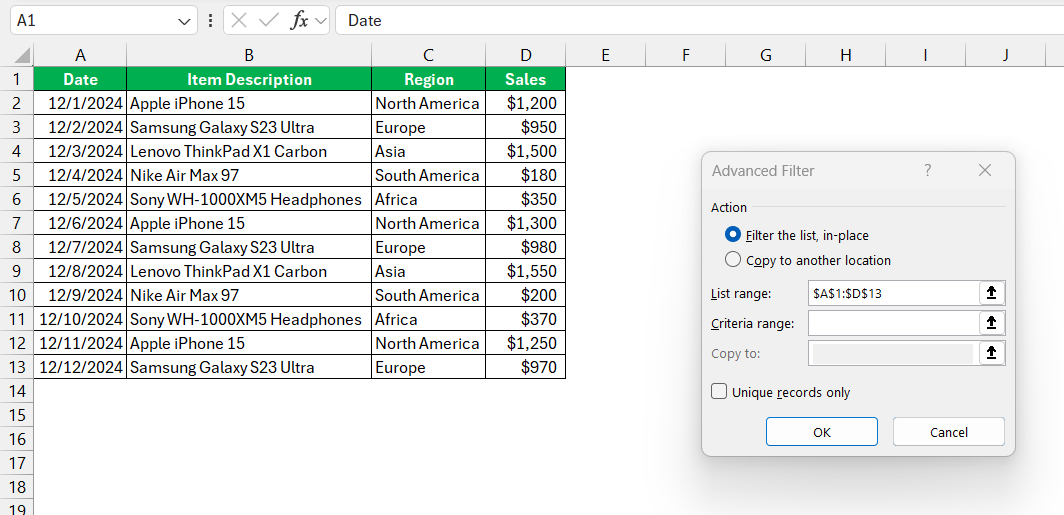
Accessing the Advanced Filter dialog box is straightforward. I start by selecting a cell within my dataset and navigate to the “Data” tab in the Excel ribbon. Under the “Sort & Filter” section, I find and click on “Advanced”.
The dialogue box that appears is where the real magic happens.
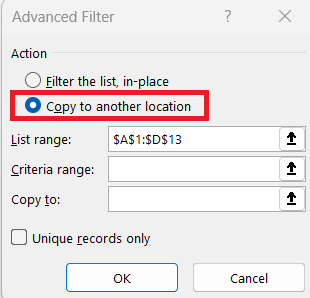
Here, I am presented with options to set my criteria range and decide if I want the filtered data in place or copied to another location. It’s a crucial step that paves the way for more refined data manipulation.
Crucial Criteria for Advanced Filtering
Defining Your Criteria Range Effectively
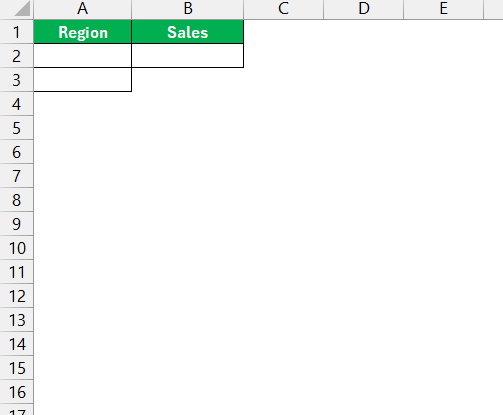
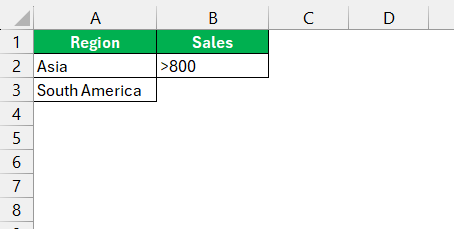
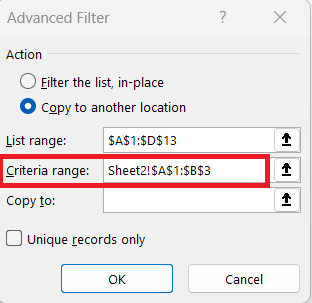
Defining my criteria range effectively is all about clarity and precision. The criteria range should mirror the headers of my dataset and be placed separately. Directly beneath these headers, I specify the conditions that my data must meet to pass through the filter.
When setting my criteria, I can include multiple conditions for a more tailored result. It’s like giving Excel a list of instructions to only show the rows that meet my exact needs.
Utilizing Comparison Operators Like a Pro
To filter data like a pro, I utilize comparison operators within my criteria range. These operators are simple: equals (=) for an exact match, greater than (>) and less than (<) for numerical comparisons, greater than or equal to (>=) and less than or equal to (<=) for range-based criteria, and not equal to (<>) for exclusions.
For example, if I need to filter records with amounts over $500, I use “>” in my criteria range. It’s all about using these operators to instruct Excel on how to compare data points and streamline my dataset.
Step-by-Step Guide to Apply Advanced Filter
Here’s how I apply an Advanced Filter step by step:
STEP 1: Highlight the dataset you want to filter.
STEP 2: Go to the Data tab, and under the Sort & Filter group, click on Advanced.
STEP 3: Choose Filter Options:
- Filter the list, in-place: Filters the data within the existing range.
- Copy to another location: Allows you to extract filtered results to a new location.
STEP 4: Click in the Criteria range box and select the criteria range you prepared earlier.
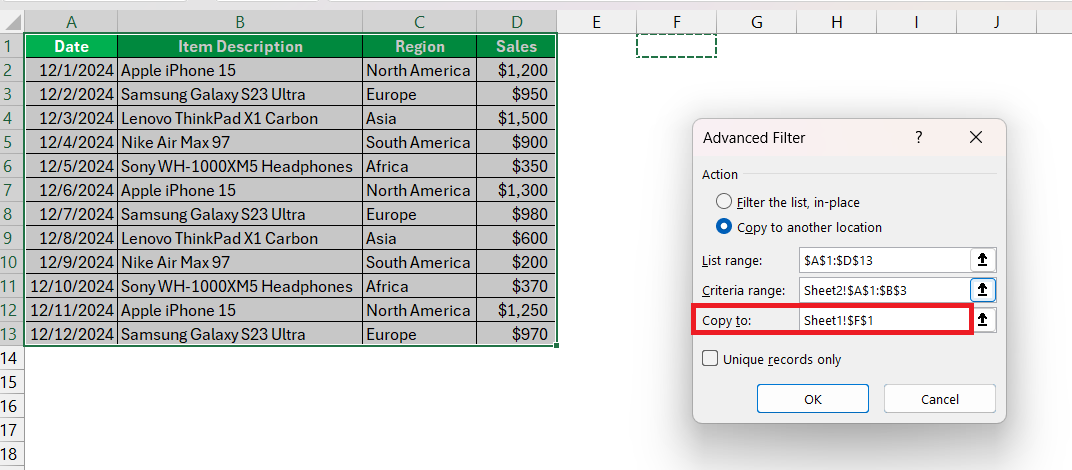
STEP 5: If you chose to copy the data, define the location in the Copy to box.
STEP 6: Check the box for Unique records only if you want to remove duplicates.
STEP 7: Click OK.
Excel will apply the filter based on your criteria.
Troubleshooting Common Issues
- No Results Appear: Double-check your criteria range for errors or mismatched column headers.
- Filtered Data Overwrites Original Data: Always verify the “Copy to” location if you’re extracting data to another range.
- Duplicates Still Appear: Make sure the “Unique records only” box is checked.
FAQ: Fast Track Your Excel Filter Knowledge
How do you do an advanced filter in Excel?
To perform an advanced filter in Excel, start by ensuring your data has headers and no blank rows. Define a criteria range with matching headers and your desired conditions. Then, select your data range, go to the Data tab, and click Advanced in the Sort & Filter group. Set the list and criteria ranges, choose to filter in place or copy results elsewhere, and click OK to apply the filter.
What is the difference between a basic filter and an advanced filter in Excel?
The basic filter in Excel, also known as AutoFilter, offers straightforward filtering options for single criteria per column or simple text searches. In contrast, the Advanced Filter allows me to apply multiple, complex criteria across different columns, providing a depth of analysis that the basic filter doesn’t support. While AutoFilter suits quick and simple tasks, Advanced Filter excels in detailed data examinations.
How to Use Wildcard Characters in Excel Advanced Filter?
To use wildcard characters in Excel Advanced Filter, I insert an asterisk (*) to substitute for any string of characters, a question mark (?) for any single character, or a tilde (~) to search for the wildcard characters themselves. By adding these to my criteria range, I can filter data for partial matches or specific patterns, greatly enhancing the versatility of Excel’s search capability.
Can You Create an Advanced Filter with AND vs. OR Logic?
Yes, I can create an Advanced Filter that employs both AND and OR logic. For AND logic, conditions should be placed in the same row, indicating all must be met. For OR logic, conditions go on separate rows, indicating that any one of them suffices. Combining these in complex filtering scenarios allows Excel to display results meeting a sophisticated blend of requirements.
What Are Some Common Mistakes When Setting Up an Excel Advanced Filter?
Some common mistakes when setting up an Excel Advanced Filter include not matching criteria range headers to data set headers, leaving empty rows within the data range, and misplacing AND/OR conditions. Unclear or incorrect criteria can also lead to unexpected results. It’s crucial to ensure accuracy in these areas to enable the Advanced Filter to work as intended.
John Michaloudis is a former accountant and finance analyst at General Electric, a Microsoft MVP since 2020, an Amazon #1 bestselling author of 4 Microsoft Excel books and teacher of Microsoft Excel & Office over at his flagship MyExcelOnline Academy Online Course.

