Key Takeaways
Appointment vs. Meeting Purpose:
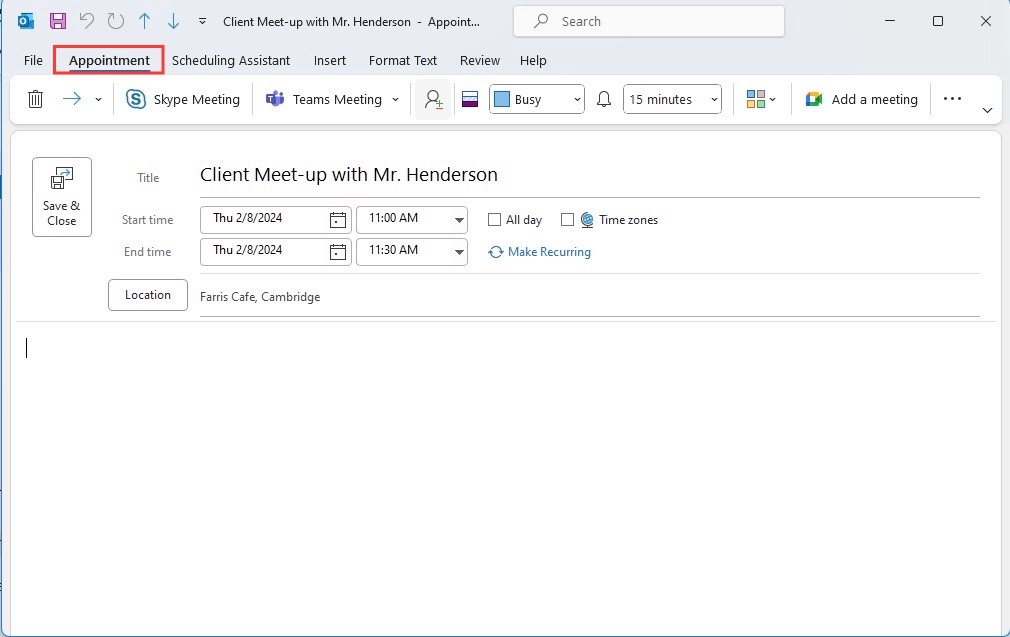
- Appointments: Primarily serve personal scheduling needs. They are time blocks reserved for personal tasks, reminders, or activities without the involvement of other individuals. Appointments typically don’t involve invitations or attendees.
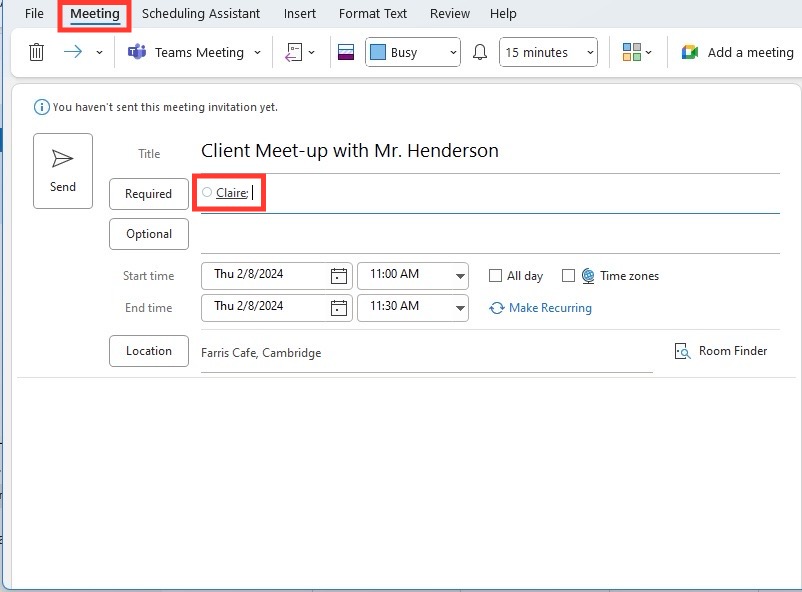
- Meetings: Designed for group collaboration and coordination. Meetings involve inviting attendees to a specified date and time to discuss topics, make decisions, or share information. They enable interactive engagement among participants.
Attendee Management:
- Appointments: Typically involve only the individual who schedules them. They are personal time slots that don’t require inviting others or managing attendee lists.
- Meetings: Involve multiple participants, each with their own scheduling considerations. The meeting organizer sends invitations to selected individuals, who can accept, decline, or propose alternative times. Meeting organizers can manage attendee responses and track attendance status within Outlook.
Interactivity and Collaboration:
- Appointments: Focus on individual time management and reminders. They are primarily for personal organization and don’t involve interactive collaboration or coordination with others.
- Meetings: Facilitate interactive discussions, decision-making, and collaboration among attendees. Participants can share agendas, documents, and presentations during the meeting, fostering collaboration and information exchange.
Learn about Excel with our Free Microsoft Excel Online Course!
Outlook’s Key Features for Organizing Your Day
Outlook equips you with an arsenal of features to keep your day neatly organized. The calendar function enables you to view your schedule by day, week, or month, affording you a bird’s-eye view of your commitments. You can set up and categorize appointments, block time for focus sessions, and even schedule meetings with internal or external participants. Task management is streamlined too, with the ability to create, prioritize, and track the progress of various tasks. Moreover, Outlook’s search functionality helps you swiftly locate emails and calendar events, and inbox management tools like Ignore, Archive, and Clean Up keep your email communications in check without clutter.
Table of Contents
Understanding the Basics: Appointments vs. Meetings
What Defines an Appointment in Outlook?
In Outlook, an appointment is a scheduled block of time that only involves you. Picture it as a commitment you’ve made to yourself on your calendar, where no other attendees are involved. You set a start and end time, and during this period, you’re marked as busy, or out-of-office, depending on how you configure it. Appointments can be one-offs or recurring and are perfect for blocking out time for focused work, personal activities, or reminders for deadlines.
The Meeting Concept in Outlook Explained
A meeting in Outlook is when you involve other people and schedule a shared time on everyone’s calendar. Unlike an appointment, you can invite attendees and include resources like conference rooms or equipment. The meeting request you send acts as an invitation which recipients can accept, decline, or suggest another time for. When accepted, the meeting automatically pops into their calendar. Meetings in Outlook are collaborative tools, perfect for discussions, brainstorming sessions, and decision-making processes.
Setting Up Your Outlook Calendar
How to Create an Appointment in Outlook
Creating an appointment in Outlook is a straightforward process. Here’s a quick guide to setting one up:
STEP 1: Open Microsoft Outlook.
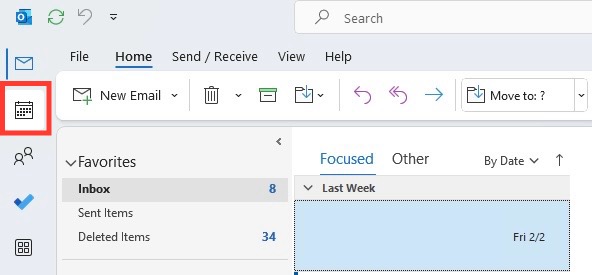
STEP 2: Click on the calendar icon in the left pane.
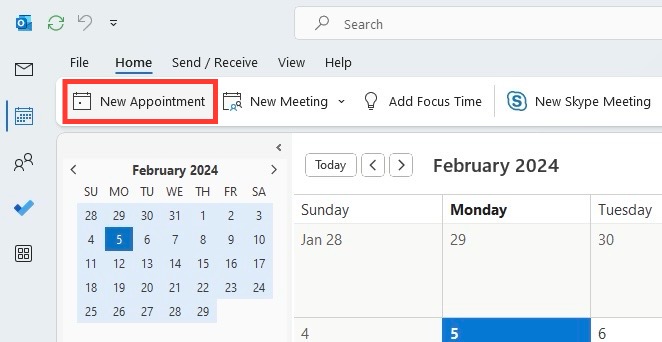
STEP 3: Choose “New Appointment” or press Ctrl+N.
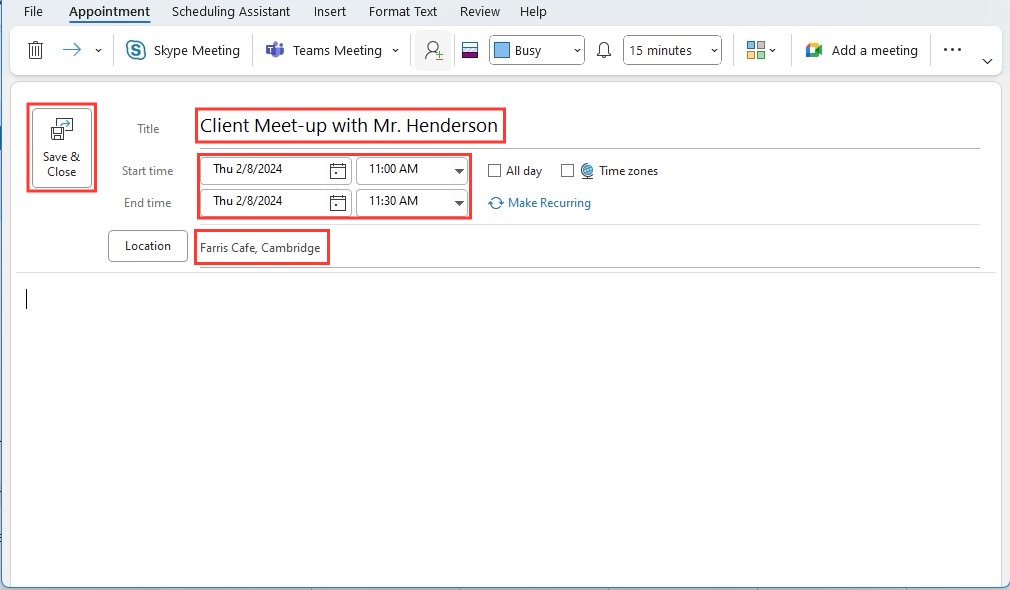
STEP 4: Fill in the details like the subject, location, and the start and end times.
STEP 5: If you need to enter a custom time not on the hour or half-hour, simply click the time fields and type the desired time.
STEP 6: Save your appointment by clicking “Save & Close”.
Remember that by default, Outlook sets appointments on the hour or half-hour, but custom timing is always an option for your unique schedule.
Steps to Schedule a Meeting and Invite Participants
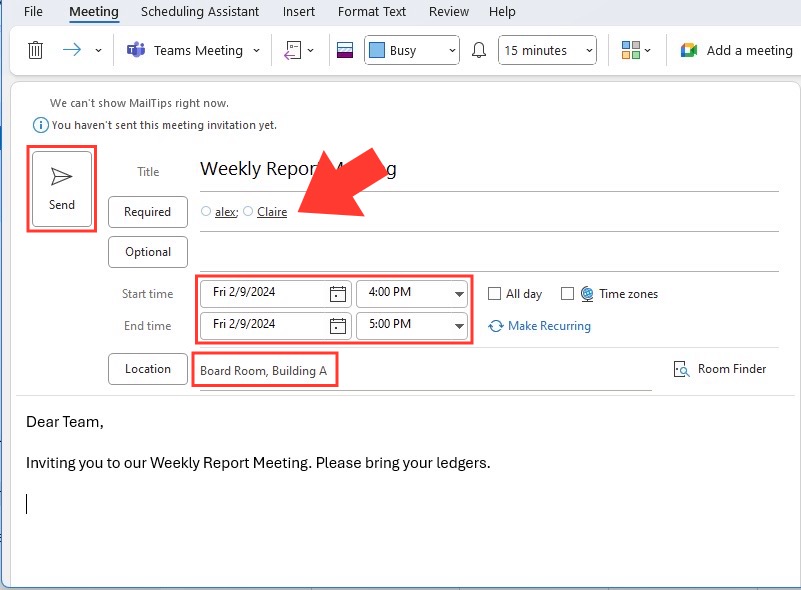
Scheduling a meeting and inviting participants in Outlook is designed to be efficient and intuitive. Follow these steps and you’ll have your meeting set up in no time:
STEP 1: Open Microsoft Outlook.
STEP 2: Navigate to the Calendar view by clicking the calendar icon at the left pane.
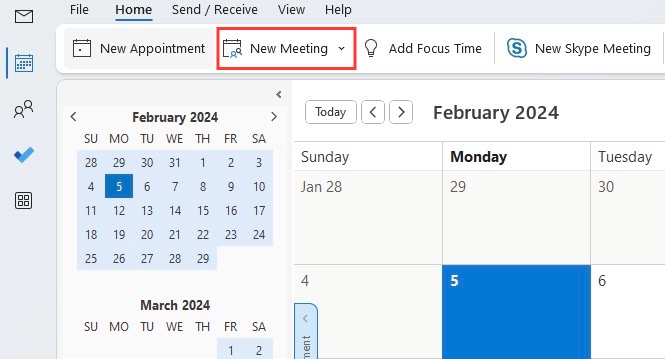
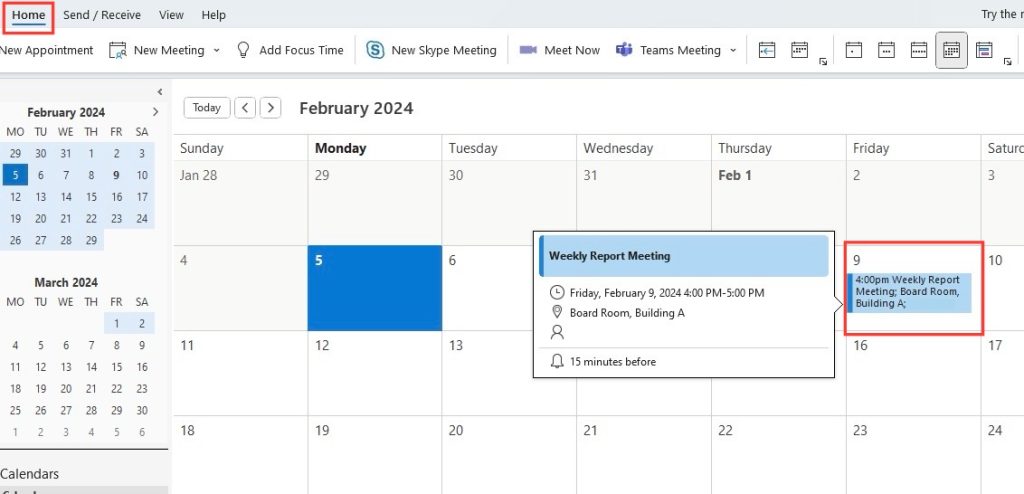
STEP 3: Click “New Meeting” on the Home tab.
STEP 4: Add participants in the ‘To’ field. You can type names directly or click “To…” to select from your contacts.
STEP 5: Specify a subject for the meeting and the location where it will take place.
STEP 6: Set the start and end times for your meeting.
STEP 7: For online meetings, select “Teams Meeting” or add a link to a virtual meeting platform.
STEP 8: Include an agenda or other notes in the big text box for attendees’ reference.
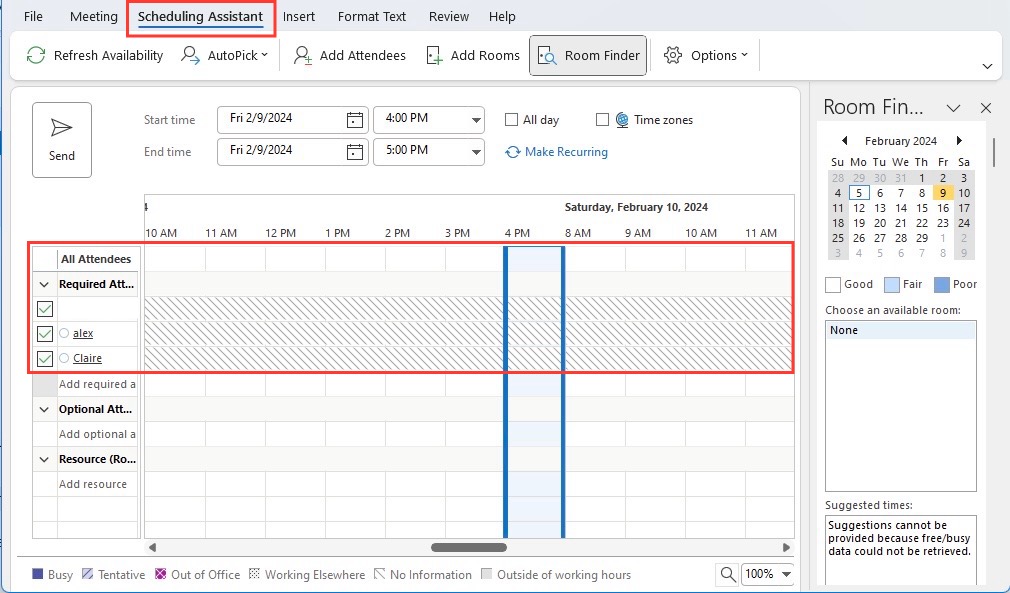
STEP 9: Use the “Scheduling Assistant” to view attendees’ availability.
STEP 10: Once you’re ready, hit “Send” to dispatch the invites.
Remember, you can use the ‘Scheduling Assistant’ for finding the best time slot that works for all attendees.
Diving Deeper: The Nuances That Set Them Apart
Flexibility and Usage: When to Use Appointments Over Meetings
Choosing between an appointment and a meeting in Outlook depends on the need for collaboration. You’d use an appointment for personal reminders or tasks that don’t involve other people, like blocking out time to work on a project, attending a webinar, or scheduling a doctor’s appointment. These events are for your eyes only unless you share your calendar with others.
Conversely, a meeting is your go-to when you need to collaborate with one or more individuals. This could range from business meetings and team check-ins to social gatherings like lunch with colleagues. Meetings are all about group involvement, with Outlook providing tools to manage invitations and track who can attend.
Managing Invitations and Responses for Meetings
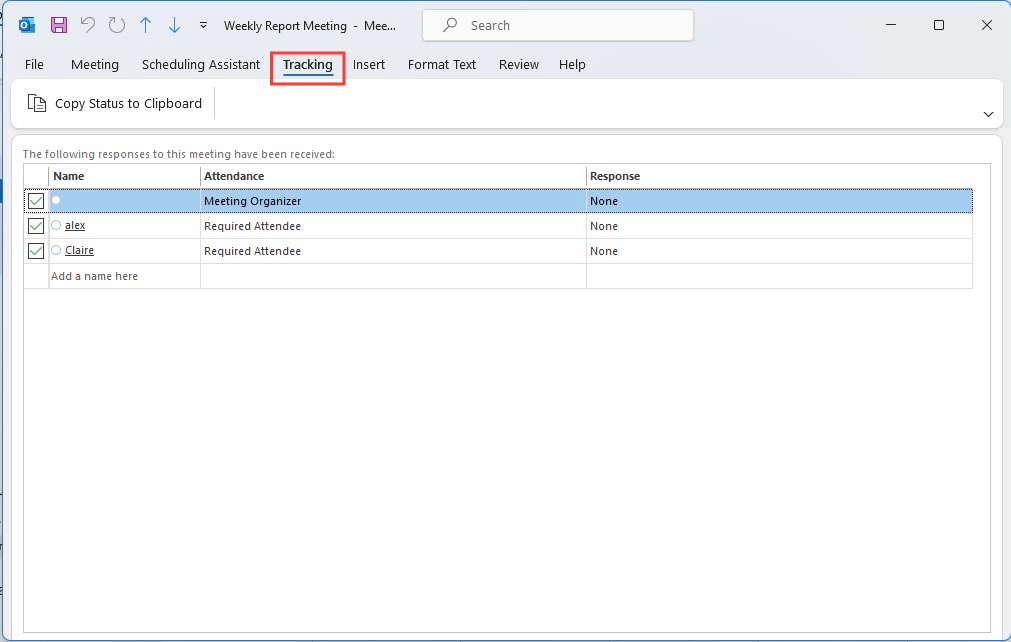
As the organizer, managing invitations and responses is a key part of hosting a meeting. When you send out a meeting request in Outlook, recipients can reply with their attendance status: Accept, Tentative, or Decline. Follow these steps to manage the responses:
STEP 1: Open the meeting from your calendar by double-clicking on it.
STEP 2: Click on the “Tracking” tab to view who has responded and their attendance status.
STEP 3: You can make adjustments to the meeting based on the responses received.
STEP 4: If necessary, right-click on a name to remove an attendee and update the invitation.
Keep in mind that as people respond, these updates are automatically reflected in the tracking list, giving you real-time insight into who will be attending your meeting.
Advanced Outlook Functionality
Making the Most of Recurring Events
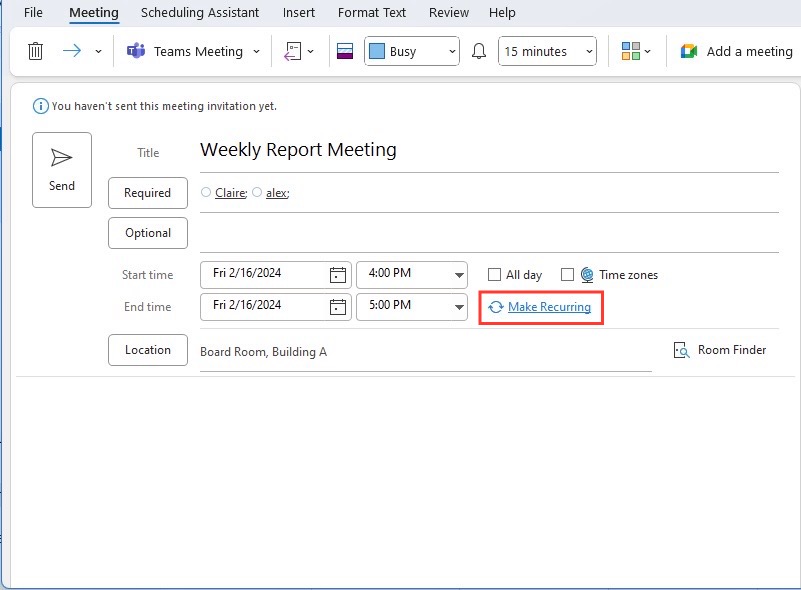
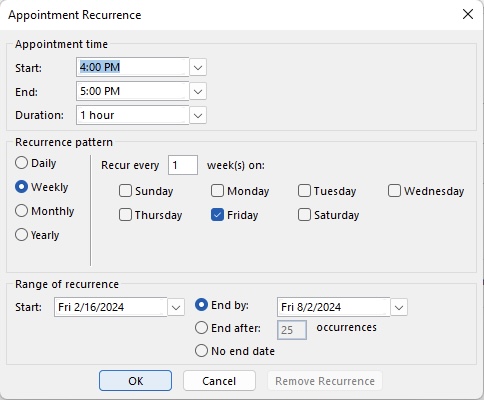
Recurring events in Outlook are an efficient way to manage events that happen on a regular basis without the need to manually enter them each time. Whether it’s a weekly team sync or a monthly project meeting, here’s how to set up a recurring event:
STEP 1: In Outlook Calendar, click on “New Appointment” for appointments or “New Meeting” for meetings.
STEP 2: Fill in the necessary details for the event, such as subject, location, and time.
STEP 3: Click on the “Recurrence” button to open the recurrence options.
STEP 4: Choose the recurrence pattern—daily, weekly, monthly, yearly—and specify the interval.
STEP 5: Set the range of recurrence by selecting a start and end date.
STEP 6: Confirm the details and click “OK” to set the recurrence.
STEP 7: Save and close for an appointment, or send for a meeting with attendees.
By leveraging recurring events, you ensure consistency in your commitments without the hassle of repeated scheduling.
Customizing Notifications and Reminders
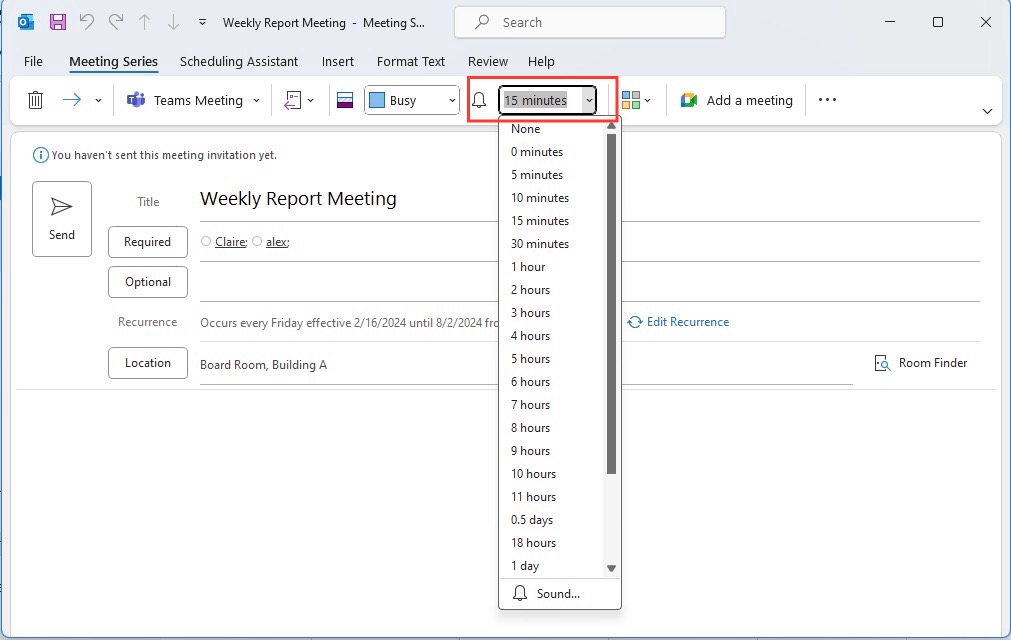
Notifications and reminders are crucial for ensuring you never miss an important event scheduled in your Outlook calendar. Here’s how to customize them to suit your preferences:
STEP 1: When creating an appointment or meeting, select the “Reminder” dropdown menu.
STEP 2: Choose when you want to be reminded about the event: from 0 minutes (at the time of the event) up to two weeks before.
STEP 3: For custom reminders, enter the number of minutes, hours, days, or weeks in advance you wish to be prompted.
STEP 4: If you need a more persistent reminder, enable the option to display the reminder over other windows.
STEP 5: For mobile users, ensure your Outlook app settings have push notifications enabled for calendar events.
STEP 6: Save your event or send out the meeting invites.
Custom notifications and reminders tailor your Outlook experience to your work habits and ensure you stay on top of your schedule without manual follow-ups.
Tips and Tricks for Efficient Outlook Management
Leveraging Outlook for Optimal Time Management
To make the most of your time, Outlook offers features that can boost your time management skills:
- Categories and Color Coding: Use these to quickly identify types of tasks or events. Assigning a color to client meetings or personal appointments helps distinguish them at a glance.
- Focused Inbox: This feature sorts your emails into two tabs—Focused and Other—to keep important messages front and center, minimizing distractions.
- Tasks Feature: Keep track of to-dos by creating tasks in Outlook. You can specify due dates, set reminders, and even assign tasks to others if you’re working in a shared environment.
- Time Blocking: Reserve blocks of time in your calendar for specific activities. This encourages deep work sessions free from meetings or interruptions.
- Rules and Alerts: Create rules for incoming emails to automatically sort, flag, or forward messages. This keeps your inbox organized without constant attention.
Using these features in harmony can transform the way one handles their daily routine, making it more productive and less overwhelming.
Organizing and Prioritizing Calendar Items for Productivity
To keep your schedule from becoming a confusing tangle of events, it’s important to organize and prioritize your calendar items in Outlook:
- Use the Priority setting to sort tasks. Flag important emails and convert them to tasks using drag-and-drop functionality, so you can prioritize them on your calendar.
- Color-code appointments to quickly identify the type of commitment at a glance—blue for client meetings, red for deadlines, green for personal time, etc.
- Set private for sensitive appointments to keep details hidden from others who might view your calendar.
- Utilize Categories to cluster related calendar items together. Categories are also searchable, making it easier to find similar events later.
- Finally, review your calendar regularly — daily or weekly — to reassess priorities and adjust your schedule to reflect the most immediate needs.
An organized Outlook calendar is more than just a list of dates; it’s a visual representation of how you allocate one of your most valuable assets—your time.
Common Pitfalls and How to Avoid Them
Ensuring Privacy and Security During Meetings Scheduling
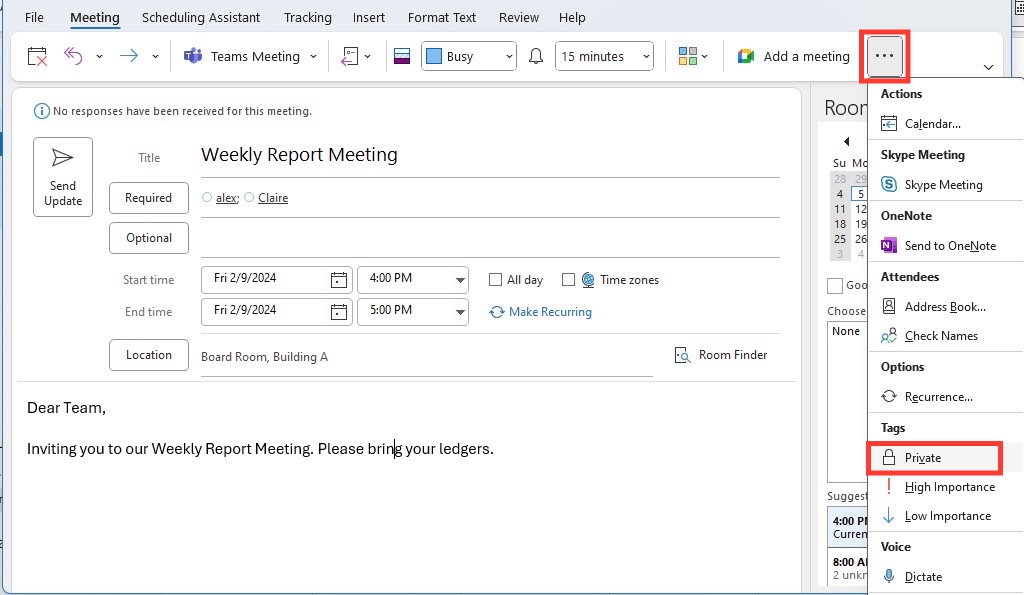
When scheduling meetings, privacy and security are paramount. To make sure sensitive information stays confidential during meetings scheduling in Outlook, follow these steps:
- Choose Private when creating a new appointment or meeting. Click on the lock icon (Private) in the ribbon to denote this. Only the organizer and invitees can see the details, while others will only see it marked as ‘Private Appointment.’
- Control Permissions by setting who can view your calendar details. Right-click your calendar, go to Properties, and configure permissions.
- Be selective in sharing meeting links, especially for remote meetings. Avoid posting them in public forums to prevent unauthorized access.
- When discussing confidential matters, verify attendee identities and possibly use additional password protection if the meeting platform allows it.
- Regularly review and update permissions for Delegates who can access your calendar to ensure only the current trusted individuals have viewing capabilities.
By taking these precautions, you can maintain privacy and ensure that the details of your meetings remain secure.
Avoiding Overbooking and Scheduling Conflicts
Overbooking and scheduling conflicts can lead to missed appointments and frustrated colleagues. To avoid this in Outlook:
STEP 1: Use the Scheduling Assistant to view attendee availability when setting up meetings. It helps prevent double-booking by showing when invitees are busy.
STEP 2: Configure automatic calendar alerts for bookings that overlap. Go to File > Options > Calendar to enable or customize these alerts.
STEP 3: Maintain regular calendar reviews to anticipate and resolve conflicts ahead of time.
STEP 4: If you manage multiple calendars, use the overlay view to see them all simultaneously, making conflicts visually apparent.
STEP 5: Prioritize engagements by significance. If a conflict arises, determine which commitment takes precedence and reschedule the other with timely communication to the involved parties.
By proactively managing your calendar, you minimize the stress of overlapping engagements and maintain your professionalism.
Best Practices for Running Smooth and Effective Meetings
To ensure meetings are both smooth and effective, integrate these best practices into your Outlook scheduling routine:
- Set a Clear Agenda: Include a concise meeting agenda in the Outlook invitation. This defines the purpose and structure of the meeting, allowing attendees to prepare appropriately.
- Be Selective with Invites: Only invite those who need to be there. This keeps the meeting focused and efficient.
- Use Reminders: Set reminders for yourself and attendees to ensure everyone is prepared and punctual.
- Follow Up: Post-meeting, use Outlook to send out a summary of what was discussed, including action items and deadlines.
- Solicit Feedback: After the meeting, consider asking for feedback on its effectiveness and how it could be improved for next time.
Adopting these strategies can greatly enhance the productivity of your meetings and respect everyone’s time.
FAQ: All About Outlook Appointments and Meetings
Can I convert an appointment into a meeting in Outlook?
Yes, you can convert an appointment into a meeting in Outlook. Simply open the appointment on your calendar, click “Invite Attendees,” and add the email addresses of the people you want to join. Once you send out the invitations, the appointment becomes a meeting.
How can I track responses to meeting invitations in Outlook?
To track responses to meeting invitations in Outlook, go to your Calendar, open the specific meeting, and click the “Tracking” tab. You’ll see a list of invited attendees and their responses—Accepted, Declined, or Tentative.
What are the different types of events in Outlook?
In Outlook, there are three primary types of events:
- Appointments: A block of time you schedule for yourself without inviting others.
- Meetings: Appointments that involve other people and resources, which you can invite attendees to.
- All-Day Events: Activities or reminders that last an entire day but don’t block out specific hours like appointments.
What is an all-day event?
An all-day event in Outlook is an activity that spans an entire day without a specific start or end time. It’s used for events like vacations, holidays, or birthdays. All-day events appear at the top of your calendar day or in a banner format, not blocking out time slots.
Can others see my appointments in Outlook?
Others can only see your appointments in Outlook if you’ve shared your calendar with them or if your calendar permissions allow it. You can adjust privacy settings for individual appointments to keep them private even if your calendar is shared.
John Michaloudis is a former accountant and finance analyst at General Electric, a Microsoft MVP since 2020, an Amazon #1 bestselling author of 4 Microsoft Excel books and teacher of Microsoft Excel & Office over at his flagship MyExcelOnline Academy Online Course.

