Dive into the world of Microsoft Excel‘s AutoSum—a superhero feature for quick calculations. Picture it as your personal math whiz, swiftly totaling rows or columns with just a click. It’s not just about speed; it’s about precision, accuracy, and freeing up time for deeper analysis.
Key Takeaways:
- Speedy Calculations: AutoSum in Excel turns tedious number crunching into a breeze, saving time and effort by automating the totaling process.
- Precision and Accuracy: Say goodbye to manual errors—AutoSum ensures precise calculations every time, guaranteeing accurate results for financial analysis or budgeting tasks.
- Versatility: Beyond simple sums, AutoSum handles various calculations like averages and counts, catering to diverse needs with ease.
- Ease of Use: Getting started with AutoSum is a cinch, with intuitive steps that make it accessible even for Excel novices.
- Advanced Functionality: Explore AutoSum’s advanced capabilities, from handling non-adjacent cells to incorporating conditions for tailored calculations, unlocking its full potential for complex tasks.
Table of Contents
Introduction to AutoSum
What is AutoSum?
When you’re knee-deep in numbers, Excel’s AutoSum feature shines as a quick-fix superhero. Essentially, it’s a built-in tool that helps you automatically total a string of figures within your worksheet. Think of it as your personal math whiz, eager to tally up columns or rows at the click of a button, turning tedious tasks into a breeze.
AutoSum is not just about speed; it’s about precision, too. No more second-guessing if you’ve missed a number during manual entry. This handy function does the job accurately and in a fraction of the time, giving you peace of mind and more time for analytical thinking or that well-deserved coffee break.
Why Use AutoSum for Faster Calculations?
Using AutoSum is like having a calculator that’s already aware of what you want to add up. It eliminates the grunt work of manually entering various sums. Imagine the time you’ll save not having to type out individual cell references or formulas, making it significantly faster to crunch numbers. Plus, it’s not just about adding – AutoSum can swiftly carry out other calculations like averages and counts, streamlining a variety of tasks with the same ease.
By integrating AutoSum into your Excel routine, you minimize human errors that can sneak in with manual calculations. You can rest assured that your totals are precise, which is crucial when accuracy in financial analysis or budgeting matters most. So, whether you’re summarizing sales figures, auditing expenses, or evaluating datasets, AutoSum is your dependable shortcut to both speed and reliability.
Getting Started with AutoSum
A Simple Guide to AutoSum Basics
Getting started with AutoSum is a walk in the park. Here’s how you can harness its basic powers:
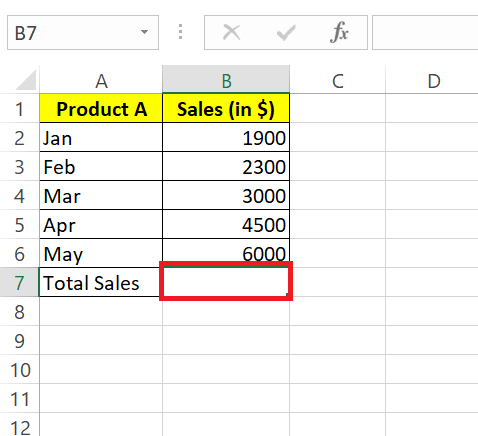
STEP 1: Click on the cell where you want the sum to appear, typically below the last data entry.
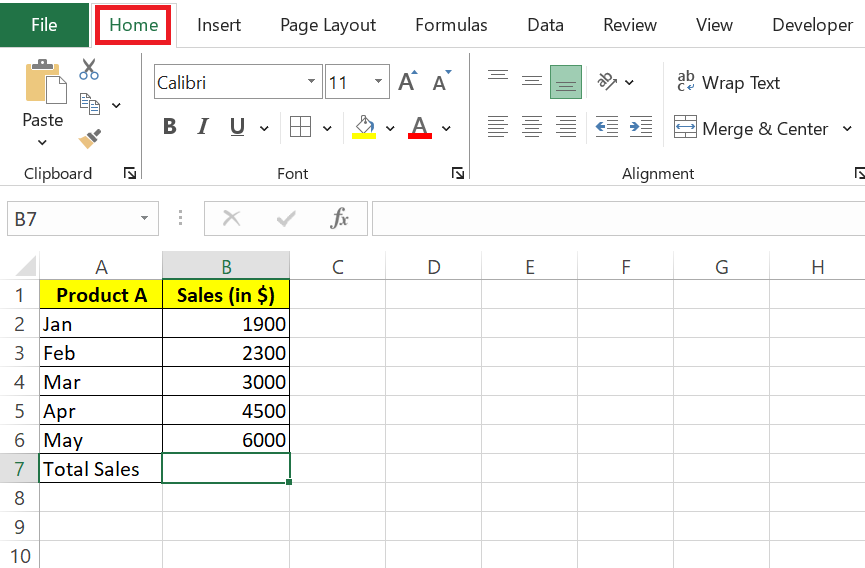
STEP 2: Navigate to the Home tab on the Excel Ribbon.
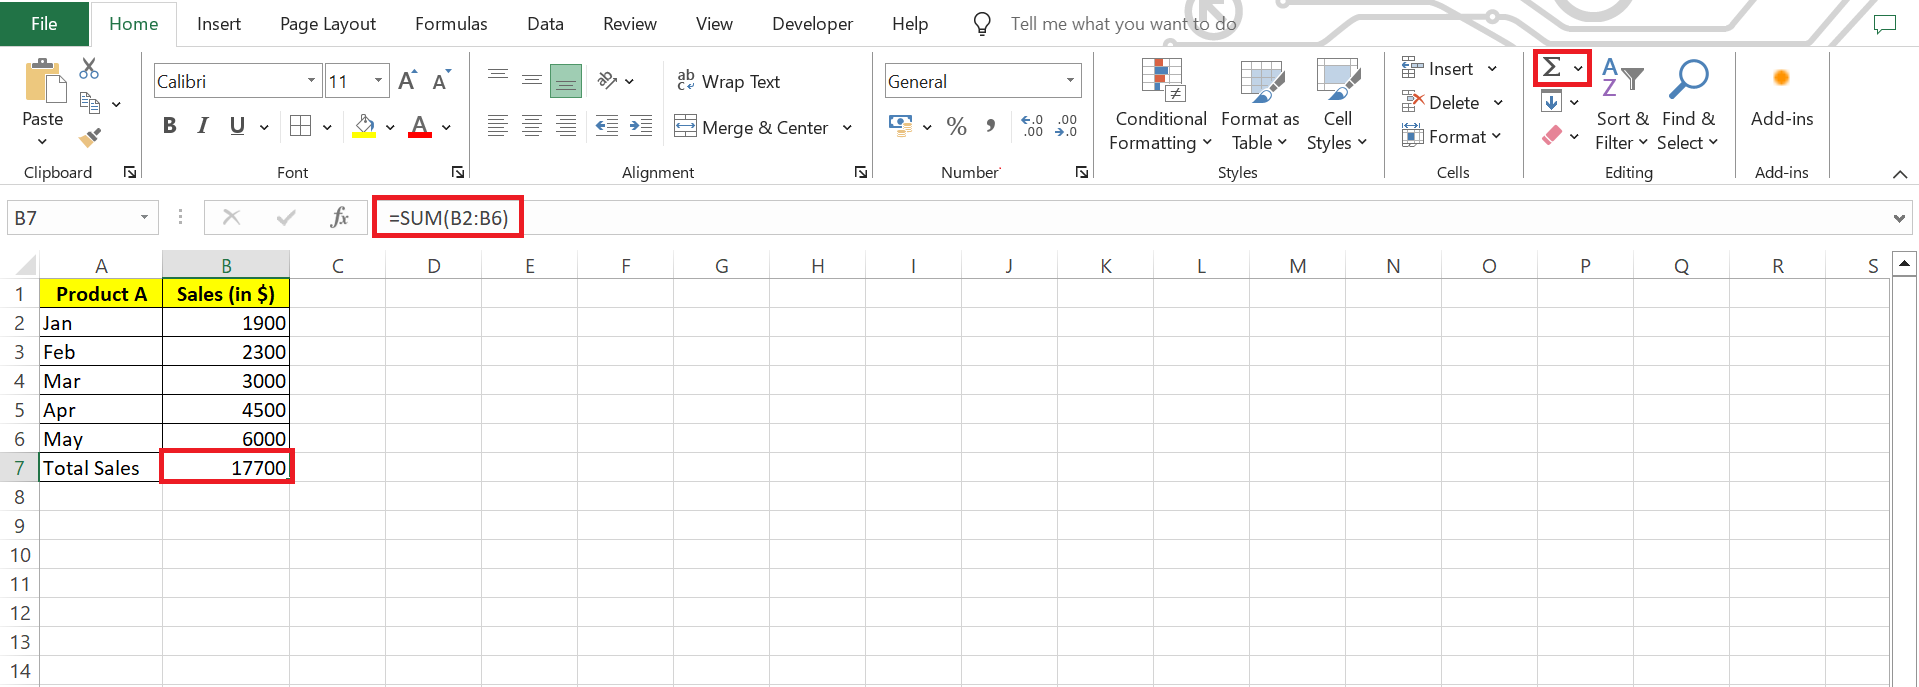
STEP 3: Look for the Editing group, where you’ll find the AutoSum button represented by the Greek sigma symbol (Σ).
STEP 4: Click on the AutoSum button to instantly calculate the sum of the selected range.
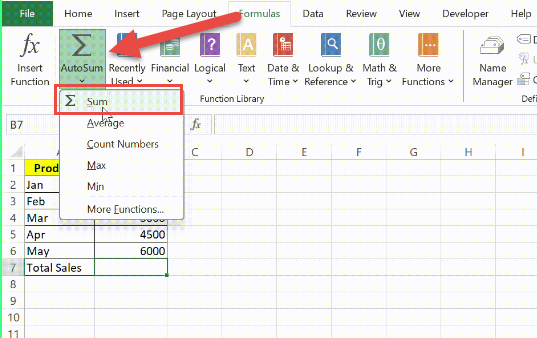
STEP 5: Alternatively, switch to the Formulas tab and locate the AutoSum button within the Function Library group to access the same functionality.
Remember that Excel is pretty smart. It can often detect the range to sum based on your data layout, but always double-check to ensure the right cells are included, especially if your data has blank cells or isn’t contiguous.
Using AutoSum for quick calculations is like a gentle introduction to Excel’s powerful formula capabilities, warming you up for more complex tasks ahead.
Making the Most of AutoSum
Handling Ranges with Empty Cells
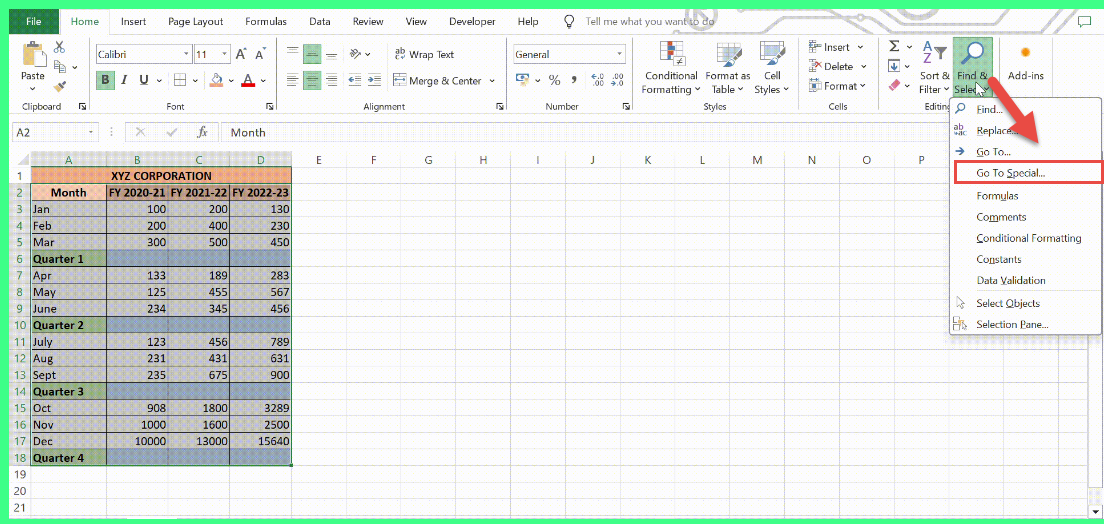
Don’t fret when your data isn’t a perfect block of numbers. Let’s take an example of a MNC – XYZ Corporation. Here we have to find Quarterly Profits across different months of last 3 financial years data. Follow the video to incorporate AutoSum.
STEP 1: Go to Home > Editing > Find & Select > Go to Special
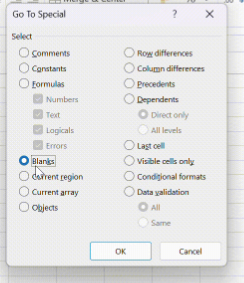
STEP 2: Select Blanks and click OK.
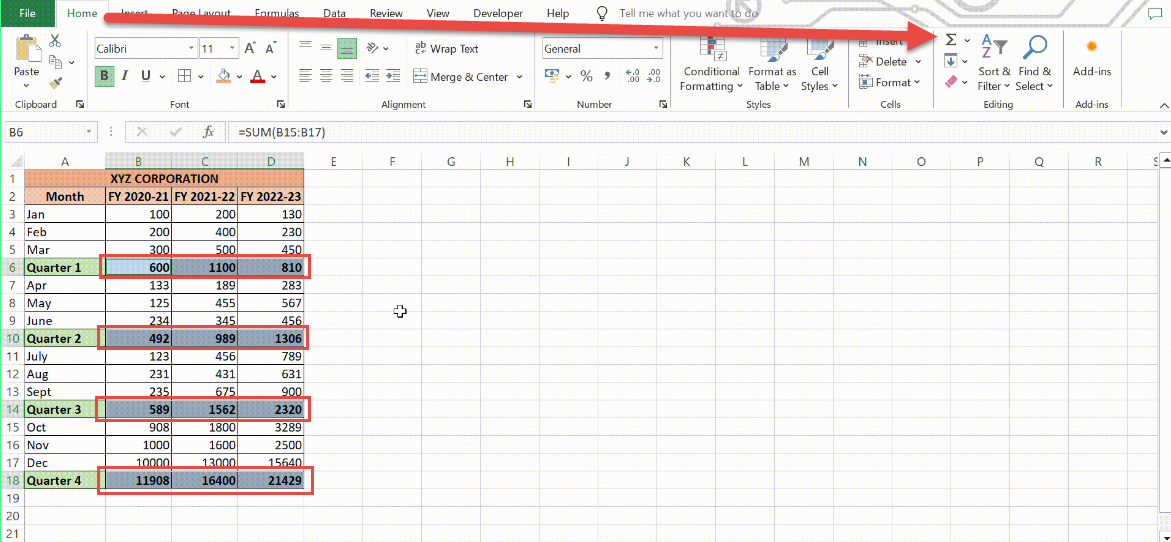
STEP 3: Go to Home > Editing > AutoSum
This intelligent feature ensures your totals aren’t skewed by gaps in data, making AutoSum reliable even amidst missing values. Just select the cells you want to sum up (including those pesky blank ones), hit AutoSum, and behold the magic as the function tunes out the silence and plays on with just the numbers.
Working with Non-Adjacent Cells
Yes, AutoSum can gracefully juggle non-adjacent cells like a pro. Let’s say you’re eyeing specific data points scattered on your Excel canvas. Just hold down the Ctrl key as you click on each one, and watch as AutoSum weaves them into a single sum without batting an eye. The flexibility to cherry-pick numbers scattered across your sheet allows for tailored calculations that adhere to your unique data story.
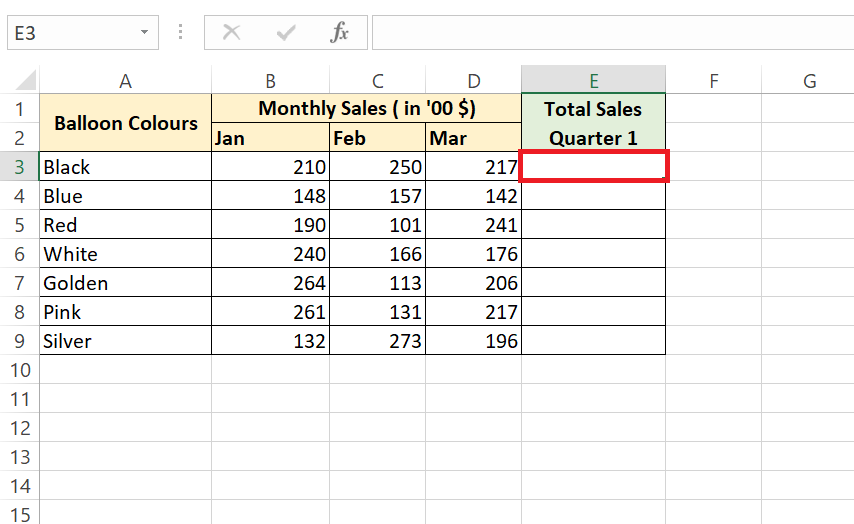
The formula that springs to life will look something like =SUM(C3:C5,E3:E5) if you’re adding the blue and white balloons from your party planner spreadsheet. It ties together separate clusters of cells with a neat comma, wrapping up your disparate numbers into one tidy sum.
Let’s have a look through the steps in Excel:
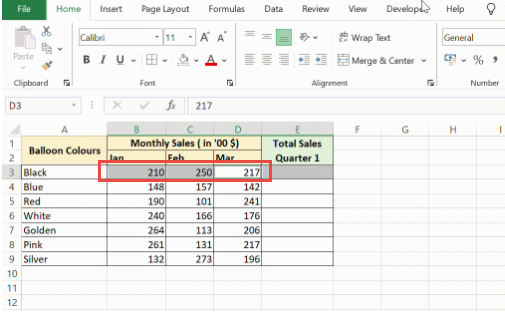
STEP 1: Select a cell where you want the sum to appear i.e., cell E2
STEP 2: Hold down the Ctrl key and click on cells B3, C3, D3.
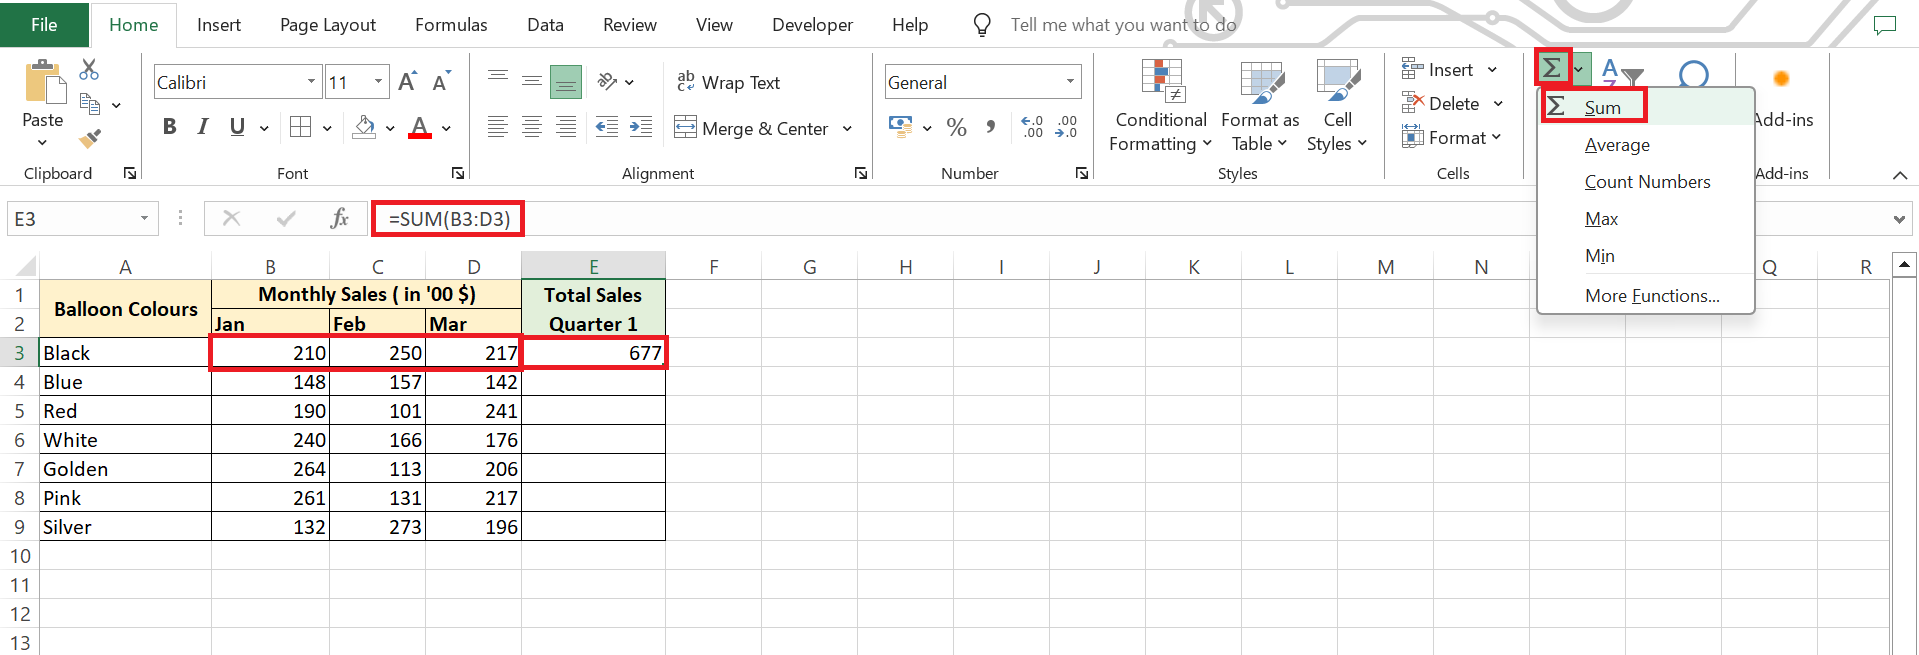
STEP 3: Release the Ctrl key & select auto sum.
STEP 4: Drag down the formula for the rest of the cells. The formula will automatically include the selected non-adjacent cells and display the total sum.
Gone are the days of crafting complex formulas by hand—AutoSum does the heavy lifting for you.
Advanced AutoSum Techniques
AutoSum with Conditions
Take your data wrangling up a notch with AutoSum’s conditional talents. By wielding functions like SUMIF or SUMIFS, you can set specific criteria, such as adding up sales only for a certain product or from a particular region. This is AutoSum pulling off a sophisticated data dance, where it sifts through the numbers, handpicks the ones that match your terms, and presents you with the sum total of just those figures.
There’s magic in the efficiency it offers, especially when you’re looking to quickly analyze segments of your data. With a formula that looks like =SUMIF(range, criteria, sum_range), you tell Excel exactly what you’re after, and it zeroes in on those conditions with precision.
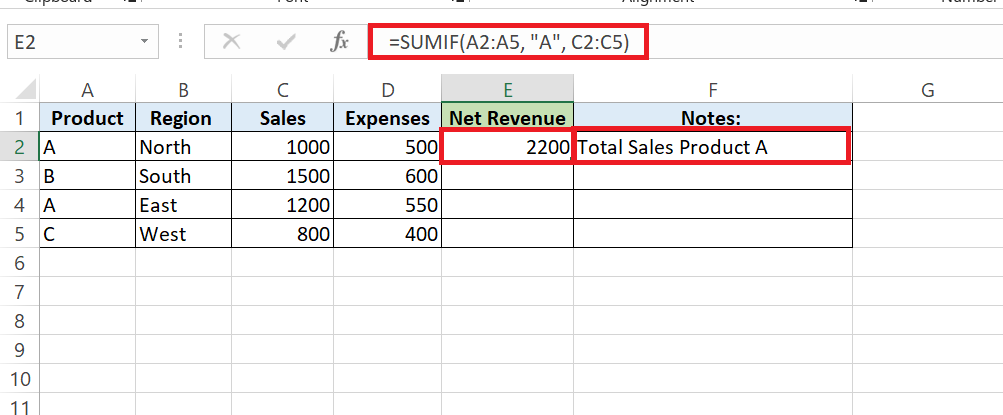
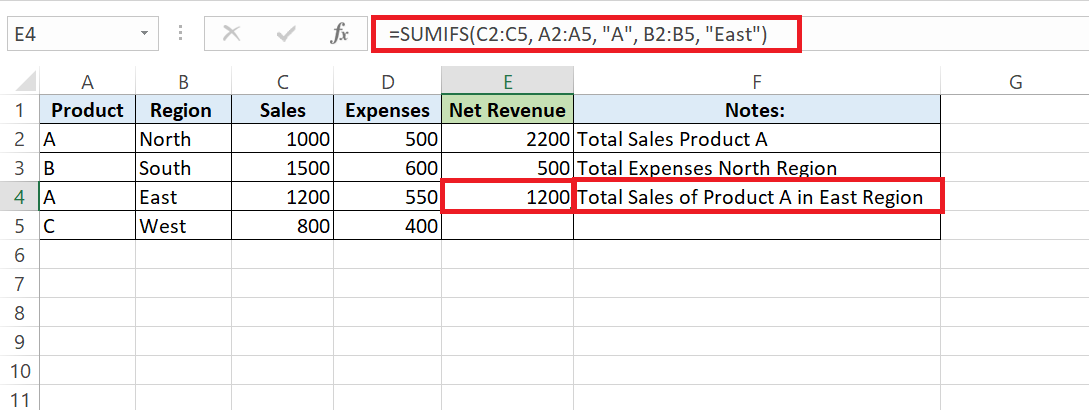
CRITERIA 1: To sum sales for Product A, in cell E2, type =SUMIF(A2:A5, “A”, C2:C5) and press Enter.
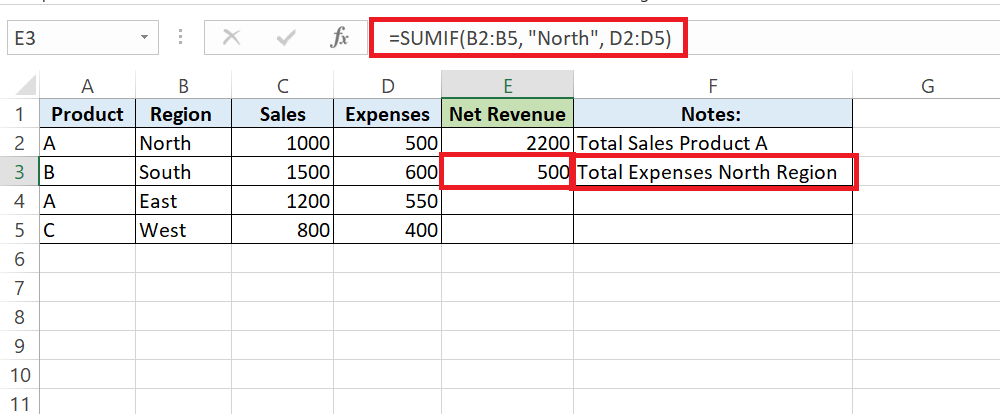
CRITERIA 2: To sum expenses for the North region, in cell E3, type =SUMIF(B2:B5, “North”, D2:D5) and press Enter.
CRITERIA 3: To sum sales for Product A in the East region, in cell E4, type =SUMIFS(C2:C5, A2:A5, “A”, B2:B5, “East”) and press Enter.
These steps illustrate AutoSum’s conditional prowess, allowing precise analysis based on specified criteria.
Imagine the possibilities—totaling up expenses that are only above a certain amount, or pulling together sales figures for a hot item during a specific period. AutoSum with conditions is like having a specialized filter for your numbers, one that can instantly provide insights and save you from getting lost in a sea of data.
Summing Only Visible Cells with Subtotal Function
When dealing with rows hidden by filters or manually, the typical SUM function would still include those out-of-sight values in your total. That’s where the SUBTOTAL function emerges as the hero, adept at paying attention only to the visible cells.
Here’s what you do:
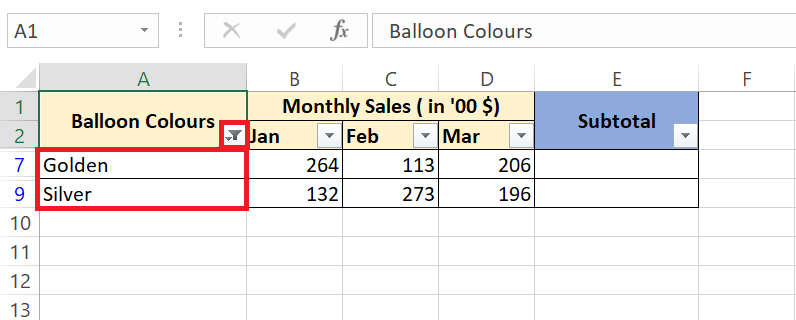
STEP 1: Apply your filter to the dataset and pick the rows you wish to see.
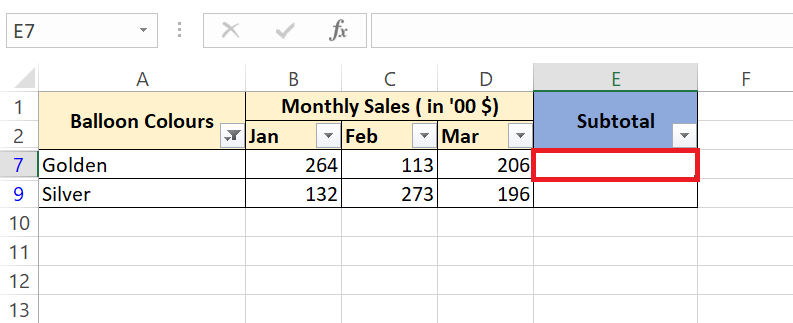
STEP 2: Now, select the cell where you want the subtotal to appear.
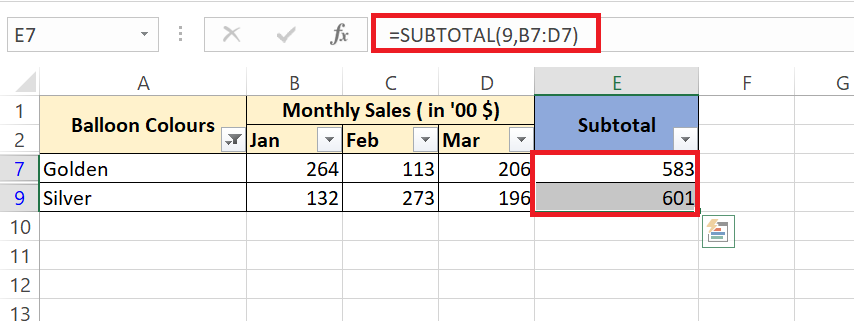
STEP 3: Click the AutoSum button in Excel. Instead of a standard SUM, it intuitively inserts the SUBTOTAL function.
STEP 4: Drag the formula to the next cell, and just like that, the numbers that are playing hide and seek are left out of your total—only the ones basking in the Excel sunlight are included.
This nifty feature is perfect for when you want summaries based on active data filters, ensuring your final tally reflects only the information that meets your current view or criteria.
Excel AutoSum Shortcuts and Tips
Key Shortcuts for Using AutoSum
Embrace the speed of keyboard shortcuts to make AutoSum your quick-calc comrade in Excel. The most rapid route to a sum without a mouse click in sight is by pressing Alt + Equal sign (Alt + =). It’s like whispering a secret code to Excel and watching it obey, to sum up numbers instantly.
To get the job done even faster, here’s what you can do:
- Navigate to the cell you want to be the home of your sum.
- Hold down the Alt key, and while doing so, tap the Equal sign (=). Excel springs into action and guesses the range you’re eyeing.
- If Excel’s guess looks good, seal the deal with a tap on the Enter key. If not, simply adjust the marching ants (the dotted border indicating the selected range) to cover the right cells before you hit Enter.
And there you have it—summing made simple at lightning speed, all from the comfort of your keyboard.
Troubleshooting Common AutoSum Issues
Excel AutoSum Not Working — Now What?
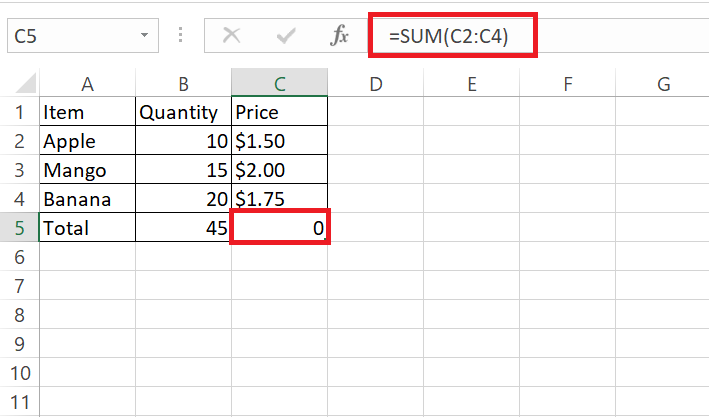
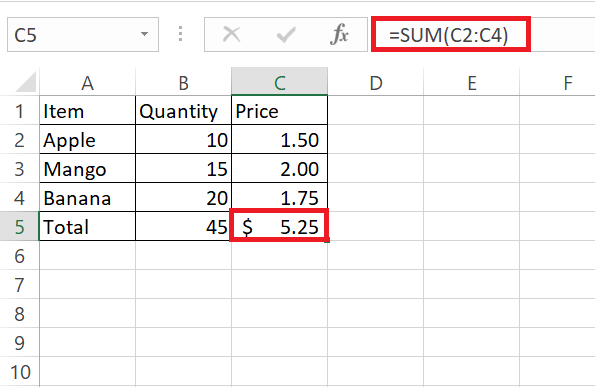
When you encounter a rebel AutoSum that won’t tally up, don’t panic. Often, the culprit is deceptively simple: numbers formatted as text. While the figures may look number-worthy, Excel reads them as text strings, leaving them out of the calculation party. Eye out for telltale signs like a green triangle in the cell’s corner or left alignment that’s not typical for genuine numbers.
Quick fix? Just select the affected cells, hit the warning sign that pops up, and select ‘Convert to Number’. Voila, your AutoSum should now be working as smoothly as a hot knife through butter.
Remember, importing data or mischievous quotes around numbers in formulas can also trick Excel into text mode. Keep an eye on imported data and formulas that could be outputting text values, and you’ll have AutoSum back on track in no time.
Ah, the beauty of AutoSum lies in its dynamic prowess to stay in-tune with your ever-evolving data. When you add new figures to a range already blessed by AutoSum, fret not—your total gets a swift update. It’s like a live show where the lead performer—the sum—changes with each new act.
But here’s the catch: this seamless show only goes on if you append numbers within the calculated range. Want to widen the stage? Simply tug the formula’s edges—or those blue box corners—to include additional cells. Deleting or inserting cells inside the range? AutoSum doesn’t miss a beat there, either. It adjusts the movement like a skilled choreographer, ensuring your sum always reflects the latest performance of your data.
To prevent Excel hiccups, regular checks can help. Just a glimpse at your formulas during data updates confirms that the spotlight shines on all your desired cells.
Expanding AutoSum Capabilities
AutoSum in Multiple Worksheets and Workbooks
AutoSum truly excels when it comes to totaling across multiple worksheets and even different workbooks. Imagine needing to pull in numbers from various tabs or files—it can feel like a juggling act. But AutoSum is your skilled performer, capable of keeping all the balls in the air.
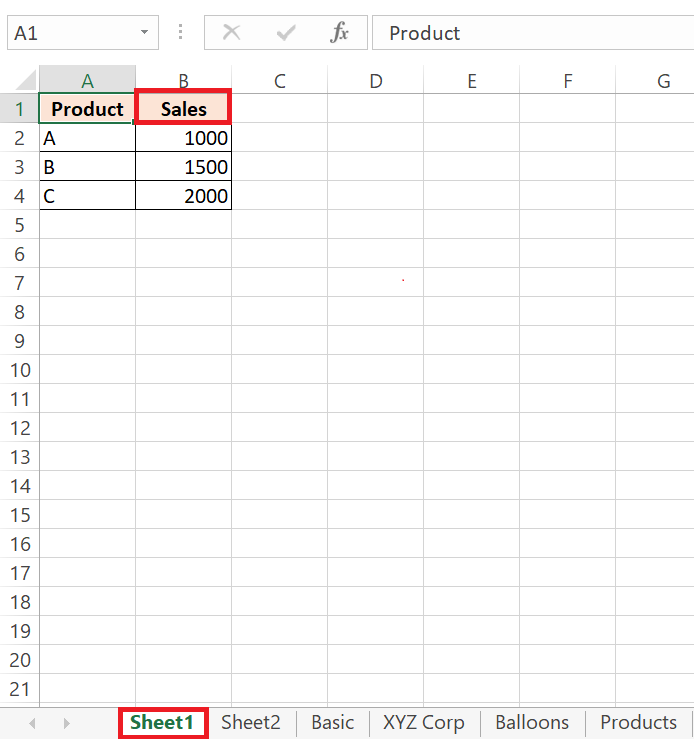
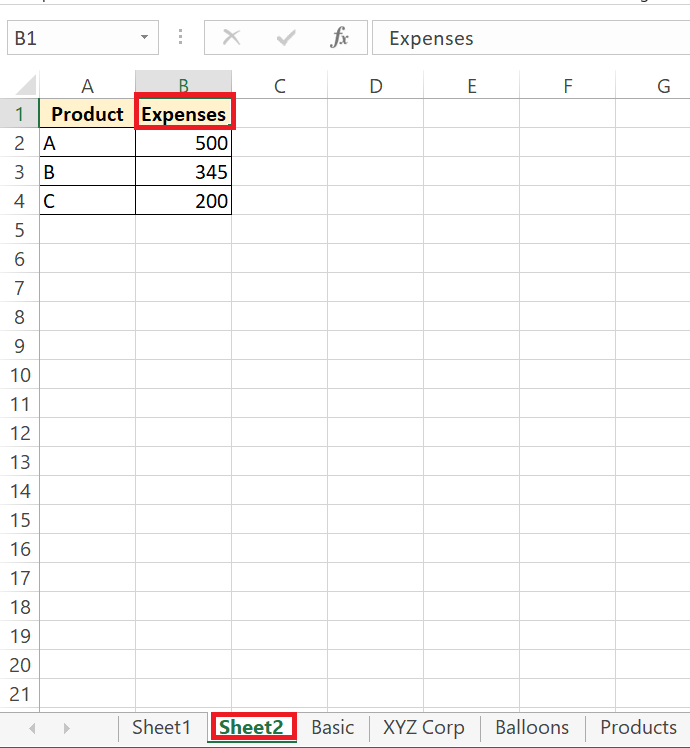
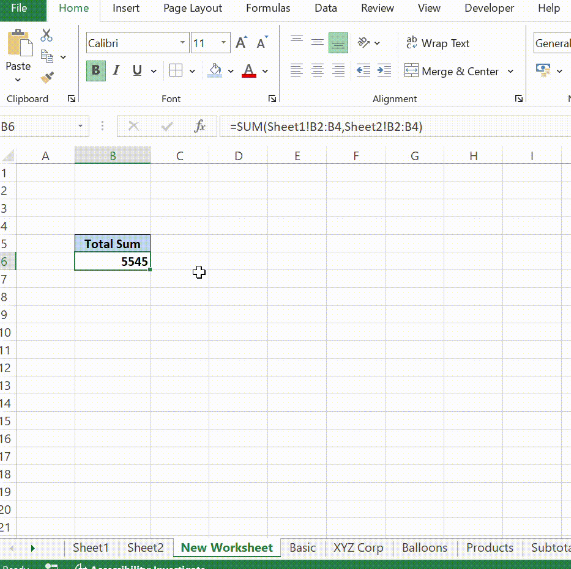
To tally figures from different sheets, initiate the SUM function, and then navigate through the tabs, selecting the cells you need. AutoSum is adroit at keeping track of various locations, stitching them together into a cohesive sum across worksheets. And if you’re working with more than one workbook, AutoSum is still on your side. Make sure the workbooks are open, then weave into your sum formula references to the cells in these books.
Let’s look at an example of the same:
Dataset 1: Sales in Sheet 1
Dataset 2: Expenses in Sheet 2
In cell B6 of a new worksheet, type =SUM(‘Sales’!B2:B4, ‘Expenses’!B2:B4) to sum the sales and expenses across worksheets. Press Enter to see the total.
It’s a streamlined approach that spares you from the complexities of manual cross-sheet or cross-book calculations. AutoSum flexes its robust abilities here, showcasing just how indispensable a tool it is in your Excel arsenal.
Frequently Asked Questions
Can AutoSum Handle Large Datasets?
Absolutely, AutoSum is well-equipped to swiftly sail through large datasets, adding up hundreds or thousands of rows or columns of data without skipping a beat. Its efficiency slightly depends on the might of your computer’s processing power and memory availability — but, usually, it tackles substantial data volumes with ease.
The true beauty of AutoSum is its ability to deliver speed without sacrificing accuracy, even when faced with a sea of numbers. So, go ahead, drop that hefty dataset into your spreadsheet, and watch AutoSum do the heavy lifting for you.
How Can I Undo an AutoSum Calculation?
To backtrack on an AutoSum calculation, simply click on the cell holding the sum and hit Ctrl + Z to undo, or click the Undo button in the toolbar. This command acts like a time machine for your cell, reverting it to its state before the AutoSum spell was cast.
This quick reversal is handy for correcting slip-ups or changing your mind about a calculation. Remember, the Ctrl + Z shortcut is your trusty sidekick across all of Excel’s features, always ready to step in when you need a do-over.
Can I Use AutoSum on a Mobile Device?
Yes, you can tally up totals on the go since AutoSum doesn’t chain you to a desktop. Thriving in the mobile territory, spreadsheet apps like Microsoft Excel and Google Sheets bring this feature to your smartphone or tablet. While the interface might be compact, the functionality packs the same punch.
You’ll find the essence of AutoSum alive and well on mobile devices. Whether you’re commuting or lounging away from your desk, rest assured that your summing capabilities are just a few taps away.
Does AutoSum Function with Negative Numbers?
Yes, AutoSum works seamlessly with negative numbers. When summing a range that includes negative values, AutoSum will correctly calculate the sum, considering the sign of each number. Whether you have a mixture of positive and negative values or solely negative values, AutoSum will provide an accurate result that reflects the true balance of your data.
This versatility ensures that you can rely on AutoSum for a wide array of financial and mathematical tasks without having to manually adjust for negative figures.
What is the shortcut for AutoSum?
The shortcut for AutoSum in Excel is a breeze: simply press Alt + Equals (Alt + =) on your keyboard. This quick key combination prompts Excel to automatically insert the SUM function into your selected cell, streamlining the process of adding up numbers like a pro.
This does wonders in crunching numbers swiftly, so next time you’re looking to tally up those figures, remember this shortcut—it’s your secret weapon for rapid calculations.
John Michaloudis is a former accountant and finance analyst at General Electric, a Microsoft MVP since 2020, an Amazon #1 bestselling author of 4 Microsoft Excel books and teacher of Microsoft Excel & Office over at his flagship MyExcelOnline Academy Online Course.

