Imagine your Digital Notebook storing all those critical notes, imaginative doodles, and information as precious as the treasure of El Dorado. Now, envision the horror if this repository vanished without a trace. That’s not drama; that’s reality striking if you don’t have a backup plan. Preserving your digital notes isn’t just about guarding against loss; it’s about ensuring your intellectual property and hard work endures no matter what digital calamities you might face.
Download our 101 Advanced Excel Formulas & Functions Examples!
Key Takeaways
- Ensure your OneNote notebooks are stored in OneDrive by checking the location settings in OneNote. This automatically backs up your notes to the cloud, keeping them accessible from any device.
- Regularly export your OneNote notebooks by going to File > Export > Notebook and selecting a format like OneNote Package (*.onepkg). Save these files to an external drive or another backup location.
- Adjust OneNote’s backup settings by navigating to File > Options > Save & Backup. Set up automatic local backups to a specific folder on your computer, and periodically copy these backups to an external storage device.
Reliability and Peace of Mind
Knowing how to backup OneNote on Windows 11 brings a comfortable sigh of relief. Backup is akin to having an insurance policy for your digital world. When you back up your notes, you’re not just protecting against potential hardware failure or malware attacks; you’re also safeguarding against human error – that accidental deletion that we’ve all bemoaned at some point. It’s about crafting a digital safety net that provides consistency and reliability, allowing you to focus on your creativity and productivity with a calm mind.
Table of Contents
Understanding the Versions of OneNote
The Variations Between OneNote Editions
Diving into the world of OneNote, you’ll discover it’s not a one-size-fits-all affair. Microsoft offers a spectrum of editions, each with nuances and features tailored for specific user needs. For instance, OneNote for Windows 11 flaunts integration with other Windows features and a user-friendly interface, while OneNote 2016 packs more advanced features with a classic Office look. Understanding these variations ensures that you pick the right approach when backing up, as each version could have different ways and locations for storing data.
Identifying Your Version for Proper Backup Methods
Before you dive into safeguarding your notes, it’s crucial to identify your version of OneNote, as each has its distinct backup processes. OneNote for Windows 11, the app typically pre-installed with Windows 11, has a more streamlined, touch-friendly interface and syncs with OneDrive automatically. On the other hand, OneNote 2016 is the legacy desktop version that has more comprehensive menus and features. The first step in effective backup is to verify which OneNote you’re using—simply check your app’s “About” section. Once you know this, you can tailor your backup approach accordingly to ensure no note is left behind.
Setting Up Automatic Backups in OneNote
Configuring OneNote’s Built-In Backup Options
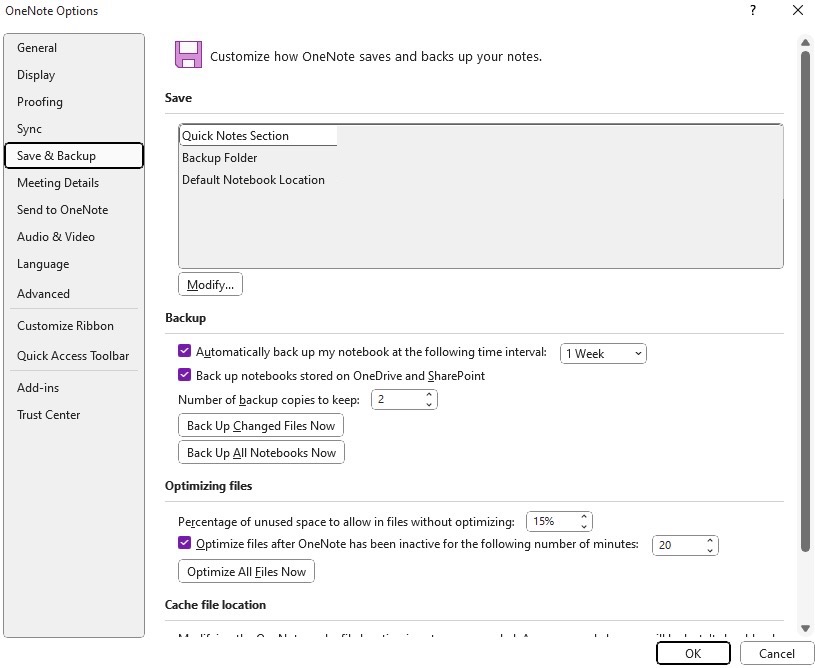
Configuring the backup options in OneNote is almost as easy as pie. Those handy built-in settings are there to give you control over how and when your data is saved. Simply navigate to the ‘Options’ menu and choose ‘Save & Backup’ to find the treasure trove of settings that await. You’ll see options to change the default backup location—handy if you prefer your data in a specific spot on your system—and modify the frequency of automatic backups. From daily to weekly intervals, you can dictate how often OneNote protects your precious content. A mere few clicks, and you’re on your way to a fail-safe note-keeping experience.
Advantages of Using Automatic Backup Features
Embrace the autopilot of OneNote’s automatic backup features, and you’re signing up for an effortless ride to data security. With automatic backups, you can spend less time worrying about the ‘what-ifs’ and more time on what you do best. Imagine not having to manually intervene every time you create or modify a note. The beauty of automatic backups lies in their consistency, ensuring that your latest work is preserved without lifting a finger. Plus, it’s not just about convenience: in the unforeseen event of a crash or corruption, these timely snapshots of your data can be your digital lifeline to recovery.
Manual OneNote Backup Strategies
Step-by-Step Guide to Manually Backup Your OneNote Data
Sometimes, taking the reins for a manual backup is necessary, especially if you’ve made significant changes or are prepping for a system update. Here’s a simple guide:
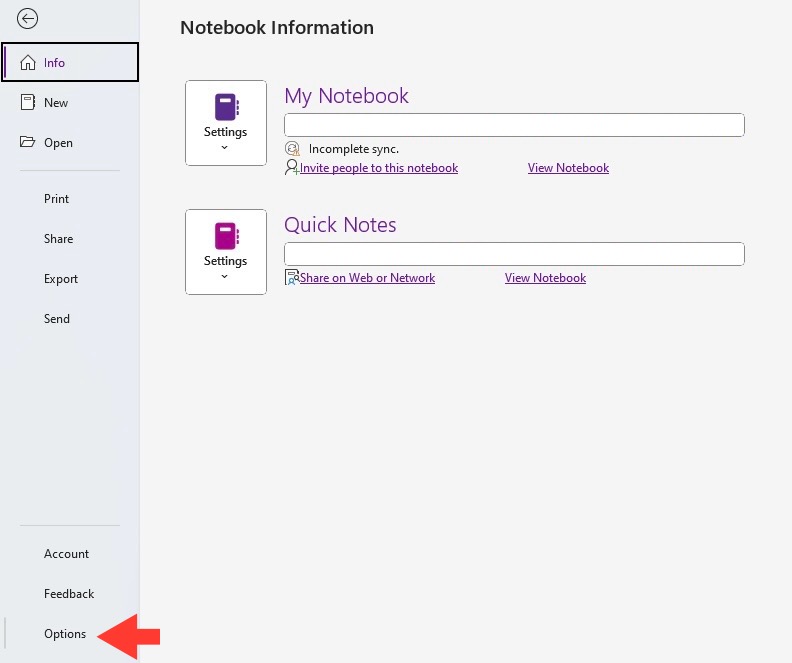
STEP 1: Fire up OneNote and head to ‘File’ > ‘Options’.
STEP 2: In the ‘OneNote Options’ panel, click on ‘Save & Backup’.
STEP 3: To select your desired backup location, click ‘Backup Folder’ > ‘Modify’. This is where you can choose your local drive or an external beast of a hard drive.
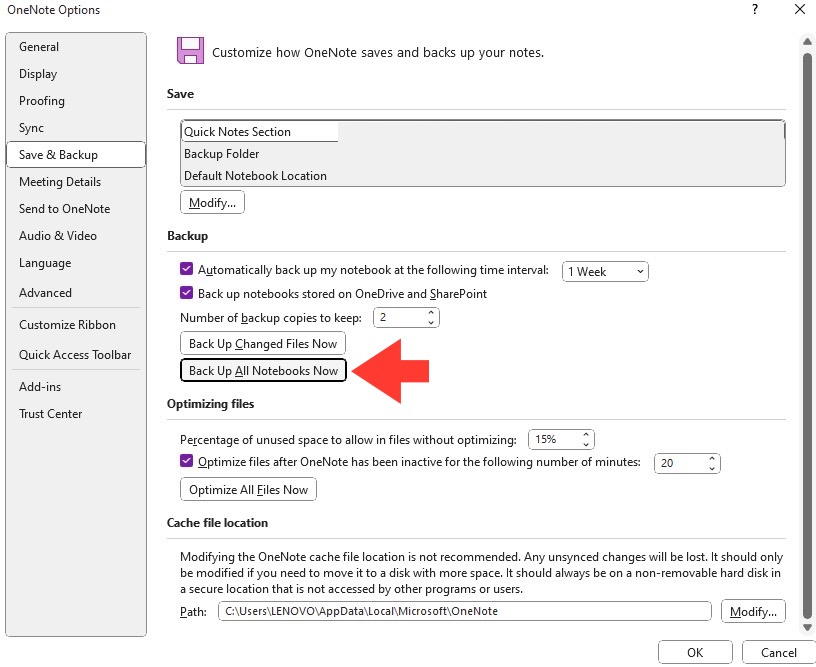
STEP 4: Once the location is settled, hit ‘Back Up All Notebooks Now’ under the ‘Backup’ tab.
STEP 5: When OneNote prompts ‘Backup complete’, you click ‘OK’ and revel in a job well done.
Remember, running a manual backup is like wielding a magic wand for data protection – a little effort for a lot of peace.
Locating OneNote Files for Manual Backup
To ensure your manual backups have everything tucked away nicely, you need to know where OneNote keeps its files. Generally, they like to hide in the depths of your Documents folder, nestled within the ‘OneNote Notebooks‘ folder if you’re using OneNote 2016 or earlier versions. For users of OneNote for Windows 11, your notes sync directly with OneDrive, but you can still find local cache files to back up. It’s good practice to check the ‘Save & Backup’ settings in OneNote to see the exact path where your notebooks are stored. And if you prefer to store backups elsewhere, from this cozy spot you can quickly copy your files to an external hard drive or a cloud service of your choosing.
Restoring OneNote from Backup
How to Retrieve Your OneNote Content from a Backup Image
So, you’ve got a backup image and need to bring your OneNote content back to life? Here goes:
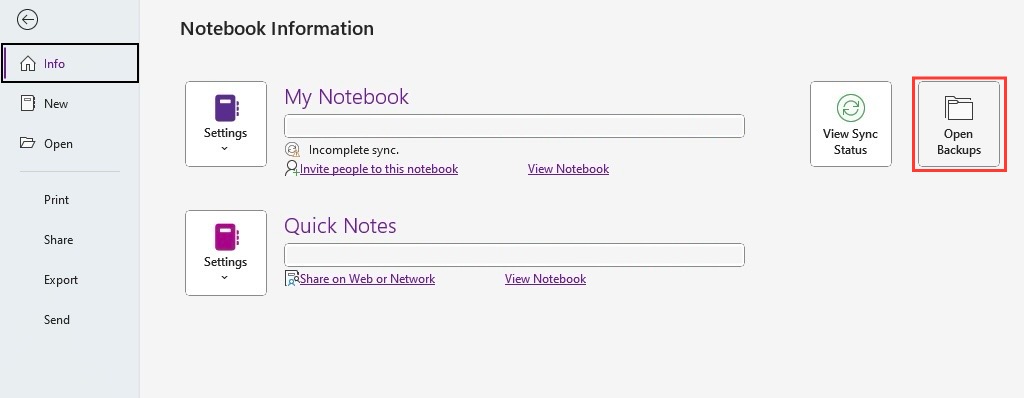
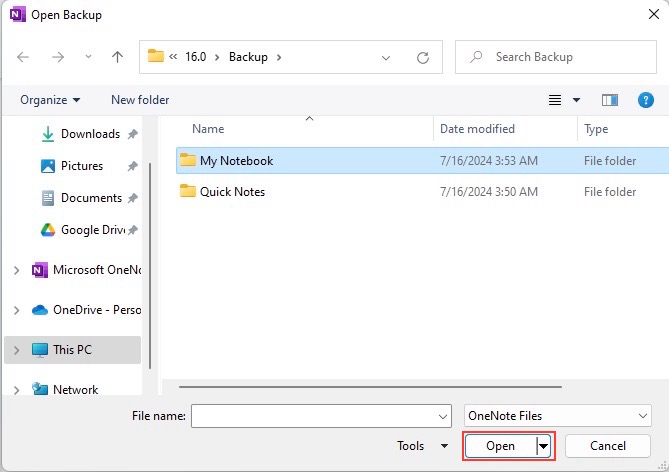
STEP 1: Open OneNote, make your way to ‘File’, and select ‘Open Backups’.
STEP 2: In the ‘Open Backup’ dialog box, double-click your notebook’s folder.
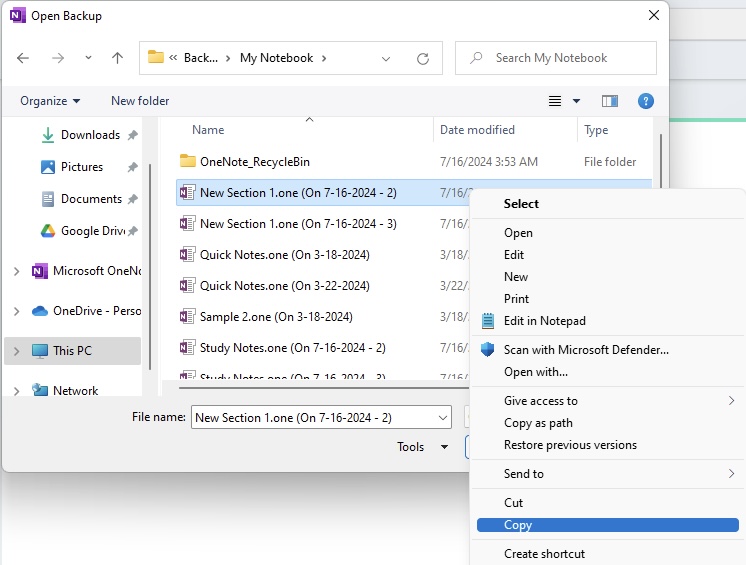
STEP 3: Choose the backup files you want to restore—either the whole section or specific pages—and click ‘Open.’
STEP 4: To resurrect the entire backed-up section, right-click its tab and hit ‘Move or Copy’.
STEP 5: For specific pages, right-click the desired page tabs and likewise select ‘Move or Copy’.
STEP 6: In the ‘Move or Copy’ box, pick a location for your data’s new home and click ‘Copy’. Voila! Your notes return from the digital beyond, ready for action.
Right-click the backed-up section when you’re done and close it out. Remember to open your original notebook to carry on with your usual note-taking endeavors.
Dealing with Sync Issues and Backup Failures
Troubleshooting Common OneNote Backup Problems
When OneNote throws a curveball and your backup isn’t the smooth sail you hoped for, don’t fret! Most issues can be remedied with a few simple steps. If you’re staring at a ‘storage full’ error, it’s time to play digital janitor and clear out some room on your device. Should that not do the trick, sometimes it’s just a hiccup with the synchronization of your notes, and re-syncing could resolve it. And if all else fails, reach out to support without hesitation. They’re the tech wizards equipped with the right spells to troubleshoot your backup woes and get you back on track.
What to Do When Your OneNote Backup Fails
Don’t let a backup failure send you into a spiral – there’s always a solution. Firstly, check for the common culprit: insufficient storage space. A quick declutter can often free up enough space for a proper backup. If it’s not a space issue, try re-syncing your notes. It’s like giving OneNote a gentle nudge to get its act together. However, if that nudge turns into a persistent poke without result, it’s time to call in the cavalry—support. Contact them with confidence; they’re your allies in this battle against backup rebellion, and they can help you figure out exactly where things went sideways.
FAQs About How to Backup OneNote Windows 11
How Often Should I Backup My OneNote Data?
It’s wise to backup your OneNote data frequently, especially after significant note additions or changes. Weekly backups are standard, but if you’re a heavy user scribbling down mission-critical info daily, consider upping the frequency to daily. Tailor the backup schedule to your usage and peace-of-mind needs.
Where Does OneNote Store Its Backup Files on Windows 11?
On Windows 10, OneNote typically reserves a spot for backup files at “C:\Users[Your Username]\AppData\Local\Microsoft\OneNote[Version]\Backup”. This nook on your hard drive is the default hideout where your notes sit snugly until you need them.
Can I Backup OneNote to an External Hard Drive or Cloud Service?
Absolutely! Backing up OneNote to an external hard drive is a breeze – just change the backup location in the OneNote options to your drive. And for cloud services, you can manually upload backup files or use third-party tools for a more hands-off approach.
How Do I Restore My OneNote Pages from a Backup?
To restore OneNote pages from a backup, open OneNote and hit ‘File’ > ‘Info’ > ‘Open Backups’. In the ‘Open Backup’ dialog, pick your notebook and click ‘Open’. Now, simply use ‘Move or Copy’ in the right-click menu to restore sections or pages where you want them.
John Michaloudis is a former accountant and finance analyst at General Electric, a Microsoft MVP since 2020, an Amazon #1 bestselling author of 4 Microsoft Excel books and teacher of Microsoft Excel & Office over at his flagship MyExcelOnline Academy Online Course.


