When it comes to managing data in Excel, calculating age is a common task—whether it’s for a project involving demographic analysis, employee records, or customer profiles. Over the years, I’ve developed a few go-to techniques for handling age-related calculations that have saved me time and reduced errors. Let me walk you through these methods on how to calculate ageing in Excel like a pro.
Key Takeaways:
- Excel is a versatile tool for age analysis, offering flexibility and accuracy with formulas like DATEDIF.
- The DATEDIF function efficiently calculates years, months, and days, ideal for detailed age tracking.
- Combining formulas such as DATEDIF, TODAY(), and IF allows for advanced data segmentation and insights.
- Preparing clean, structured data ensures precise results, especially for aging reports and financial analysis.
- Mastering shortcuts, advanced formulas, and features like NETWORKDAYS enhances efficiency and accuracy in Excel.
Table of Contents
Introduction: Mastering Age Calculations in Excel
Why Excel is the Go-To for Age Analysis
With its robust set of tools and functions, Excel becomes the natural choice for conducting age analysis. From HR departments tracking employee ages to financial teams needing accurate date-related calculations for reports, Excel’s flexibility is unrivaled. Not only does it handle large volumes of data with ease, but its formulas like DATEDIF allow me to perform complex computations swiftly and accurately.
The Role of DATEDIF and Other Formulas
The DATEDIF function is a powerhouse for determining precise age differences between two dates. It elegantly calculates years, months, and days, crucial for detailed analyses like determining a person’s exact age on a specific date or tracking age-related milestones.
Other Excel formulas, such as TODAY() and NOW(), integrate seamlessly with DATEDIF, providing dynamic date values for real-time calculations. These functions, when combined, offer a comprehensive suite for age-related data processing in Excel.
The Fundamentals of Ageing in Excel
Understanding the DATEDIF Function
The DATEDIF function is Excel’s hidden gem for date difference calculations. By specifying the start and end dates along with a unit of measure, it computes differences as complete years, months, or days. This precision allows me to craft intricate age analyses, from calculating an employee’s service duration to a person’s exact age on a certain date. Its flexibility extends to ignoring months or days in the age count when required, making it an indispensable function for a variety of scenarios.
Setting Up Start and End Dates
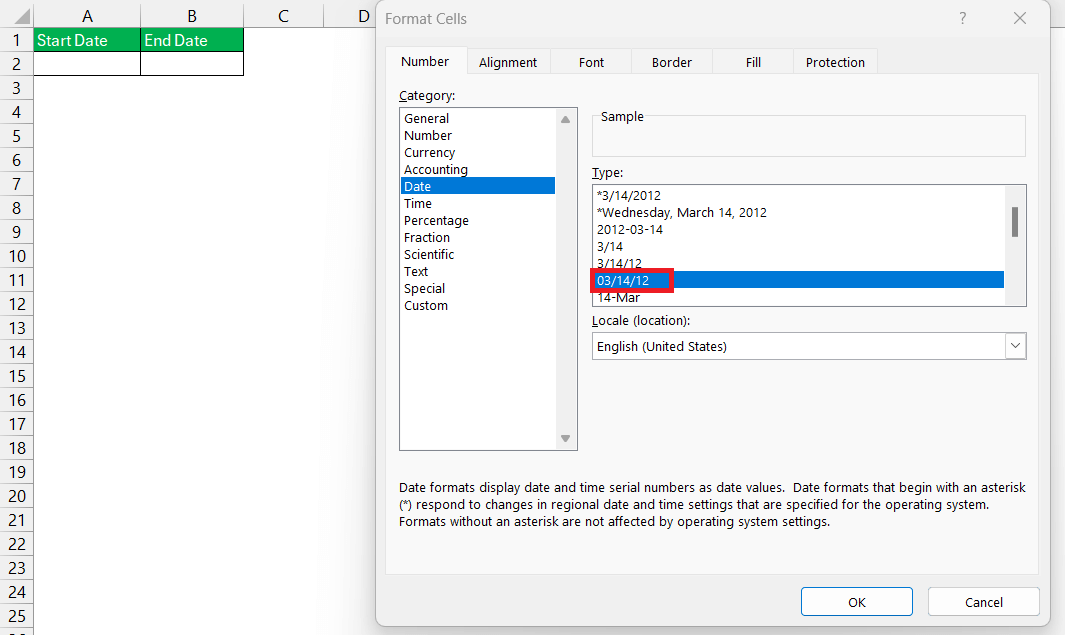
Properly setting up start and end dates is essential for accurate calculations in Excel. I ensure the dates are formatted correctly, typically in ‘mm/dd/yyyy’ or ‘dd/mm/yyyy’ format, and placed in separate cells.
This clear demarcation avoids confusion and errors in calculations. It’s also important to maintain consistency in date formats throughout the spreadsheet to prevent any discrepancies that might arise during the aging process.
Step-by-Step Calculation Methods
Using DATEDIF to Calculate Complete Years
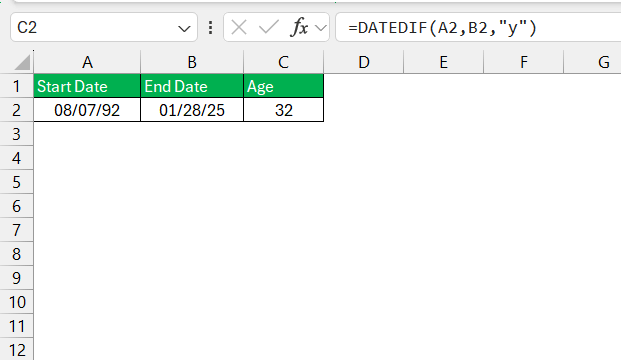
When calculating complete years with DATEDIF, I first ensure that the start date is less than the end date. Then I simply use the function =DATEDIF(Start_Date, End_Date, “Y”) which gives me the number of full years between the two dates.
This is particularly useful for HR to determine an employee’s tenure or for finance departments to calculate investment durations. It’s a straightforward method that quickly and efficiently provides the age in years.
Breaking Down Age into Years, Months, and Days
Breaking down age into years, months, and days takes a more detailed approach using Excel’s DATEDIF function. I calculate the total number of years, then the remaining months, and finally the days left over. The combined formula looks like this:
=DATEDIF(Start_Date, End_Date,"Y") & " Years, " & DATEDIF(Start_Date, End_Date,"YM") & " Months, " & DATEDIF(Start_Date, End_Date,"MD") & " Days"
It’s an elegant way to express an exact age or duration in a format that’s immediately understandable. This method is especially helpful when precise age details matter, such as when celebrating birthdays, and anniversaries, or tracking age-specific milestones.
Advanced Techniques for Age Analysis
Combining Multiple Formulas for Detailed Insights
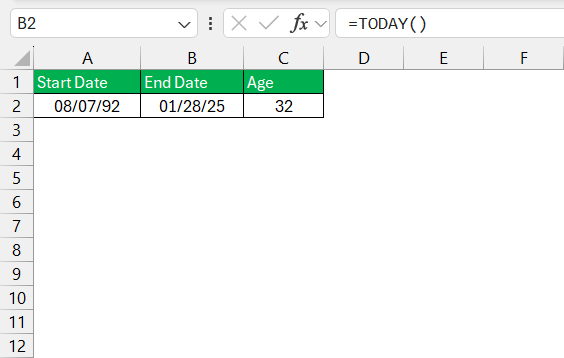
By combining multiple formulas, Excel allows me to unlock detailed insights that would be time-consuming to derive manually. For instance, I might use a combination of DATEDIF for age calculation, TODAY() or NOW() to get the current date, and IF statements to categorize age brackets.
This multifaceted approach enables me to analyze data in-depth, such as segmenting a customer base by age group or assessing the maturity of financial instruments. The resultant dataset is rich with information, and ready for further analysis or visualization.
Creating an Aging Report for Financial Management
Preparing Your Data for an Aging Report
Before generating an aging report in Excel, it’s paramount that I meticulously prepare my data. I ensure that the dataset is clean and structured with clear headers for invoice dates, due dates, and amounts. This step includes verifying the accuracy of date formats and removing duplicates to prevent skewing the report.
Validating each entry’s correctness sets the foundation for an aging report that truly reflects the financial health of accounts receivable.
Analyzing Payment Patterns with Aging Reports
Aging reports in Excel provide a visual representation of payment patterns, which is invaluable for cash flow management. By sorting outstanding payments into specified aging buckets, such as 0-30 days, 31-60 days, and so on, I can easily identify trends and potential issues.
This analysis aids in making informed decisions about credit policies, pinpointing slow-paying customers, and prioritizing collection efforts. The ability to customize the aging intervals gives me the flexibility to adapt the report to the specific needs of any business.
Enhancing Your Excel Skills
Working with Holidays in Age Calculations
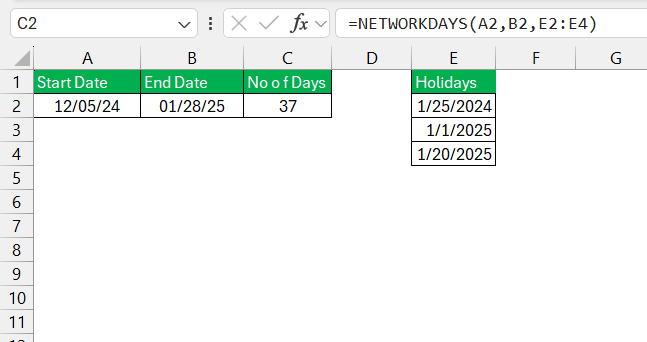
Adding holidays into age calculations is vital for accurately estimating delivery times, project deadlines, and employee benefits that depend on business days. To accommodate this in Excel, I usually incorporate a custom list of holidays and utilize the NETWORKDAYS function, which computes the number of working days between two dates while considering weekends and holidays.
By doing so, it presents a realistic timeline for tasks that don’t occur over continuous, uninterrupted periods. The precision of including holidays ensures that my estimates match real-world scenarios closely.
Tips and Tricks to Elevate Your Excel Proficiency
To enhance my Excel skills, I constantly look out for shortcuts and advanced features. For instance, quick keys like Ctrl + ; to insert today’s date or using the Fill Handle to copy formulas efficiently save time. Mastering PivotTables or learning to use array formulas for bulk calculations allow for deeper data analysis.
Regular practice, coupled with a curiosity to explore Excel’s features, like conditional formatting and data validation, ensures that I stay at the top of my game. Online forums and tutorials also serve as excellent resources to learn new tips and tricks.
FAQ: Answers to Your Age Calculation Questions
How to calculate ageing in Excel?
To calculate ageing in Excel, use the DATEDIF function: =DATEDIF(start_date, end_date, "Y") for years, =DATEDIF(start_date, end_date, "YM") for remaining months, and =DATEDIF(start_date, end_date, "MD") for remaining days. These formulas yield the number of complete years, months, and days between two dates, respectively.
What Is the Syntax of the DATEDIF Function?
The syntax of the DATEDIF function is: =DATEDIF(start_date, end_date, unit), where “start_date” is the initial date, “end_date” is the last date, and “unit” is the age calculation unit such as “Y” for years, “M” for months, or “D” for days. Other units include “YM” for the difference in months ignoring years and “MD” for the difference in days ignoring years and months.
How Do I Calculate Exact Age Down to the Day in Excel?
To calculate the exact age down to the day in Excel, combine three DATEDIF functions:
=DATEDIF(start_date, end_date, "Y") & " Years, " & DATEDIF(start_date, end_date, "YM") & " Months, " & DATEDIF(start_date, end_date, "MD") & " Days"
This provides a comprehensive age calculation displaying years, months, and days.
Are There Any Common Pitfalls When Using DATEDIF for Ageing?
Yes, common pitfalls when using DATEDIF for aging include entering a start date that is after the end date, which results in an error, and not accounting for leap years when calculating by day units. Additionally, the function is undocumented and unfamiliar to many users, which can lead to misuse or confusion. It’s important to understand the function’s behavior and to test the formula to ensure accuracy.
How to use the datedif function to calculate age?
Use the DATEDIF function to calculate age by entering =DATEDIF(birth_date, TODAY(), "Y") into a cell. This formula calculates the number of complete years from the birth_date to today’s date. Adjust the unit argument as needed for months (“M”) or days (“D”).
John Michaloudis is a former accountant and finance analyst at General Electric, a Microsoft MVP since 2020, an Amazon #1 bestselling author of 4 Microsoft Excel books and teacher of Microsoft Excel & Office over at his flagship MyExcelOnline Academy Online Course.


