When it comes to analyzing data in Excel, one of the most common tasks I encounter is calculating differences. Whether it’s comparing sales figures, tracking time intervals, or analyzing percentage changes, Excel has the tools to make it all effortless. Let me share how I approach to calculate differences in Excel step by step.
Key Takeaways:
- Understand Basic Formulas: Start with the formula
=A1-B1to calculate simple differences in Excel. - Date & Time Functions: Use functions like
DATEDIFandNETWORKDAYSfor calculating date and time differences effectively. - Percentage Change Tips: Apply absolute references, rounding, and error-handling techniques for precise percentage calculations.
- Error Handling Matters: Use functions like
IFERRORandISNUMBERto manage non-numeric data and avoid calculation errors. - Use Time-Saving Tools: Leverage AutoFill, shortcuts like Ctrl + R/D, and the Quick Analysis tool for efficiency.
Table of Contents
Excel Mastery: Start with the Basics
Understanding Basic Terminology for Difference Calculation in Excel
To excel in spreadsheet calculations, let’s begin with understanding some core terms that underpin difference calculations in Excel. “Cell references” signify the unique address of a cell, while “values” denote the actual data entered into the cells. We use “formulas” to express the operations we wish to perform on these values, and the “results” are the outcome of these calculations, displayed in cells of our choosing.
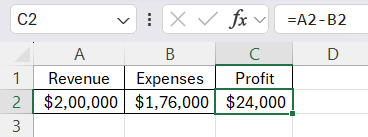
Imagine we have two numbers in Excel: one in cell A2 and another in cell B2. To find the difference, we might use a formula in cell C2 that looks like =A2-B2. The result in C1 would be the subtraction of B2 from A2.
Dive into Date & Time Calculations
How to Calculate Differences in Days, Weeks, and Months
Calculating the difference in time intervals such as days, weeks, and months using Excel is incredibly useful in various contexts like project management or tracking milestones. For a simple day-to-day difference, subtract one date from another, as in =B2-A2, resulting in the number of days between two dates.
To exclude weekends, the NETWORKDAYS function is a lifesaver. Suppose you enter =NETWORKDAYS(A2, B2), with A2 being the start date and B2 the end date; Excel tallies the weekdays only, skipping Saturday and Sunday. If you need to consider public holidays, you can define a range of holiday dates and include that in the function like so: =NETWORKDAYS(A2, B2, [MyHolidays]).
When determining weeks or months, you might use functions like DATEDIF or other date and time functions to custom-tailor the calculation to specific needs, such as getting an exact number of completed months or weeks between two dates.
For example, =DATEDIF(A2, B2, "M") yields the complete months between two dates. These functionalities render Excel an extremely potent tool for anyone needing to intricately manage timelines and dates.
Tips and Tricks for Calculating Percentage Change Effectively
Calculating percentage change in Excel can be made efficient and accurate with a few handy tips and tricks. Here are some I recommend:
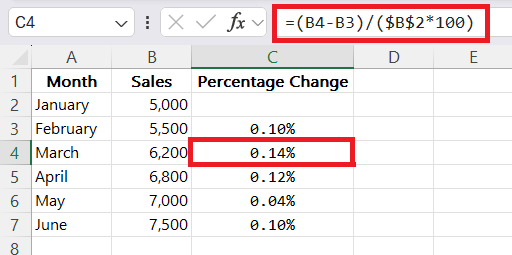
- Use Absolute References: When calculating percentage changes for a series of data points, make sure to use absolute references (with $ symbols) for the denominator if the base value remains constant. This allows you to copy and paste formulas without mistakenly shifting the denominator.
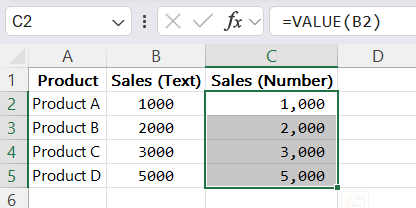
- Numbers to Real Numbers: Ensure that your data is formatted correctly as real numbers, not as text, which can mislead your calculations. You can use the
VALUEfunction to convert text that represents numbers into actual numbers.
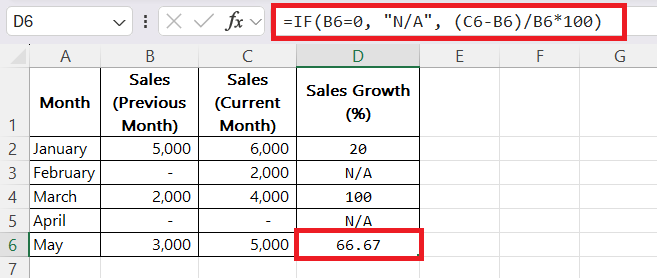
- Avoid Division by Zero: When your dataset includes zeros, you’ll need to account for division by zero errors. Use the IF function (
=IF(A2=0, "N/A", (B2-A2)/A2)), to handle these gracefully within your spreadsheet.
- Appropriate Rounding: By using the
ROUNDfunction (=ROUND((B2-A2)/A2, 2)), you can specify the number of decimal places for more readable results, particularly when dealing with currency or financial metrics.
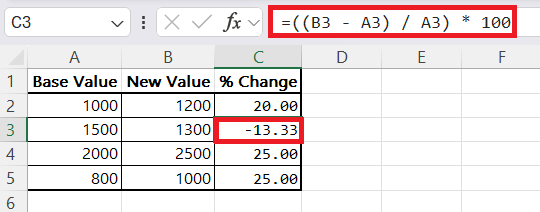
- Label Columns Explicitly: Make sure your columns are clearly labeled, such as ‘Base Value,’ ‘New Value,’ and ‘% Change,’ to maintain clarity in your percentage calculations, especially when sharing the spreadsheet with others.
By employing these methods, I’ve found that not only do I work more efficiently in Excel, but my analyses are also more precise and communicative, which is critical in supporting data-driven decision-making.
Overcoming Common Challenges in Excel Difference Calculations
Dealing with Non-Numeric Values and Error Handling
In Excel, dealing with non-numeric values when you’re expecting numerical data can be challenging but is manageable with some savvy error handling techniques. Here’s how I approach this common predicament:
Firstly, I use the ISNUMBER function to verify if a cell contains a numeric value. Embedded within an IF statement, it allows me to check a cell’s content before performing any subtraction. For example, =IF(ISNUMBER(A2), IF(ISNUMBER(B2), A2-B2, "Invalid"), "Invalid") safeguards against subtracting non-numerical data.
If errors are a concern, I wrap the formula in an IFERROR function to handle them gracefully, like =IFERROR(A2-B2, "Error"). This will return “Error” instead of the default error code if the calculation fails, keeping the spreadsheet tidy and readable.
I also suggest using conditional formatting to highlight non-numeric cells. By setting a rule to color cells with text differently, I can swiftly spot and troubleshoot them before performing calculations.
Remember, it’s all about ensuring that Excel’s calculations are meaningful and free of misinterpretations caused by unexpected non-numeric data. By taking these preventive steps, I maintain the integrity and utility of the data I’m working with, leading to reliable and impactful results.
FAQ: Excel Difference Calculation Made Simple
What is the formula for calculating difference in Excel?
The basic formula for calculating the difference between two values in Excel is =A1-B1, where A1 contains the first value (minuend) and B1 contains the second value (subtrahend). This will give you the result of A1 minus B1 directly in the cell where you enter the formula. Ensure both A1 and B1 contain numeric values for the correct calculation.
What is the DATEDIF function and how is it used in Excel?
DATEDIF is a function in Excel that calculates the difference between two dates. It’s used by entering =DATEDIF(start_date, end_date, "unit") into a cell, where start_date is the starting date, end_date is the ending date, and "unit" specifies the unit of time to return (like “D” for days, “M” for complete months, or “Y” for full years). Despite its usefulness, note that DATEDIF isn’t documented in Excel and should be used carefully, as it may produce incorrect results in some scenarios. Always confirm the results for accuracy.
Can you explain how to calculate percentage differences in Excel?
Certainly! To calculate percentage differences in Excel between two values, you can use the following formula: =(New_Value - Old_Value)/ABS(Old_Value)*100. Here, New_Value represents the updated or final value, while Old_Value refers to the original value. Make sure to format the cell with the formula as a percentage. This will give you the percentage change from the Old_Value to the New_Value. It’s important to use the absolute function ABS to avoid negative numbers in the denominator when computing the difference.
What are some common mistakes to avoid when calculating differences in Excel?
When calculating differences in Excel, avoid these common pitfalls:
- Incorrect Cell References: Ensure you reference the correct cells in your formulas to avoid erroneous results.
- Mixing Data Types: Verify that all cells used in difference calculations contain compatible data types. Numbers should not be formatted as text.
- Misusing Absolute and Relative References: Understand when to use absolute (
$A$1) versus relative references (A1) to prevent incorrect calculations when copying formulas. - Failing to Account for Empty Cells: Empty cells can affect calculations. Use functions like
IForIFERRORto handle these situations. - Neglecting Error Checks: Always include error checking in your formulas (e.g., using
IFERROR) to manage unexpected or incorrect values gracefully.
Remember, attention to detail is crucial for accurate difference calculations in Excel.
Are there any shortcuts or tips to speed up difference calculations in Excel?
Yes, to speed up difference calculations in Excel, use the following shortcuts and tips:
- Employ the AutoFill feature: Once you’ve written a formula, use AutoFill by dragging the corner of the cell downwards or across to replicate the formula.
- Use keyboard shortcuts:
Ctrl+Rto fill cells to the right andCtrl+Dto fill cells downwards with the content of the first cell. - Include absolute references ($A$1) for static values when copying formulas.
- Utilize the
Quick Analysistool by selecting the data and clicking on the lightning bolt icon for common calculations.
Adopt these strategies for faster and more efficient difference calculations in Excel.
John Michaloudis is a former accountant and finance analyst at General Electric, a Microsoft MVP since 2020, an Amazon #1 bestselling author of 4 Microsoft Excel books and teacher of Microsoft Excel & Office over at his flagship MyExcelOnline Academy Online Course.

