Calculating the Z score in Excel is a powerful way to understand data in terms of its standard deviations from the mean, making it easier to identify outliers and understand the distribution of your dataset. This statistical measure is widely used in various fields, including finance, research, and quality control. By leveraging Excel’s built-in functions, you can efficiently compute Z scores and gain valuable insights into your data. In this article, we will explore the step-by-step process of calculating Z scores in Excel, ensuring you can accurately interpret your results.
Key Takeaways:
- Understanding Z Score Basics: A Z score indicates how many standard deviations a value is from the mean, helping identify outliers and the distribution of data.
- Importance of Standard Deviation: Standard deviation is crucial in calculating Z scores as it measures the data’s spread around the mean.
- Setting Up Excel for Calculations: Ensure your Excel version supports necessary statistical functions and your data set is well-organized and free of missing values.
- Methods for Calculation: You can calculate Z scores manually using formulas for the mean and standard deviation or utilize Excel’s STANDARDIZE function for simplicity.
- Visualizing Data with Z Scores: Scatter plots in Excel effectively visualize Z scores, making it easier to interpret the distribution and identify patterns in your data.
Table of Contents
Understanding Z Score Basics
What is a Z Score?
A Z score is an intriguing statistical metric that tells me how a particular value compares to the average of a group of values. It’s calculated in a standardized way, meaning it’s free of scale and unit dependencies, making it a universal benchmark.
By understanding how many standard deviations a value lies from the mean, I can quickly assess the rarity or commonness of the data point in question. This digit, which can be either positive or negative, offers a clear perspective on where an observation stands in relation to others – above, below, or at the same level as the average.
The Importance of Standard Deviation in Z-Scores
Standard deviation is the cornerstone in the realm of Z-scores; it’s the unit of measurement that defines the spread of data around the mean. When I look at a Z-score, it illustrates how many standard deviations a data point is from the average — a telling signal of variability.
This importance is magnified since the Z-score hinges on standard deviation values to gauge the precise position of a data point within a distribution. Not only does this help identify how extreme the observation is, but it also plays a vital role in tackling more complex statistical analyses such as hypothesis testing. In essence, without standard deviation, the Z-score loses its context and significance, much like a compass without a true north.
Setting the Stage for Excel Calculations
Prerequisites for Calculating Z-Scores in Excel
Before embarking on the journey to calculate Z-scores in Excel, I ensure that I’m prepared with a few fundamentals. First, I make sure I’m operating on a version of Excel that supports the statistical functions needed for the task. It’s generally a wise practice to have the latest updates, which grant access to all the latest features.
Additionally, a foundational understanding of statistics underpins the process. Knowing the meaning of Z-scores and their significance, and being comfortable with terms like “mean,” “standard deviation,” and “confidence level,” sets the stage for accurate computation.
Equally crucial is the quality of the data set. I look to have my data neatly organized in Excel, free from missing values and arranged ideally in a single column or row for ease of reference. Taking care of these prerequisites, I ready myself for a smooth and precise calculation of Z-scores in Excel.
Familiarizing With Necessary Statistical Excel Functions
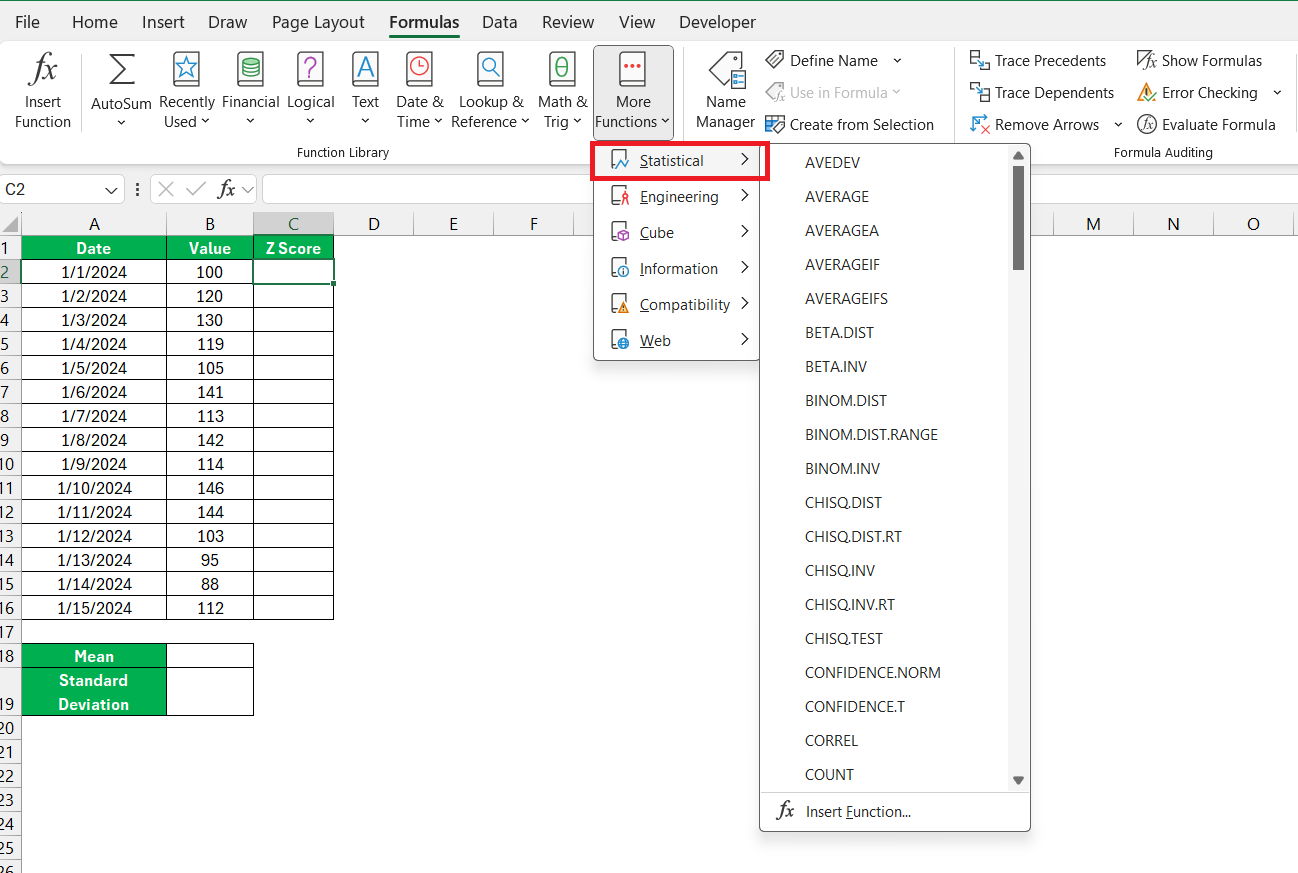
We dive into the rich repository of Excel’s statistical functions, a critical step in the process. The ‘Function Library’ within Excel’s ‘Formulas’ tab is a treasure trove of statistical tools with which I’m well-acquainted. A click on ‘More Functions’ followed by ‘Statistical’ unfolds a list that encompasses a variety of functions, including ‘STANDARDIZE,’ ‘AVERAGE,’ and ‘STDEV.’
The ‘STANDARDIZE’ function is particularly noteworthy when dealing with Z-scores as it computes the standardized value using the mean and standard deviation. This function is key for anyone aiming to undertake statistical analysis without having to perform manual calculations.
To ease the journey through Excel’s functionality and locate these critical functions, I familiarize myself with the built-in ‘Help’ feature. Mastery of these tools paves a straightforward path to calculating Z-scores and harnessing Excel’s full potential for statistical analysis.
Step-by-Step Calculation of Z-Score in Excel
Method 1: Using Excel Formulas Manually
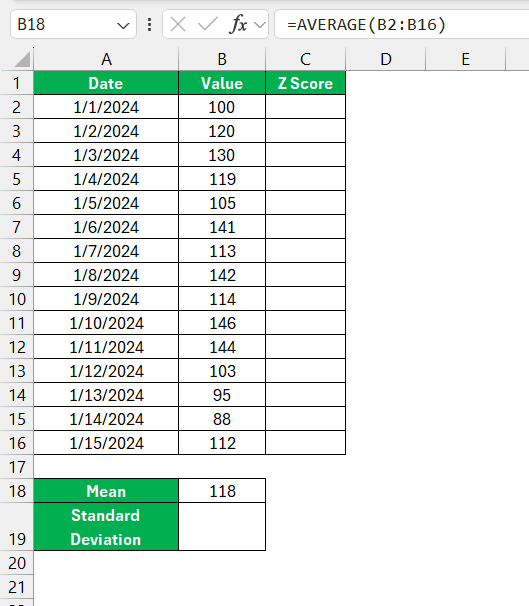
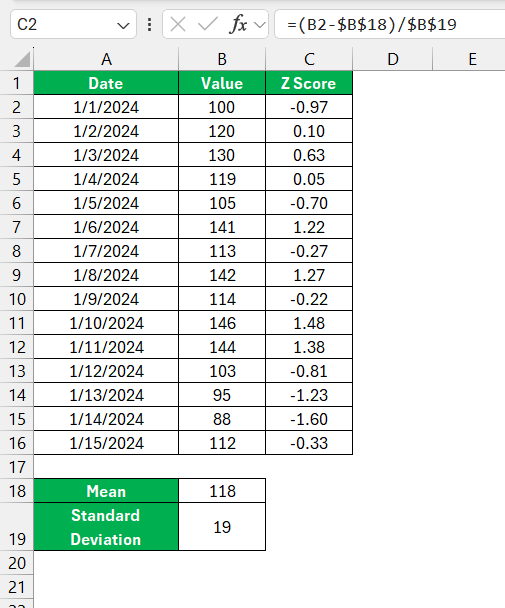
When it comes to the manual calculation of Z-scores in Excel, I follow a systematic approach. Firstly, I ascertain the mean of the data set with the ‘AVERAGE’ function.
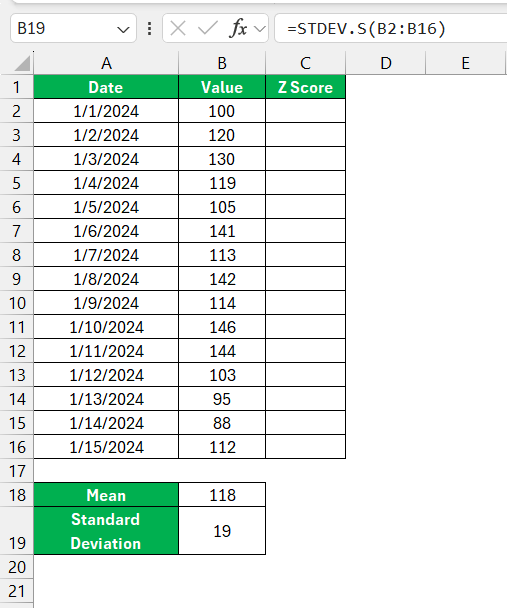
Then, I employ the ‘STDEV’ function to derive the standard deviation.
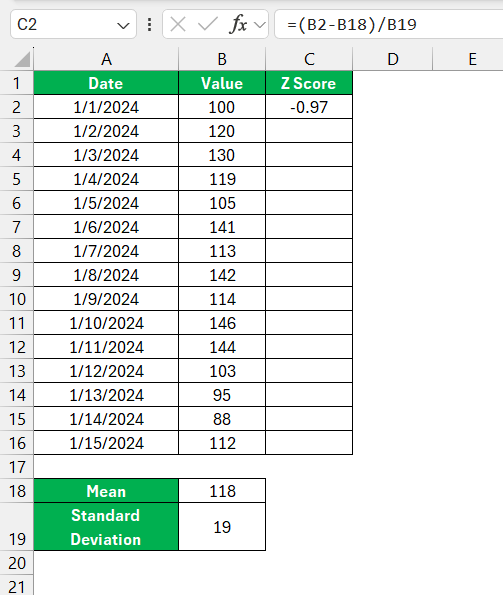
With these values at hand, I craft the Z-score for an individual data point by subtracting the average and then dividing by the standard deviation.
For accuracy and efficiency in larger data sets, I make clever use of Excel’s relative and absolute cell references. By adding the $ symbol to certain parts of a formula, I anchor the mean and standard deviation cells, allowing me to drag and replicate the formula across multiple cells without any hitch.
This technique, often overlooked by many, dramatically reduces the potential for manual error and saves an exorbitant amount of time.
Method 2: Utilizing the STANDARDIZE Function
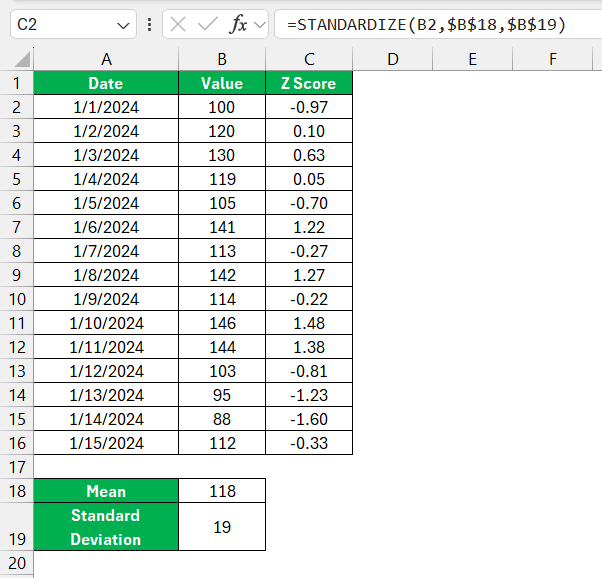
For an even more streamlined and swift experience, the STANDARDIZE function in Excel comes to our rescue. This purpose-built function dramatically simplifies Z-score computations—mercifully sparing us from manual calculations.
To conjure a Z-score into existence, I invoke the function, which seeks three core inputs: the data point itself, the mean of the dataset, and the standard deviation. The correct syntax unfolds as =STANDARDIZE(data_point, mean, standard_deviation). Once the formula is in place, I press Enter, and Excel effortlessly reveals the standardized Z-score value.
Applying the STANDARDIZE function becomes a matter of routine with practice; I can almost do it with my eyes closed, but I always keep them open to watch the magic happen as the numbers effortlessly align into Z-scores. It’s a function that epitomizes efficiency, and indeed what sets Excel apart as a powerful tool for statistical analysis.
Visualizing Your Data with Z-Scores
Crafting a Z-Score Scatter Plot in Excel
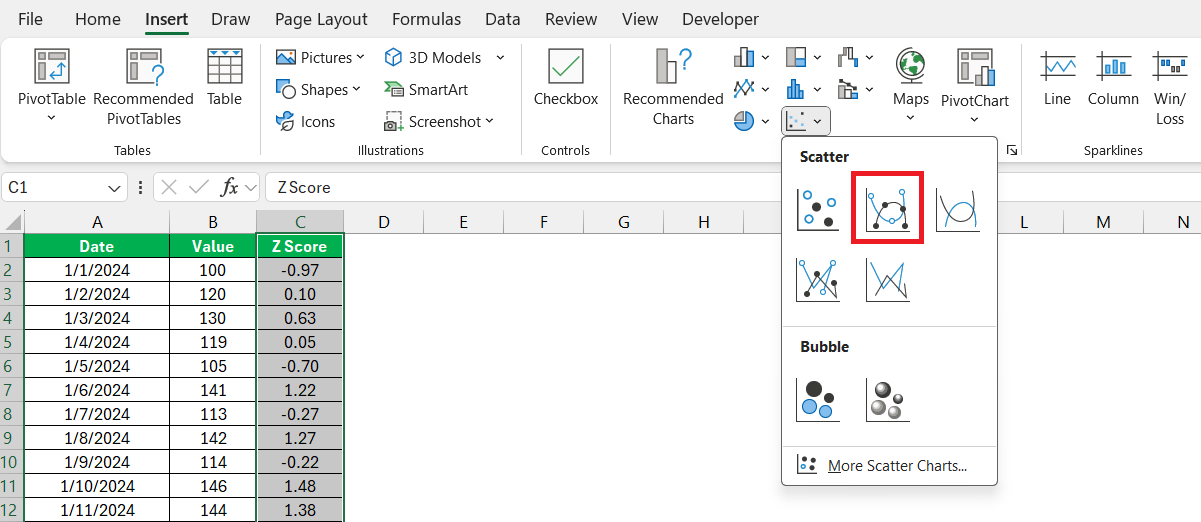
When visualizing data with Z-scores, nothing is quite as illustrative as a scatter plot. Our journey with Excel takes us to the ‘Insert’ tab, where under the ‘Charts’ group, the option for a ‘Scatter’ chart awaits my selection.
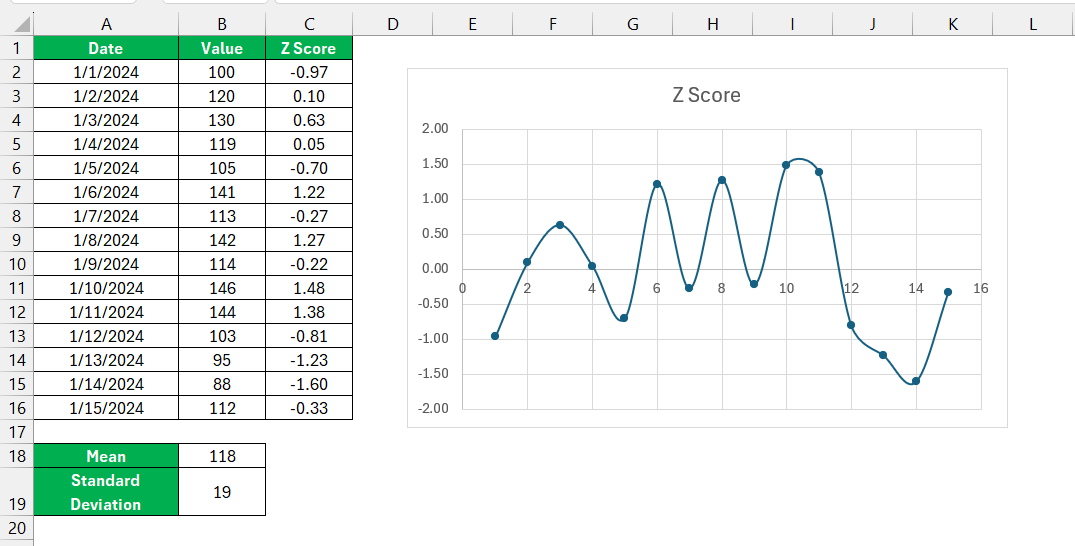
Here, I typically choose a scatter plot with just markers, as it provides a clear visualization of how individual data points are spread out in relation to Z-scores. To set this up, I select the data range for my x-values and pair these with the corresponding Z-scores as my y-values. After confirming the selection, Excel brings my data to life, plotting each point in standardized units of deviation from the mean.
Fine-tuning comes next: I add axis titles to clarify what each axis represents, adjust the marker style and size for better readability, and sometimes play with the color scheme to match the presentation style. A well-crafted Z-score scatter plot can unravel complex data stories, making them comprehensible at a glance.
FAQs about Z-Scores in Excel
How do you calculate z-score on Excel?
To calculate a z-score in Excel, I input my data set into a column, use =AVERAGE(range) for the mean and =STDEV.S(range) for the standard deviation if it’s a sample (or =STDEV.P(range) if it’s a population). Then, I apply the z-score formula =(data_point-mean)/standard_deviation for each data point. Each step can be executed in separate cells for clarity.
How to do the z test in Excel?
To perform a z test in Excel, first calculate the z-score for your sample mean using =(sample_mean-population_mean)/(population_standard_deviation/SQRT(sample_size)). Then find the p-value with =NORM.S.DIST(z_score, TRUE). Compare the p-value to your significance level to decide whether to reject the null hypothesis.
Can Z-Scores be Used to Predict Performance?
Yes, Z-scores can forecast future performance by highlighting trends over time. If Z-scores are consistently positive, it might suggest a continuing uptrend. Meanwhile, persistently negative or volatile Z-scores could indicate a need for strategic adjustments to alter future outcomes. It’s a valuable projection tool in various fields.
How to Identify Outliers Using Z-Score in Excel?
To pinpoint outliers with Z -scores in Excel, first, calculate each data point’s Z-score using above-mentioned methods. Traditionally, values beyond +3 or below -3 are considered outliers. I can then use conditional formatting to visually flag these extremes in the data set for further examination or action.
What does z scored use for in our everyday life?
Z-scores are practical in daily life for benchmarking: comparing academic results, understanding medical test outcomes against norms, or making sense of personal finance in relation to average expenditures. These scores bring a standard measure, easing comparisons and informed decision-making in various contexts.
John Michaloudis is a former accountant and finance analyst at General Electric, a Microsoft MVP since 2020, an Amazon #1 bestselling author of 4 Microsoft Excel books and teacher of Microsoft Excel & Office over at his flagship MyExcelOnline Academy Online Course.

