Learn about Excel with our Free Microsoft Excel Online Course!
Key Takeaways
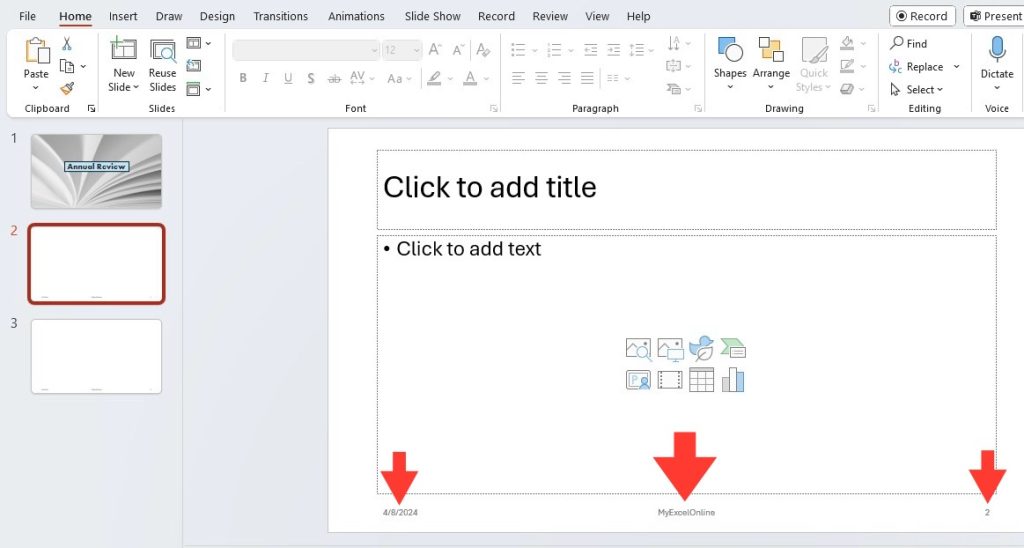
- To uniformly change the footer across all PowerPoint slides, utilize the “Slide Master” view accessible from the “View” tab, which lets you edit the master slide for consistent adjustments.
- Edit the footer details by clicking the footer text box in the “Slide Master” view; personalize with your organization’s name, date, or other information, and format using options under the “Home” tab.
- After customizing the footer, apply the changes to all slides by using “Close Master View,” and ensure to review the presentation to confirm that the footer appears correctly on each slide.
Table of Contents
Essential Steps to Change Footer in PowerPoint
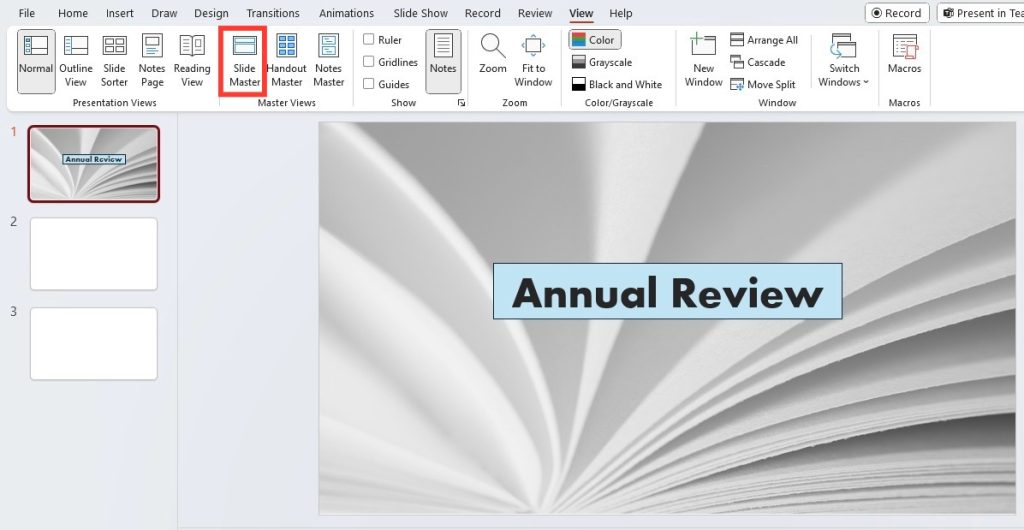
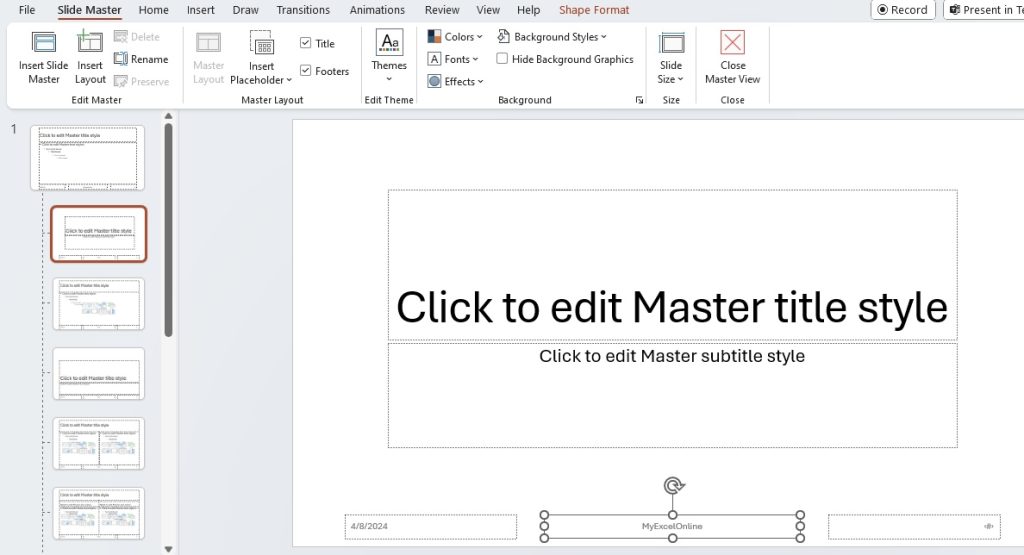
Accessing Slide Master View for Edits
To initiate changes to your PowerPoint footer, dive into the Slide Master View. It’s fairly straightforward:
STEP 1: Click on the “View” tab in the PowerPoint toolbar.
STEP 2: Choose “Slide Master” from the master views section.
By doing this, you’ll unveil the master template for your slides, where all the foundational changes, including those to the footer, are made.
Customizing or Removing the Footer
Customizing the footer on your slides lets you add a touch of personal flair or vital information. To tailor your footer:
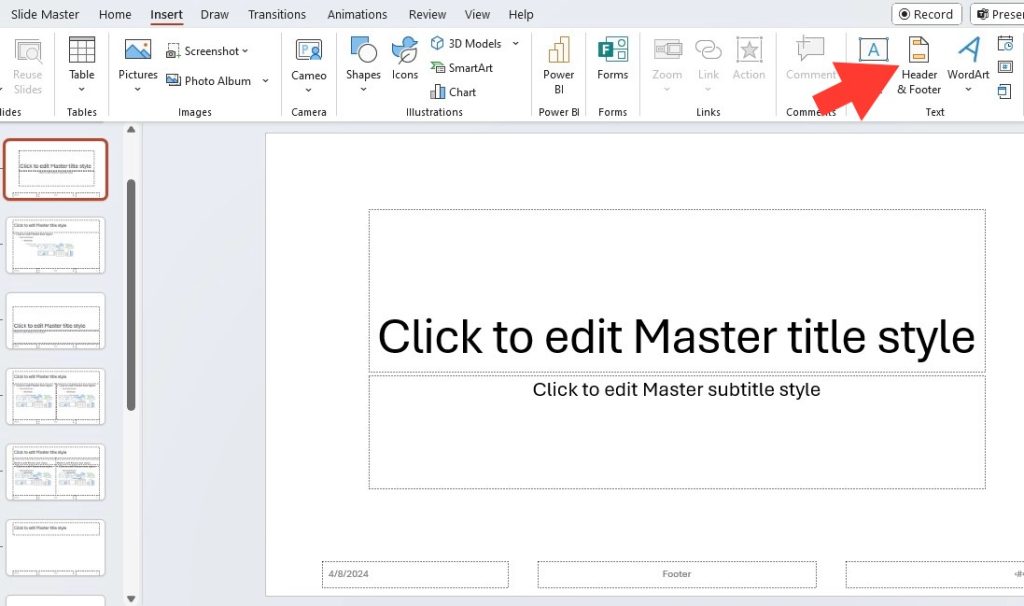
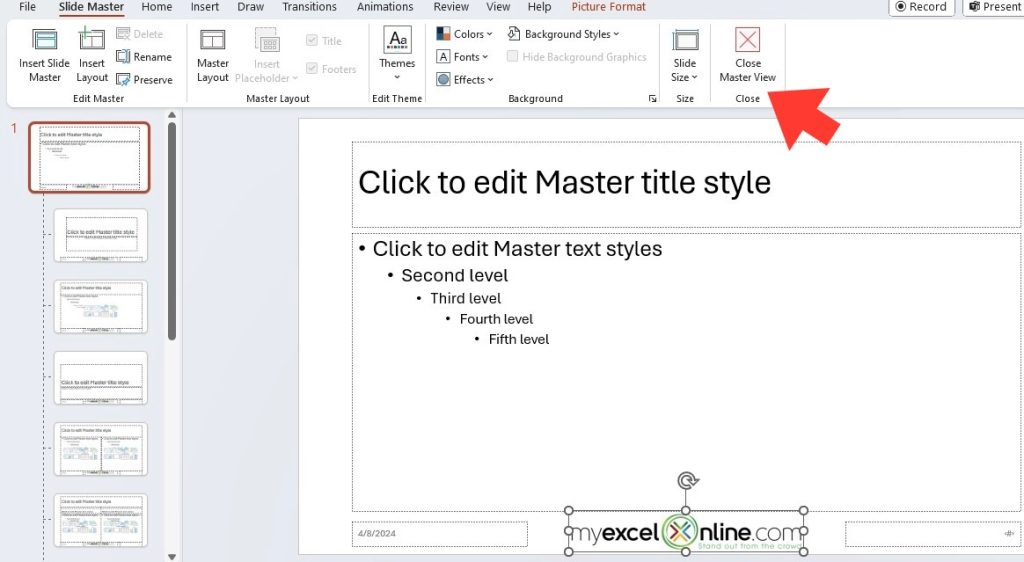
STEP 1: Within Slide Master view, select the Master Slide at the top of the thumbnail pane.
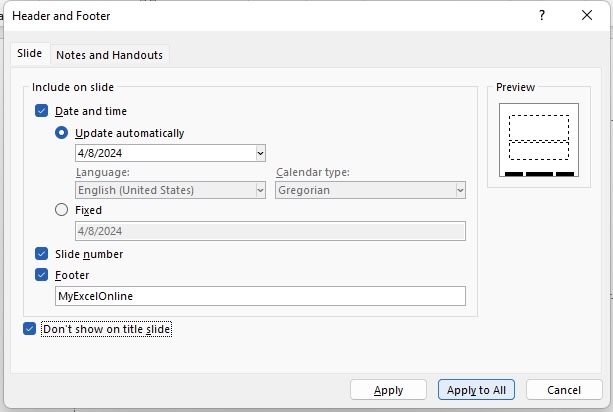
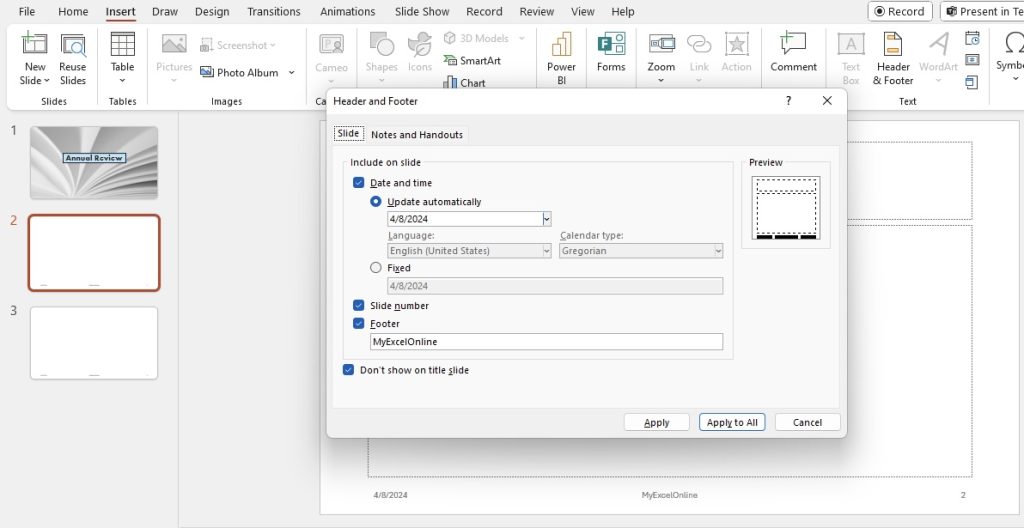
STEP 2: Click on “Insert” then “Header & Footer.”
STEP 3: Put your custom text in the footer box or modify as needed.
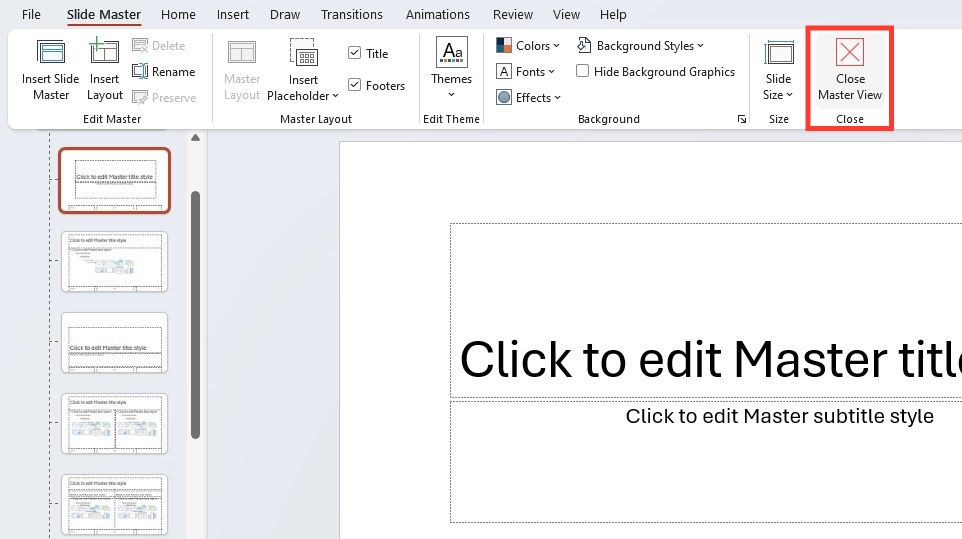
STEP 4: Click Close Master View.
Tips for Efficient Footer Management
Quick Tricks for Footer Formatting
Streamline your footer formatting in PowerPoint by utilizing these handy tips:
- Use shortcut keys (like
Ctrl+Shift+ click) to jump straight to the master slide from the normal view. - Stick to keyboard commands for text editing – they’re quicker than mouse navigation.
- Leverage the “Format Painter” tool to copy the footer style from one slide and apply it to others.
- Adjust default footer settings to automatically include your preferred font style and size.
- Save your presentation as a template with pre-set footers for future use, trimming down setup time.
Utilizing Layouts for Specific Footer Changes
Sometimes, one size does not fit all, and you’ll want particular slides to have distinct footer elements. PowerPoint’s Slide Layouts are perfect for this:
STEP 1: Access the “Slide Master” view.
STEP 2: Select the specific layout you want to modify from the left-hand panel.
STEP 3: Make your tailored changes to the footer in this layout only.
Now, any slides using this layout will display the custom footer settings without affecting the rest of your presentation.
Advanced Footer Editing Techniques
Inserting Dynamic Elements like Date and Slide Numbers
Inserting dynamic elements such as the date and slide numbers can make your PowerPoint presentation look professional and easy to follow. Here’s how you can incorporate these elements into your slides:
STEP 1: Head over to the “Insert” tab and select “Slide Number” to add slide numbers.
STEP 2: For the date and time, click “Date & Time” in the Text group and make your selections.
Incorporating Logos and Images in the Footer Space
Incorporating Logos and Images in the Footer Space
Adding logos and images to your PowerPoint footer can elevate the overall design and foster brand recognition. Here’s how you can do it seamlessly:
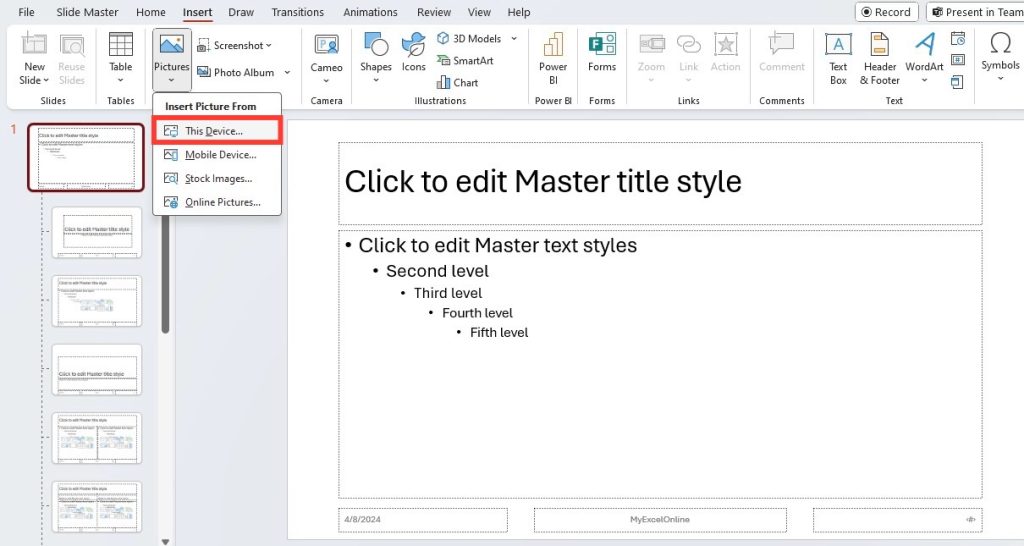
STEP 1: Open “Slide Master” view and choose the slide layout.
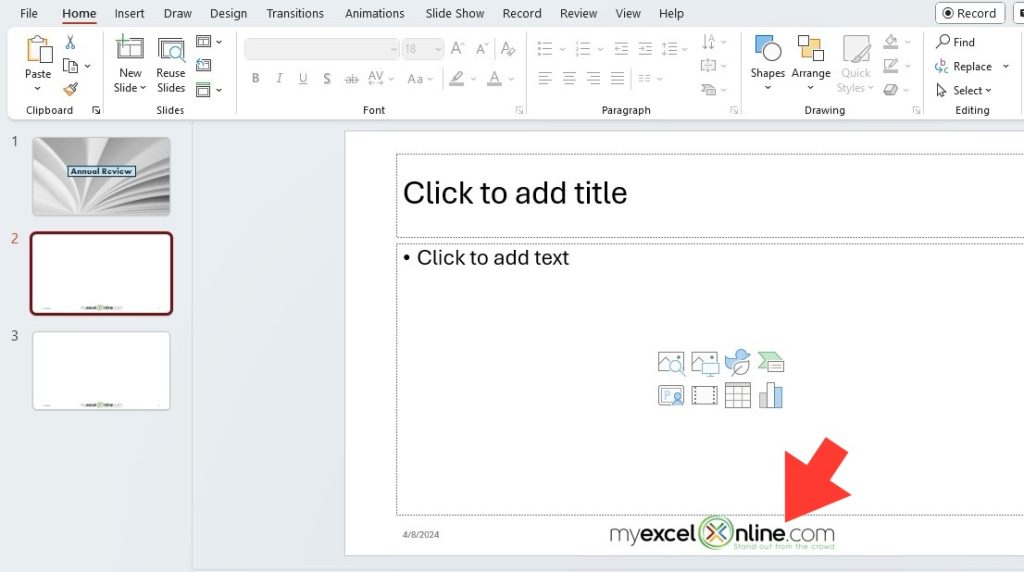
STEP 2: Click “Insert”, then “Pictures” to add your logo or image.
STEP 3: Resize and position it in the footer area.
Common Pitfalls and How to Avoid Them
Precautions When Deleting Footer Information
Be circumspect when removing footer information from your PowerPoint slides. Here’s what to consider:
- Ensure you’re not removing critical information required by your audience or for legal purposes.
- Check all slides individually after deleting footers, as changes might vary across different layouts.
- Remember that simply deleting the text won’t remove the footer field; use the Master Slide to remove it entirely.
Ensuring Visibility and Readability across All Slides
Ensuring Visibility and Readability across All Slides
When modifying footers, it’s essential that they’re clearly visible and readable on every slide. To achieve this:
- Choose contrasting colors for text and background.
- Maintain a font size that is legible from a distance.
- Avoid overloading the footer with too much text or complex graphics.
- Test your slides on different devices and projectors to ensure footers appear as intended.
Leveraging Footers for More Effective Presentations
Using Footers for Seamless Presenter Notes
Footers are also a clever spot to include concise notes or cues for the presenter. Doing so helps you glide through the presentation smoothly:
- Insert brief notes in the footer to guide your narrative.
- Make sure these notes are for your eyes only if presenting in-person or if sharing screens online.
- Use smaller font sizes or text formatting to differentiate notes from other footer content.
Enhancing Audience Engagement with Well-Placed Footer Content
A cleverly placed footer can turn into a tool for engaging with your audience. Here’s how:
- Include interactive elements like question prompts or social media hashtags.
- Place QR codes for accessing supplementary content or feedback forms.
- Use concise calls-to-action (CTAs) to direct audience behavior post-presentation.
FAQs
What is a PowerPoint footer good for and when is it useful?
A PowerPoint footer is useful for providing consistent information, like slide numbers, dates, or presenter details, across all slides. It’s particularly helpful in professional or educational settings for referencing, branding, and maintaining a polished look.
How can I change the footer formatting on all slides at once?
To change the footer formatting on all slides, go to “View,” select “Slide Master,” edit the footer in the master slide, and then click “Close Master View.” Your changes will apply to all slides.
Can I change the footer for just one specific layout or slide?
Absolutely! In “Slide Master” view, select the specific layout or slide and modify the footer. Then, apply changes to just that selection without affecting the rest.
How do I add or remove content like date and page numbers from the footer?
To add or remove content like dates and page numbers, access “Insert,” then “Header & Footer,” check or uncheck the relevant boxes, and apply to your slides.
Are there any shortcuts to edit footers more efficiently in PowerPoint?
For shortcuts, you can use standard keyboard commands or go to the “Slide Master” for quick access. It streamlines the editing process and lets you make changes effortlessly.
John Michaloudis is a former accountant and finance analyst at General Electric, a Microsoft MVP since 2020, an Amazon #1 bestselling author of 4 Microsoft Excel books and teacher of Microsoft Excel & Office over at his flagship MyExcelOnline Academy Online Course.

