Learn about Excel with our Free Microsoft Excel Online Course!
Key Takeaways
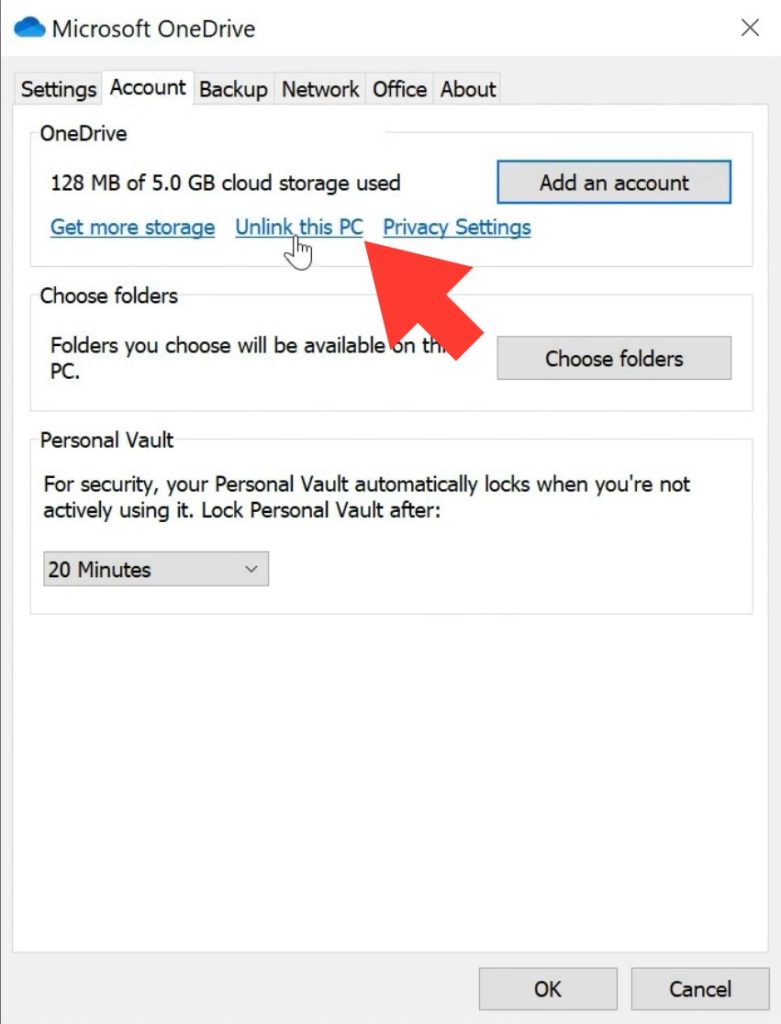
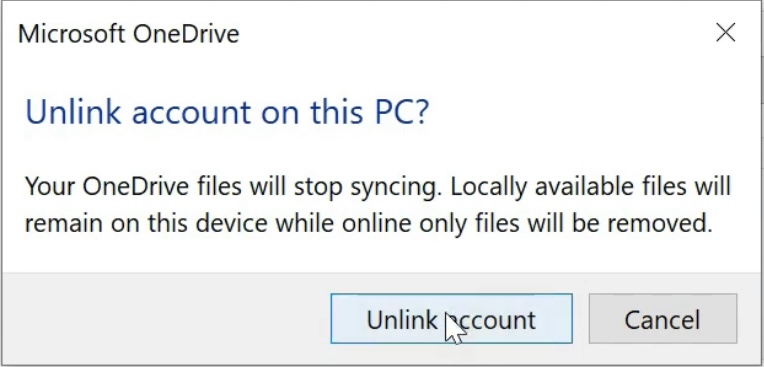
- Change OneDrive folder location by first unlinking your PC from OneDrive. Go to the OneDrive settings, clicking on the “Account” tab, and selecting “Unlink this PC.”
- After unlinking, cut and paste your existing OneDrive folder to the new desired location using File Explorer, then sign back into OneDrive and choose “Change location” to set the new folder path.
- Once the new location is selected and confirmed by clicking “Use this location,” proceed through the rest of the setup prompts, selecting your backup preferences and completing the setup for OneDrive to recognize the new folder location.
Reasons for Changing the OneDrive Folder Location
When you begin accumulating a large number of files in your OneDrive, especially hefty ones, your system drive might start feeling the pressure. Here are a few compelling reasons why you might consider moving your OneDrive folder:
- Maximizing Local Storage: Keeping the OneDrive folder on the system drive can consume valuable space, making it a necessity to relocate the folder to a larger drive.
- Organization & Convenience: A different folder location might align better with your file organization preferences and provide easier access.
- System Performance: To maintain optimal system performance, it’s often beneficial to distribute data across various drives.
- Backup Strategies: Changing the OneDrive folder location to an external drive can aid in easier data backup and recovery.
Remember, the goal is to strike a balance between ease of access, available storage, and system performance.
Table of Contents
Step-by-Step Guide to Changing OneDrive Folder Location
Step 1: Preparing to Move Your OneDrive Folder
Moving your OneDrive folder is not a complicated process, but it requires careful steps to avoid data loss. Before you get started:
- Back Up Your Files: Ensure that you have a backup of all the files currently in OneDrive, just in case things go awry during the move.
- Check Your OneDrive Sync Status: Make sure that all your files are fully synced to OneDrive online to avoid any discrepancies between local and cloud copies.
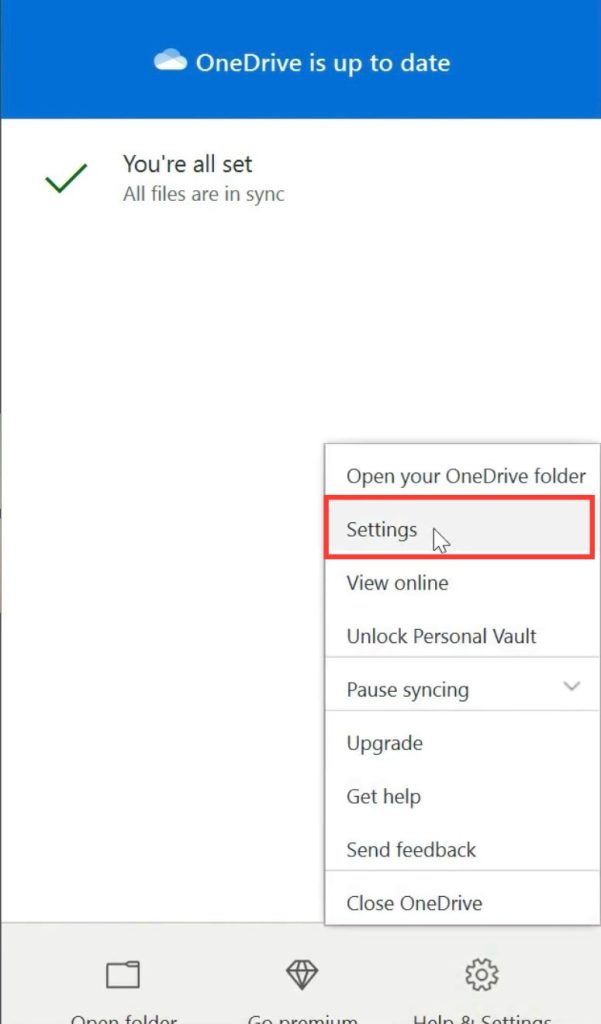
- Unlink OneDrive: Right-click the OneDrive taskbar icon, click on Settings, and then on the Account tab, click the ‘Unlink OneDrive’ button. Ignore the login screen that appears for now; you will need it later.
By unplugging OneDrive, you’re essentially telling your computer that you need to set OneDrive up again, which is precisely what you want when changing its location.
Step 2: Moving the OneDrive Folder to a New Location
To relocate your OneDrive folder to your preferred spot on your Windows PC:
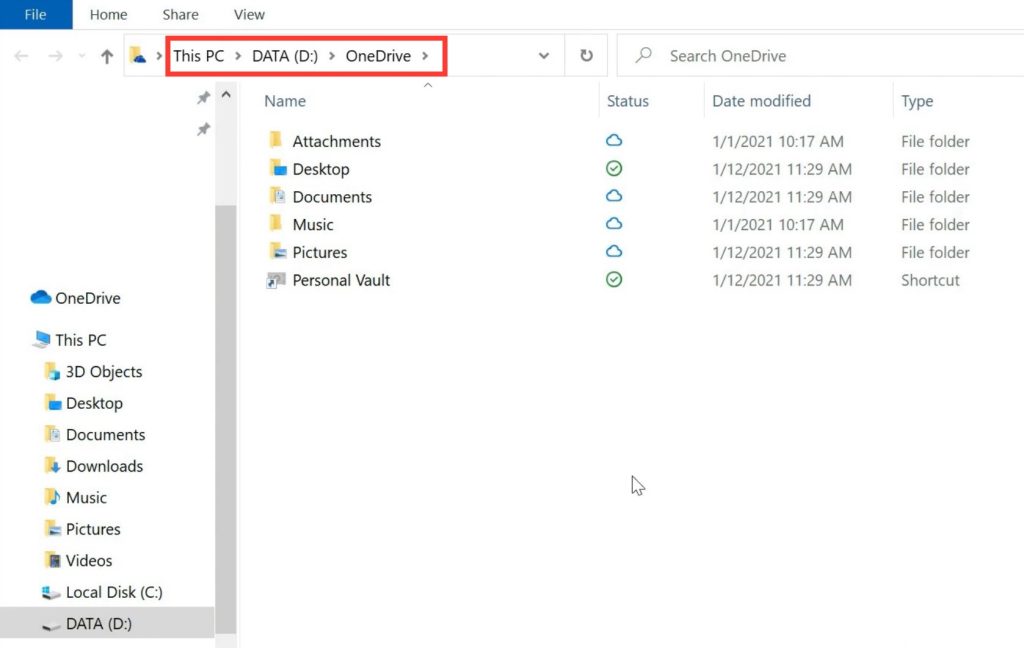
- Open File Explorer: Go to the current OneDrive folder location, which is typically found in your user folder.
- Utilize the Ribbon: Click on the ‘Home’ tab on the ribbon in File Explorer.
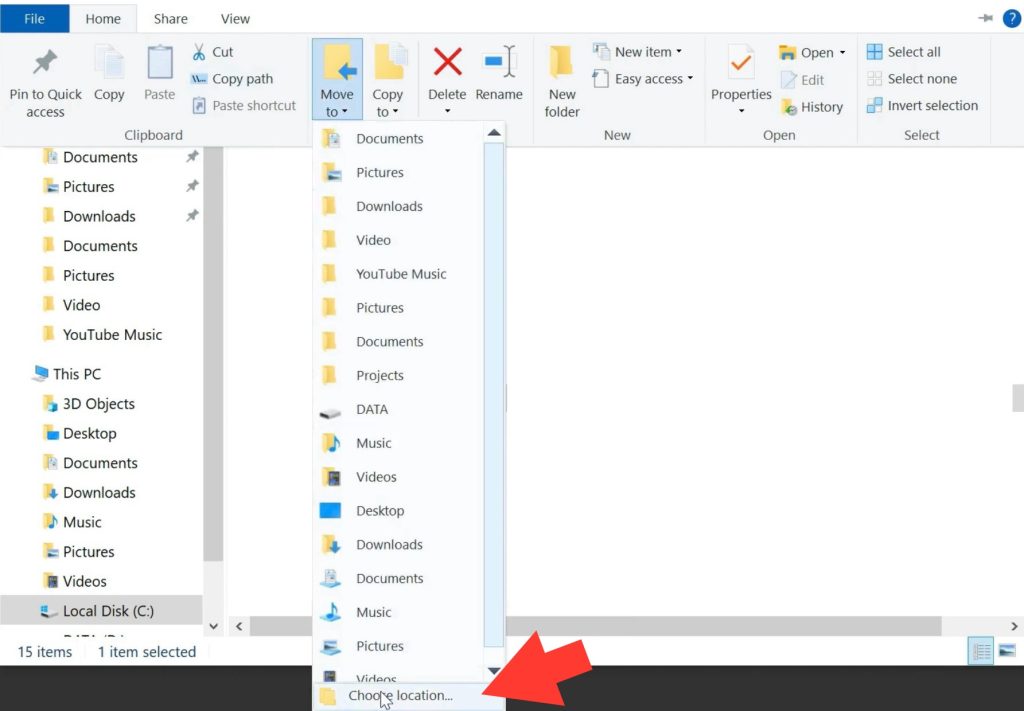
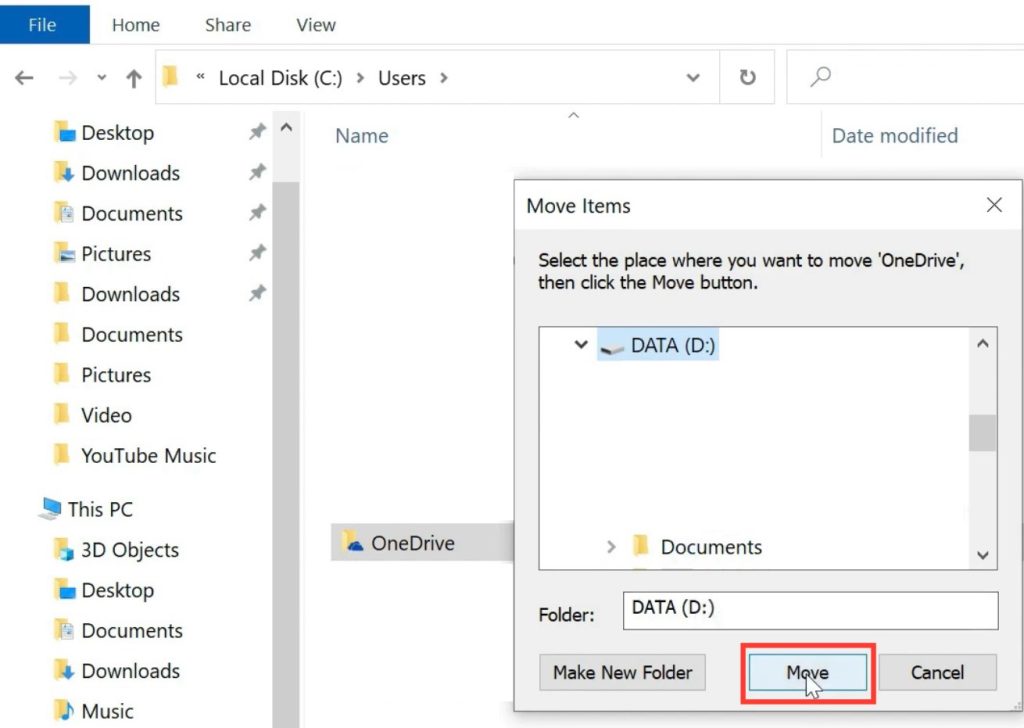
- Move Command: Select your OneDrive folder. In the ribbon, click ‘Move to,’ then choose ‘Choose location’ from the dropdown menu.
- Choose New Location: In the pop-up dialog, navigate to your desired new folder location, select it, and then click the ‘Move’ button.
Windows will proceed to move your entire OneDrive folder, along with all its contents, to the new location. Please wait patiently: depending on the size of your folders, it may take several minutes.
Now your files are exactly where you want them, and you’re ready for the next step: re-linking OneDrive.
Step 3: Linking OneDrive to the New Folder Location
With the OneDrive folder now in its new home, it’s time to link your OneDrive account with the new location on your PC:
- Reopen OneDrive Setup: Access the ‘Set up OneDrive’ window that you previously closed, or reopen it by clicking on the OneDrive app.
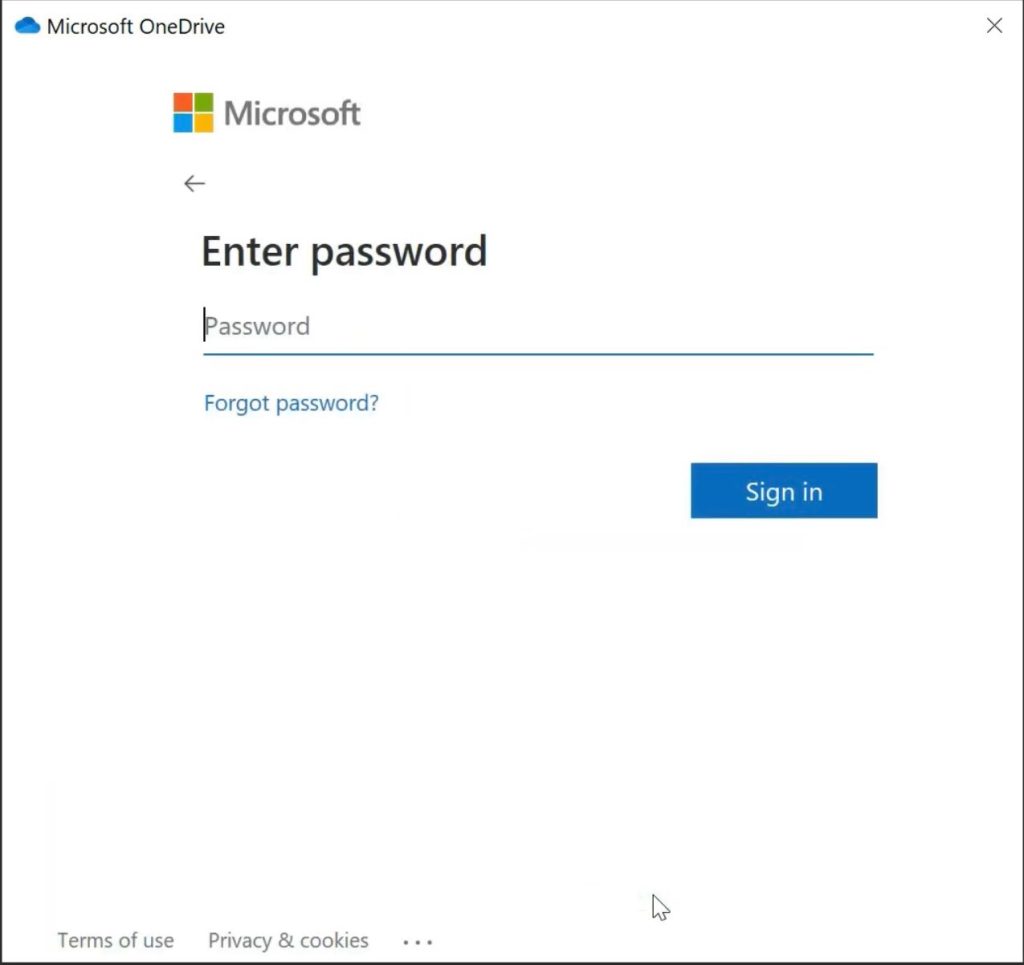
- Email and Sign In: Enter your email address in the OneDrive app window and click ‘Sign in’.
- Personal or Work: Choose ‘Personal’ when prompted to specify why you’re signing in.
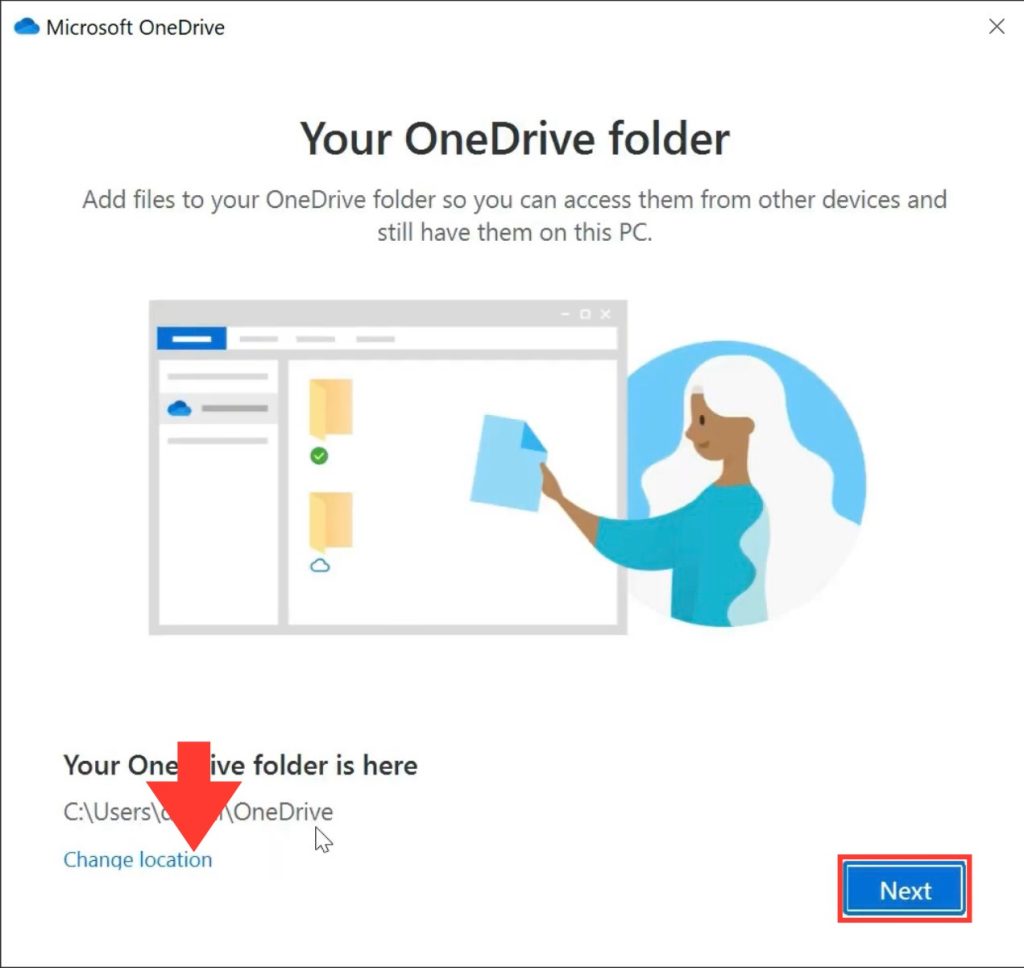
- Password Entry: Type in your password, follow through the sign-in process, and when you get to the ‘This is your OneDrive folder’ screen, select ‘Change location.’
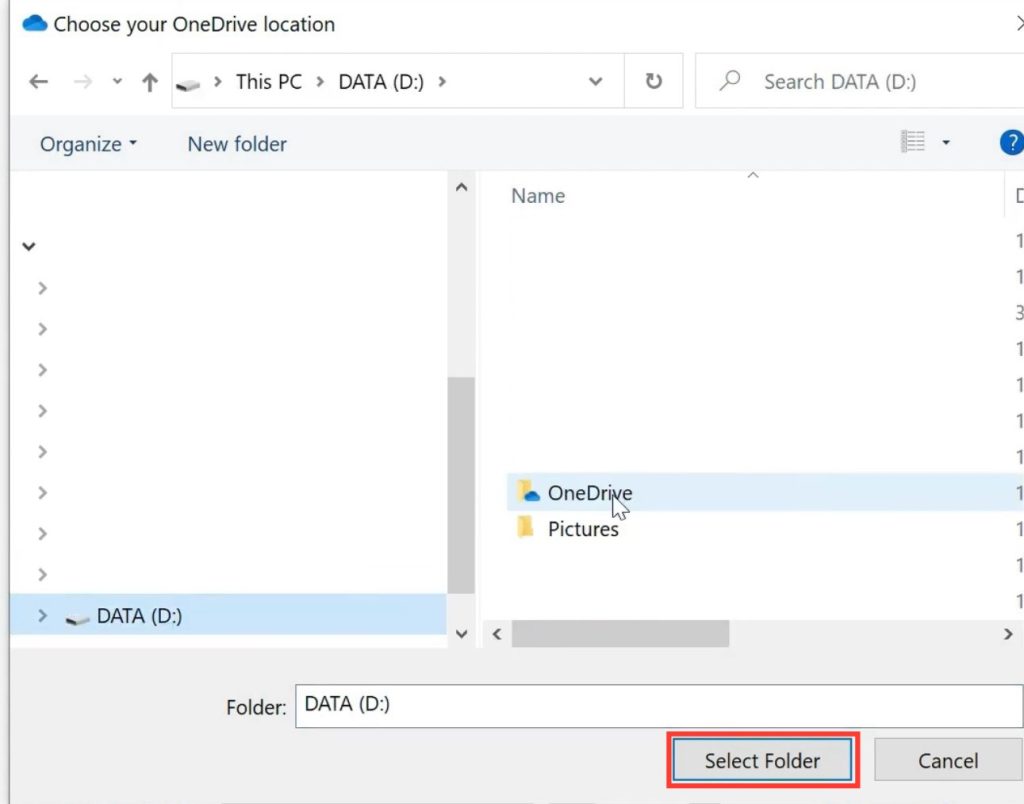
- Selecting New OneDrive Location: Navigate to the new OneDrive folder location and click ‘Select Folder.’
- Confirmation: Click ‘Use this location,’ which tells OneDrive to sync to this new location on your device.
- Finish Setup: Follow the remaining instructions to finish syncing your files. Select folders to sync if you do not wish to sync them all.
Now, your OneDrive should reflect the changes, and files will sync to and from this new directory. Congratulations on successfully relocating your OneDrive!
Common Mistakes During the Moving Process
It’s essential to be aware of some common pitfalls when moving the OneDrive folder:
- Interrupting the Move: Avoid using your computer for other heavy tasks that might interfere with the moving process.
- Insufficient Permissions: Ensure that the destination folder has the correct permissions set for OneDrive to operate correctly.
- Forgetting to Sync: If you forget to let OneDrive sync fully before moving it, you might end up with outdated or missing files.
- Incompatible Locations: Some devices or network locations might not be supported by OneDrive, so confirm the suitability of the new location beforehand.
By being meticulous and patient during the move, you can reduce the likelihood of encountering issues.
Troubleshooting Post-Migration Issues
After moving your OneDrive folder, you might encounter some glitches. Here’s how to troubleshoot common post-migration issues:
- Files Not Syncing: Ensure OneDrive is linked correctly to the new location. If not, relinking may be necessary.
- Sync Errors: Conflicts or permission issues could cause sync errors; check if you have the right permission levels in the new location.
- Missing Files: If files are missing, check your OneDrive online to confirm if they exist there and weren’t lost during the transition.
Should these steps not resolve the issue, consider consulting Microsoft’s support resources or restarting your PC, which can often solve miscellaneous problems.
Remember that by taking methodical steps throughout the migration and knowing how to handle potential issues, you can minimize disruption and keep your files safe.
Benefits of Relocating Your OneDrive Folder
Relocating your OneDrive folder comes with multiple advantages:
- Enhanced Storage Management: By moving your folder to a drive with more space, your primary system drive remains free for other critical files and applications.
- Improved System Performance: Spreading out data across multiple drives can enhance the performance of your system by reducing the load on any single drive.
- Flexibility in File Access: Change your OneDrive location to a more convenient or easily accessible spot on your network, personalizing your storage solution.
- Efficient Backup Solutions: With your OneDrive folder on an external drive, you have an additional layer of data backup, offering peace of mind.
- Adaptability to Workflows: Professionals with large files can adapt their storage solutions to better fit their workflows, optimizing productivity.
Consider these benefits as you decide whether relocating the OneDrive folder fits your needs.
Additional Tips for Organizing Your OneDrive
For an optimized OneDrive experience, organization is key. Here are some additional tips:
- Folder Structure: Create a logical folder hierarchy for easy navigation and file retrieval.
- File Naming: Stick to consistent naming conventions for your files to make them easily searchable.
- Regular Clean-up: Periodically review and remove outdated or unnecessary files to keep your OneDrive clutter-free.
- Selective Sync: Use OneDrive’s selective sync feature to sync only the files you need on your device, saving space and bandwidth.
- Archiving: Archive older files that are not frequently accessed but that you prefer not to delete, perhaps in a designated Archive folder.
Integrating these habits into your routine can help you maintain a tidy and efficient OneDrive.
FAQs
Can I move the OneDrive folder to an external drive?
Yes, you can move the OneDrive folder to an external drive. Just make sure that the drive is always connected when you start up your PC, as OneDrive will need to access its folder to sync files.
What happens if I move files out of the OneDrive folder?
If you move files out of the OneDrive folder, they will no longer be synced to the cloud. These files also won’t be accessible from other devices where you use OneDrive unless you move them back or upload them manually.
Is it possible to rename the OneDrive folder after moving it?
No, renaming the OneDrive folder is not recommended. It can disrupt the synchronization with the cloud and possibly cause errors with the files that are already synced. Stick with the default folder name to ensure smooth operation.
How can I ensure that my files are syncing correctly after changing the location?
To ensure your files are syncing correctly after changing the OneDrive location:
STEP 1: Check the OneDrive sync status in the taskbar.
STEP 2: Confirm that all desired folders are selected in your sync settings. This helps maintain consistent synchronization of your files.
John Michaloudis is a former accountant and finance analyst at General Electric, a Microsoft MVP since 2020, an Amazon #1 bestselling author of 4 Microsoft Excel books and teacher of Microsoft Excel & Office over at his flagship MyExcelOnline Academy Online Course.

