Learn about Formulas with our 101 Advanced Excel Formulas & Functions Examples!
Key Takeaways
- To circle key points in PowerPoint, first select the object (text, shape, or image) that you want to emphasize.
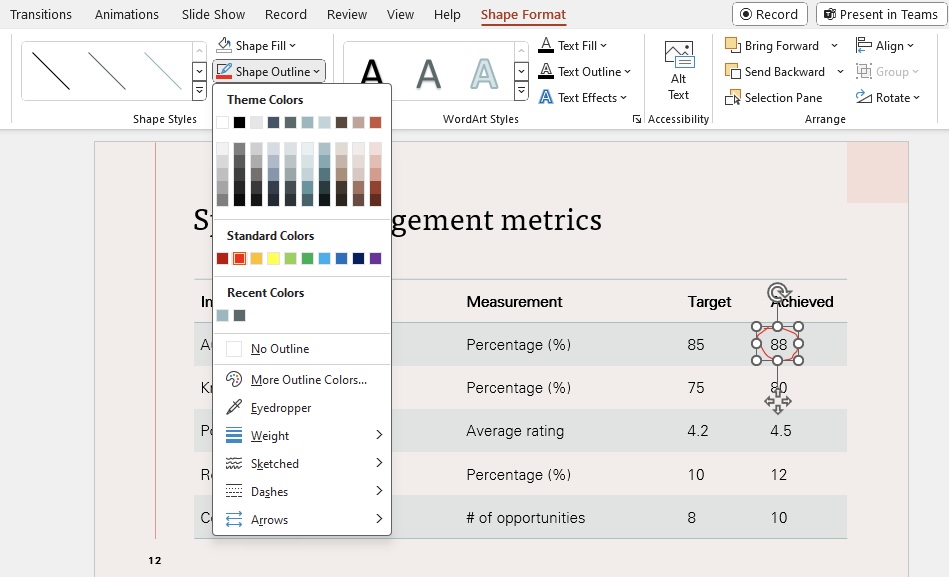
- Use the Drawing Tools Format tab to find the Shape Outline option, and from the drop-down menu, choose the circle shape.
- Adjust the size and positioning of the circle to ensure it properly encircles the selected object and draws attention to it effectively.
Why Circle Key Points in Your Presentation?
Highlighting key points in your presentation does more than just draw the eye; it creates a visual cue that signifies importance. This technique can help underscore facts, figures, or any piece of information that you want your audience to remember. It’s like saying, “Hey, look here; this is crucial!” Plus, it adds an element of design to your slides, making them more engaging.
Table of Contents
User-Friendly Techniques for Circling Objects
Method 1: Using the Shape Tool to Create Circles
Using the Shape Tool in PowerPoint is a straightforward and precise way to circle key points in your slides. Here’s how you do it:
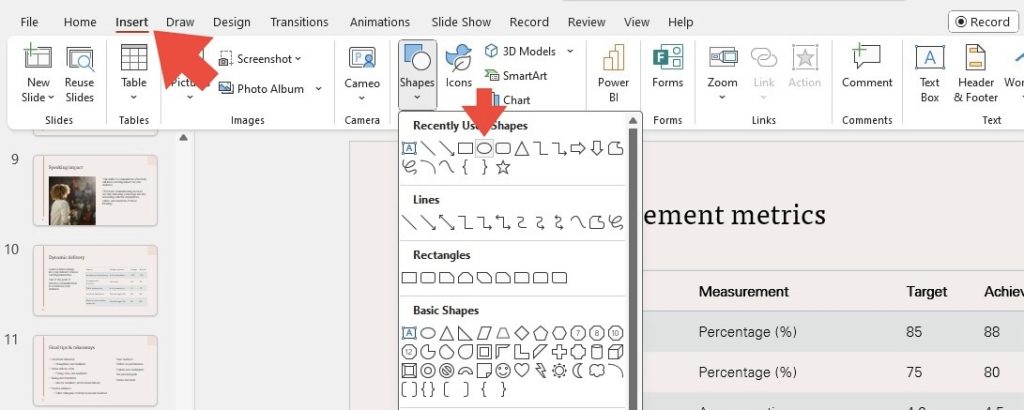
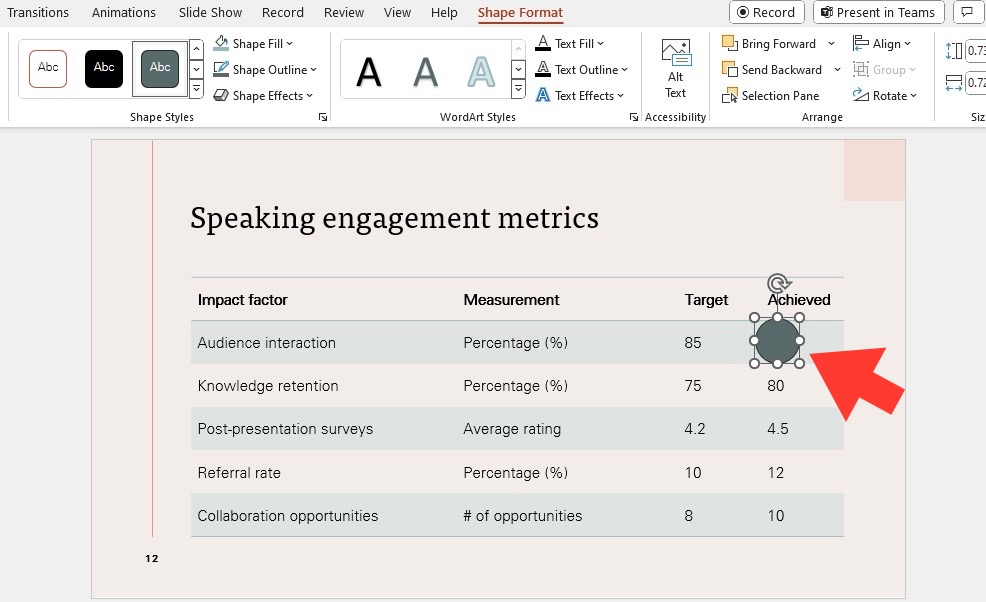
STEP 1: Navigate to the “Insert” tab and click on “Shapes.” Select the oval shape to create a perfect circle by holding down the ‘Shift’ key while dragging your cursor.
STEP 2: Adjust the circle over the key point you wish to highlight by clicking and dragging.
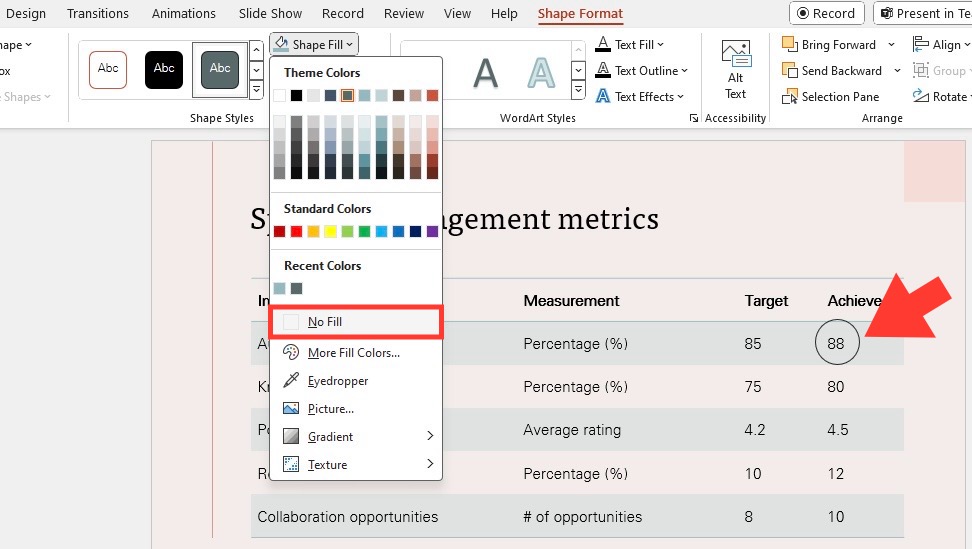
STEP 3: Customize the circle using the “Format” tab to change its color, outline, and effects to match your presentation’s theme. Click on Shape Fill > No Fill to create an outline of a circle.
This method is ideal for those who value accuracy and consistency.
Method 2: Freeform Drawing for Emphasis
For a more organic feel, you can use the Freeform Drawing tool to circle key points. This method allows for a hand-drawn look that can bring personal touch and immediacy to your presentation:
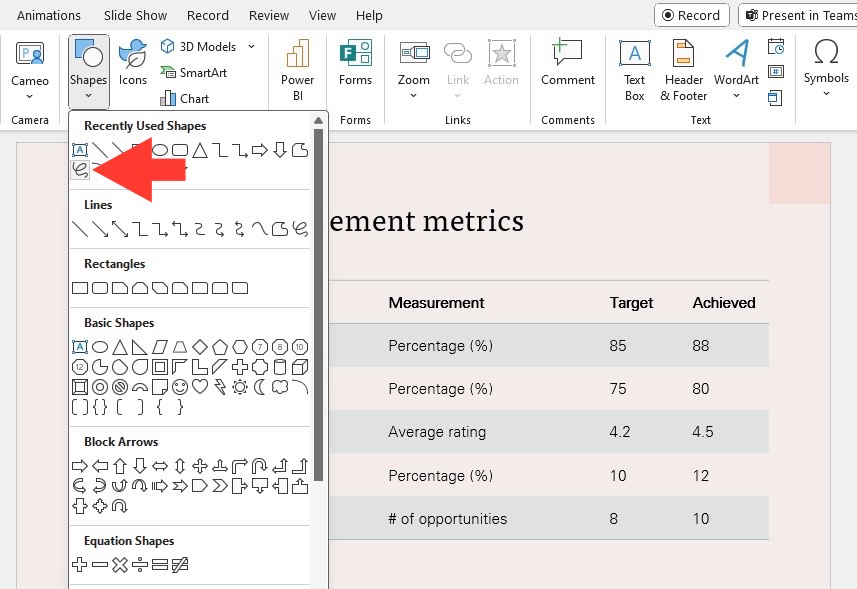
STEP 1: Go to the “Insert” tab, select “Shapes,” and choose the “Freeform” option to start drawing your shape.
STEP 2: Click to begin the line and release to stop; continue until you’ve drawn a circle around the area you want to emphasize.
STEP 3: Refine the shape by clicking and adjusting the points to achieve the desired look.
While this method might be less precise than using the Shape Tool, it can be useful in creating a sense of engagement as if you were highlighting something on a whiteboard in real time.
Optimizing Visual Appeal
Customizing the Appearance of Circles
Customizing the appearance of circles in your PowerPoint presentation ensures they complement your content and theme seamlessly. To personalize your circles, follow these tips:
- Fill Adjustments: You can tweak the fill color or add gradient effects, patterns, or pictures to make your circles stand out or blend in with the slide background.
- Line Settings: Choose the color, thickness, and style (solid, dashed, or dotted) of your circle’s outline to enhance visibility against different slide elements.
- Shadow and Glow: Add depth and emphasis by incorporating shadow effects, or use a glow option to make your circle lively and eye-catching.
Remember, consistency is key in professional presentations, so once you’ve found a style you like, stick with it across all your circles.
Animation Effects to Capture Attention
Injecting a bit of motion into your presentation can really make those key points pop. Utilizing animation effects for your circles ensures they’ll grab attention at just the right moment. Here’s how to animate them:
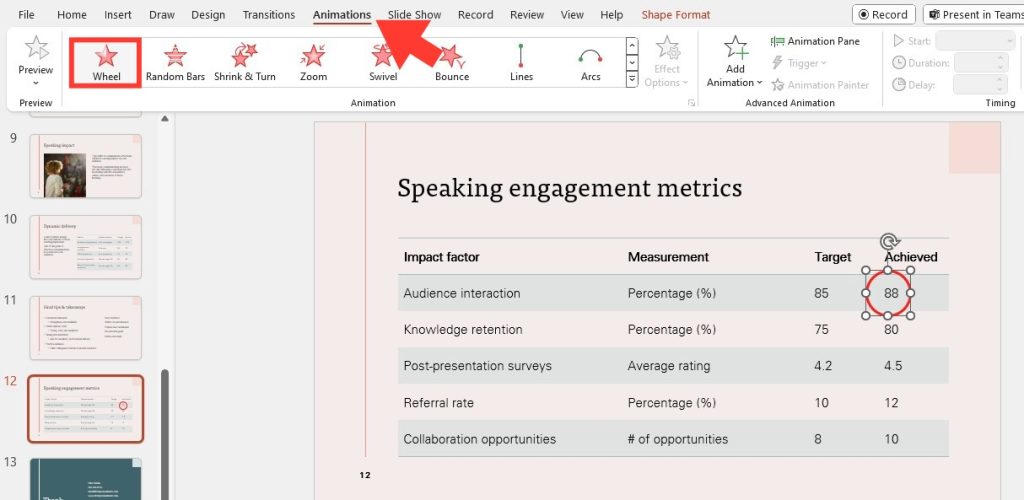
STEP 1: Choose your circle and head over to the “Animations” tab. Peruse the entrance effects, and decide whether a subtle “Fade” or an energetic “Fly In” best suits your content.
STEP 2: To make the animation truly special, consider the “Wheel” effect, where the circle appears as though it is being drawn in real-time around your key point.
STEP 3: Tinker with the animation settings, adjusting the duration and timing to sync perfectly with your presentation flow.
Animations can serve as dynamic signals, marking noteworthy information without a word, and can be an effective way to keep your audience dialed into your presentation.
Efficient Editing and Positioning
Adjusting and Resizing Circles
Properly sized circles ensure that information is highlighted without overwhelming your slide. To resize a circle in PowerPoint:
STEP 1: Click directly on the circle, and drag one of the corner handles in or out to make the circle larger or smaller while maintaining its proportions.
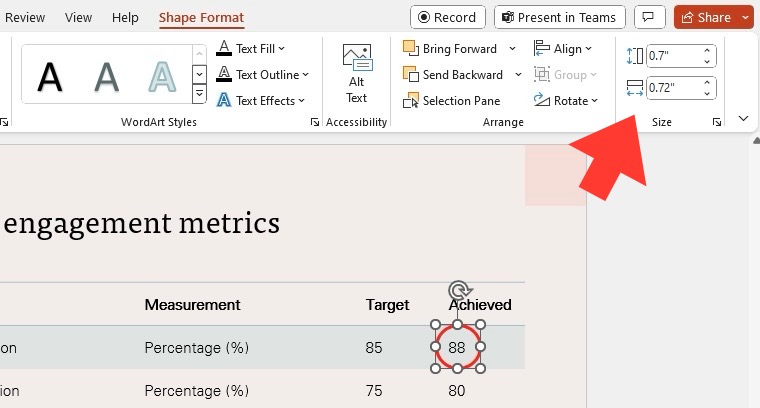
STEP 2: For precise adjustments, right-click on the circle and select ‘Format Shape’. Here, you can input exact measurements for the height and width, offering you a high level of control.
STEP 3: Alternatively, under the “Format” tab, use the “Size” section to adjust the “Height” and “Width” sliders for minute changes.
Tip: You can move the circle with precision by using the arrows on your keyboard.
This flexibility allows you to adjust circles to the right size quickly and ensure nothing important is obscured or looks out of place.
Aligning Circles with Presentation Content
For a polished and professional look, aligning circles with other presentation elements is crucial. It highlights the key points while maintaining a clean layout. Here’s how to align circles effectively:
STEP 1: Select your circle, and hold down the “Shift” key to select additional objects (like text boxes or images) you wish to align with.
STEP 2: Navigate to the “Format” tab, and in the “Arrange” group, click “Align.” Choose from options like “Align Center,” “Align Left,” or “Align Top” to align the circle with the selected objects.
STEP 3: Use “Align to Slide” to center or position the circle relative to the entire slide, ensuring consistent placement across multiple slides.
By neatly aligning your circles, you help create a visual harmony that allows the audience to follow along effortlessly.
Advanced Tips and Tricks
Layering Shapes for Improved Clarity
Layering shapes is a technique that can enhance the clarity and depth of your PowerPoint slides. By stacking different objects, you can create a more dynamic and organized presentation.
- Start by creating or selecting your shapes. Use the ‘Send to Back’ or ‘Bring to Front’ functions located under the ‘Format’ tab in the ‘Arrange’ group to control the order of the shapes.
- Pay close attention to overlap and how the layers interact visually. Make sure that important information isn’t obscured by a higher layer.
- Consider the use of transparency for your top layers; this can create an intriguing visual effect without hiding the content beneath.
Layering is a simple way to add sophistication to your slides, helping you to articulate complex ideas more clearly.
Utilizing Shortcuts for Faster Creation and Editing
Speed up your PowerPoint workflow by mastering keyboard shortcuts for creating and editing shapes, including circles. Here’s a quick roundup of time-saving shortcuts:
- Insert Textbox: Alt+Shift+X
- Insert Rectangle: Alt+Shift+R
- Insert Oval: Alt+Shift+O
- Insert Right Arrow: Alt+Shift+I
- Insert Right Brace: Alt+Shift+{
These shortcuts enable you to add shapes with a simple keystroke, bypassing the need to navigate through menus. For more advanced users, PPT Productivity lets you customize these shortcuts further to tailor them to your workflow. Remember, the fewer clicks, the more time you save.
FAQ: Honing Your PowerPoint Expertise
Can I copy a circled key point across multiple slides?
Yes, you can copy a circled key point across multiple slides by selecting the circle, pressing “Ctrl+C” to copy, and then “Ctrl+V” to paste it onto other slides.
How do I ensure the circle doesn’t obscure important content?
To prevent the circle from obscuring content, adjust its transparency, resize it appropriately, or change its position. Use the ‘Send to Back’ or ‘Send Backward’ features to layer text over the circle.
How can I move a circle in powerpoint?
You can move a circle in PowerPoint by clicking and dragging it to the desired position. For finer control, use the arrow keys to nudge it incrementally, or set exact coordinates in the ‘Format Shape’ pane.
John Michaloudis is a former accountant and finance analyst at General Electric, a Microsoft MVP since 2020, an Amazon #1 bestselling author of 4 Microsoft Excel books and teacher of Microsoft Excel & Office over at his flagship MyExcelOnline Academy Online Course.

