Unable to Clear Pivot Table Cache Memory? Have you ever cleared, deleted, or replaced your Pivot Table data/items but they still show inside your Pivot Table filters? What gives? Well, you can easily clear your Pivot Table’s old items from your Pivot Table’s memory or cache.
Key Takeaways
-
Pivot Tables Retain Old Data – Even after refreshing, Pivot Tables can still show old or deleted data in dropdown lists due to cached data storage.
-
Manually Clear Old Items – You can remove old items by going to PivotTable Options > Data and setting Number of items to retain per field to None, then refreshing the table.
-
Refresh Pivot Cache Automatically – Using VBA, you can clear old data by running a macro that refreshes and clears Pivot Table cache, preventing outdated entries from appearing.
-
Delete and Recreate the Pivot Table – If old data persists, deleting and rebuilding the Pivot Table from scratch ensures only current data is used.
-
Check for Source Data Updates – Ensure the Pivot Table source range is updated correctly to exclude outdated data before refreshing to avoid unnecessary old items appearing.
Table of Contents
How to Clear Pivot Table Cache Memory
You might have faced this issue before. You have deleted or replaced old data from the data table but even after refreshing the pivot table, the data is still visible.
This is because the old data is stored in the cache memory and displayed in filter selections even if there is no data for it at all. This can be confusing as well as annoying.
Let’s look at an example and understand How to Clear Pivot Table Cache Memory!
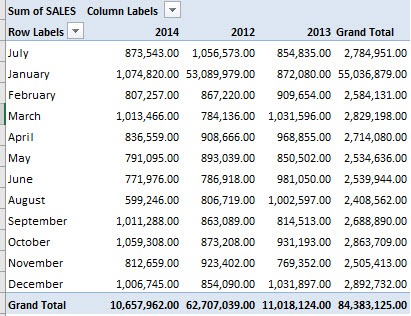
So, you have created a Pivot Table using the original data source containing the years 2012, 2013, and 2014.
The Pivot Table will look like this :
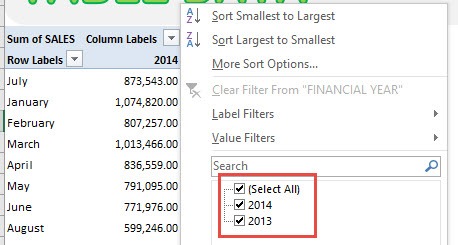
Now, you change the year 2012 in your data source to 2013 and the same is reflected in the Pivot Table as well. But, the year 2012 is still visible in the Pivot Table’s filter selection.
This is because the old item is still saved in the Pivot Table cache memory. Let’s learn how to fix it!
Example 1:
Follow the step-by-step tutorial on How to Clear Pivot Table cache memory and make sure to download the exercise workbook to follow along:
STEP 1: Below is our data source and we want to replace the year 2012 with 2013, effectively only showing the years 2014 & 2013.
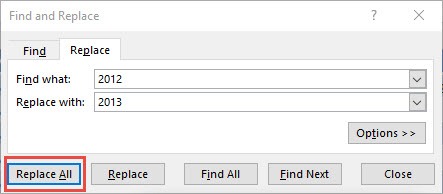
Go to Home > Find & Select > Replace
Let us replace the year 2012 with the year 2013. Click Replace All.
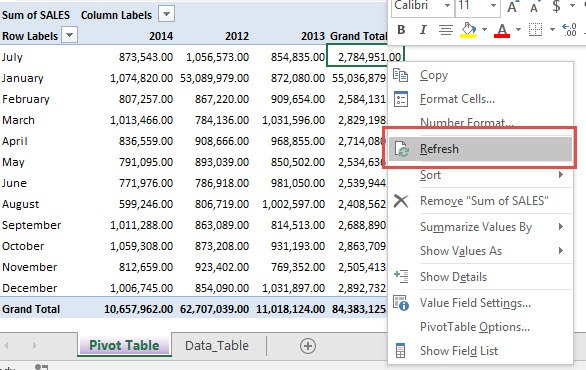
STEP 2: Go back to your Pivot Table. Right click and select Refresh.
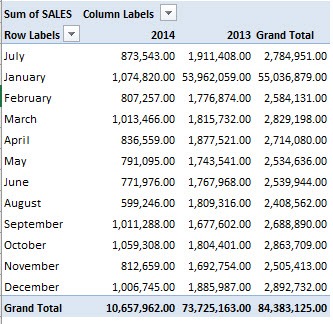
We have technically deleted the year 2012 records, so they should be gone from our Pivot Table, right?
Hmm.. Looking good, the year 2012 is now gone from our Pivot Table!
BUT WAIT!
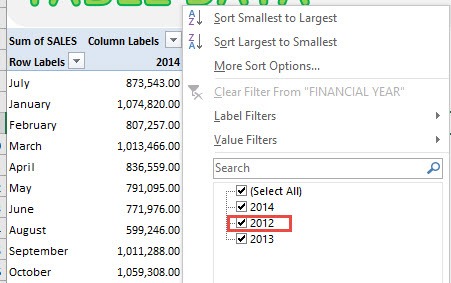
Clicking on the Column Labels drop-down list, the Year 2012 is still there! Bloody hell!
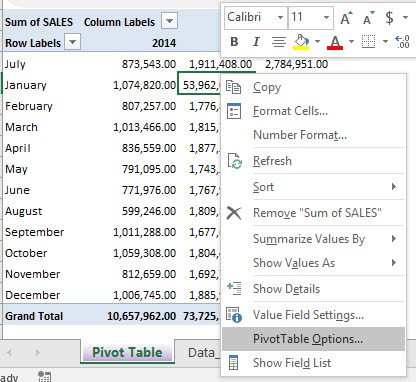
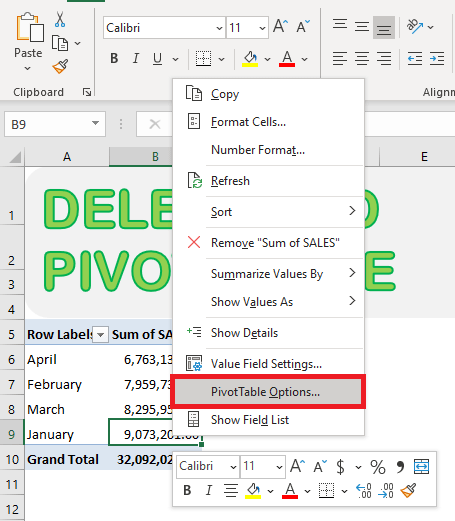
STEP 3: Let us fix this! Go back to your Pivot Table > Right click and select PivotTable Options.
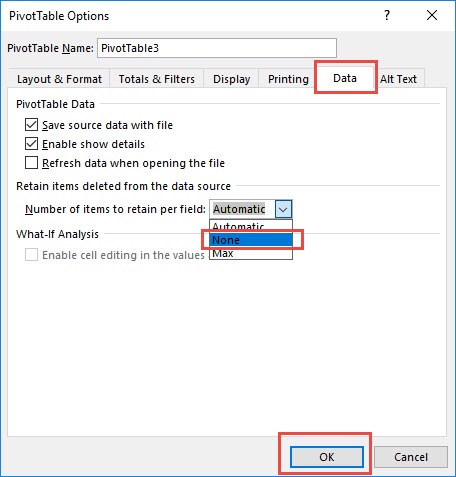
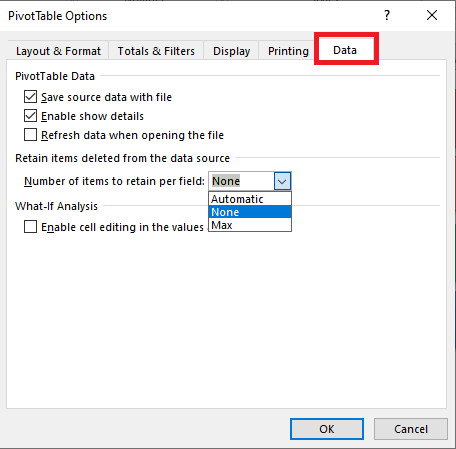
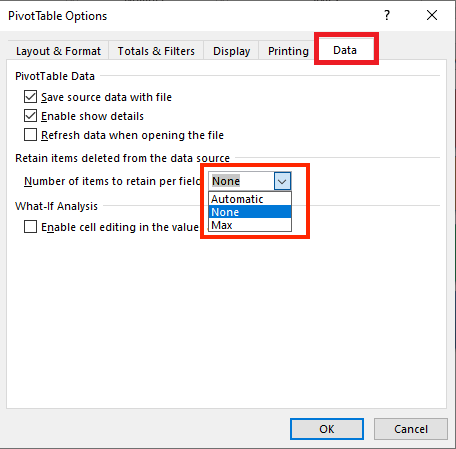
STEP 4: Go to Data > Number of items to retain per field.
Select None then OK. This will stop Excel from retaining deleted data!
This box lets you set the number of items per field to temporarily save, or cache with the workbook.
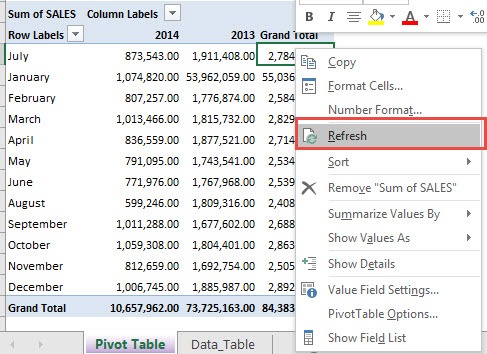
STEP 5: Go back to your Pivot Table. Right-click and select Refresh.
Click the Column Labels drop-down list, and the Year 2012 is now gone! Problem fixed!
Example 2:
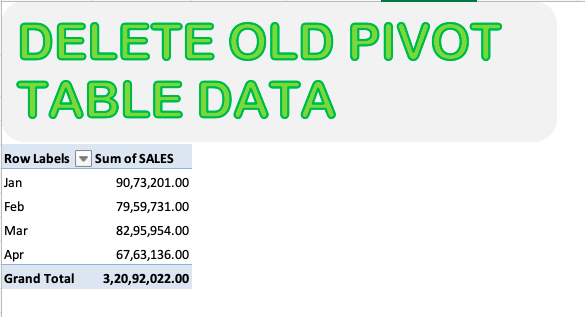
In this table, months are displayed as abbreviations i.e. 3-letter month name, and using this data a Pivot Table is created.
But after creating Pivot, you realize it is better to present the full-length month name and hence you change the name in the data source.
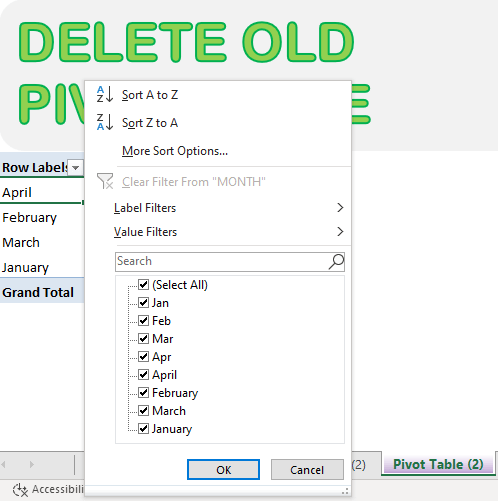
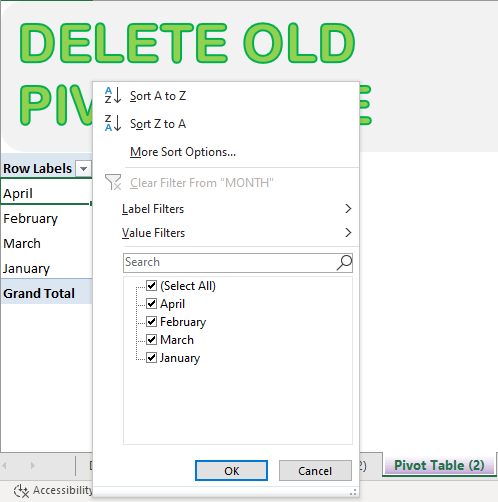
Now, when you look at the filter selection of Pivot Table, you will find that both versions of the month names are visible.
Let’s fix that using the 3 simple steps!
STEP 1: Right-click on the Pivot Table and select PivotTable Options.
STEP 2: In the dialog box, go to Data Tab.
STEP 3: In the dropdown for the Number of items to retain per field, select None.
Click OK and don’t forget to refresh the Pivot Table.
This will remove the abbreviated version of the month name and only show the full-length month name.
To keep the data in the Pivot Table’s filter updated, make sure to change the number of items to retain per field to None.
Once that is done and you refresh your table, the old data will no longer appear. This will clear Pivot Table Cache Memory!
Change Default setting of Retain Items
By default, the number of items to retain per field is set to “Automatic”.
If you want you even change the default setting to None so this setting is reflected in all the Pivot Tables you create. To do that, follow the steps below (this is applicable for Office 365 and Excel 2019 only):
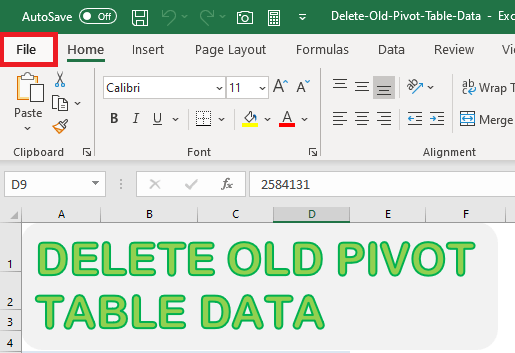
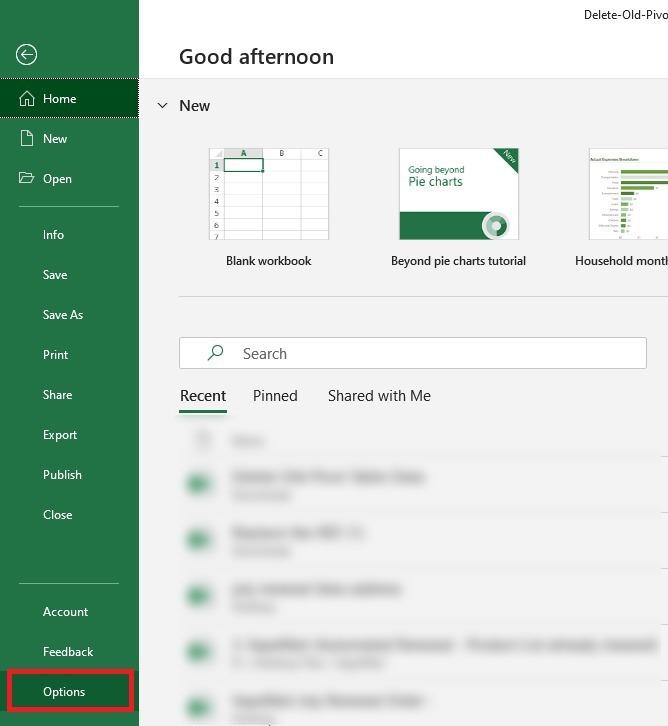
STEP 1: Click on the File Tab at the top-left corner of Excel
STEP 2: From the left panel, select Options.
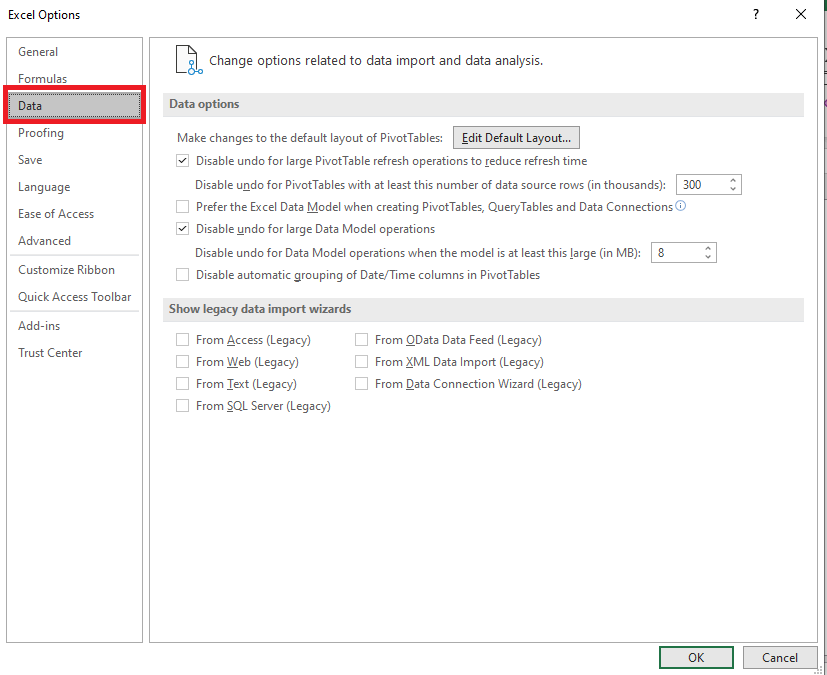
STEP 3: In the Excel Options dialog box, click on the Data.
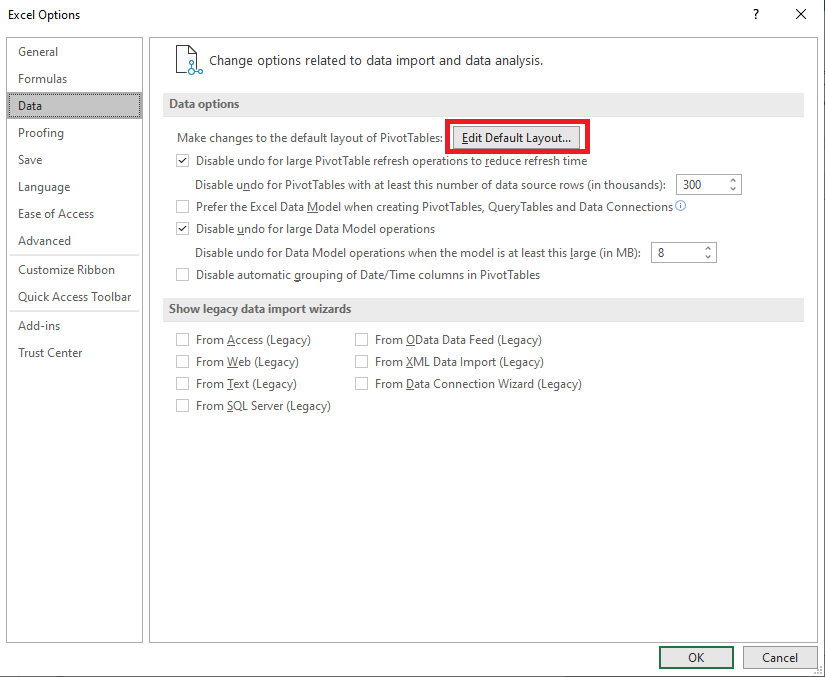
STEP 4: Under Data Options, select Edit Default Layout button
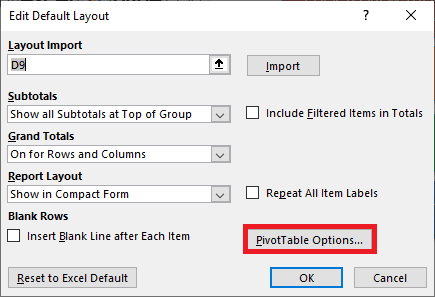
STEP 5: In the Edit Default Layout dialog box, click on PivotTable options button.
STEP 6: In the PivotTable Options dialog box, click on the Data tab,
STEP 7: Under the Data tab, select None from the drop-down list in the Retain Items section
Click Ok three times and Voila it’s done! The old deleted items from the data source are not shown in the Pivot Table’s filter selection anymore.
Frequently Asked Questions
Why do old items still appear in my Pivot Table even after refreshing?
Old items remain because Excel stores a cache of previous data to speed up Pivot Table performance. This cache needs to be manually cleared.
How can I remove old items from the Pivot Table dropdown list?
Go to PivotTable Options > Data and set Number of items to retain per field to None, then refresh the Pivot Table. This will clear outdated items.
Can I use VBA to clear old Pivot Table items automatically?
Yes, you can run a VBA macro to refresh and clear the Pivot Table cache. This ensures that only the latest data is displayed without manually adjusting settings.
Will deleting and recreating the Pivot Table remove old data?
Yes, if refreshing doesn’t work, deleting and rebuilding the Pivot Table ensures that only current data is used, effectively removing outdated items.
How do I prevent old items from appearing in the future?
Always update your data source range before refreshing the Pivot Table and set the Number of items to retain per field to None to stop Excel from storing old data.
Conclusion
In this tutorial, you have learned how to delete pivot table cache memory and change the default setting of the retain items deleted from the data source.
This will help you to force the Pivot Table to only show data or items that are currently in the data source.

Bryan
Bryan Hong is an IT Software Developer for more than 10 years and has the following certifications: Microsoft Certified Professional Developer (MCPD): Web Developer, Microsoft Certified Technology Specialist (MCTS): Windows Applications, Microsoft Certified Systems Engineer (MCSE) and Microsoft Certified Systems Administrator (MCSA).
He is also an Amazon #1 bestselling author of 4 Microsoft Excel books and a teacher of Microsoft Excel & Office at the MyExecelOnline Academy Online Course.
