In this tutorial, we will be providing you with a comprehensive overview of the features of Microsoft OneDrive, including its’ real-world uses.
- Introduction to Microsoft OneDrive
- When to Use SharePoint or OneDrive
- Microsoft OneDrive | OneDrive Sync Explained
- Microsoft OneDrive Tips and Tricks
- How to Fix OneDrive Sync Issues 2023
- OneDrive vs Google Drive – Which Should You Use?
Introduction to Microsoft OneDrive
Microsoft’s cloud storage solution, OneDrive, allows you to securely store all of your files in one location and access them from anywhere. Windows 10’s integrated Microsoft OneDrive cloud storage capability is a tool you should not miss out on.
Microsoft has refined OneDrive into a strong, trustworthy, and incredibly helpful service over the course of many years. In the contemporary world where everything is increasingly digital, additional storage space is something that everyone requires.
This need can easily be solved by Microsoft OneDrive. Watch Introduction to Microsoft OneDrive on YouTube and give it a thumbs-up!
In this article, we will cover the following topics:
Let’s look at each of these topics one by one!
- You can easily synchronize your data from a local folder with the cloud.
- You can be confident about data security because Microsoft protects your data both in transit and at rest by using robust encryption.
- You can conveniently share your data with friends, families, colleagues, and even co-workers.
- You can access your uploaded files from multiple devices.
- It frees up a lot of your device’s space, making it operate at a more optimum level.
- It can display multiple types of files without having the proper apps to view them.
- You can back up your data, protecting it from data loss and ransomware attacks.
- OneDrive can offer security on multiple levels, with tools to place restrictions on data sharing like synchronizing company data with your home computer.
Let us explore how we can use OneDrive on different devices!
There are 3 different ways to access OneDrive. You can use it on a PC, you can use it over the Internet, and lastly, you can use it on any handheld devices like phones and tablets.
OneDrive comes preinstalled on your device if you are using Windows 11. To access OneDrive, you need to follow these steps –
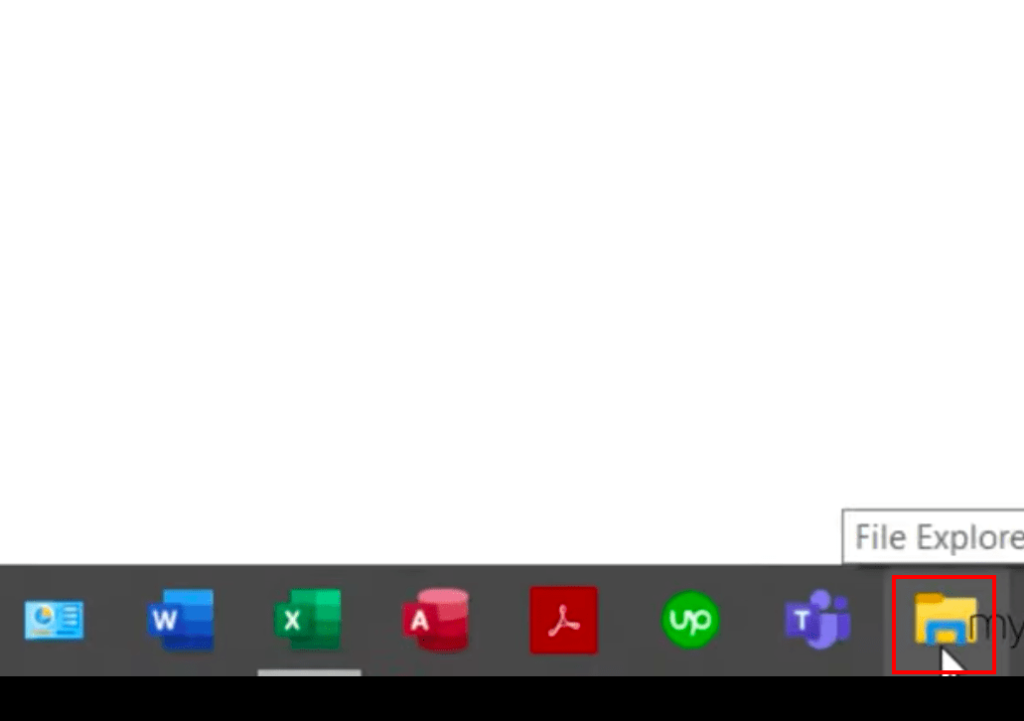
- Open File Explorer.
You can open it via the icon present on your taskbar at the bottom of the screen.
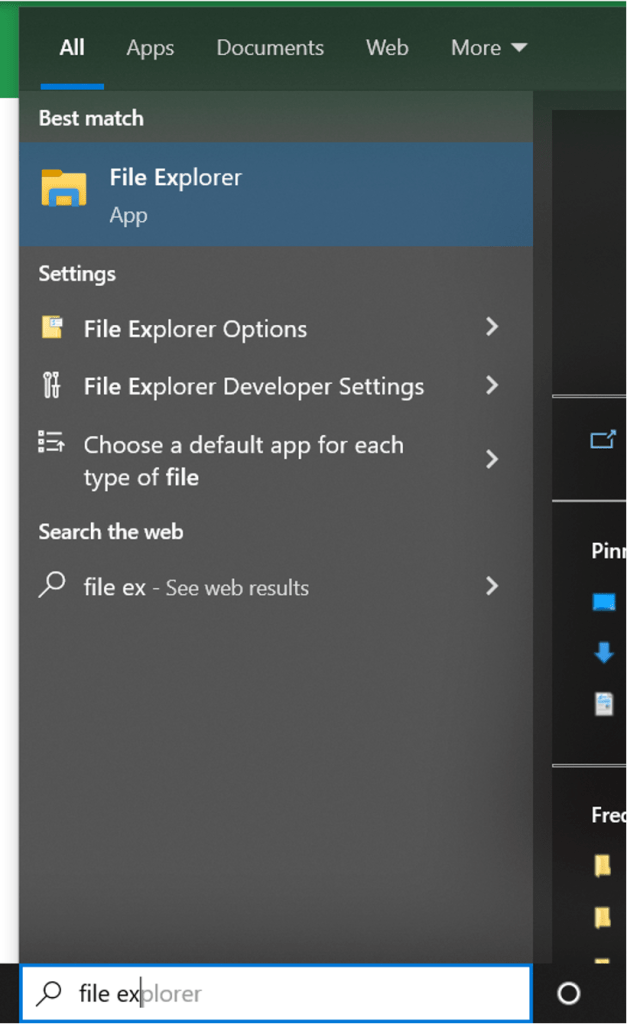
Alternatively, You can type “File Explorer” in the search bar at the bottom of the screen and select the result.
From the folder’s list, you can spot the folder for OneDrive. Clicking on it will access your personal OneDrive folder and show the contents in it.
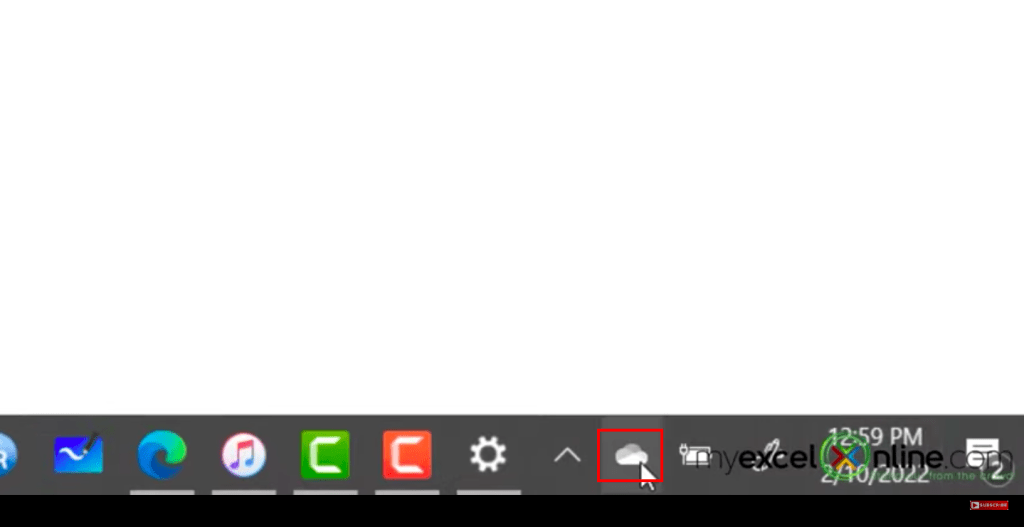
Alternatively, you can also access your OneDrive via the Taskbar. On the Taskbar, near the clock, you will find a cloud icon. Clicking on that will open up OneDrive.
If that icon is not visible to you, you can –
- Go to the search bar.
- Type and open up Taskbar settings.
- Scroll down and click on “Select which icons appear on the taskbar”.
- Make sure the setting for OneDrive is switched on.
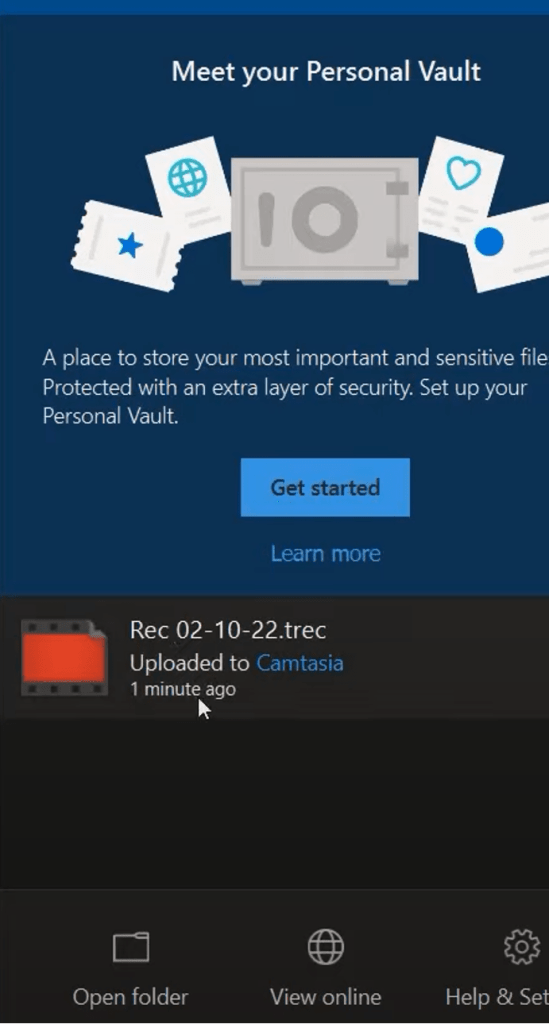
Once you open up OneDrive via the cloud icon on your taskbar, you will be able to see the files you have shared with someone else.
If you click on the Open Folder option, it will take you back to the OneDrive folder that we saw earlier.
Now let us explore the contents inside this folder.
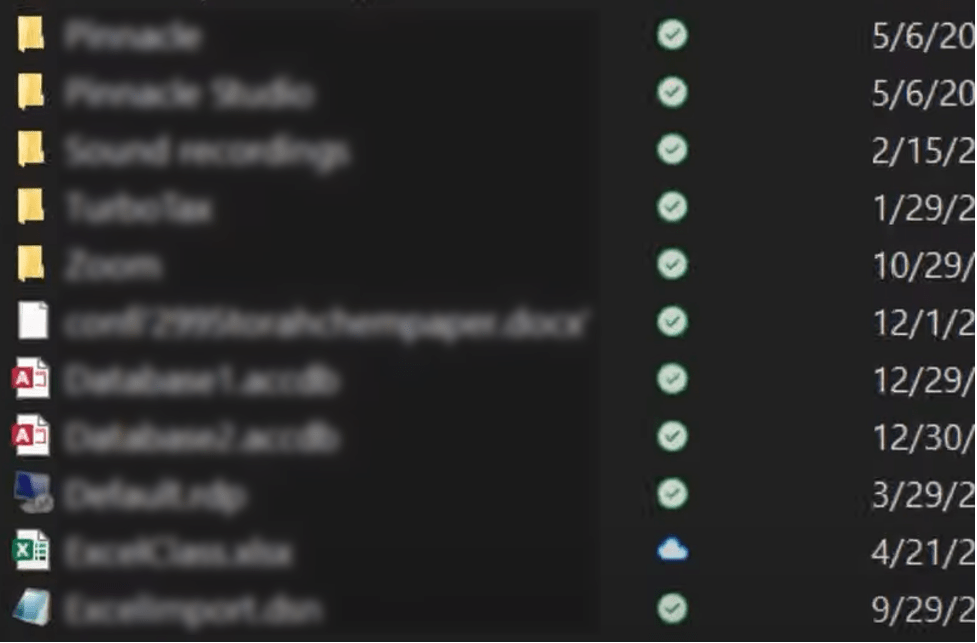
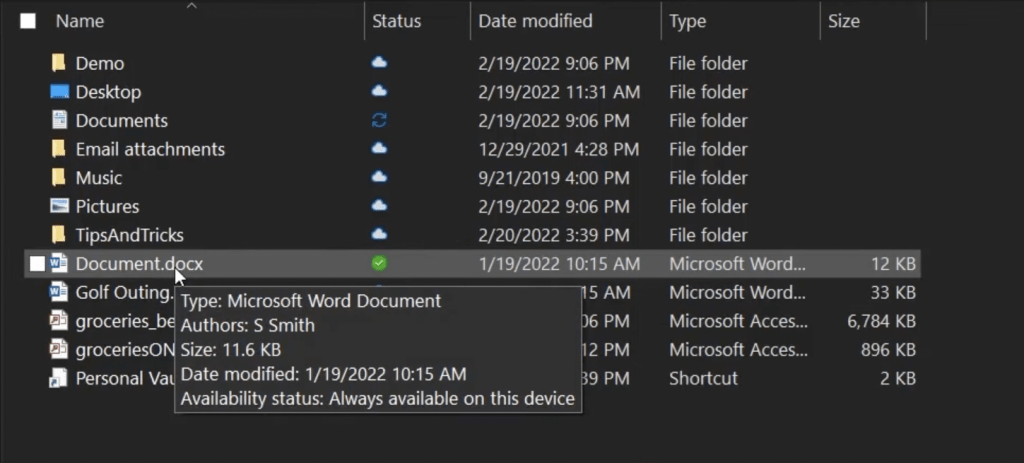
- If you see a cloud icon beside any file, then that means it is safely stored on the OneDrive cloud.
- A green tick means that you have a local copy of the file on your PC. You don’t even need the internet to access this file.
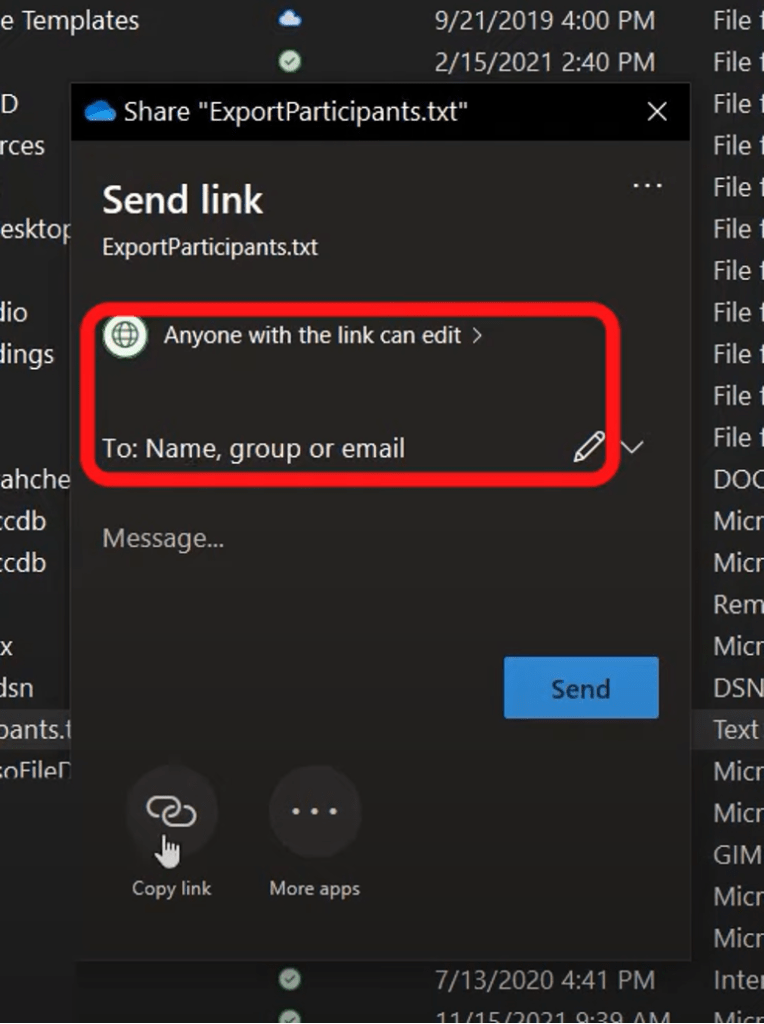
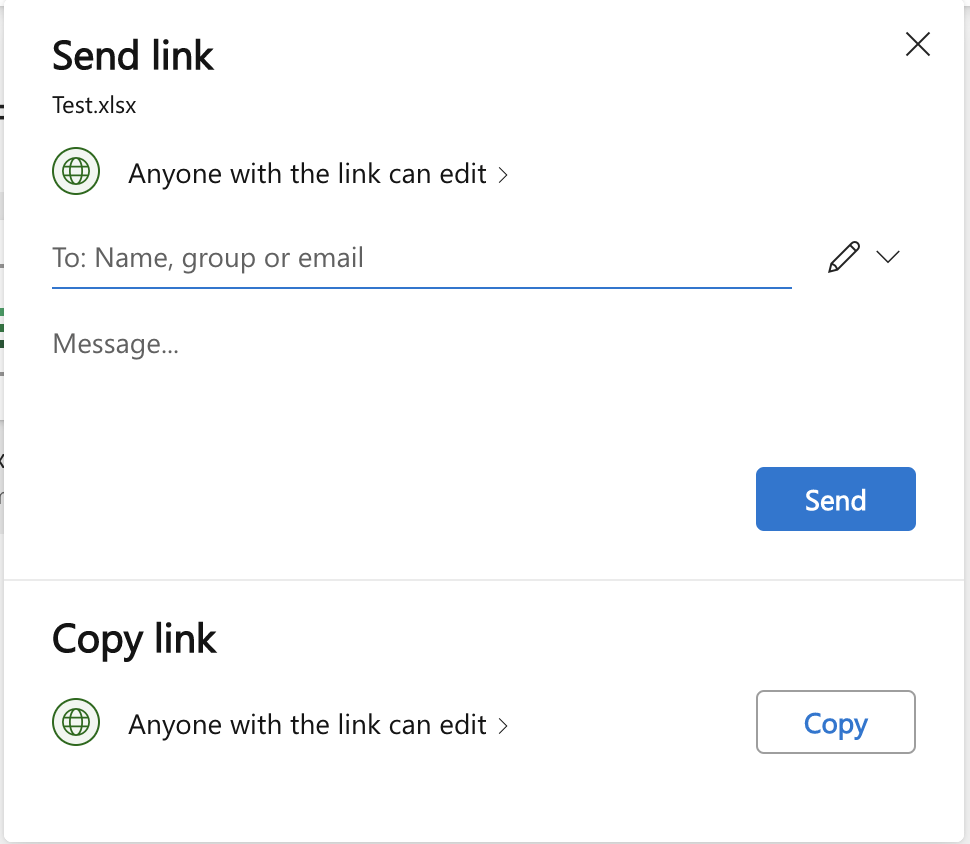
- You can right-click on any file and click on Share to share the file with someone else. There you can enter the name or email address of the person you want to share the file with. You can even copy the link by clicking on the Copy Link icon and send that link via any medium you want.
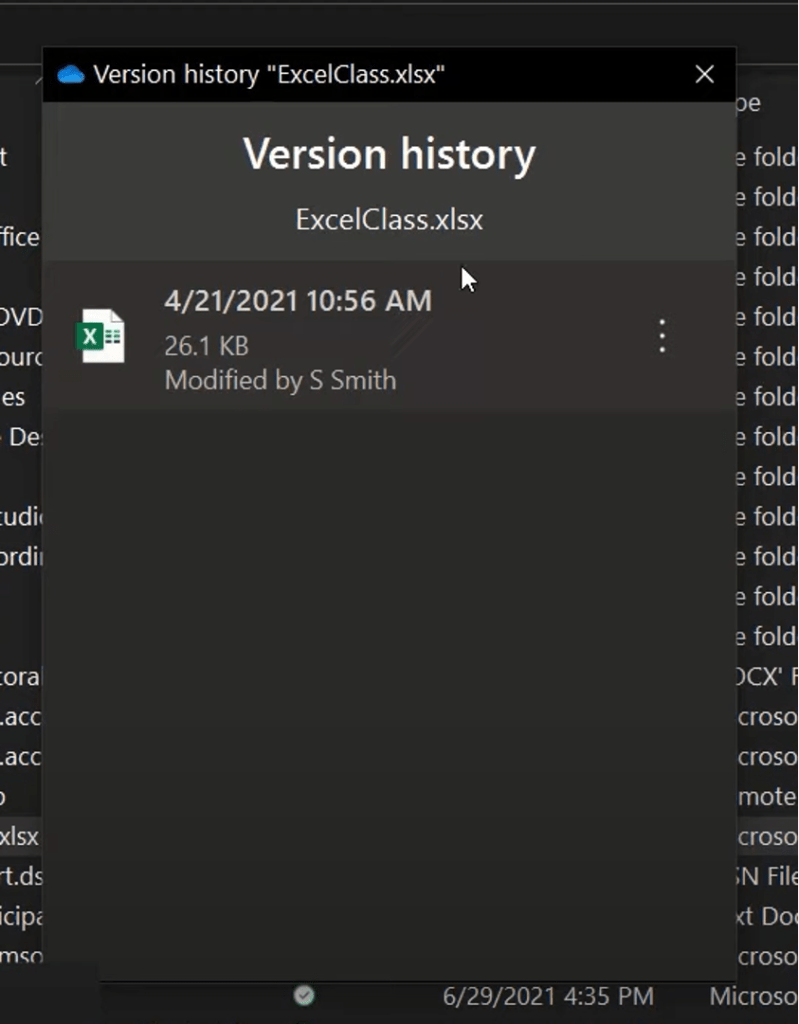
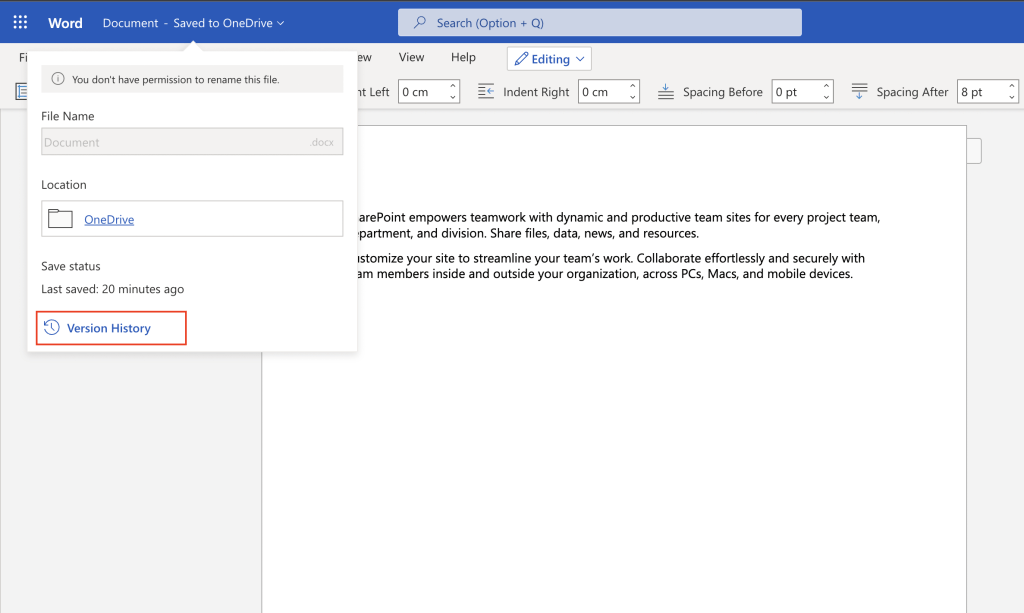
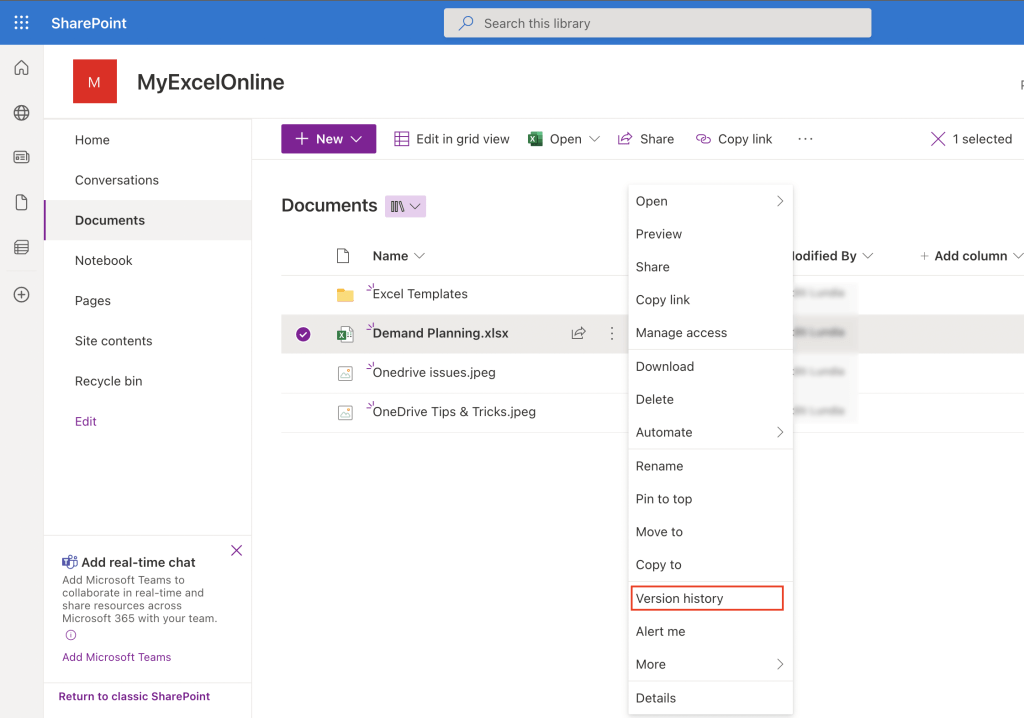
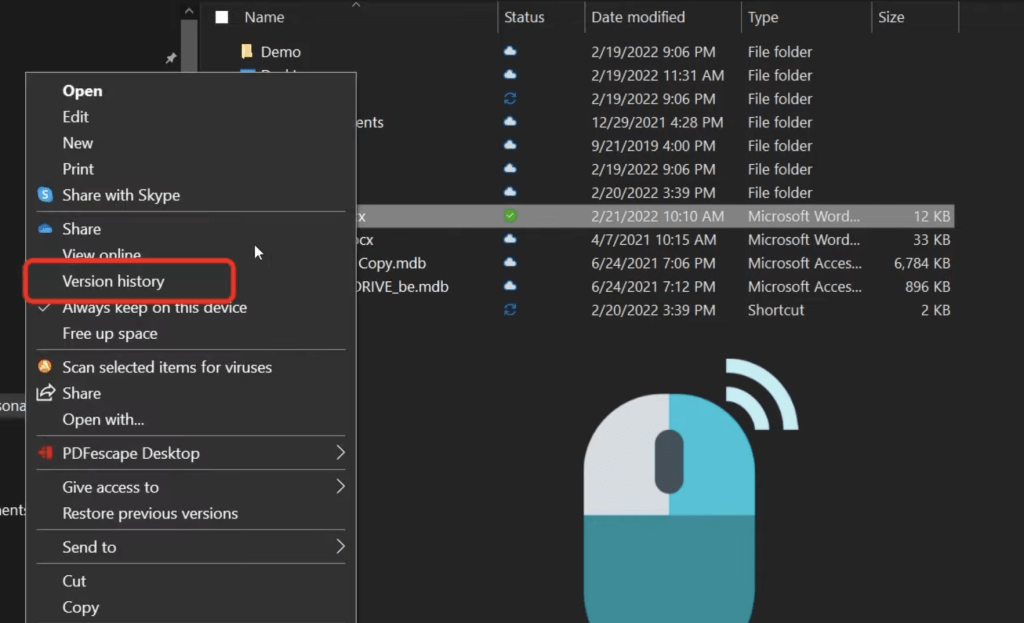
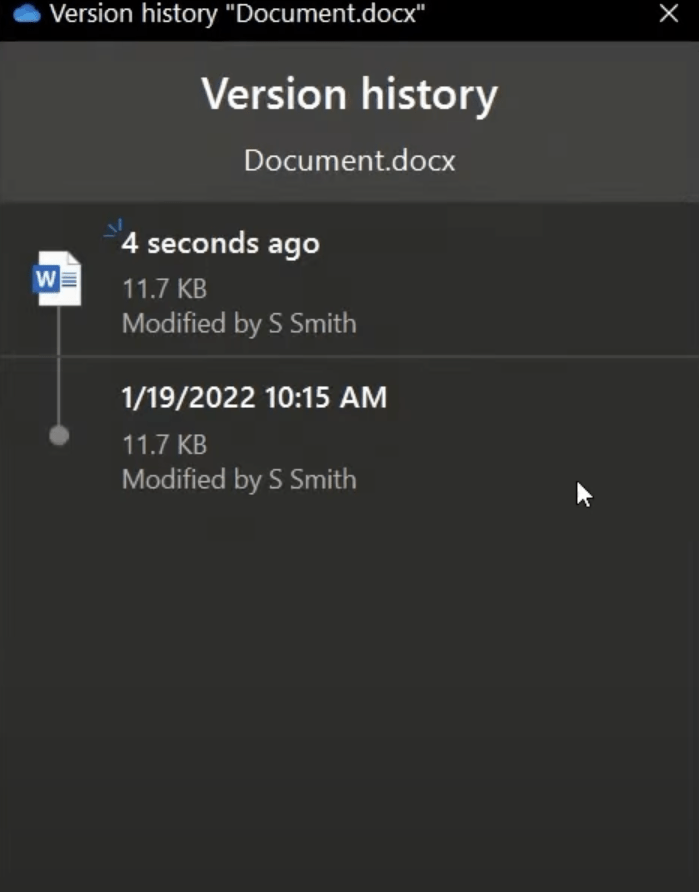
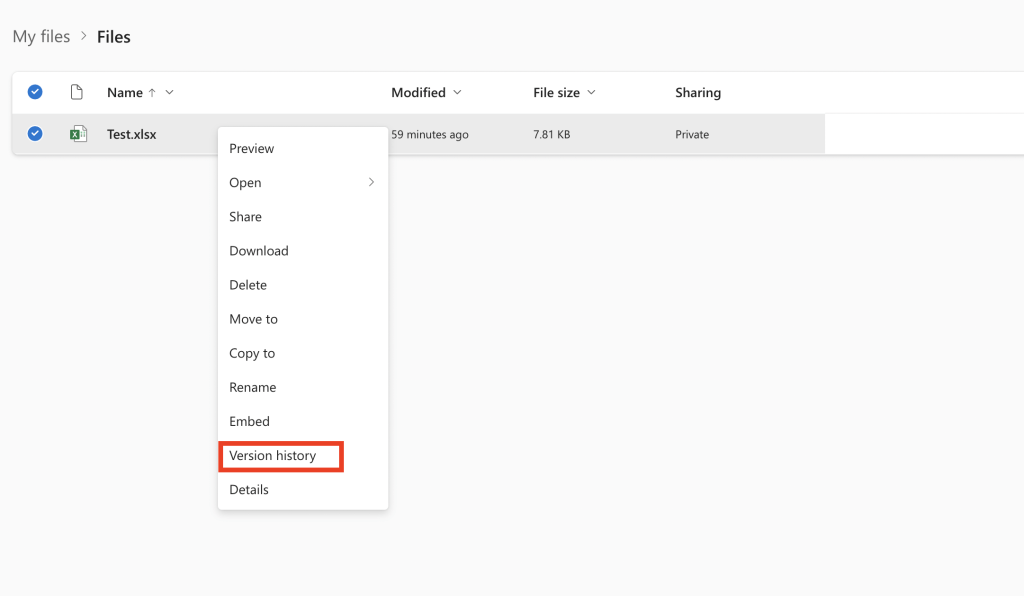
- You can also right-click on any file and click on Version History. This will show you the different versions of the file that multiple people may have worked on. You can open up previous versions of the file to spot consistency or human errors.
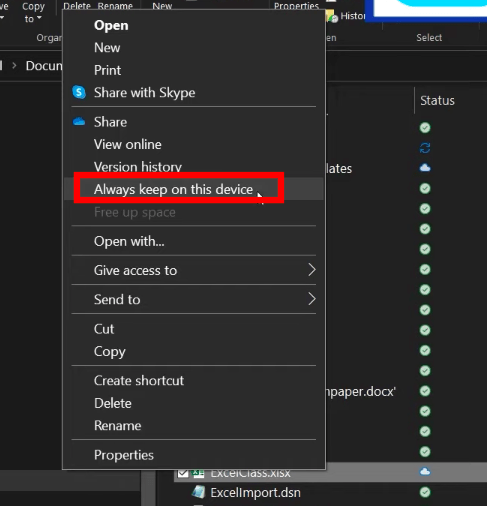
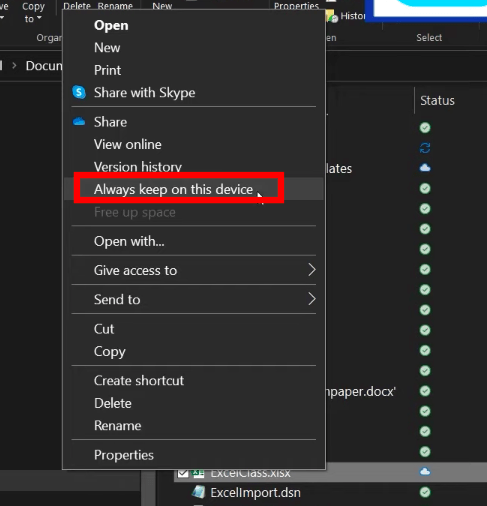
- You can also right-click on any file and click on Always keep on this device so that you always have a copy on the device that you can easily access.
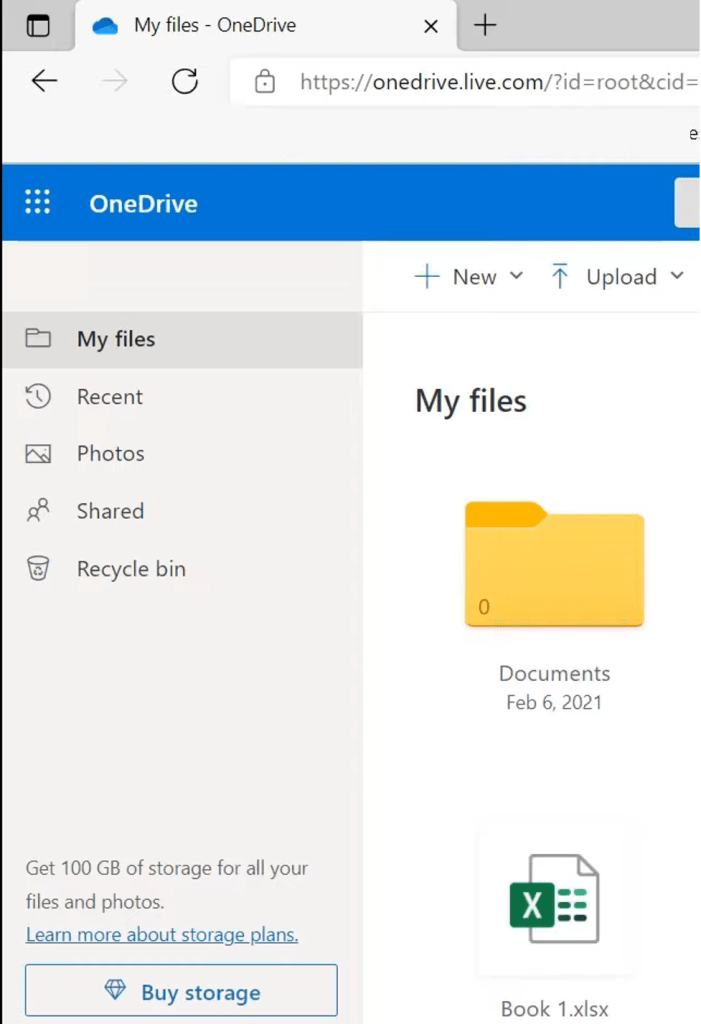
Once you open your Web Browser (Microsoft Edge), you will directly be taken to your OneDrive folder. Your files will be visible in this folder if they are shared with OneDrive.
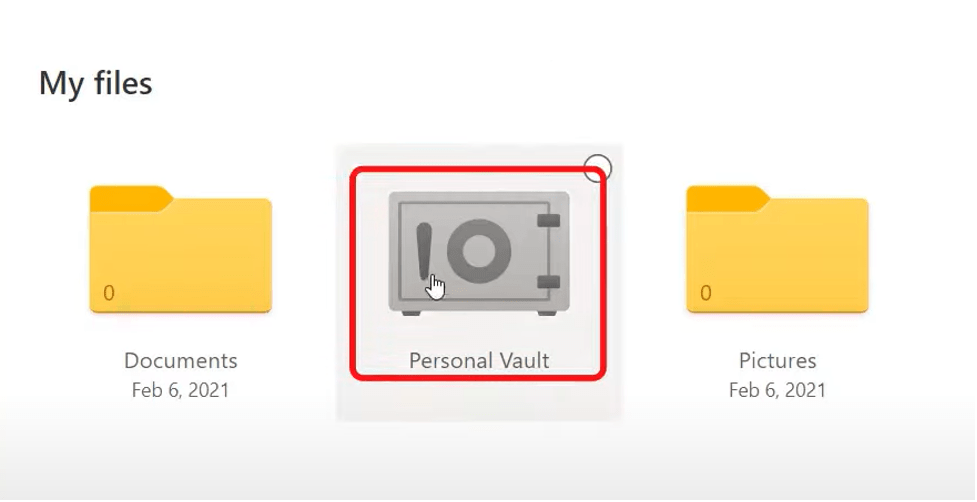
One thing that you would notice is the Personal Vault folder. This folder is a great way to keep your personal files and documents secure. It requires two-factor authentication to access it, making it a highly secure place to keep your files.
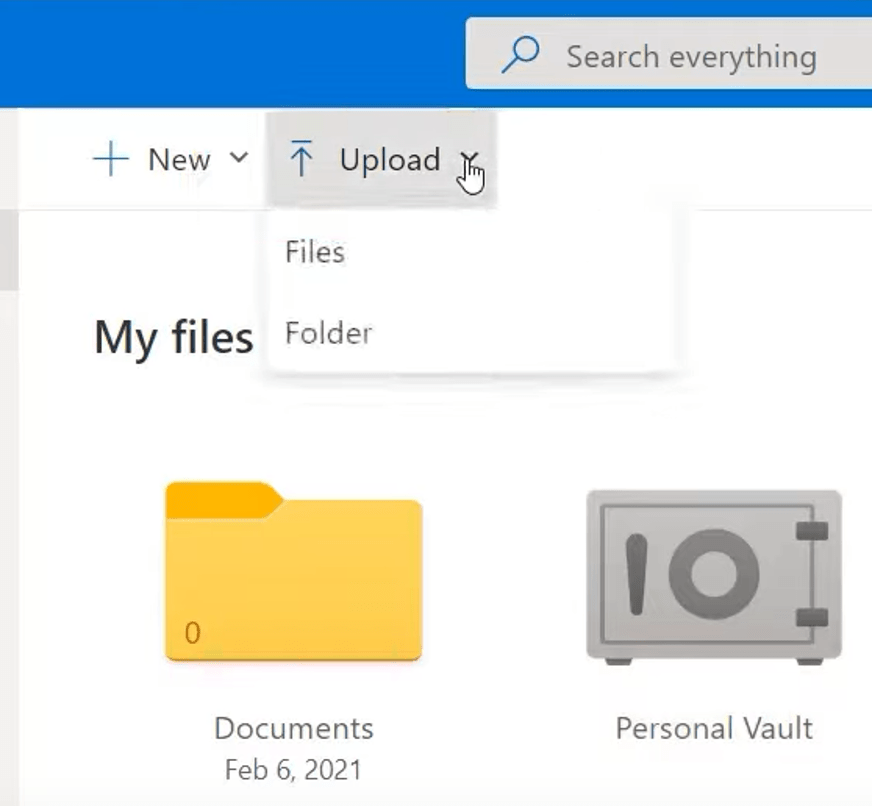
You can click on the Upload button and select the option for files or folders. A new window explorer will pop up where you can browse your computer and upload any files to your OneDrive cloud.
You can also select any file and click on download to have a copy of the file on your device. Then you will not need to have an internet connection to access the file. You can also perform other functions like deleting, moving, renaming, etc.
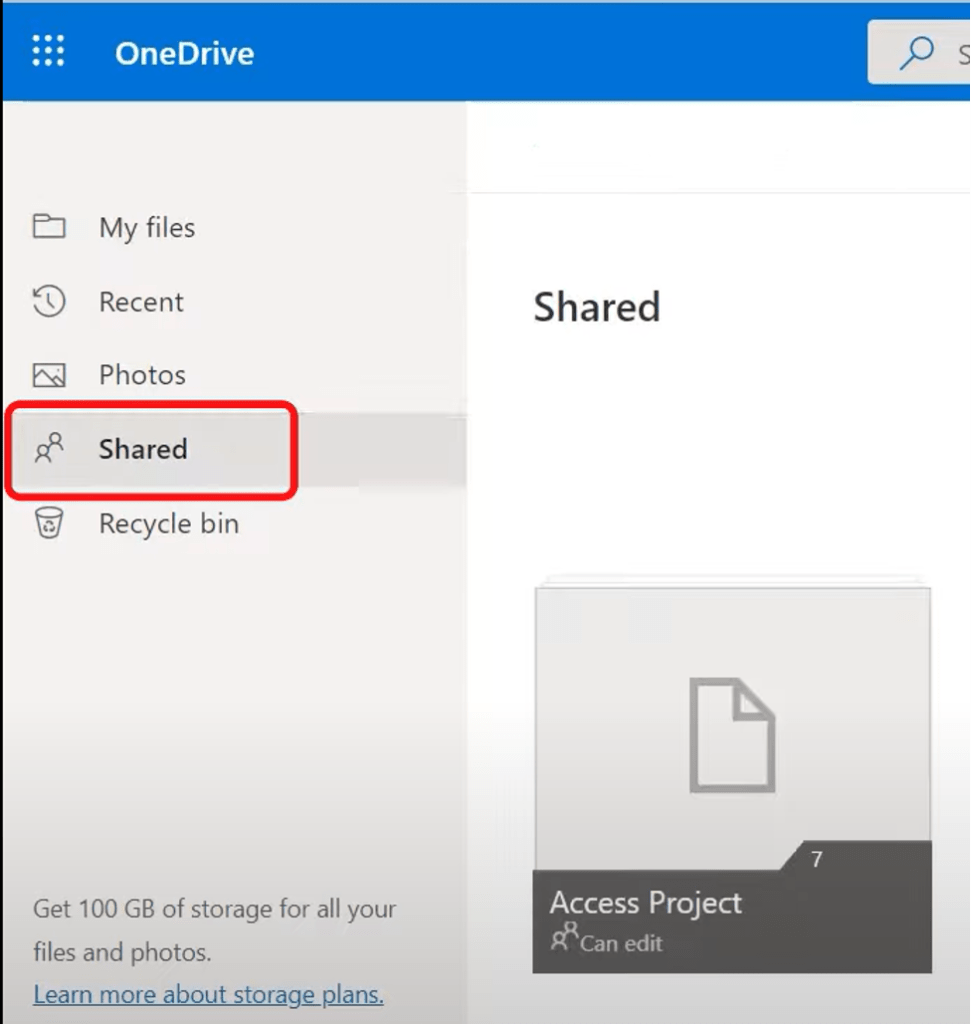
You can also click on the Shared tab and view all the files that you may have shared.
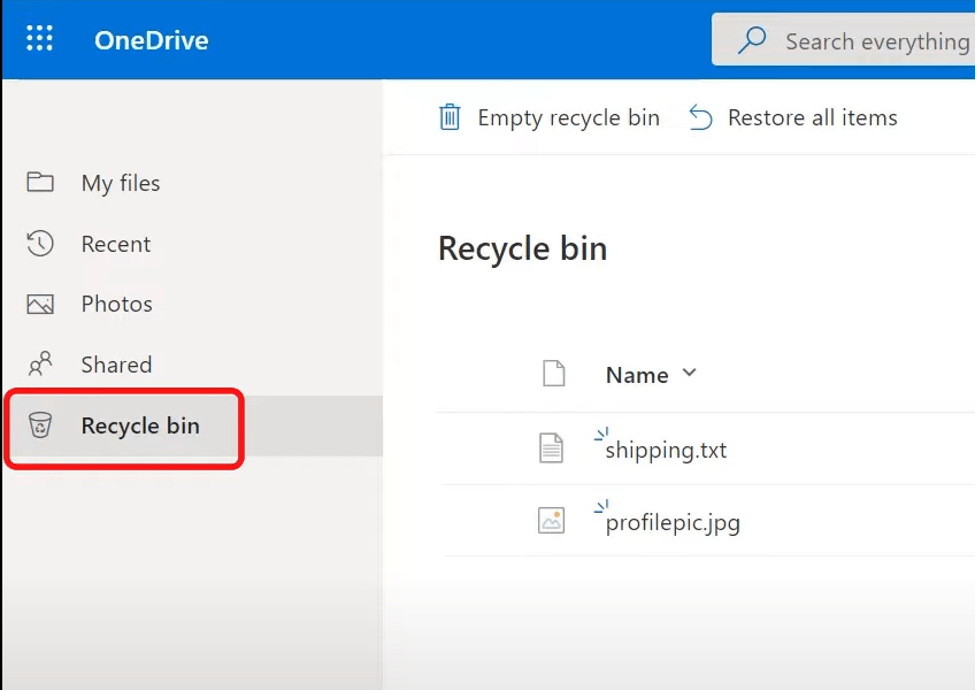
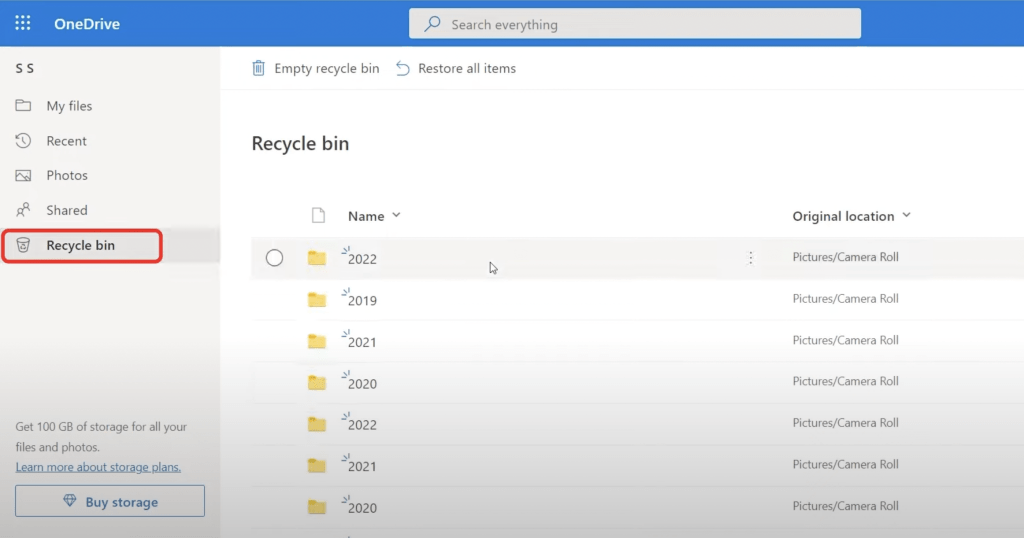
You can also click on the Recycle Bin tab and view all the files that have been recently deleted. You can even restore the files in case you accidentally deleted any of them.
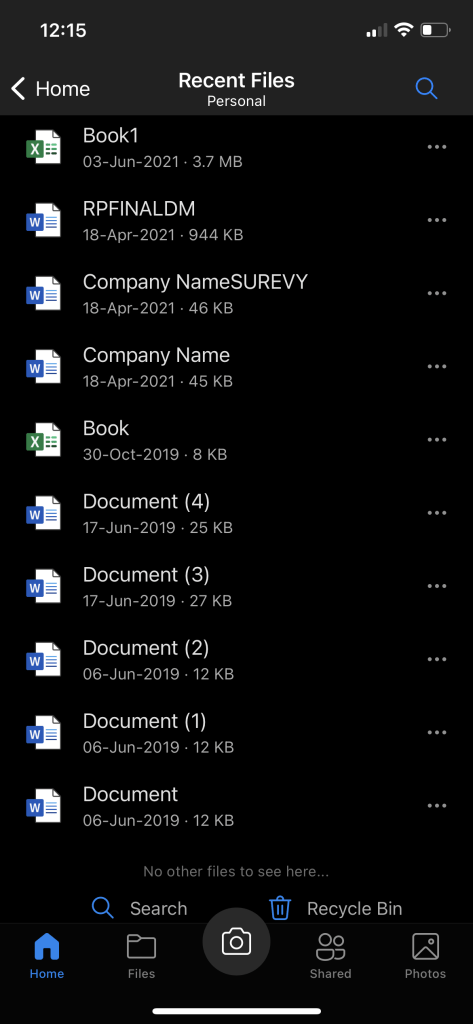
The first and foremost thing is to download OneDrive on your device. You can easily download the app from your app store.
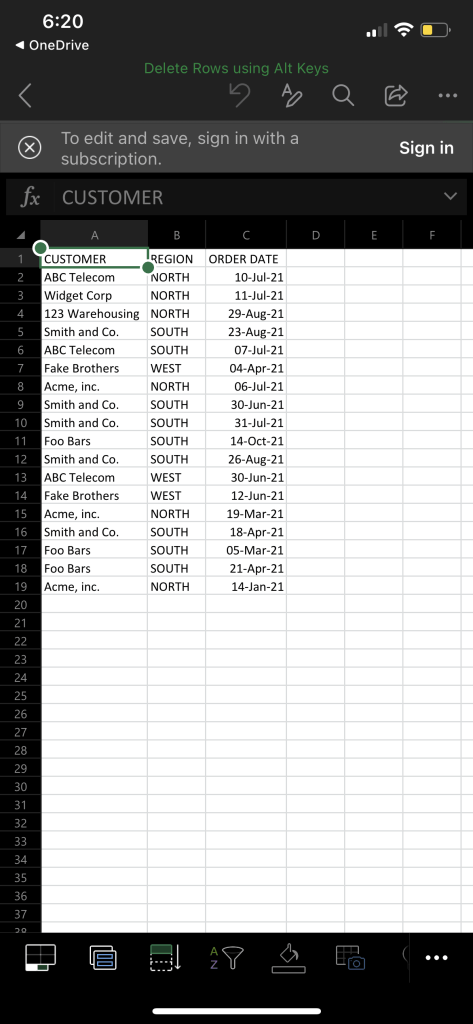
When you open the app, you will be able to view your files. You can open the files, view their contents as well as edit them.
Any edits and changes made on your mobile device will instantly be uploaded to the cloud.
So if you open up OneDrive on any other device, you will be able to see the files with the new changes that have been made from your mobile device.
Hope this article has shed light on how to get started with using OneDrive, on different mediums as well. Now you can start using OneDrive efficiently, and if you want to brush up on your basics by coming back here!
Click here to learn How to use Microsoft OneDrive for Windows 10 & 11!
You can learn more about how to use Excel by viewing our FREE Excel webinar training on Formulas, Pivot Tables, and Macros & VBA!
When to Use SharePoint or OneDrive
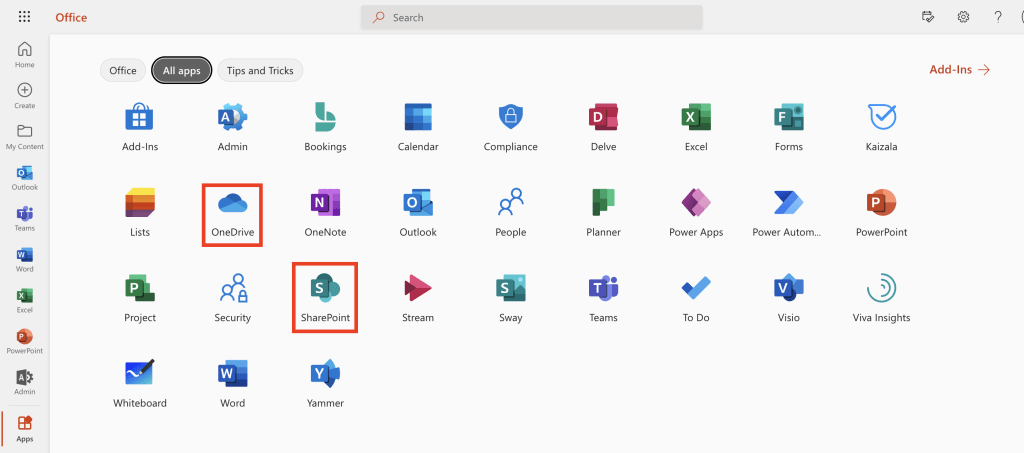
OneDrive and SharePoint are two convenient and handy file-sharing services. They let you save your files on the cloud and share them with other users or use them online from any other device.
In this article, we will cover the strengths of both these services by comparing their features – OneDrive vs SharePoint. You will also understand how to get the most effectiveness out of these file-sharing services and cover how Microsoft Teams fits into file sharing.
Watch the video on when to Use SharePoint, OneDrive, or Teams on YouTube and give it a thumbs-up!
We will be discussing the following functions for each of the file-sharing services:
- Default Sharing
- Concurrent Users
- Notification of Changes
- Version History
- Permissions
- Mobile Access
- Device Syncing
- Process of Using Both OneDrive and SharePoint
- Incorporating Microsoft Teams
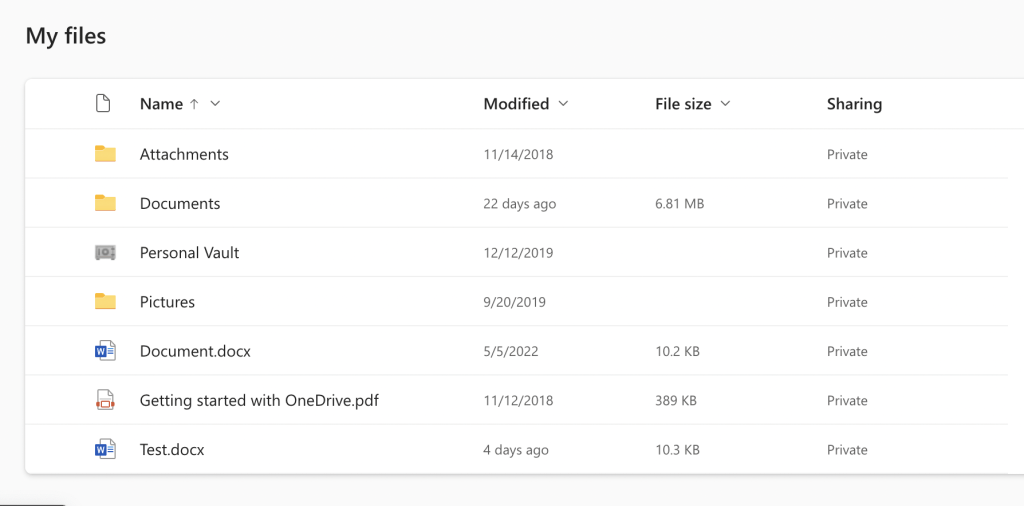
OneDrive is an excellent option if you want to work on a file yourself and save it privately. When you upload a file on OneDrive, it is available just for you and you can use it on different devices. By default, every file in OneDrive is private.
It also has an option to share with others if required.
Whereas, if you use SharePoint it saves your files in a shared library. When you upload a file in SharePoint, whoever has access to the shared folder can use it.
So, with OneDrive your default sharing mode is private, and with SharePoint, it is shared. These are just default settings and you can change them if you want.
Both OneDrive and SharePoint allow multiple users to work on the same file simultaneously. All the changes made will be reflected on a real-time basis.
When you share a file on OneDrive, you will not get a notification of any changes made to that file.
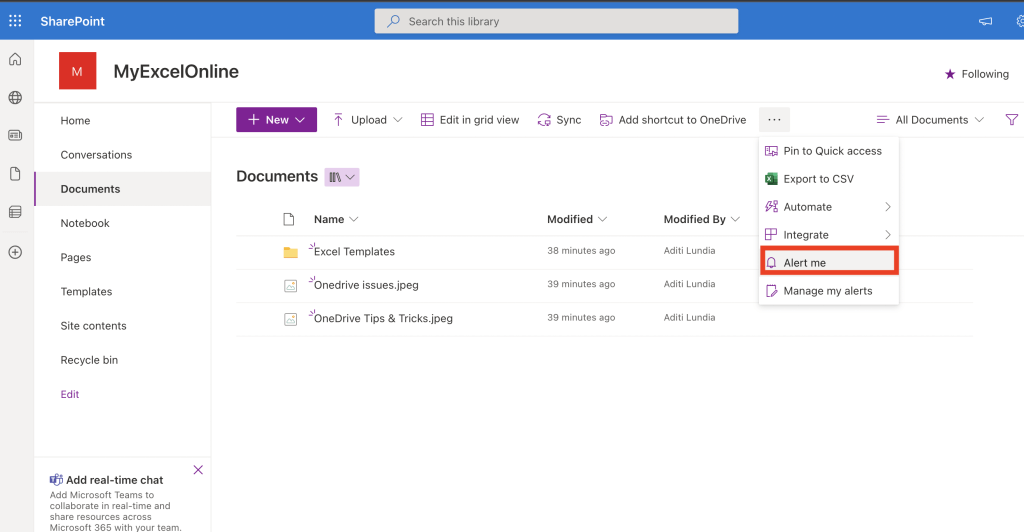
But, when you share a file on SharePoint, you will be notified of the changes i.e. if someone is working on a shared file you will get an automatic email that that person is working on the file.
You can select Alert me to access this feature!
Both OneDrive and SharePoint have version history but one is more robust than the other. The version history of SharePoint is stronger as it shows changes made to multiple users at multiple times.
In OneDrive, permissions are assigned by individual files i.e. you need to manage permissions for every file that you upload. Whereas, in SharePoint, permissions are assigned by the group so each file uploaded in the folder will have the same permission.
This gives SharePoint more adaptability and lesser maintenance.
Both OneDrive and SharePoint allow you to access your files remotely on mobile and any other device.
All of your devices can sync to both OneDrive and SharePoint. Click here to how more about how to sync files on OneDrive!
Process of Using Both OneDrive and SharePoint
The process of using these file-sharing services is that you start with OneDrive and end with SharePoint.
You can start with a private file uploaded on OneDrive and you work on it. Once it is completed and ready to be shared with others, you can upload it on SharePoint. In this way, everyone can have access to that file after it is ready.
So, it is not necessary that you need to choose one of the two services. You can use them both as per your requirement.
Microsoft Teams is more like SharePoint. When you use your files on Microsoft Teams:
- It allows access to everyone on your team
- Multiple users can make changes to the file
- You can see other people making changes to your file
You can use SharePoint or Teams, there isn’t much difference between the two!
This article explores the different strengths of the two file sharing services – OneDrive vs SharePoint. The difference between the two is in default sharing, permissions, users, mobile access, syncing, and much more!
Microsoft OneDrive | OneDrive Sync Explained
Microsoft OneDrive provides free online storage for its users. With OneDrive, you can easily sync your files between PC and cloud to work with the files when you’re on the go!
After you sync Microsoft OneDrive, you will be able to access your files from any device – computer, mobile phone, or tablet with your Microsoft Account. When you add, edit or delete a file or folder in your OneDrive folder, the same will be reflected on the OneDrive website and vice versa.
Watch How to Sync Microsoft OneDrive on YouTube and give it a thumbs-up!
In this article, we will cover the following topics in detail:
- View OneDrive on PC and Cloud
- File and Folder Level Syncing Icons
- Changing Sync Microsoft OneDrive Status
- Differences between Green Check and White Check
- View File Size
- Adding Files to PC and Cloud
Let’s explore each of these one by one!
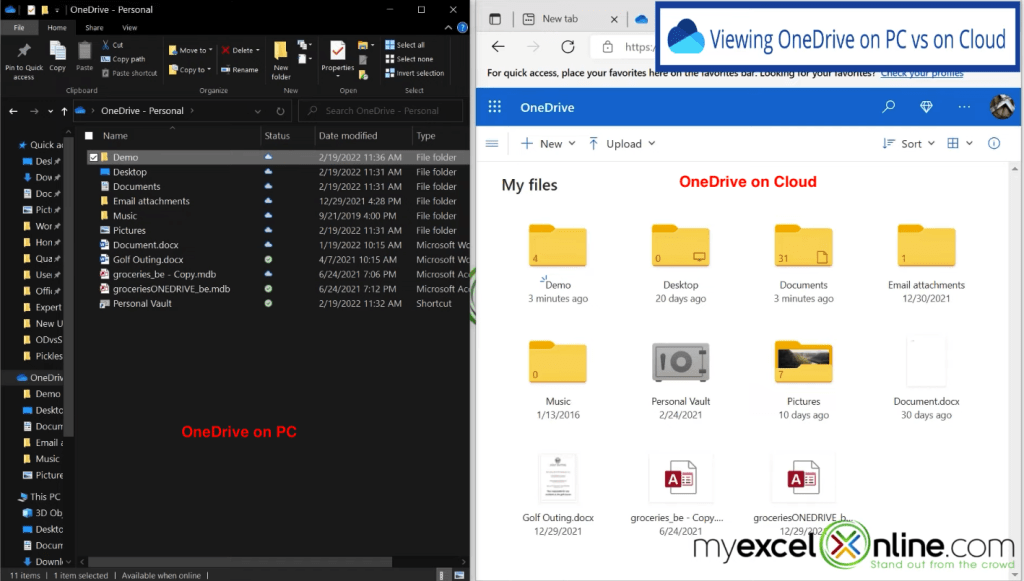
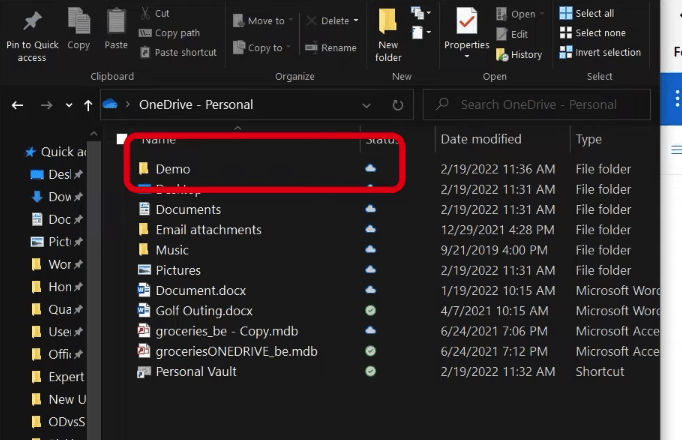
First, let’s open OneDrive on our computer and online. Below you can see how OneDrive will look when opened on a PC (left side) and how it will look online (right side).
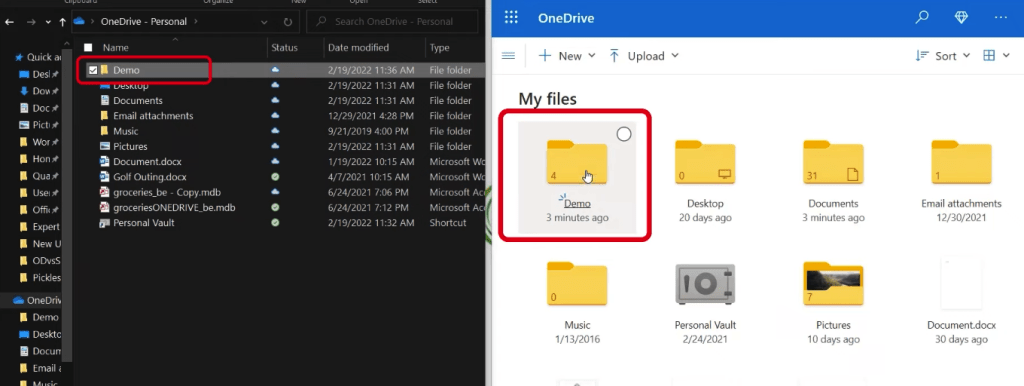
In both locations, we have a folder named Demo. You can single-click on this folder on the cloud and double-click on the PC to open it.
You might have noticed that the files we have on the cloud are the same as the files we have on the PC.
File and Folder Level Syncing Icons
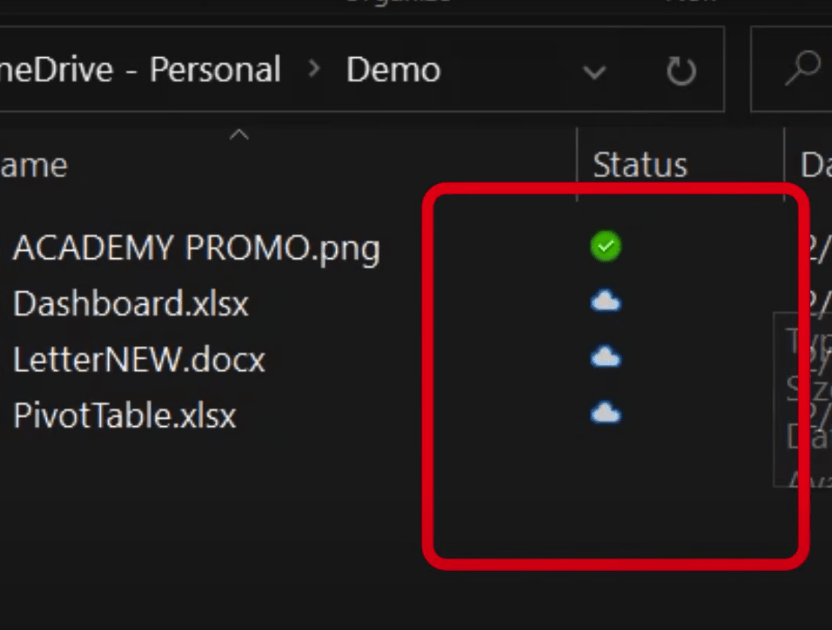
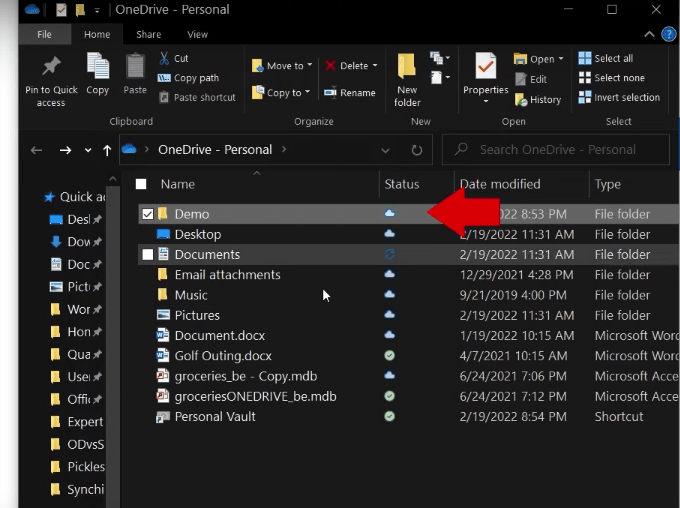
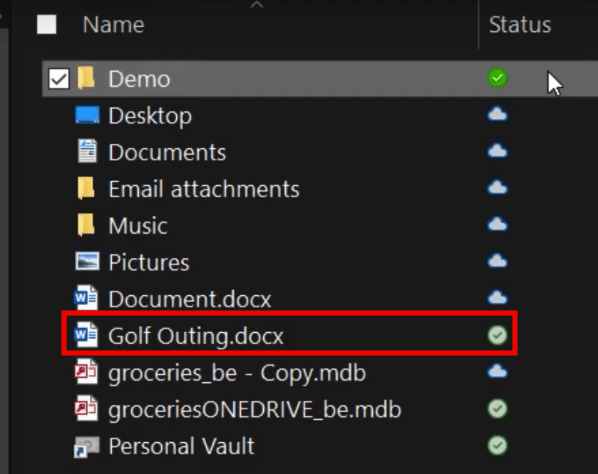
In this OneDrive folder, we have two different icons – Green icon and Cloud icon.
Let’s analyze the meaning of both these icons:
- Green icon
It is a green circle with a white checkmark icon. Files with this icon are marked as “Always keep on this device“. It means that these files are present in both folder and on cloud.
- Cloud icon
It is a blue outlined cloud icon next to the file. It indicates that the file is only available online. It does not take up space on your computer.
When you open this file, you are actually opening the file saved on the cloud. If you don’t have access to the cloud, this file will not open.
These are file-level syncing icons. Now let’s see how folder level syncing icon works!
Here, you can see that the Demo folder has a cloud icon. It means that there is at least one file in this folder that resides in the cloud.
Changing Sync Microsoft OneDrive Status
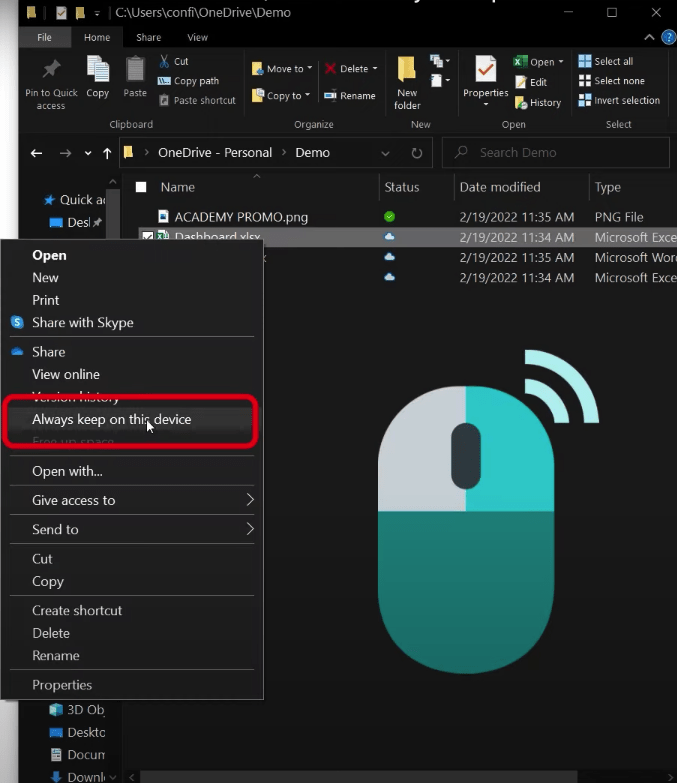
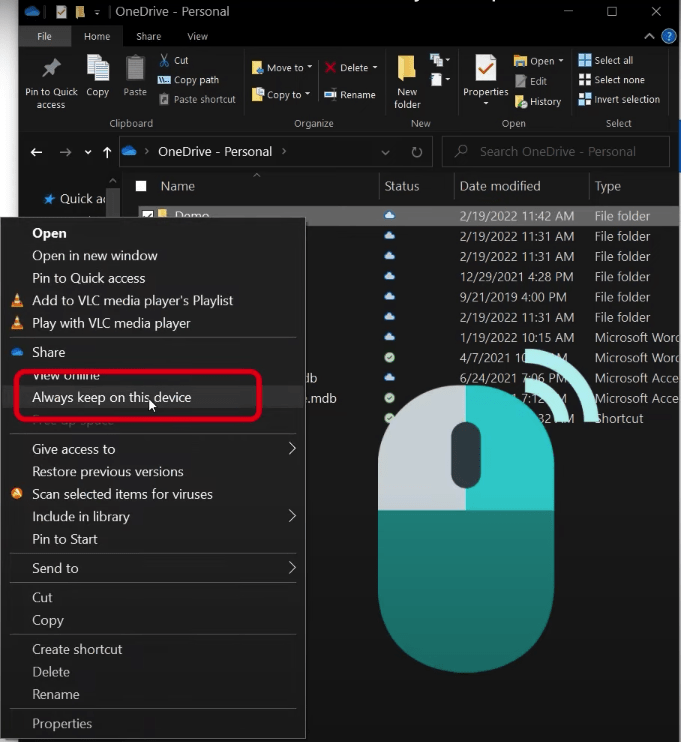
You can single-click on the Demo folder to open the files inside it. Let’s try and change the sync icon from cloud to green checkmark i.e. mark the file to reside both on PC and cloud.
- Right-click on the file
- Click on “Always keep on this device”
Let’s do this for the other files as well.
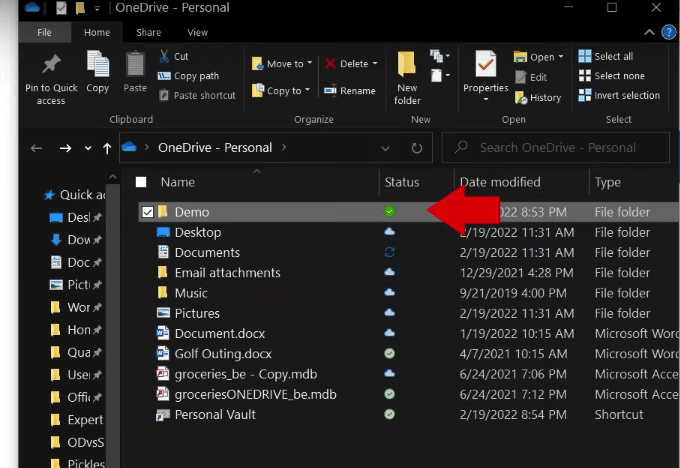
Now, go back to the Demo folder and check the syncing icon.
You can see that it now shows a green circle with a white checkmark icon indicating that all the files in this folder have been downloaded to have a copy on the PC.
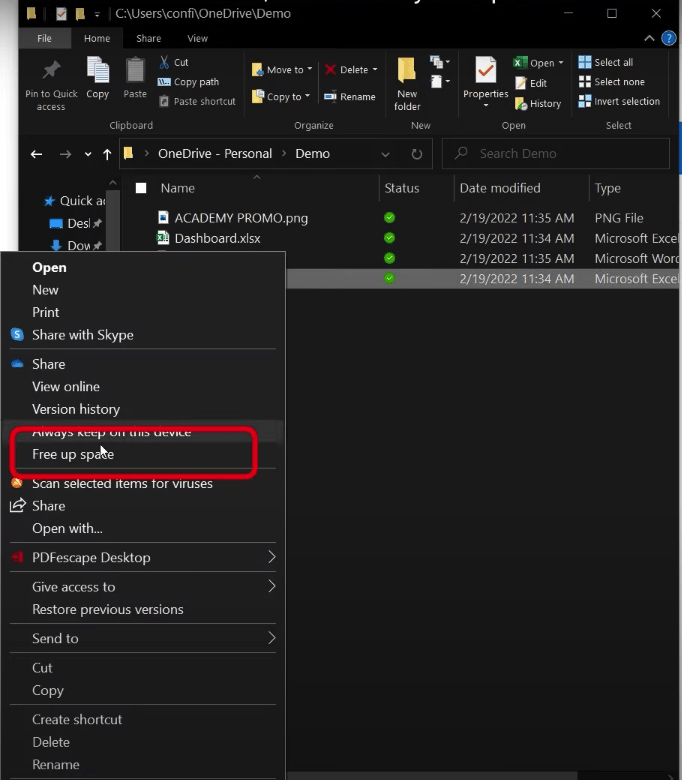
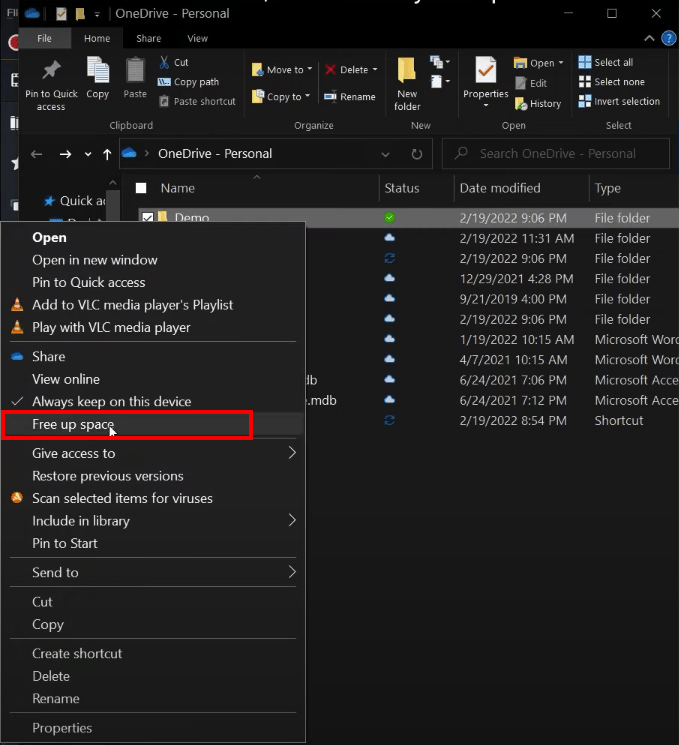
But, if you right-click even one file in this folder and change it to the cloud by clicking on “Free up space” and folder icon will again become a cloud.
You can also change the syncing icon at the folder level:
- Right-click on the folder and select Always keep on this device. This will make all files in this folder reside on both PC and cloud.
- Right-click on the folder and select Free up space. This will change the folder icon to cloud and make all files in the folder reside on the cloud only.
This is how you can keep the files you want on the cloud only and on both PC and cloud at the file and folder level.
Differences between Green Check and White Check
While browsing through the files on OneDrive, you might have also seen a white circle with a green check icon.
There is a difference between the two checkmark icons:
- Files that you mark as Always keep on this device have a green circle with a white check mark.
- Files that are marked Available on this device but can be offloaded using SourceSafe have a white circle with a green check mark.
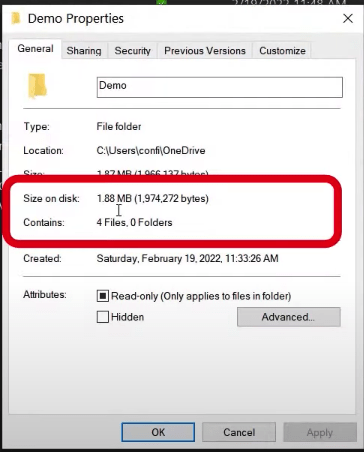
Follow the steps below to view the file size on PC and cloud:
PC:
- Right-click on the demo folder
- Select Properties
- Go to size on disk. You can check the size of the folder here.
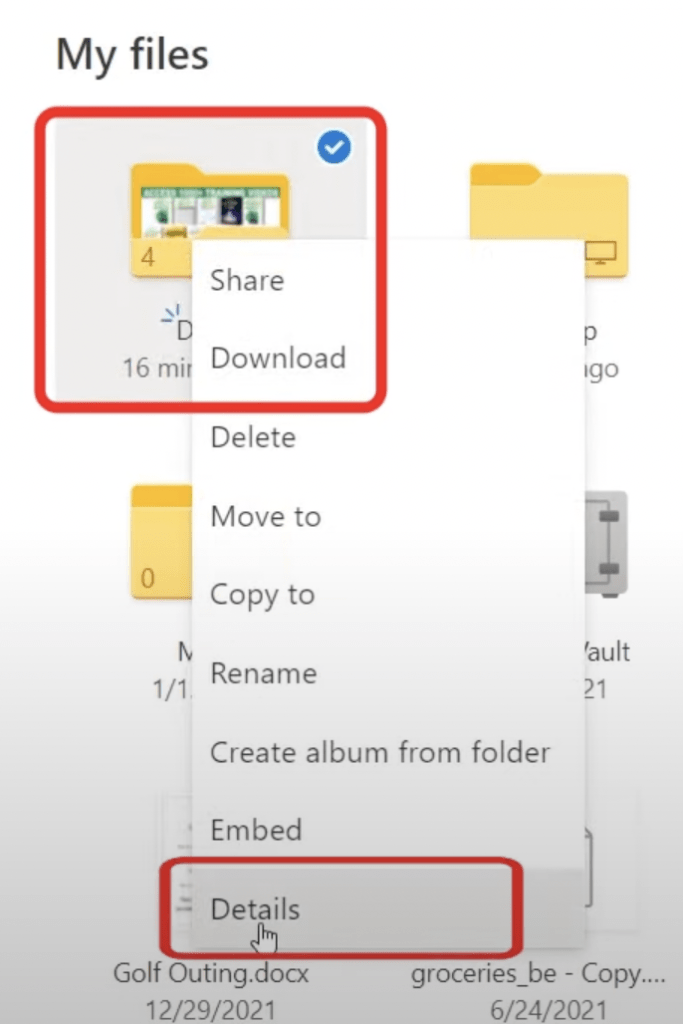
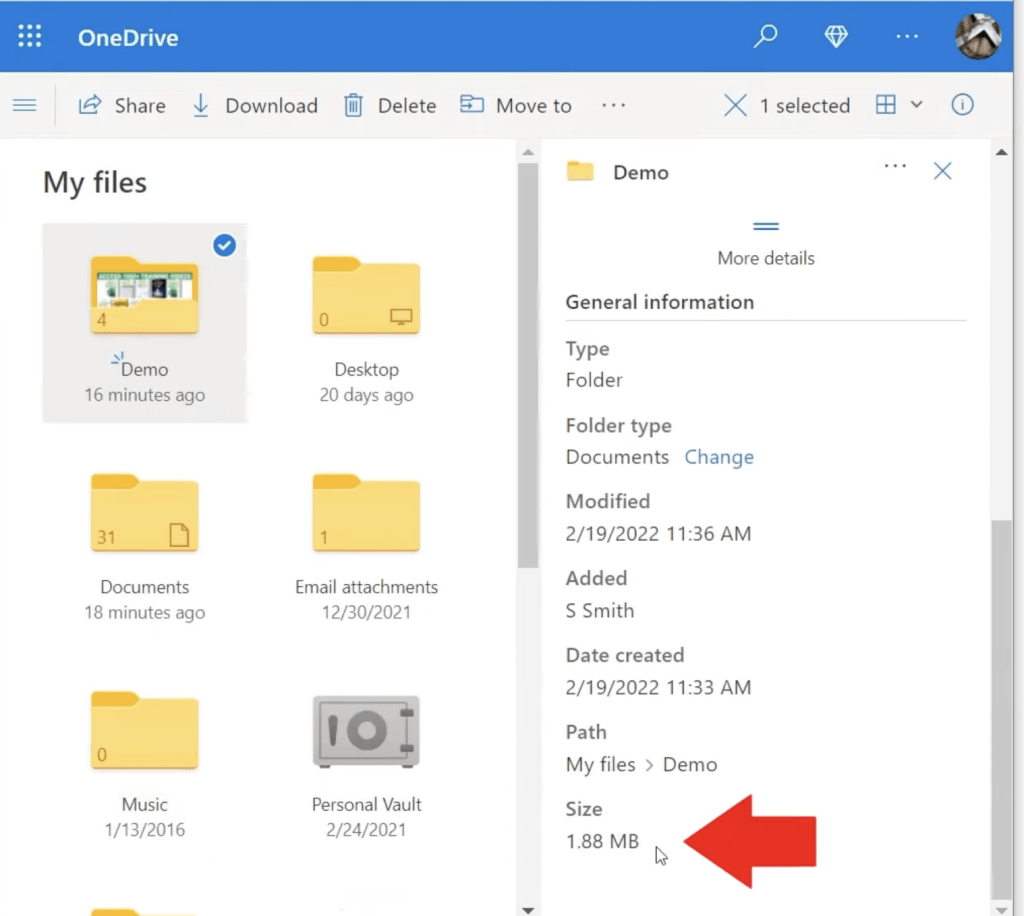
Cloud:
- Right-click on the demo folder
- Go to Details
- Scroll down to check the file size.
Let’s add a new file to OneDrive online and then sync Microsoft OneDrive them to view it on PC:
- Open OneDrive online
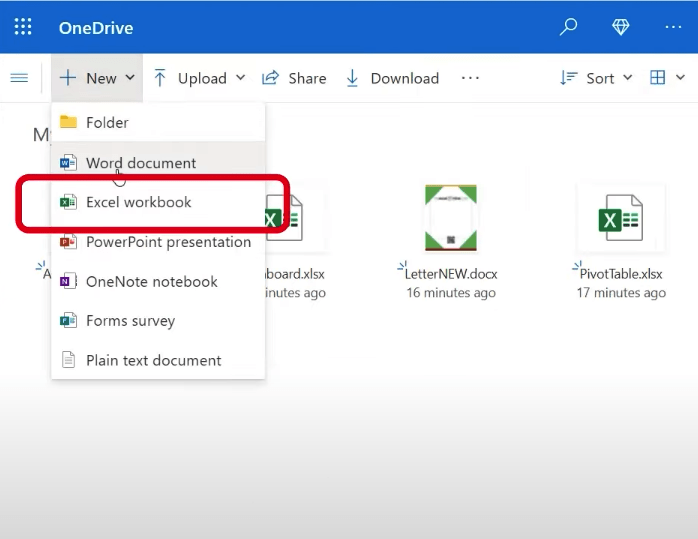
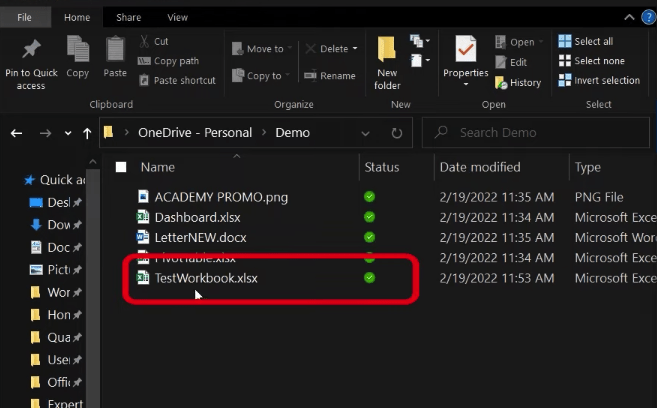
- Go to New > Excel Workbook
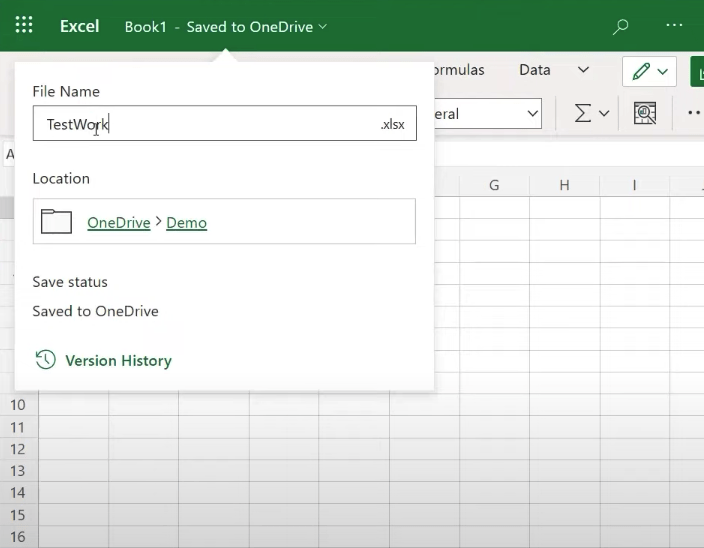
- Rename it as TestWorkbook
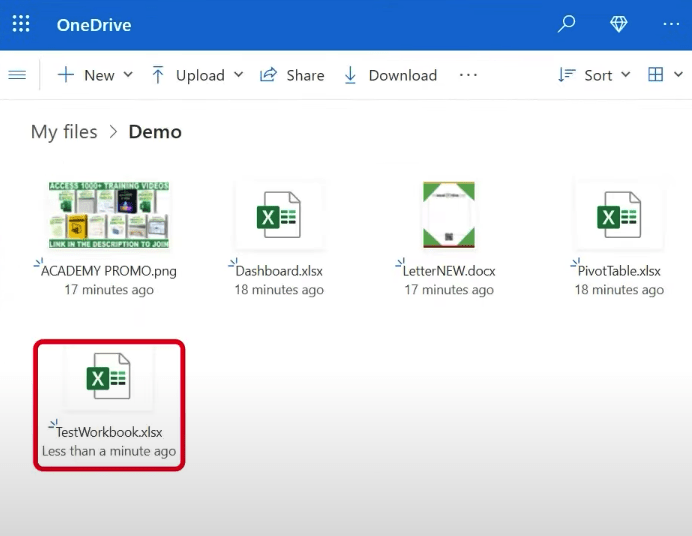
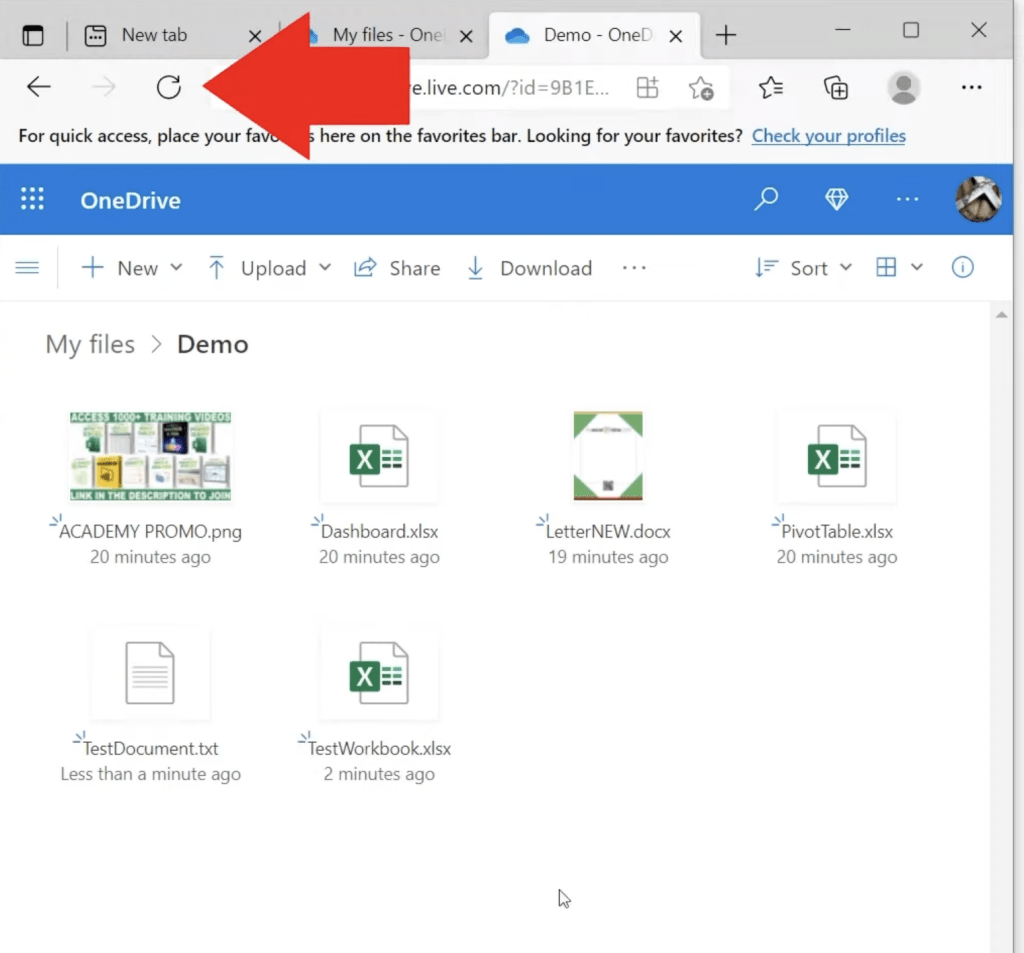
- Close the workbook and refresh OneDrive. You will see the new file here.
- Now, open OneDrive on your PC. If the file is not here, we need to sync Microsoft OneDrive.
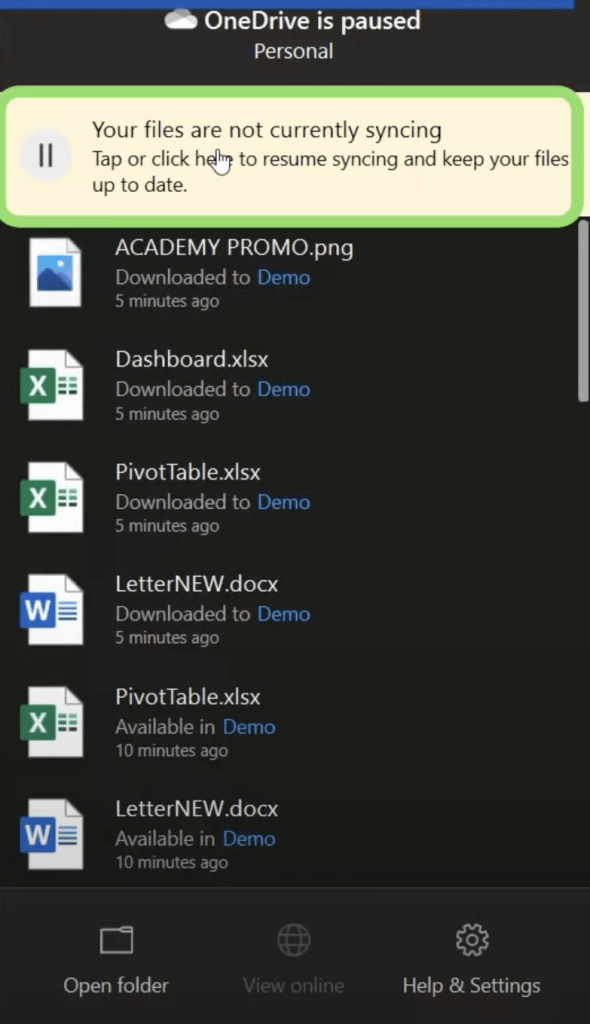
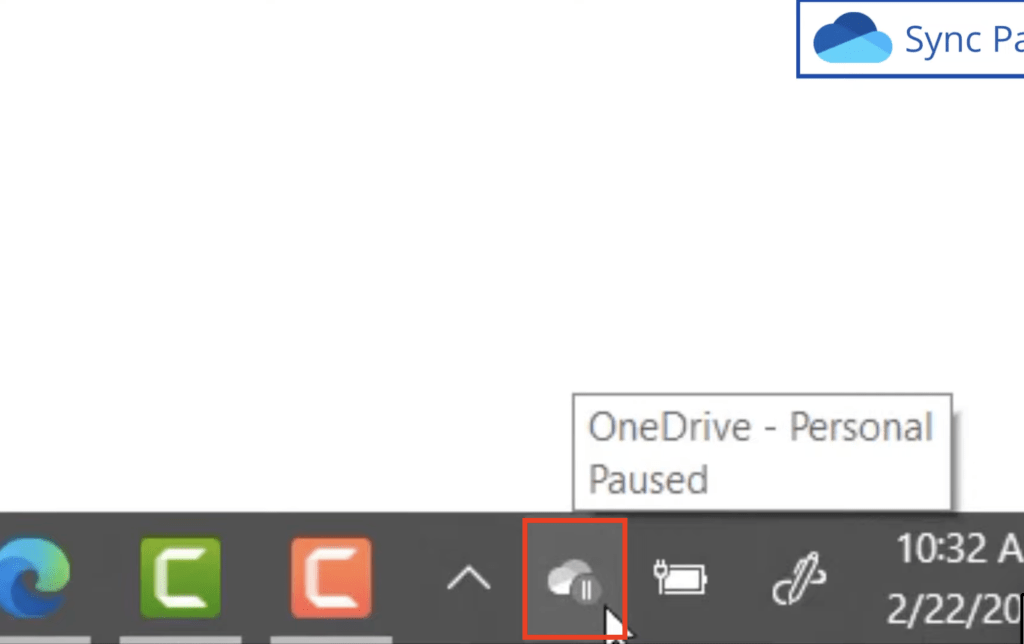
- Go to the OneDrive icon on the taskbar below. You can see that the syncing is paused.
- Click on it to start syncing again.
- Now, check the OneDrive folder on PC. You will find the TestWorkbook there.
Similarly, you can even add the file to your OneDrive folder on your PC and view it online.
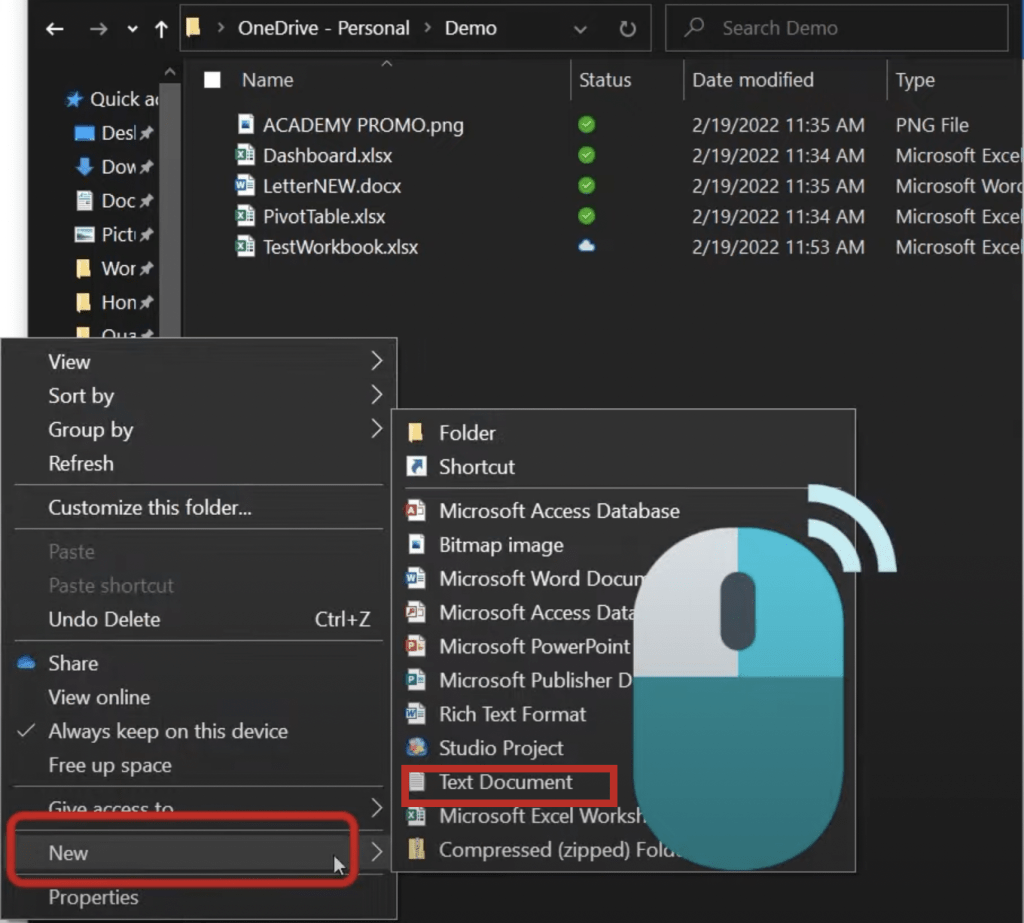
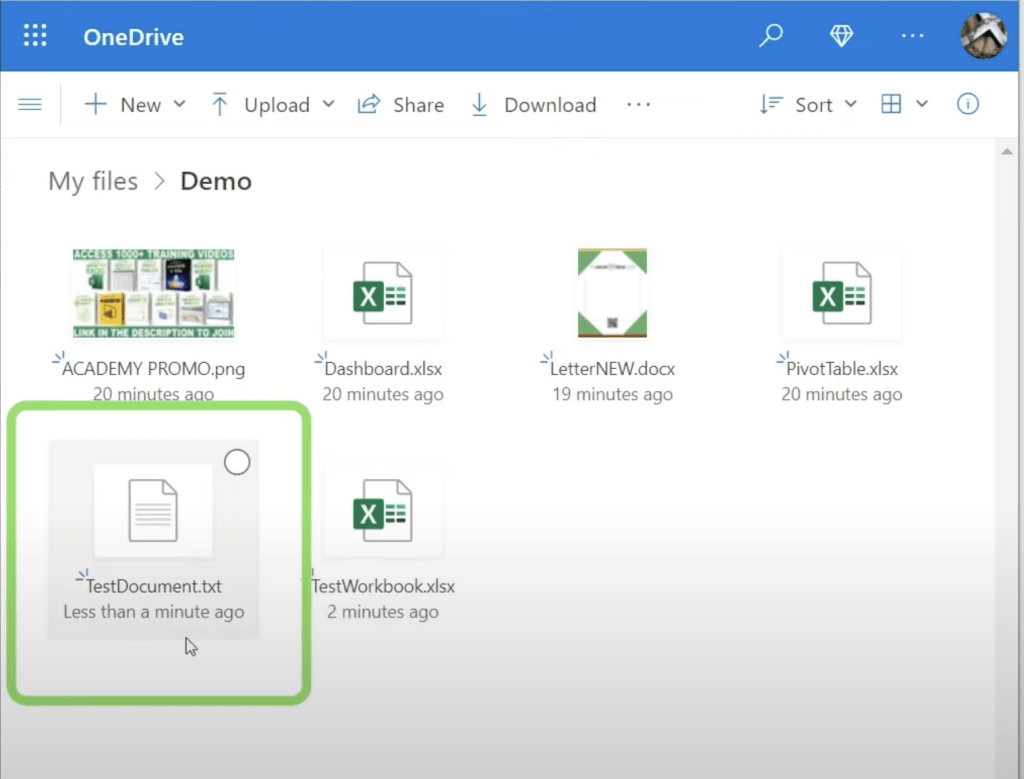
- Right-click and select New > Text Document.
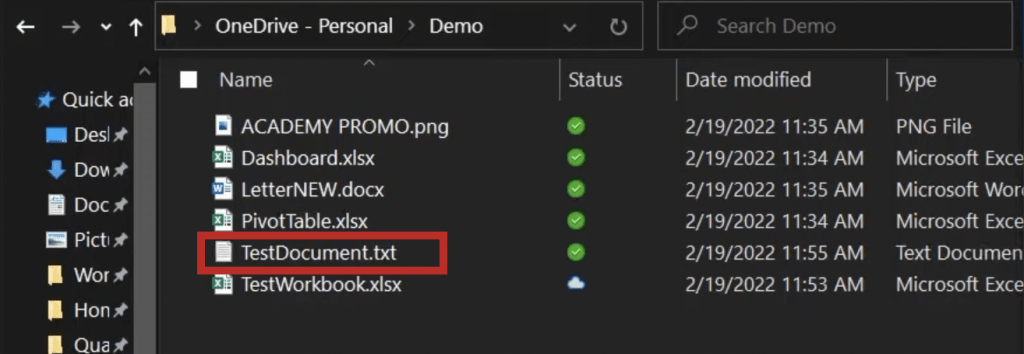
- Rename it as TestDocument.
- Refresh OneDrive online.
- This will sync Microsoft OneDrive and you will see the document online as well.
In this article, we have covered how to sync Microsoft OneDrive so that files are present on a PC as well as on the cloud.
We have reviewed the different icons used for syncing, such as the green check, the white check, and the cloud icons. We have also gone over the differences between file-level sync and folder-level sync.
Lastly, we have seen how to see the file size on your PC vs cloud and add a new file to both PC and cloud
Hope this article has shed light on how to sync Microsoft OneDrive and the significance of different syncing icons. Now you can start using OneDrive efficiently, and if you want to brush up on your basics by coming back here!
Microsoft OneDrive Tips and Tricks
OneDrive by Microsoft is a tool that helps you store your files on the cloud and access them from anywhere. It is a very handy tool, especially in a world where data is evolving and eating up more and more space on your devices.
Today, let’s go over some OneDrive tips and tricks on your Phone, PC, or online. These tips will help you utilize the best of OneDrive in an efficient manner. You will also get more accustomed to using OneDrive on all your devices, making it an even more convenient tool for you.
Below are the Top 10 + 1 tips that you must know if you plan on using OneDrive:
- Backing Up Photos from Smartphone to OneDrive
- Scanning a Document From Smartphone to OneDrive
- Sharing Options via Email or Link from Your PC
- File Security Options from Your PC
- Managing Sharing Access to Files on Your PC
- PC Icon Explanation
- Using the Personal Vault on Your PC and on The Cloud
- Version History on Your PC and on The Cloud
- Generating Code for Embedding a File from The Cloud
- Using the Recycle Bin on The Cloud
- BONUS TIP
Watch Top 10 OneDrive Tips & Tricks on YouTube and give it a thumbs-up!
Tip 1: Backing Up Photos from Smartphone to OneDrive
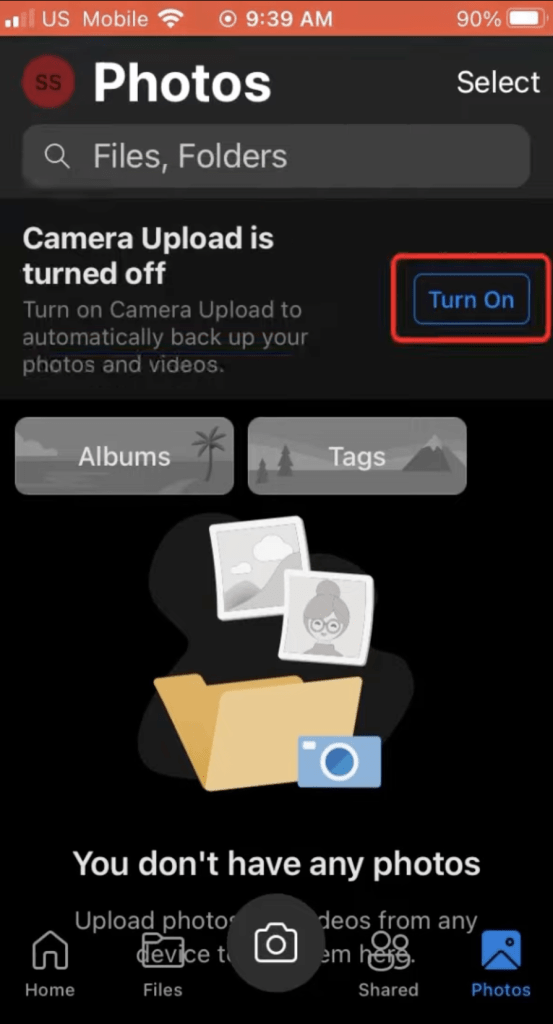
You can easily sync photos from your camera roll to OneDrive via your smartphone. Let’s see how!
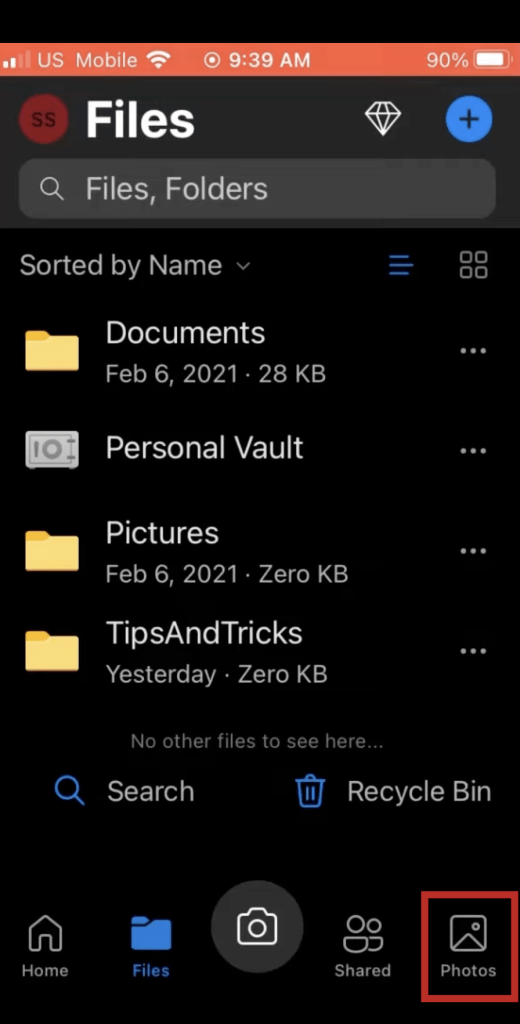
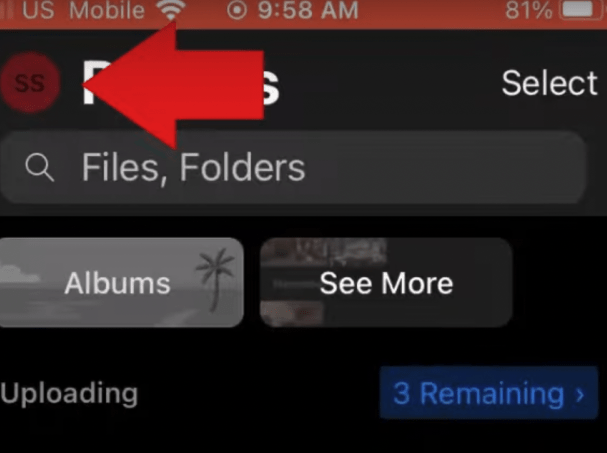
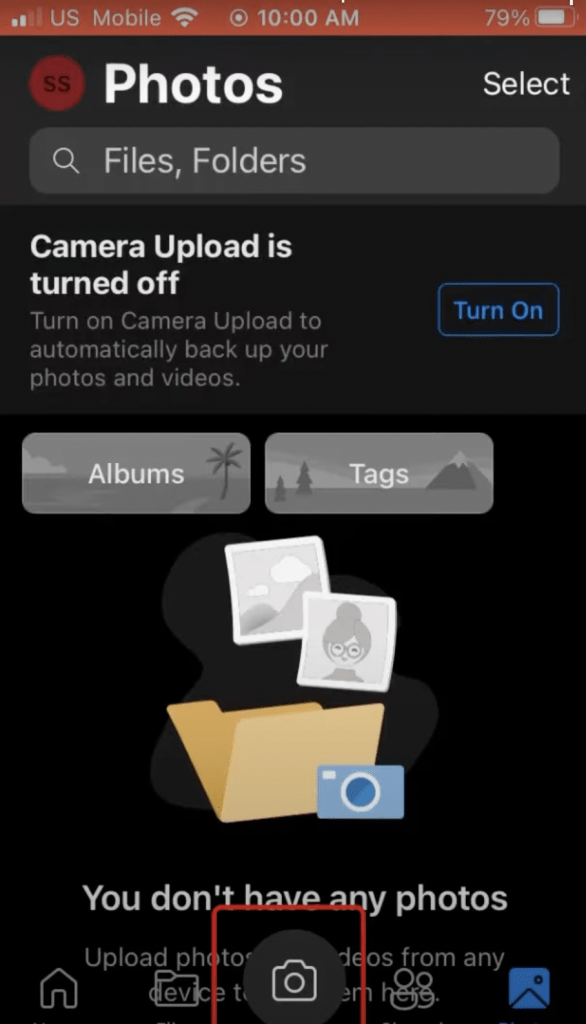
- On the OneDrive app, go to Photos.
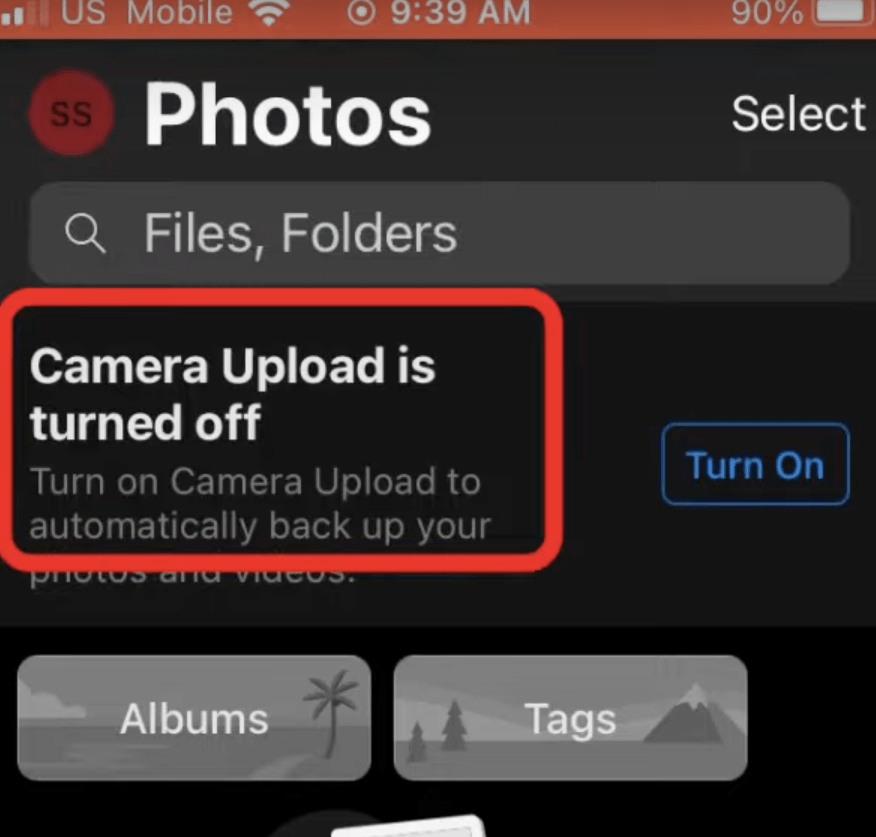
You will see that the Camera upload option is off.
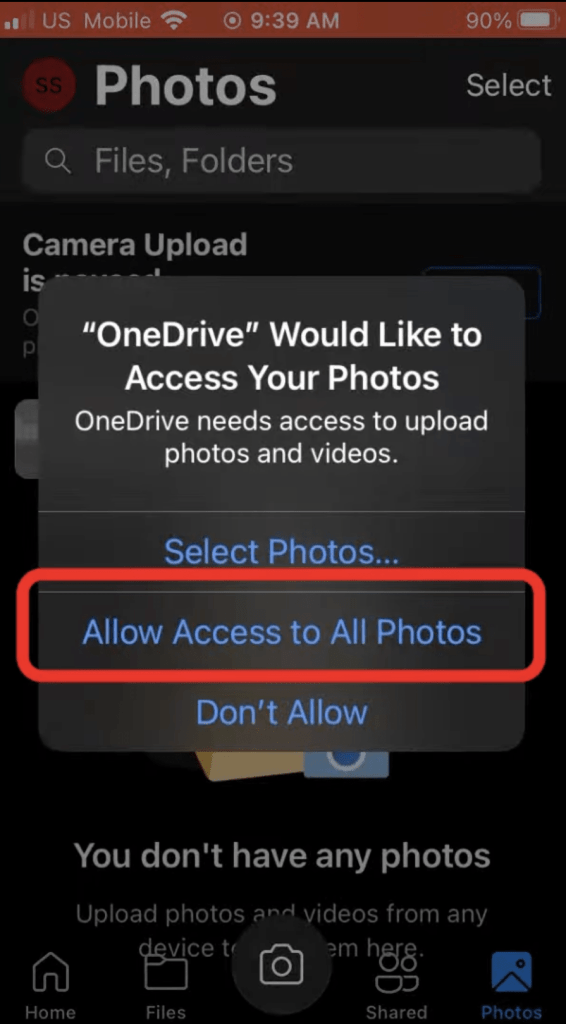
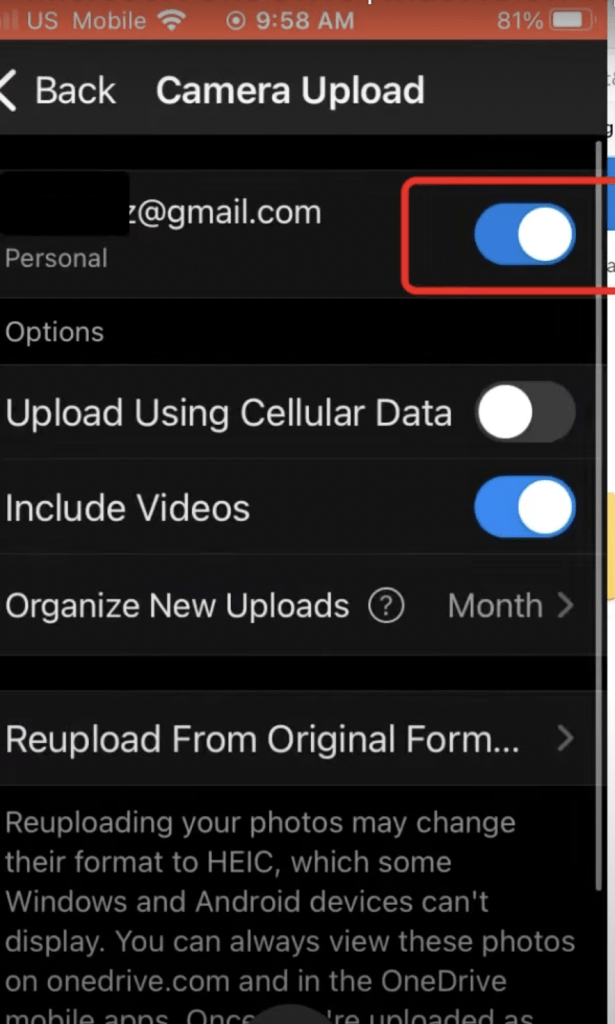
- Turn on the Camera Upload option.
- Allow access to OneDrive when the pop-up window appears.
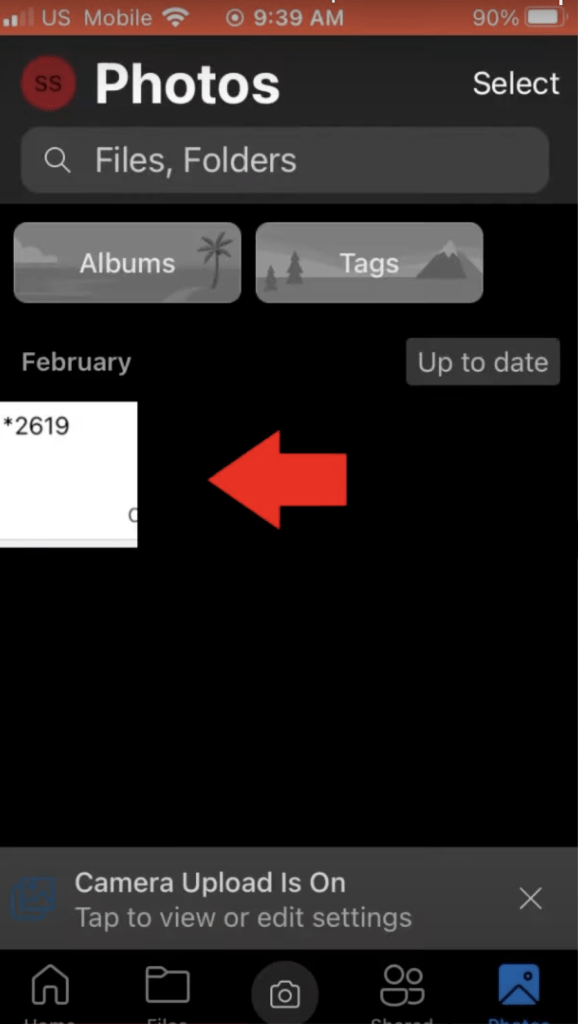
Upon doing the above steps, you will notice that your camera roll has backed up in OneDrive.
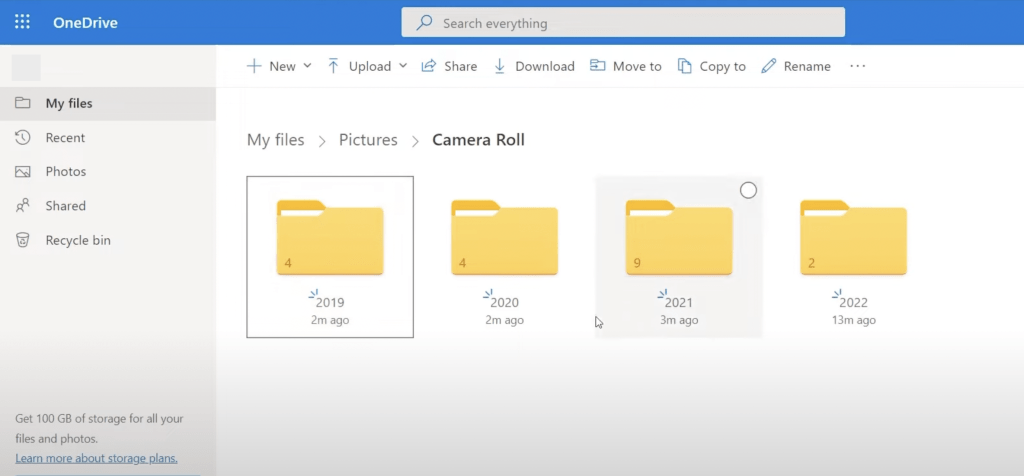
Now if you go to the Pictures folder in your OneDrive, you will find a folder named Camera Roll. You will notice that inside the folder, all your photos will be organized year-wise.
One thing to note is that OneDrive will not extract files from a different cloud such as iCloud. It will only back up photos that are physically present on your device.
You can also turn this feature off if you do not want to upload to the cloud. To turn off camera roll backup –
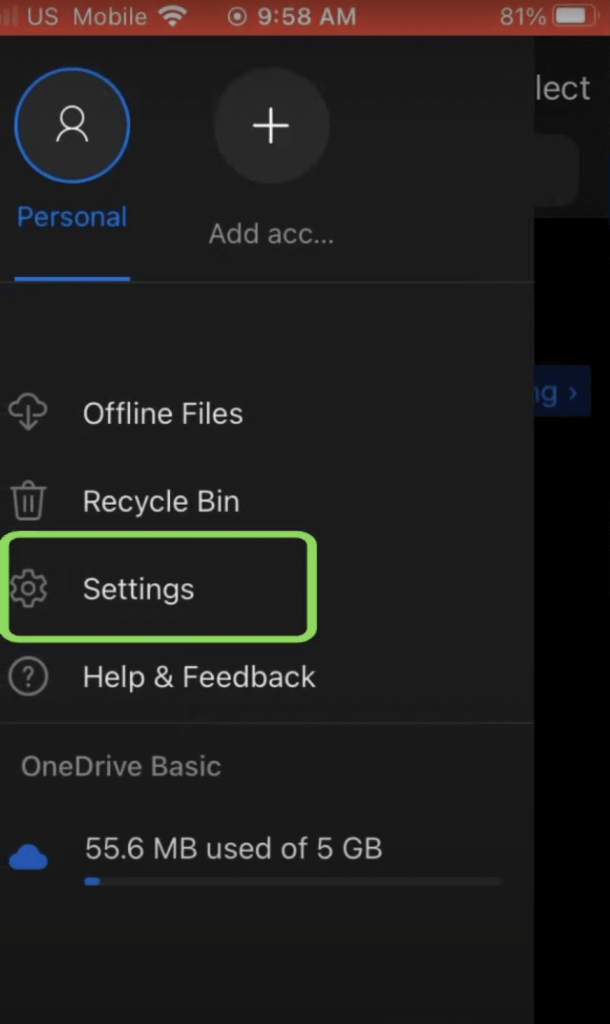
- Click on your profile icon.
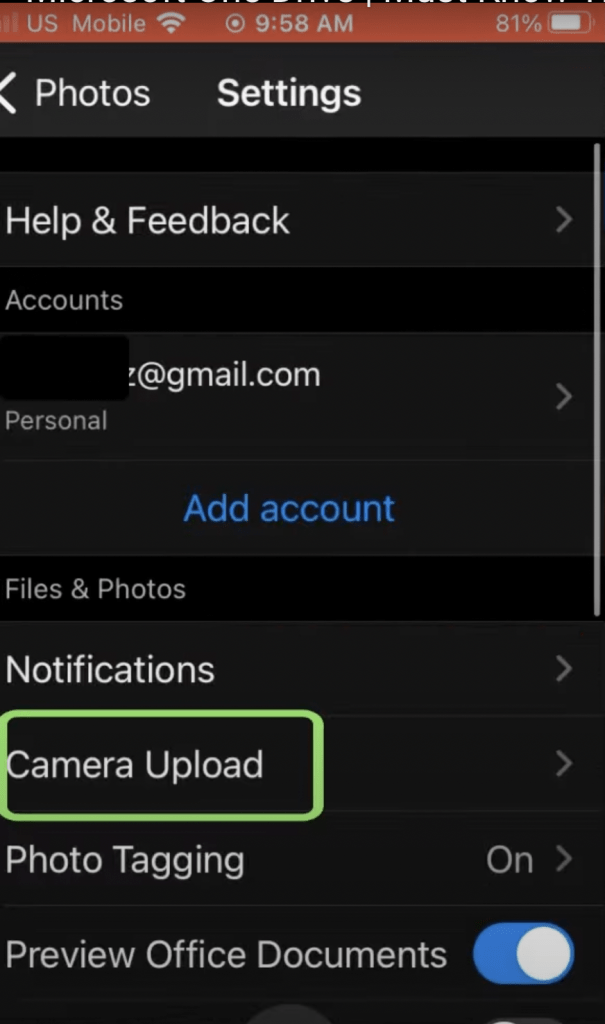
- Go to Settings.
- Go to Camera Upload.
- Turn off the sync from your account.
Tip 2: Scanning a Document From Smartphone to OneDrive
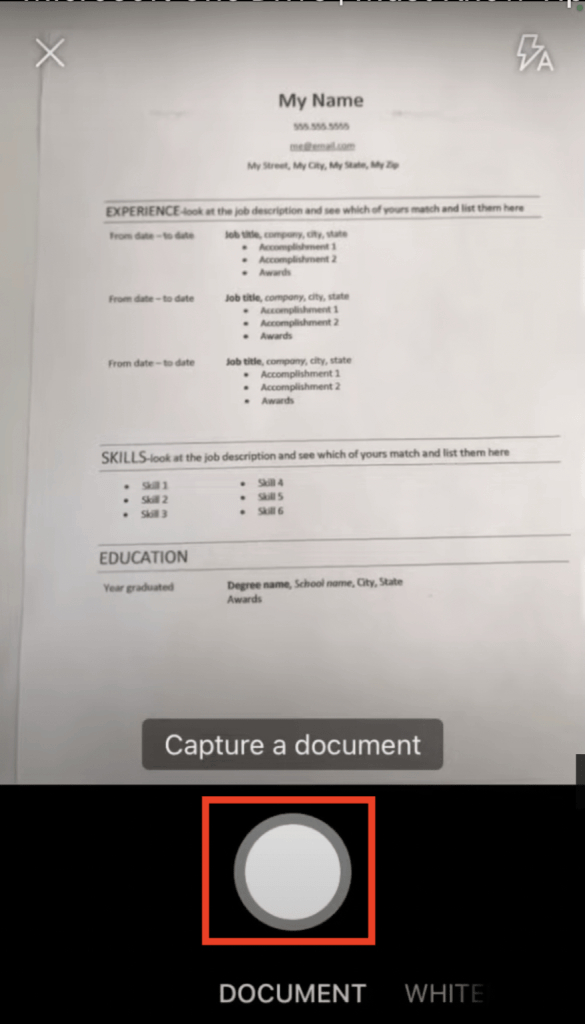
Making your work easier, this next OneDrive tip on your smartphone is pretty handy. If you want to click a picture of something important and upload it to the cloud, you can directly do that from the OneDrive app!
- Click on the camera icon in the OneDrive app.
- Line up your document and click a photo.
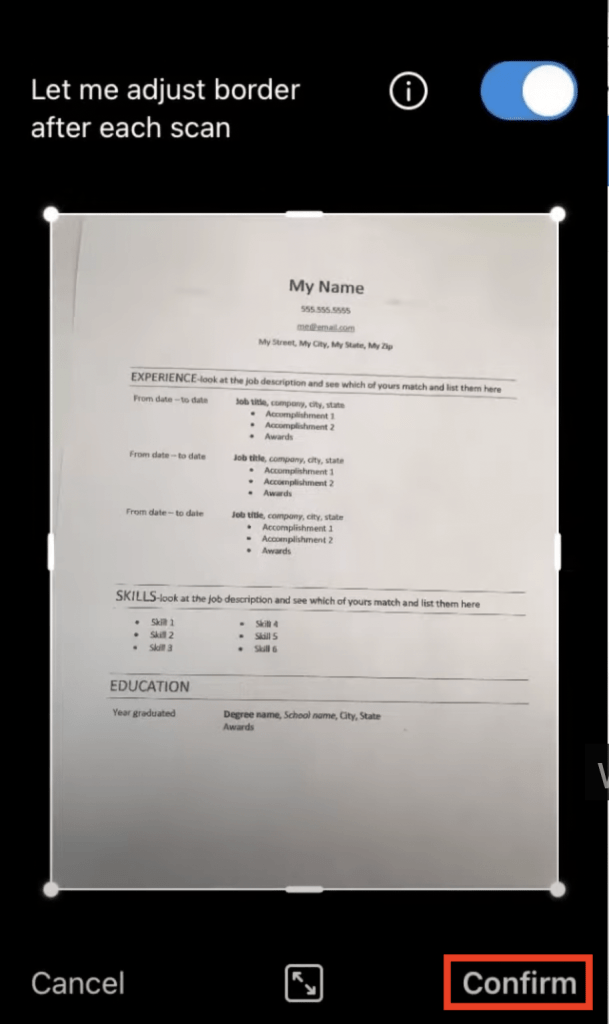
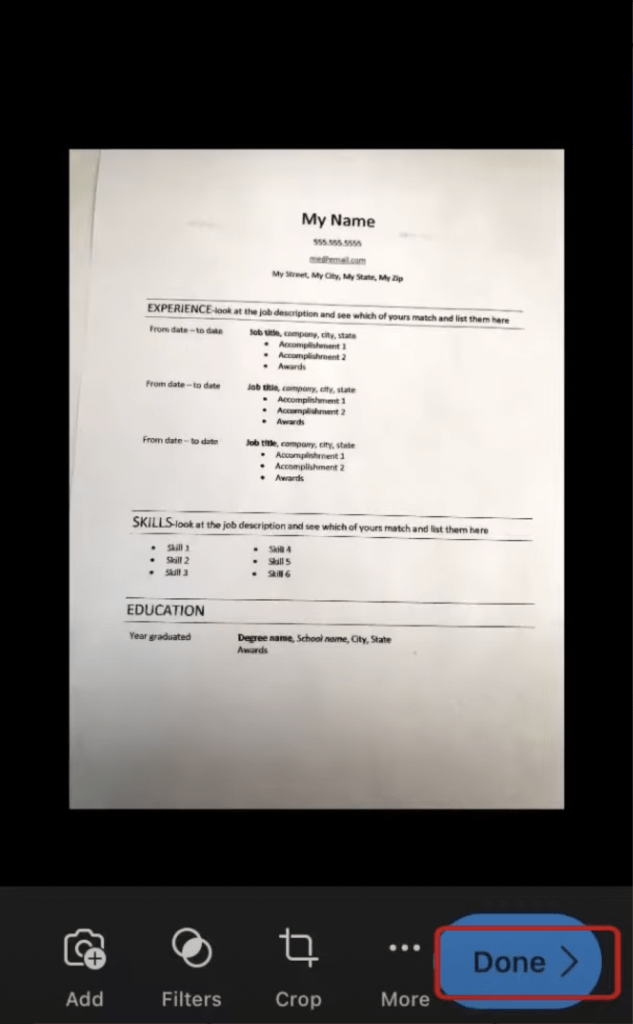
- You can edit and confirm those changes.
- Click on Done.
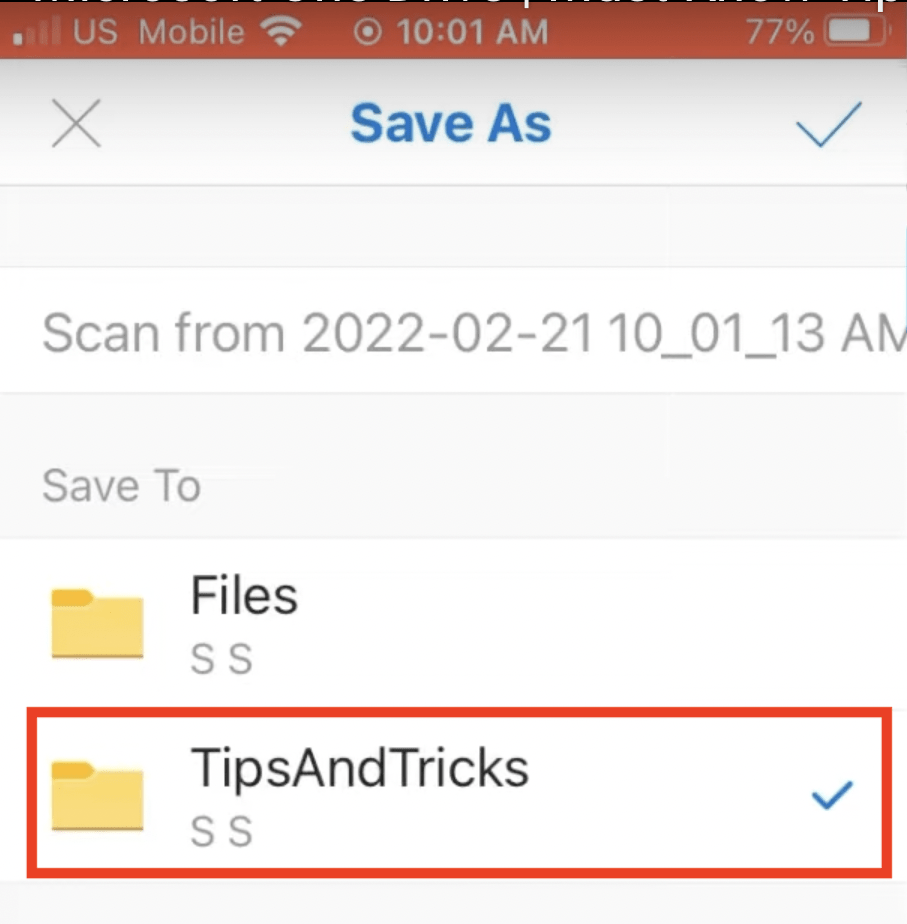
- Select the folder that you want to save the file to.
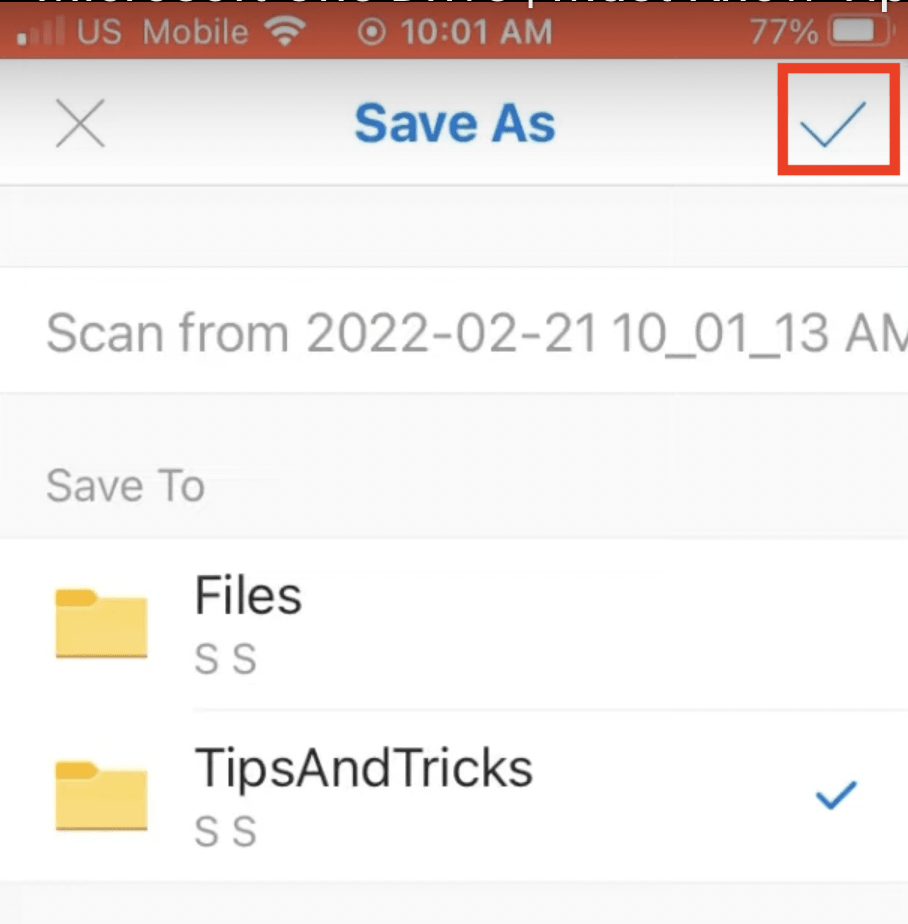
- Click on the check mark to confirm it.
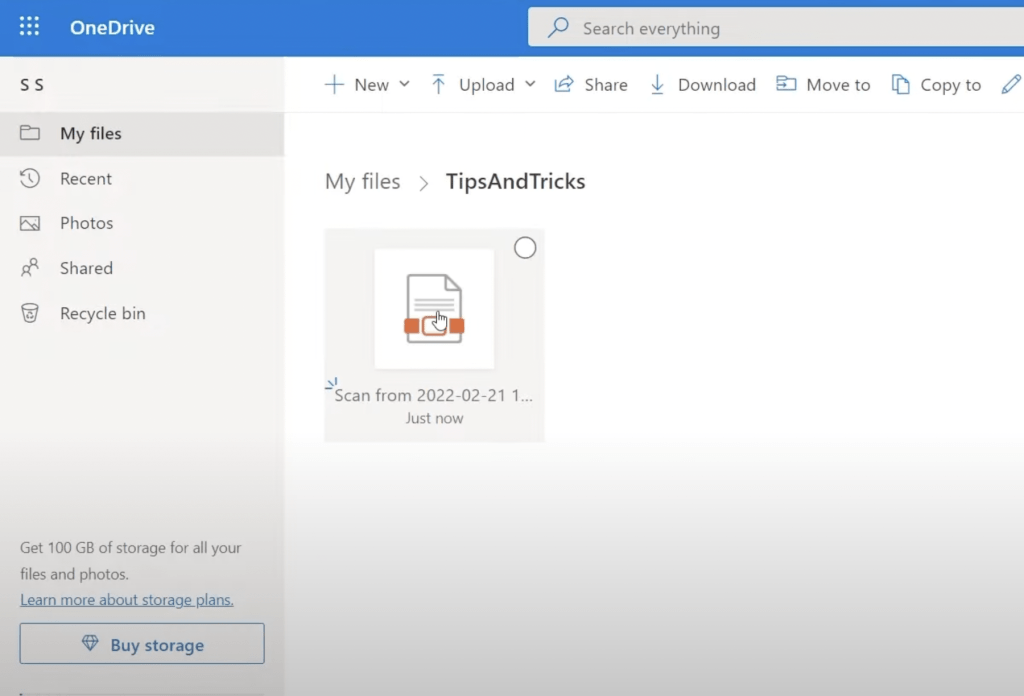
Now if you look into that folder, you will see that the photo you clicked has been uploaded as a document.
Tip 3: Sharing Options via Email or Link from Your PC
Let’s go over some OneDrtive tips on your PC. To open OneDrive –
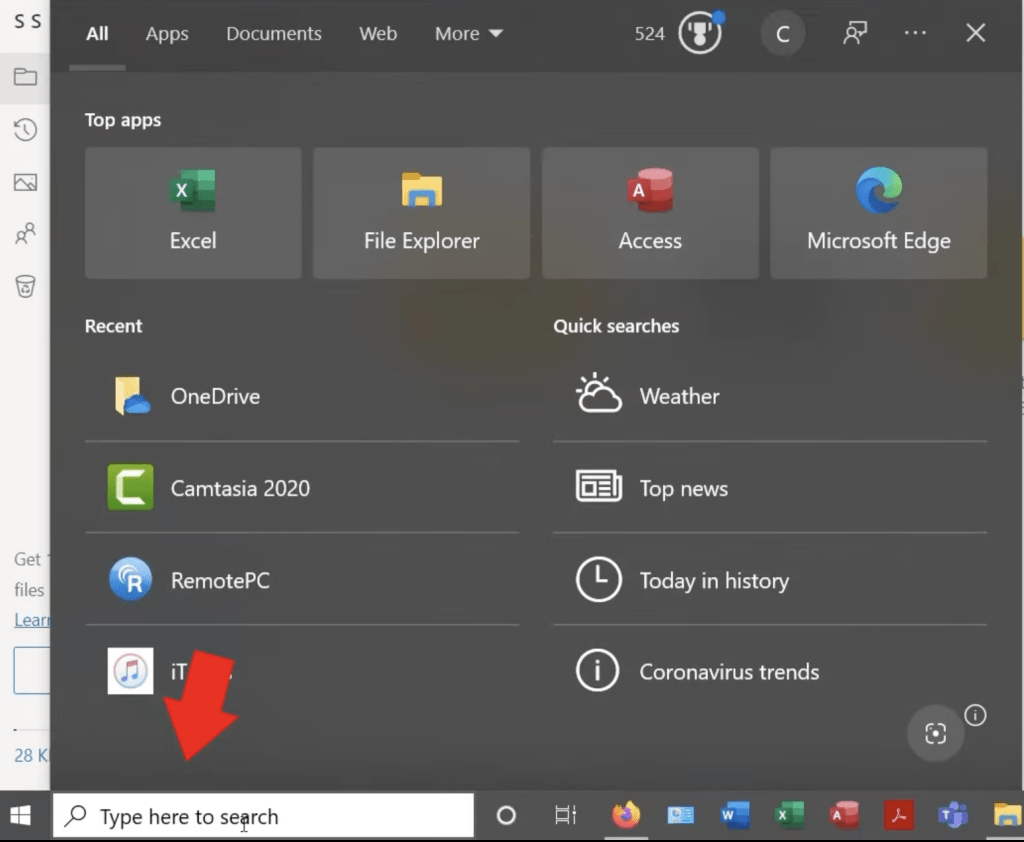
- Go to the search bar on your Taskbar.
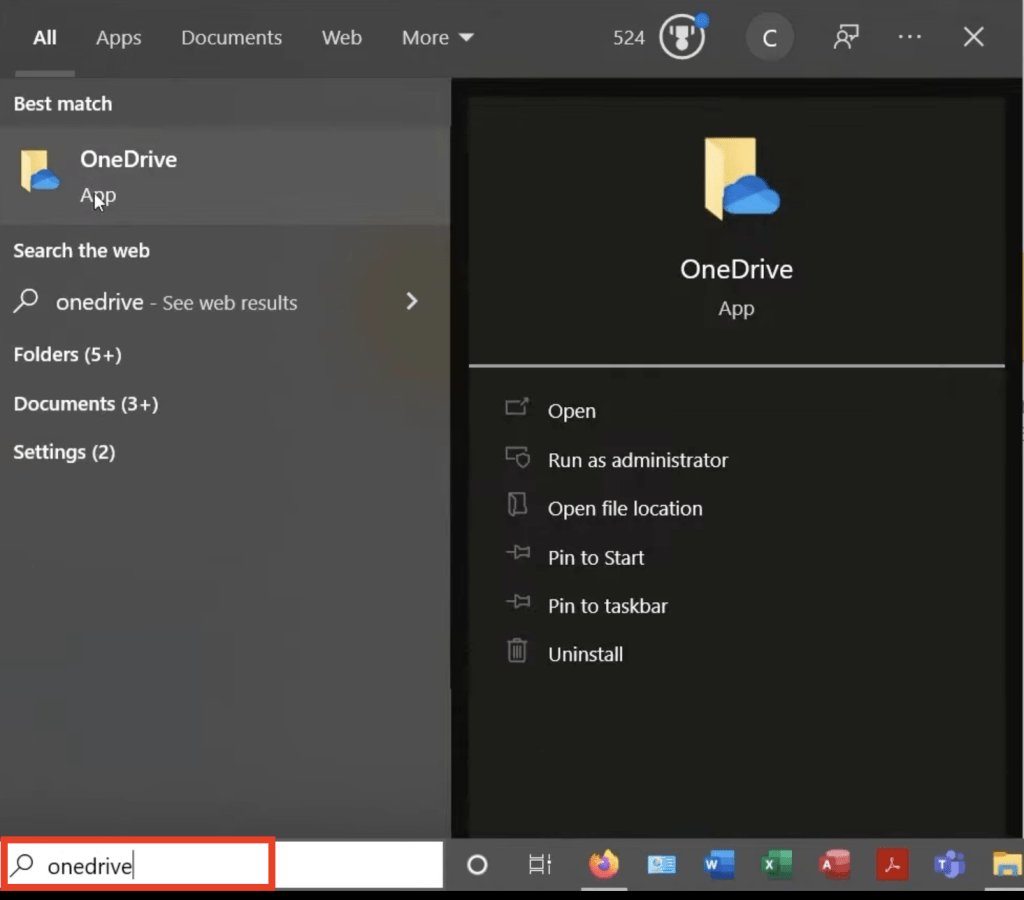
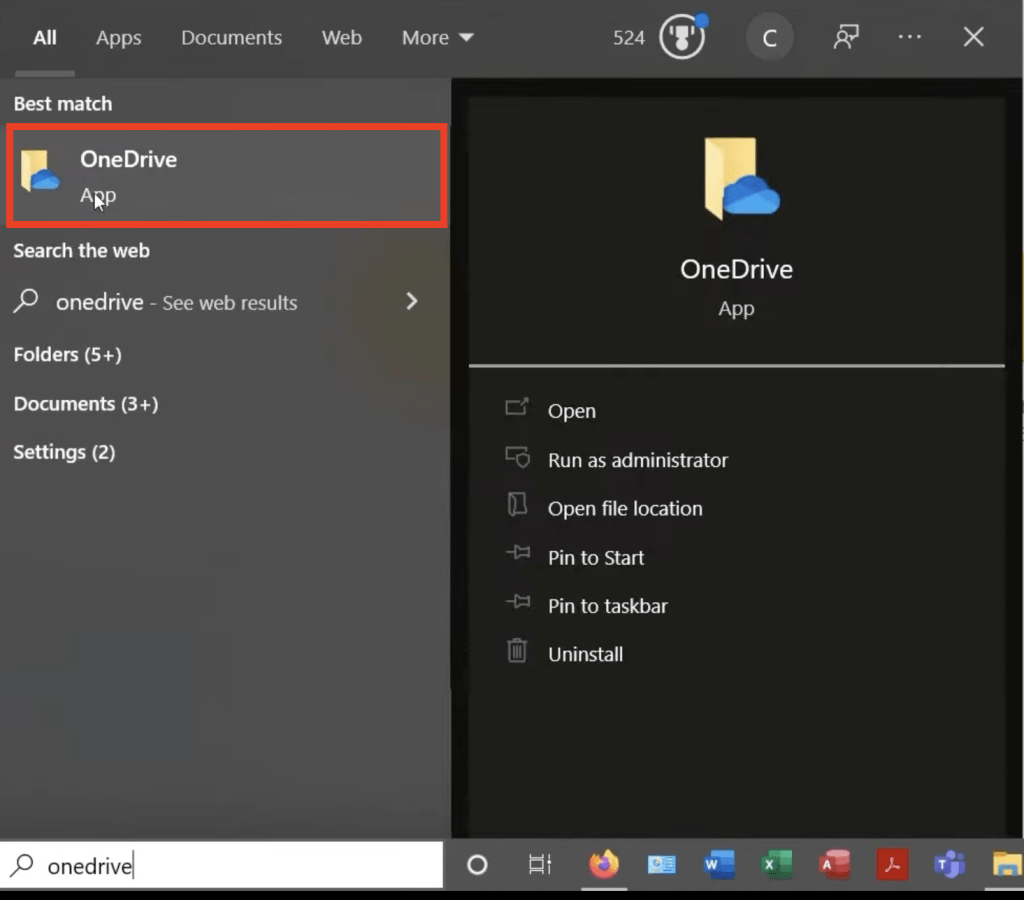
- Type OneDrive.
- Open the OneDrive folder.
Now we’ll explore the different possibilities offered when sharing a file with someone.
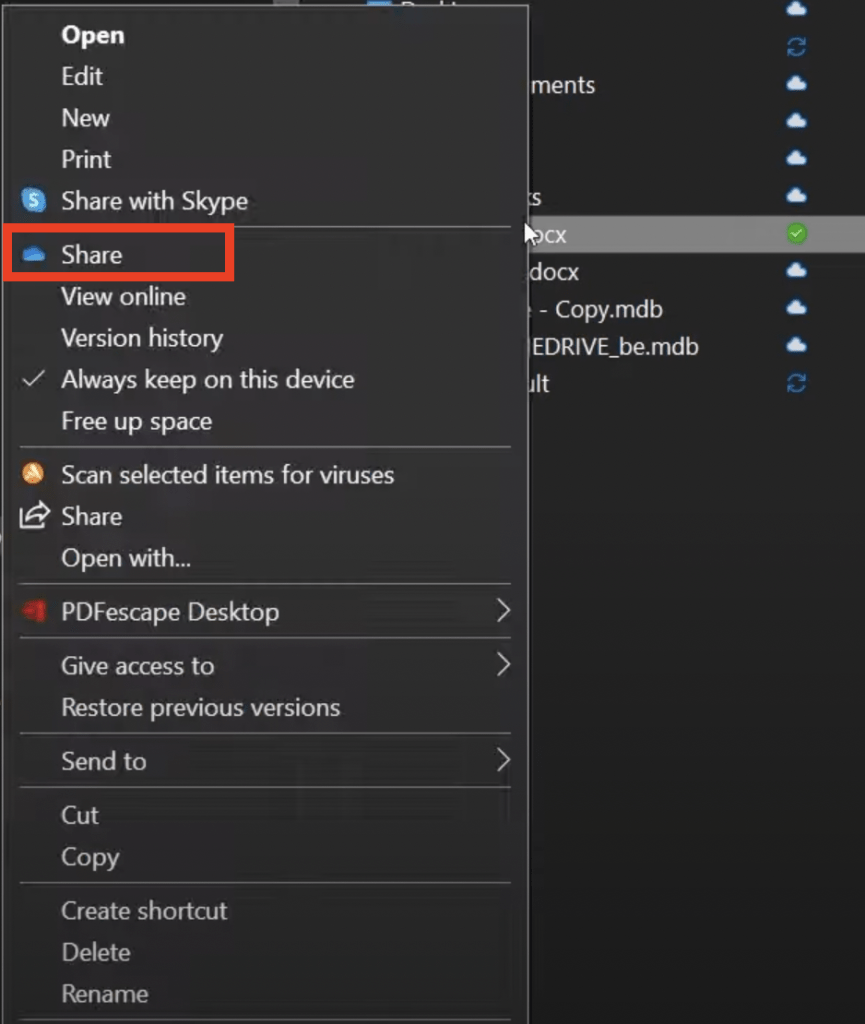
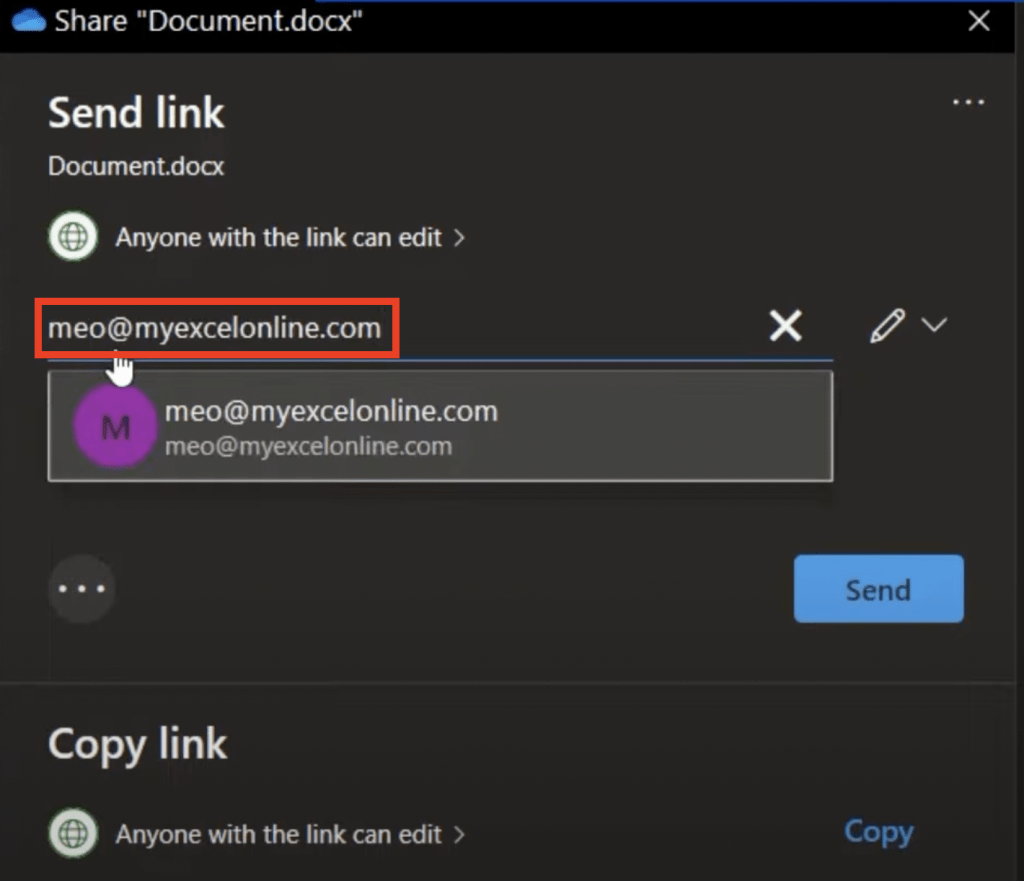
- Start by right-clicking on any file you want to share.
- Click on Share.
- In the pop-up window – you can directly enter someone’s email ID and share the file.
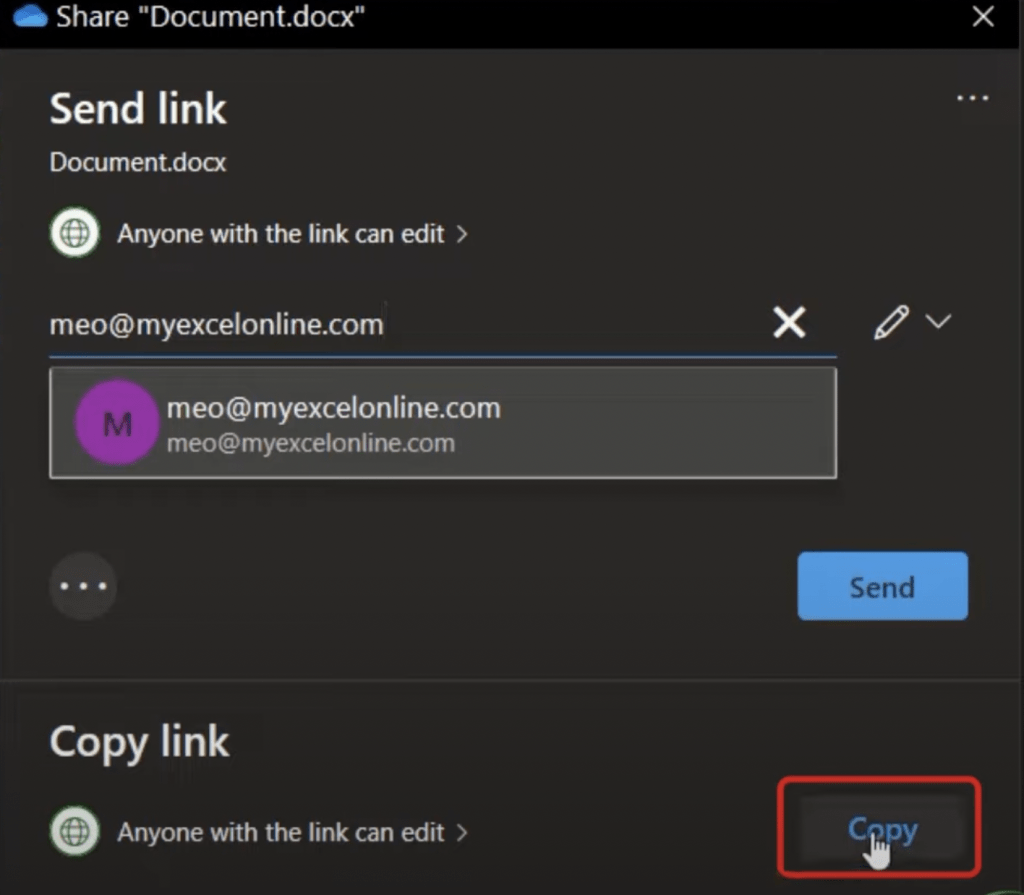
Or,
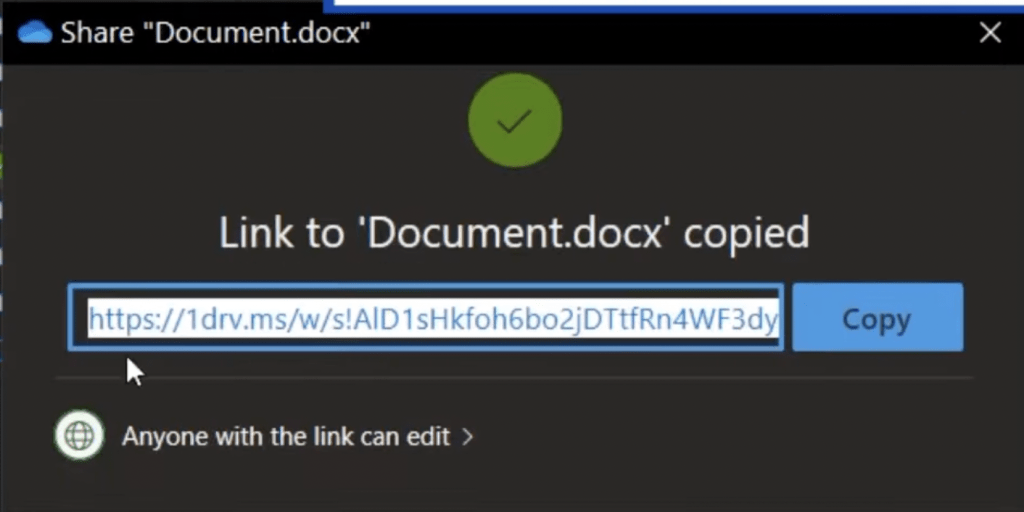
- At the bottom, click on copy
- It will create a link to the file which you can copy and send to someone. They will be able to see and edit the file through that link.
A nice feature is that here, the recipient is not only able to view the file but is able to view the file on your drive. This means that any updates that they make will be visible to you as well.
Tip 4: File Security Options from Your PC (expiration date and password)
You can even add different levels of security to your shared file.
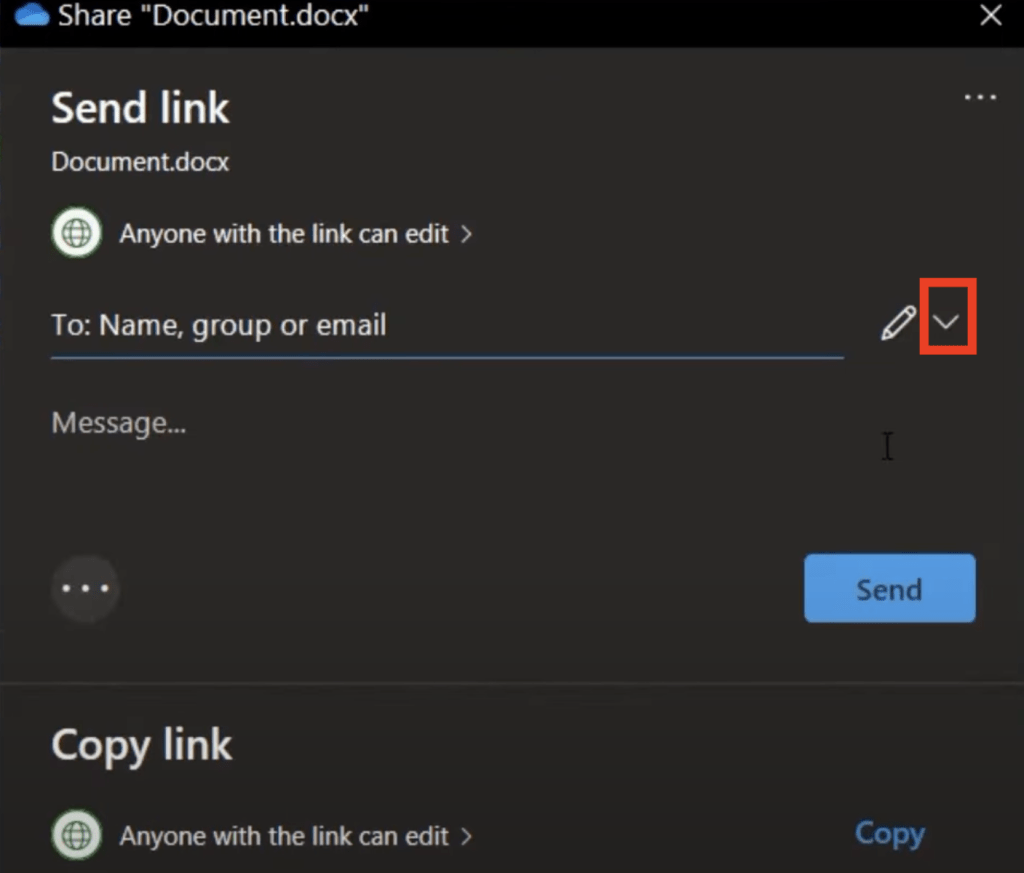
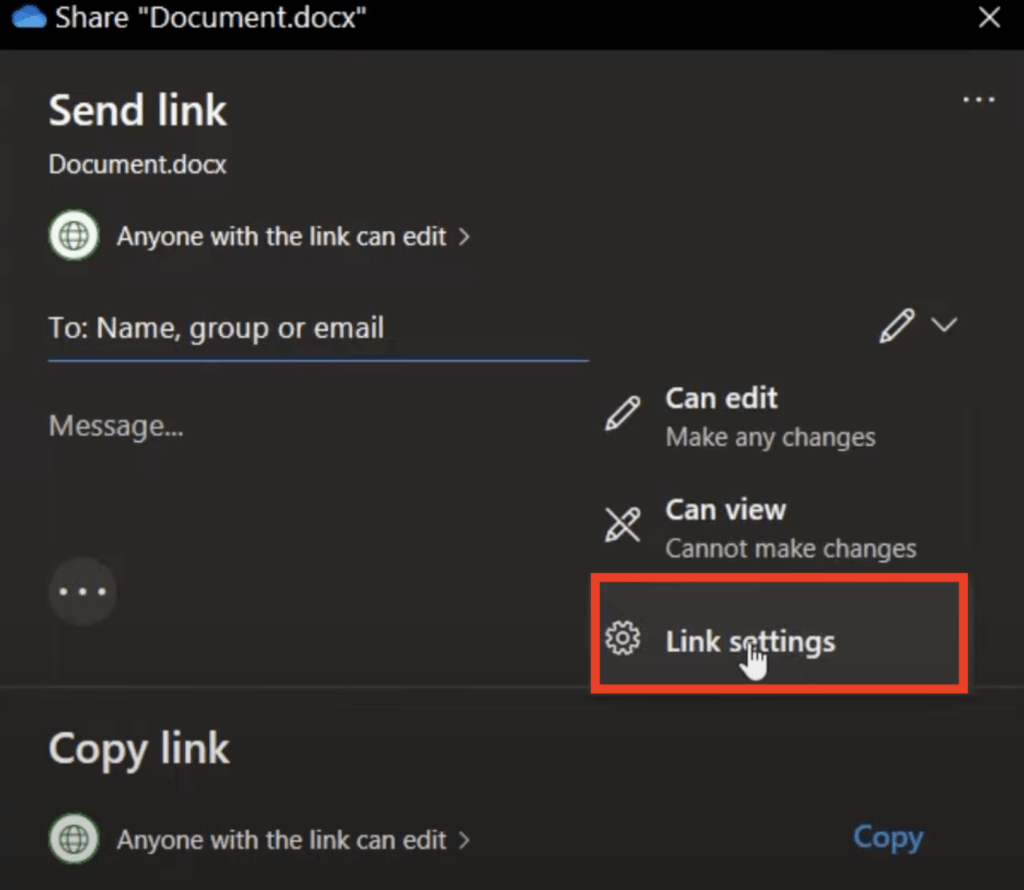
In the file-sharing pop-up window mentioned above, click on the arrow down button next to the edit icon.
Click on Link settings.
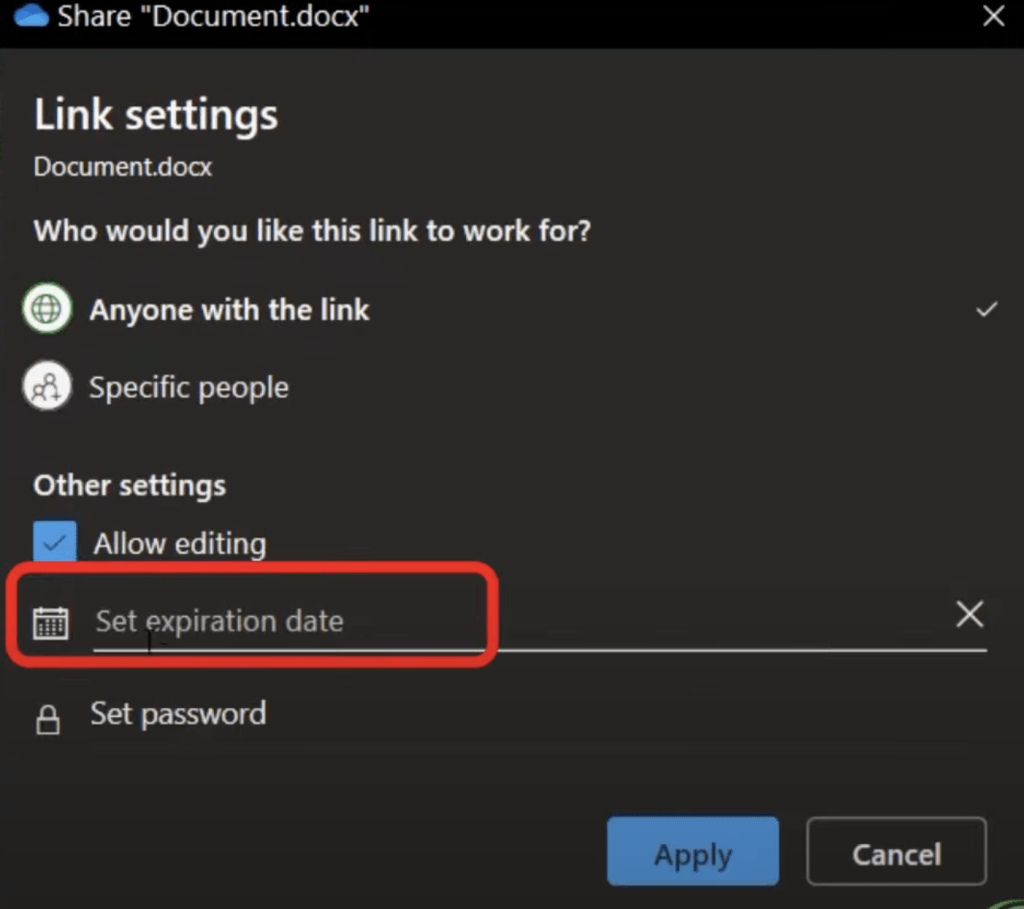
Here, under the Other settings area, you can set an expiration date. The other party with whom you have shared this document will only be able to edit this file till the date mentioned as the expiration date.
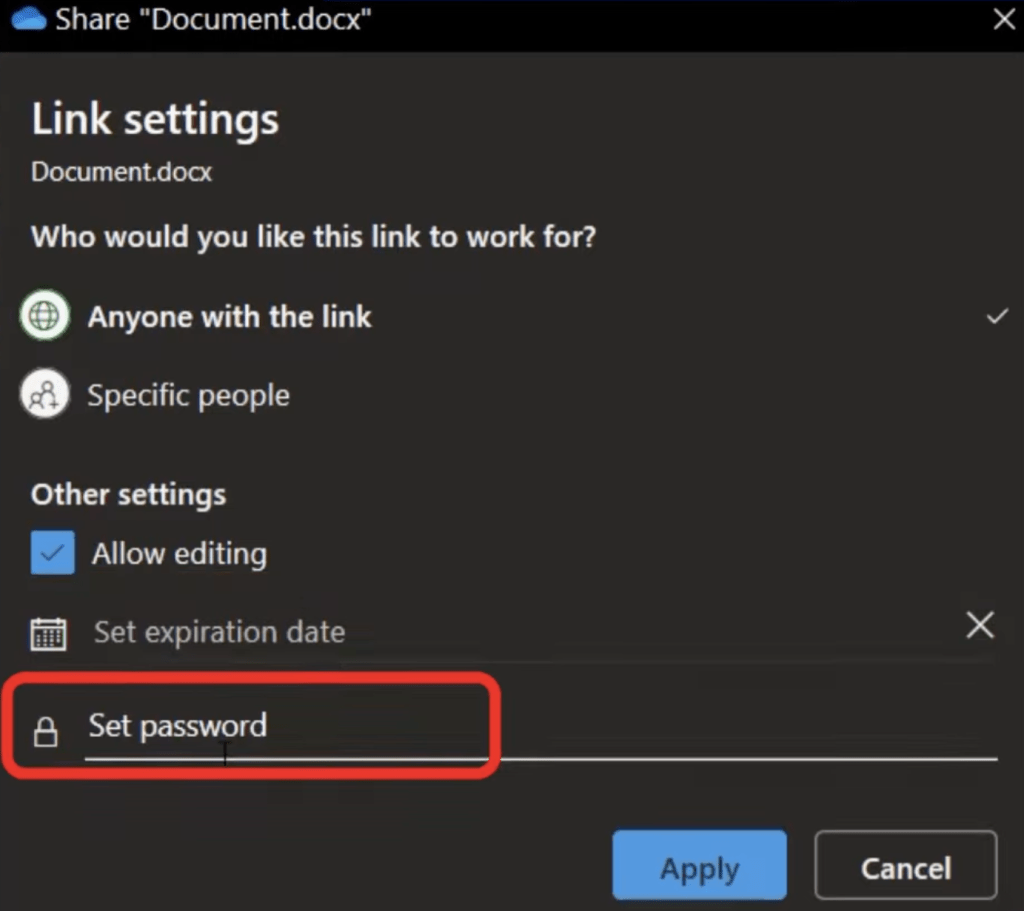
You can also set a password for additional security.
Tip 5: Managing Sharing Access to Files on Your PC
Now let’s see how you can manage the access of different people with whom you have shared any file.
1. Right-click on any file you want to manage access to.
2. Click on Share.
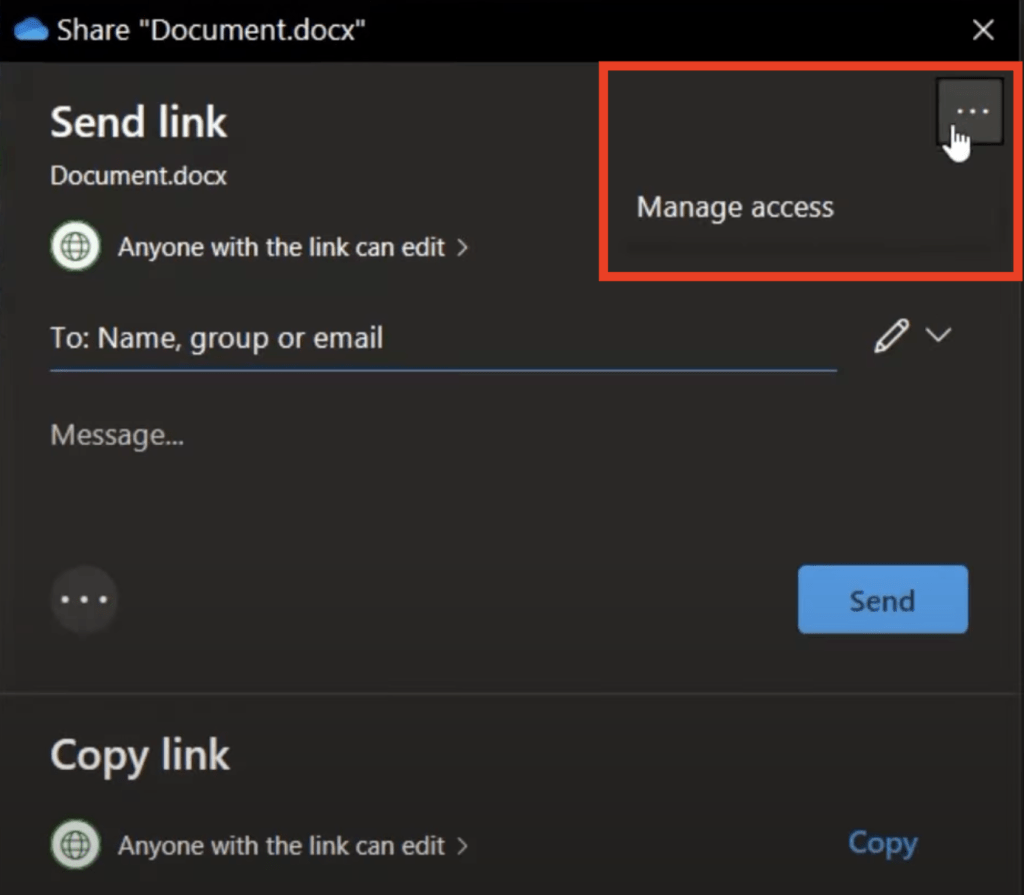
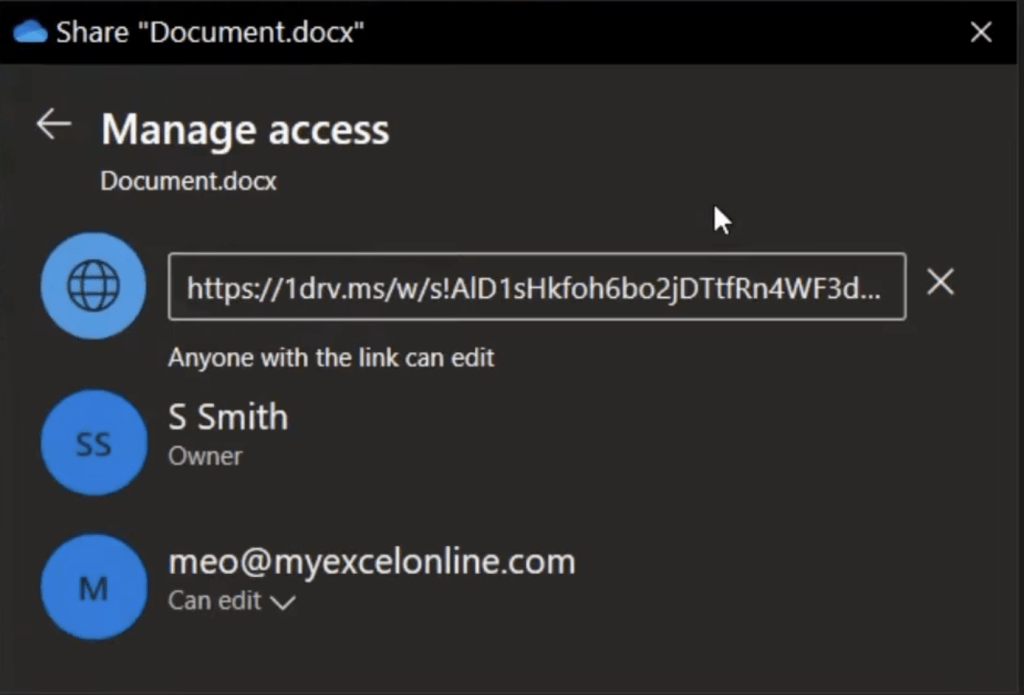
3. In the pop-up window, click on the three dots on the top and click on Manage access.
Here you can see everyone who has access to this file.
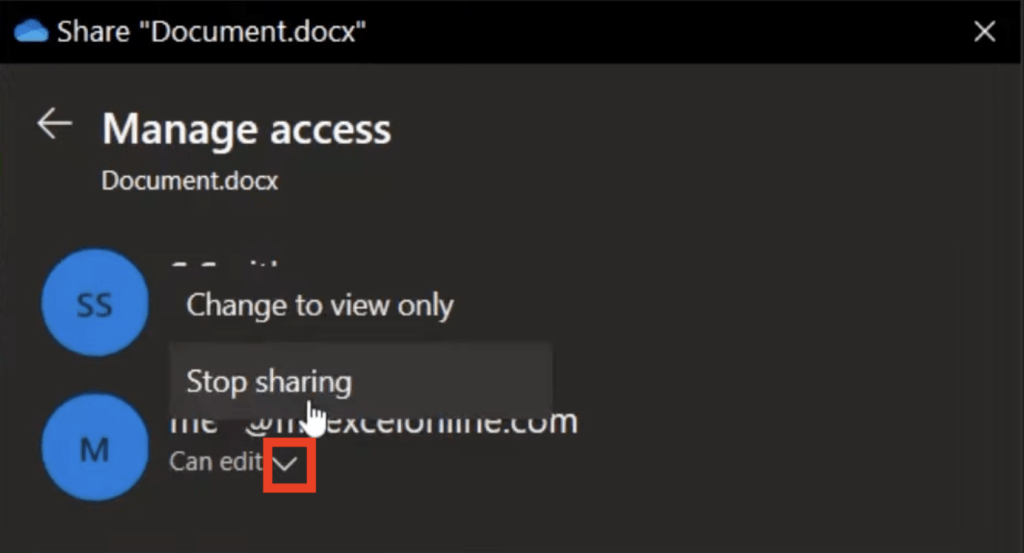
If there are certain people with whom you do not want to share this file, you can remove their access. To do so, simply click on the arrow under their name and select Stop sharing.
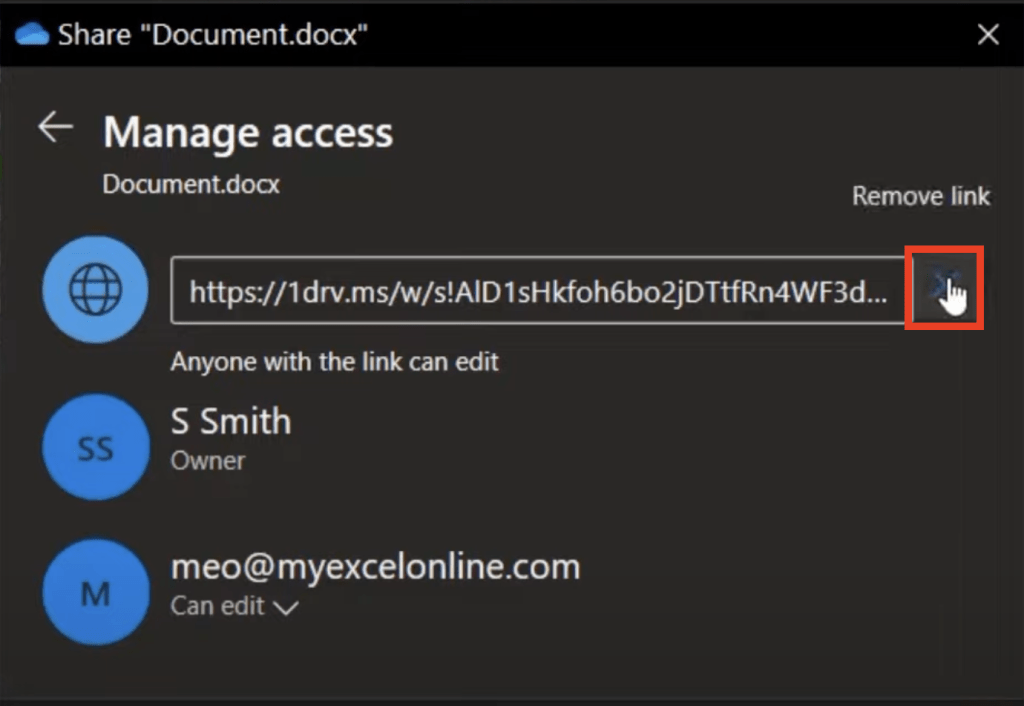
If you want the link that you shared to not exist anymore, simply click on the X icon next to the link and select Remove link.
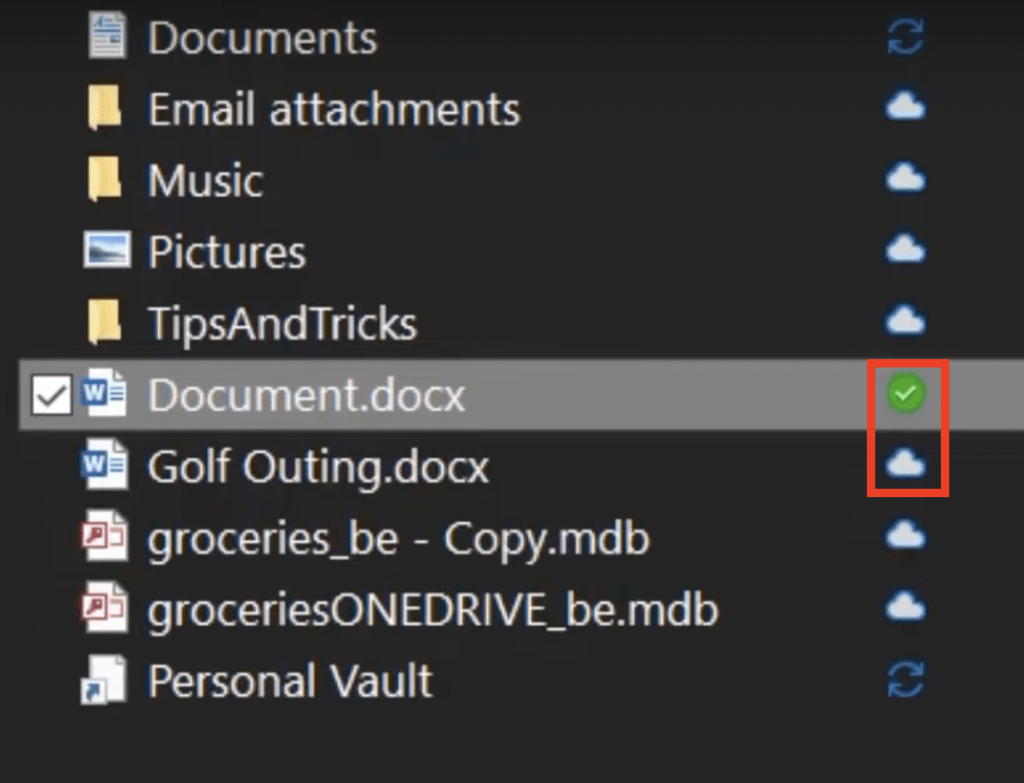
The next tip is one where the files in OneDrive actually reside. The different OneDrive icons can tell you the destination for the files –
- Green circle with white checkmark – It means that your file resides on both PC and cloud. These files are marked as “Always keep on this device”
- Blue Cloud – It means that your files are on the cloud only. It does not take up space on your device and to edit those files you need to be connected to WiFi.
Tip 7: Using the Personal Vault on Your PC and on The Cloud
One neat feature available in both mediums of Onedrive,i.e, PC as well as on the cloud is the Personal Vault.
It is a place where you would want to keep sensitive material. Personal Vault keeps these files extra safe as it requires two-factor authentication to access the vault.
You can keep important documents such as ID card pictures, social security number, your signed will, or anything that contains sensitive information.
Tip 8: Version History on Your PC and on The Cloud
You can also right-click on any file and select Version history.
This will show all the previous versions of the file after which some changes might have been done in the file. In case of any error in the current file, you can restore the file to a previous version that does not contain the error.
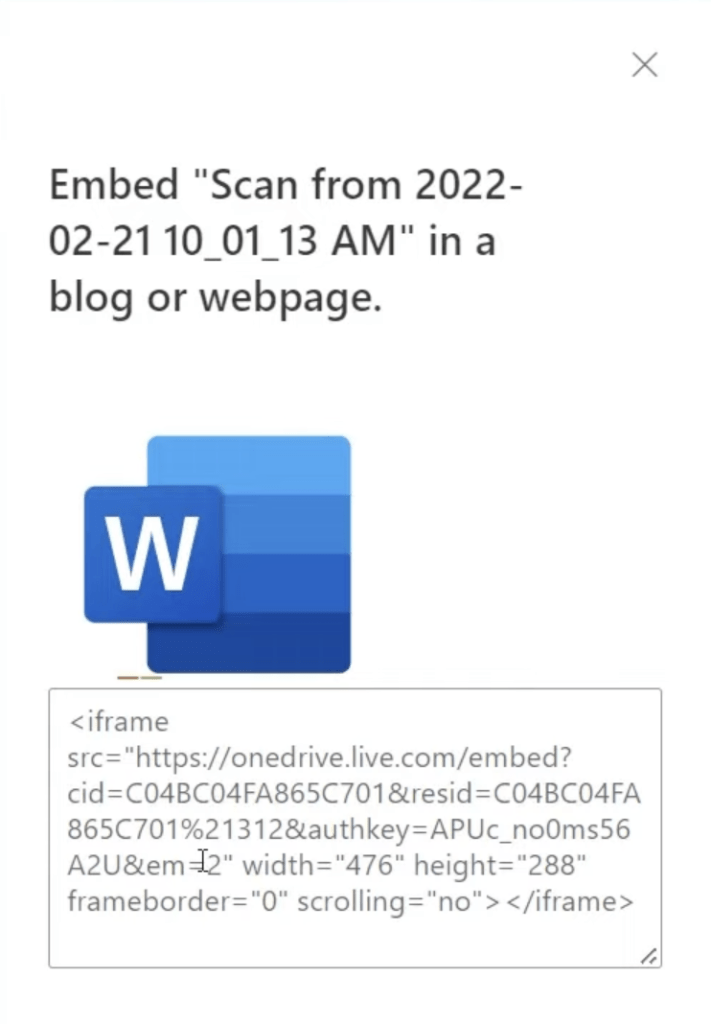
Tip 9: Generating Code for Embedding a File from The Cloud
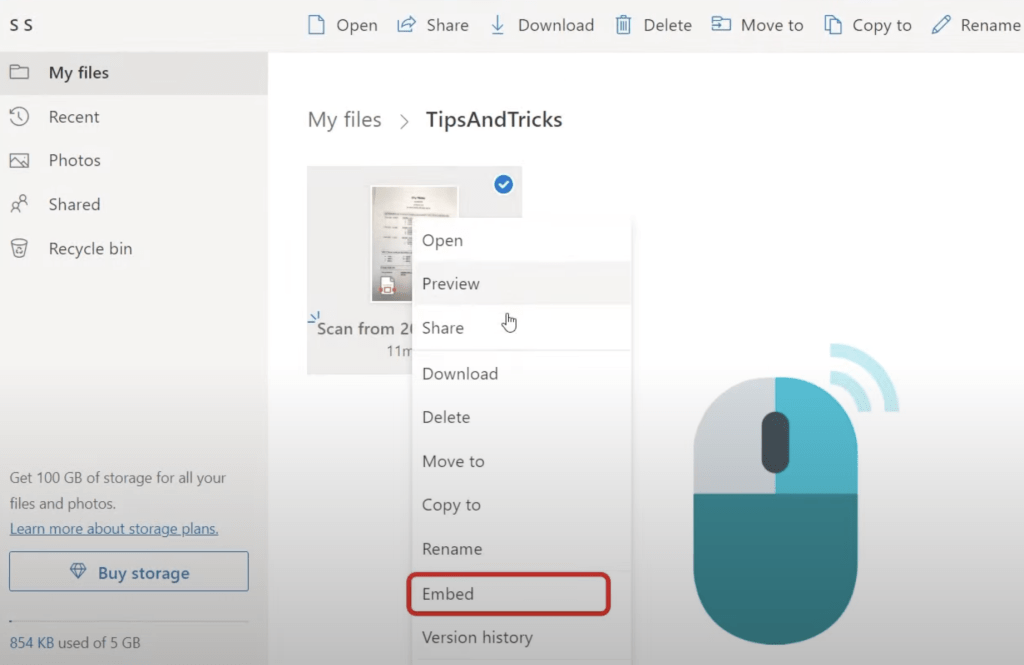
You can also right-click on any file, while using the online version of OneDrive, and click on Embed.
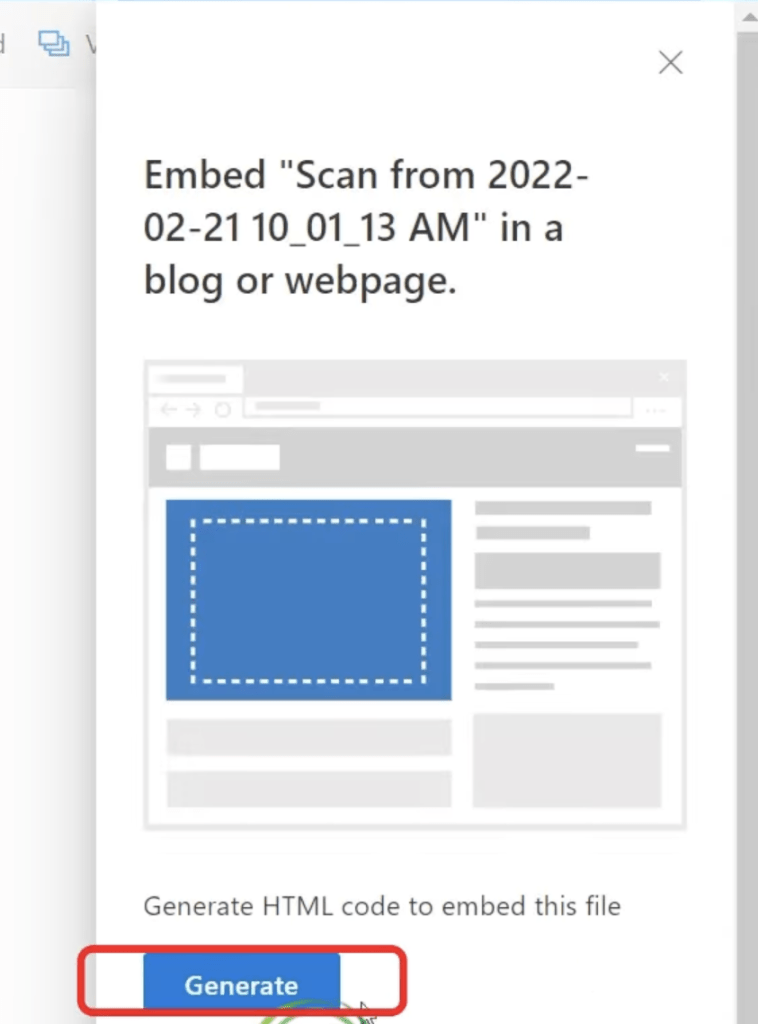
In the pop-up window, click on Generate.
This will generate a link directly to this file which you can embed on a website.
Tip 10: Using the Recycle Bin on The Cloud
Lastly, the Recycle bin shows you files that have been recently deleted.
Just like your PC, OneDrive also keeps a recycle bin where deleted files are kept for 30 days before being deleted permanently. So if you accidentally delete any file, you can restore it easily from the Recycle bin.
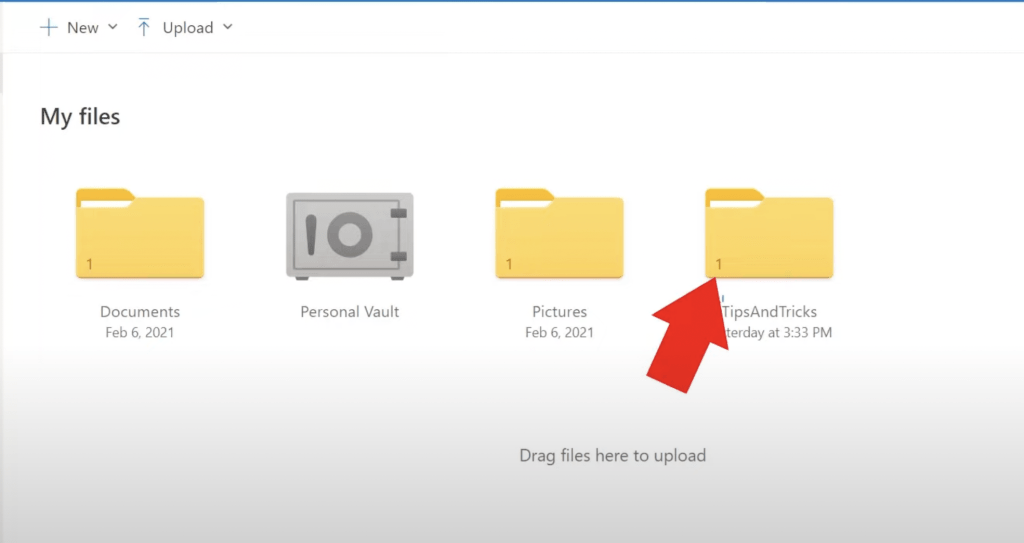
BONUS TIP: Viewing the Number of Files in a Folder on The Cloud
Before ending this article, here is a bonus OneDrive tip for you. On the OneDrive cloud, you can see small numbers on the bottom of your folder icons. That number indicates the number of files within that folder.
Hope this article has given you some new information on using OneDrive, on different mediums as well. Now you can start using OneDrive efficiently, and if you want to revise these OneDrive tips that went through today, you can always come back here!
How to Fix OneDrive Sync Issues 2023
In this article, we will talk about the syncing issues in OneDrive that you may face or have faced and how to fix OneDrive issues. Following are the common issues that users face while trying to sync OneDrive:
- OneDrive Requirements
- Logins
- Sync Paused
- No WiFi or Airplane Mode
- Delete File and Upload Again
- Repair Office
- Windows Update
- Reboot
Let’s explore each of these OneDrive issues one by one!
Watch How to Fix Microsoft OneDrive Sync Issues on YouTube and give it a thumbs-up!
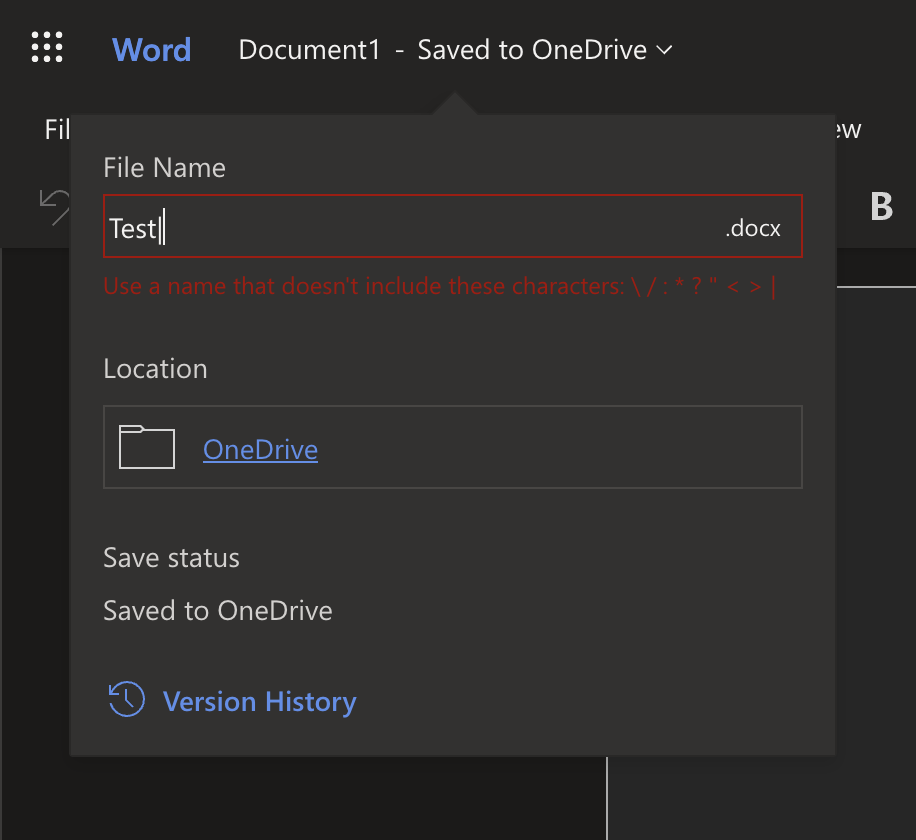
1. File Naming –
The main requirement of file naming in OneDrive is that you cannot use certain characters in your file name. The characters that you have to avoid are:
- “
- *
- :
- <
- >
- ?
- /
- \
- |
When you try to use these characters in the file name – you will get an error and need to fix it.
You also have to avoid starting a file name or ending a file name with a space. If you try adding leading or trailing spaces, OneDrive will remove them automatically.
2. File Location – When considering file location, keep in mind that you cannot sync a mapped drive.
3. Length of file path – The entire file path of any document should be less than 400 characters.
For example – If you can have an image named “TestDocument.jpg” saved in a Pictures folder on your windows computer. The file path of this image will be: “C:\Users\john\Pictures\camera\2022\TestDocument.jpg” and the number of characters should be within 400.
Each segment of this file path cannot be more than 255 characters.
4. The file size for uploading or downloading should be within 250 GB.
5. At a time, you can sync a maximum of 2500 files. If you try and upload more than that, you will get an error.
6. You cannot sync to more than 1 OneDrive account.
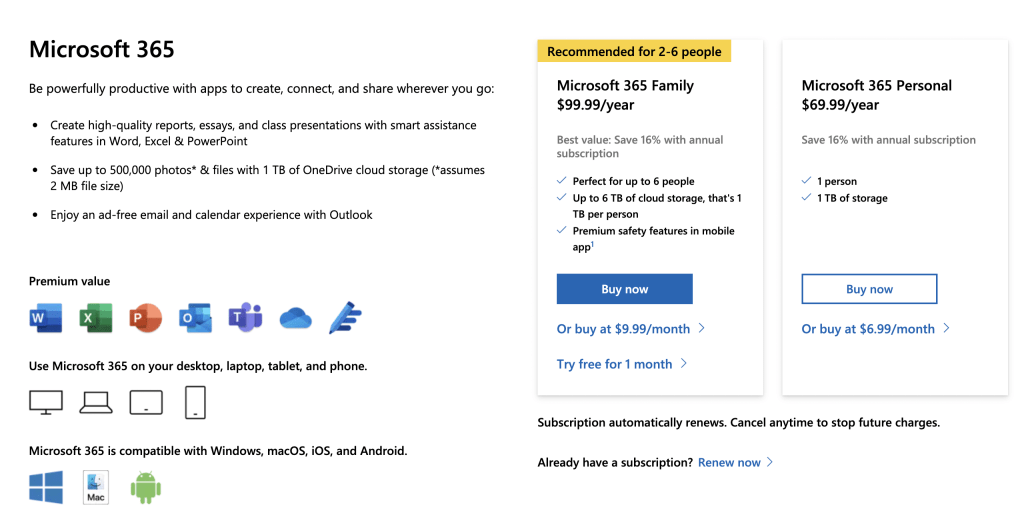
7. In the basic OneDrive account, you have a total of 5 GB of space. If you upgrade your account, you’ll get 1 TB of space and Microsoft 365.
Sometimes it might happen that you open OneDrive on both PC and online but the folders do not sync. What can be the possible reason for that?
You may be using one account online but on PC you may have logged in using a secondary account.
It might also happen that you accidentally pause file syncing on OneDrive.
You may not realize that you have paused syncing. Now, when you upload a new file on a PC and do not see the same file online you may not be able to identify the reason.
So, it is always a good practice to check the OneDrive icon present on the taskbar.
Currently, you can see a small pause icon on the OneDrive icon. This means that the syncing is paused.
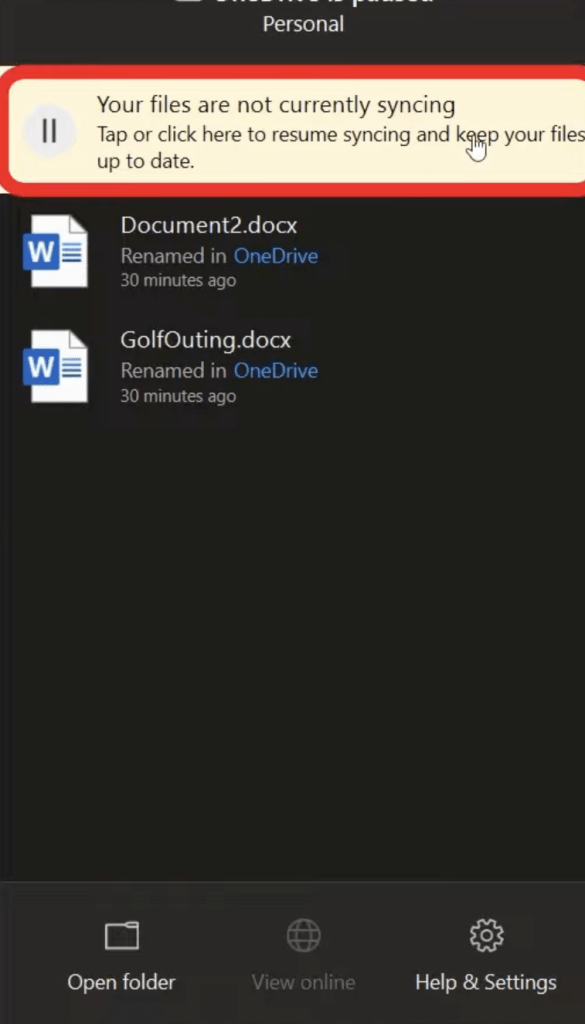
If you click on the logo, you can see the same message displayed on the banner.
Simply, click on the banner and the syncing will start again.
What if you are not connected to your WiFi or you accidentally hit the airplane button on your keyboard?
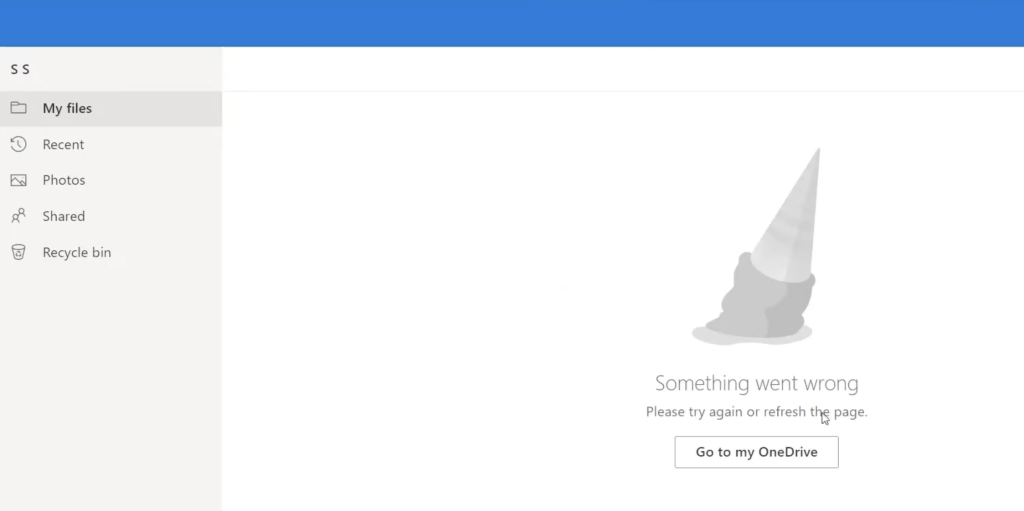
You will see that OneDrive on the cloud will show a “Something went wrong” error.
It may be difficult to understand the reason for this error and you may end up spending a lot of time troubleshooting it.
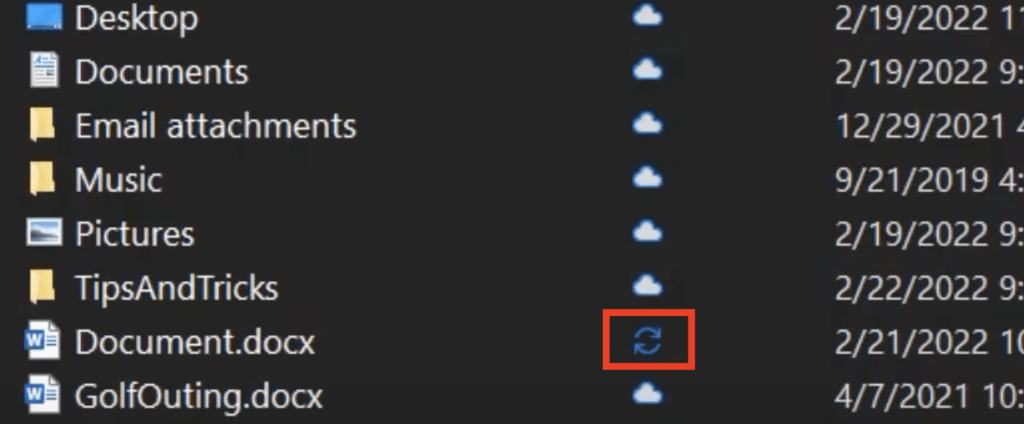
One thing you can do is open the OneDrive folder and check for a blue recycling arrows icon. If you see it, it means you have encountered a connectivity issue and your file is not syncing to OneDrive.
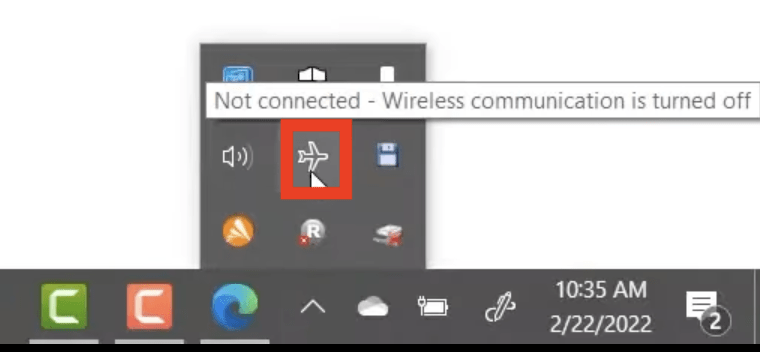
Now if you go to the taskbar, you will see that your PC is now in airplane mode.
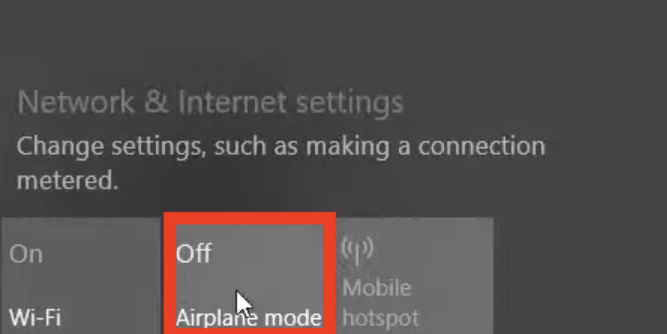
Once you turn off the airplane mode and give it a minute to come back online, you will see that the files have now synced as it now has a cycle with a checkmark icon.
If you have tried a few troubleshooting issues and still do not know what is wrong, a quick fix would be to delete the problematic file and upload it again.
The issue might resolve on its own.
Another option to fix OneDrive sync issues is to reboot office. You can follow the steps below to repair office:
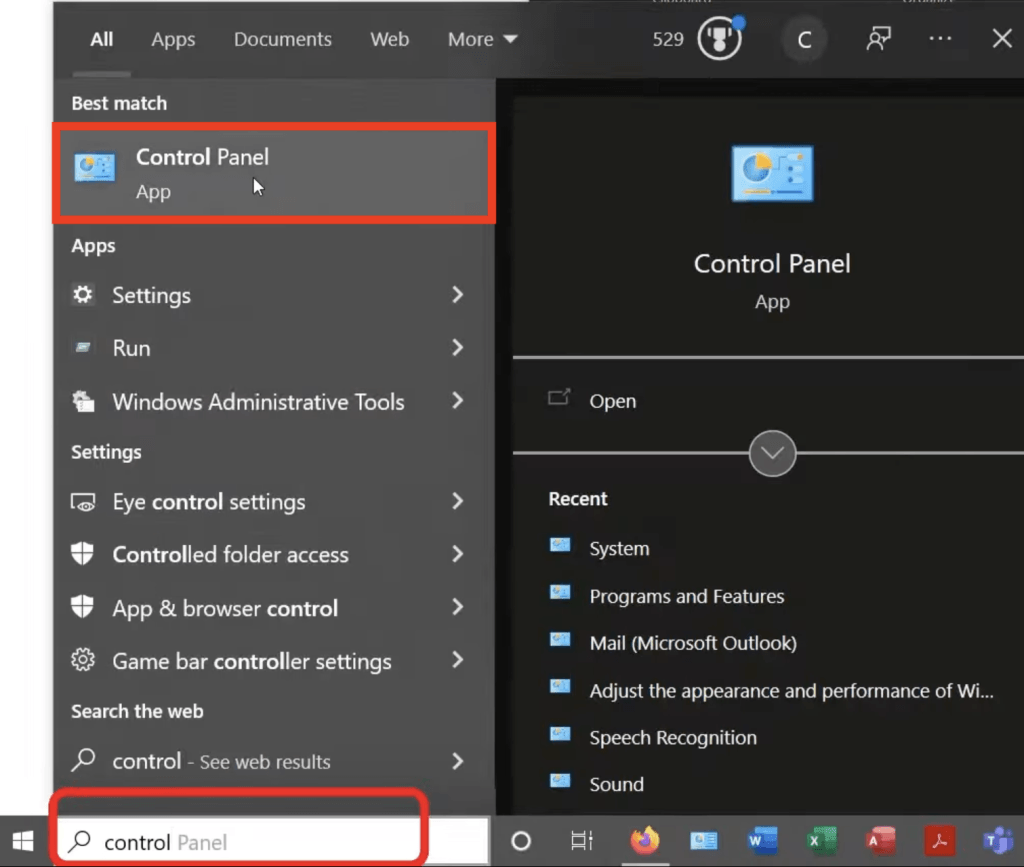
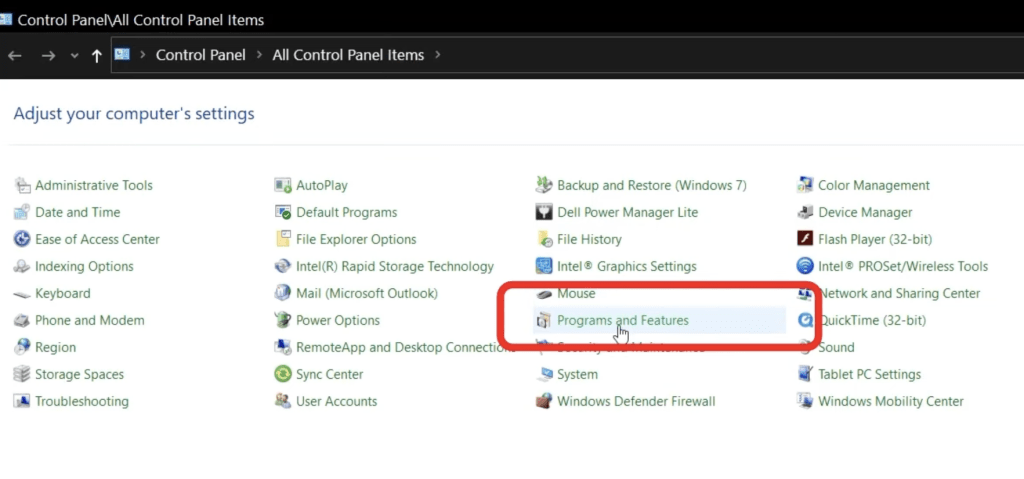
1. Go to the search bar and type Control Panel.
2. In the Control Panel, go to Programs and Features.
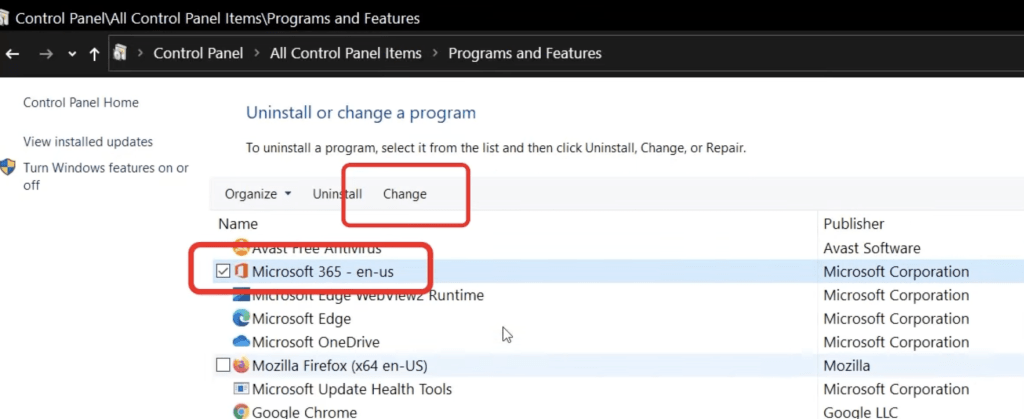
3. Select Mircosoft Office and click on Change.
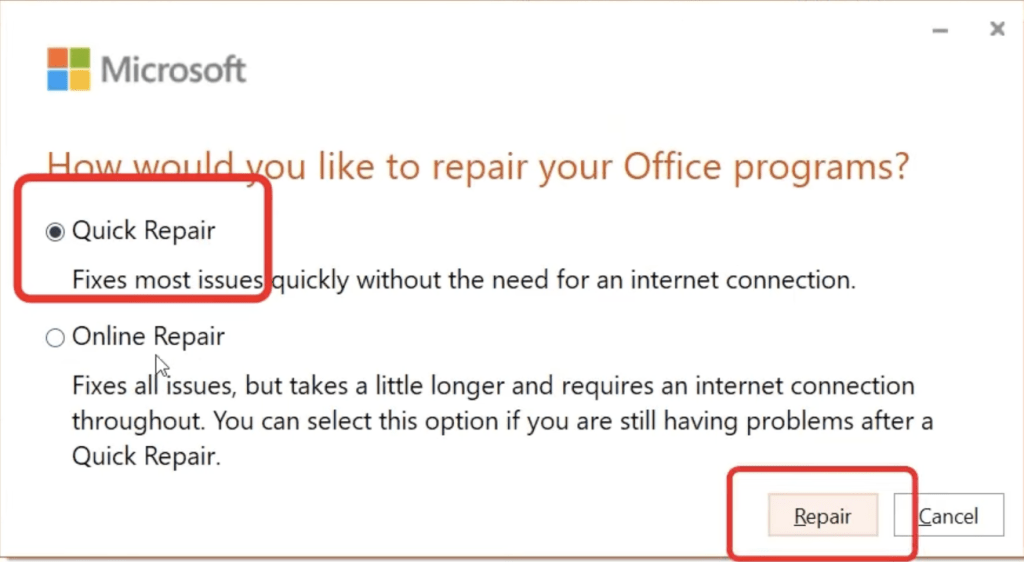
4. In the dialog box, select Quick Repair and then Repair.
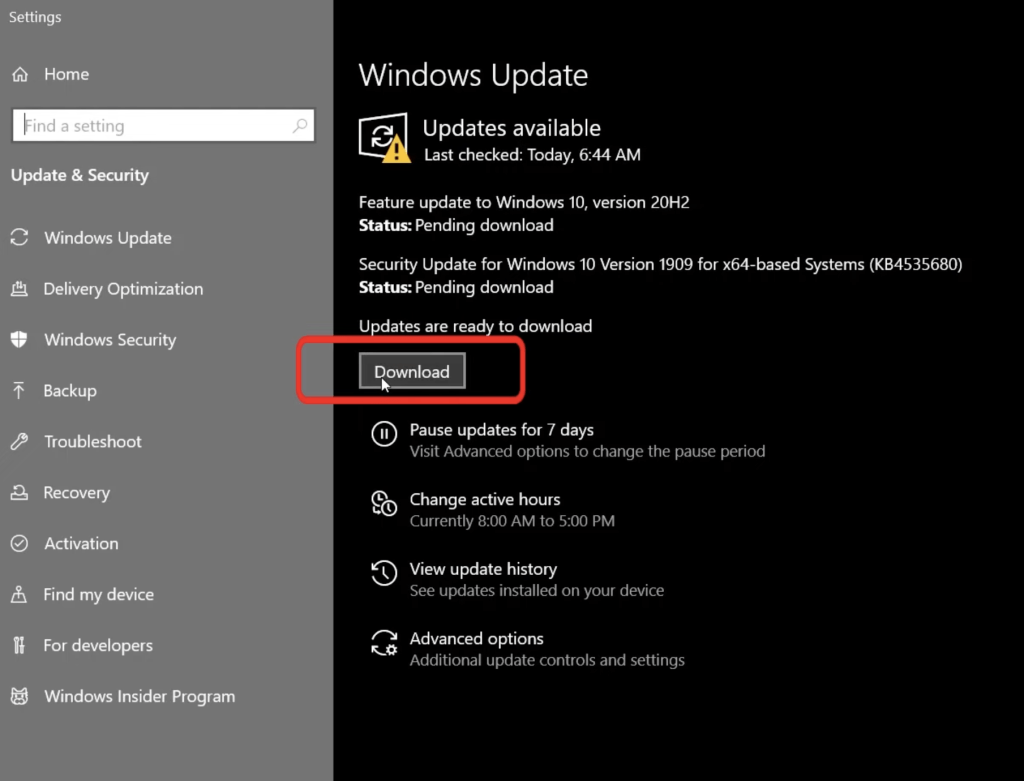
Another great option for OneDrive sync issues is to simply run the latest Windows update.
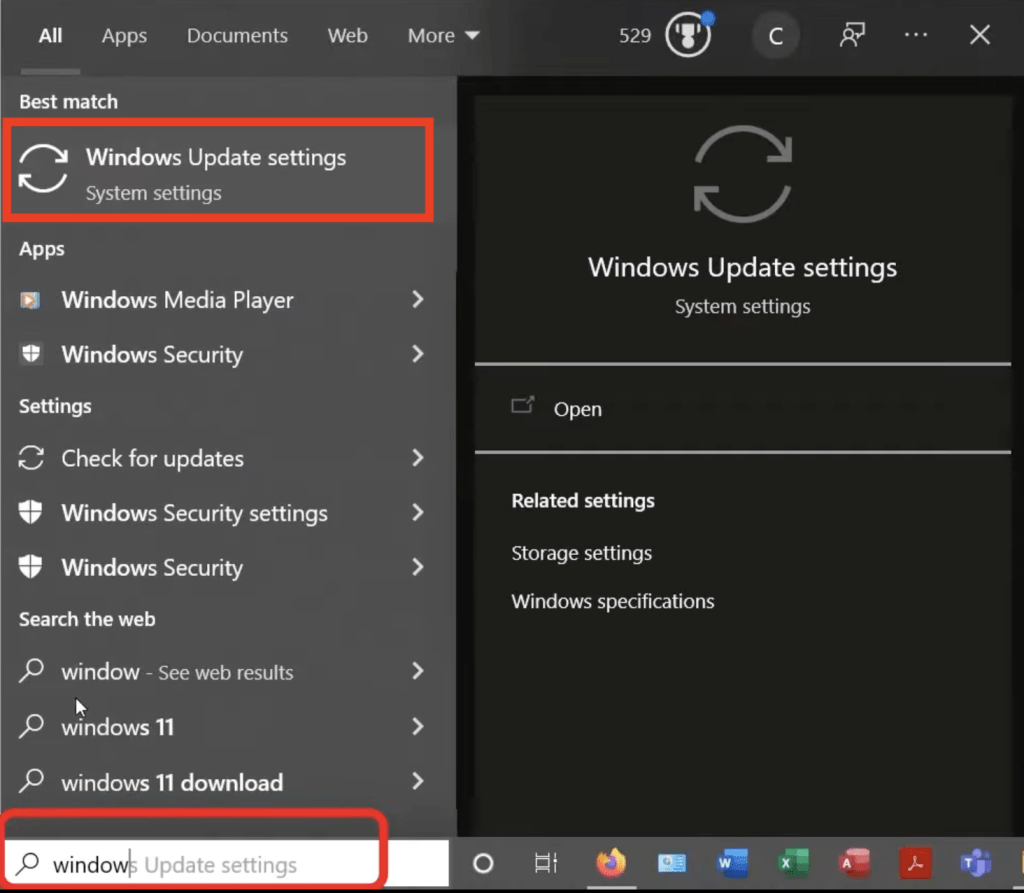
1. Go to the search bar and type Windows Update Settings.
2. If an update is available, go ahead and click on Download.
This might resolve your problem!
Lastly, if none of the above options works you might have to reboot the system to solve the problem. Rebooting sometimes covers a myriad of problems.
Hopefully, these tips and tricks would work for you if you encounter OneDrive sync issues. Now you can start using OneDrive efficiently, and if you want to brush up on your basics by coming back here!
OneDrive vs Google Drive – Which Should You Use?
In this article, you will learn the differences between OneDrive vs Google Drive and which file-sharing service you should use.
It will help you see some of the similarities and differences between OneDrive and Google Drive including space considerations, office apps, offline files, the personal vault, version history, file size, and purchasing extra space.
- Free Space
- Office Apps
- Offline Files
- Personal Vault
- File Sharing
- Version History
- File Size
- Extra Space
Watch OneDrive vs Google Drive YouTube and give it a thumbs-up!
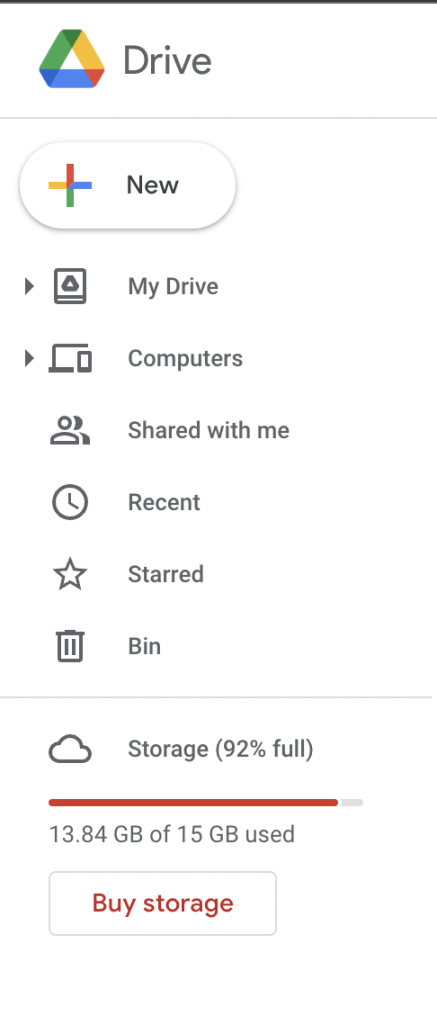
You will get 5 GB of free space in OneDrive and 15 GB of free space in Google Drive.
OneDrive –
Google Drive –
So, Google Drive provides thrice the amount of free space to its users. But one thing you need to note here is that this free space provided by Google Drive includes email.
Whereas, if you use Outlook as your email service, the amount of space in your email is not included in the 5 GB provided by OneDrive.
If you are using Google Drive, you will Google Docs, Google Sheets, Google Presentation, and much more for free.
In OneDrive, these apps are available after you upgrade your account. To upgrade, you need to pay $70/year or $7/month. Once upgraded, you can easily download these apps from www.office.com.
In OneDrive, you can right-click on any file and select “Always keep on this device“. It will allow you to work on files offline.
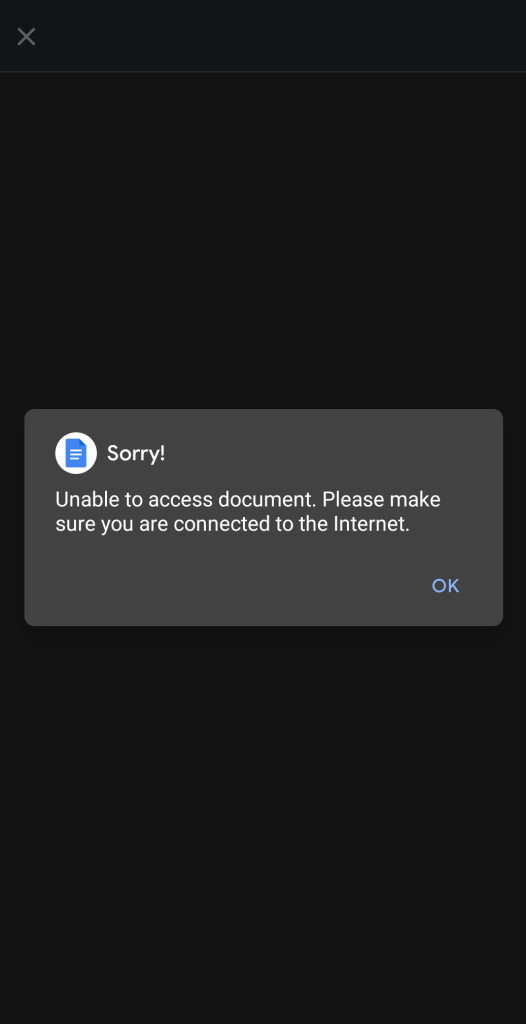
Google Drive allows you to work on offline files but sometimes you may not be able to access the offline files. You may see the following error when trying to open the file –
To fix this issue, you can try these remedies –
- Do not use Incognito Mode
- Update Chrome
- Clear Cache
OneDrive allows you to use the personal vault for free and you can have up to 3 files in it. You can store your sensitive files and photos without sacrificing the convenience of anywhere access.
Google Drive doesn’t offer anything like this.
In OneDrive, you can easily right-click on a file and email it or share the link with someone.
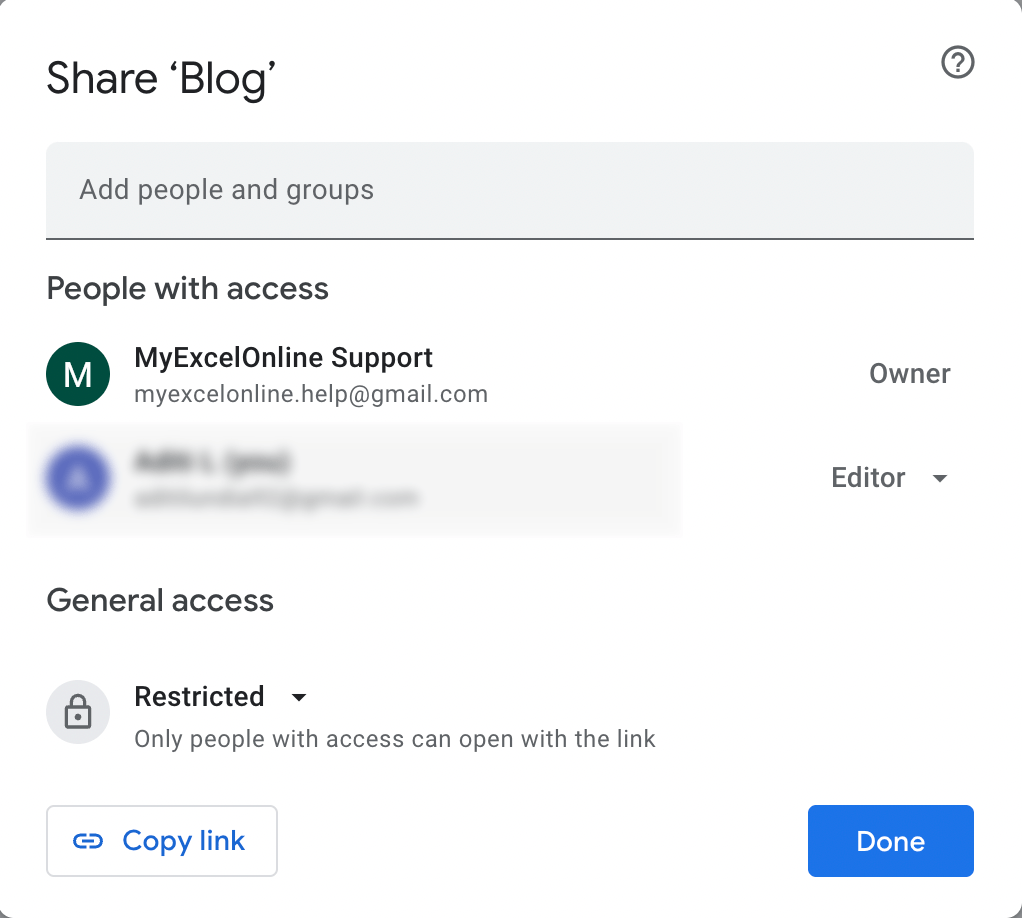
When you are sharing files stored in Google Drive, you may face some issues. The links to the file stored in google drive are not very reliable and users are not always able to download the file shared.
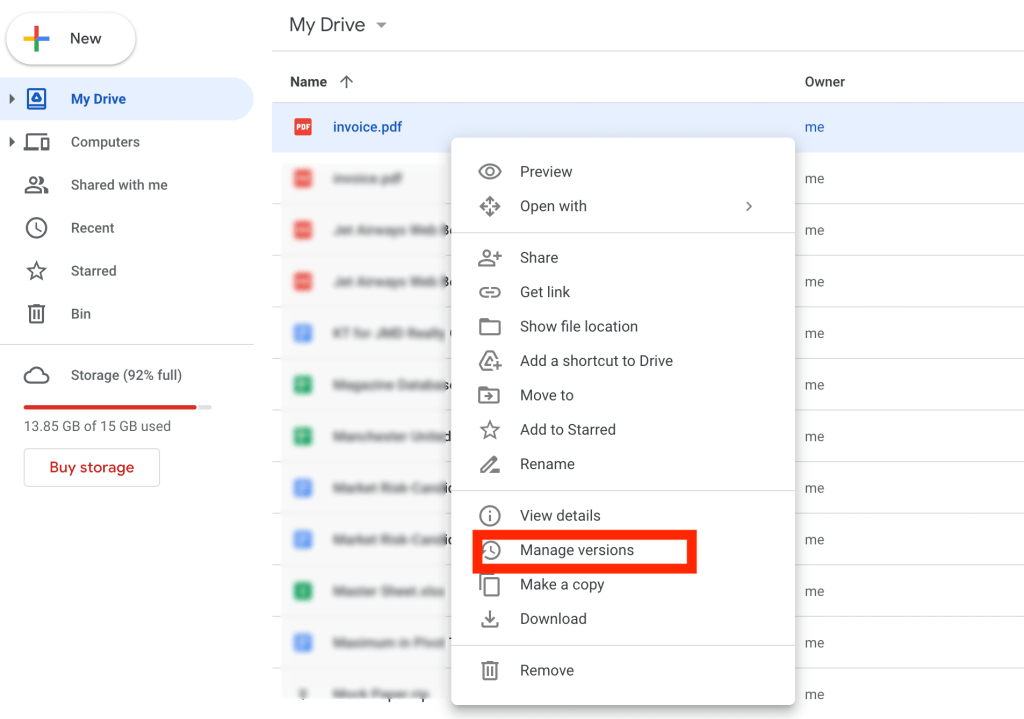
OneDrive and Google Drive both offer version history of files. So, if you make any mistake you can easily select the previous version of the file and use it.
OneDrive –
Google Drive –
For OneDrive, you can have up to 250 GB of your files.
But, for Google Drive, it varies.
- With Google docs, you can have up to 1.02 million characters.
- With Google spreadsheets, you can have up to 10 million cells.
- With Google presentations, you can go up to 100 MB.
- With others, you can have up to 5 TB.
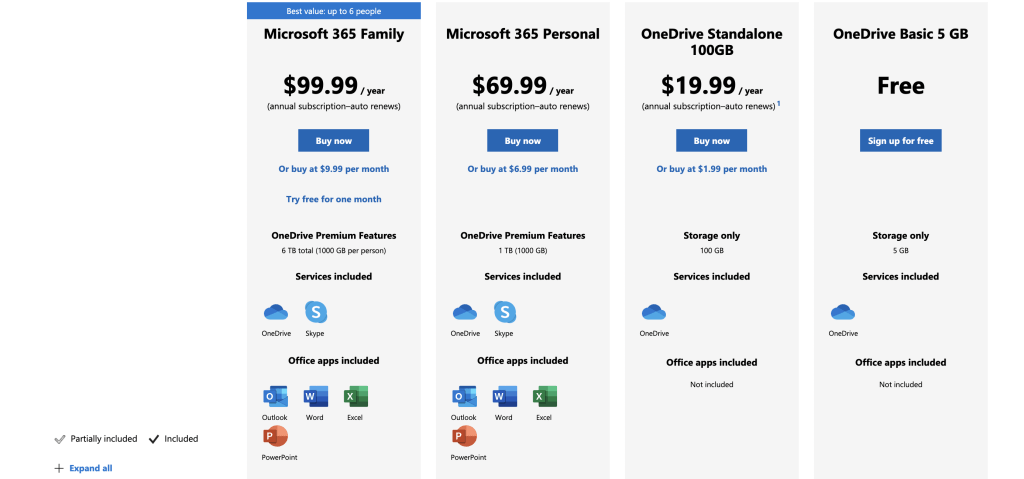
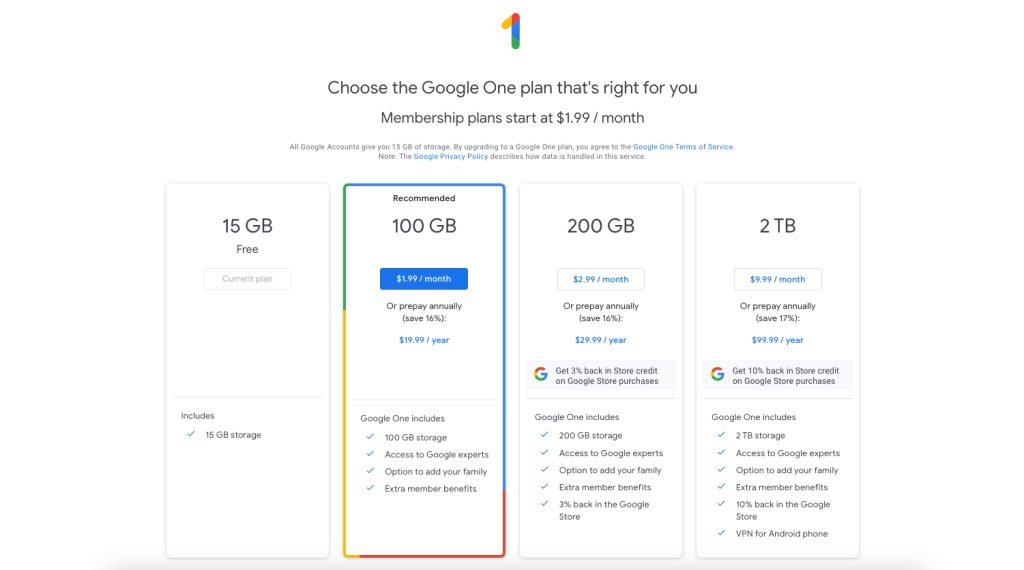
If you want extra space, there are several packages available for both OneDrive and Google Drive.
OneDrive –
Google Drive –
When you compare OneDrive vs Google Drive, you will notice that there isn’t much of a difference between the two. It rather depends on an individual’s preference and needs.
Hope this article has given you some new information regarding both OneDrive and Google Drive features. If you want to look at these features that we went through today, you can always come back here!
John Michaloudis is a former accountant and finance analyst at General Electric, a Microsoft MVP since 2020, an Amazon #1 bestselling author of 4 Microsoft Excel books and teacher of Microsoft Excel & Office over at his flagship MyExcelOnline Academy Online Course.

