Microsoft Outlook is a communication management system that allows you to stay organized with personal email service, calendar, contacts, and much more. It is part of Microsoft Office and helps you to be productive and connected –at home, on the go, and everywhere in between.
In this article on Microsoft Outlook tutorial, we will explore the following topics in detail:
-
- Microsoft Outlook Tutorial For Beginners – Office 365
- How to Reduce Too Many Emails (5 Secret Tips)
- Top 10 Outlook Email Inbox Tips and Tricks
- Top 10 Outlook 365 Calendar Tips & Tricks for 2023
- How to Setup A Signature in Outlook
- How to Fix Microsoft Outlook Error Connection Problems & Quick Solutions
- How to Set Up Outlook Automatic Reply & Out of Office Messages
- 3 Ways to Get Microsoft Outlook for FREE
Microsoft Outlook Tutorial For Beginners – Office 365
For starters, let’s dive into these topics:
- Introduction Microsoft Outlook
- Using Microsoft Outlook Email Folders
- Linking Email Accounts to Microsoft Outlook
- Composing an Email in Microsoft Outlook
- Creating and Using Microsoft Outlook Folders
- Using Microsoft Outlook Calendar
- Using Microsoft Outlook Contact
Watch this Microsoft Outlook tutorial on YouTube and give it a thumbs-up!
Introduction to Microsoft Outlook
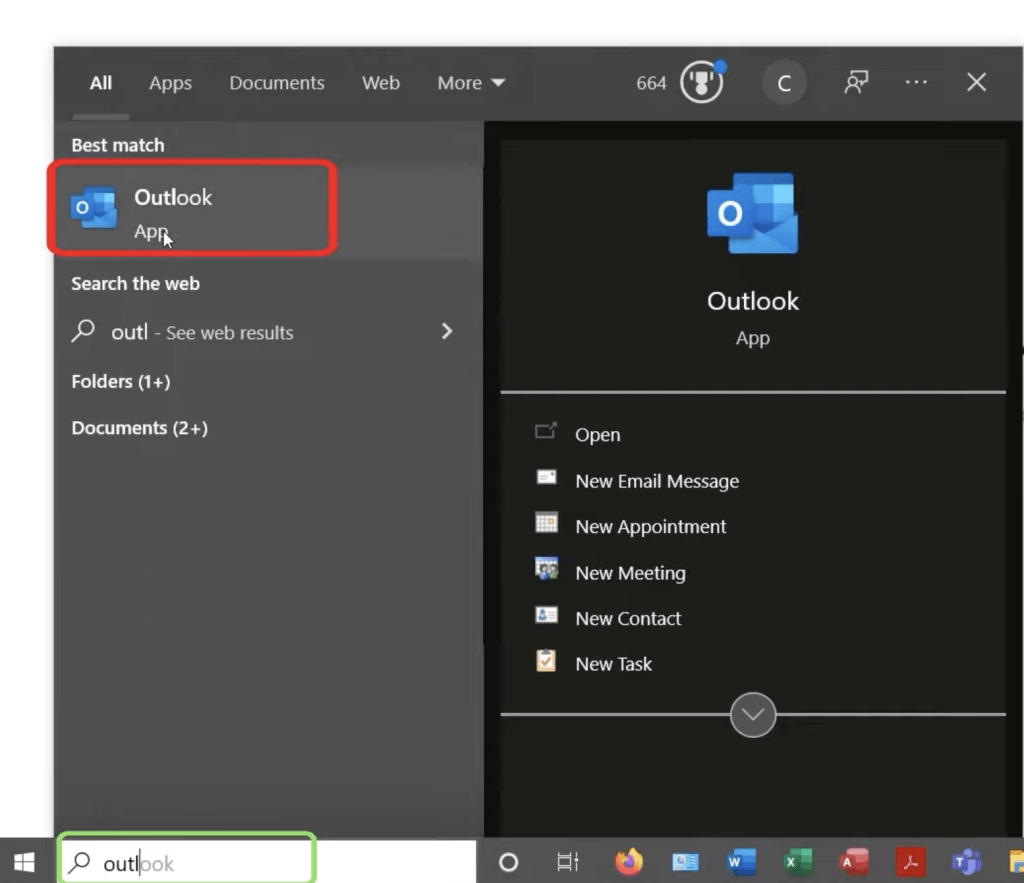
Outlook is an aggregator for your email accounts, calendars, and contacts. It provides you with all of these services in one convenient spot. If you have Microsoft Office installed on your computer, you can easily launch Microsoft Outlook –
- Click on the search bar on the taskbar
- Type in Outlook
- Click on the Outlook app
There are three major components of Outlook: Inbox, Calendar, and Contacts. Let’s look at each of these components thoroughly.
Using Microsoft Outlook Email Folders
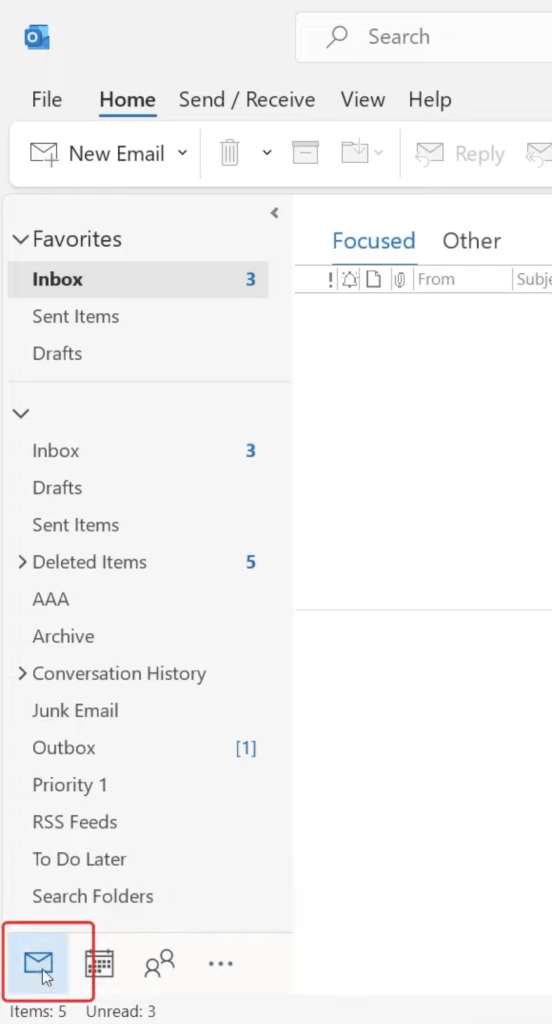
First, let’s explore the email section of outlook. Click on the envelope icon on the bottom left corner of the screen.
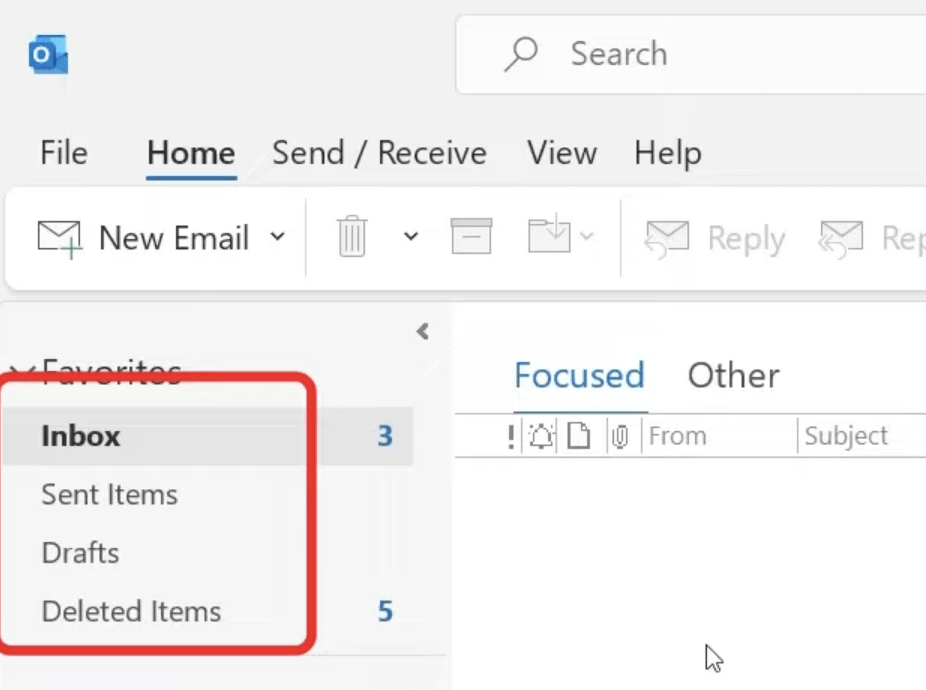
A sidebar will appear on the left-hand side of the screen. It contains different folders in it.
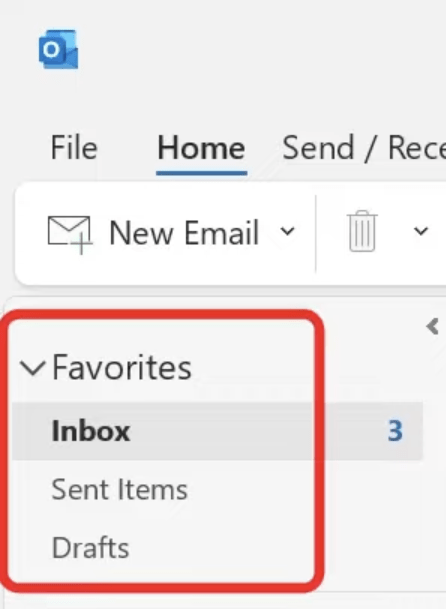
- Inbox – contains all the emails which have been received from other people
- Sent Items – contains all the emails that you have sent to other people
- Drafts – contains all the emails which have been composed by not yet sent
You may have noticed that these 3 folders are present under the Favourite section. If you have any other important folders that you may want under this section, you can add them too.
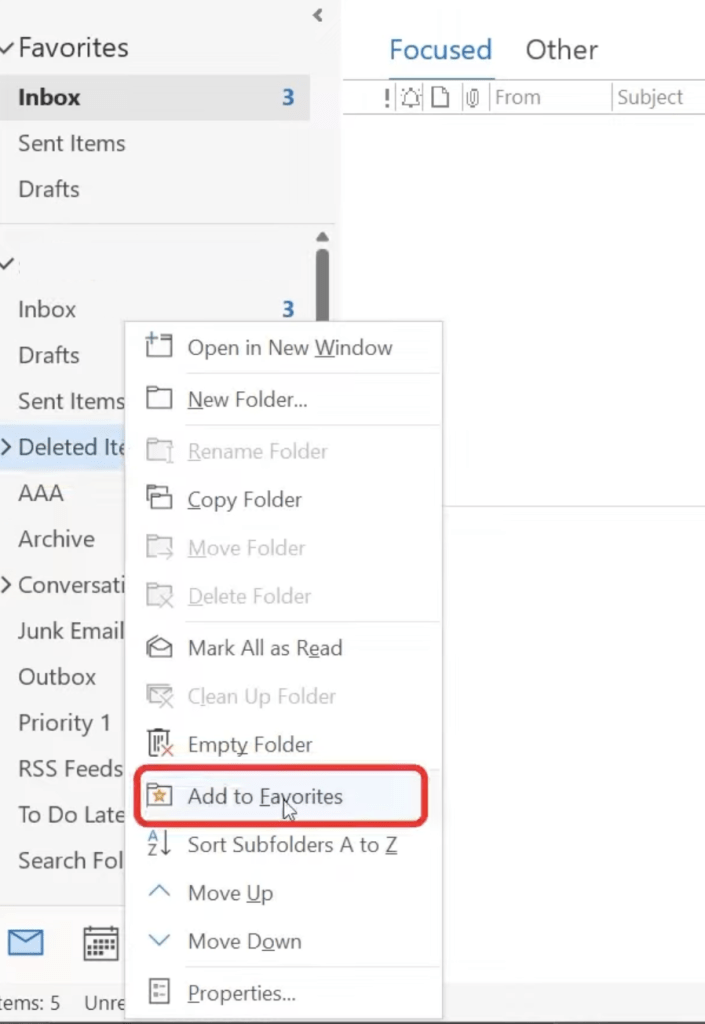
Let’s say, you want the Deleted Items folder in the Favorite section. Right-click on the folder and go to Add to Favourites.
This will pin Deleted Items folder in the Favourite section.
Linking Email Accounts to Microsoft Outlook
If you have an email account, you can easily link it to your Microsoft Outlook account. To do so, follow the steps –
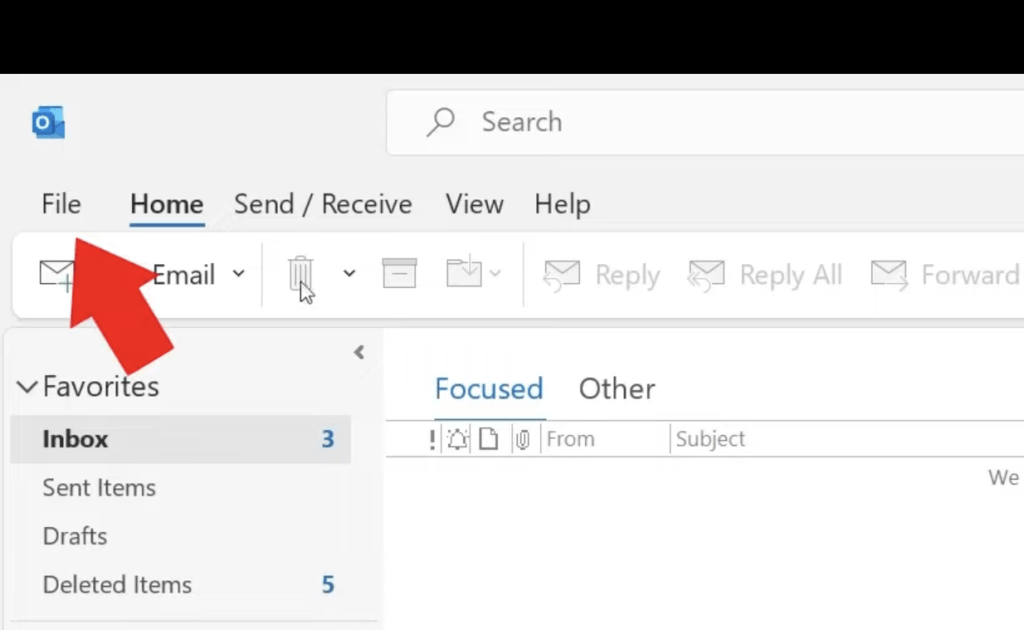
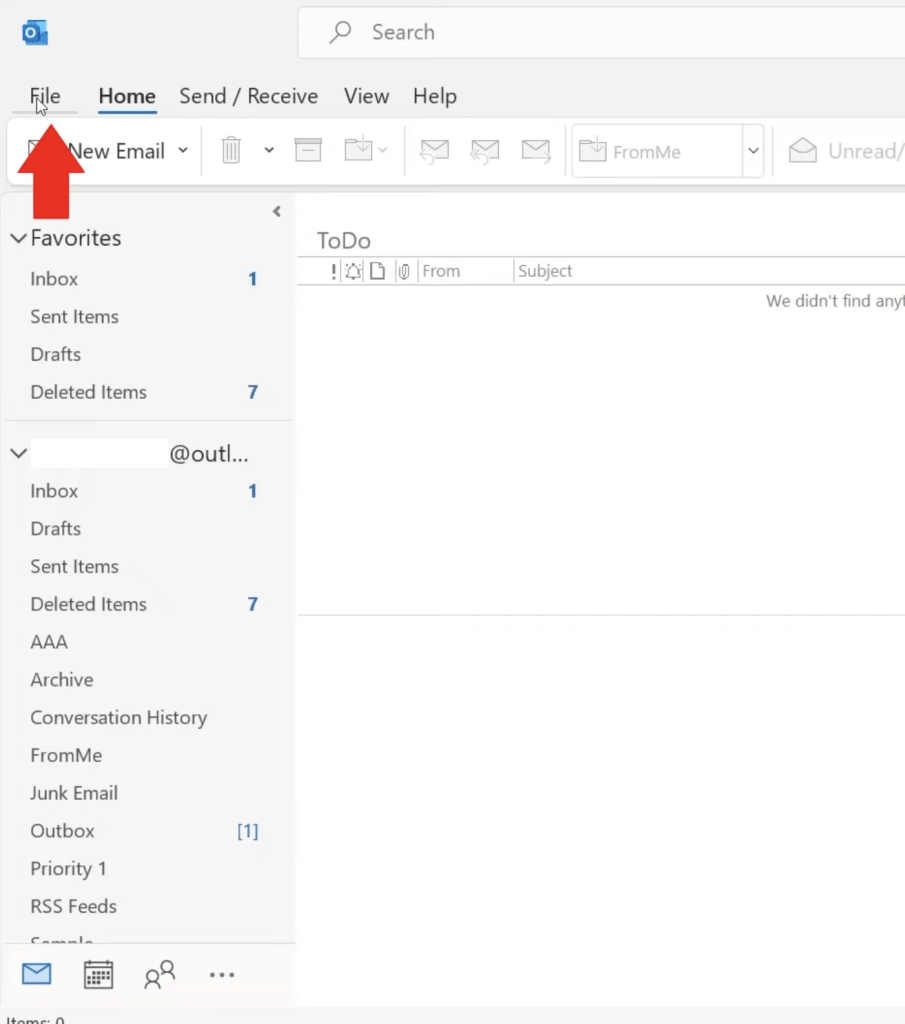
STEP 1: Go to File
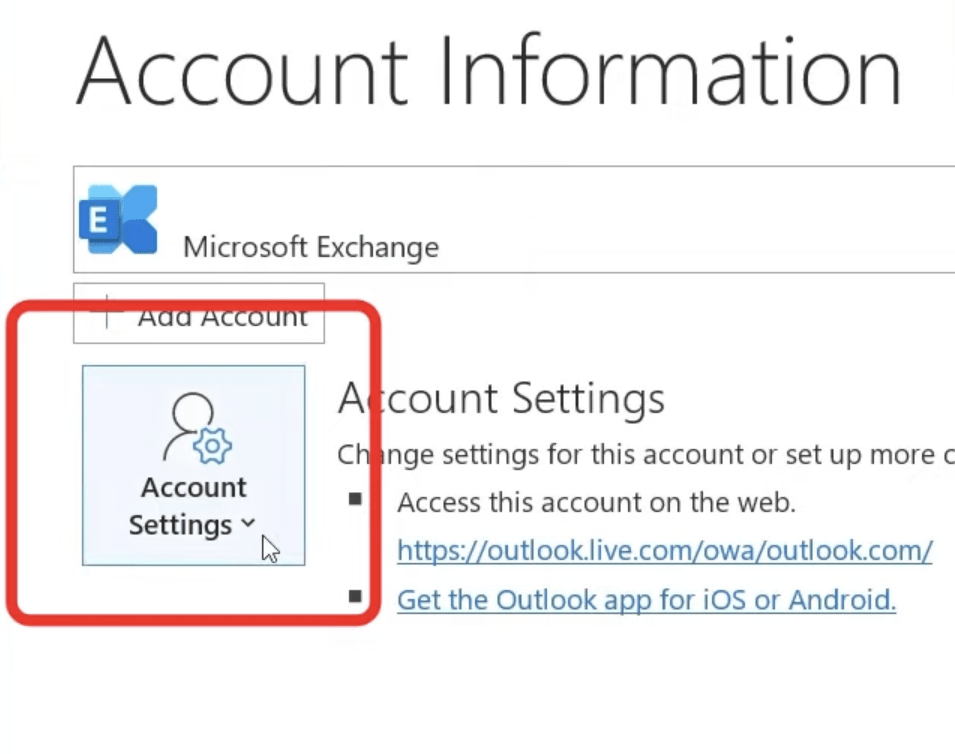
STEP 2: Click on Account Settings
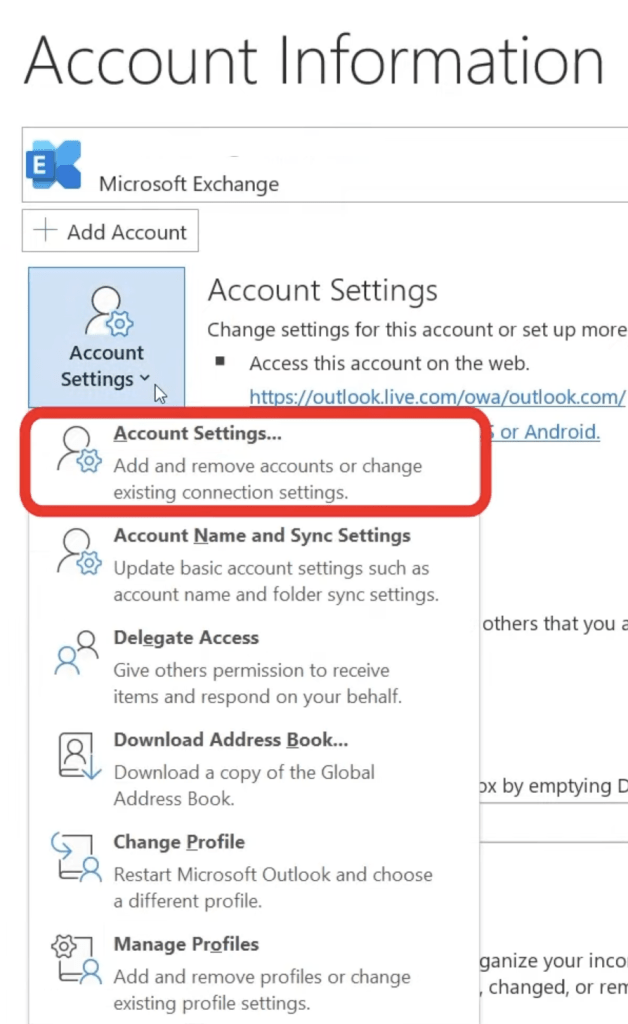
STEP 3: In the dropdown, select Account Settings again
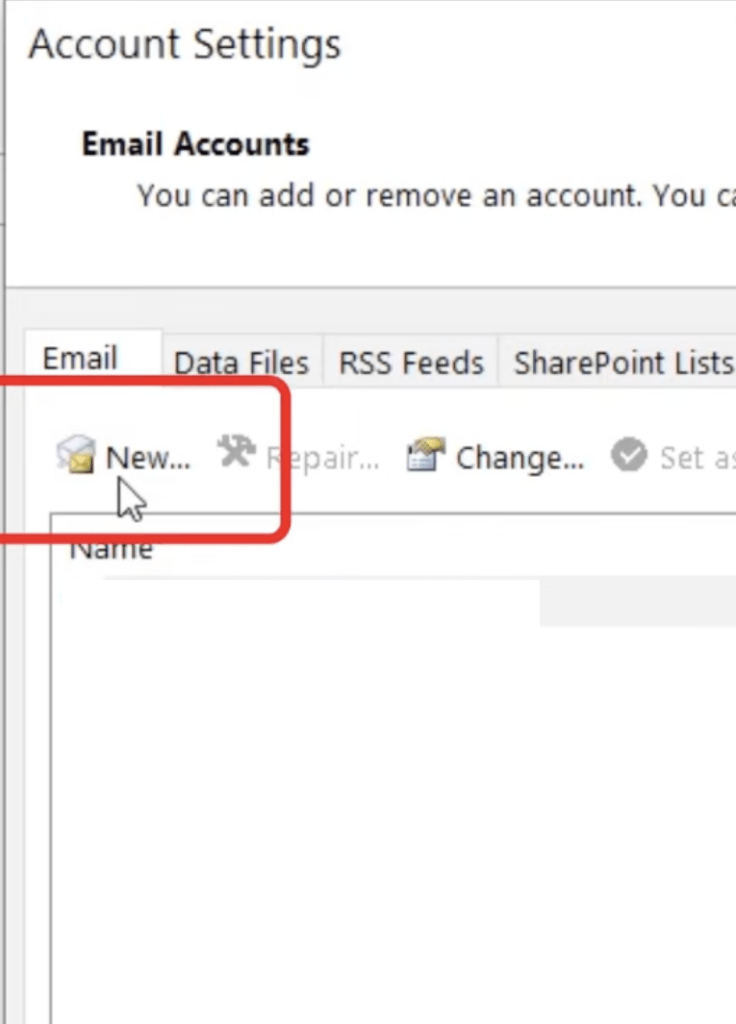
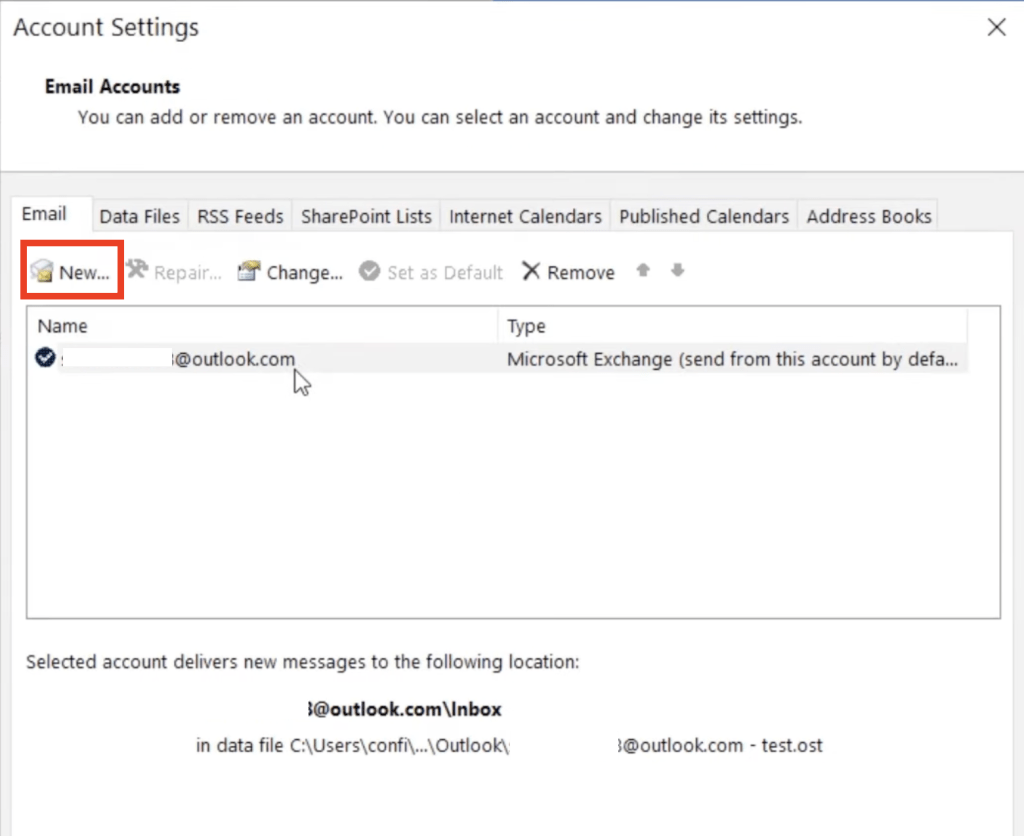
STEP 4: In the dialog box, select New
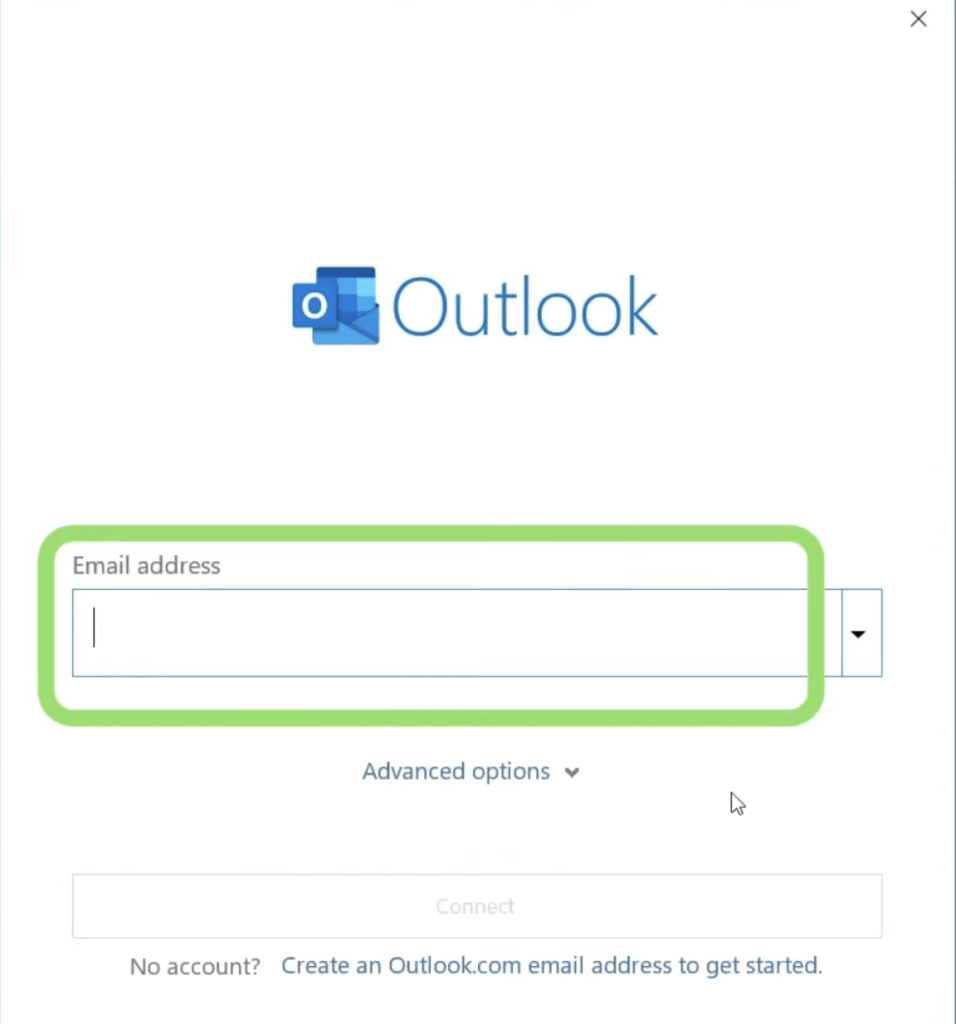
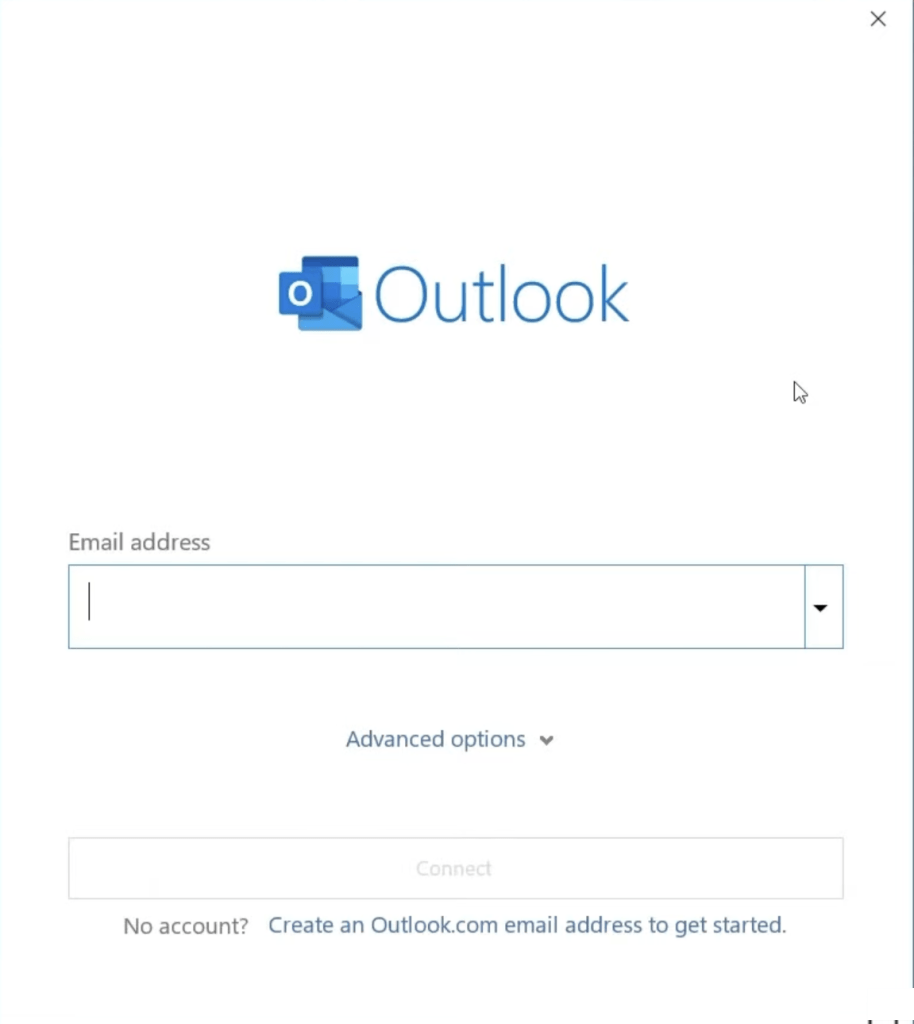
STEP 5: Enter your email address
It can also be your Gmail account, Yahoo account, iCloud account, or any account. Outlook lets you check email from multiple accounts all in one place.
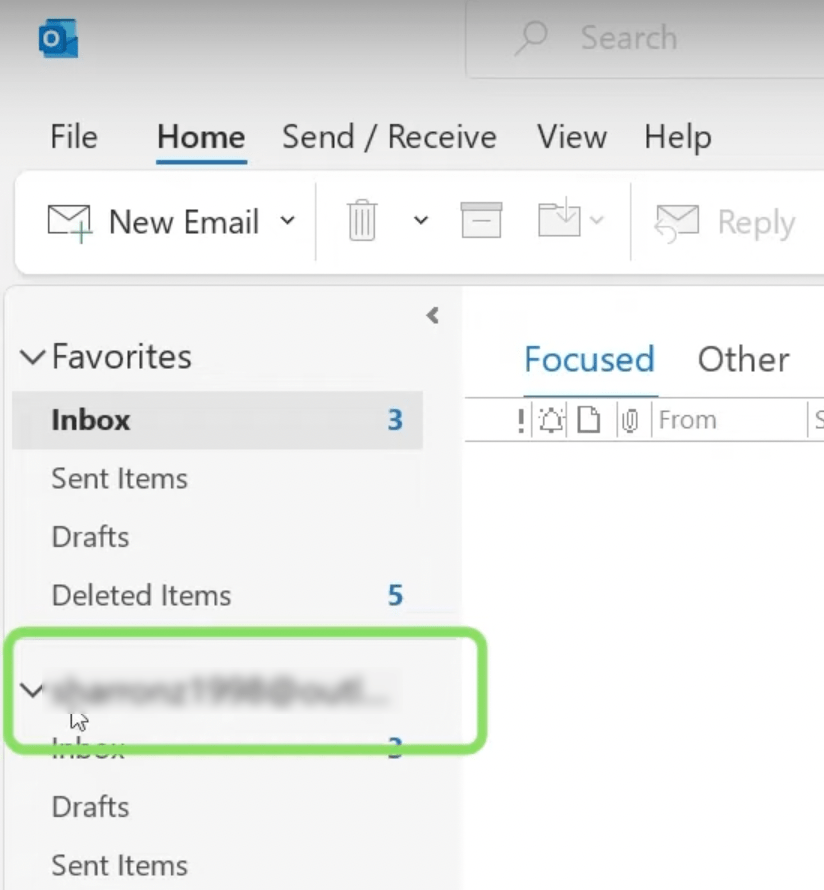
Once you have entered your password, you will be able to see your account name displayed in Outlook.
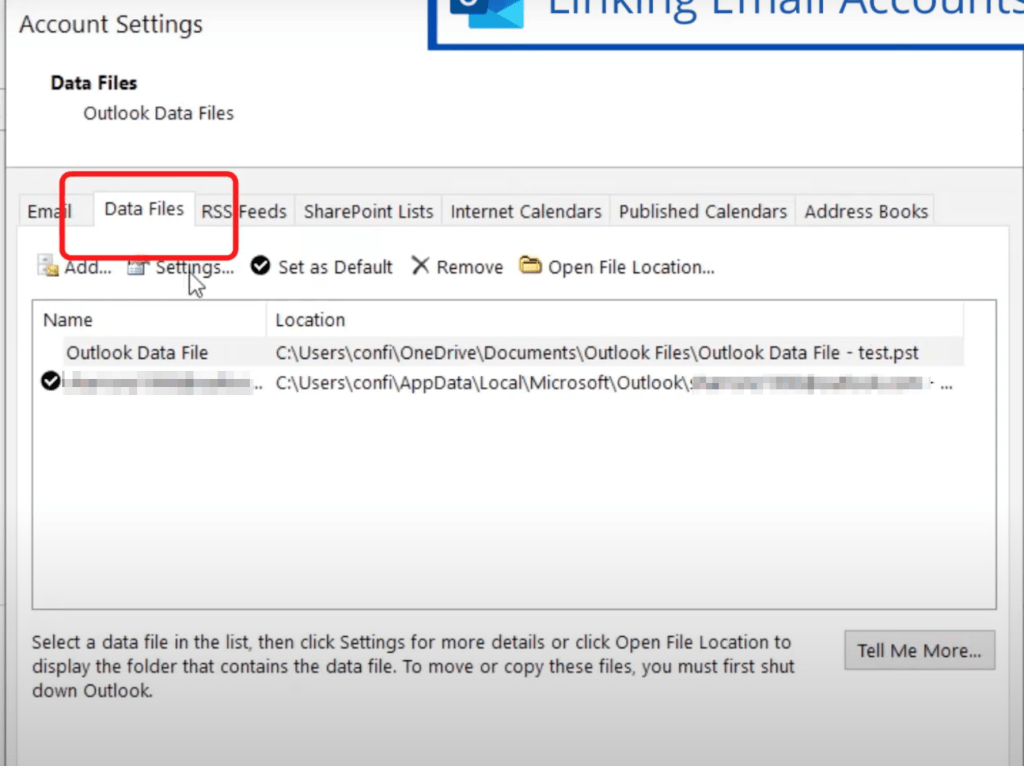
Another thing that you must know regarding Microsoft Outlook is the data files. An Outlook data file contains your messages and other Outlook items saved in OneDrive or on your computer.
Outlook Data Files can be used to:
- Archive old messages and files that aren’t being used regularly.
- Clear your mailbox by exporting items to Outlook Data files.
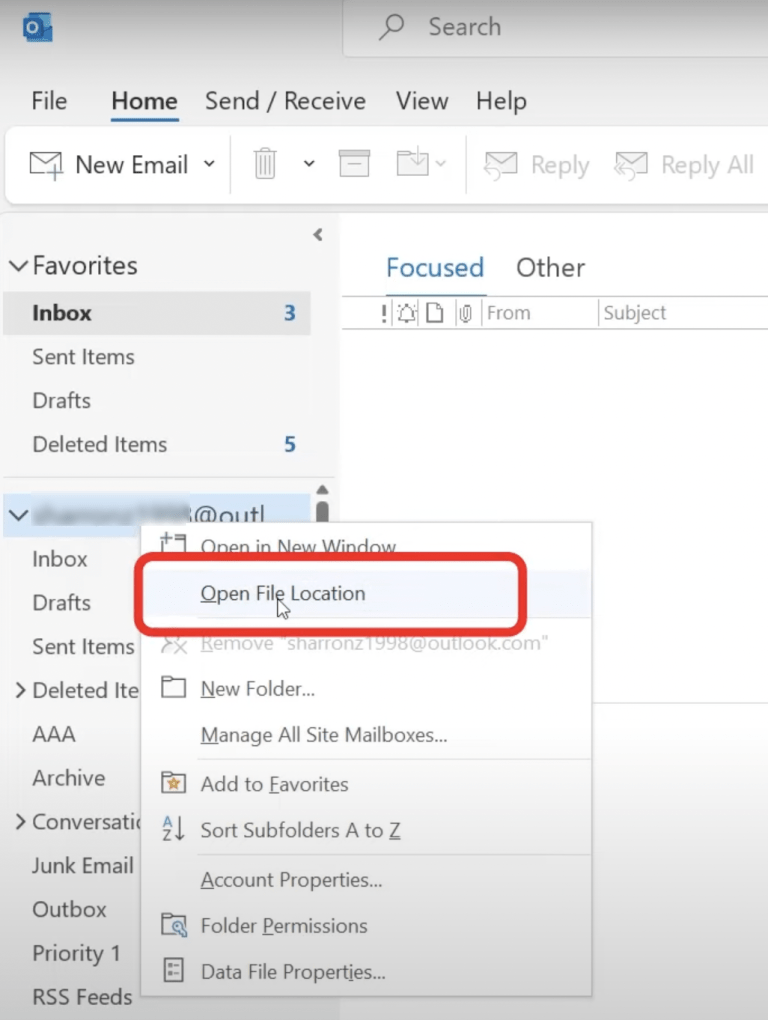
To access the data file, you can right-click on your email address and go to Open File Location.
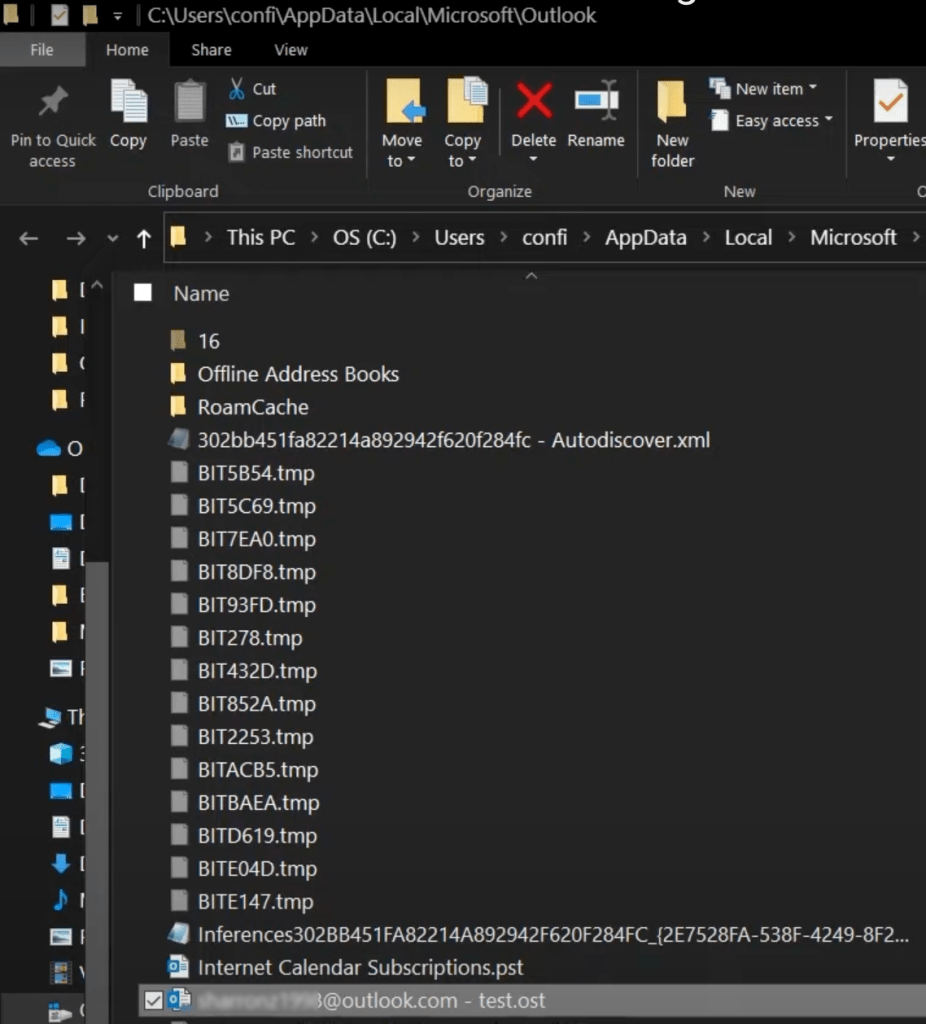
In the file explorer, you can see the .ost file where all of the data in the Outlook account including your emails, contacts, and calendar items is kept.
If you are trying to install Outlook on a new computer, you can upload this .ost file and you will be able to view all of your existing communication and other data.
Composing an Email in Microsoft Outlook
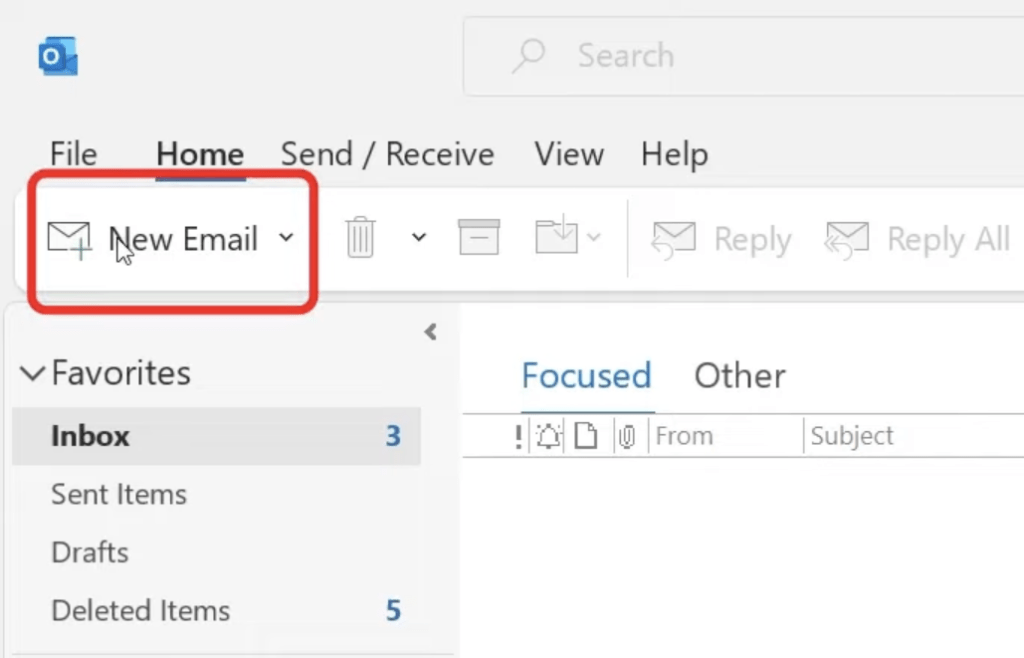
Let’s understand how to compose and send a new email to someone in Outlook. To begin, click on the New Email button on the top left corner of your screen or press Ctrl + N.
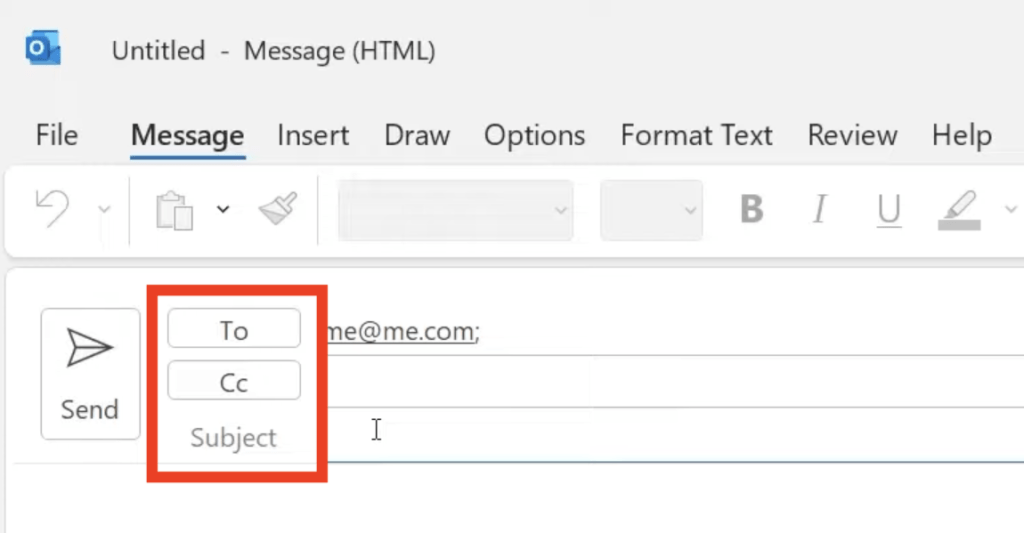
The New Message window will contain the following fields :
- To – Type the email address of the person you’re sending the message to
- Cc – Type the email address of people to whom you want to send a copy of this message
- Subject – Type a brief description of your email
You can also send a blind carbon copy (Bcc) if don’t want the recipients to know who else is receiving the email.
Both Cc and Bcc receive an exact copy of the email. The main difference is that in Cc all recipients are visible to each other while in BCC the original recipient does not know who else is receiving the message.
You can use the BCC option when you want to:
- Secretly send a message to someone else; or
- Send a group message and keep everyone’s mail private
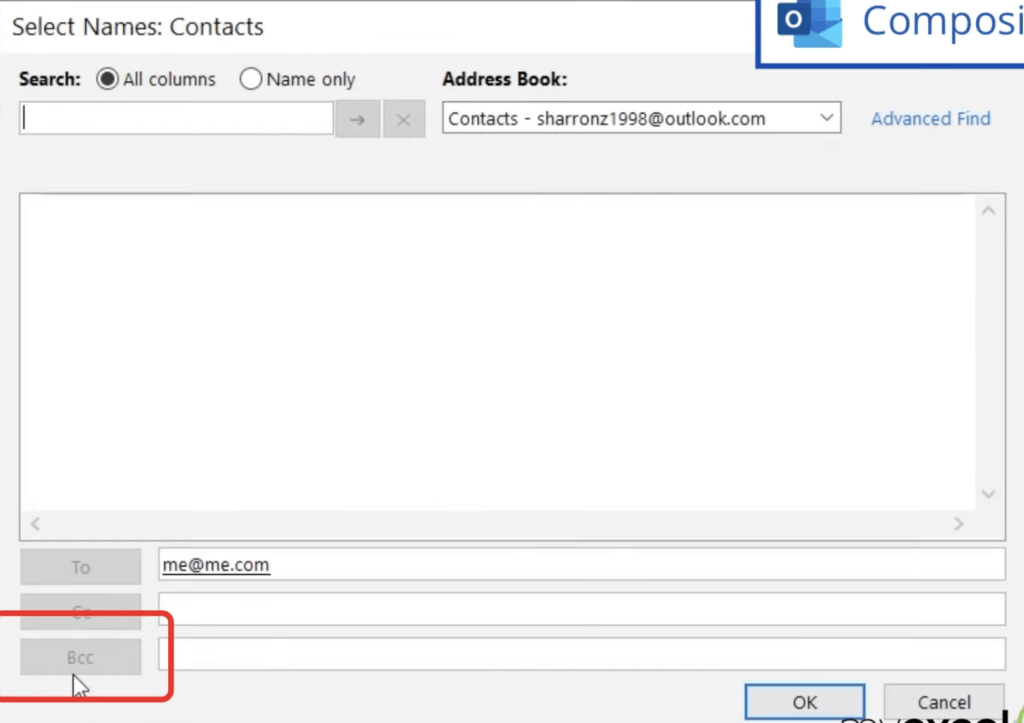
To display the BCC option, click on the CC button. In the dialog box, you will find the BCC option at the bottom left.
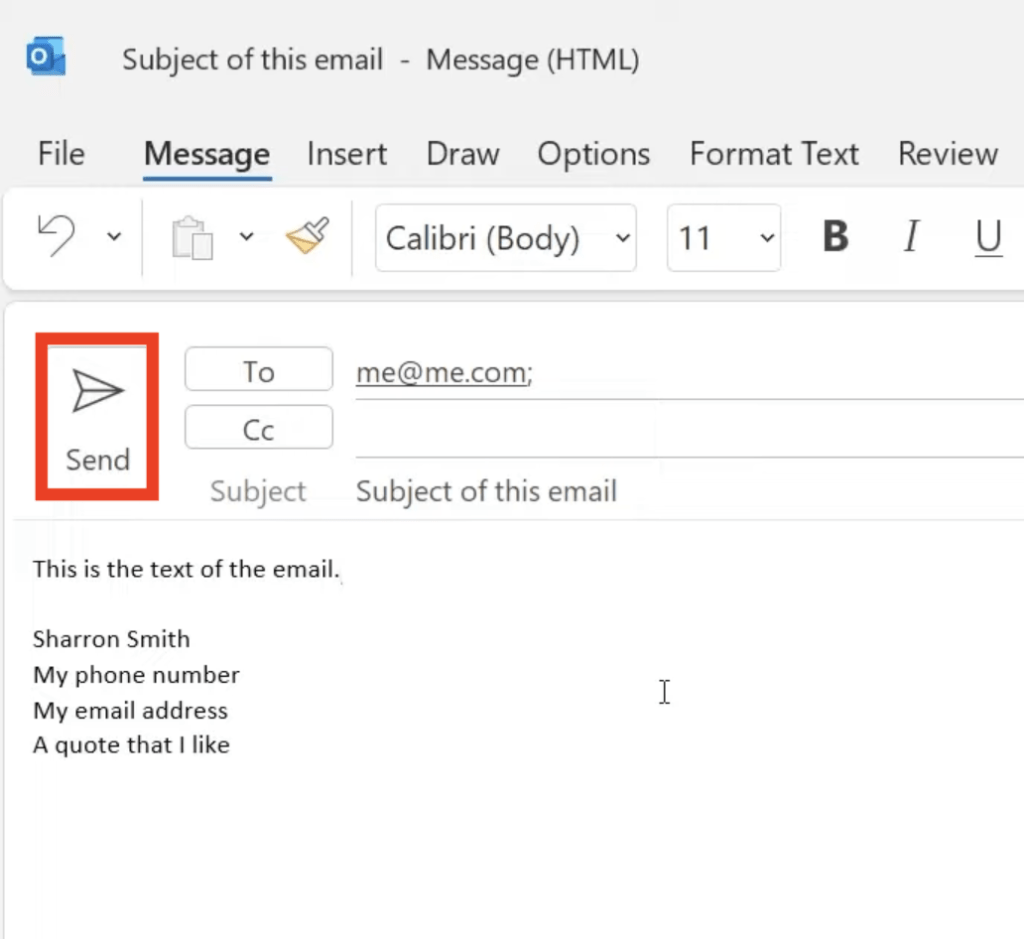
After typing the body of the message, you can simply press the Send button.
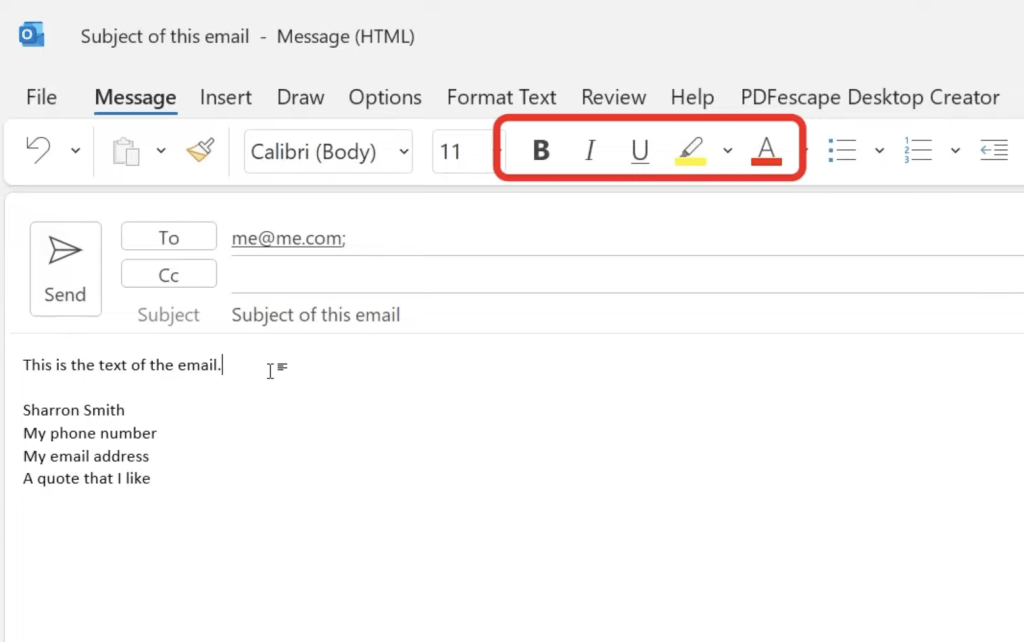
Outlook also provides you with a lot of formatting options that can be used to make your email look really professional.
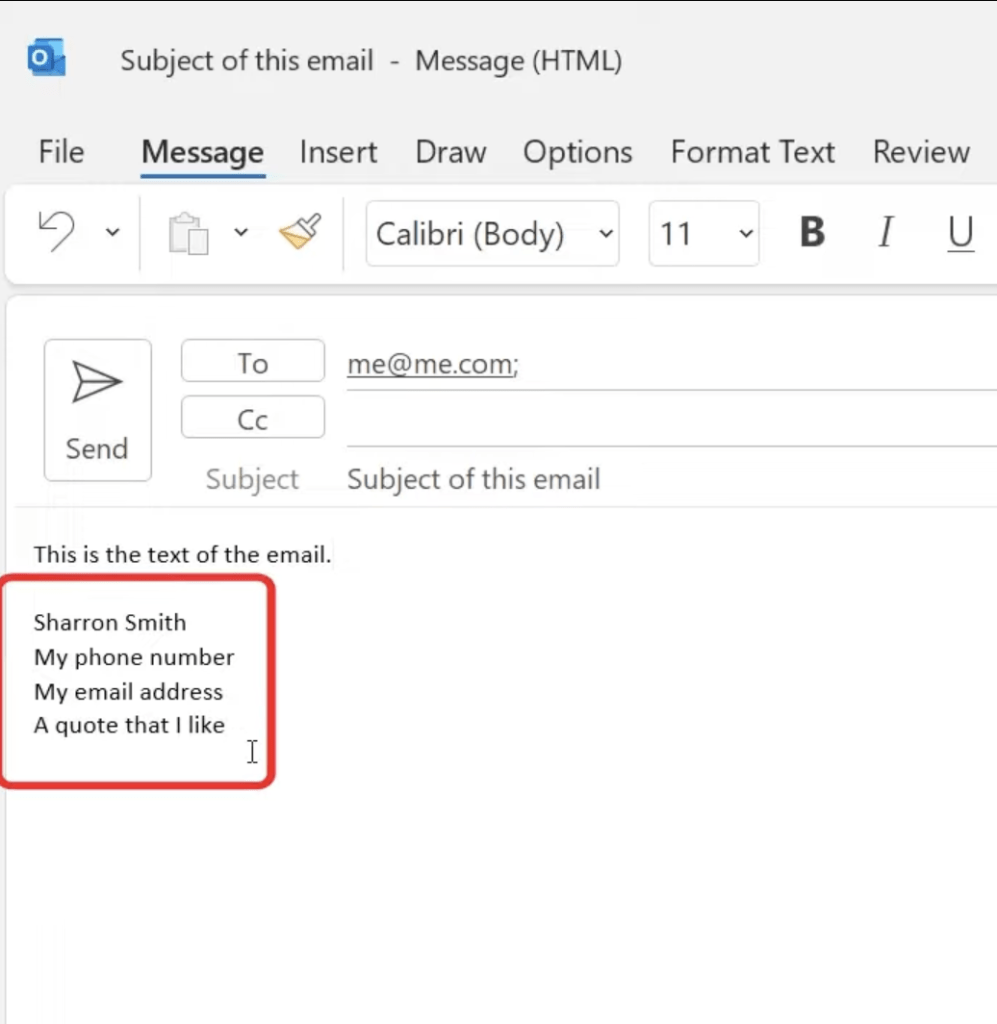
You can also set up personalized signatures on your Outlook account. This signature will automatically to added to all your outgoing messages.
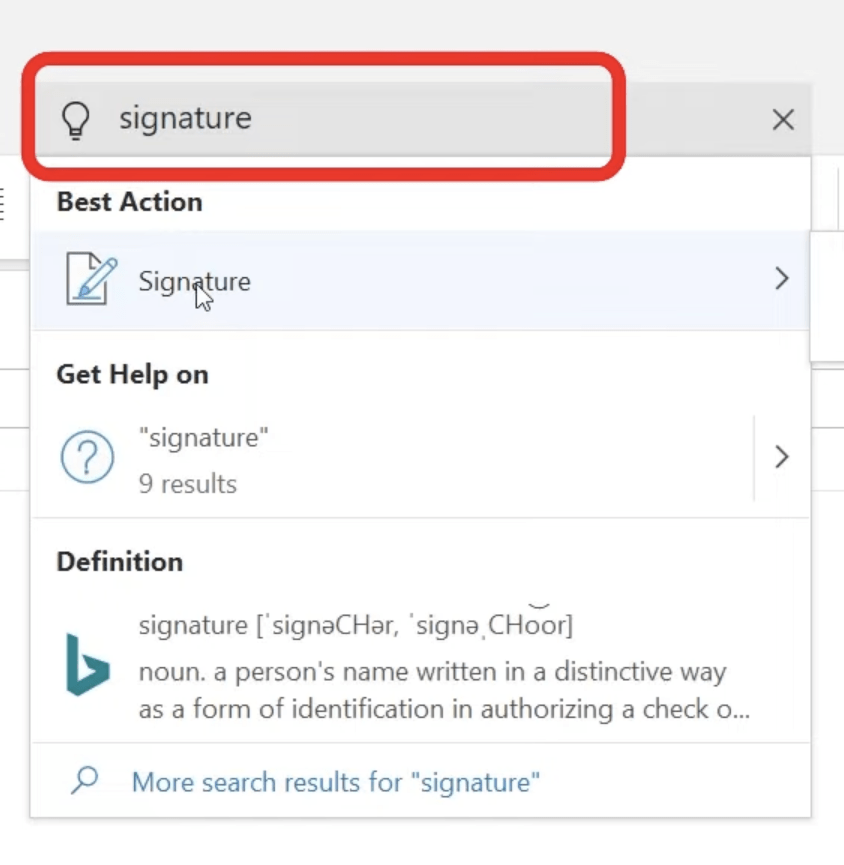
To add a new signature or edit an existing one – Go to the box Tell me what you want to do
Type Signature and then select it from the dropdown
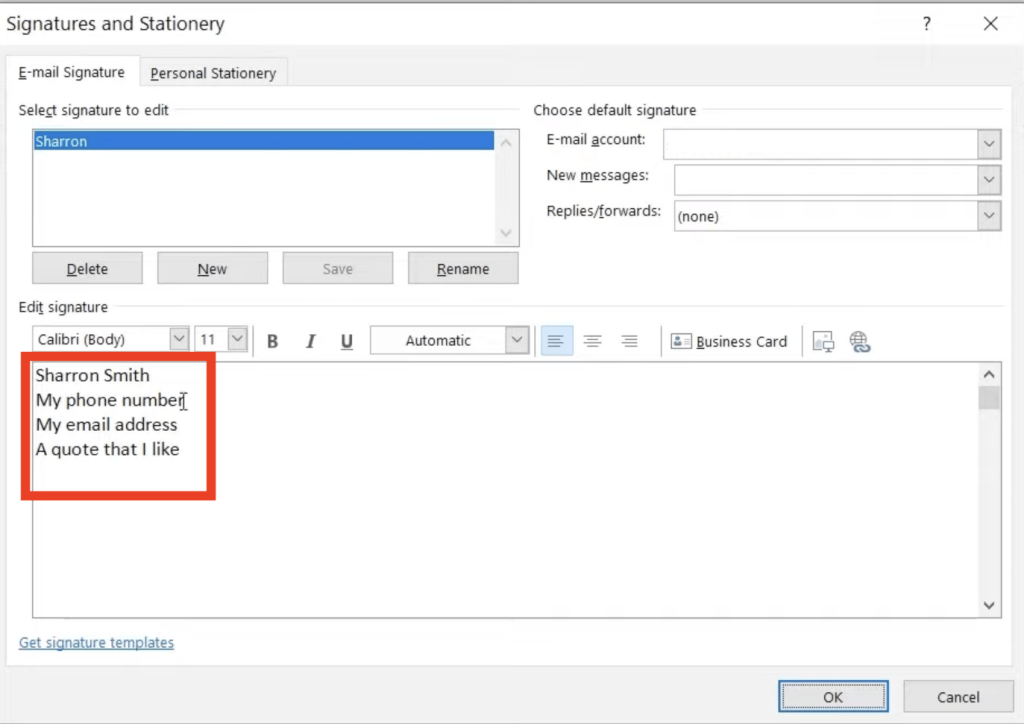
In the dialog box, you can edit or create your signature. You can also change the formatting and make the signature look professional.
Once you are done typing your email, you can simply hit Send to send the email immediately.
But what if you want to send this email sometime in the future? Outlook provides an option to schedule your email. Let’s see how it can be done.
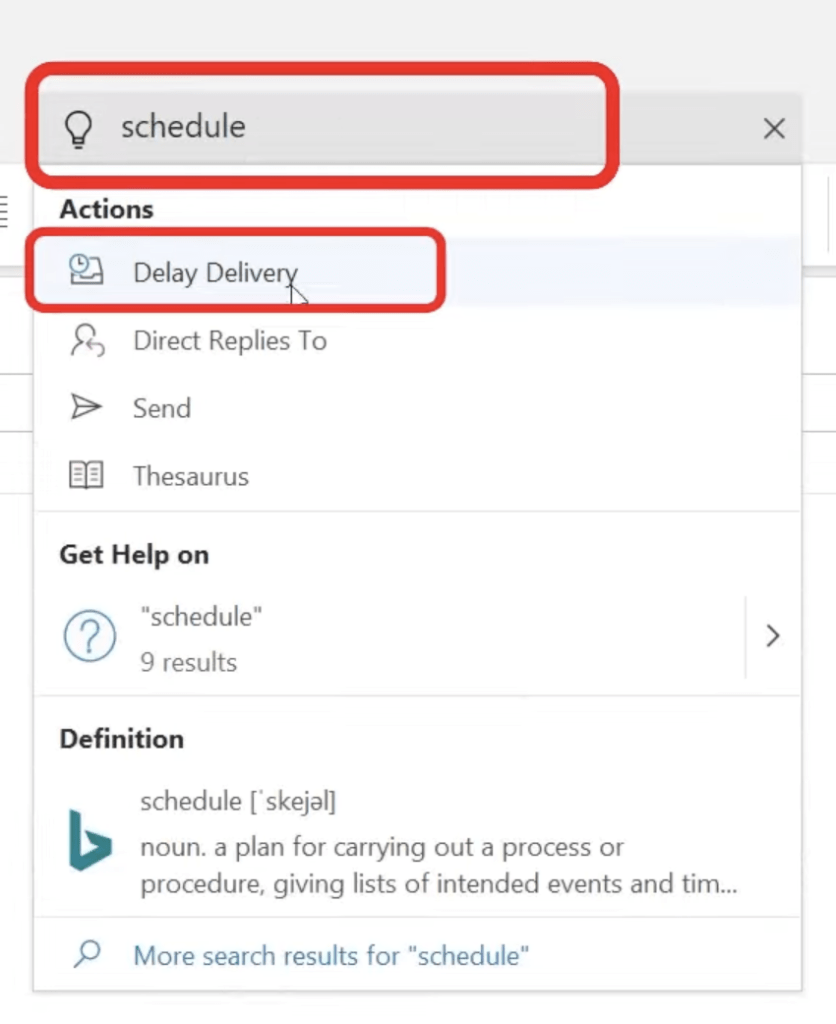
- Go to Tell me what you want to do.
- Type Schedule and select Delay Delivery.
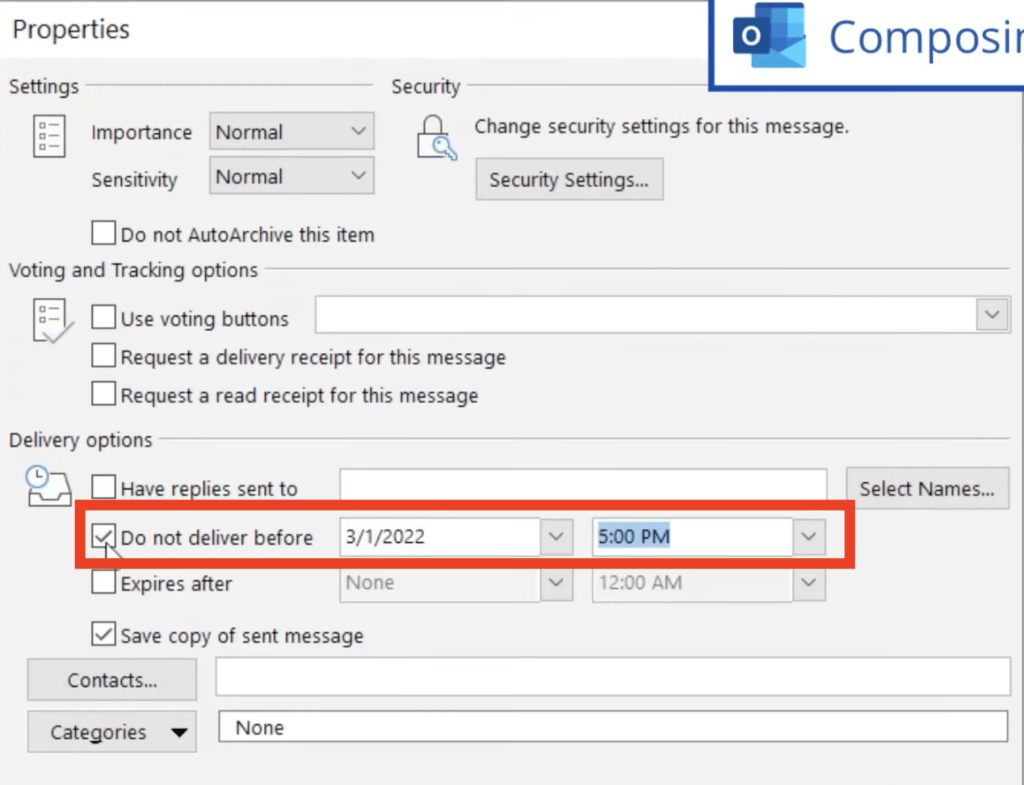
- In the dialog box, check the “Do not deliver before” box and type the desired date and time.
You can use this option to send a reminder for an event a day before that event is scheduled to happen.
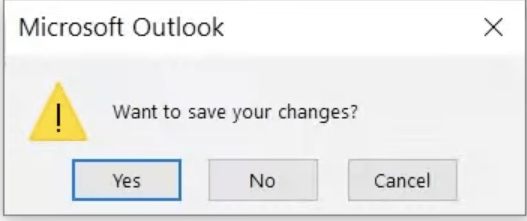
If you do not send the email immediately or schedule it, you can close the email. You will be asked if you want to save the changes.
The email will be saved as Drafts if you select Yes.
You can either send the email or delete it by clicking on the delete icon.
Creating and using Microsoft Outlook folders
A great way to organize your emails in Outlook is to create folders and unclog your inbox. This inbox management technique will help you manage your emails efficiently and help you stay on top of all your tasks.
To create a folder in Microsoft Outlook:
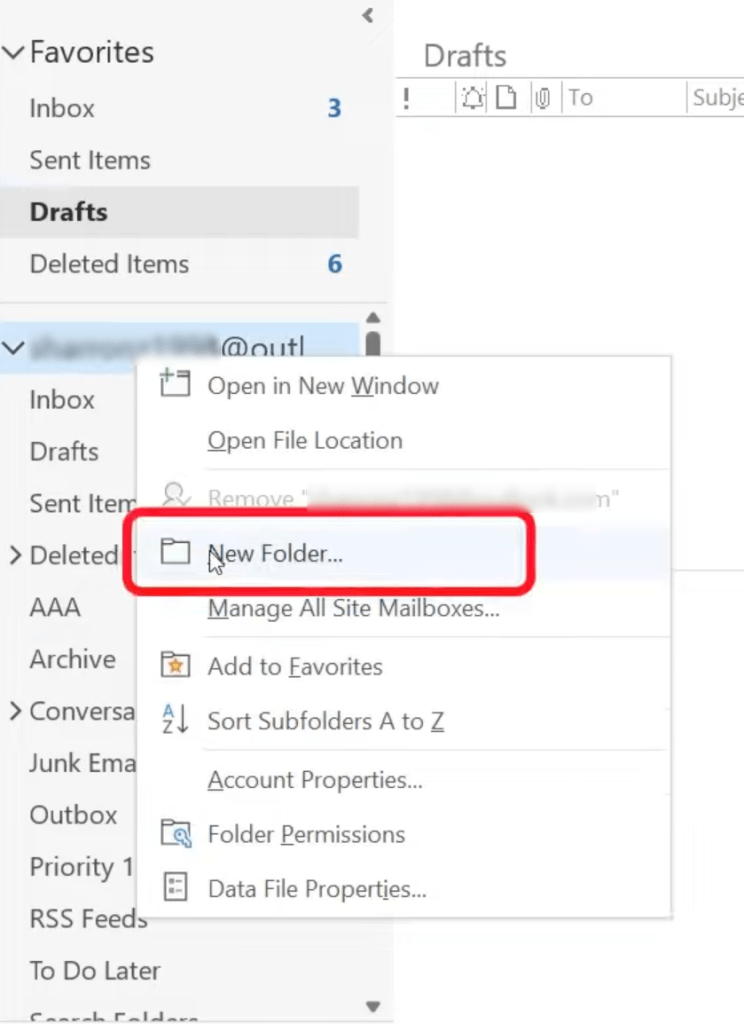
- Right-click and select New Folder.
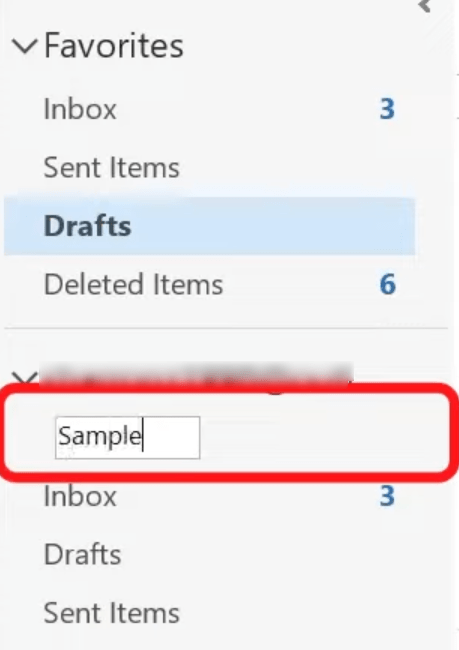
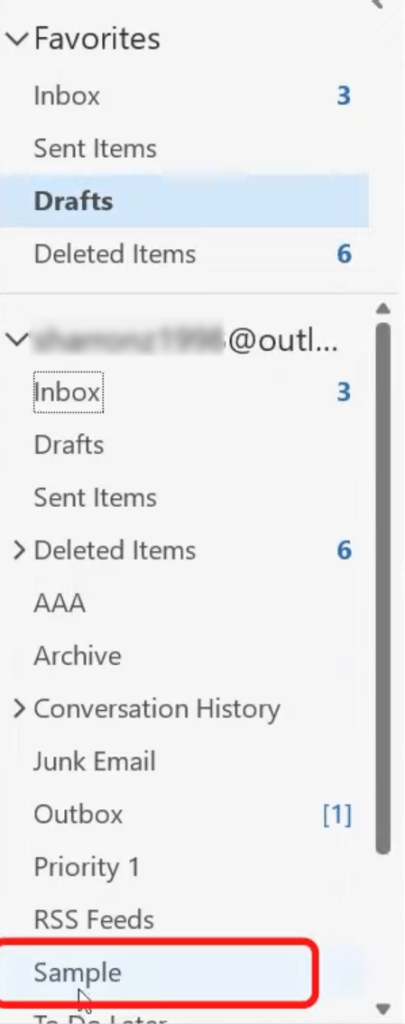
- Name the folder – Sample and hit Enter.
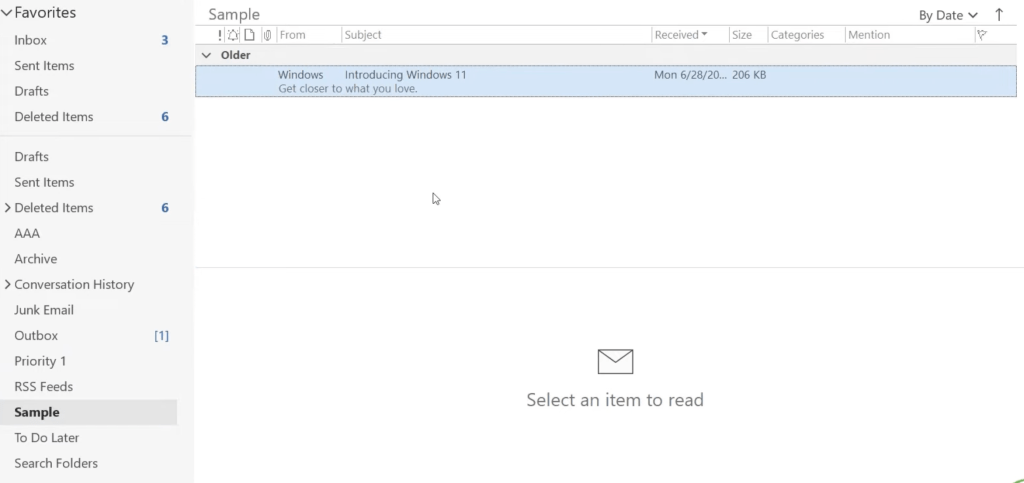
- The Sample folder will now be available on your email list.
- Drag and drop emails into the Sample folder.
In this way, you can create multiple folders and arrange your inbox.
Using Microsoft Outlook Calendar
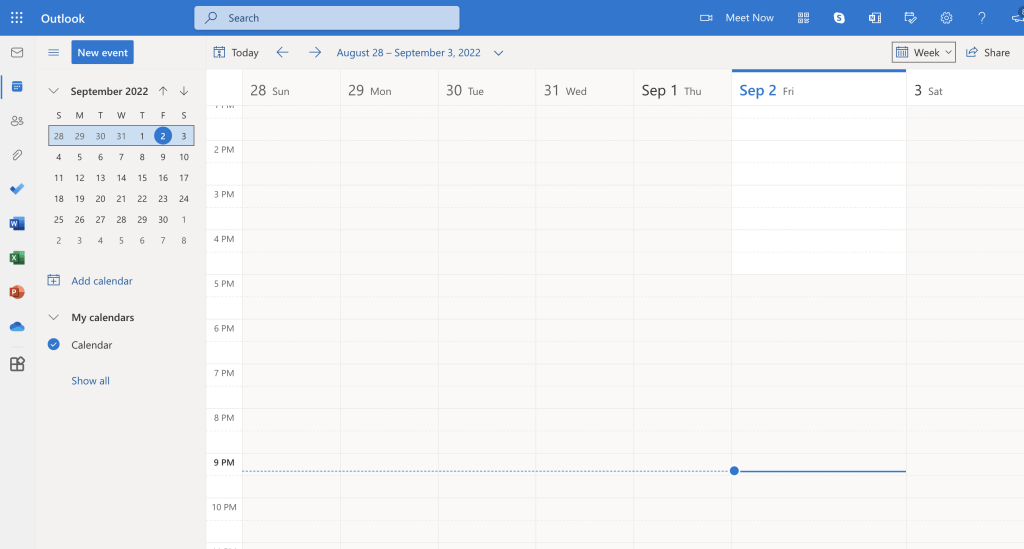
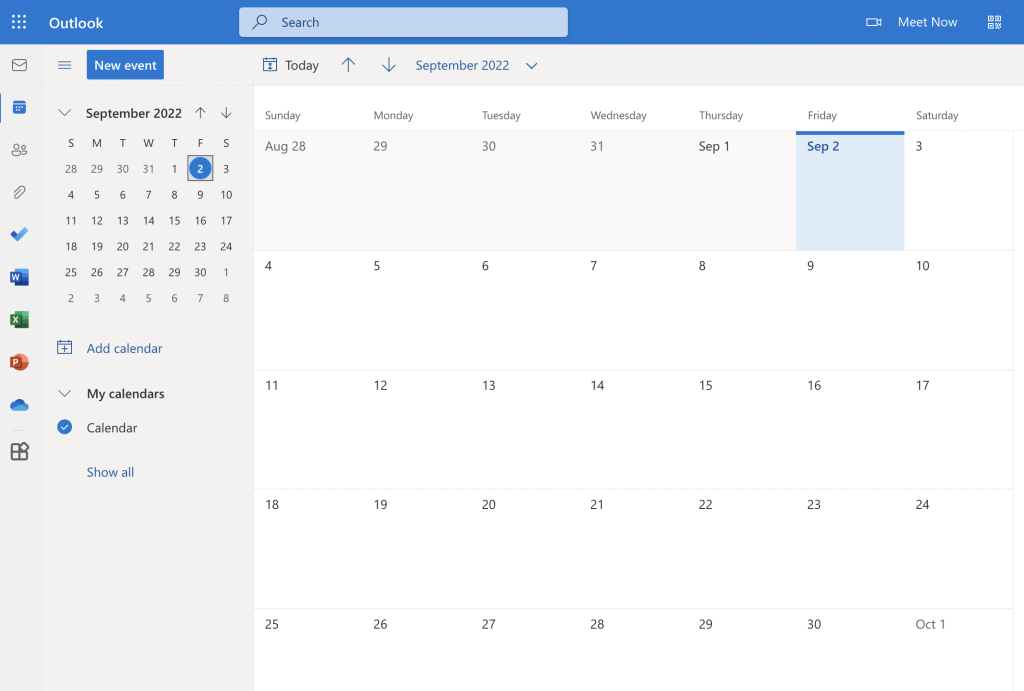
Microsoft Calendar is a great way to schedule events or appointments, create group tasks or organize meetings. Microsoft Outlook provides lots of different views for the calendar –
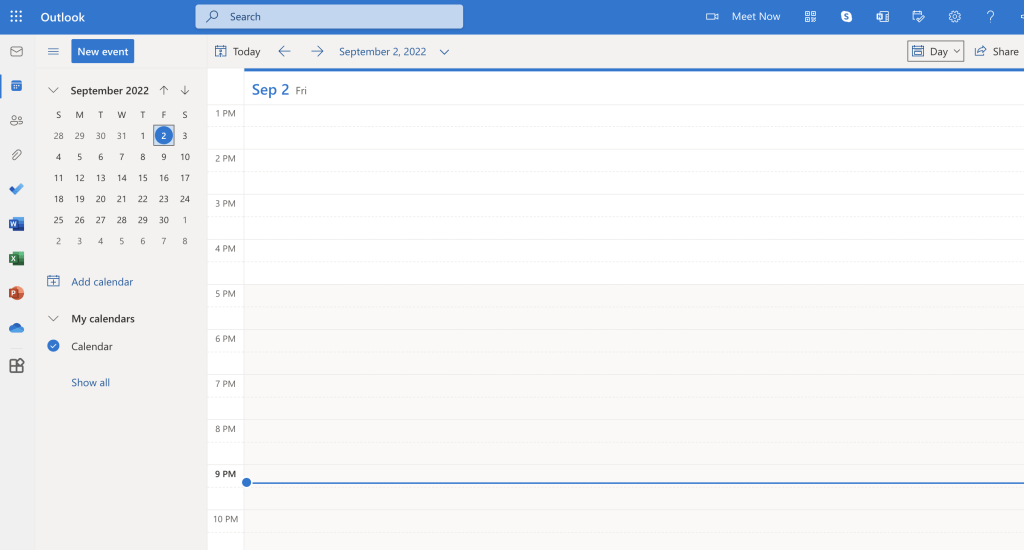
- Day – View the current day
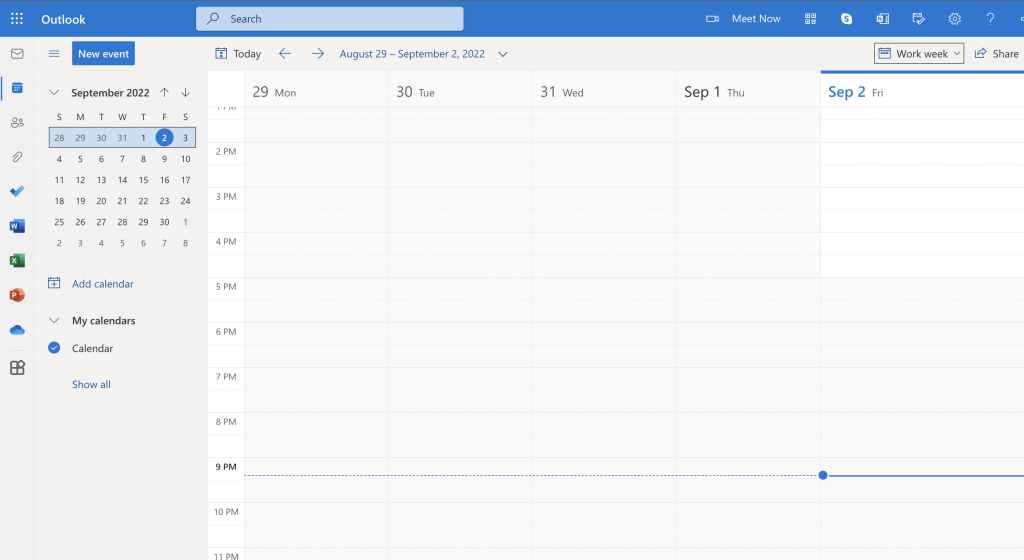
- Work Week – View 5 days a week; from Monday to Friday
- Week – View 7 days a week; from Sunday to Saturday
- Month – View the current month
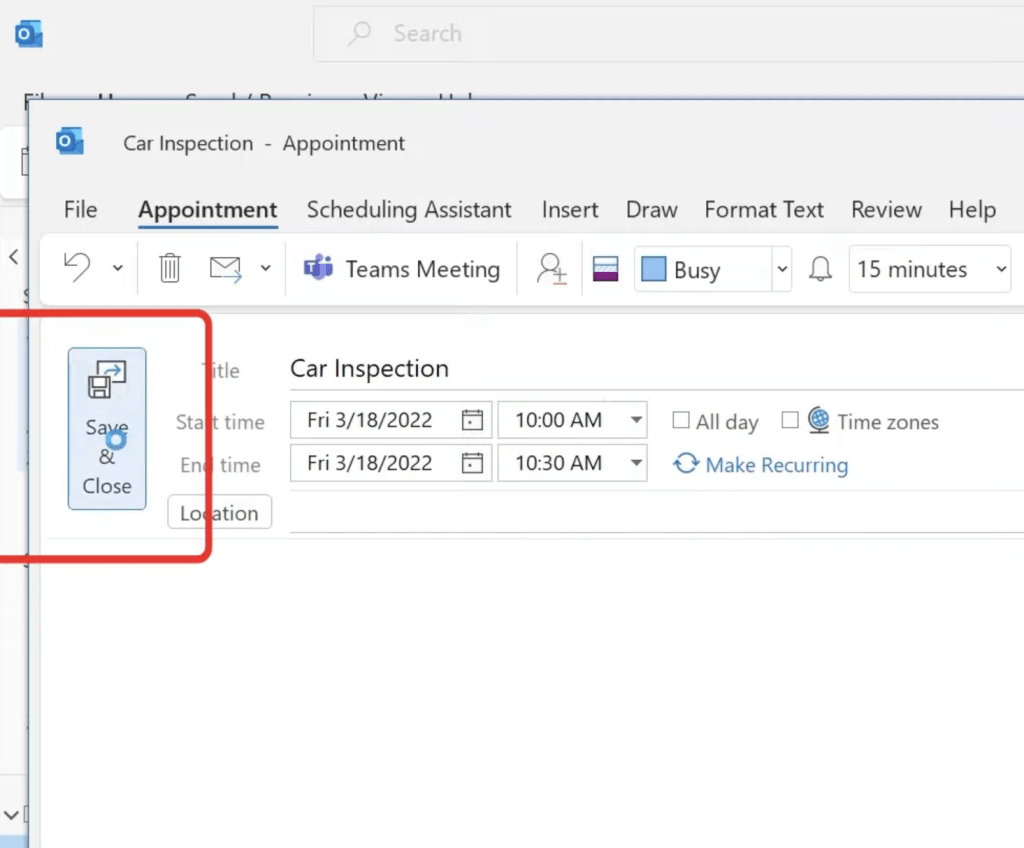
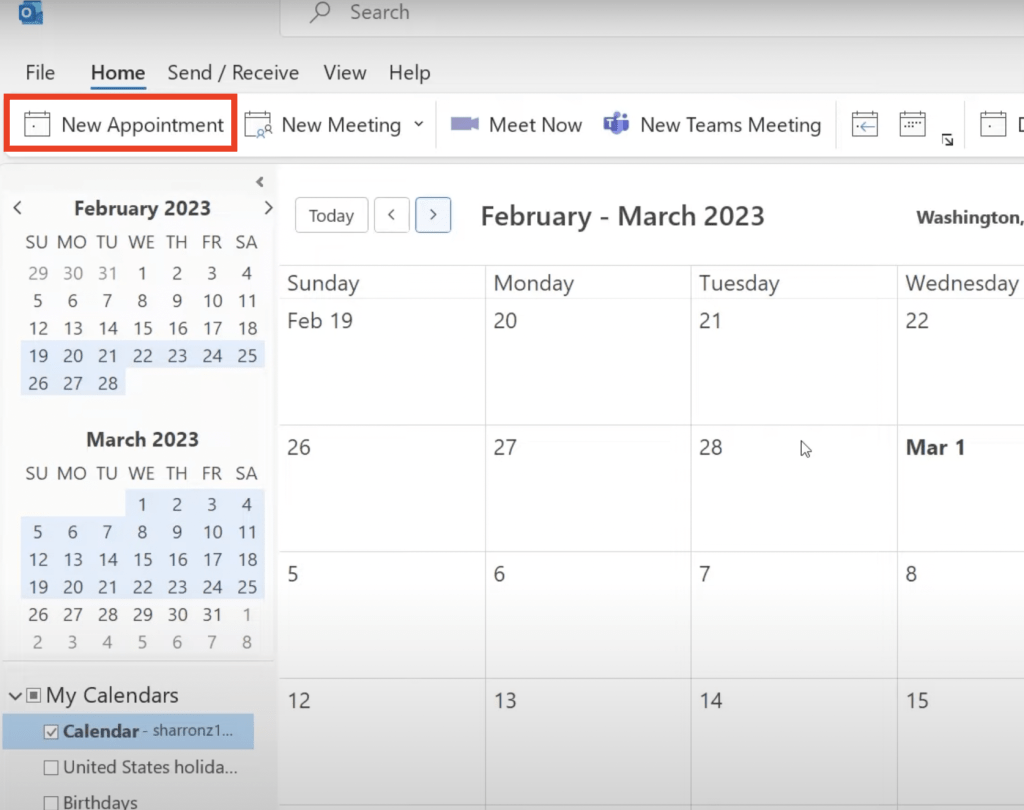
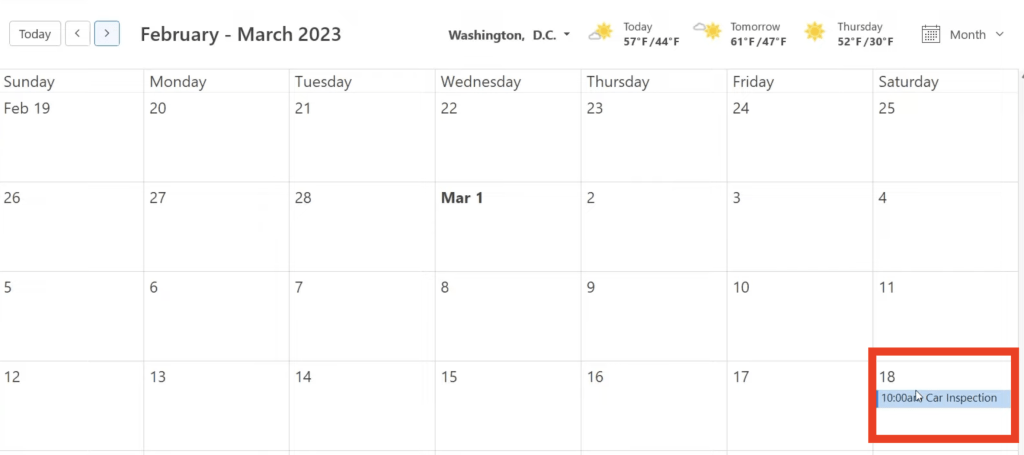
You can use the calendar to add reminders for things you have to do. Let’s say you need to add a reminder for a car inspection before the end of this month.
Double click on the date you want to add the reminder and add the following details:
- Type Car Inspection as title
- Uncheck all day and select a particular time
- Hit Save & Close
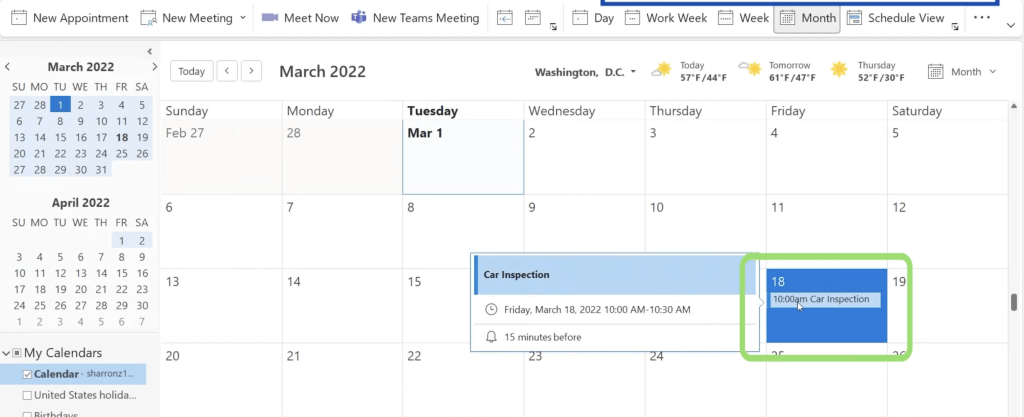
You will see that the event now appears on the calendar.
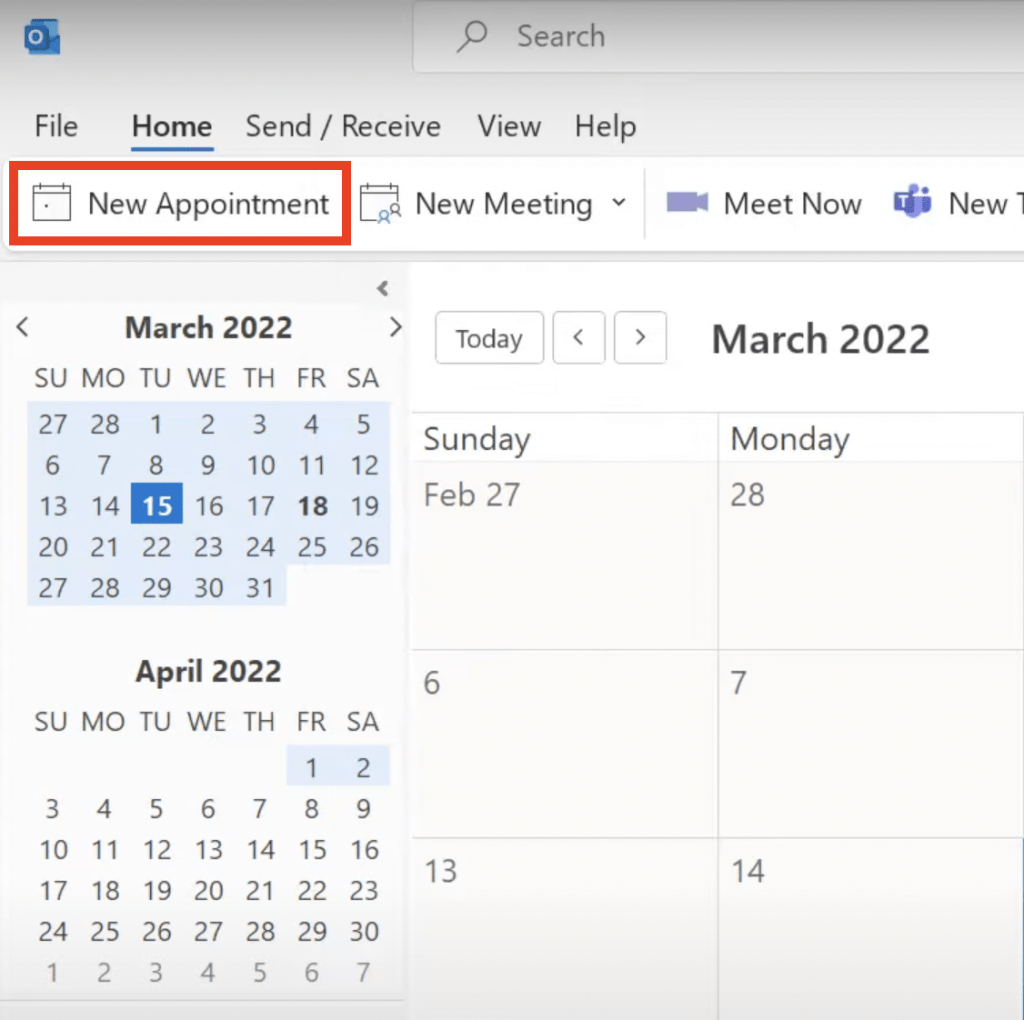
So, to create a new reminder or appointment you can either click on the date or select New Appointment.
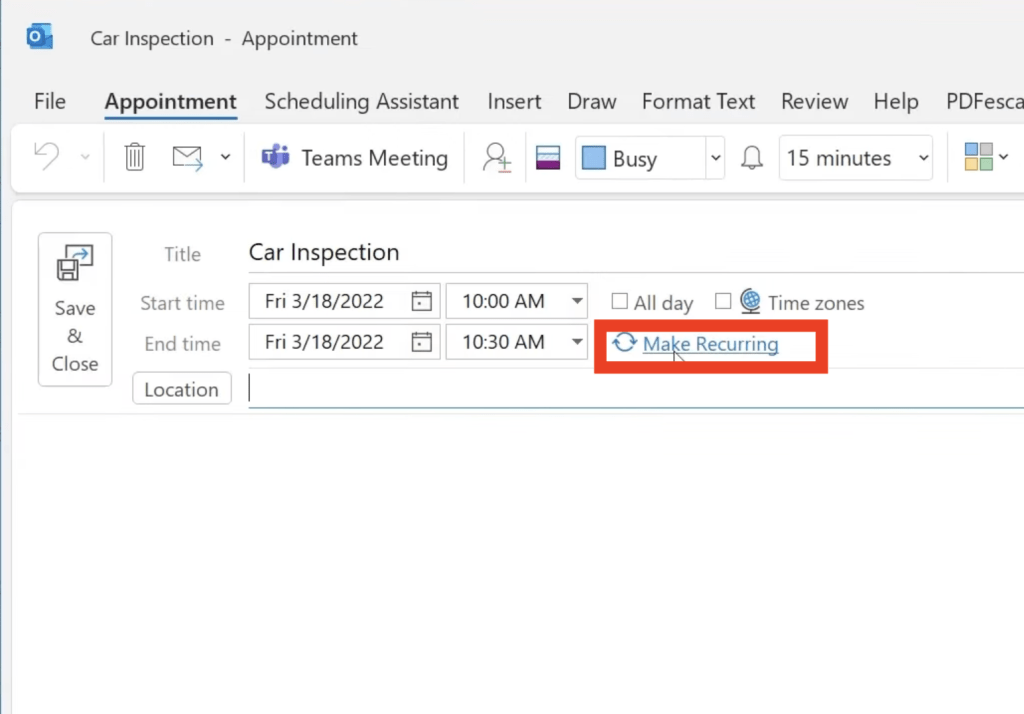
If you wish to get this reminder every year, you can click on the reminder and select Make Recurring.
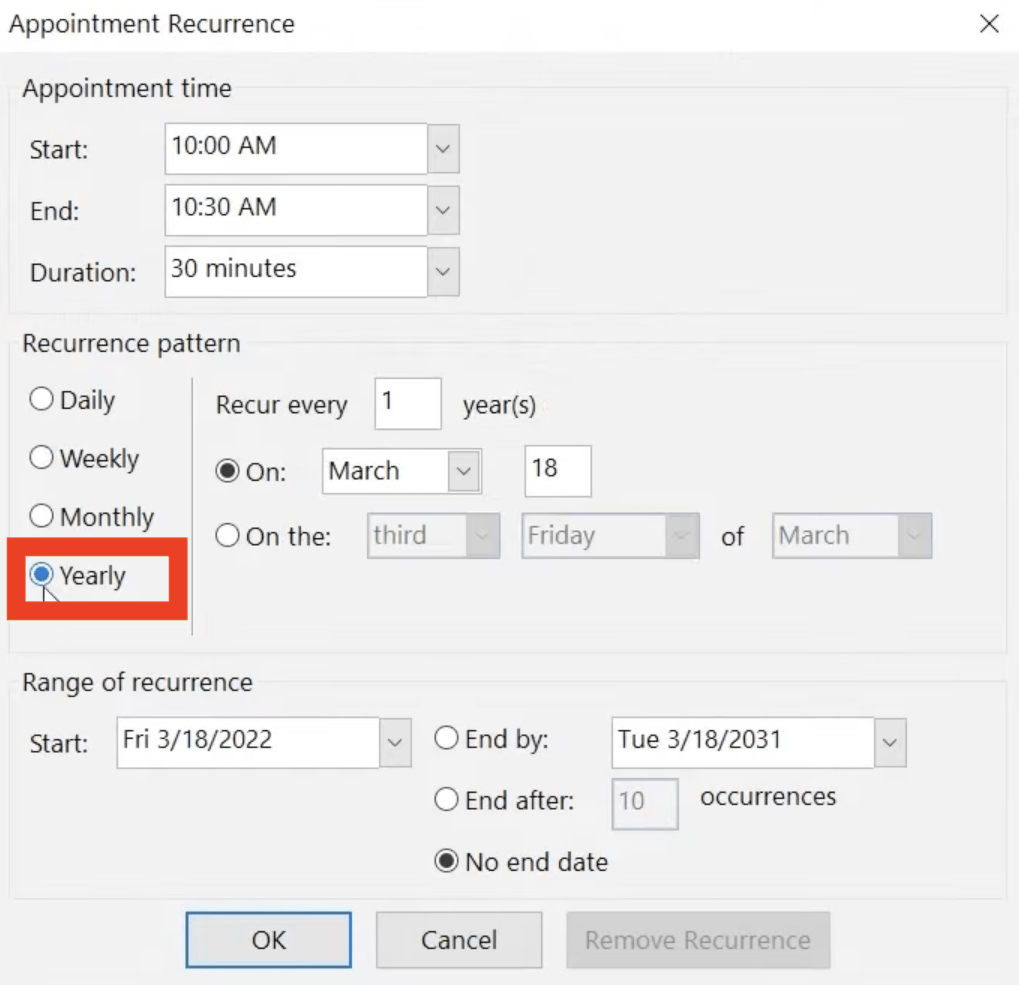
Select Yearly and click OK.
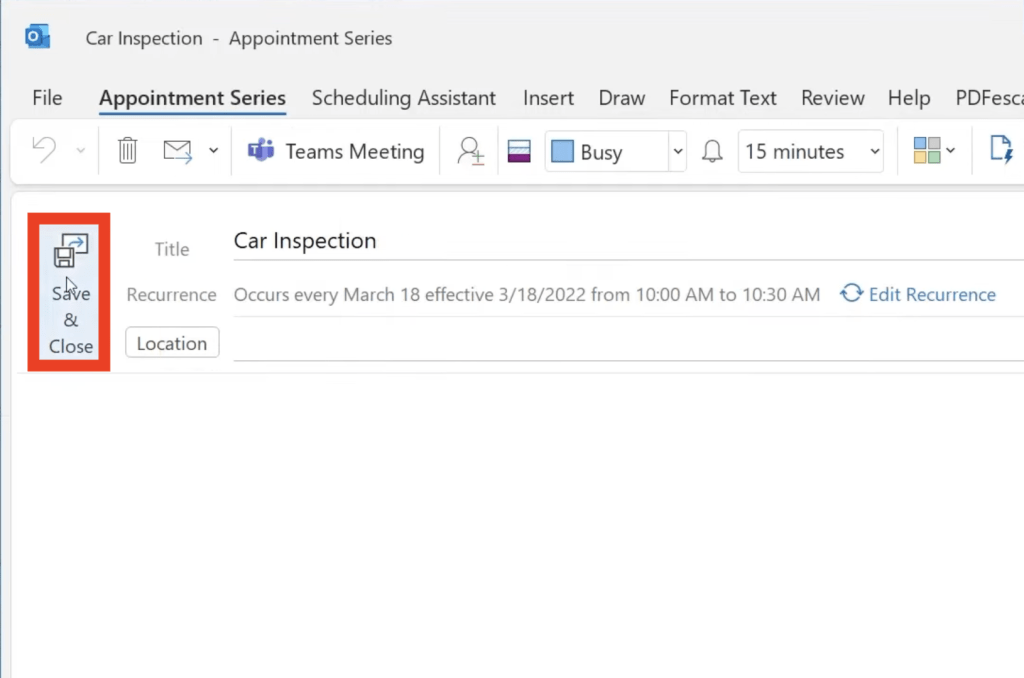
Select Save & Close.
You will see that the same event is displayed for the years 2023, 2024, and so on.
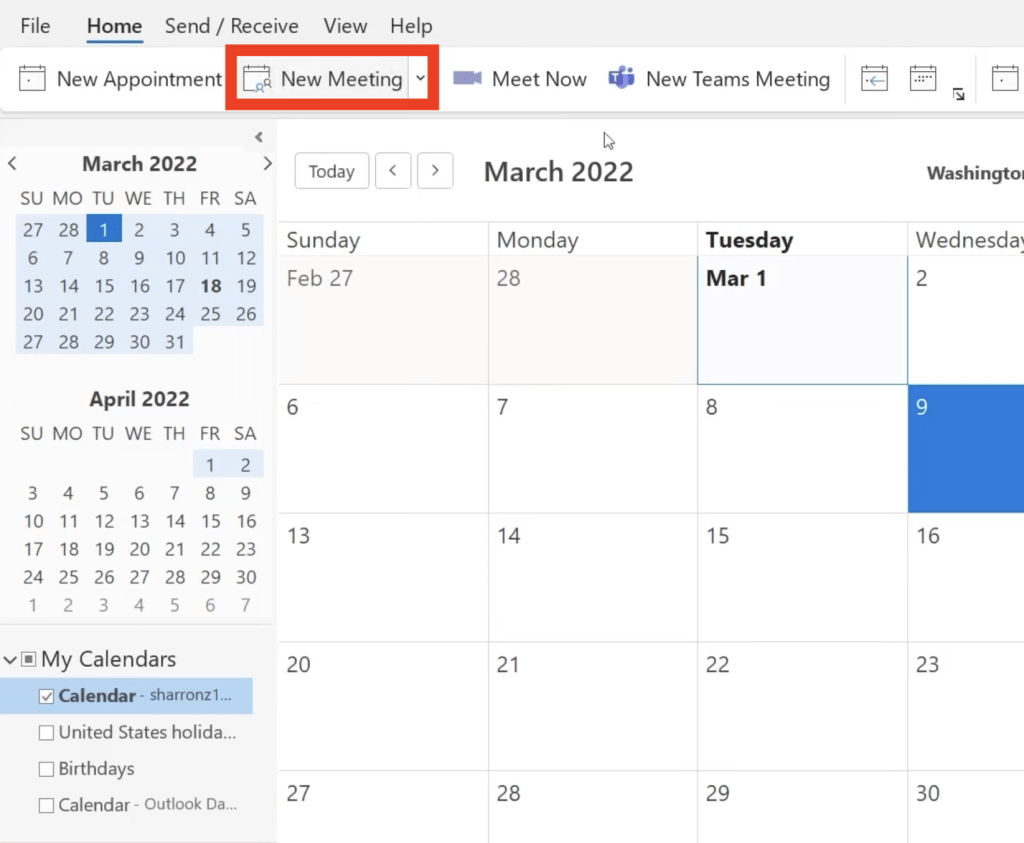
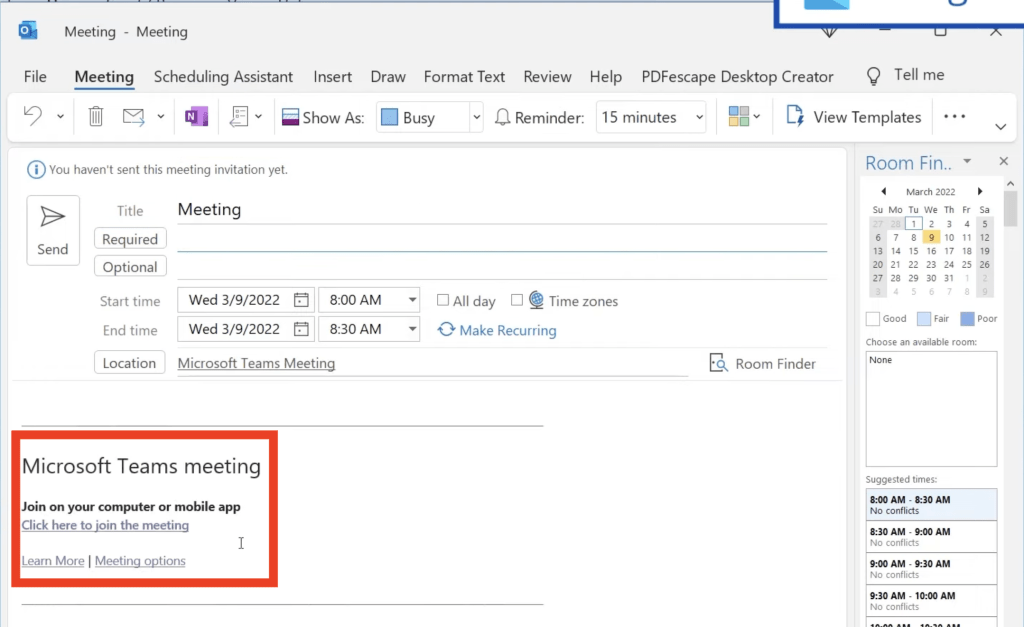
You can also add meetings to your Outlook calendar. To do that – simply click on New Meeting.
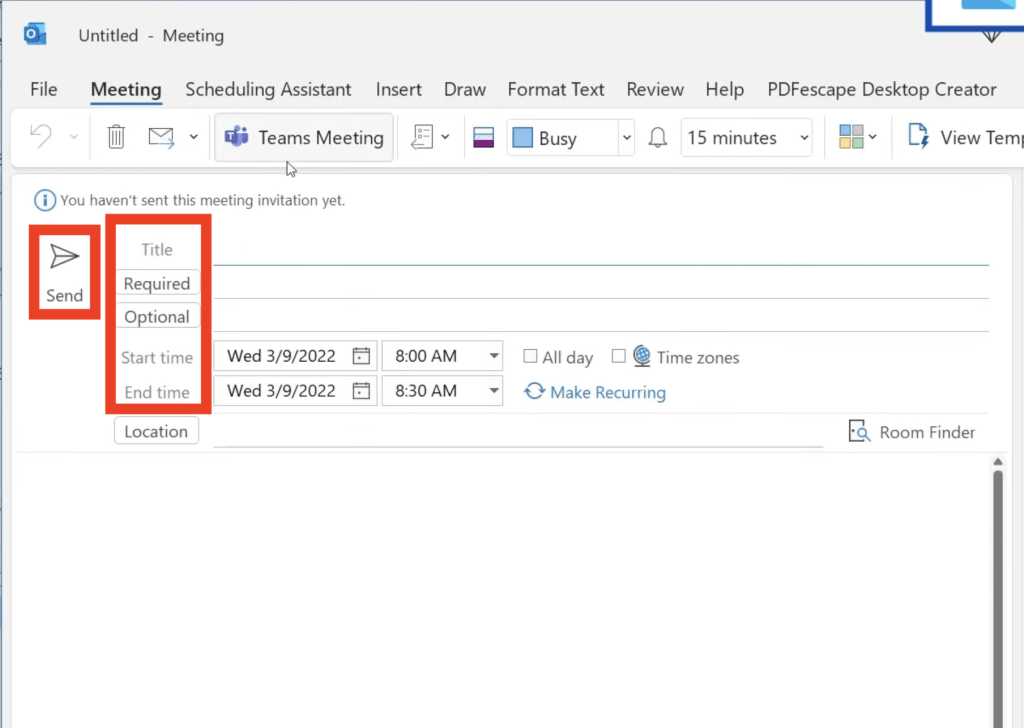
- Type the title of the meeting
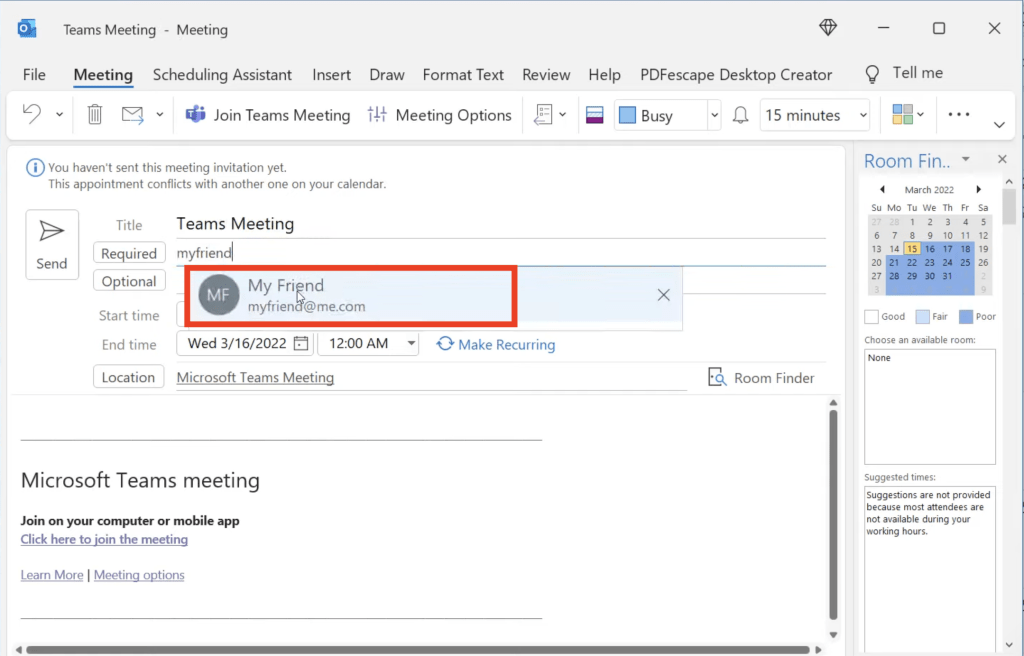
- Enter the invitee’s email address who must attend the meeting under the required field
- Enter the invitee’s email address who can optionally attend the meeting under the optional field
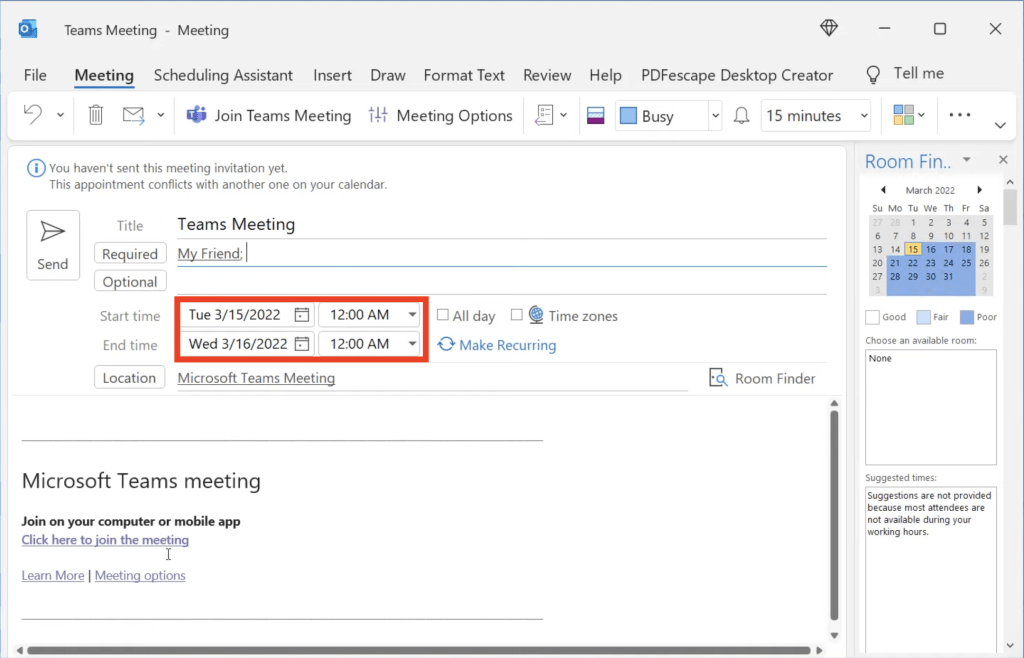
- Select Start time and End time
- Hit Send
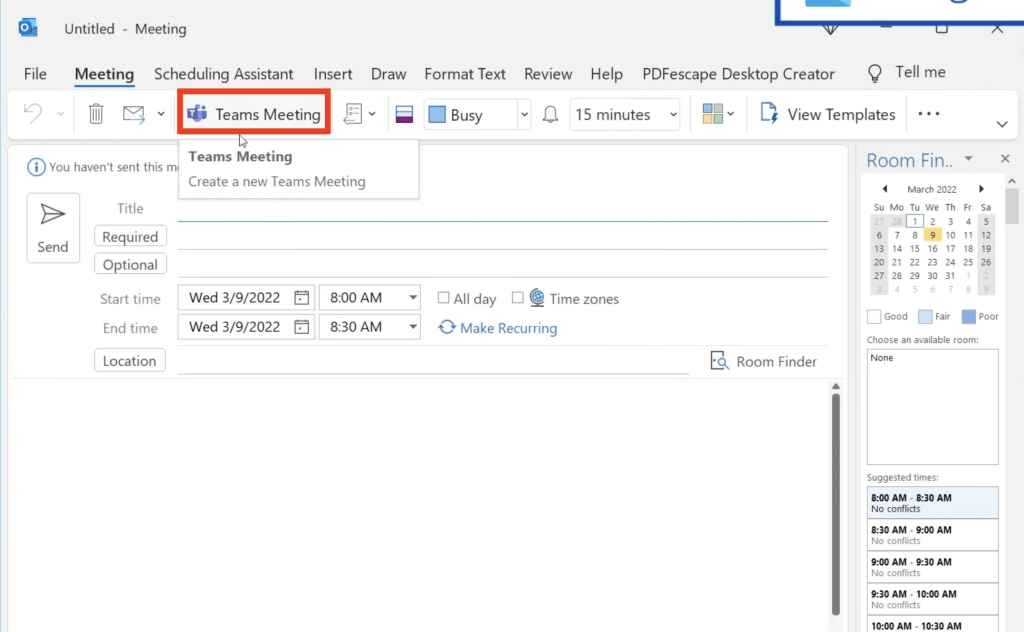
You can also hit the Teams Meeting button.
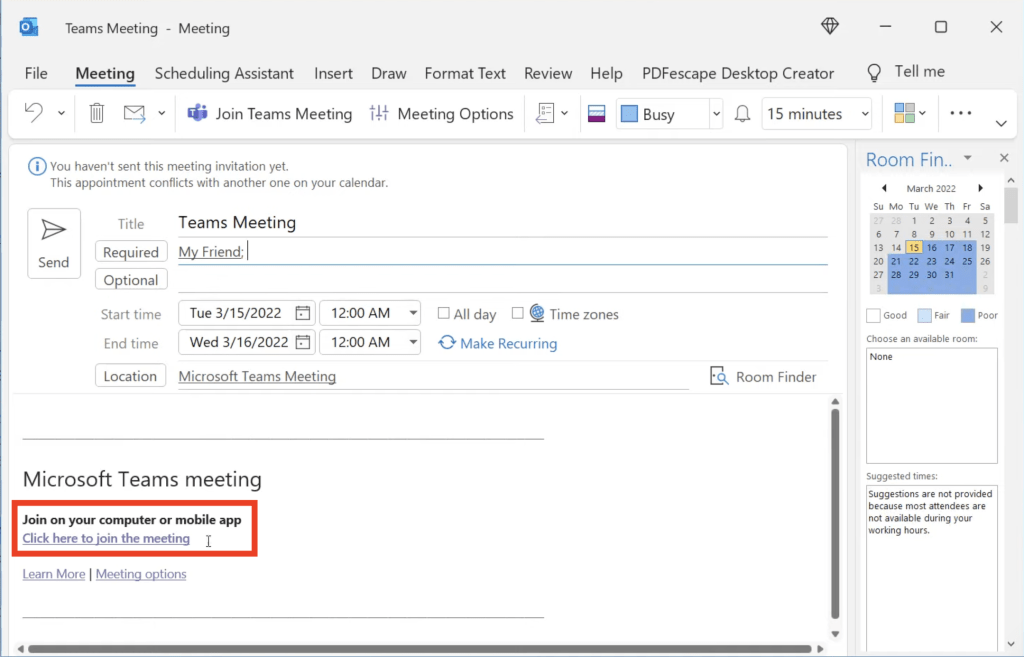
This will automatically add the Microsoft Teams Meeting link for all the invitees.
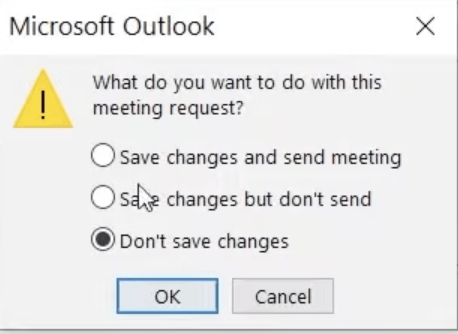
All the invitees will receive a meeting request and it will be added to their calendar. If you close this meeting, you will have the following options:
- Save changes and send the meeting
- Save changes but don’t send – Meeting will save as a draft
- Don’t save changes
Using Microsoft Outlook Contacts
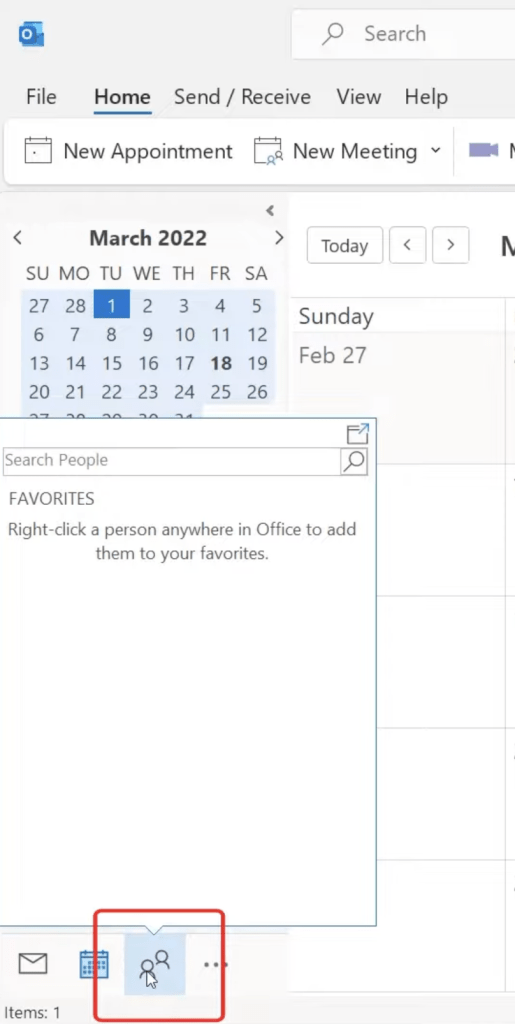
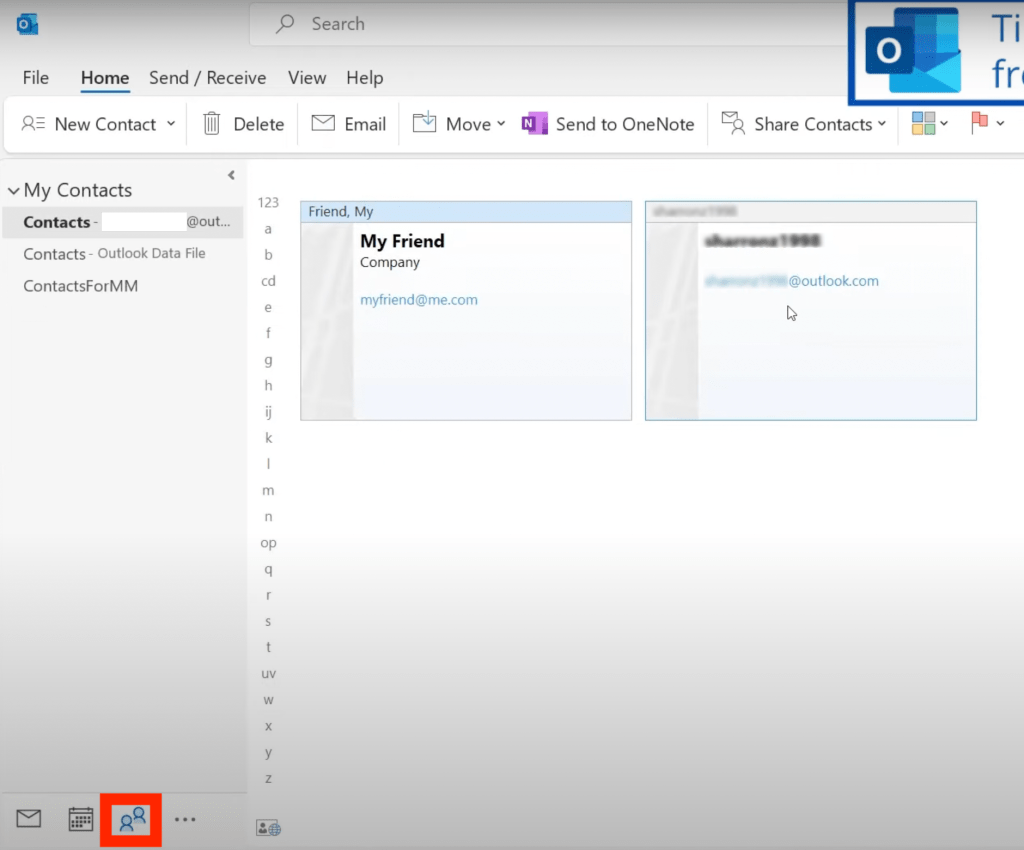
Finally, let’s move to contacts by clicking on the icon below.
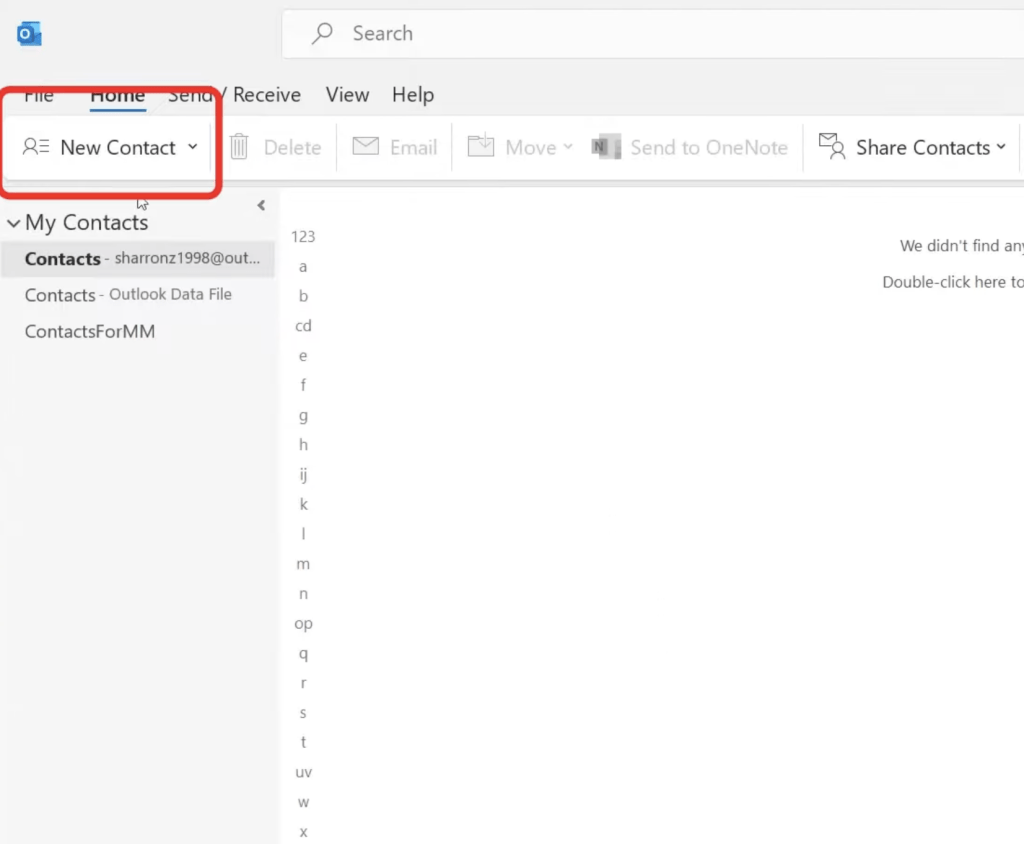
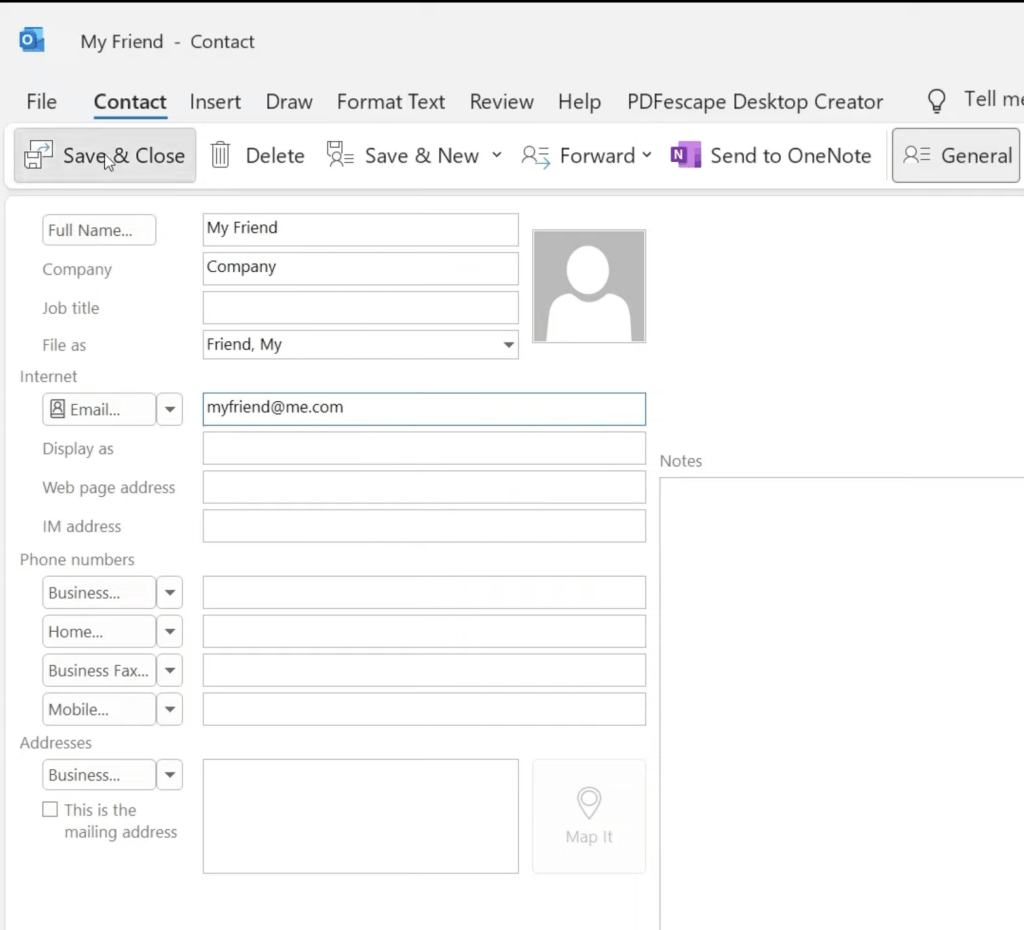
To add a new contact – Select New Contact.
You can fill in details like Name, Company, Email Address, and select Save & Close.
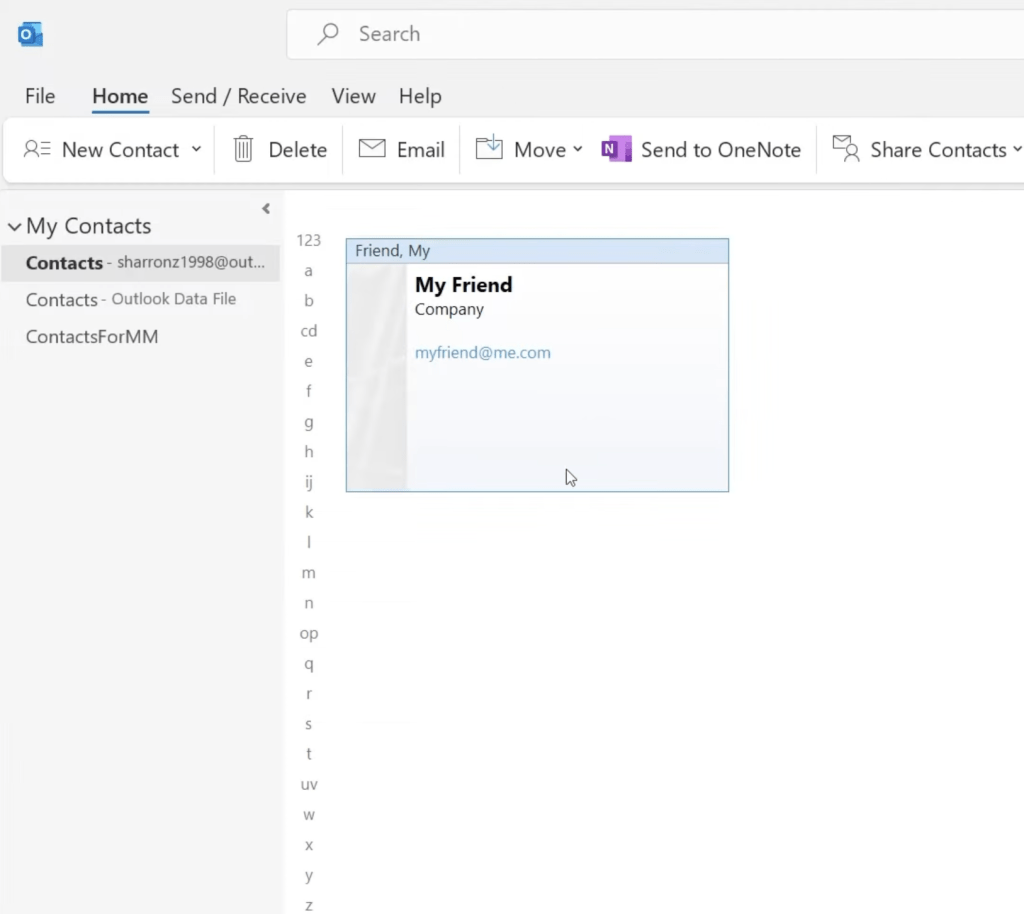
The new contact that you have added will appear in the Contacts list.
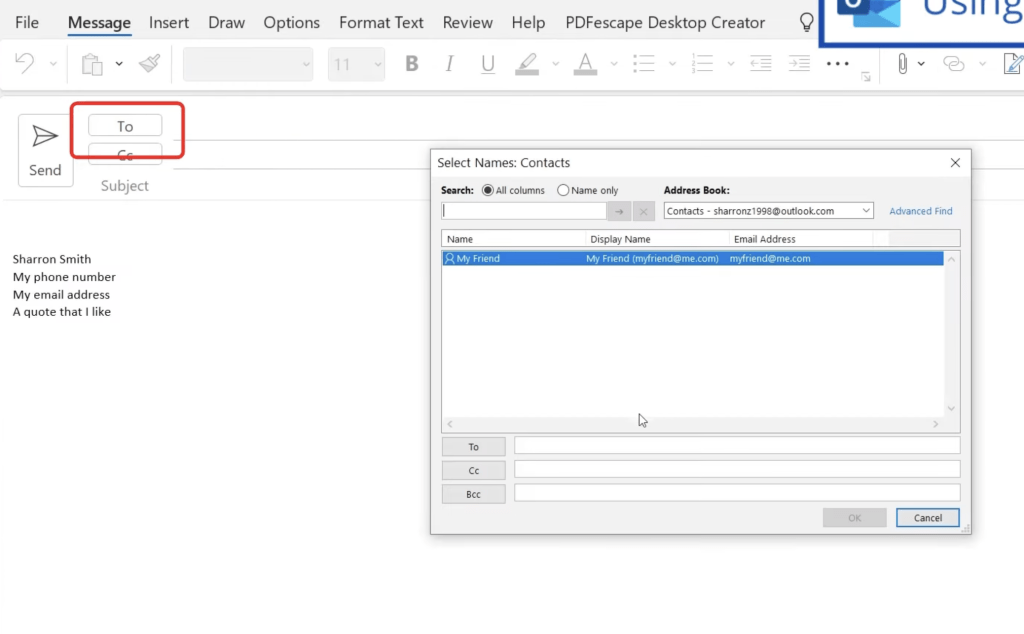
Once you have your contacts added in outlook, you can easily use them when sending emails or meeting invites. While writing an email, click on To to get the entire contact list displayed.
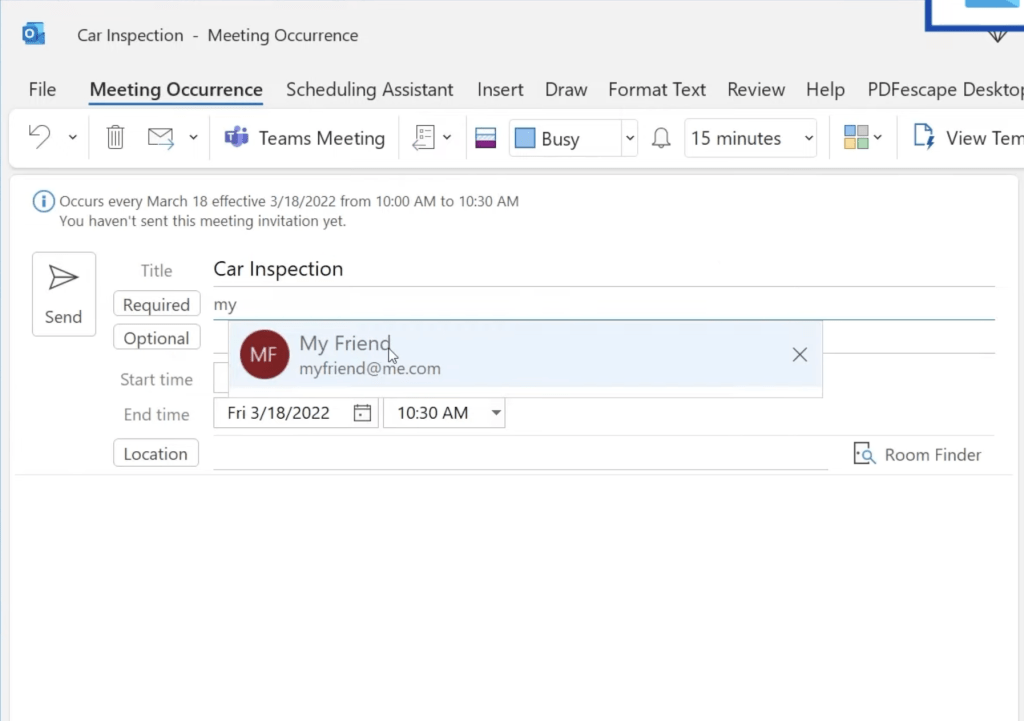
When sending a meeting invite, you can easily use the added contact as well.
Hopefully, this article has provided you with an insight on all about Microsoft Outlook, what it is, how to use email, how to organize emails, how to link other email accounts to Microsoft Outlook, how to write an email, how to schedule the sending of emails, how to create a signature, how to use the calendar, how to manage contacts and MORE!
How to Reduce Too Many Emails (5 Secret Tips)
Microsoft Outlook is an email application that is majorly used for business purposes. If you know how to manage outlook email effectively, you can save a lot of your time and remove too many emails.
On average, any professional gets more than 100 messages per day and spends around 30% of their work time reading and sending emails!
Are you also spending a lot of your time reading your inbox? Is a growing pile of unread messages bothering you? Is reading messages the first thing you are doing at work?
If we don’t manage our emails efficiently, your inbox will be out of control. With proper email management, it becomes easier to focus on important tasks instead of just managing your emails.
The following 5 Secret Outlook Tips will help you to remove too many emails in Microsoft Outlook –
Watch this Microsoft Outlook Tips on how to manage your inbox on YouTube and give it a thumbs-up!
This strategy focuses on separating email time and work time. When you have an intentional time to just check your emails, you can concentrate only on office work for the rest of your time.
This can be achieved by getting rid of email notifications as and when you receive a new email. These notifications create distractions due to the sound, email pop-ups, and icons, thereby hampering productive work time.
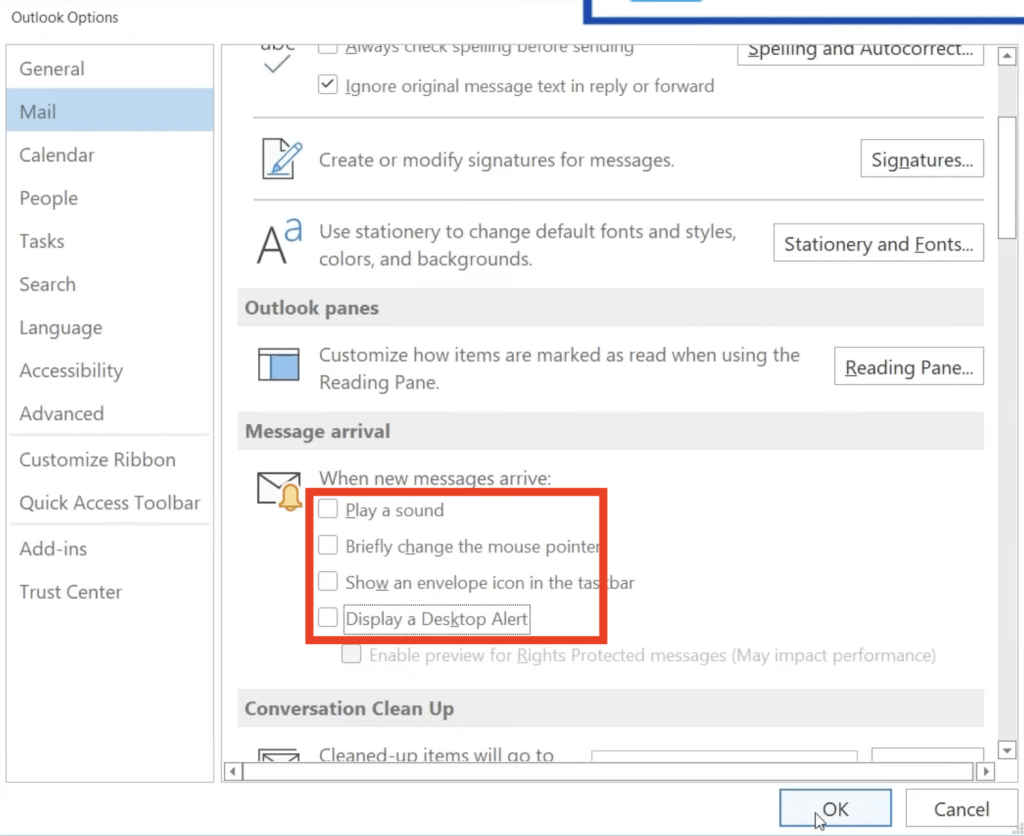
There are four settings that you can do to achieve intentional email time –
Getting rid of email notifications –
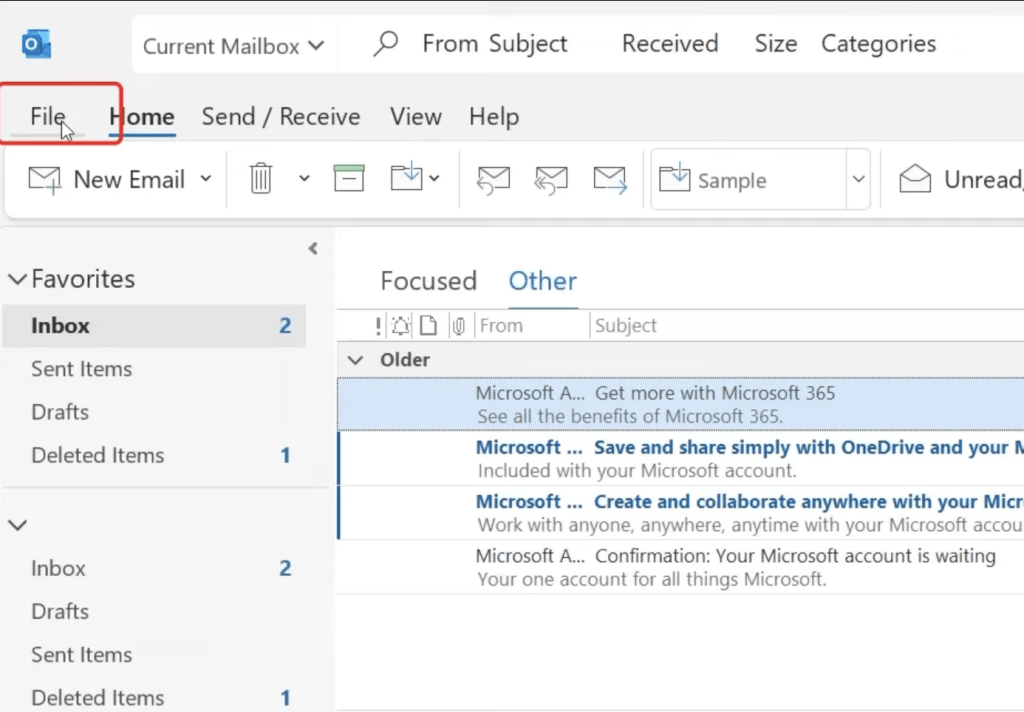
- Click on the File menu
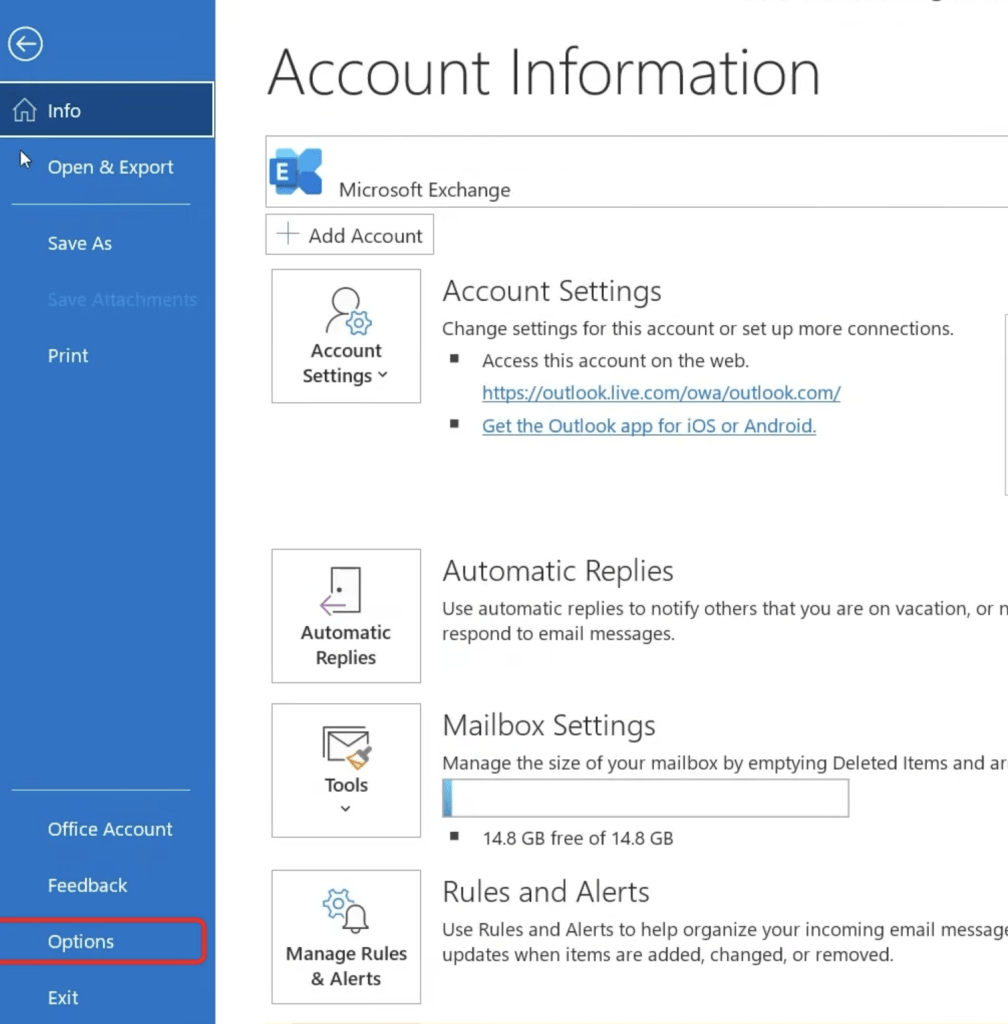
- Select Options
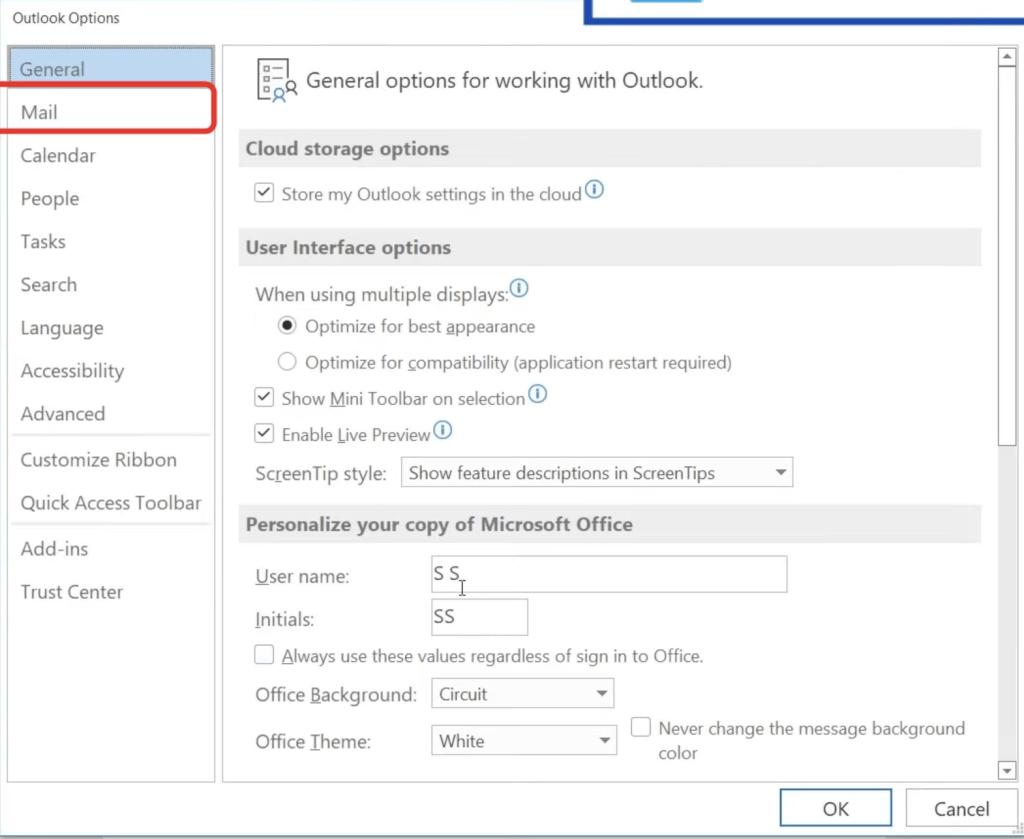
- Click on Mail
- Scroll Down and select Message Arrival
- Uncheck all the options
- Click OK
This will stop you from receiving any notification, showing email alerts, or even not showing an envelope icon on the taskbar. Hence, keeping your focus on your work time without any disturbance.
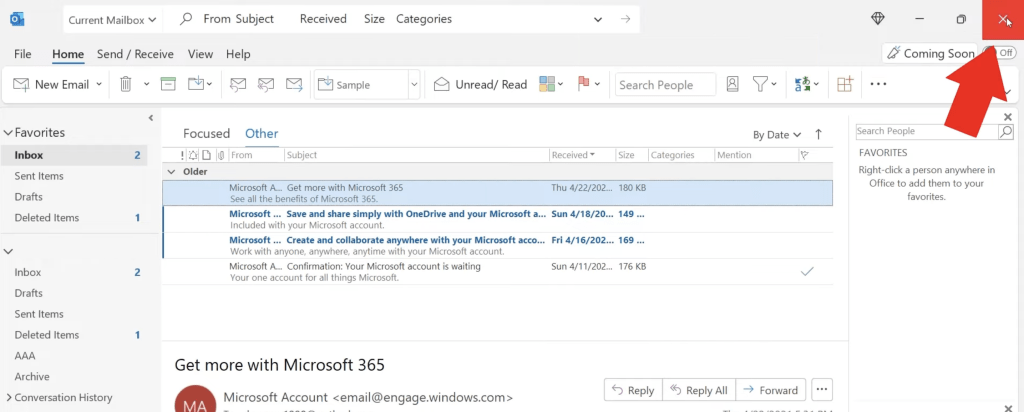
Shutdown Outlook –
Don’t leave Microsoft Outlook open on your taskbar. Instead, click on the close icon and exit out of Microsoft outlook.
This will save your work time and help you from the distractions of email notifications because Outlook is not even running.
But this is not always possible as many times you are either waiting for some urgent mail or have your email id open to get some information on what you are working on.
Work Offline –
- Go to the tab “Send/Recieve”
- Select tab “Work Offline”
This will disconnect you from the server, and save you from some disturbance.
Work offline if you do not want to receive any new emails at that time. So in this case, your outlook is open and running but you are not receiving any new mail hence not getting distracted from emails.
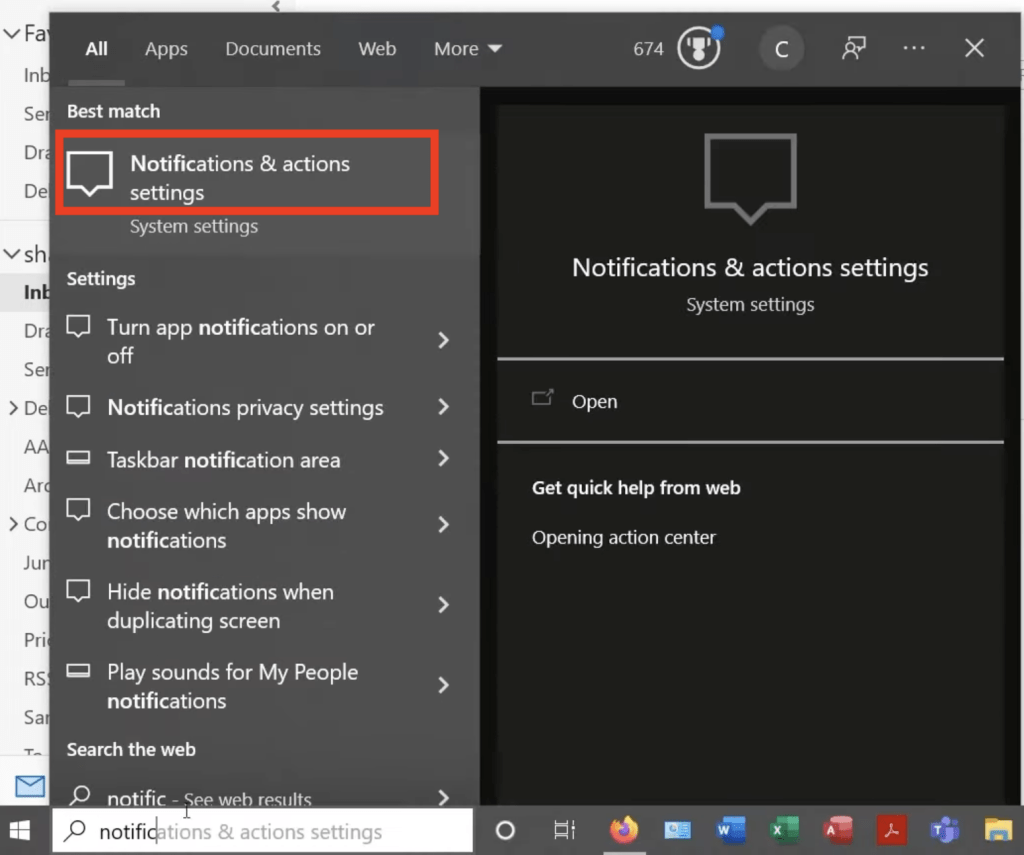
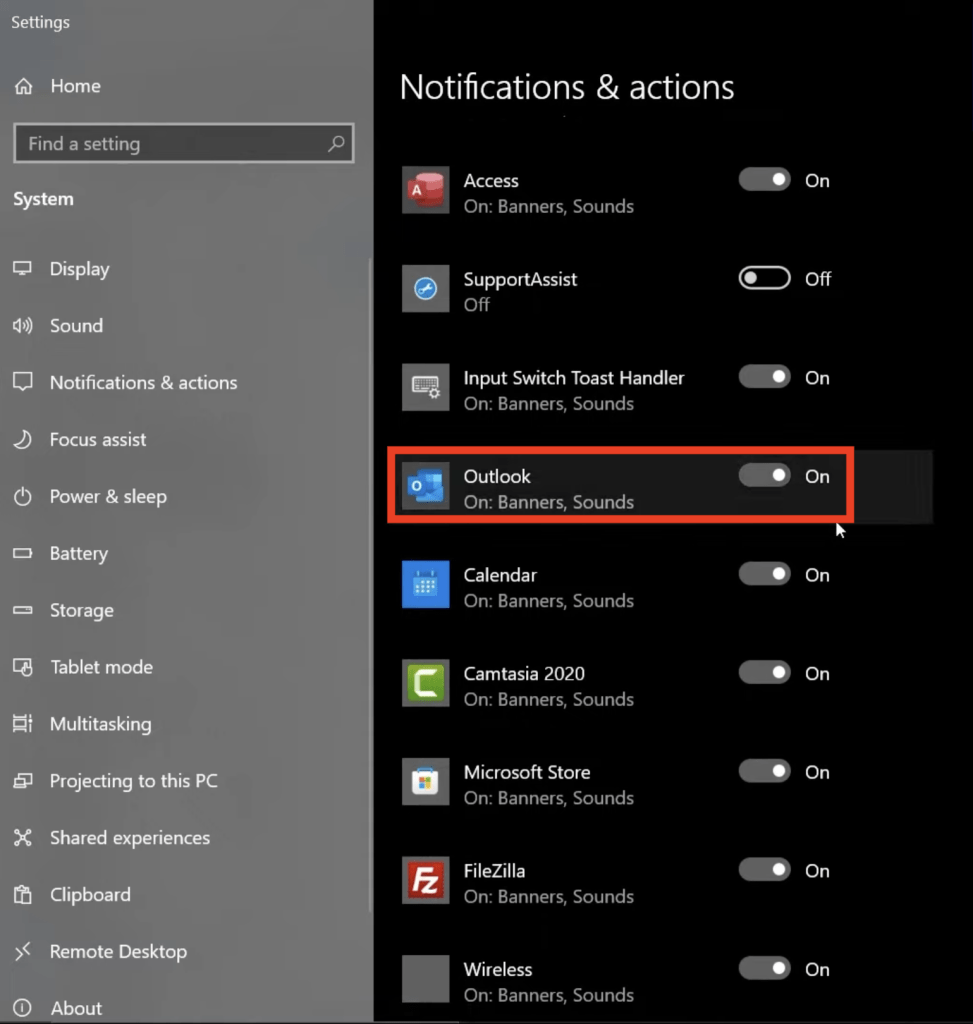
Windows setting for Microsoft Outlook –
- Click on Windows on your desktop
- Select Notifications & Actions
- Click on Outlook and turn “Off” the notification option
You can check your emails and categorize them according to the requirement and urgency of the task. When you receive an email, you need to know what action you need for that particular email.
For example:
- If an email is important and needs an urgent reply, then you can check and reply to it immediately.
- Next, there are emails that are of no use or are not important then should be immediately moved to the trash folder.
- Lastly, emails that are not very important and can have delayed responses from your side, are the ones that need to be managed.
These emails stay in our inbox and we don’t know what to do with them as neither it needs immediate action or reply nor can be deleted. It might be that we have to reply to it after a week or have to wait for some more information before replying to it. These emails get lost in our inbox as they are left unseen or unanswered.
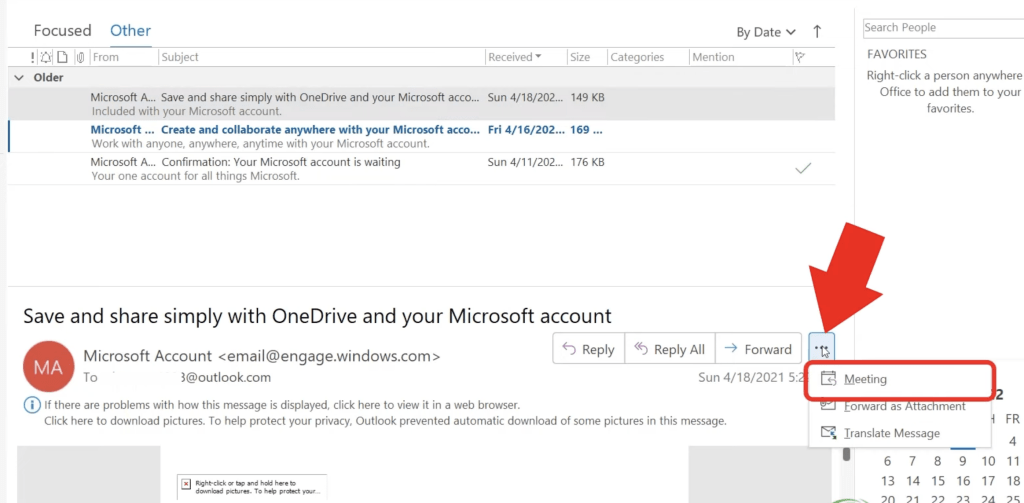
We can turn them into an event in order to save them from being unattended. By selecting the 3 dots on the email and clicking on “Meeting”, we can convert this email into an event we need to work on in the future.
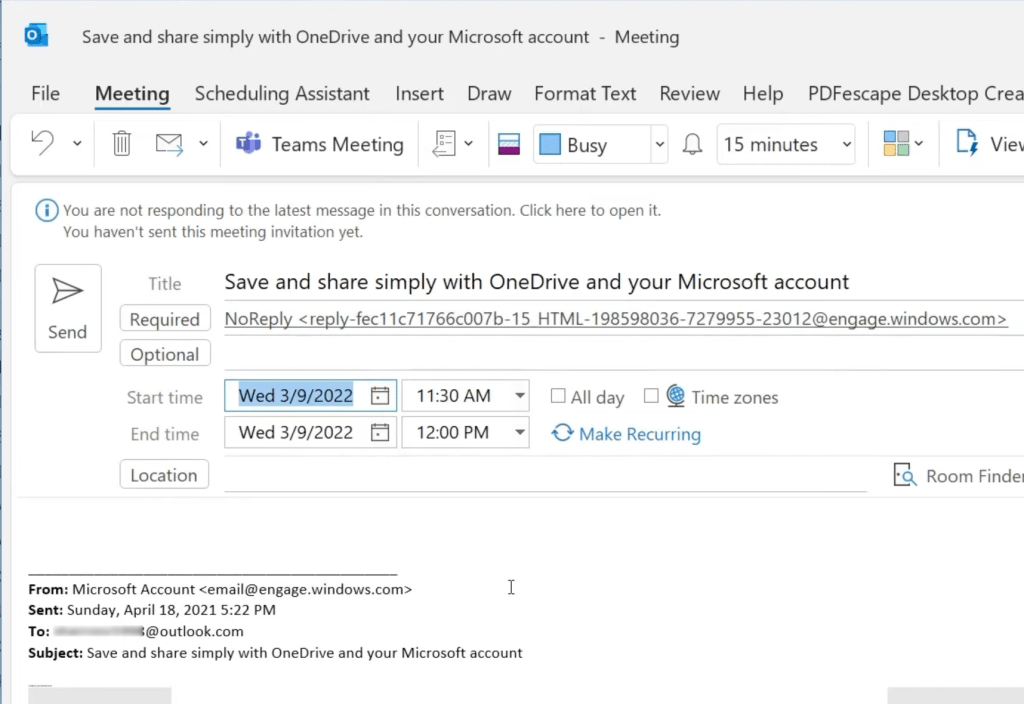
We can assign the date and time to this event and hit the “send” button in order to save this event in our calendar.
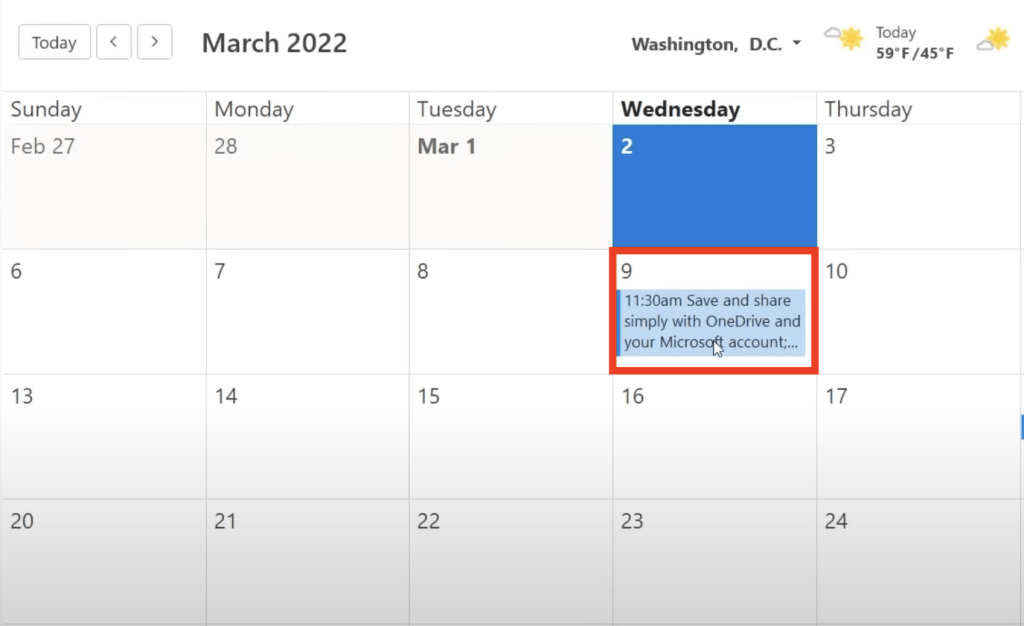
The event will then show up on your calendar.
Now we can go back to our inbox and can simply delete this particular email as it is already created as an event on our calendar and can be taken care of whenever required. This will help you remove too many emails from your inbox.
When you have emails that require action but you don’t want when to schedule them or don’t have time for it. You can create folders and combine those emails into 2 categories– a “To Do” folder and a “To Keep” folder.
You have to remember to check your To Do folder regularly so that you don’t miss out on any important task. If you think you may forget checking that folder, you can make a simple change in the Outlook setting –
- Go to File
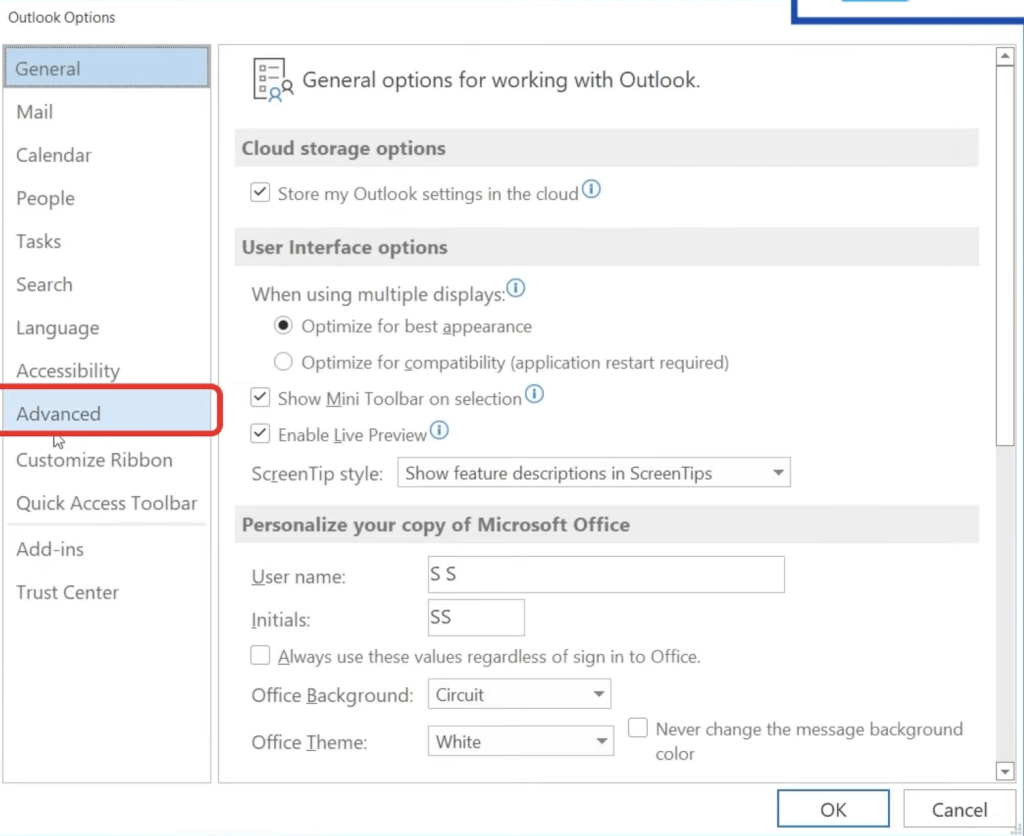
- Click Options
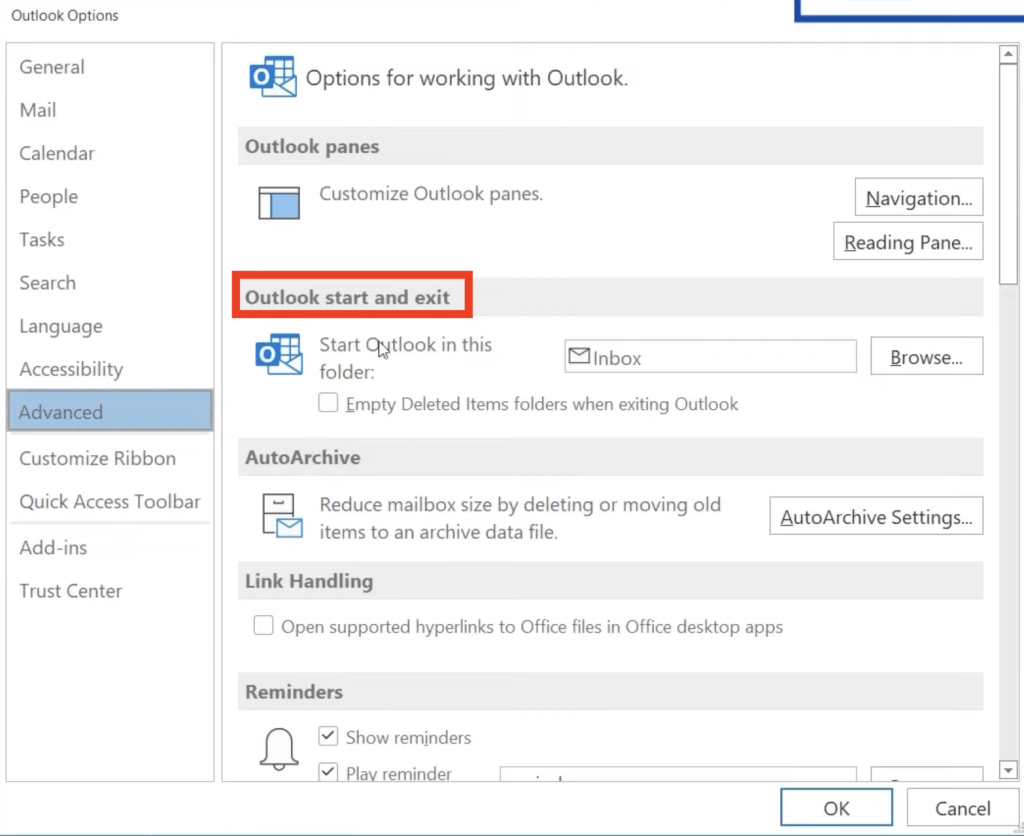
- Click Advanced
- Go to Outlook Start and Exit
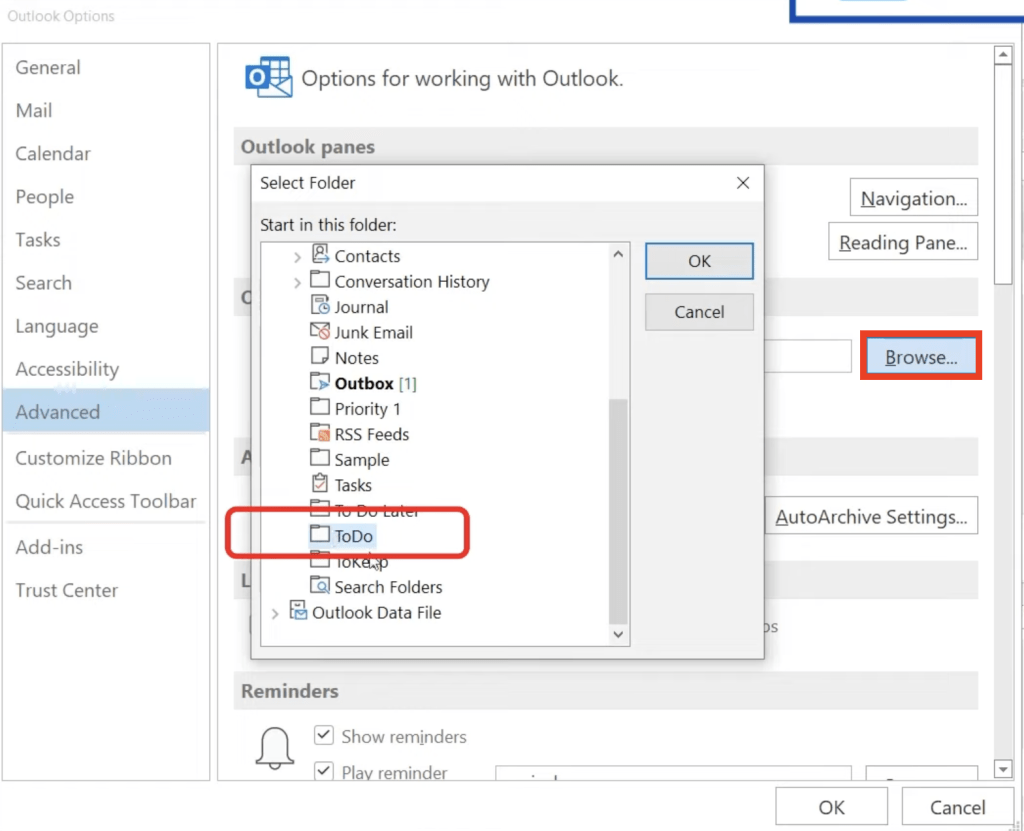
- Click Browse and select To Do folder
- Click OK
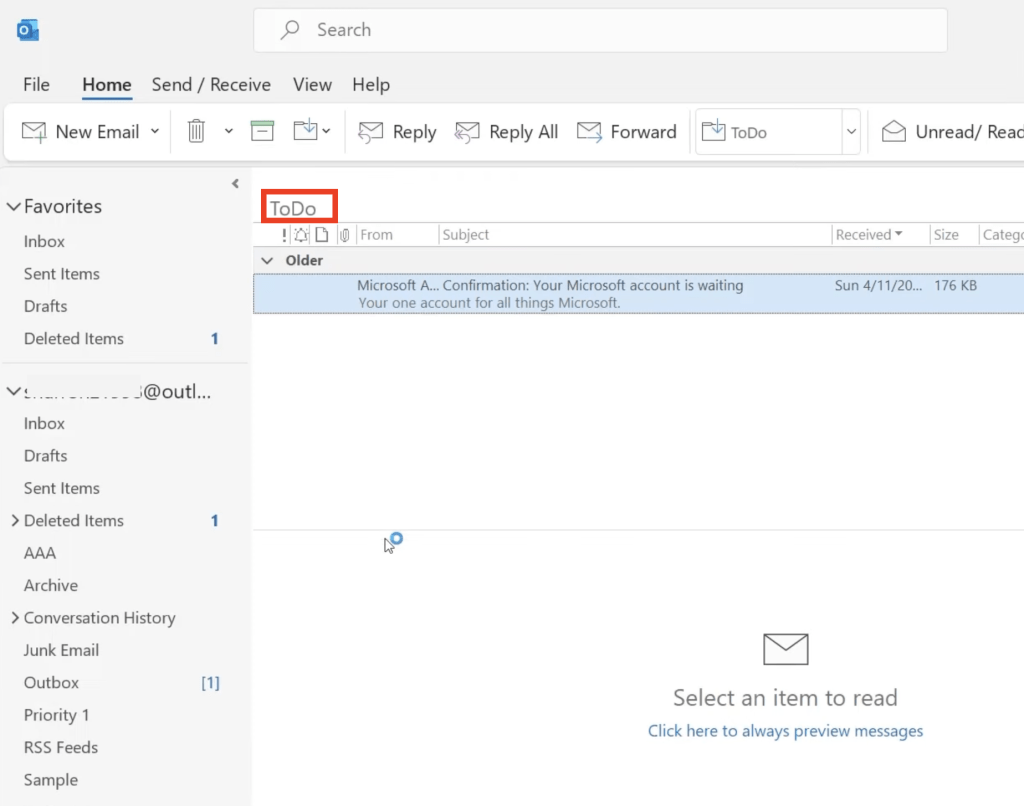
Now, if you close Outlook and open it again, the To do folder will open. This setting change will take you to the To-Do folder first before taking you to your inbox.
Another great strategy is to stop getting unwanted emails and reduce them from the source. The best way to do so is to use the unsubscribe link that comes with the email.
You can simply click on that link and unsubscribe from the email list. In this way, you would have to hit the delete button in the future.
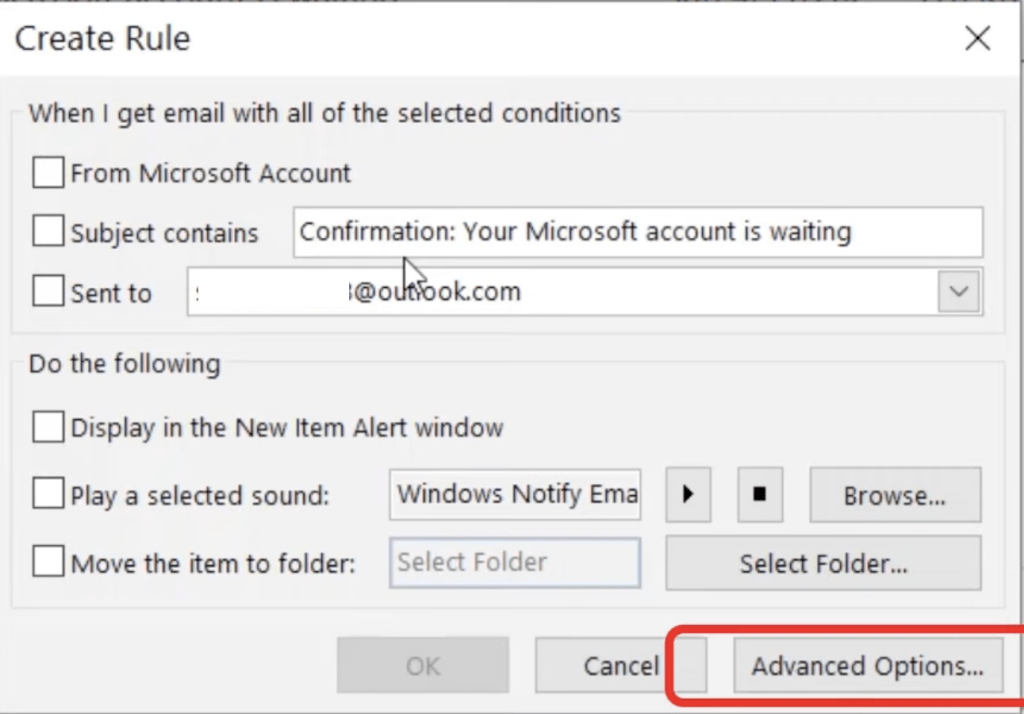
You can also reduce your inbox by creating rules when emails come in. If you do not want to receive messages or communicate with someone you can create a rule for it.
If you don’t want to receive a message that contains the keyword “Microsoft”, follow the steps below –
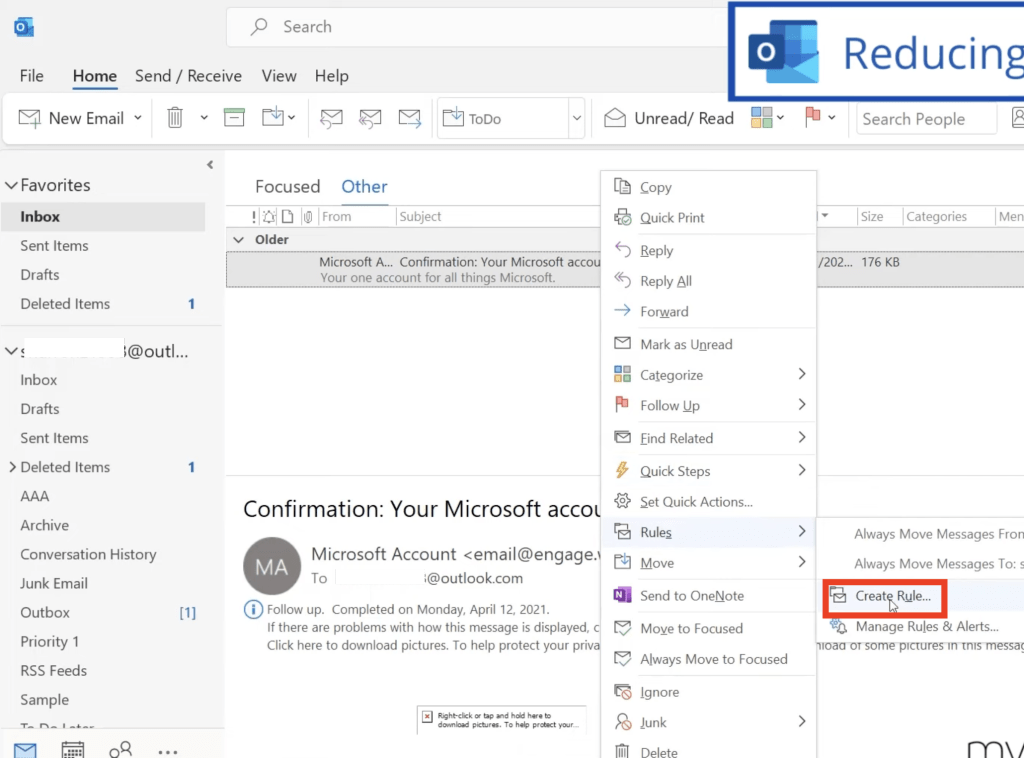
- Right-click on an email > Select Rules > Select Create Rule
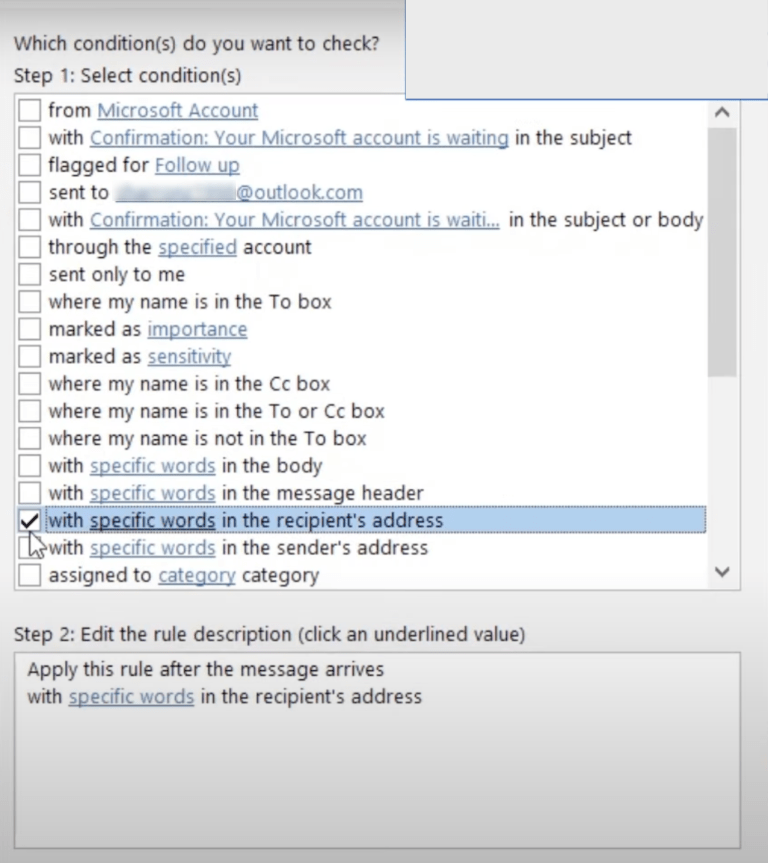
- Click on Advanced Options
- Check with specific words in the recipient’s address
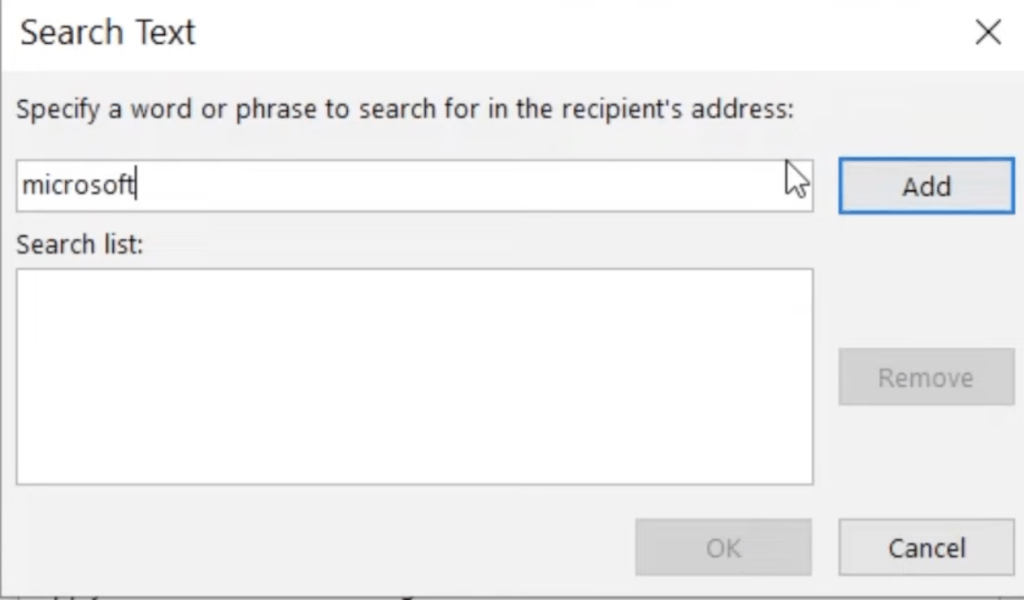
- Type Microsoft and click Add
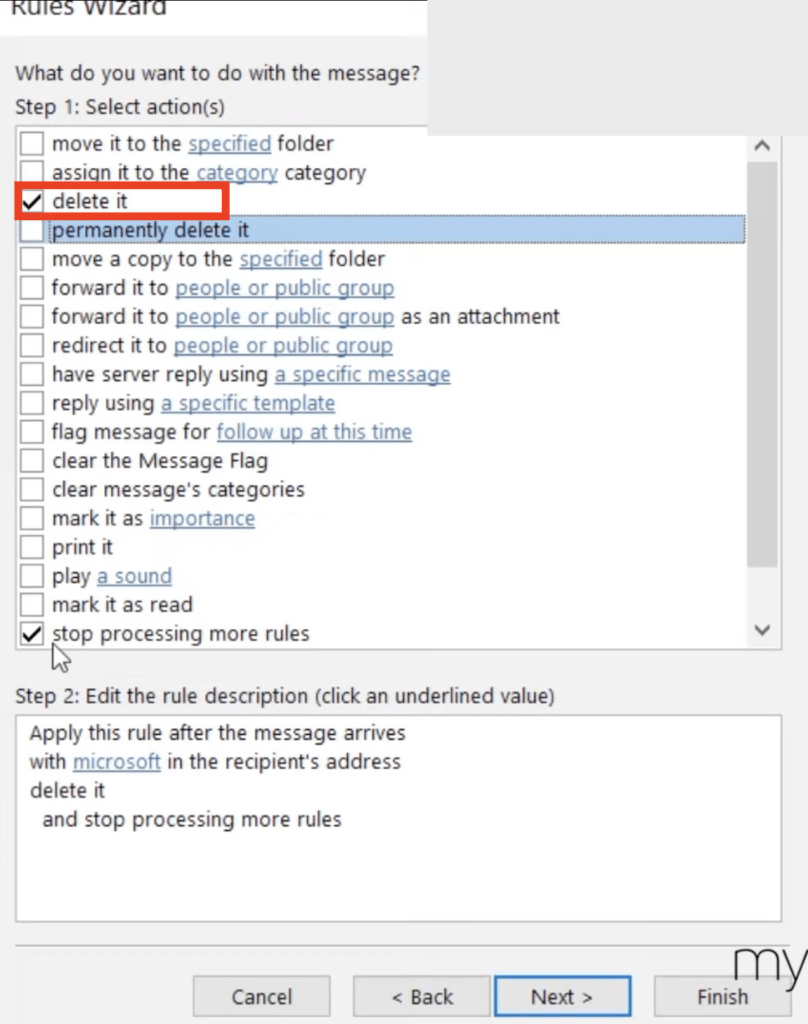
- Check Delete it
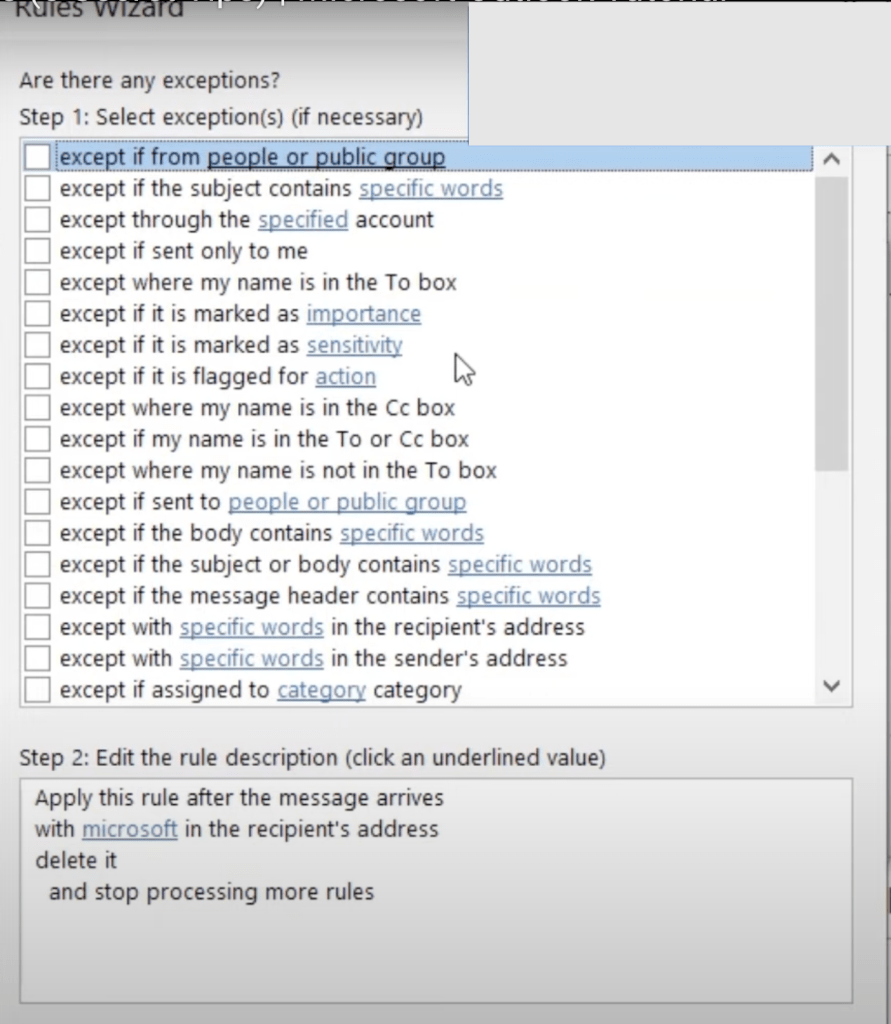
- You can also select an exception if you want
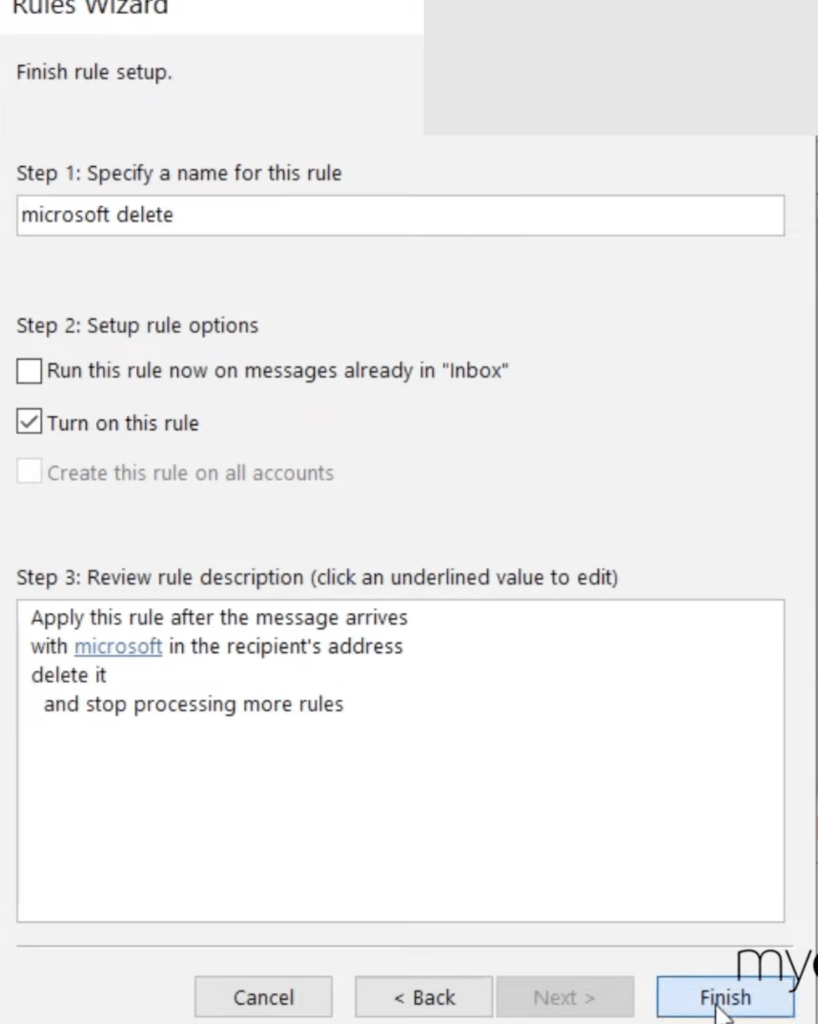
- Give this rule a name – Microsoft Delete and click Finish
Now, whenever you receive an email that contains the “Microsoft” keyword in it, it will automatically move to the Trash folder.
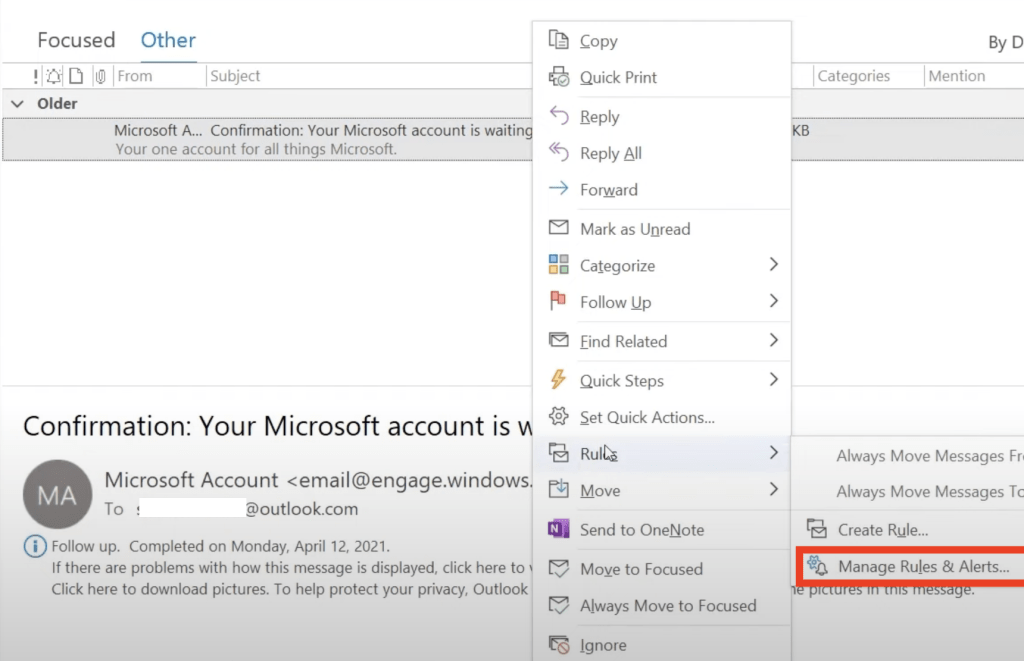
You can also manage this rule and make any change by right-clicking an email, and selecting Rules > Manage Rules & Alerts.
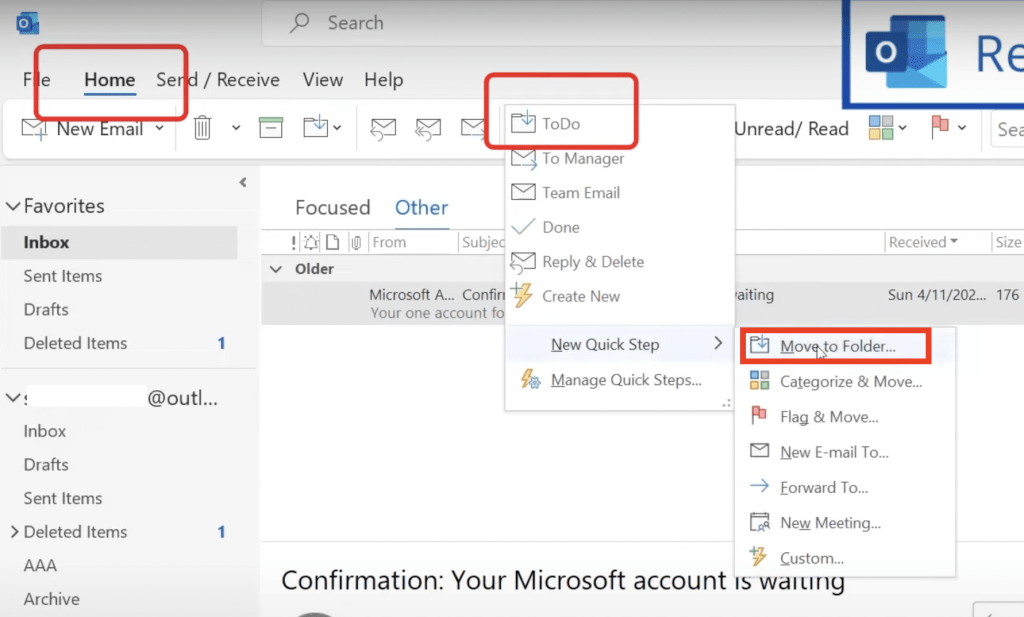
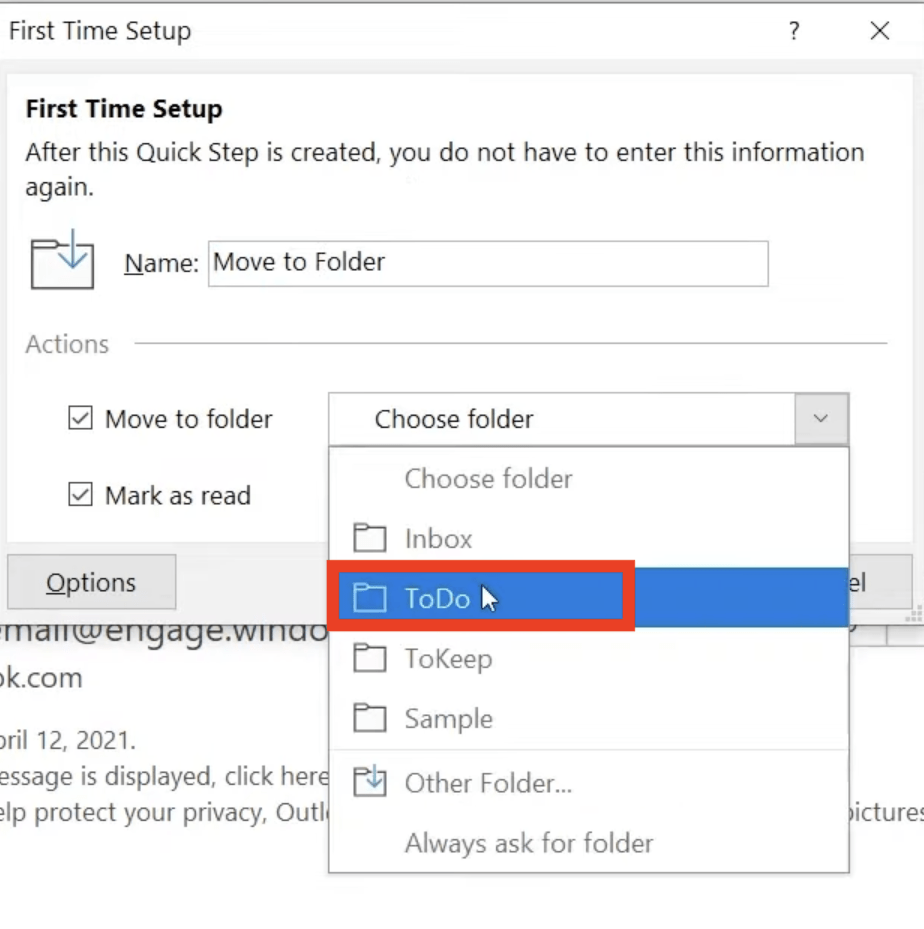
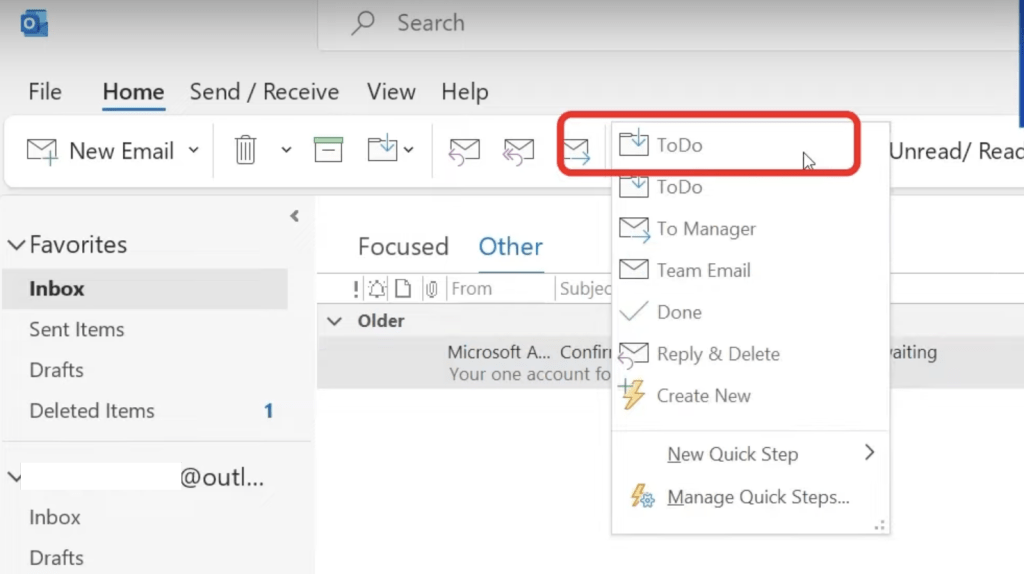
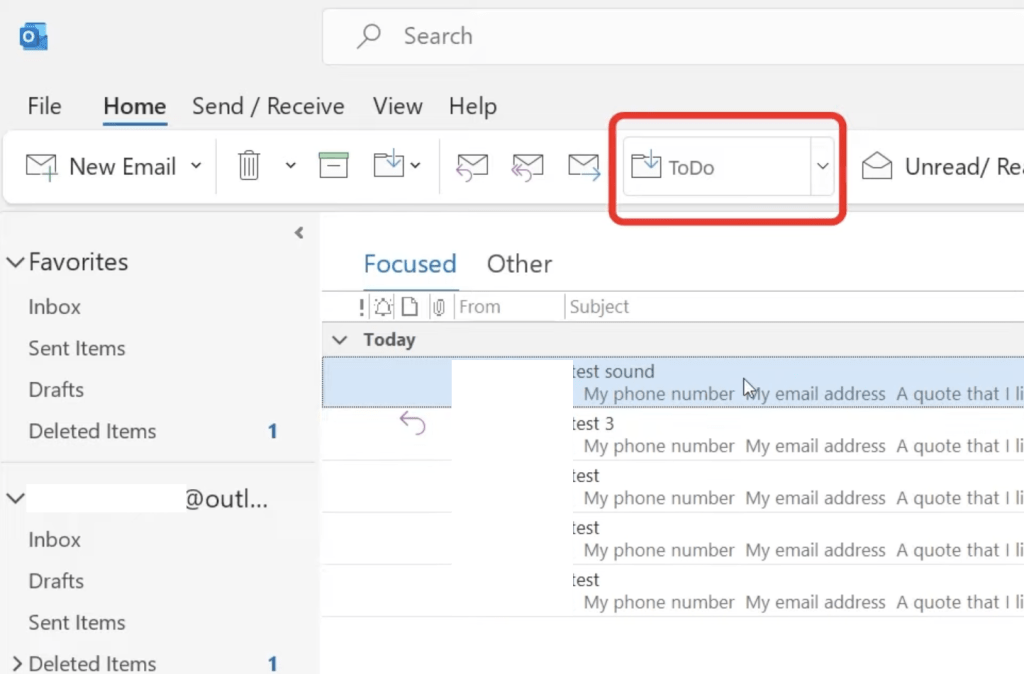
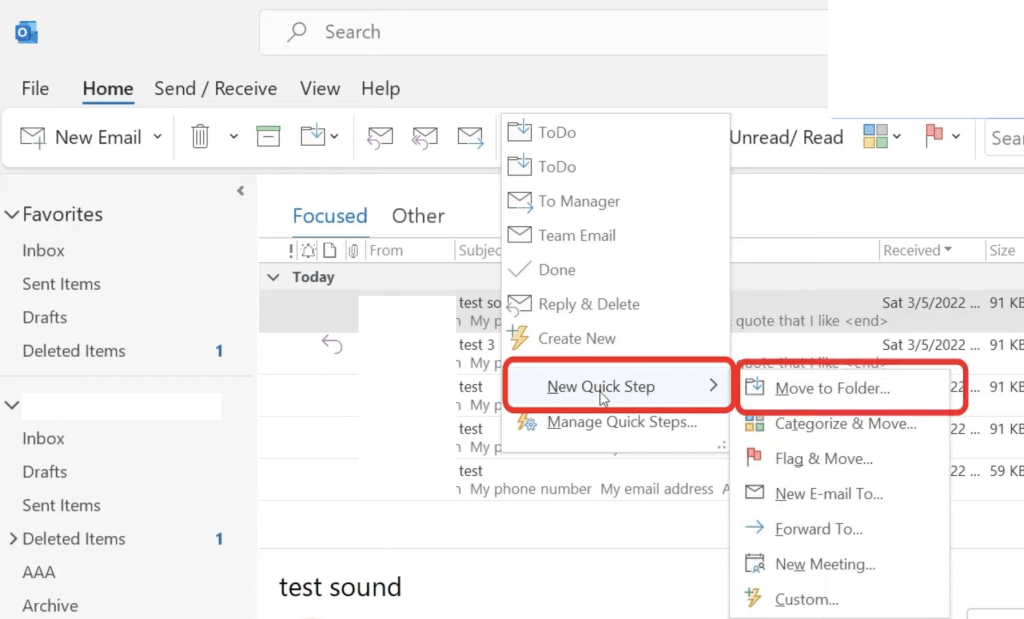
You can also create a quick step. This will help you to automate any repetitive tasks and avoid unnecessary clicks. Say you want to add a quick step to move emails to the To Do folder.
- Go to Home > New Quick Step > Move to Folder
- Go to Move Folder > To Do
- Select Email and click on To Do
Your email will automatically move to the To Do folder and you will not have to drag and drop it.
A great practice during your email time would be to go through each of the created folders and check the emails in it. You need to judge if you want to hang onto those emails or you can delete them.
Since it will be time taking process, you can select a day each month for this task. For example – You can have a folder named coupons. Once a month, you can check and delete those emails that contain expired coupons.
If you do not declutter these folders, it will end up creating an unwanted pile just like your inbox. You would not want to then check the folders as well.
So, it is best to check your messages in folders once a month and take a call if you wish to keep them or not.
In this article, we have covered tips on making the most of your email time, how to quickly process each email, creating an email folder structure, reducing emails from the source, and MORE! Hopefully, after reading and following these outlook tips you will be able to tame your inbox efficiently and remove too many emails.
Top 10 Outlook Email Inbox Tips and Tricks
Emails are meant to promote communication, but they may sometimes be counter-productive because we spend so much time handling these inboxes. One can get the most out of Microsoft Outlook 365 email applications if managed in an efficient manner.
The volume of e-mail correspondences is overwhelming nowadays, but these 10 following email tips & tricks can help you keep your outlook email inbox, and your sanity, in check:-
- Turn Off Notifications
- Find Related Messages
- Creating a Quick-Step
- Add an Email Signature
- Automatic Replies
- Delayed Delivery
- Adding a New Email
- Displaying Total Emails in a Folder
- Adding a New Contact from an Email
- Sending an Attachment Directly from Excel, Word, etc.
Watch this Microsoft Outlook Email Tips & Tricks on YouTube and give it a thumbs-up!
Switching off new email notifications can help in overcoming distractions and save from being overwhelmed with too many of these notifications. This email tip can be achieved by the following steps –
- Click on the File menu
- Select Options
- Click on Mail
- Scroll Down and select Message Arrival
- Uncheck all the options
- Click OK
This will stop you from receiving any notification, showing email alerts, or even not showing an envelope icon on the taskbar. Hence, keeping your focus on your work time without any disturbance.
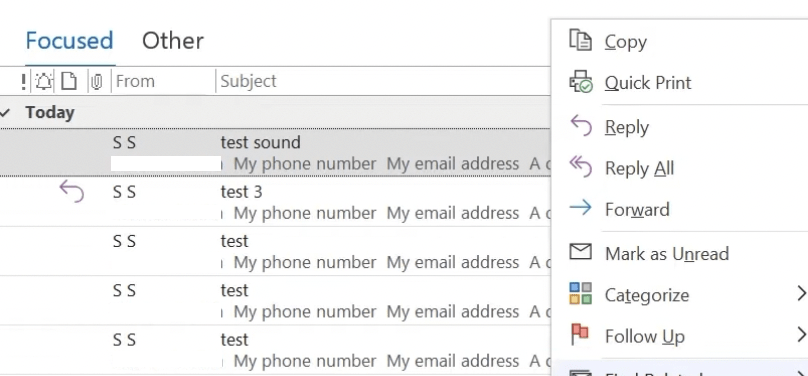
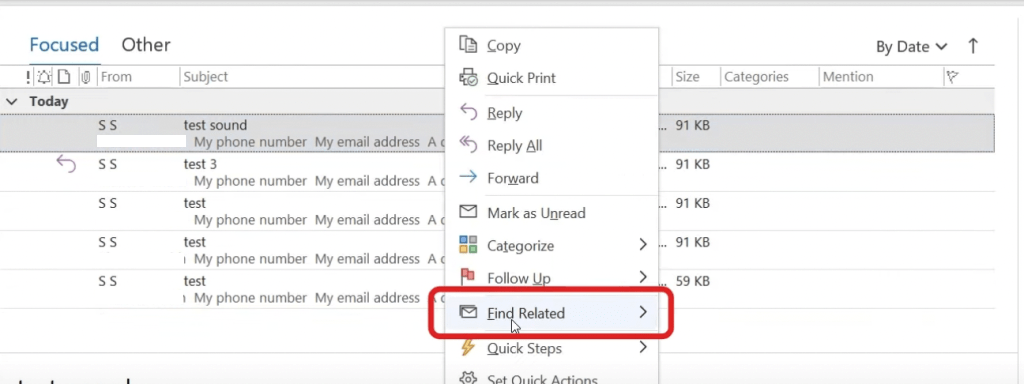
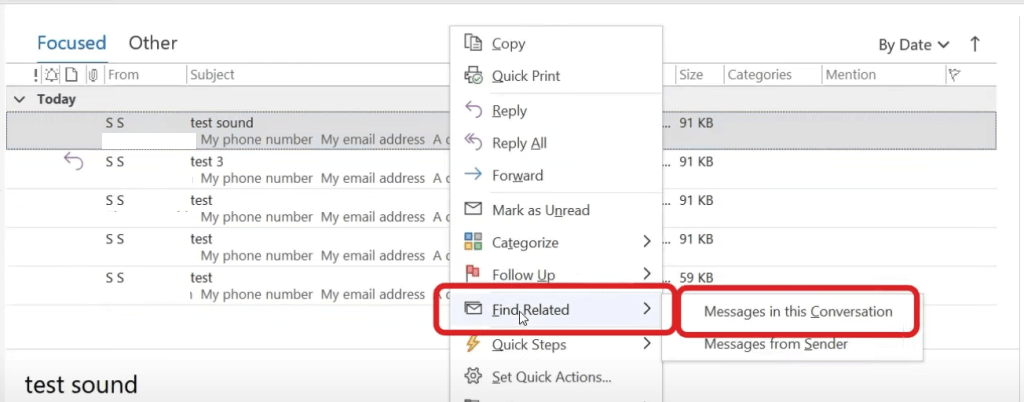
You can check all the related messages of an email chain or from the same sender very easily by applying the below-mentioned steps –
- Right-click on any email/message
- Click on Find Related
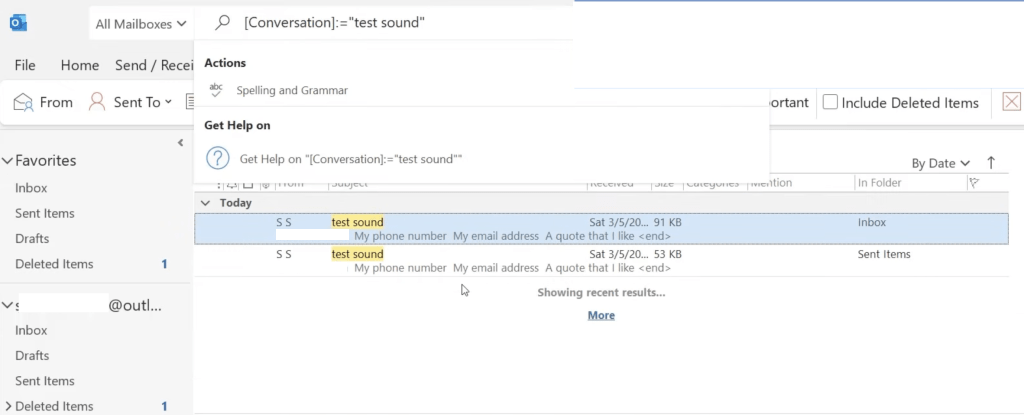
- Click on Messages in this Conversation or Message from Sender
You’ll find all the messages related to the email chain or from the same vendor on the said subject.
Achieve higher efficiency by doing the same tasks over and over again with certain messages with a small shortcut or a quick step. Checkout the following steps to reduce redundancy –
- Select the message
- Click on the quick-step menu option from the Toolbar at the top
- Click on New Quick Step and select any of the following options.
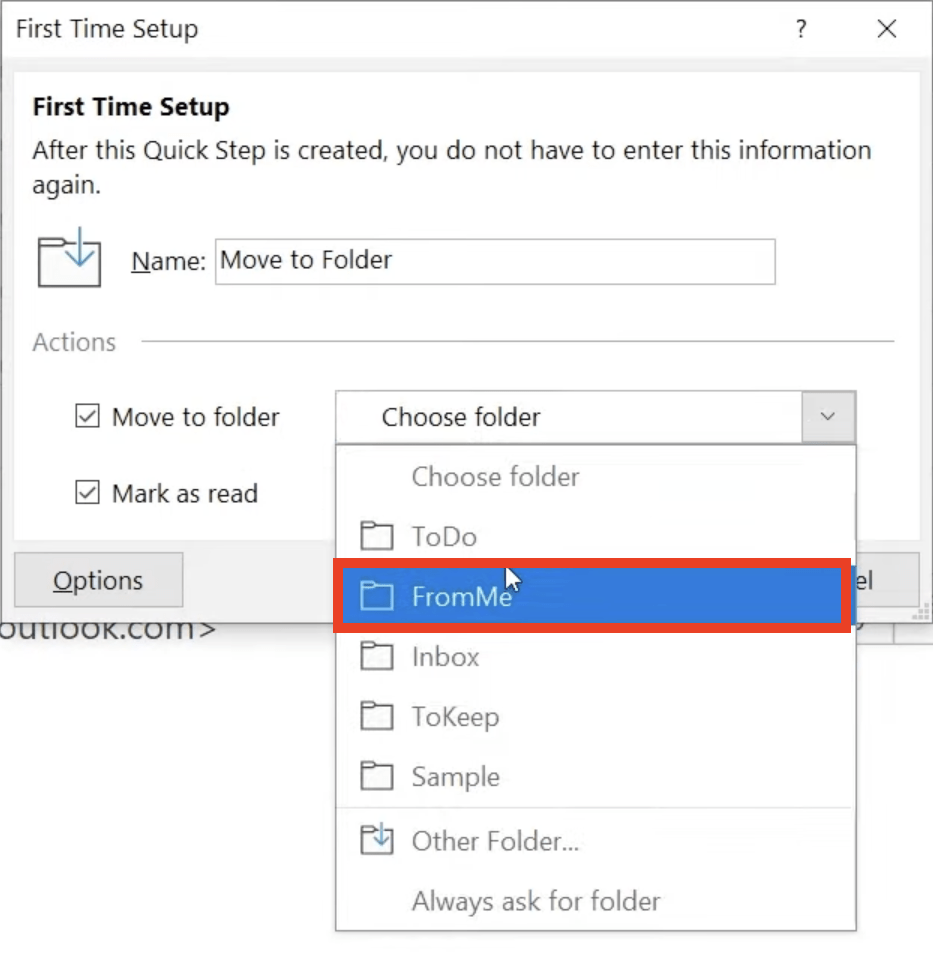
For our example – we’ll apply the “Move to folder” option, this will move the selected message to the selected folder on the left menu bar.
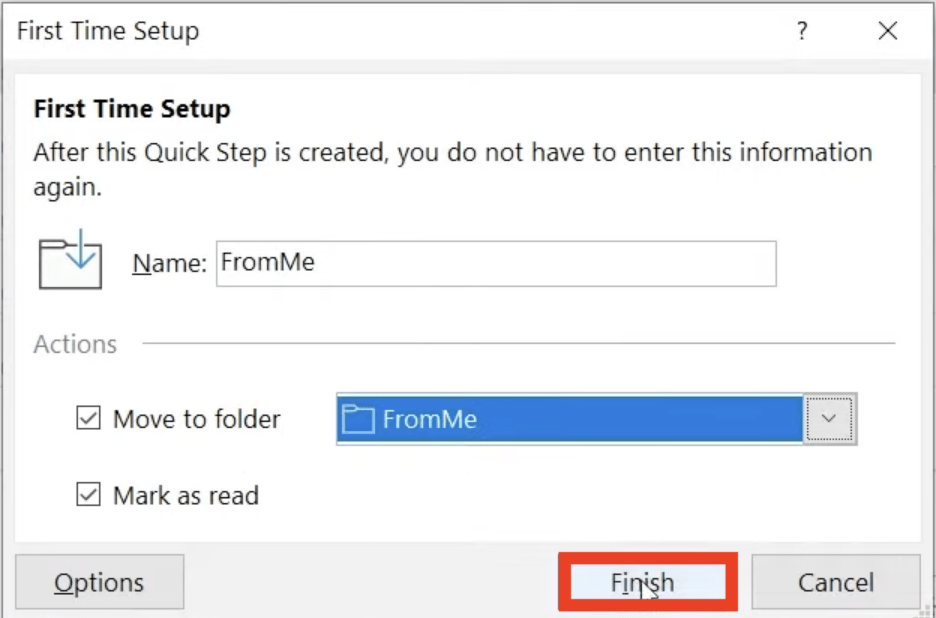
- In the dialog box, under Choose Folder dropdown – select FromMe.
- Click on Finish.
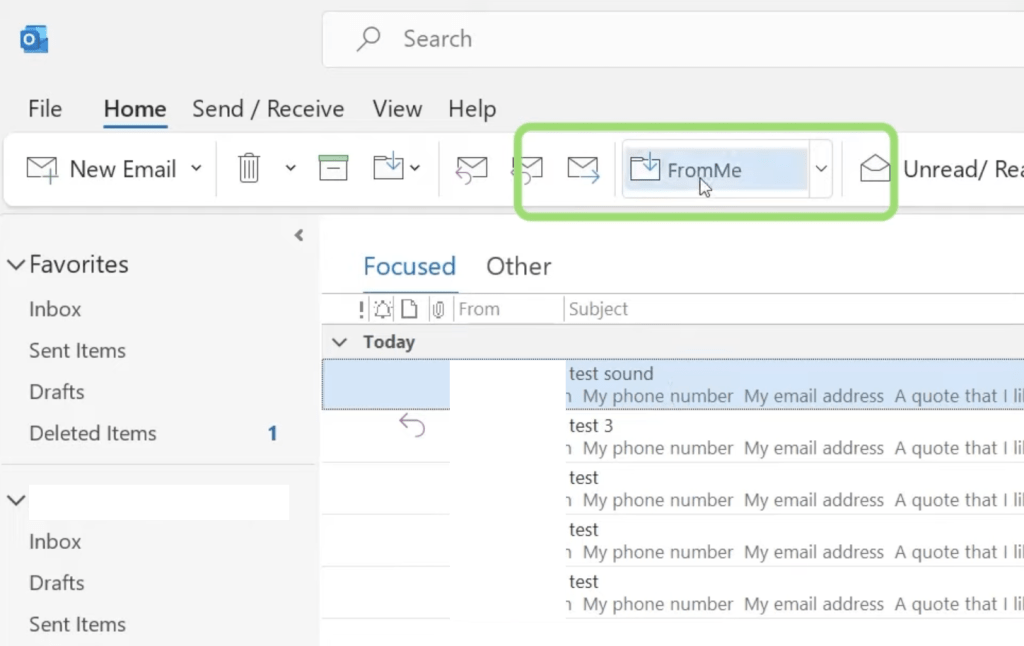
- Apply this quick step for any message by clicking on the quick-step menu item on the toolbar.
For our instance, the messages will be moved to the “FromMe” folder once you click on the quick-step option in the toolbar.
You can set up personalized signatures on your Outlook account. This signature will automatically to added to all your outgoing messages.
To add a new signature or edit an existing one, follow the steps below –
2. Type Signature and then select it from the dropdown
3. In the dialog box, you can edit or create your signature. You can also change the formatting and make the signature look professional.
You can set up a message to be sent automatically as a reply to the sender when you’re out of the office or as an acknowledgment of your message:
- Click on the File menu
- Click on the Automatic Replies option and a pop-up box will appear.
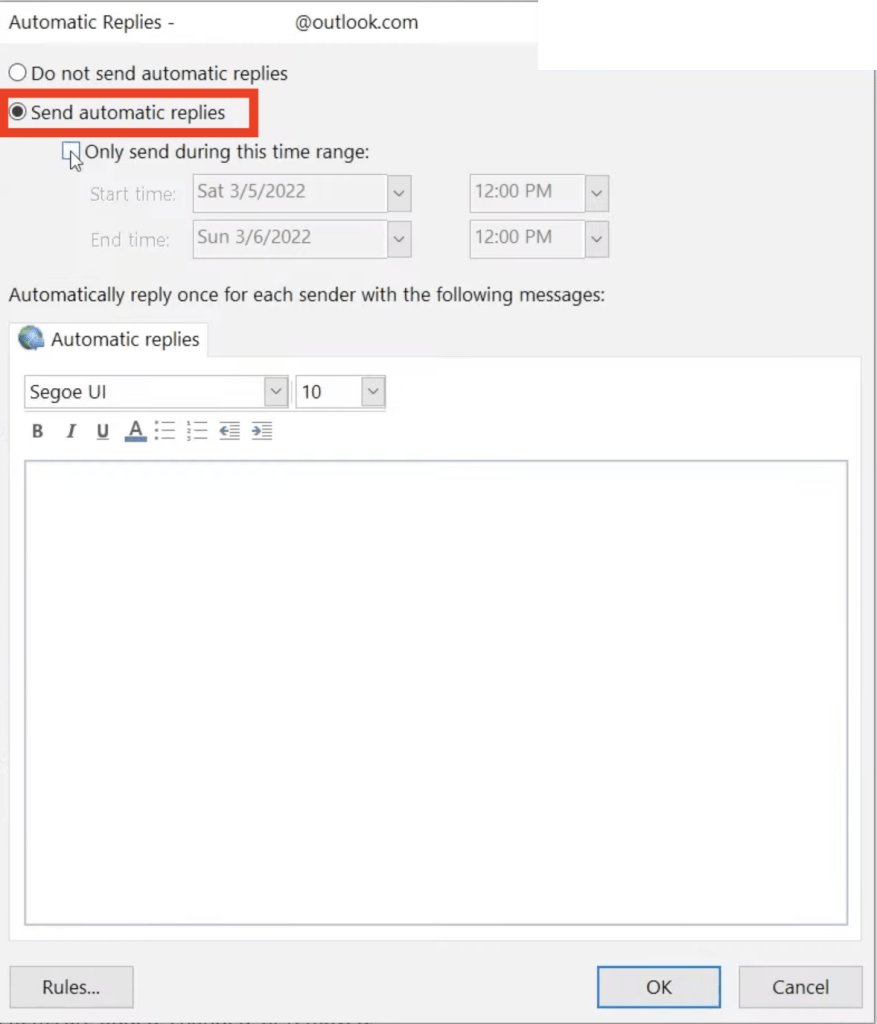
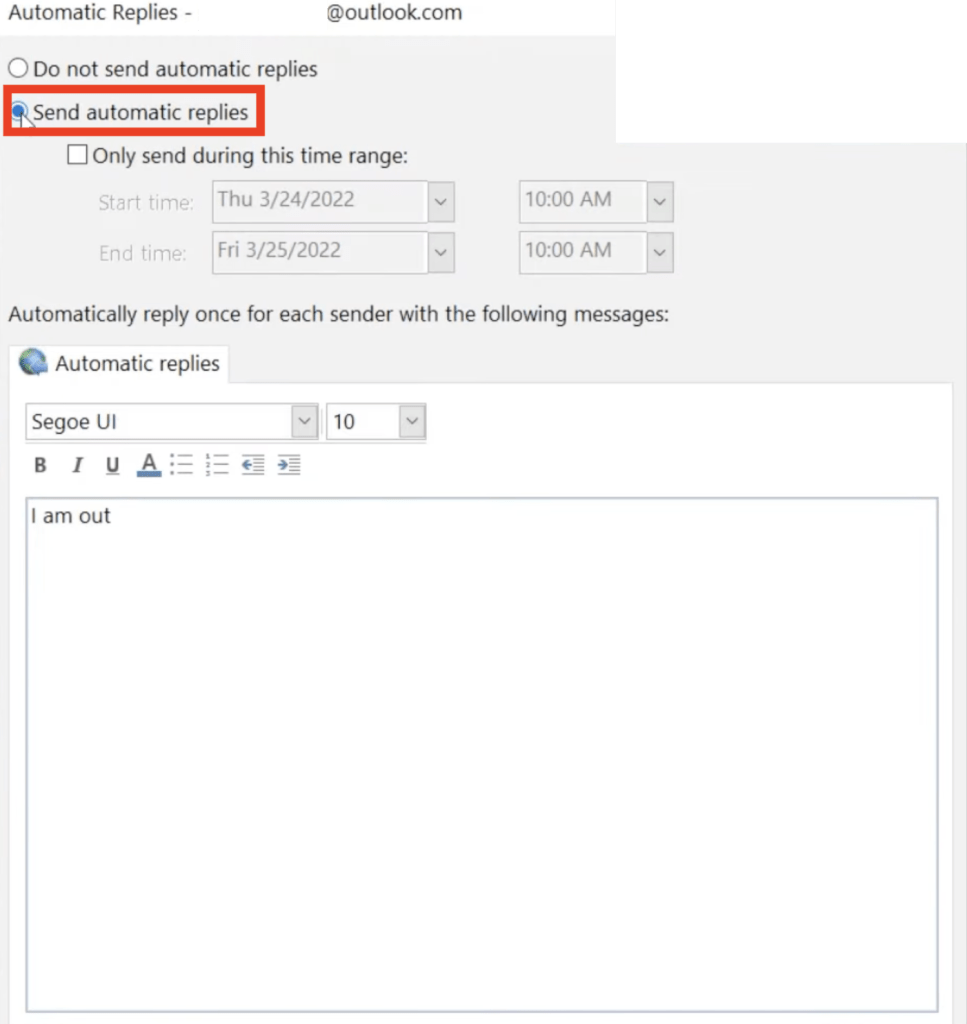
- By default, Do not send automatic replies is selected, so select Send automatic replies option.
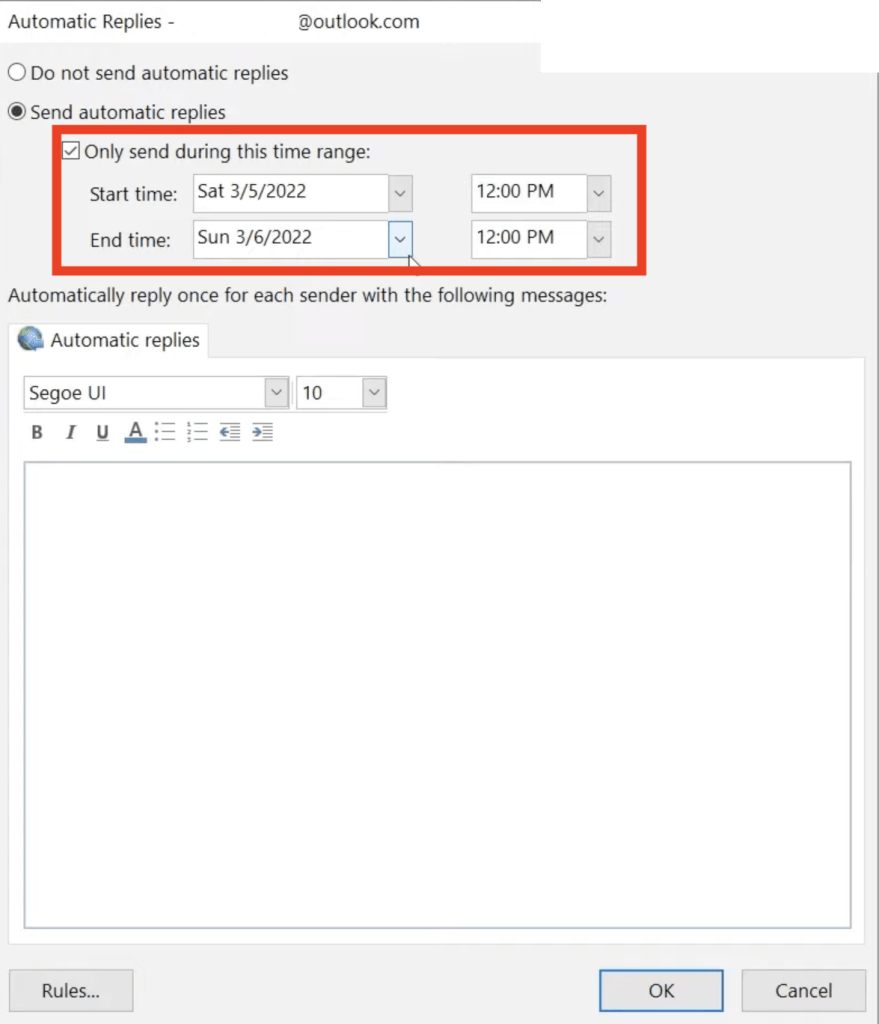
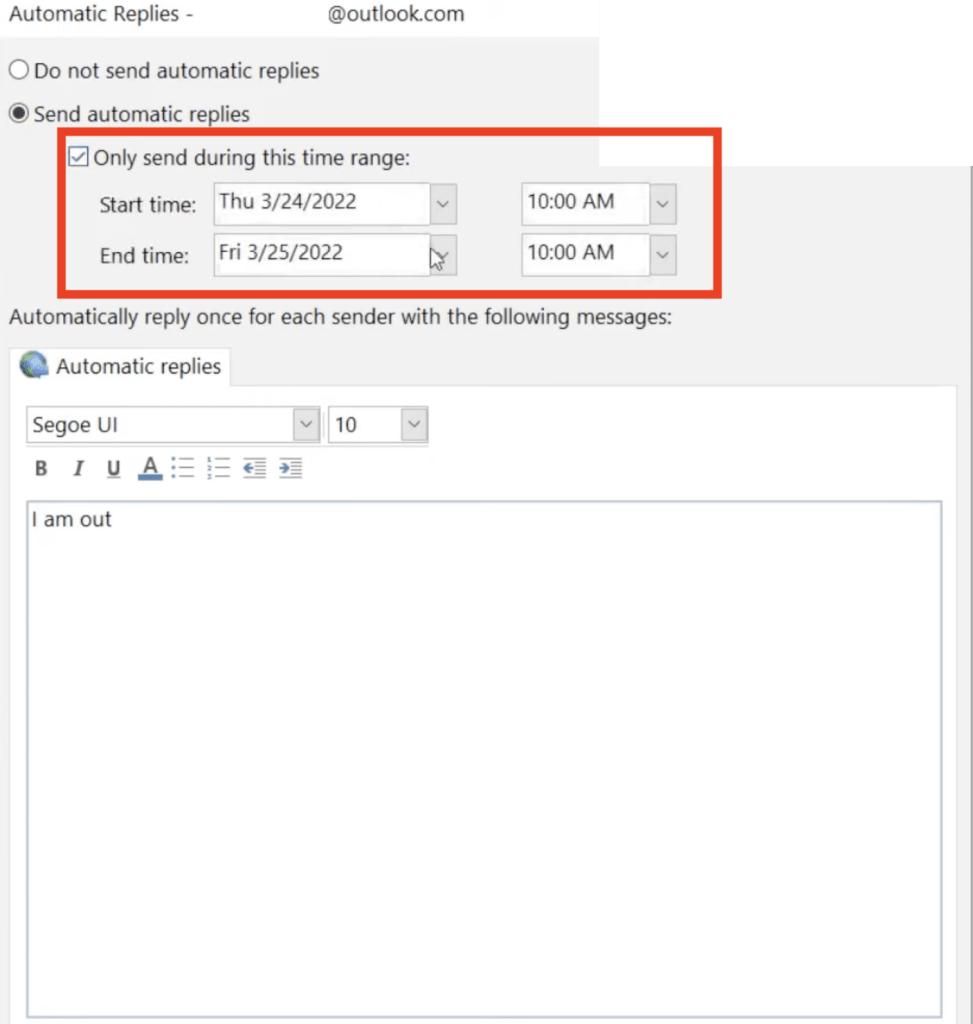
- You can optionally set a date and time range for automatic replies by checking the tickbox
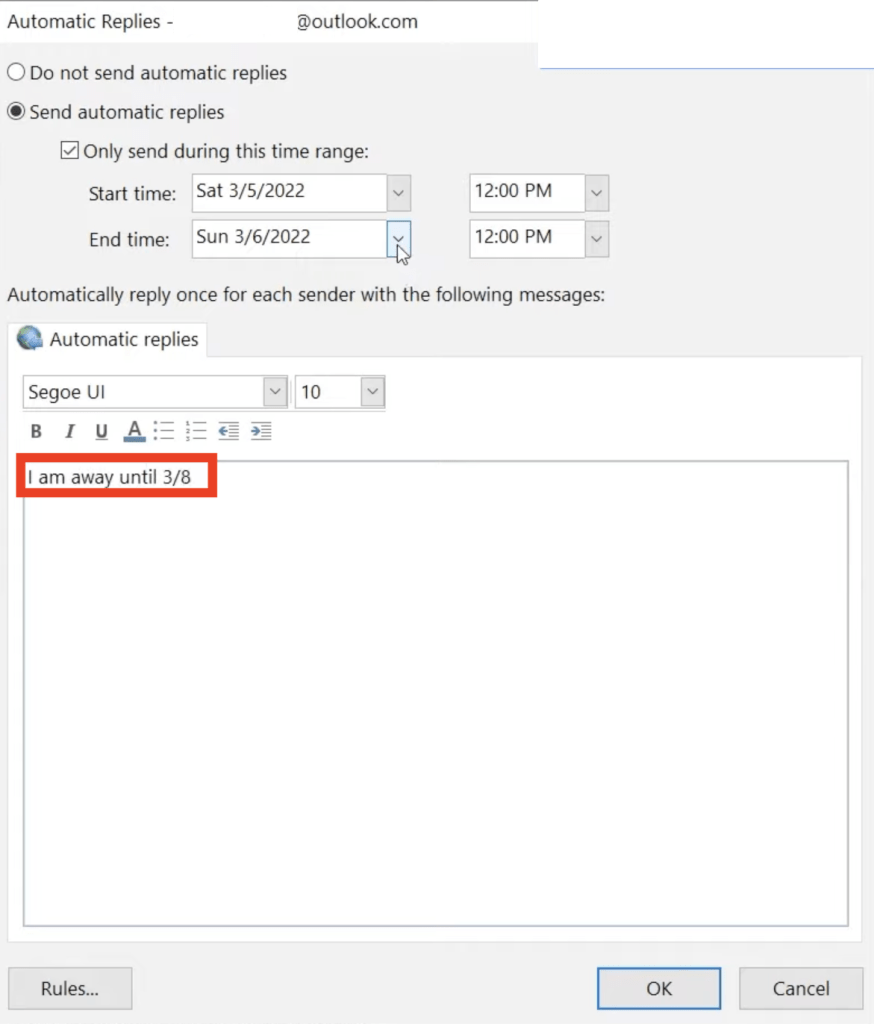
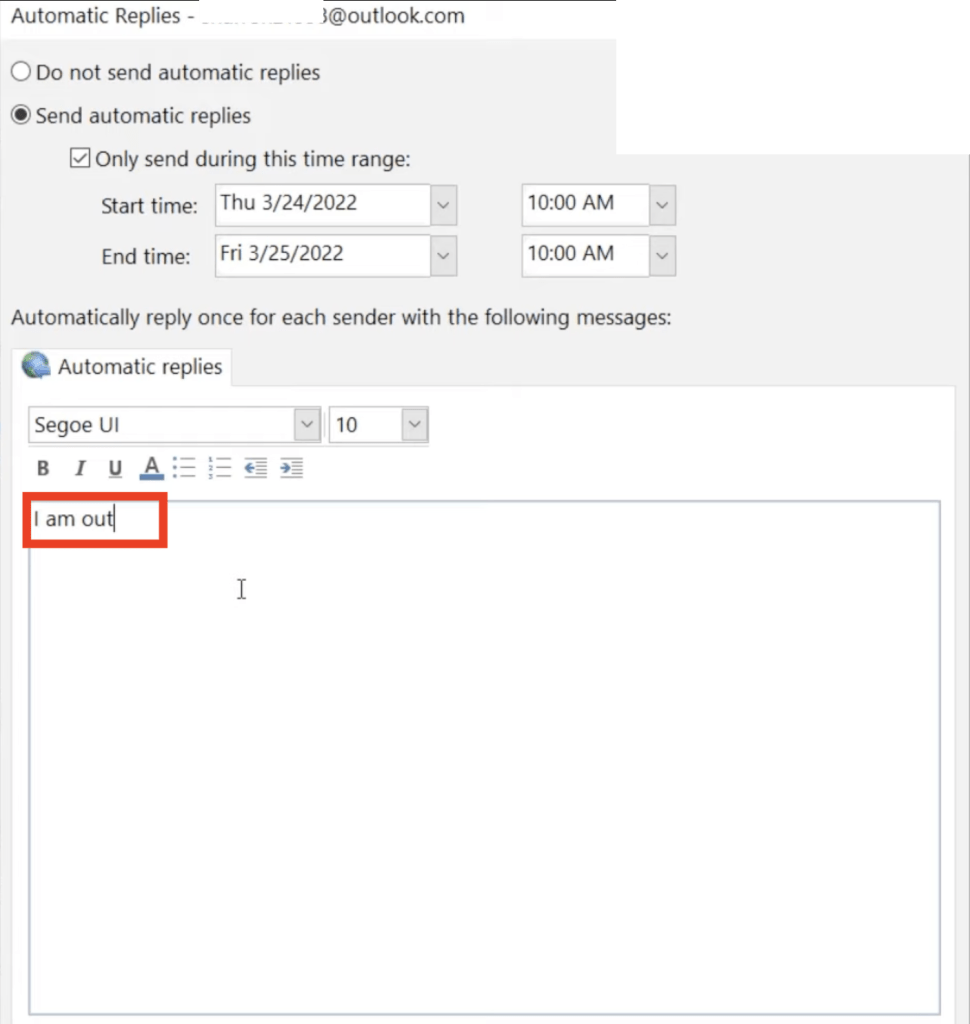
- Now type in the automatic reply text in the textbox and format the text from the options available.
You can delay or schedule the delivery of your messages to time it as per your requirements. To delay the delivery of the message, follow the steps below –
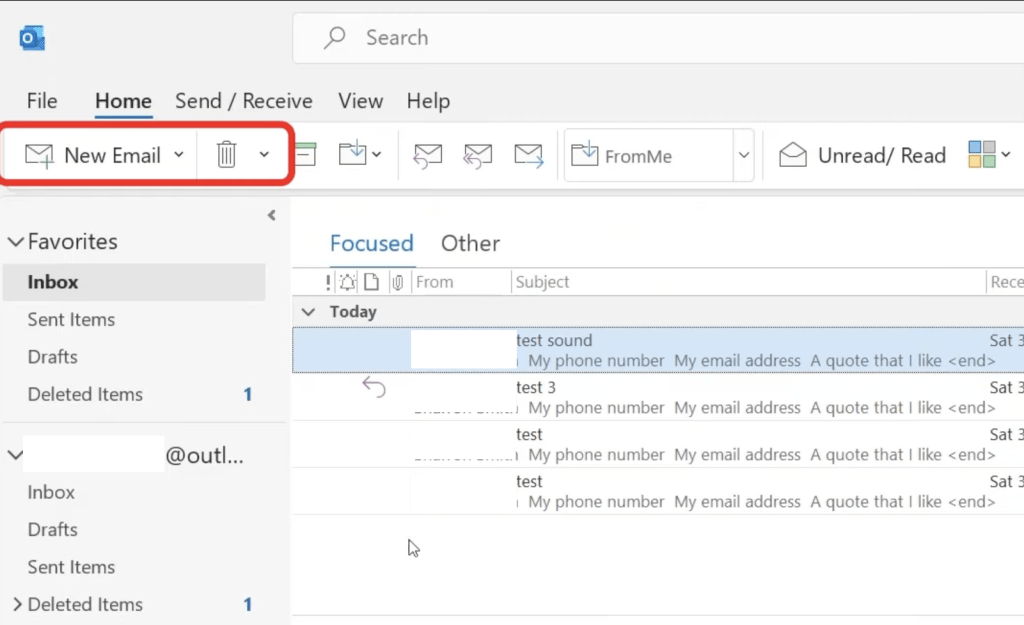
- Click on New Email from the top toolbar
- Search Delay Delivery in the search bar and select the relevant option
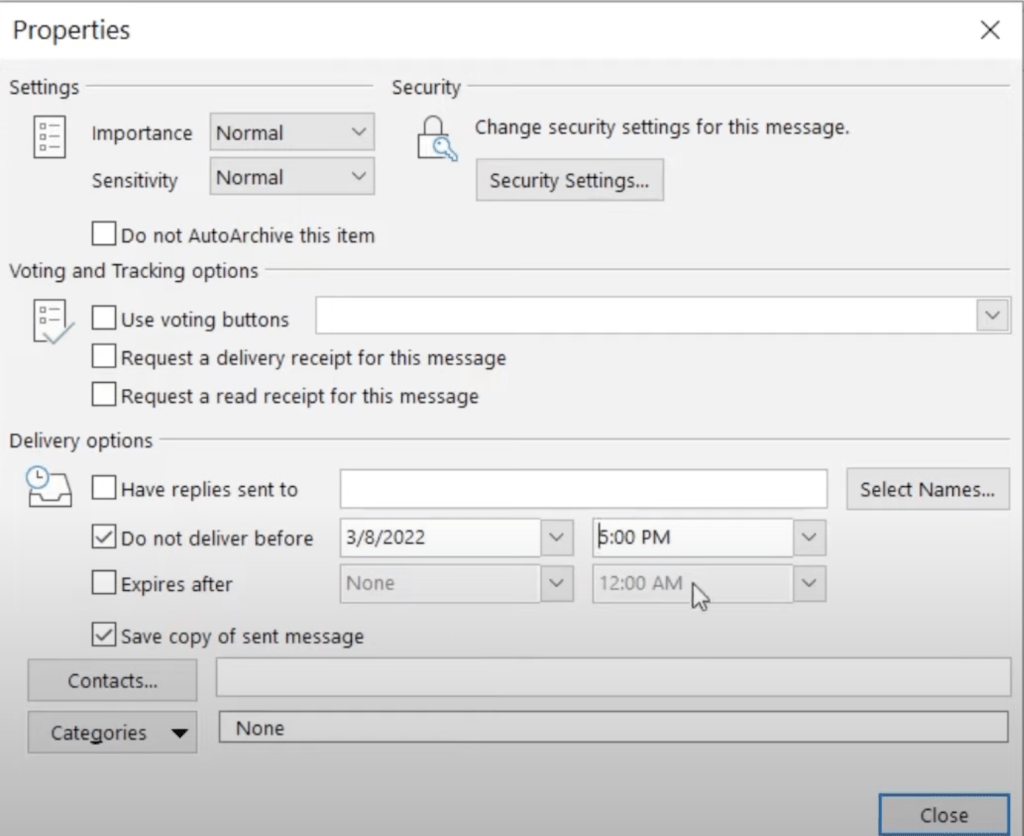
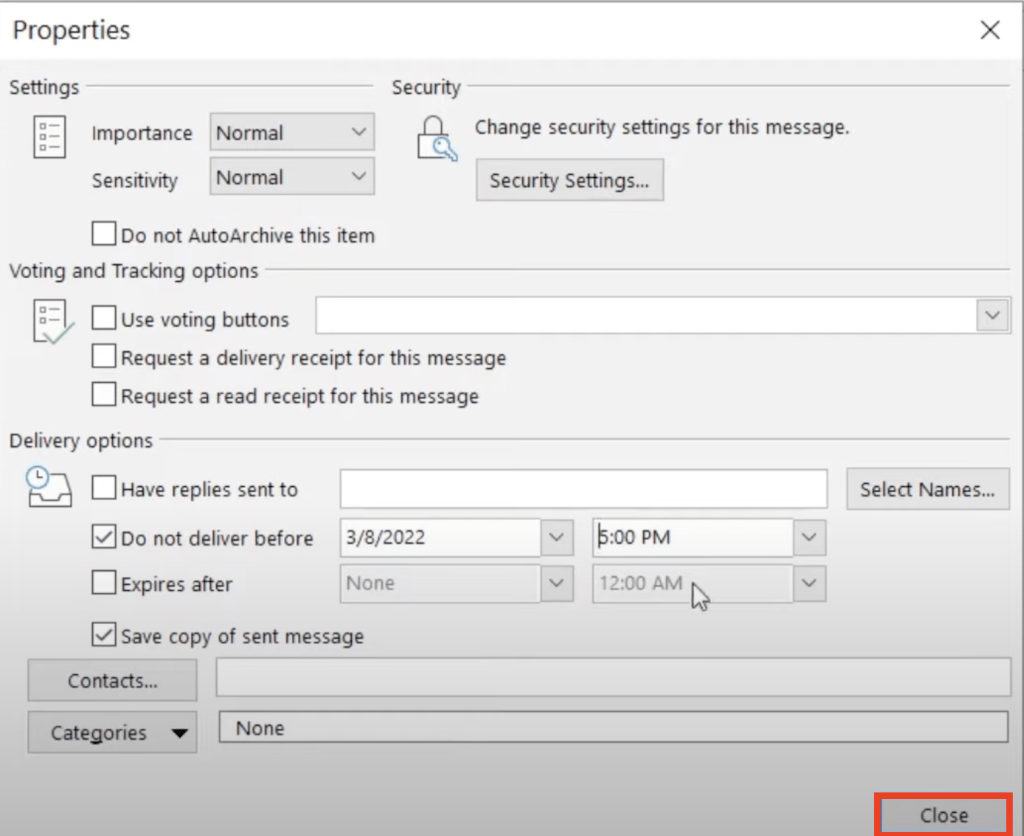
- A properties window will appear
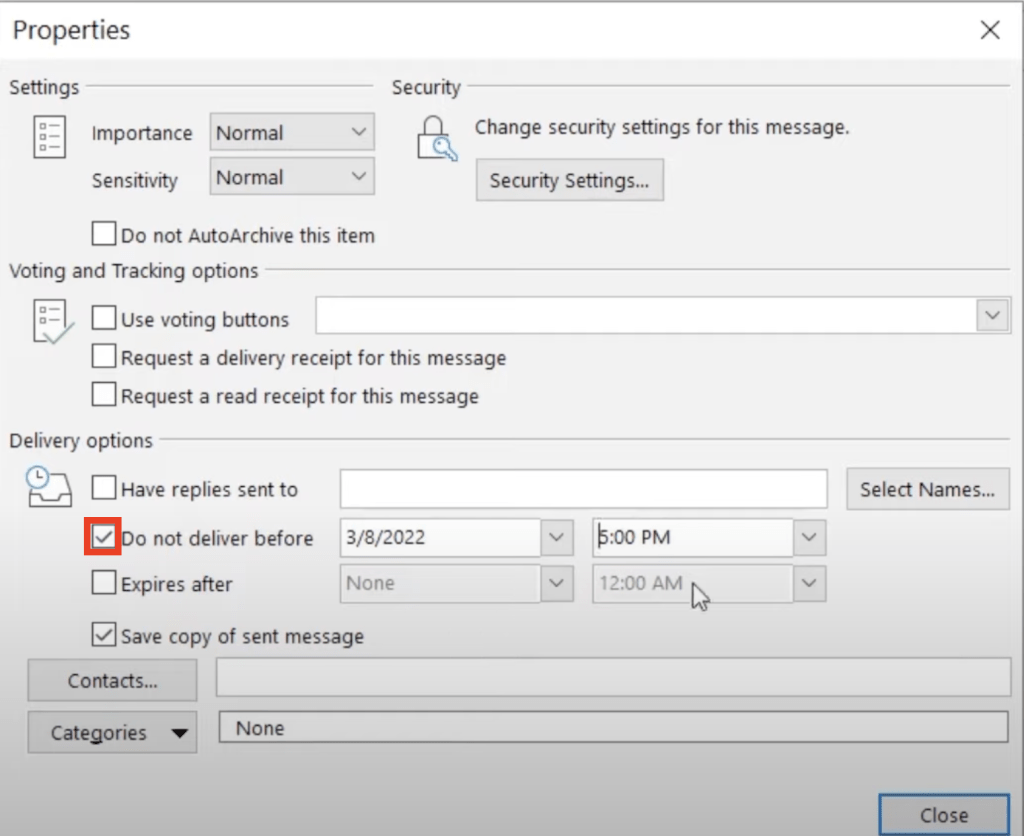
- To delay delivering the message check the box beside the do not deliver before option
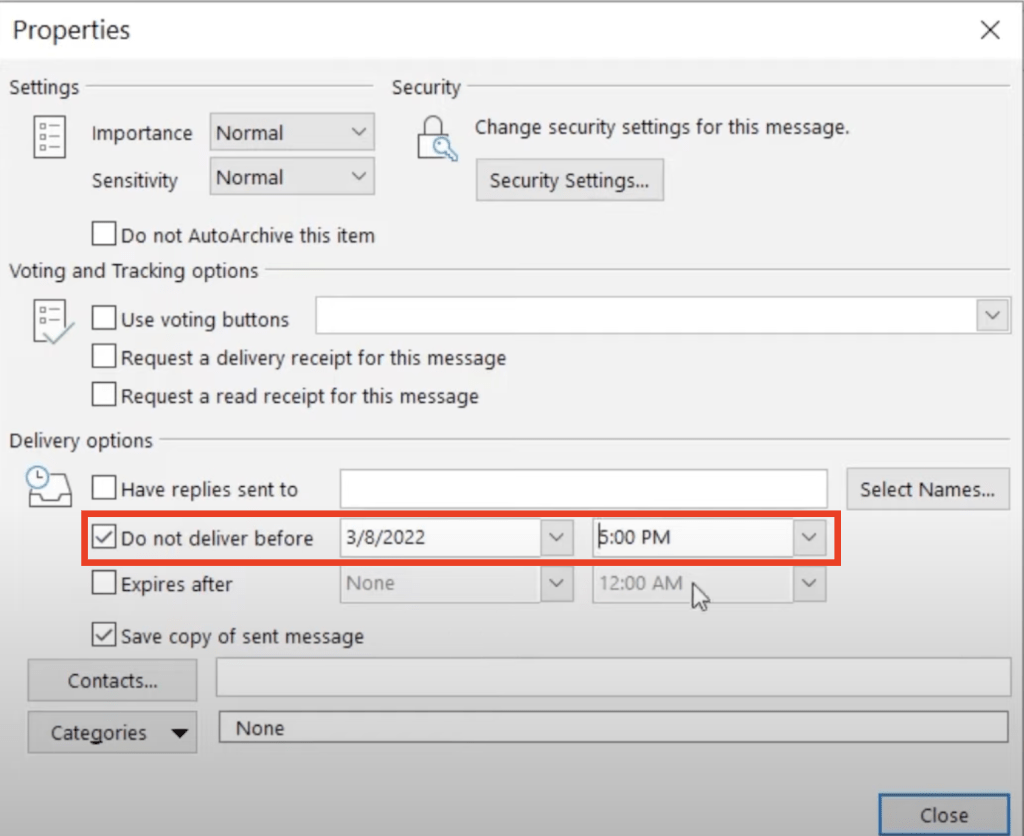
- Select future date and time until the message is to be delivered
- Click close
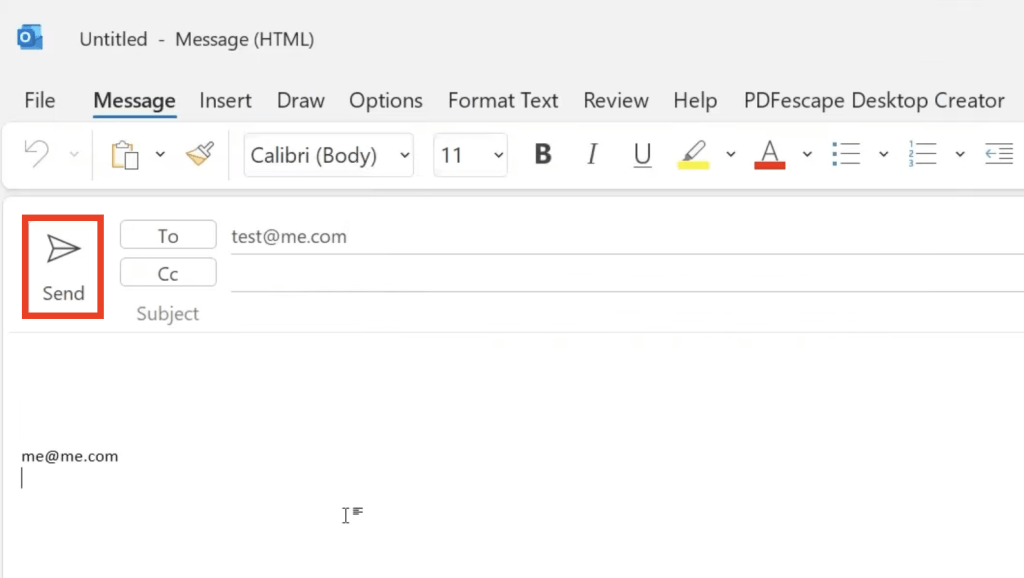
- Now send an email by putting in the recipient’s email address, subject, and content of the email and click on send
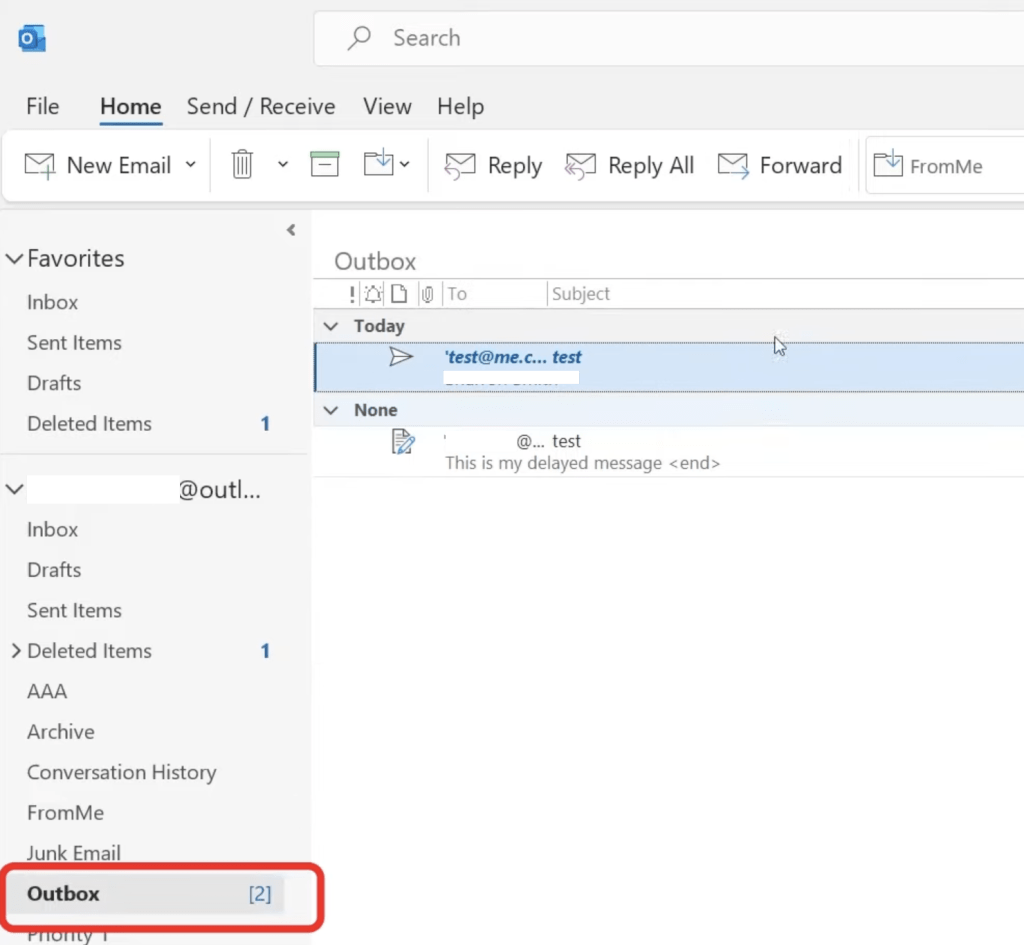
- Go to Outbox, and find that the message is sitting in there. You can even delete this email before the set deadline.
You can easily add more than one email address to your outlook. This enables the user to keep all the emails in one place. Use the following steps to add another email address –
- Click on the File menu
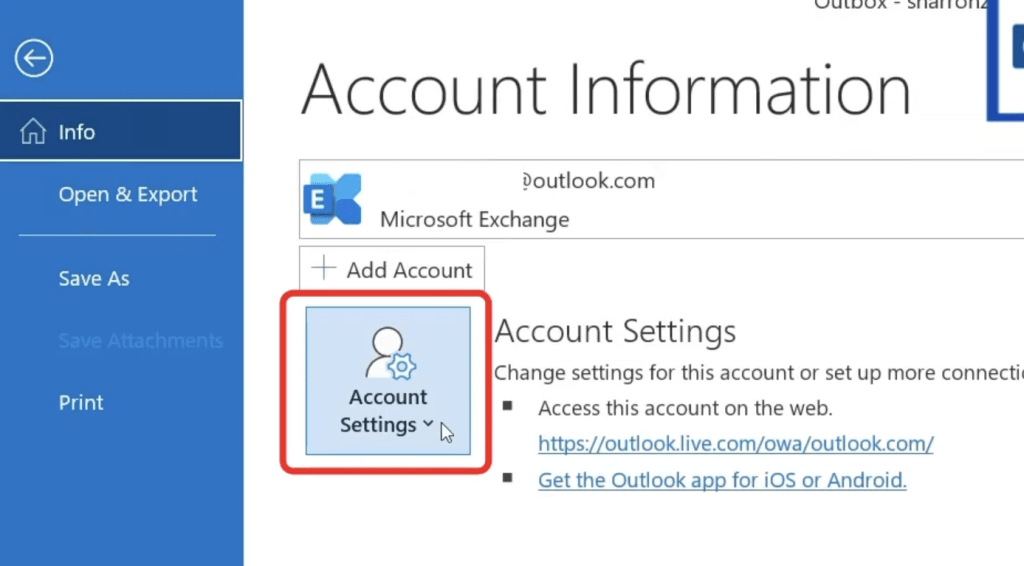
- Click on Account settings
- Click on the New option under the Email tab of the account setting popup box
- An email wizard will appear
- Once you add the new account, it will show up on the left menu with another down arrow to check the new account
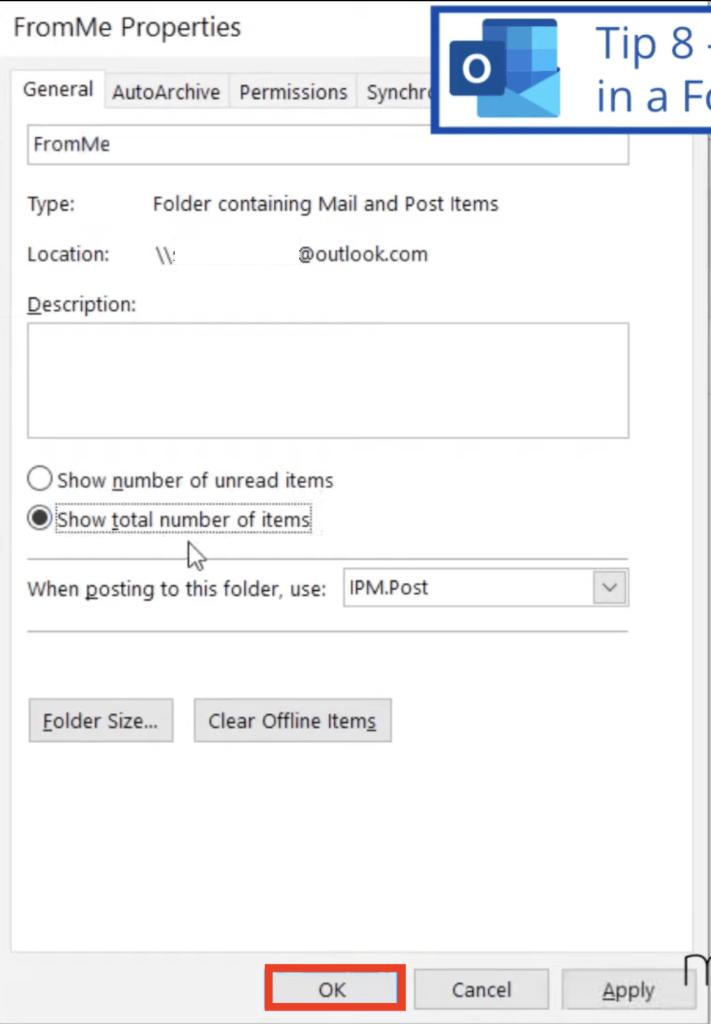
8. Displaying Total Emails in a Folder
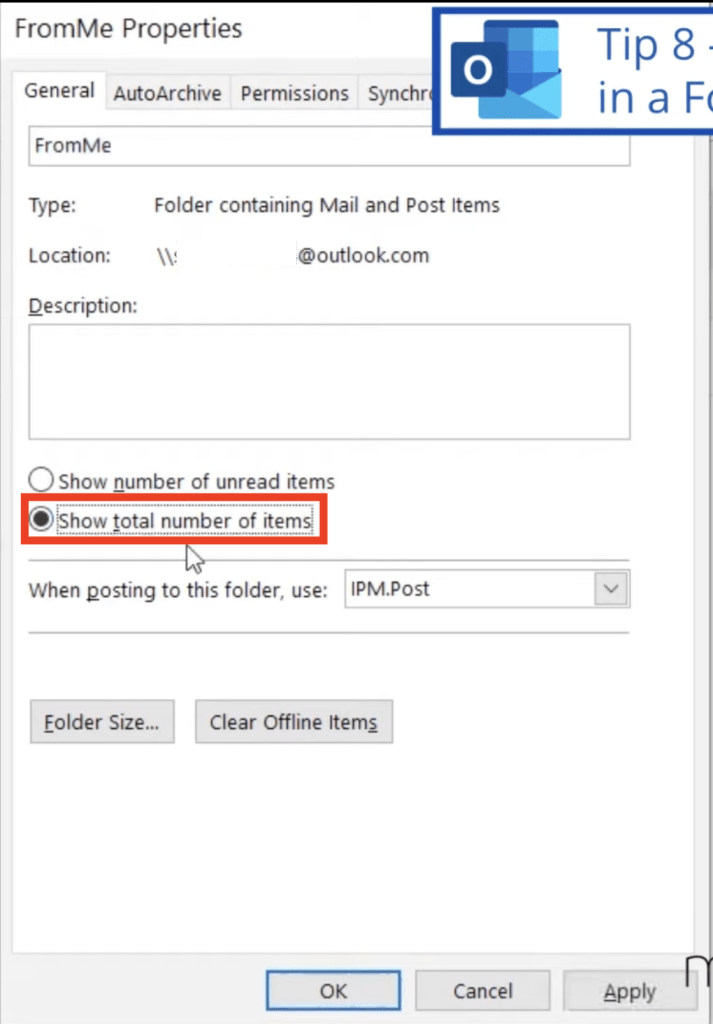
Configure your email folders to show the total number of emails beside each of them instead of just showing the number of unread messages. To make this email tip possible do the following steps –
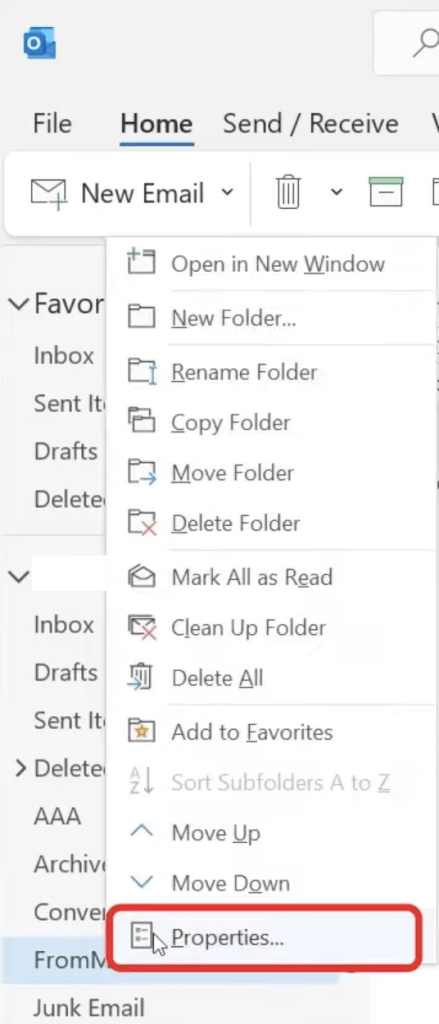
- Right-click on any folder on the left menu and click on Properties
- Under the General tab, select the option Show total number of items
- Click Okay
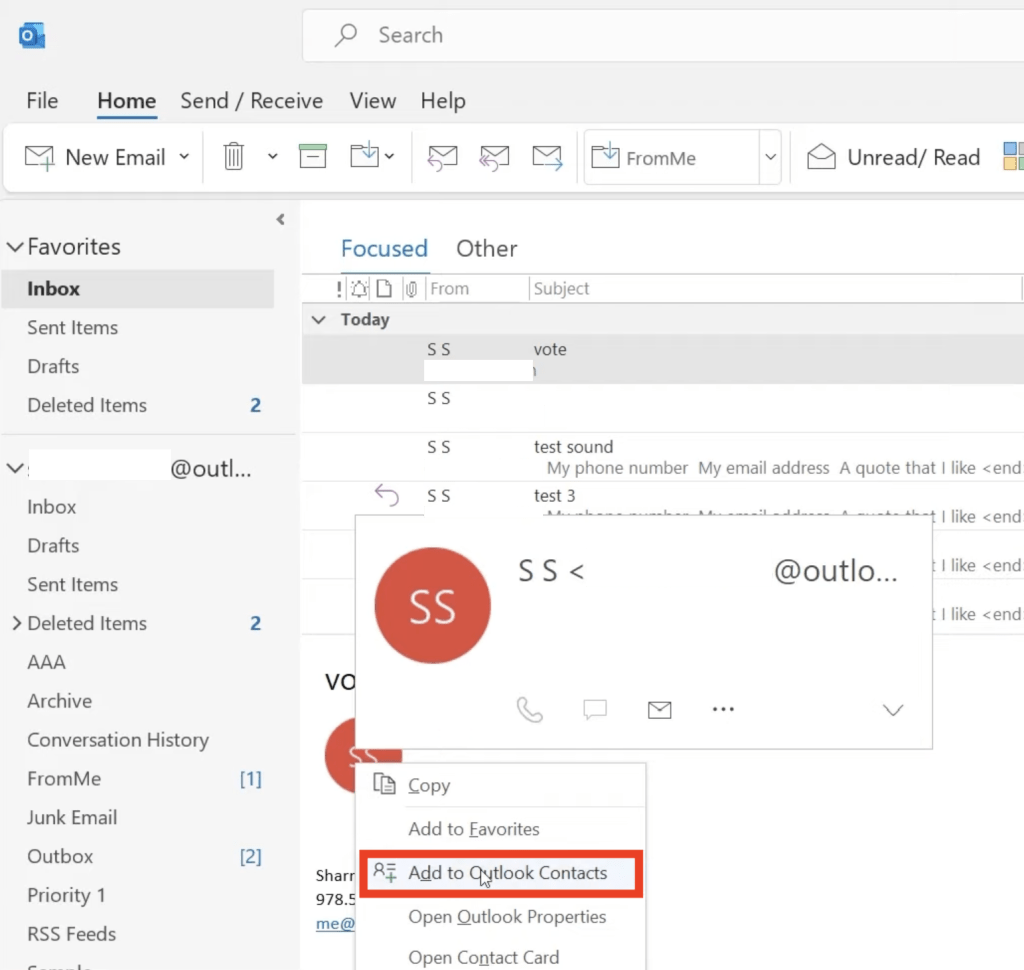
9. Adding a New Contact from an Email
With the following few simple steps add a new contact from an email –
- Go to the body of the email
- Right-click on the initials of the sender and click on Add to outlook contacts
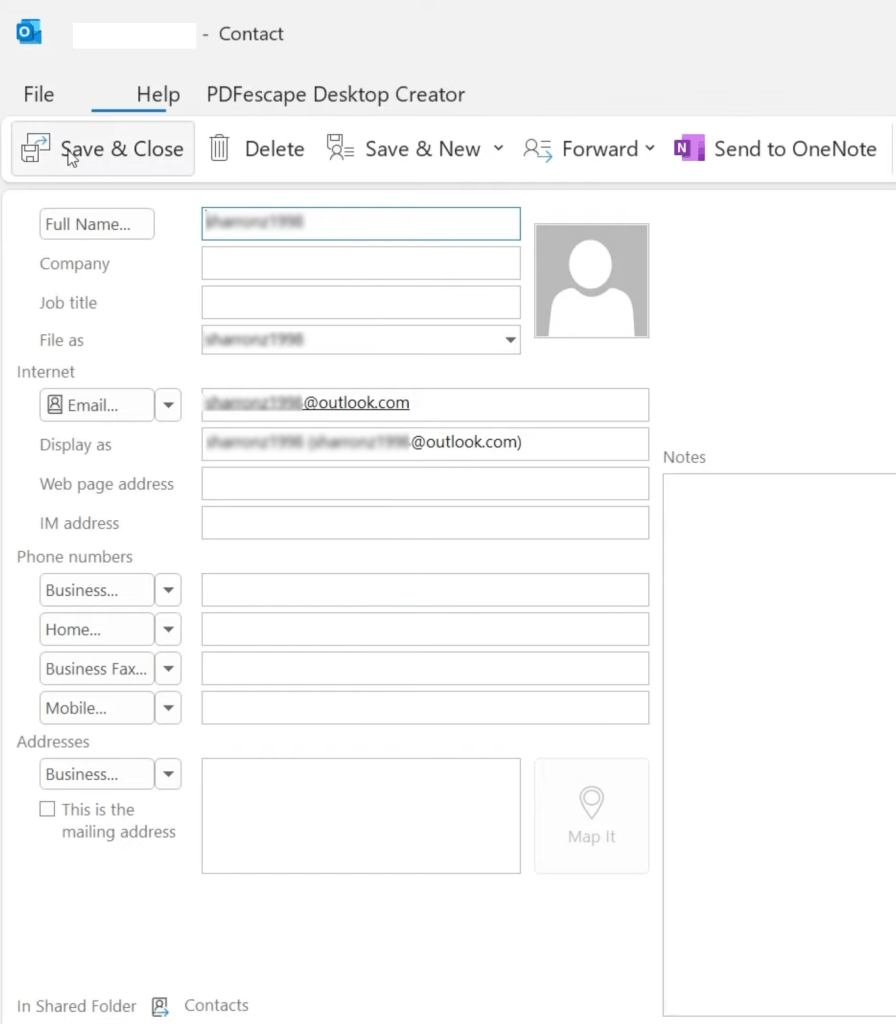
- Contact Menu tab will open, add further details as required
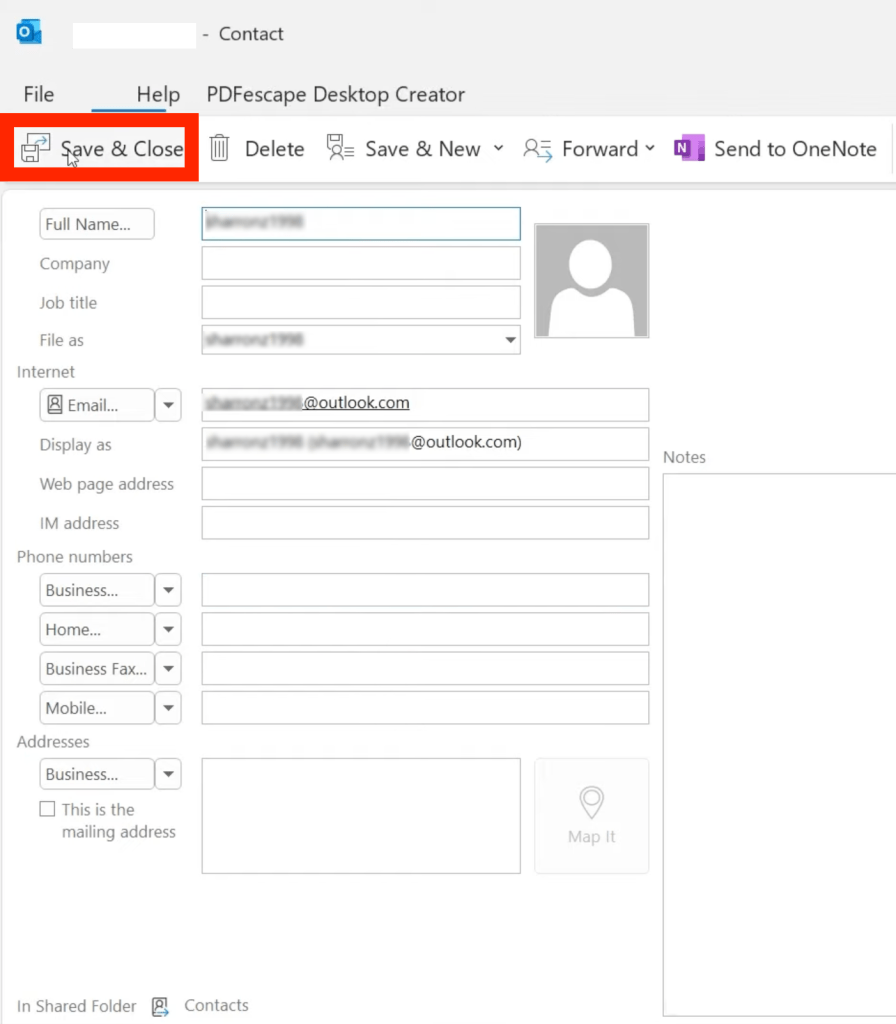
- Click on Save & Close on the top of the contact menu tab screen
- Click on the contact icon on the bottom left of the screen to check all saved contacts.
10. Sending an Attachment Directly from Excel, Word, etc.
An important aspect of email messages is the ability to attach documents, spreadsheets, pdf, etc directly from the Excel, Word, Powerpoint, etc application. Let’s see an example of attaching a file directly from Microsoft Excel –
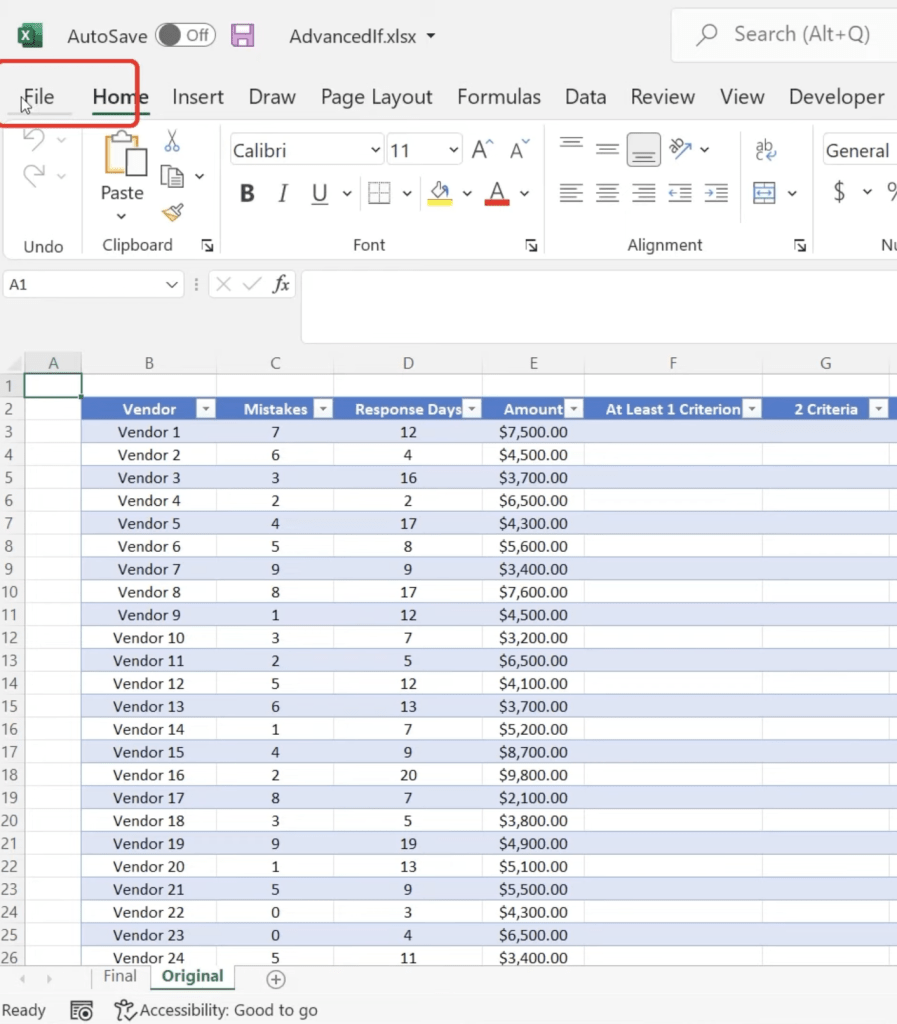
- Go to the Excel file and click on the File menu
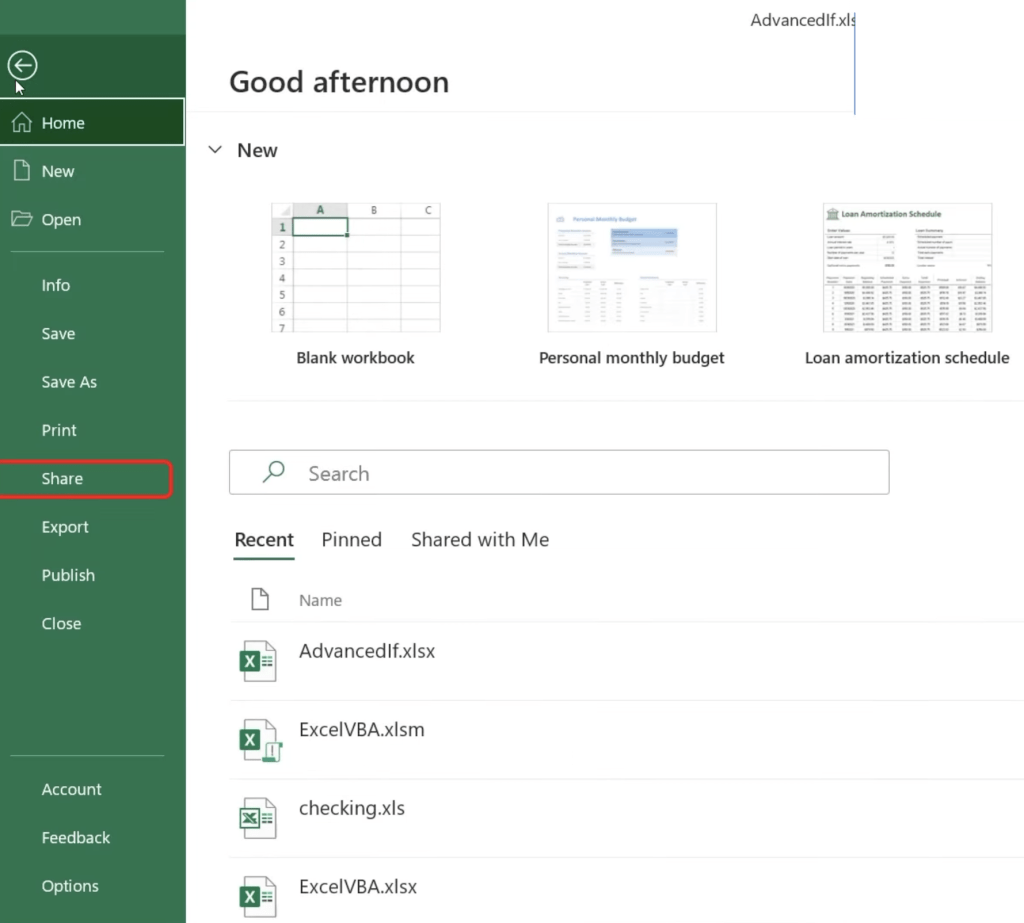
- Click on Share
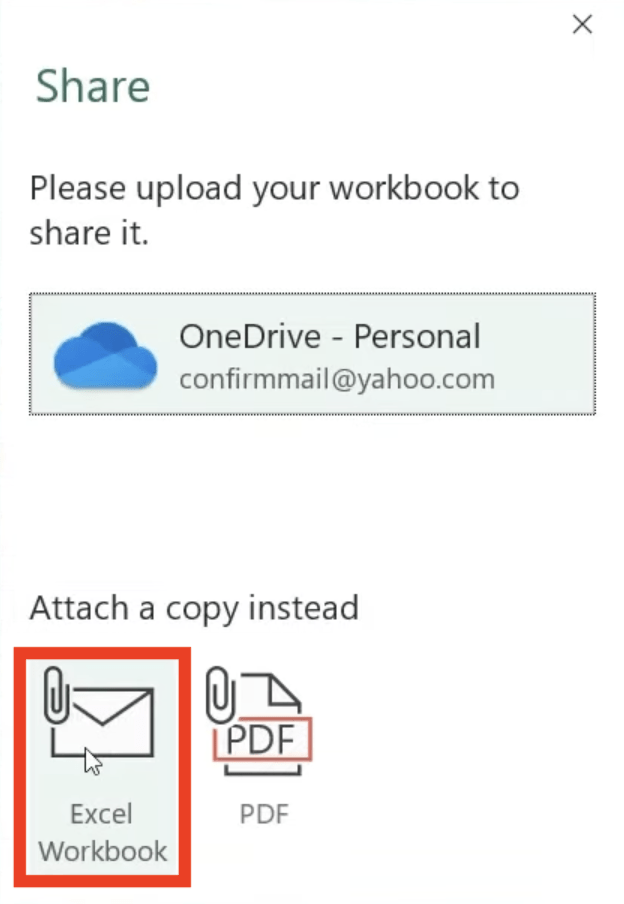
- Attach a copy of the file as an Excel workbook
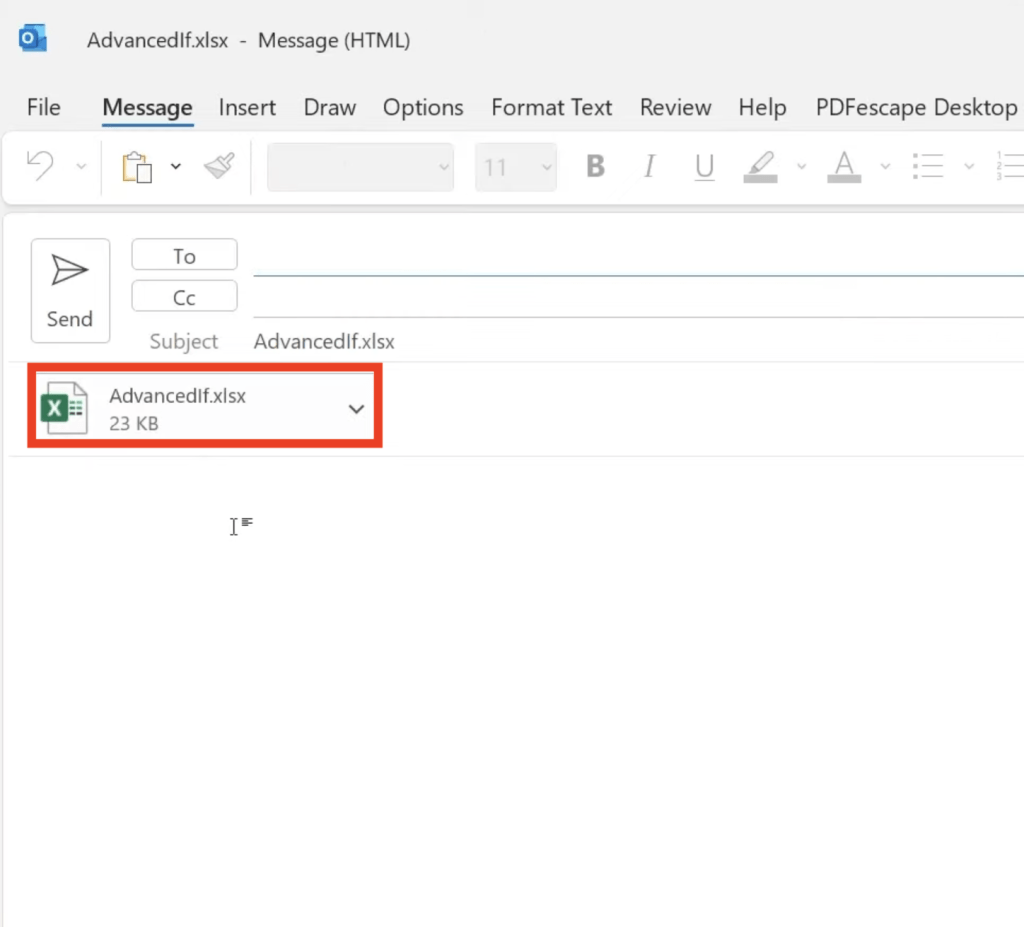
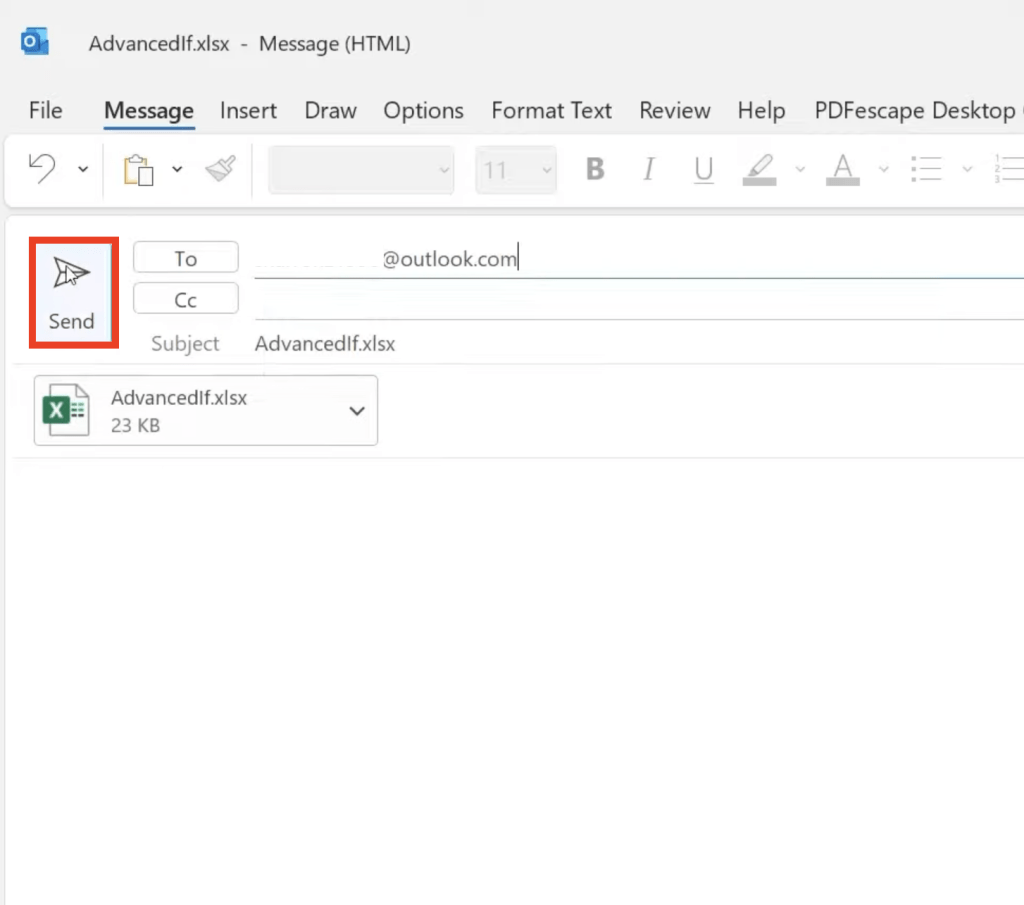
- An Outlook window will appear with the Excel workbook being automatically attached
- Now enter the recipient details, email subject, and body, and hit send
In this article, we have gone through different email tips and tricks on how to become more efficient at using Microsoft Outlook. We have covered email tips from turning off notifications to finding messages to automatic replies, quick steps, delaying delivery, and MORE!
Top 10 Outlook 365 Calendar Tips & Tricks for 2023
A Calendar is one of the most important tools required in your day-to-day work life. An organized calendar will help you readily schedule appointments and meetings, communicate with your colleagues, and plan your time efficiently.
In this article, we will go through 10 calendar tips & tricks to use Microsoft Outlook productively:
- Share a Microsoft Outlook Calendar
- FindTime Add-In
- Set Up a Teams Meeting
- Online Outlook Calendar for Sports, Shows, and More
- Merging and Color Coding
- Email Your Outlook Calendar
- Shorter Outlook Meetings
- Showing the To-Do Bar
- Add Another Calendar
- Create an Event From an Outlook Email
Let’s explore these tips one by one in detail!
Watch this video on Top 10 Outlook 365 Calendar Tips & Tricks on YouTube and give it a thumbs-up!
Share a Microsoft Outlook Calendar
The most common issue while scheduling meetings is that you don’t know what time will be suitable for the other person. To eradicate this problem, you can share your calendar in outlook with others.
To share your calendar –
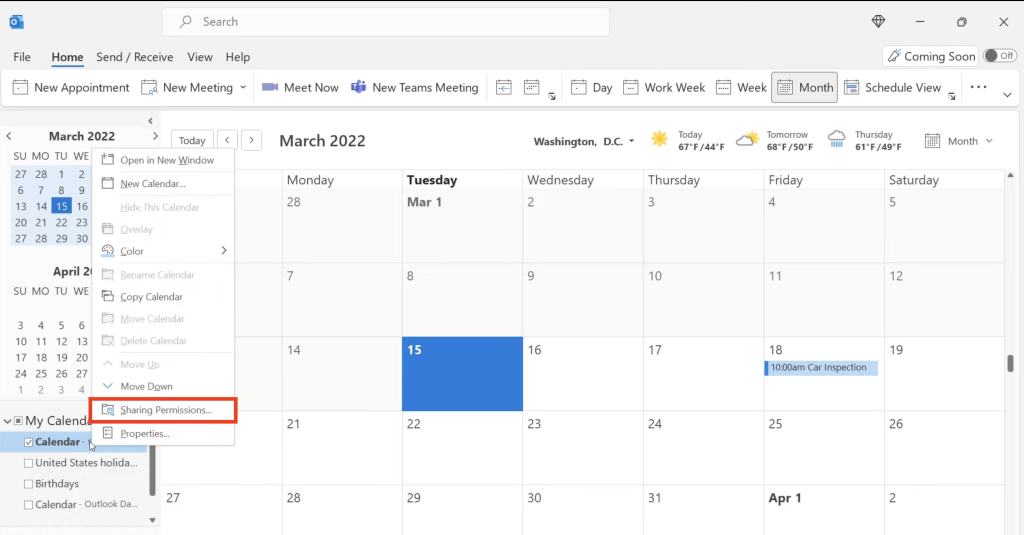
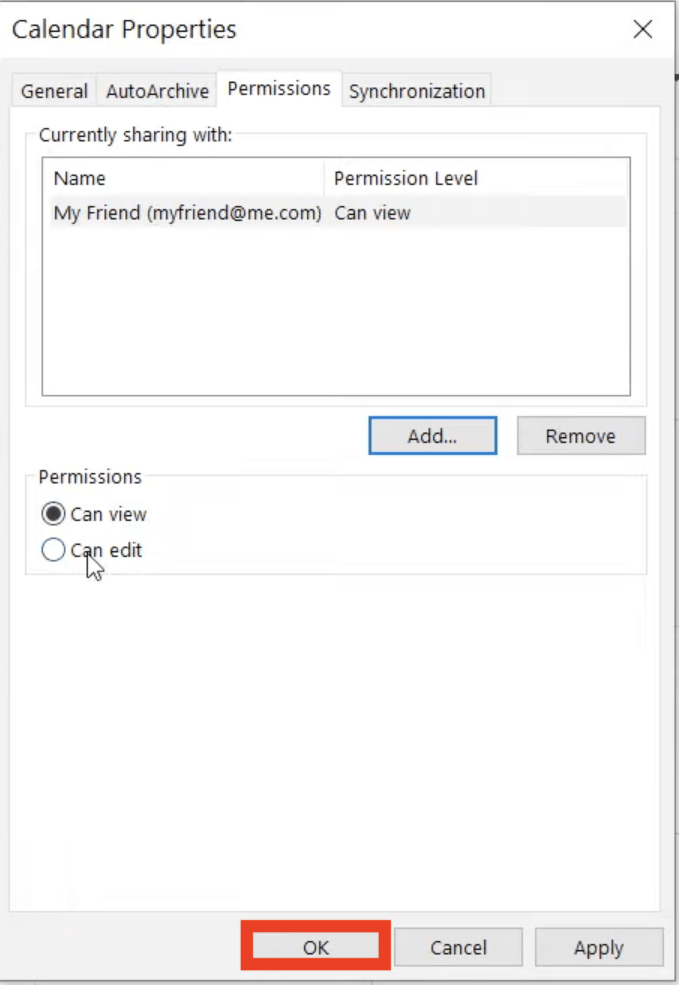
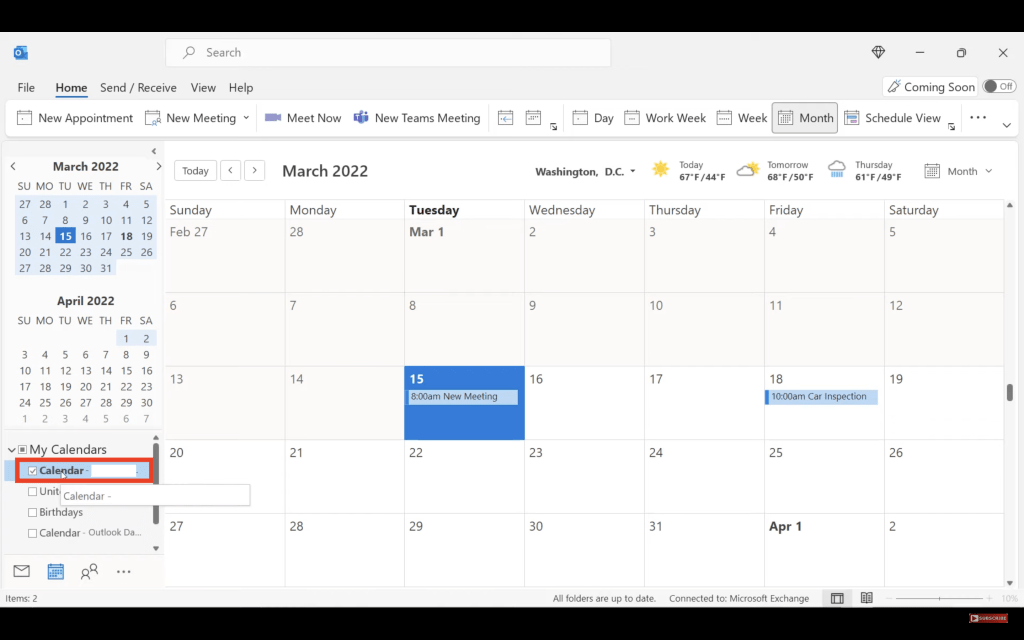
- Right-click on Calendar in the left panel
- Select Sharing Permissions
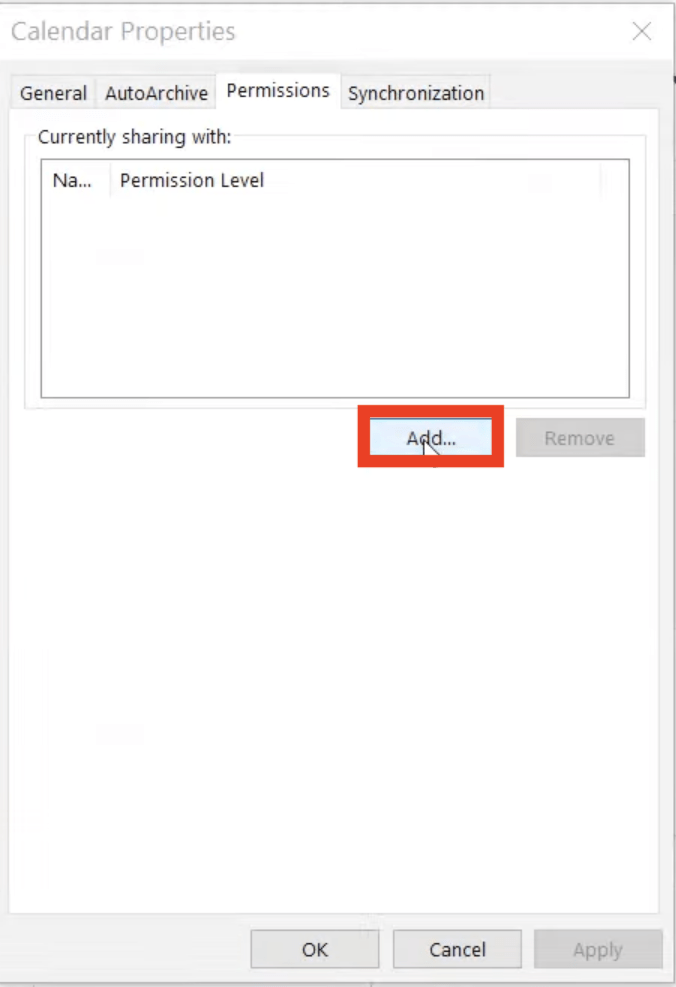
- Click Add
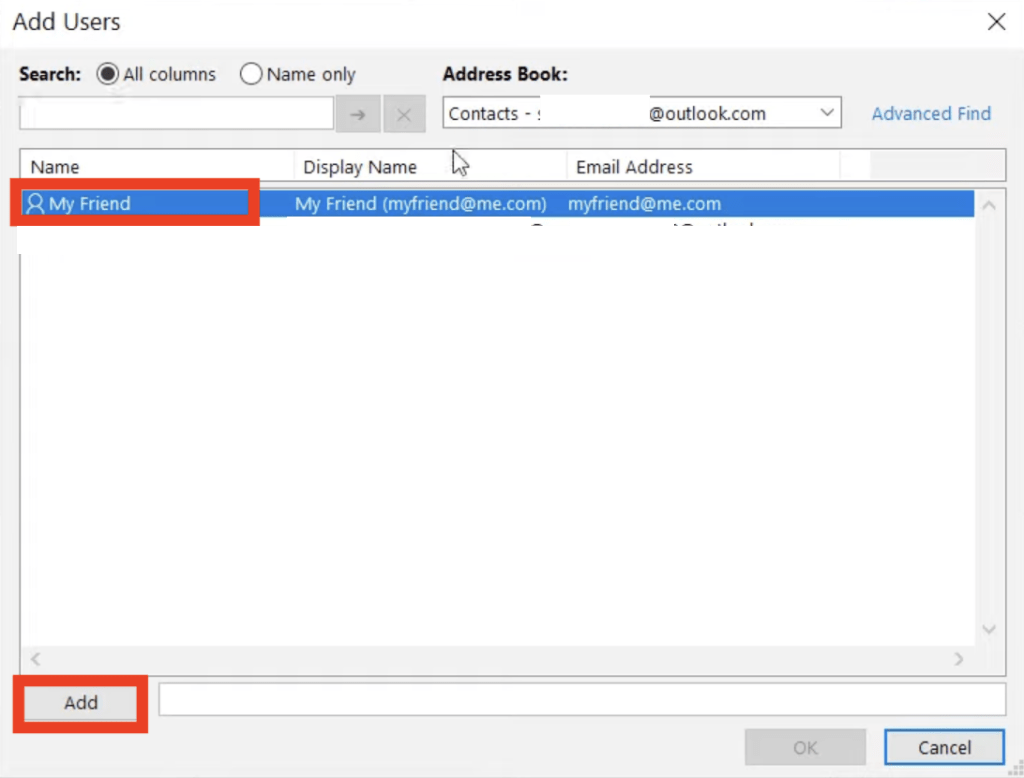
- Select a contact and click Add
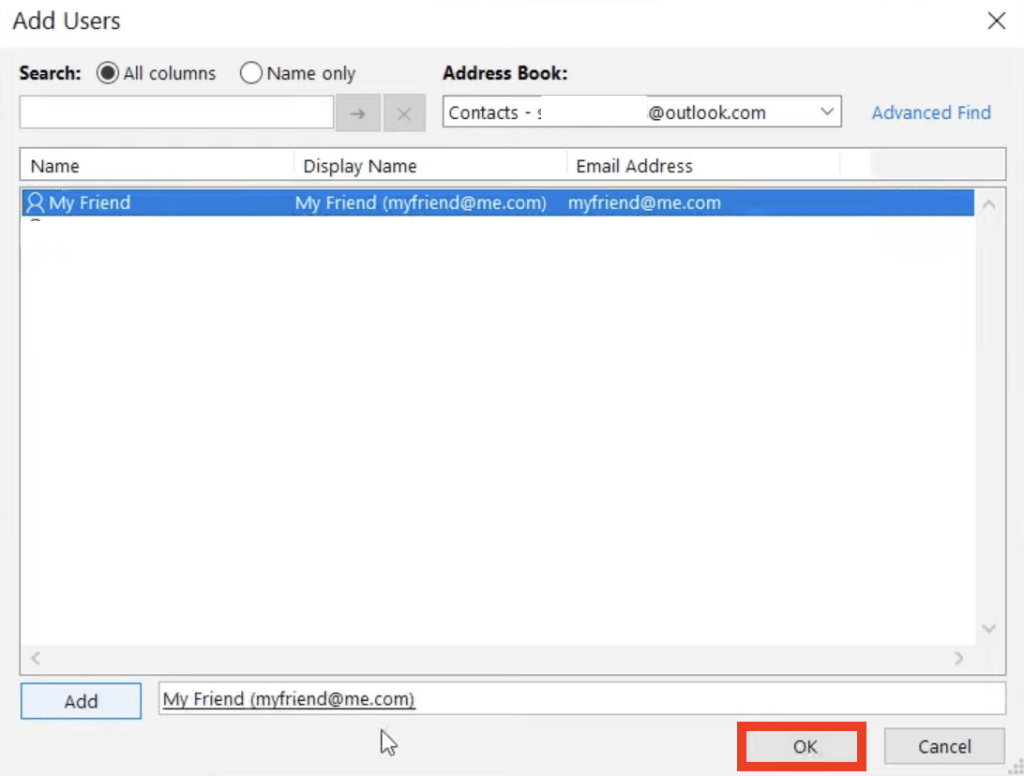
- Click OK
- Click OK
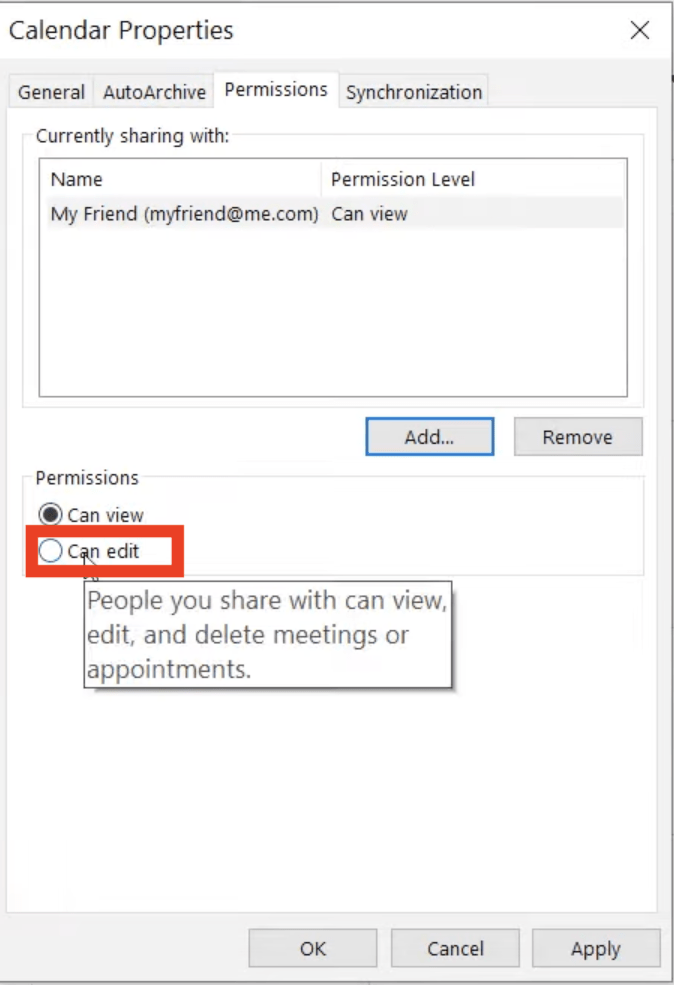
This will share your personal calendar with your contact and they will be able to view your calendar. You can also provide them with editing access – select can edit while sharing permissions.
FindTime Add-In can be used to find the perfect day and time for all attendees while scheduling a meeting. It sends multiple time options to the attendees and allows everyone to vote and reach a consensus. It can also send meeting invites on your behalf.
Follow the steps below to learn how to use this extremely helpful Add-In in Microsoft Outlook Calendar –
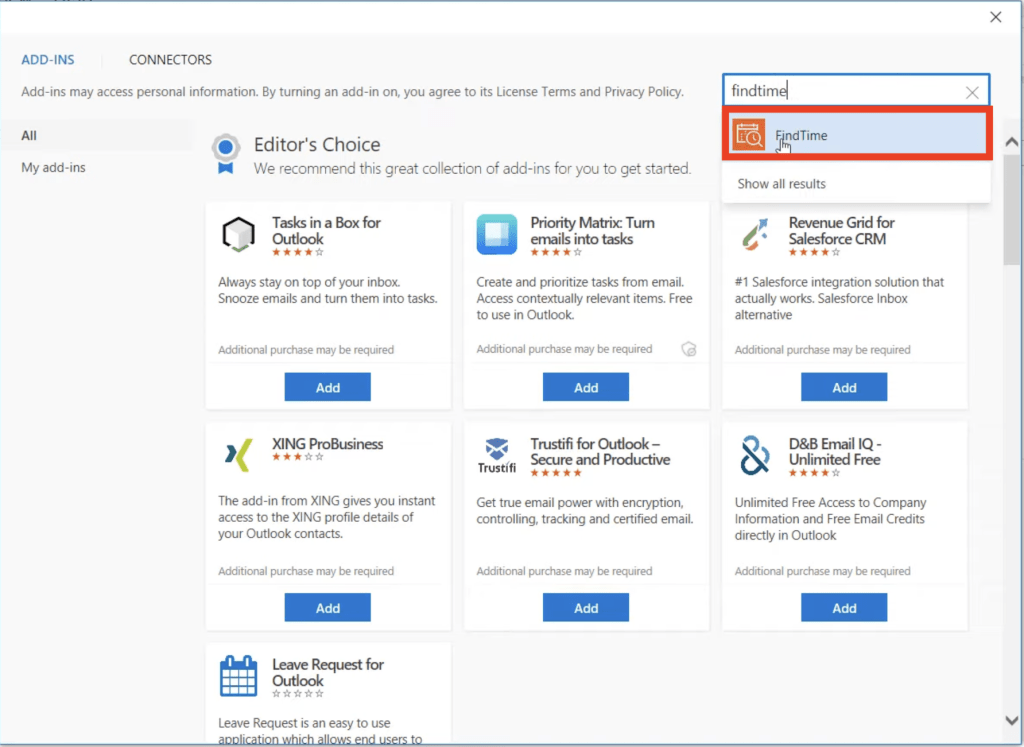
- Go to Outlook Mail
- Click on Get Addins icon
- Search FindTime
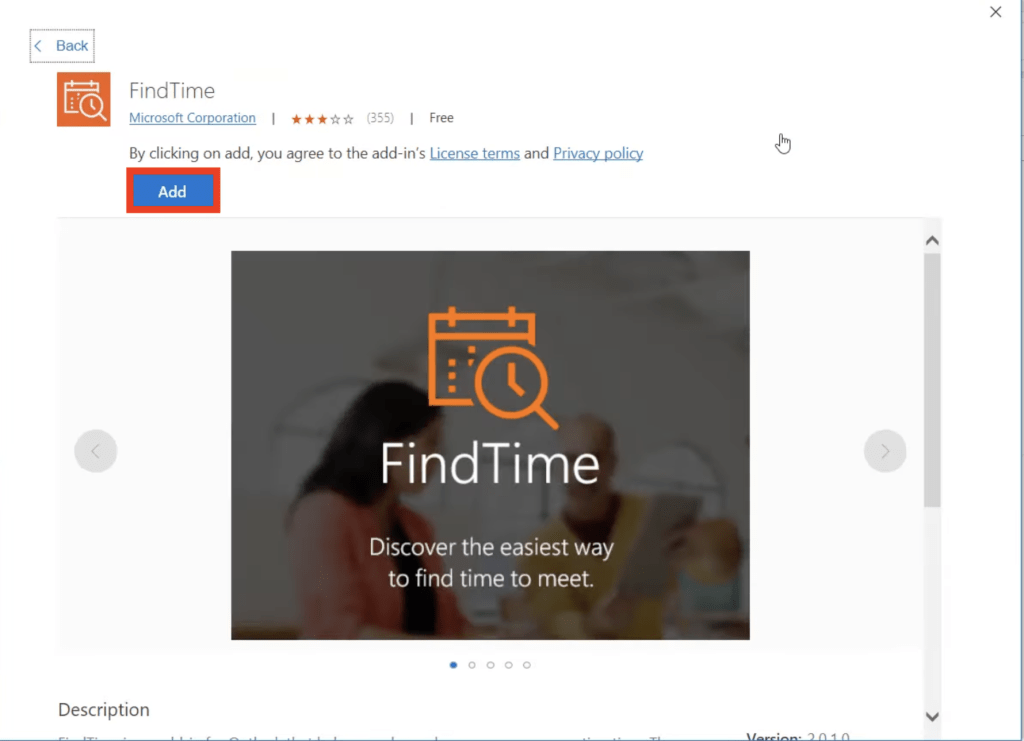
- Click Add
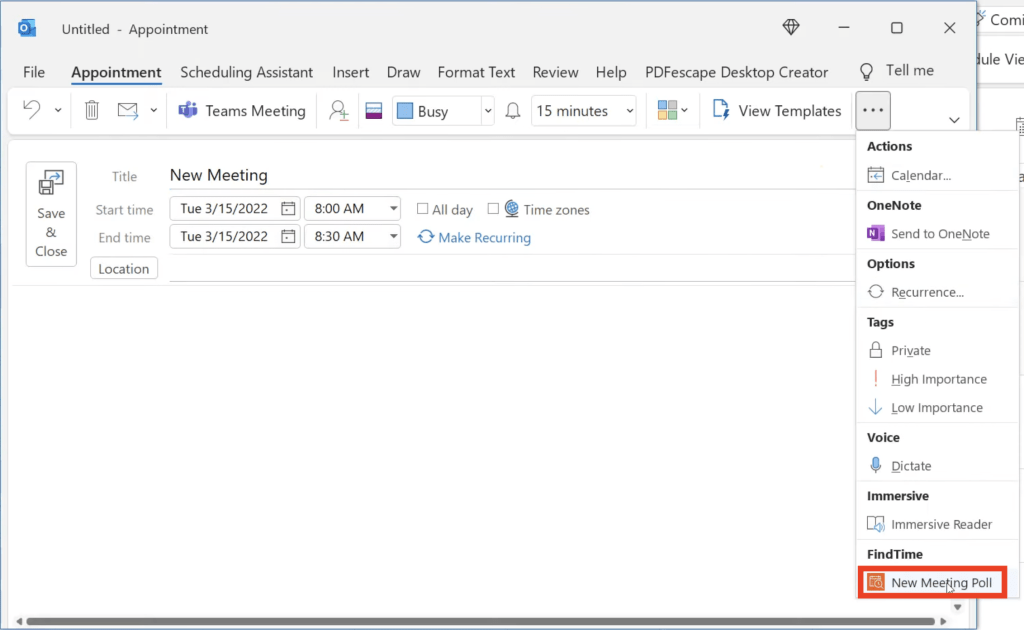
- Go to New Appointment
- You will find the New Meeting Poll
You can use this New Meeting Poll to find the best time that suits everyone who will be attending the meeting.
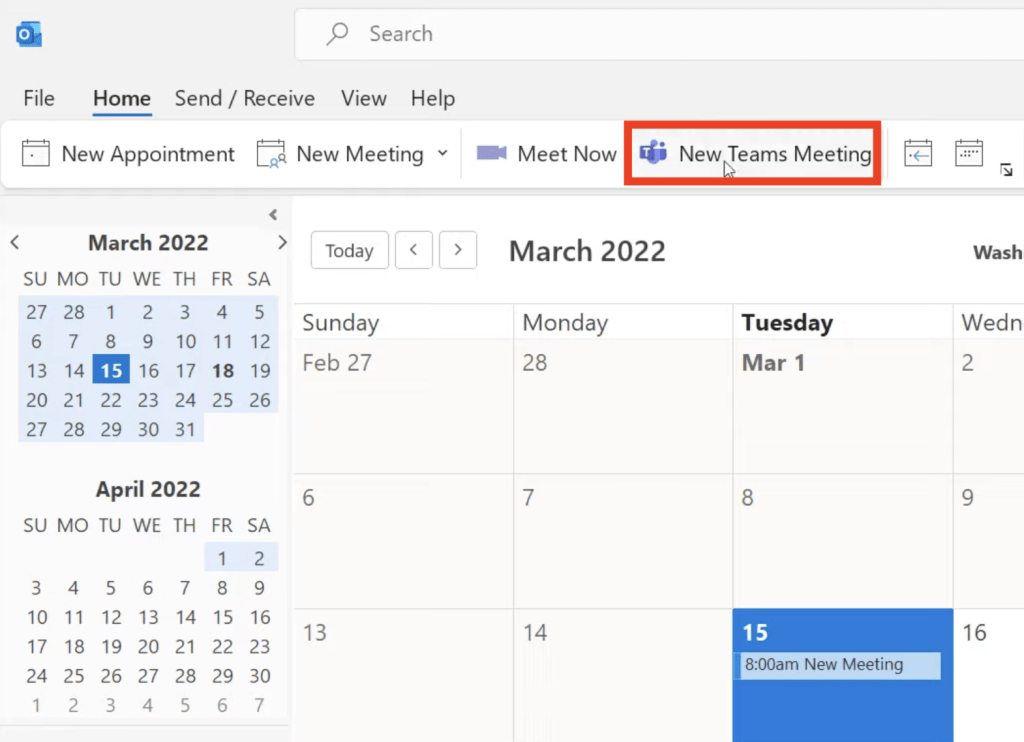
Teams Meeting not only allows you to set a date and time for the meeting but also provides a link that can be used by attendees to join the meeting.
- Click on New Teams Meeting
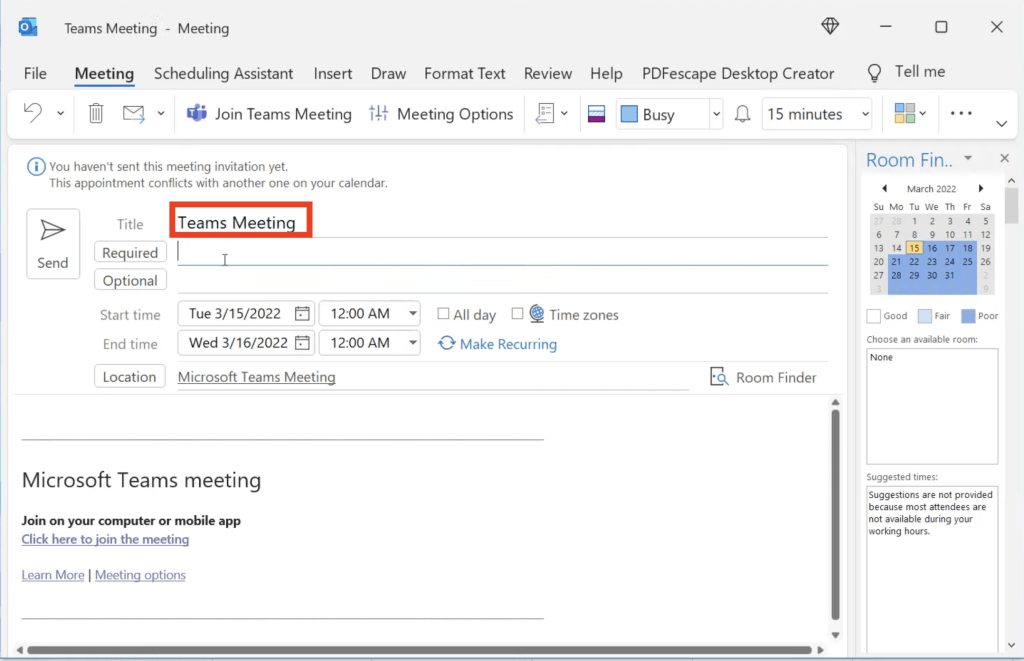
- Provide a Title
- Add Attendee’s email address
- Select Meeting’s date and time
You can see that the link is already present here that can be used to quickly join the meeting.
Online Outlook Calendar for Sports, Shows, and More
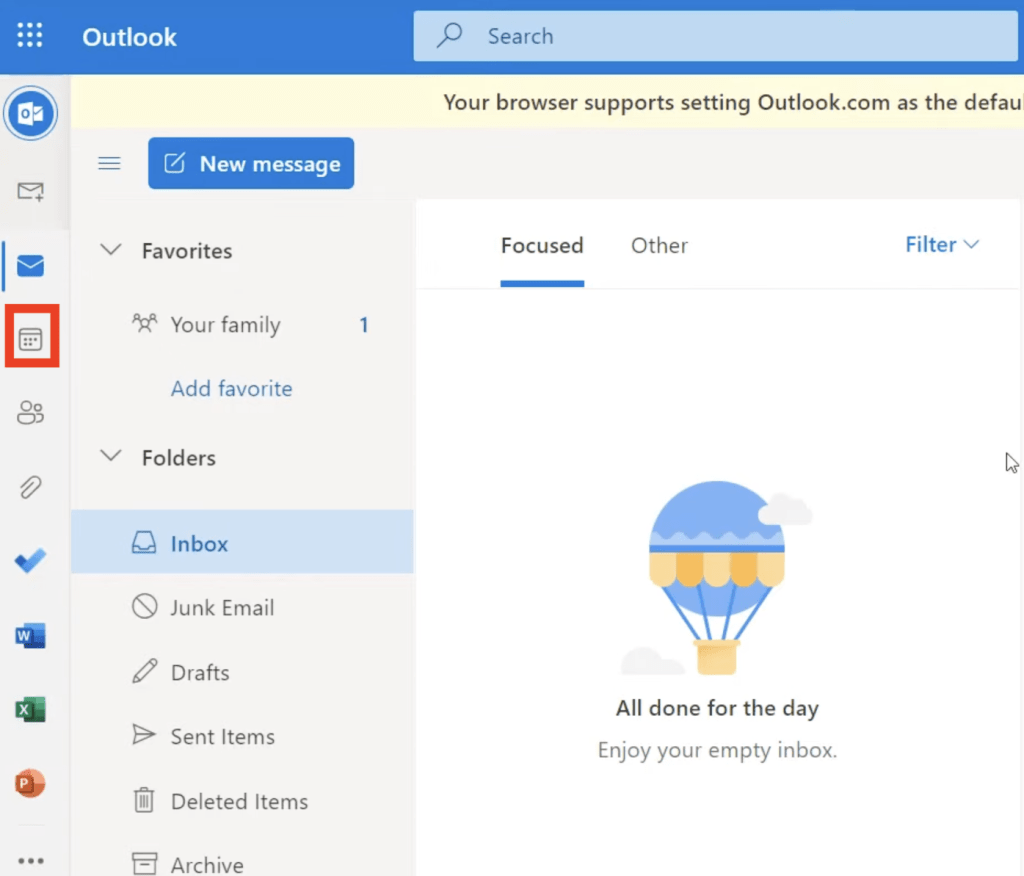
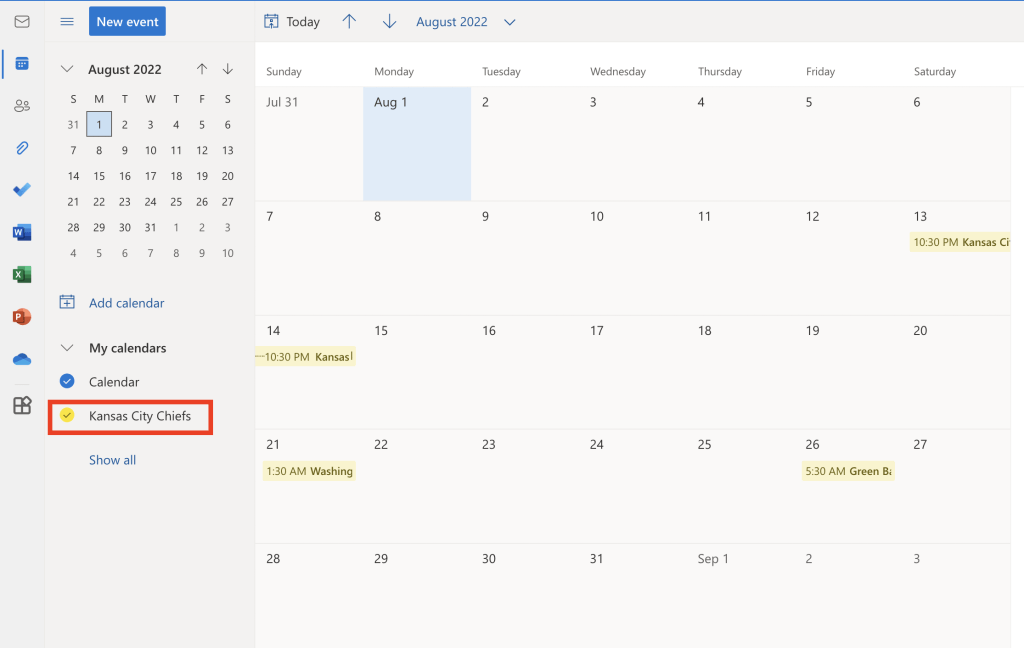
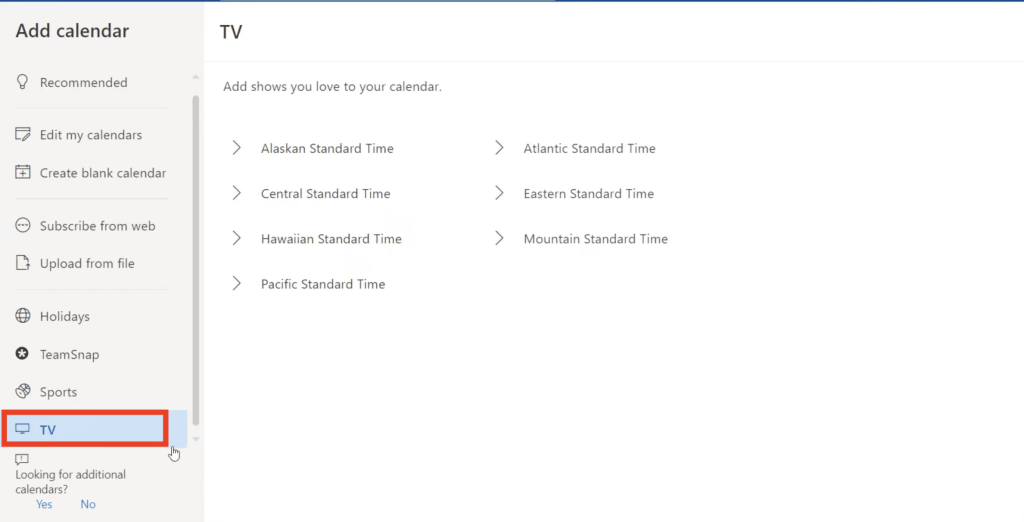
You can keep track of your favorite sports team, or get reminders for the upcoming episode of your favorite TV show using the online version of Outlook Calendar. Follow the steps below to access these features –
- Open Outlook in your web browser
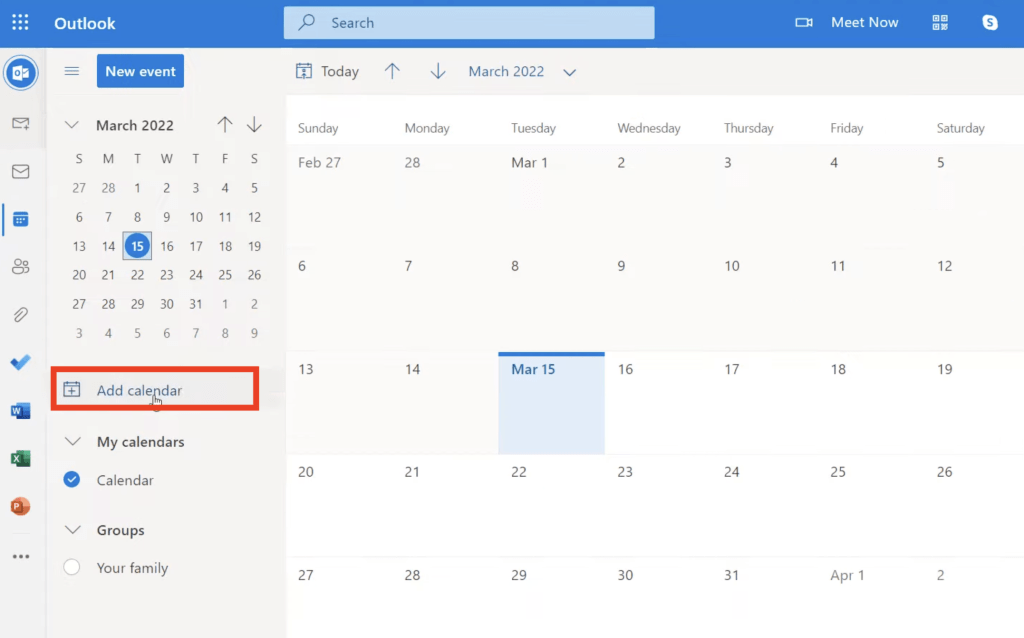
- Click on the Calendar icon
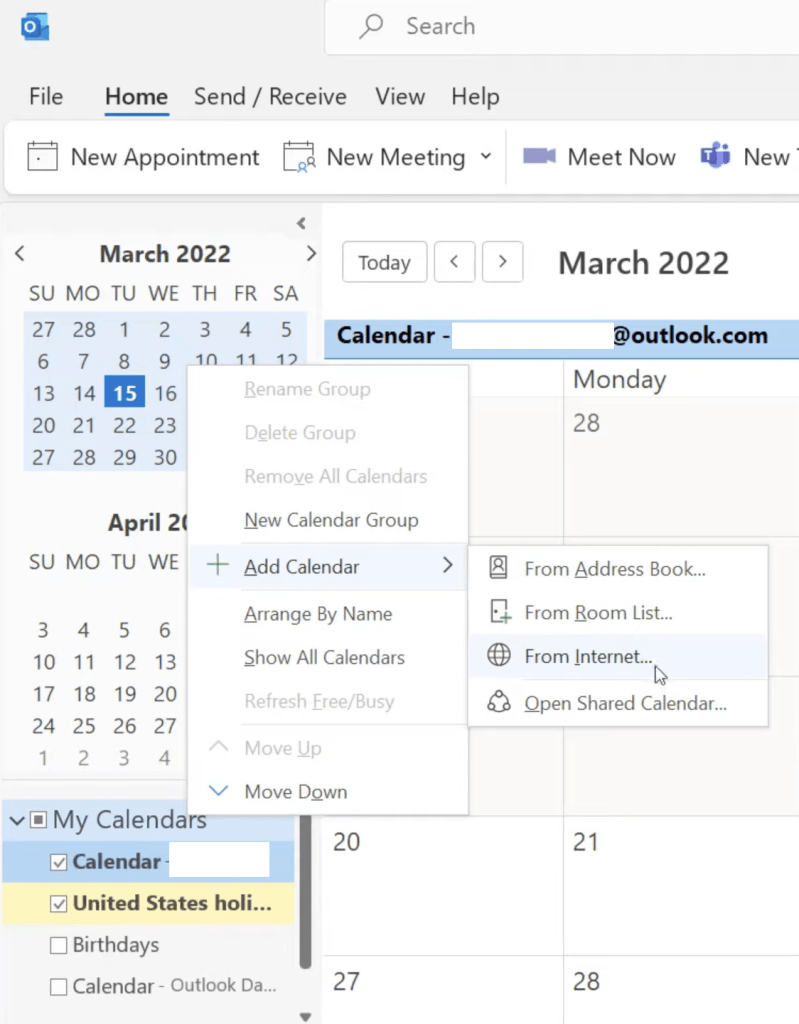
- Click on Add Calendar
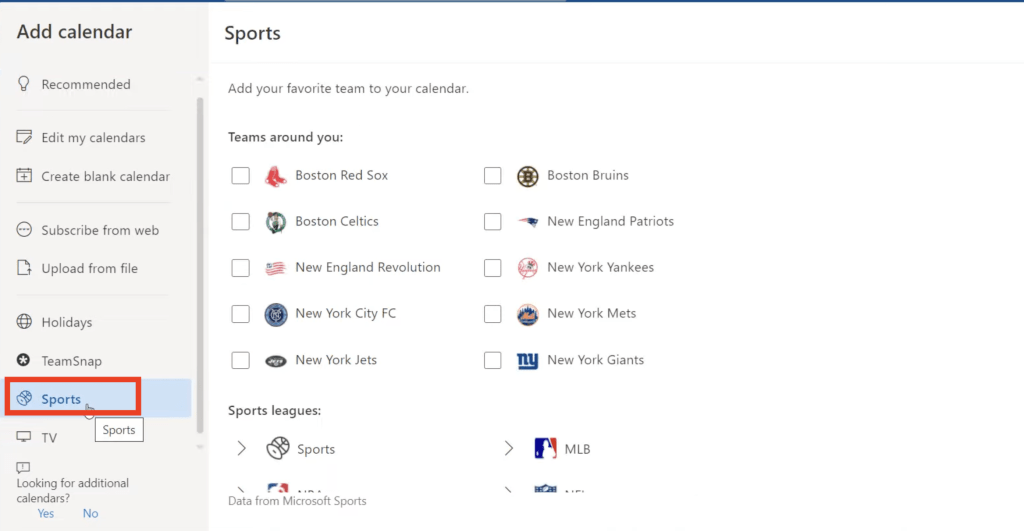
- Select Sports
- Choose a local team or sports league that you want to add to your calendar
Similarly, you can select a TV show and then use filter to select time zone > channel and then show.
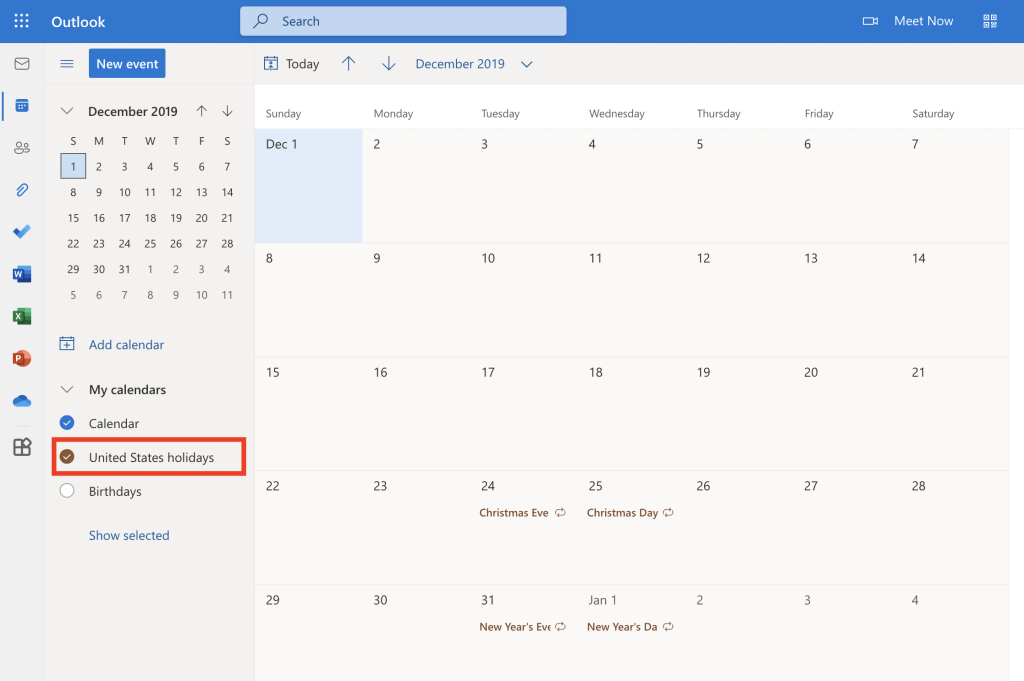
You can also add major international holidays and dates to your calendar
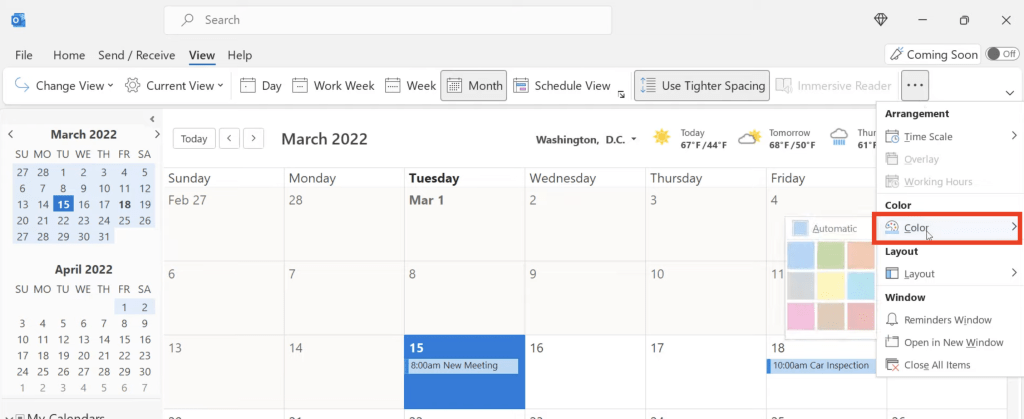
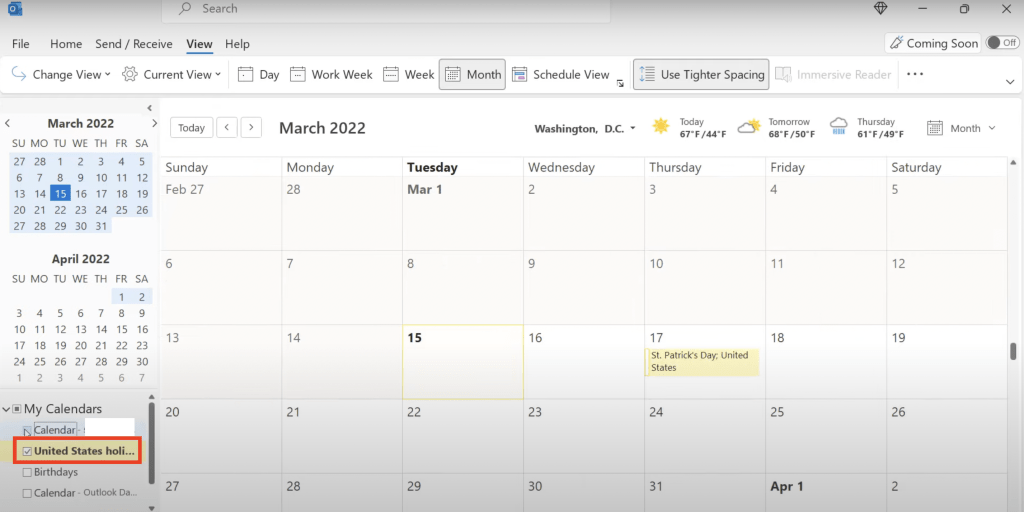
You can assign colors to different calendars on your Outlook account so that you can easily identify them. To color code, the calendars follow the steps below –
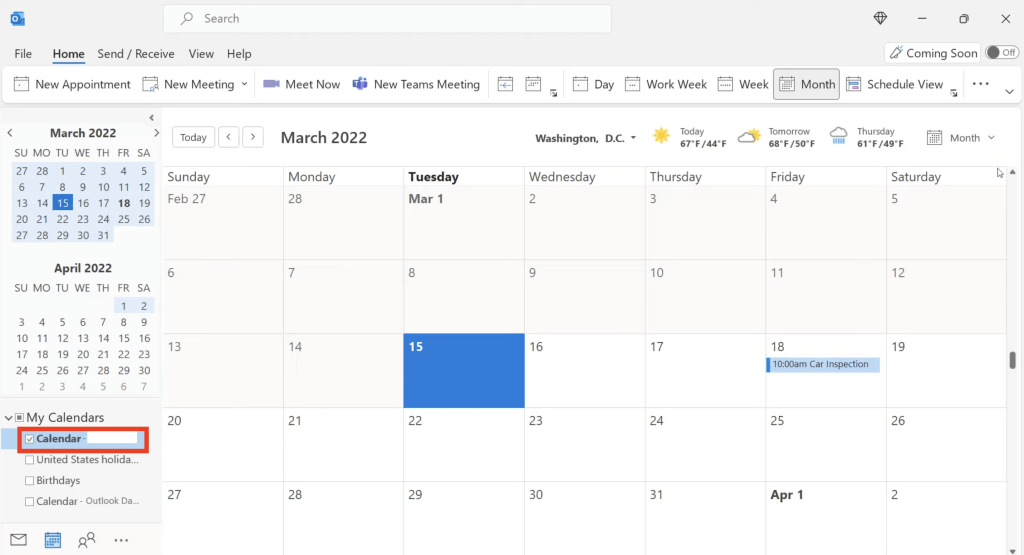
- Click on Calendar
- Go to View
- Click on three dots > Select Color – Blue
This will assign a blue color to your personal calendar.
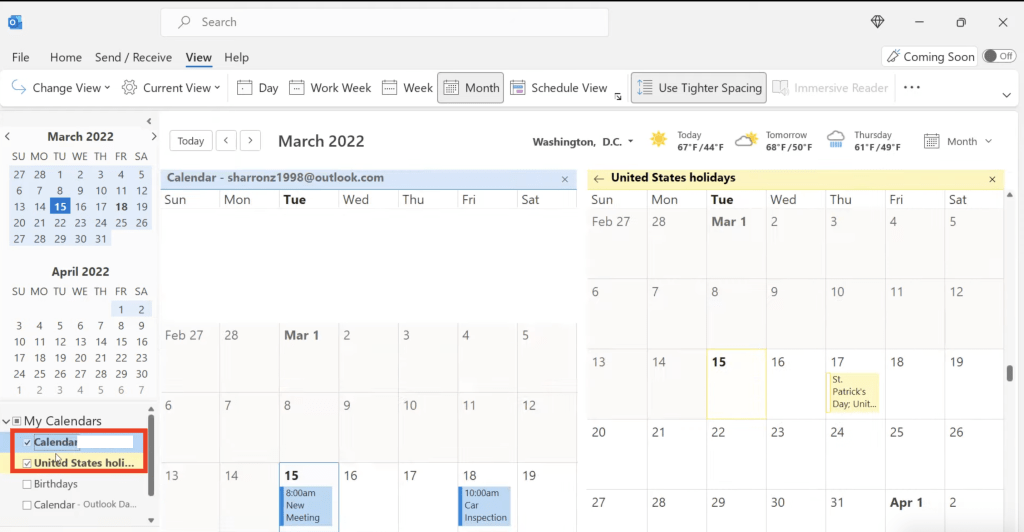
- You can do the same with the calendar – United States Holidays and assign it a color – yellow.
- Check both calendars
This will display both calendars side by side.
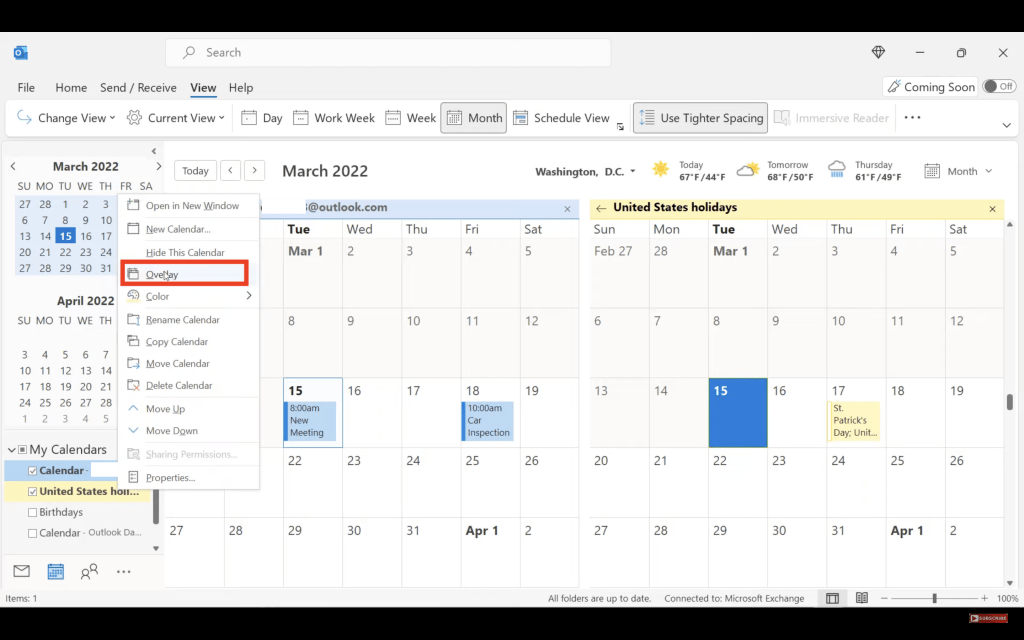
- Right click and select Overlay
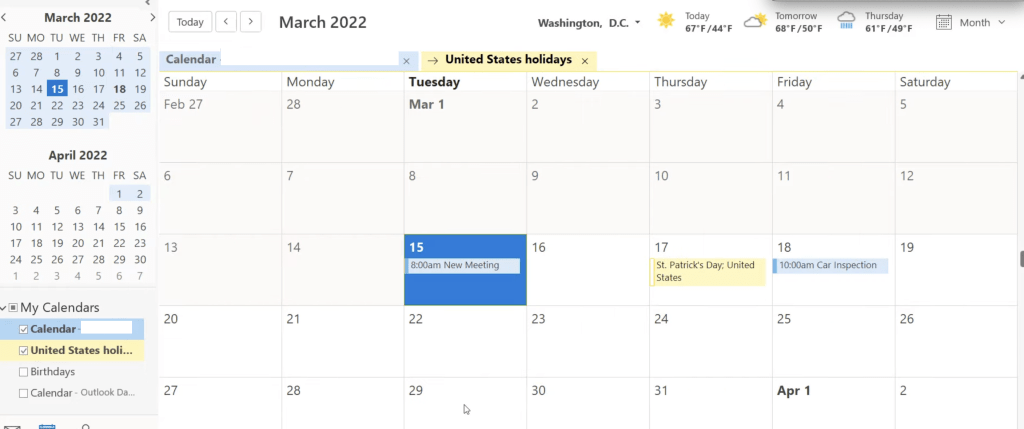
- A merged calendar will appear
The different colors will help you identify the two calendars effortlessly.
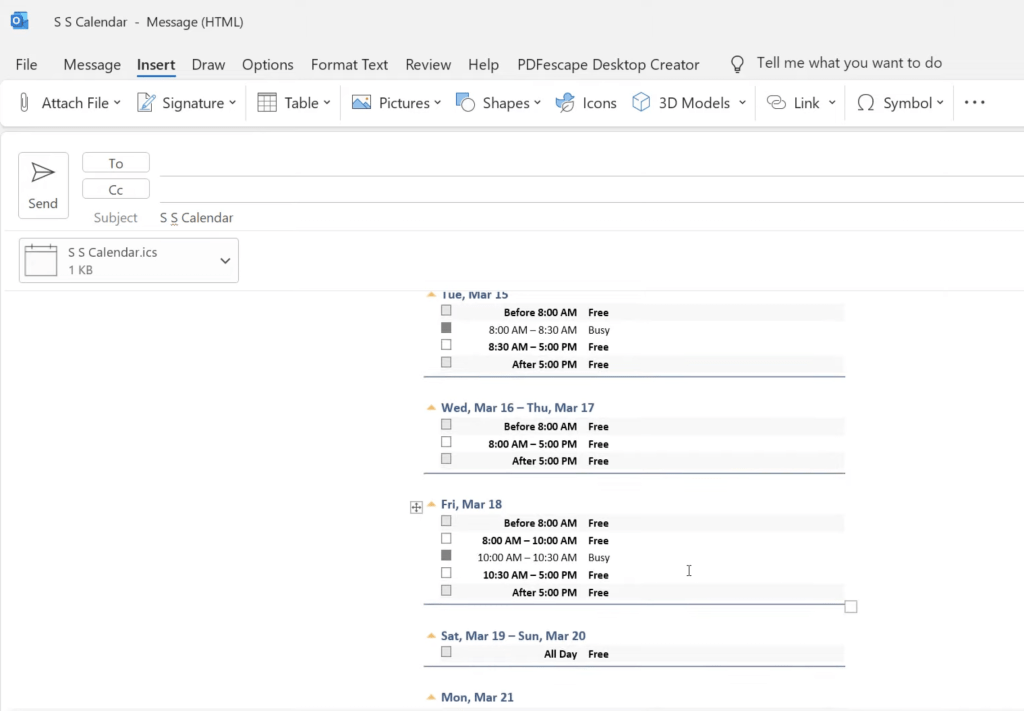
This is an email tip where you can send a specific date range of your calendar to anyone. This will give them an idea of the time slots when you are available and they can schedule appointments accordingly.
Follow the steps below to share your calendar via email –
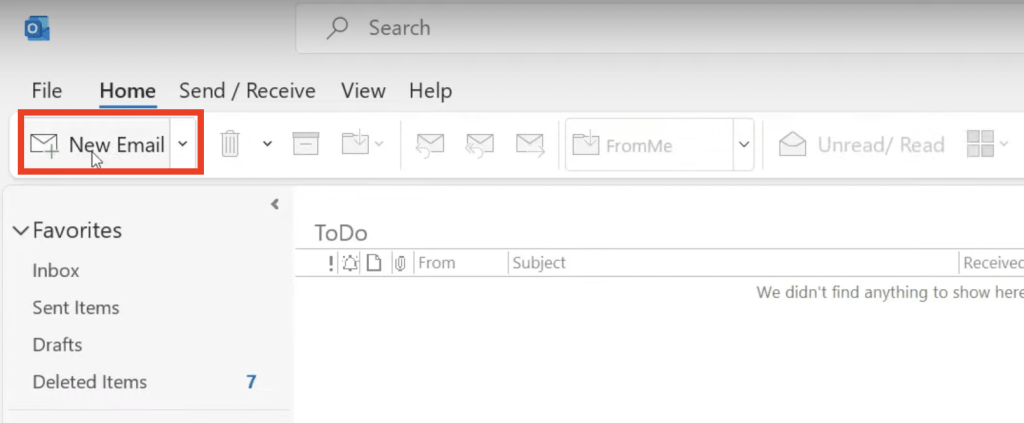
- Click on the Mail icon
- Select New Email
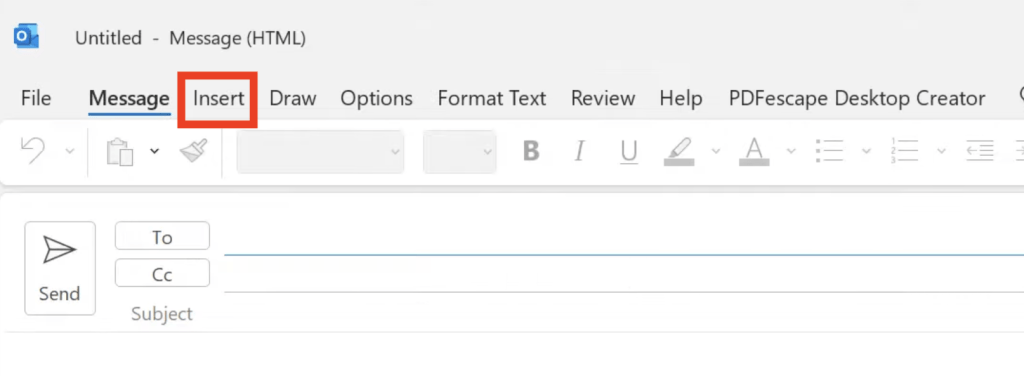
- Go to the body of the email and select Insert
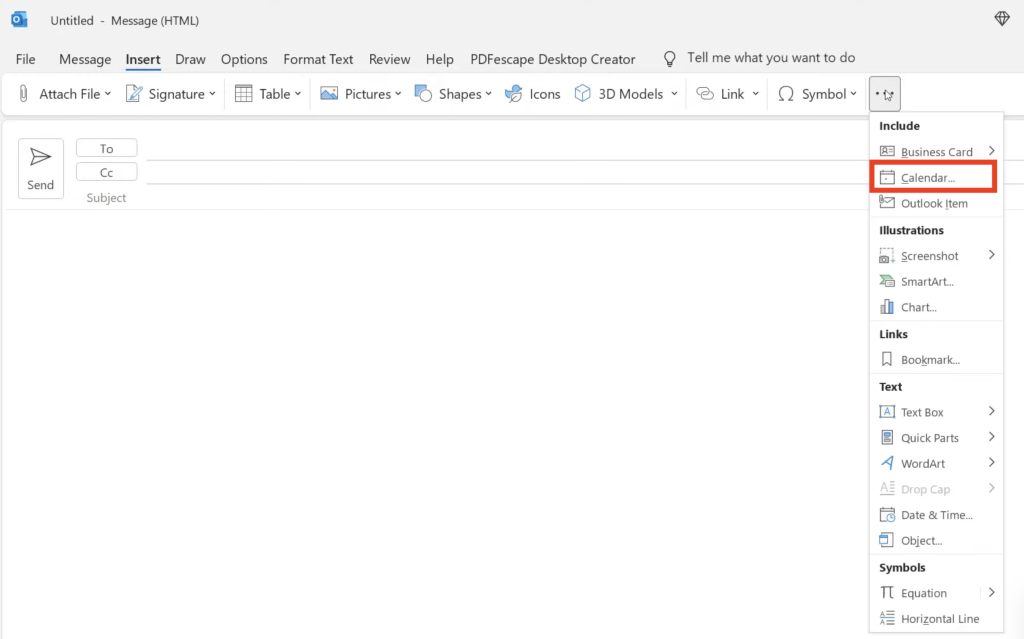
- Click on three dots > Calendar
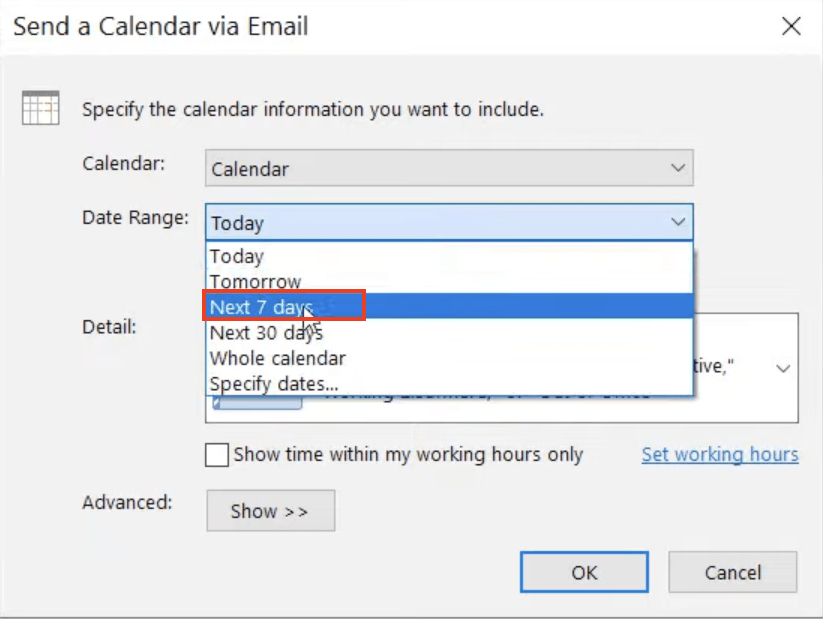
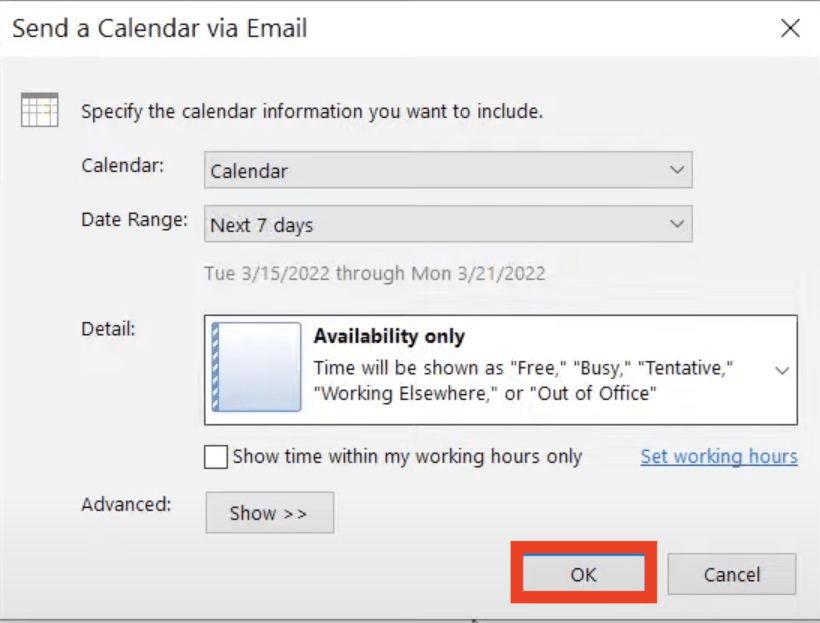
- In the dialog box, select a date range – today or next 7 days
- Click OK
Your calendar has been inserted in the body of the email and you can easily share it with your colleagues.
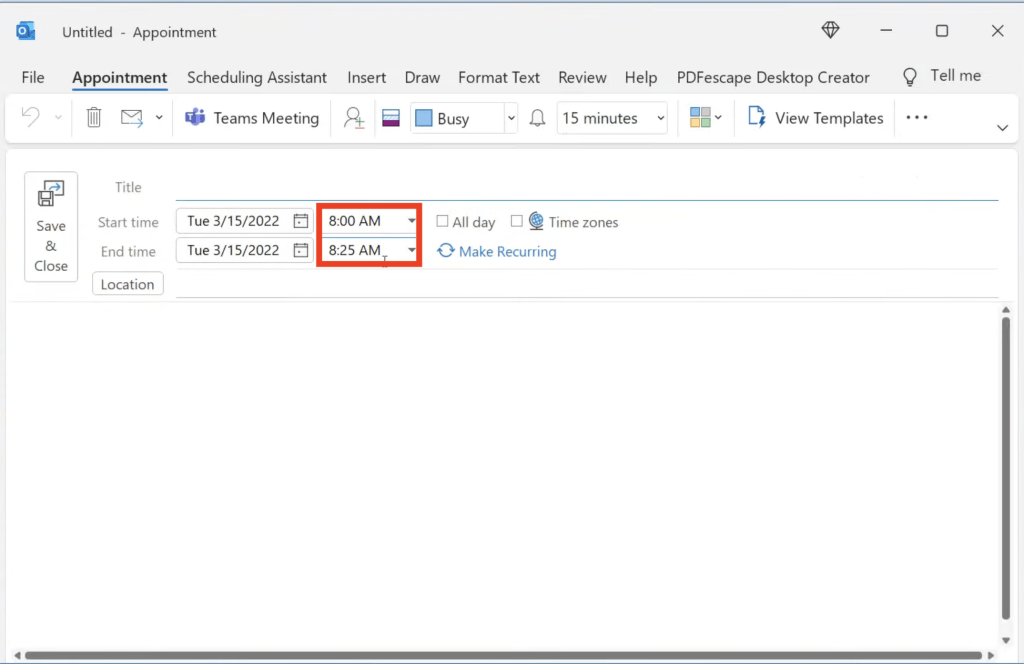
This tip can be used to add a few minutes between two meetings as a buffer time. This will prevent you from scheduling back-to-back meetings in a day. Follow the steps below to achieve this –
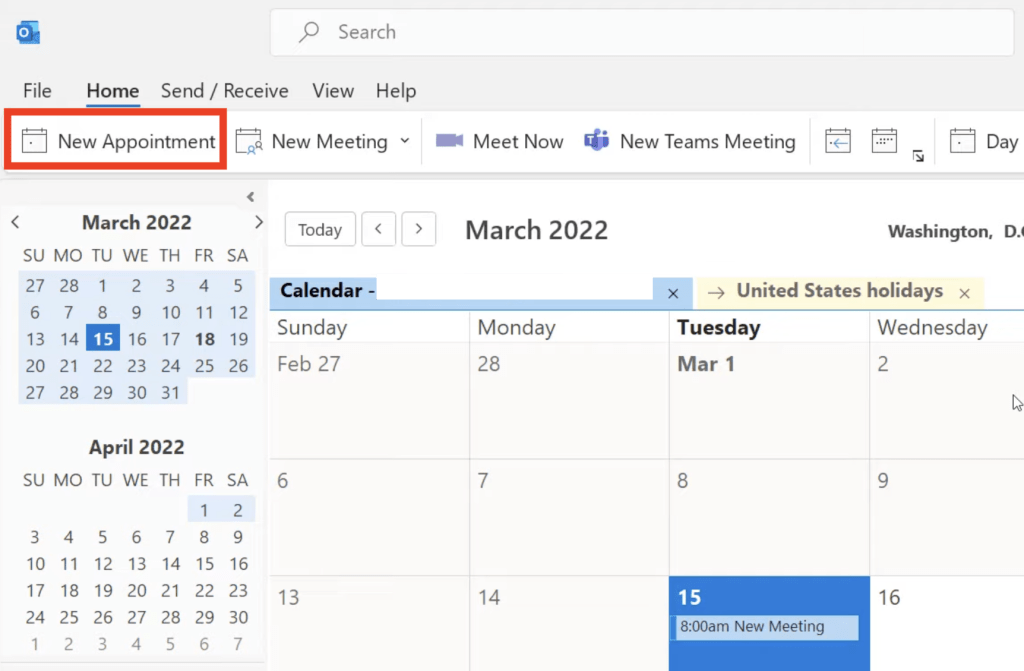
- Click on New Appointment
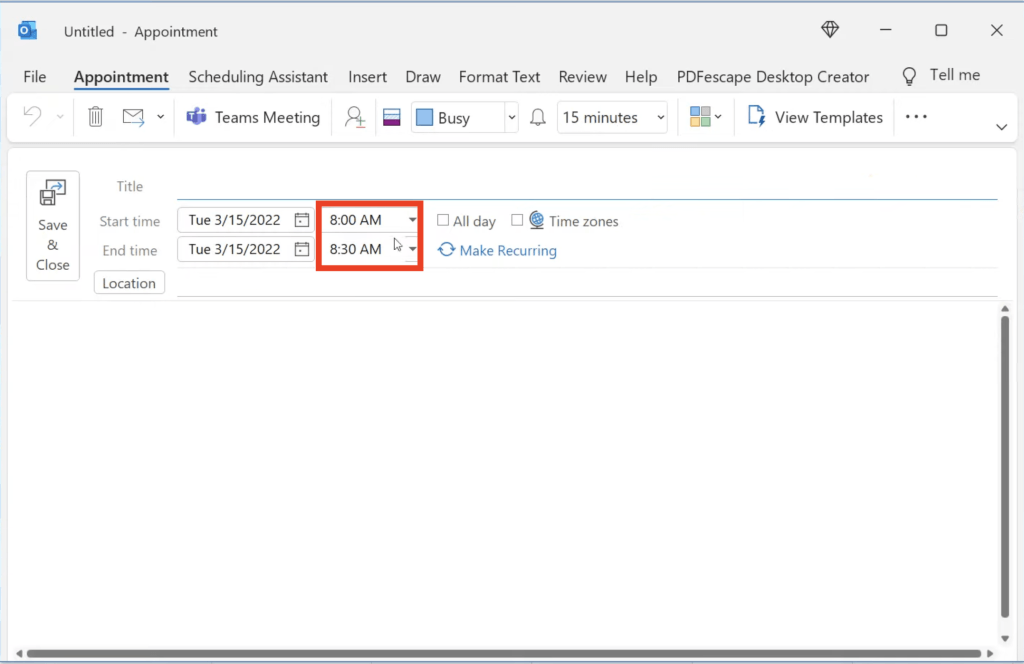
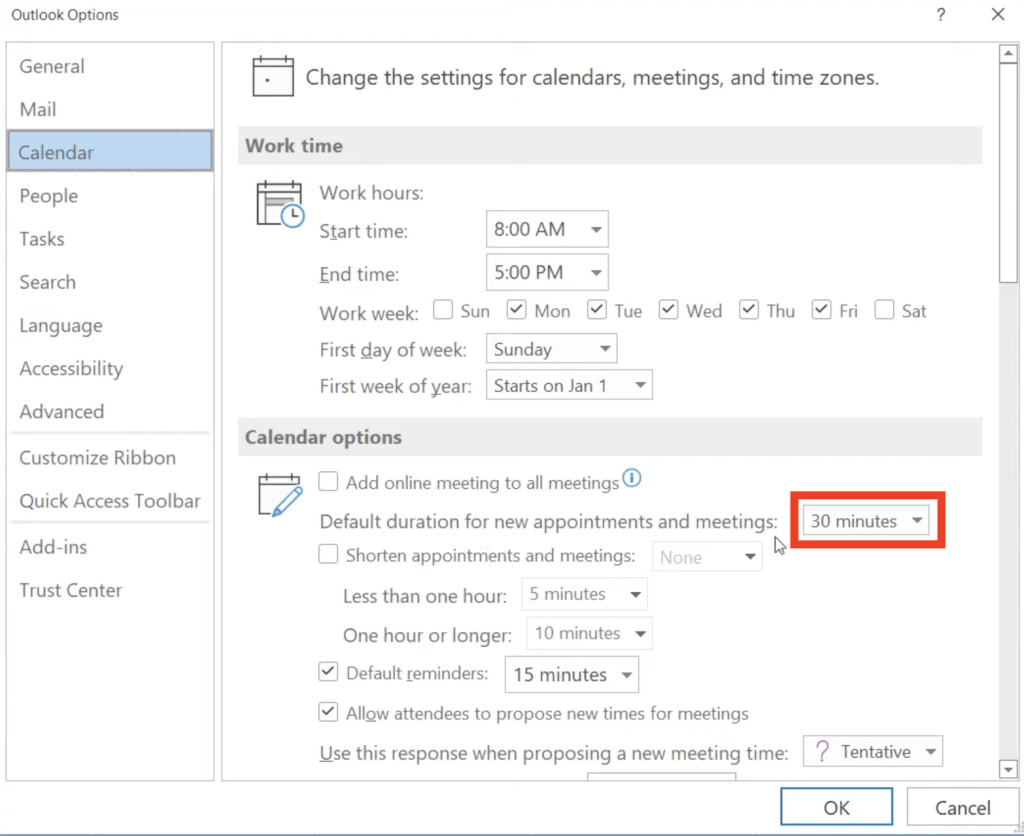
- Here, you will see that a meeting duration is 30 minutes by default.
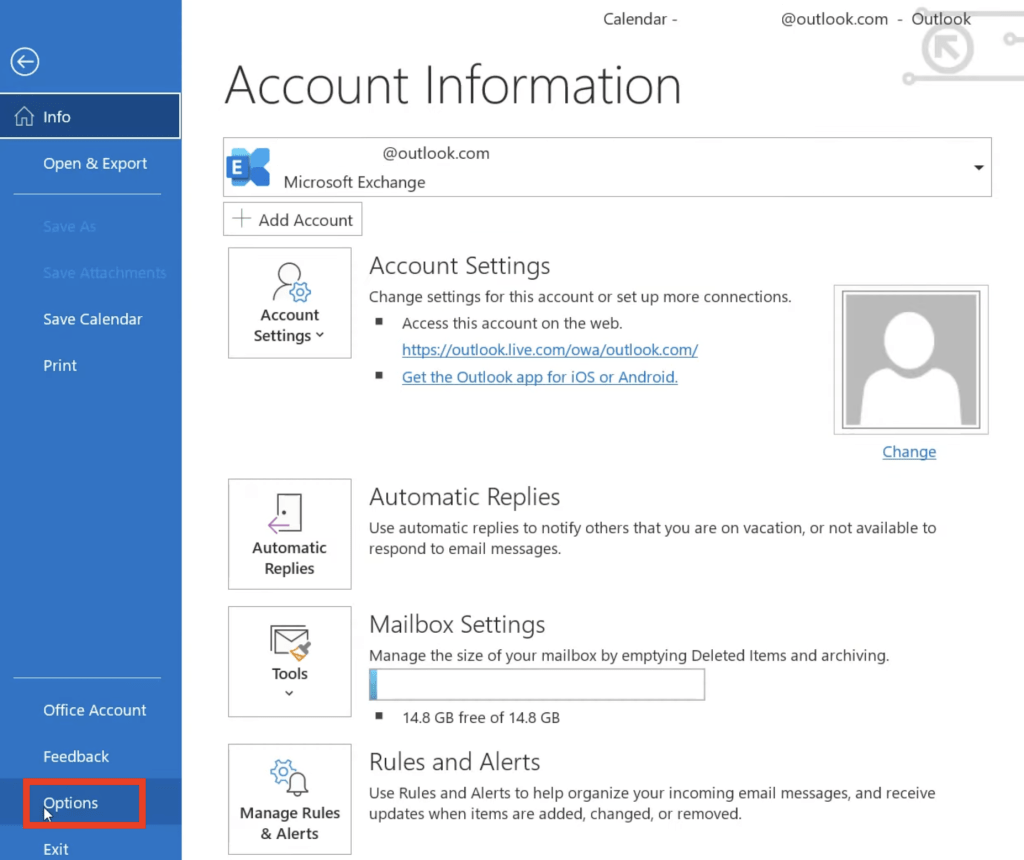
- Now, go to File > Options
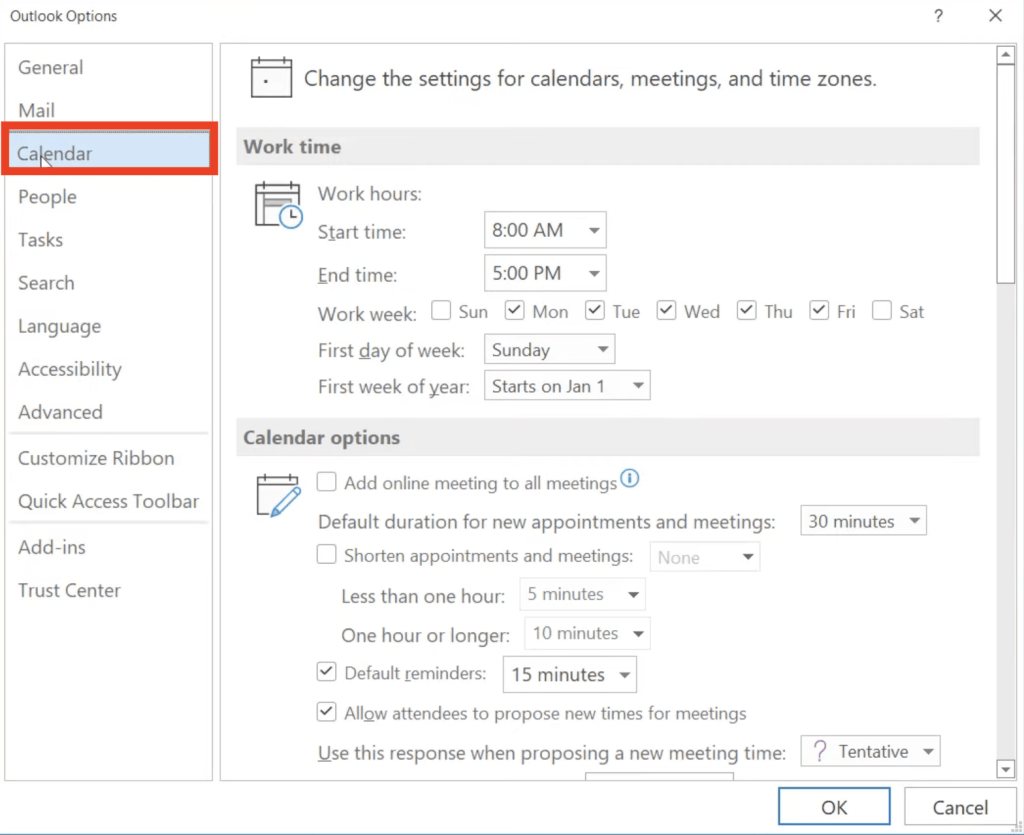
- In the Outlook Options window, click on Calendar
- You will see that the duration is set to 30 minutes
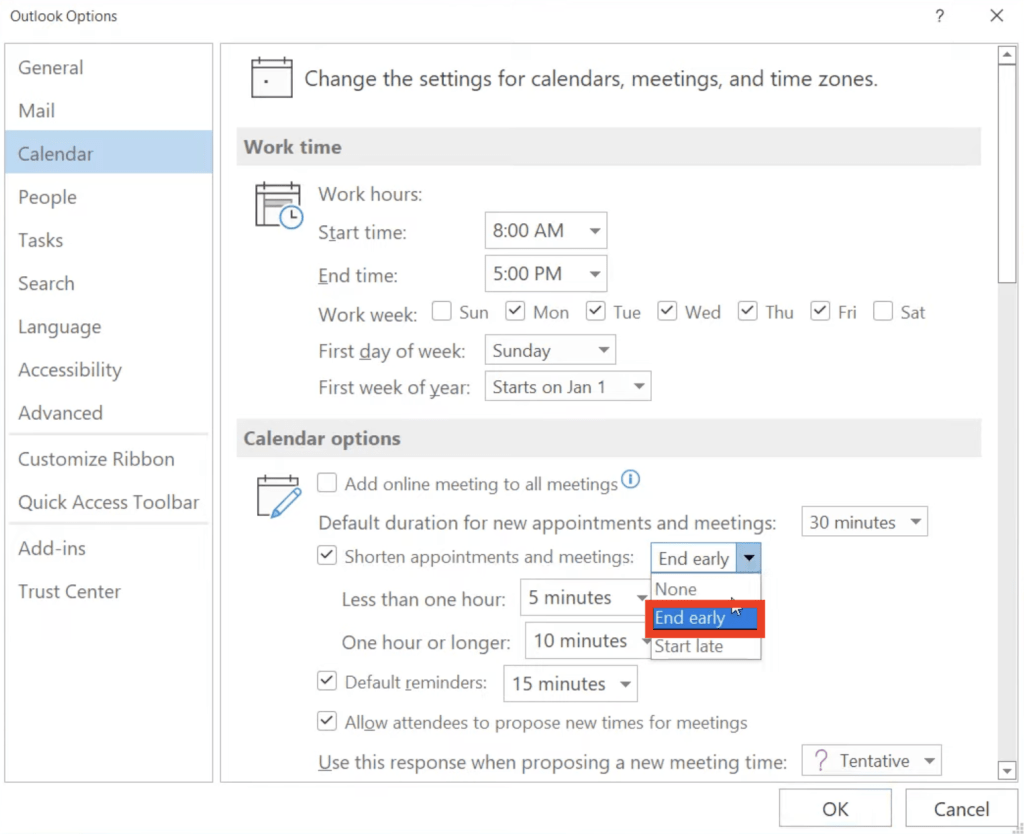
- Check Shorten appointments and meetings and select Start Late or End Early
- Go to New Appointment
This time you will see that the duration is only 25 minutes. This will give you 5 minutes of downtime between two meetings.
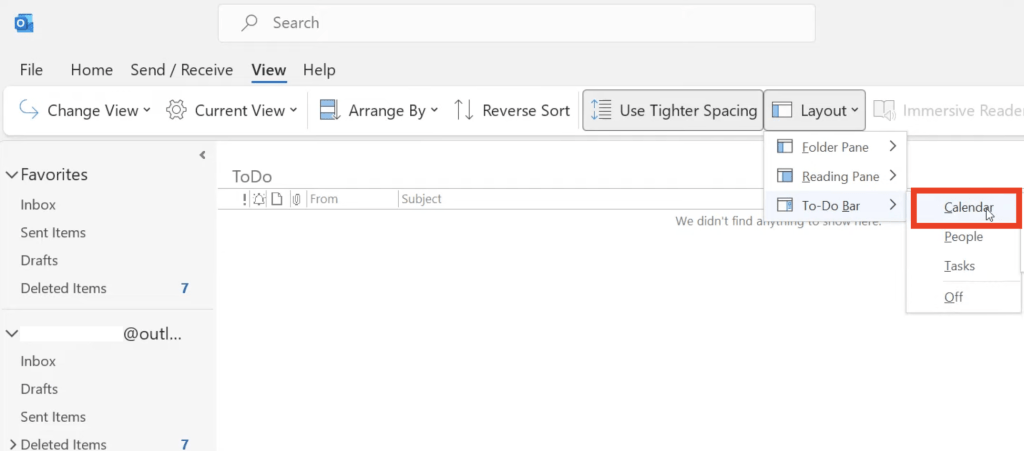
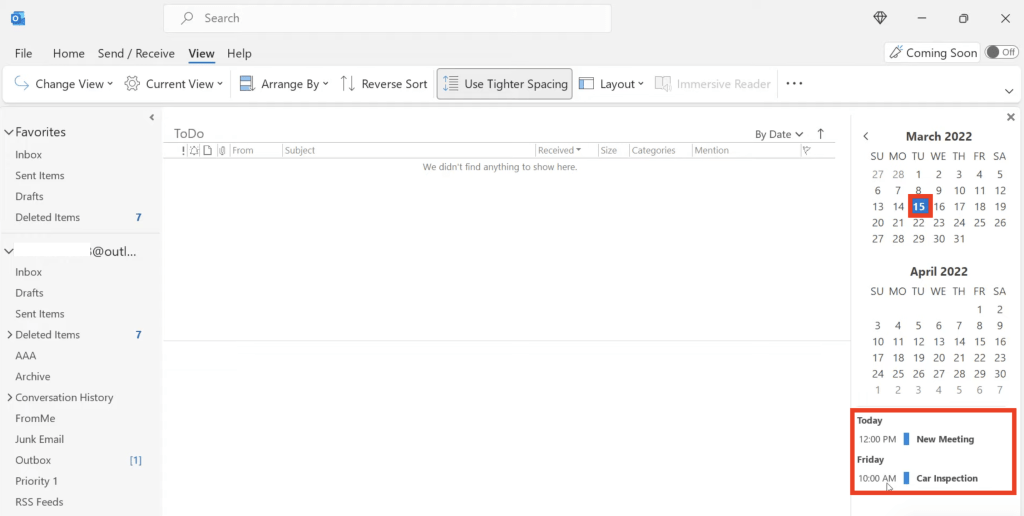
You can get a quick overview of your calendar while you are using email in your Outlook account. You will be able to view your to-do list for a range of dates. To view the To-Do bar for the calendar –
This will display the calendar on the right side of the screen and you can. select different dates to view the events scheduled on those dates.
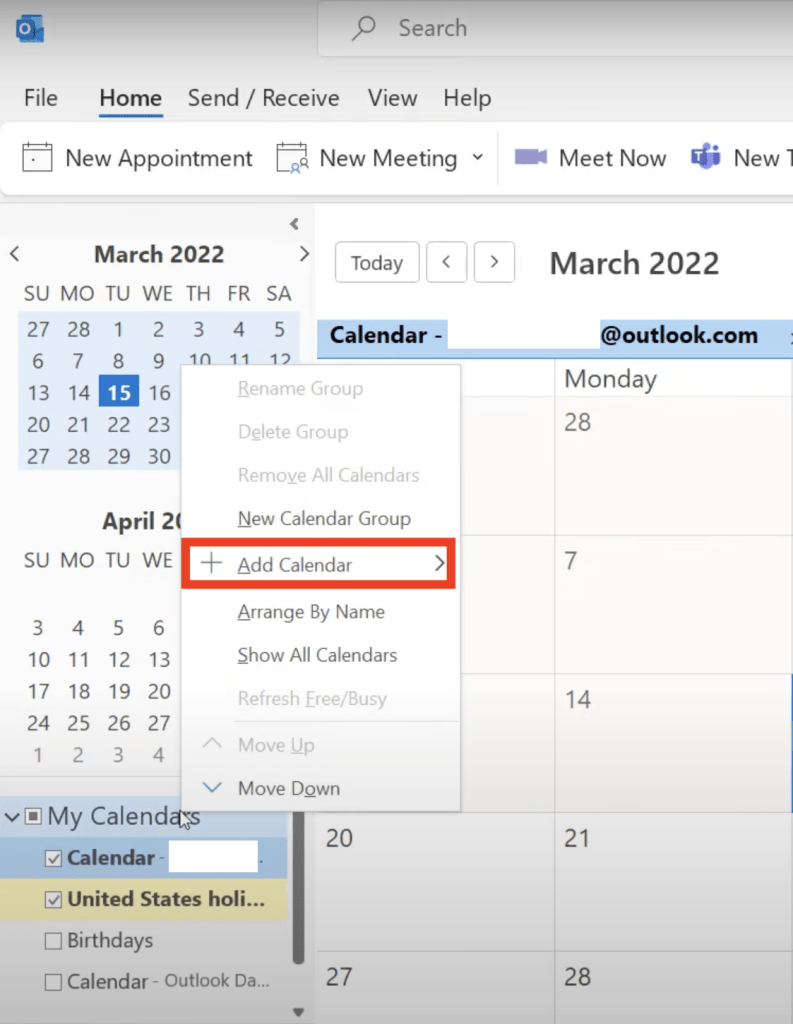
You can add calendars from various sources and display them in your Outlook account.
Create an Event From an Outlook Email
You might have emails in your inbox and does not require immediate action.We can turn them into an event in order to save them from being unattended.
- Open the email
- Selecting the 3 dots on the email and clicking on Meeting
- We can assign the date and time to this event and hit the “send” button in order to save this event in our calendar.
- The event will then show up on your calendar.
This way you can simply convert an email into an event that requires work in the future.
Hopefully, this article has helped you become more efficient at using Microsoft Outlook Calendar. We will cover tips from sharing calendars to seeing others’ availability when scheduling a meeting to setting up a Teams meeting, as well as color coding, merging, setting shorter meetings, the To-Do bar, and MORE!
How to Setup A Signature in Outlook
A Signature in Outlook is a text that is automatically added at end of an email to provide the recipient with your contact information. It is an excellent way to convey professionalism and improve brand recognition.
In this article, we will go through the following topics in order to understand how to set up a signature in Outlook:
- What is a Signature?
- Where Is the Signature Setting Located?
- Editing a Signature in Outlook
- Signatures for Different Email Accounts
- Signatures for New Messages vs Replies/Forwards
- Another Way to Access Signature Settings
- Creating a Signature in Outlook.com
Watch this video on How to add a Signature in Outlook on YouTube and give it a thumbs-up!
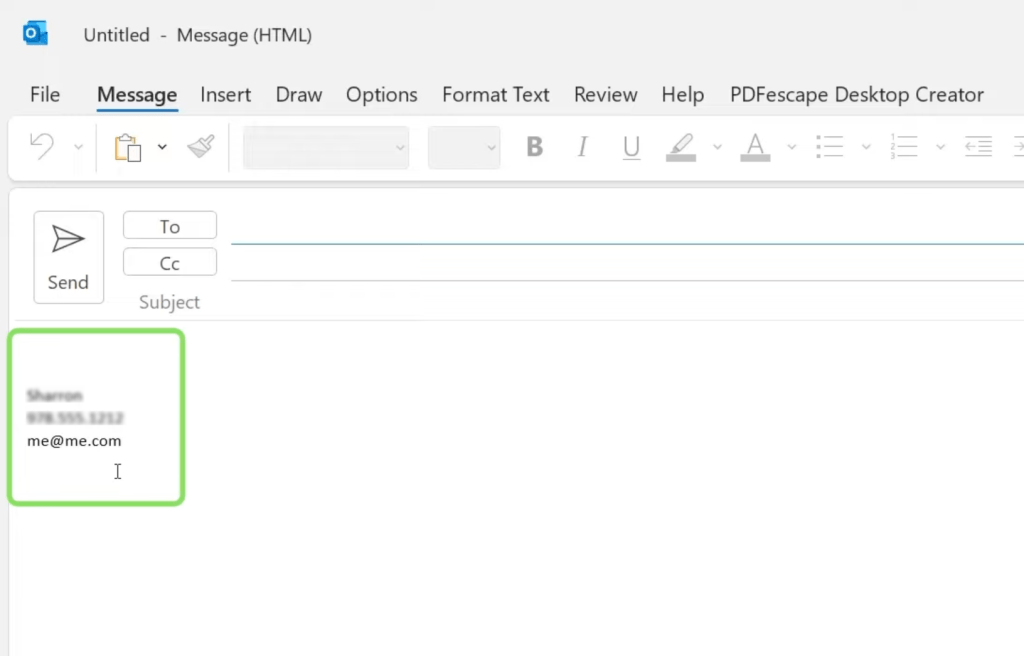
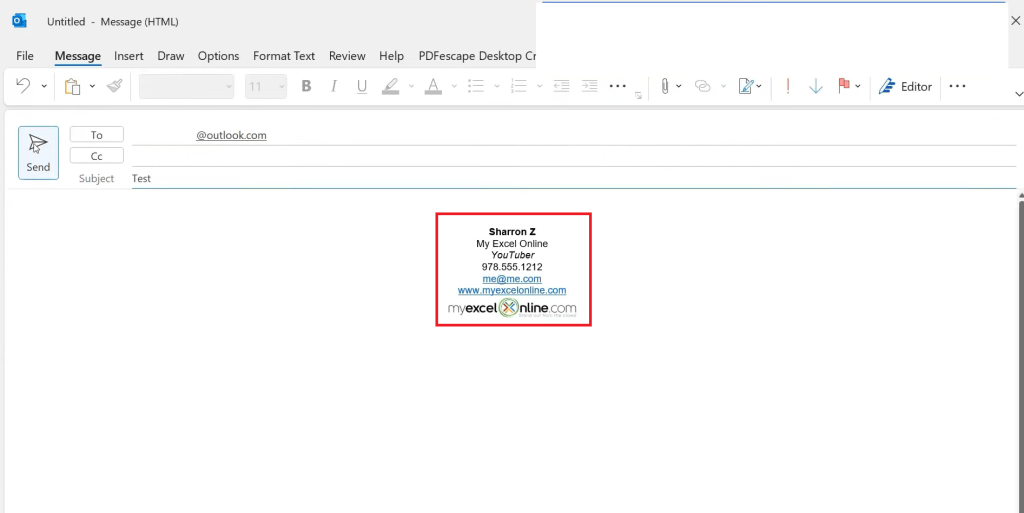
Use this feature of Microsoft Outlook to do away with the pain of adding your basic information while sending emails. It is generally added at the bottom of your email to let the recipient know basic details like email address, phone number, website, hours of operation, etc.
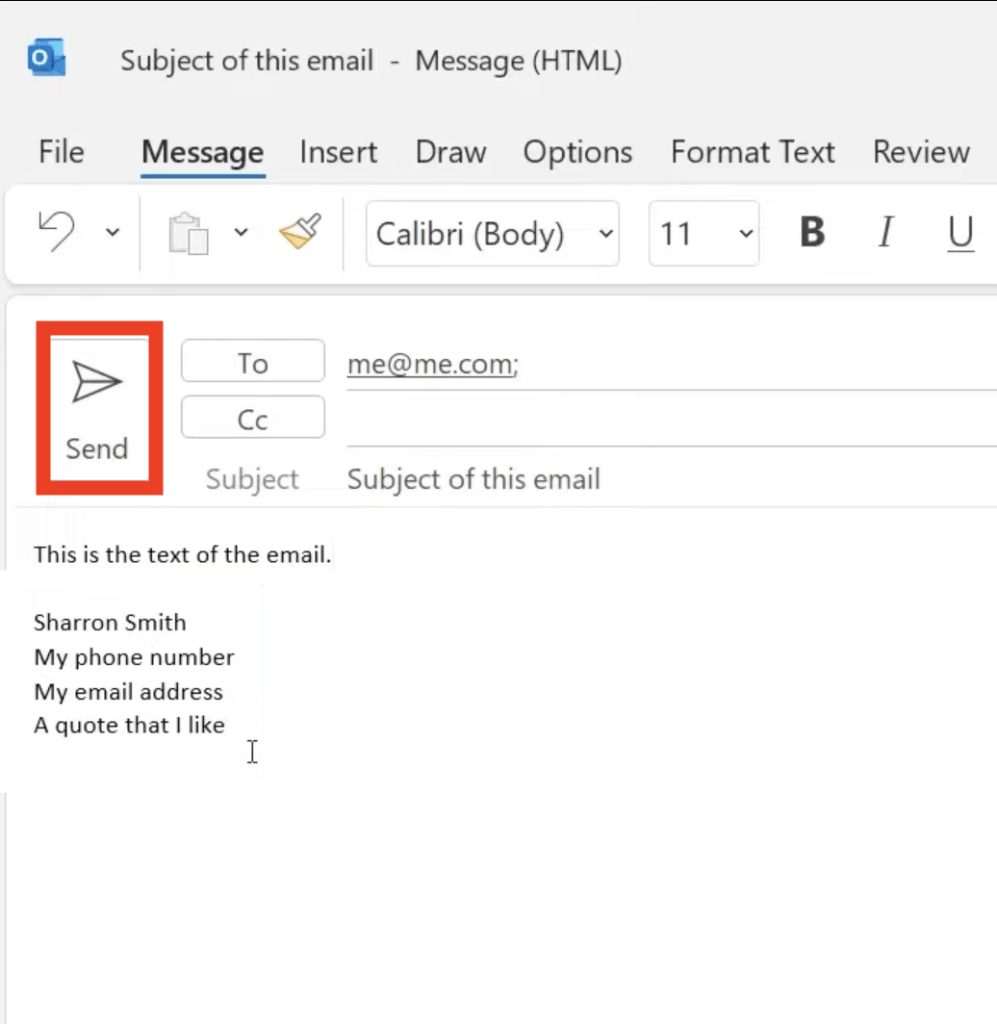
Below is a screenshot of how a signature is displayed in an email –
Where Is the Signature Setting Located?
To create or modify signatures in Outlook, follow the steps mentioned below –
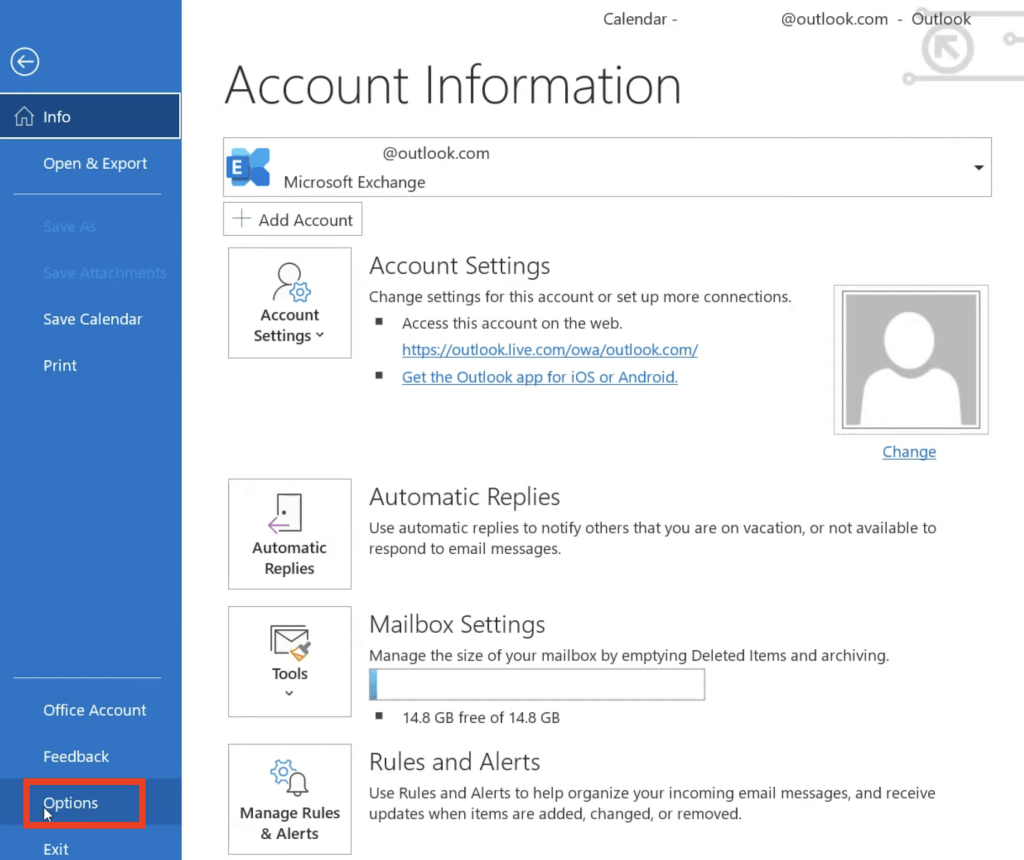
- Go to File
- Click on Options
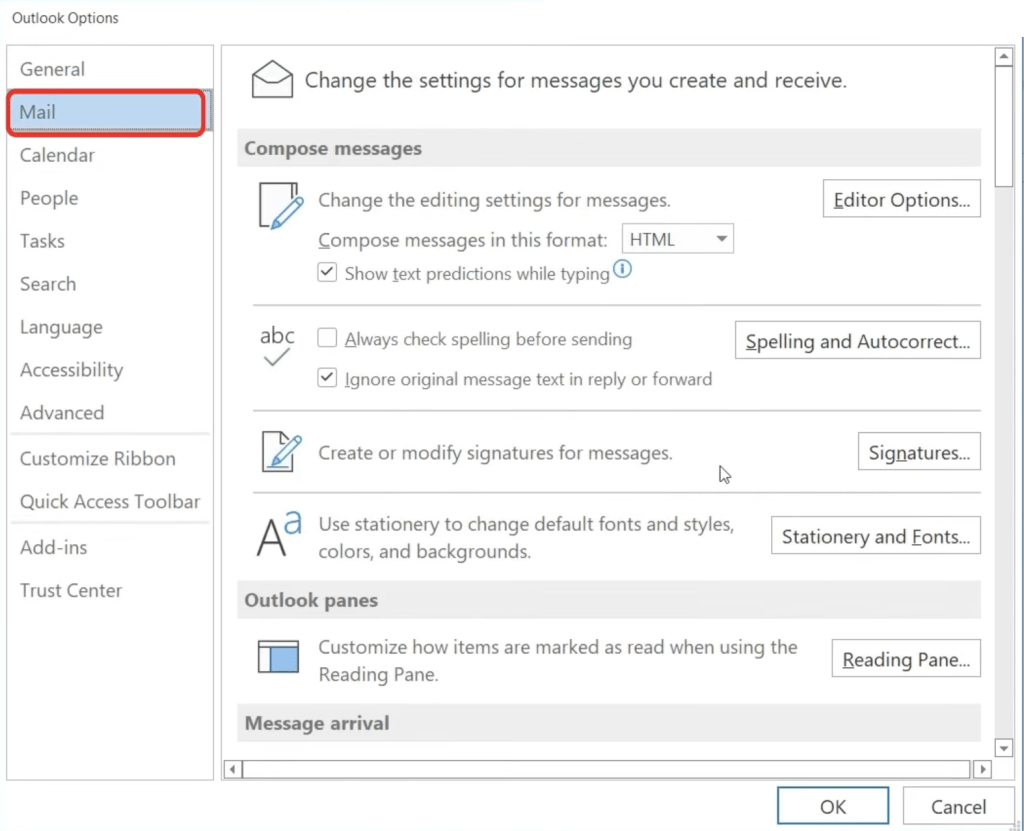
- In the Outlook Options windows, select Mail from the left panel
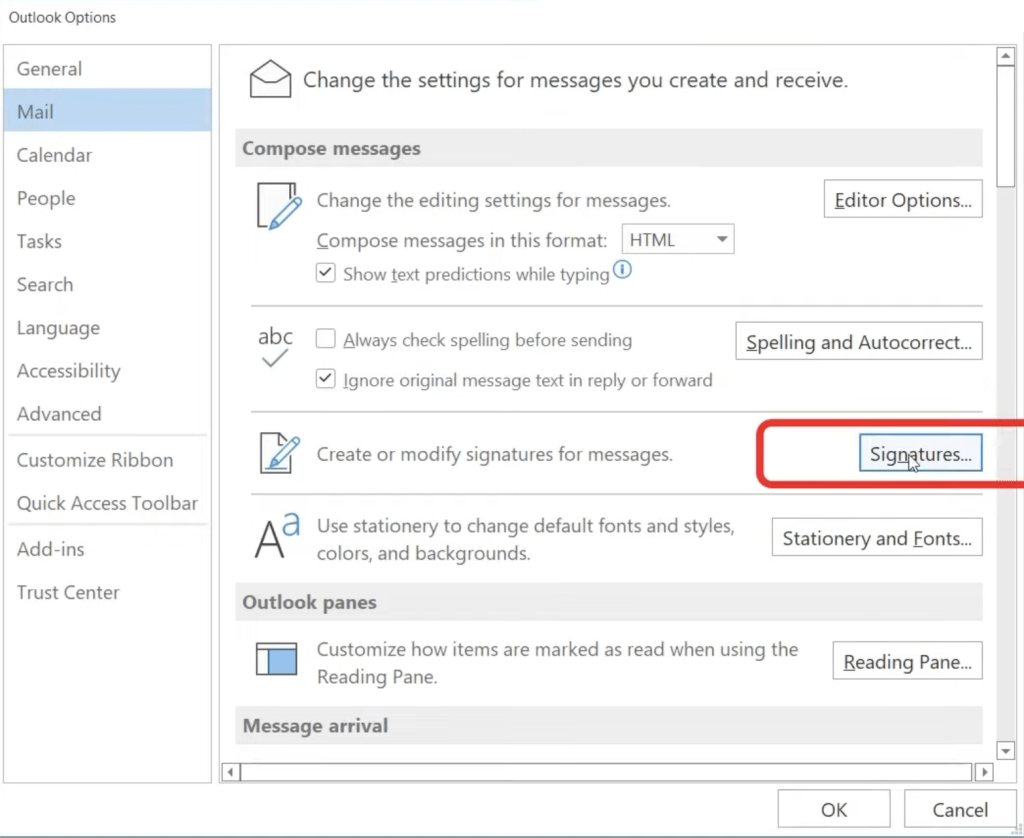
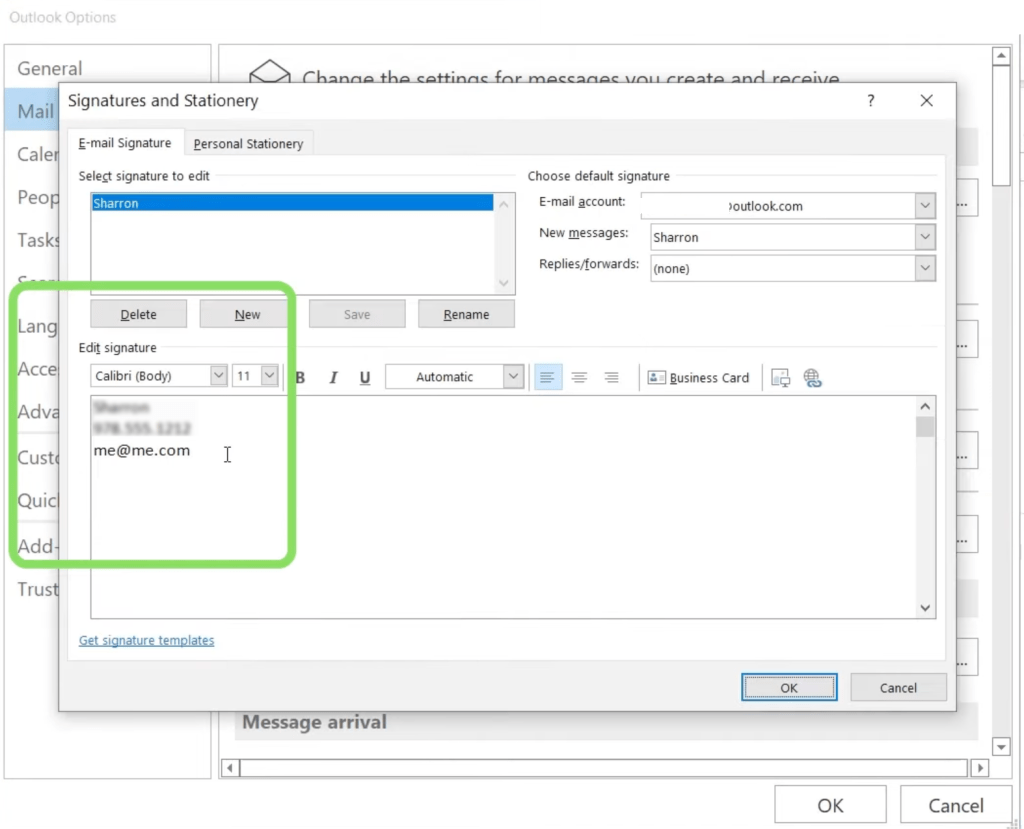
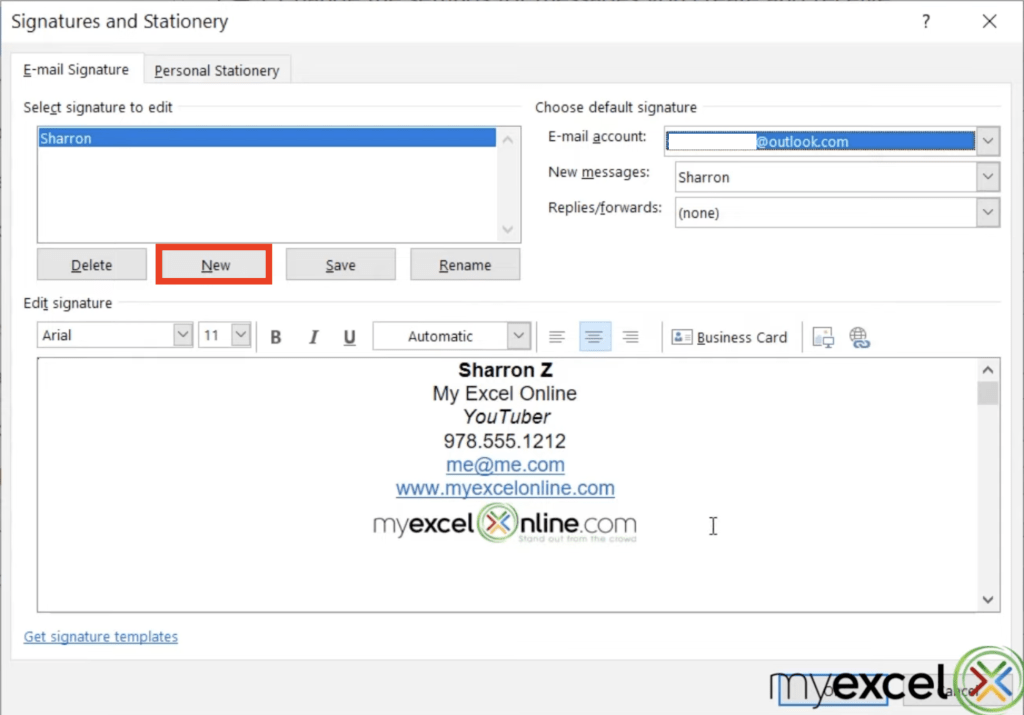
- Click on the Signatures button
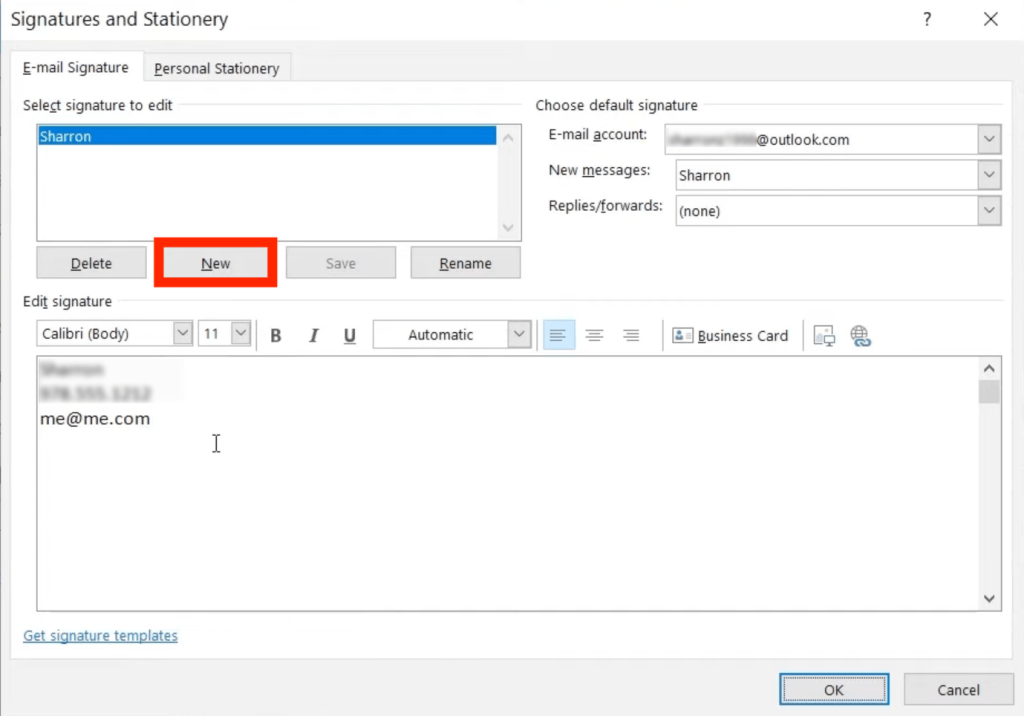
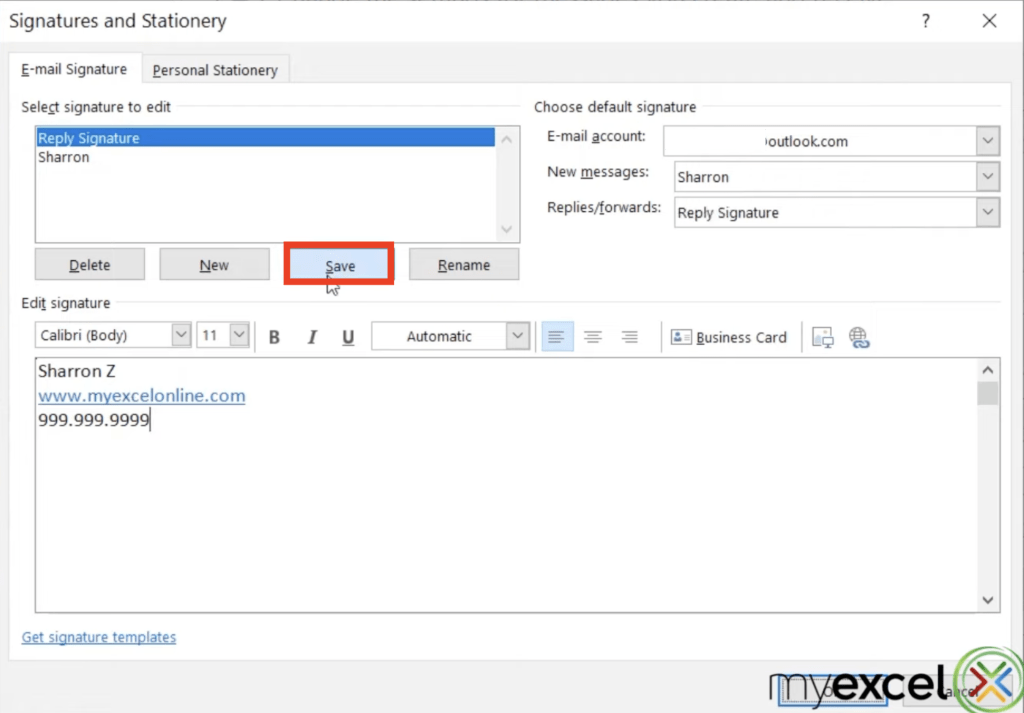
- Select New to add a new signature
- Or, click on the existing signature and edit it
Editing a Signature in Outlook
You can edit the signature using different formatting options available –
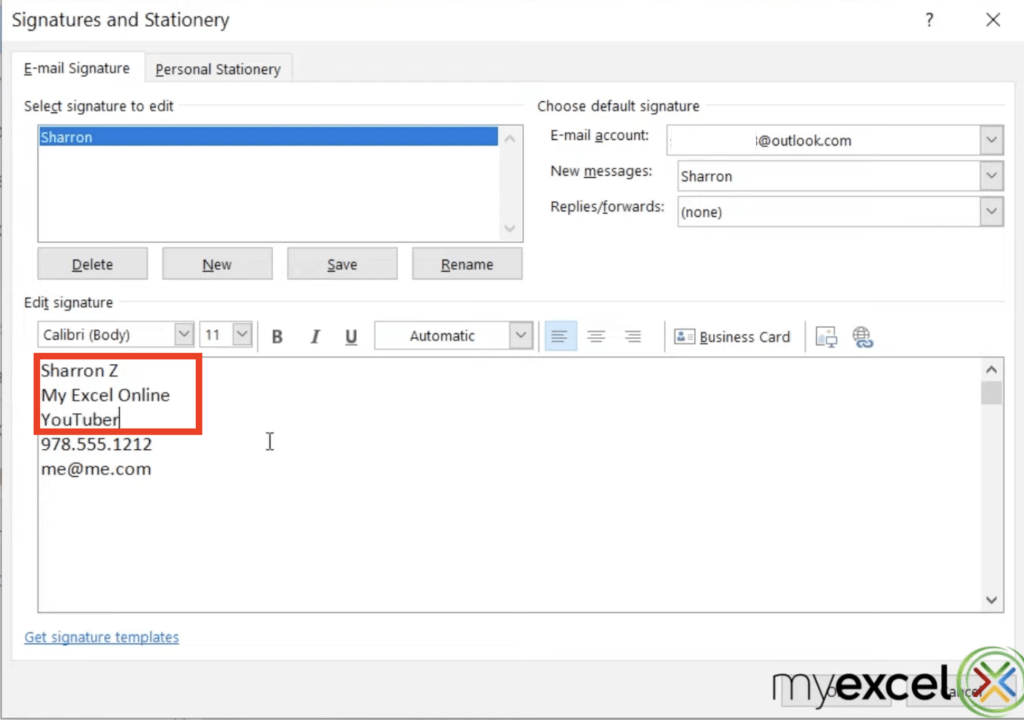
- Add your last name, your company name, and your position in the company
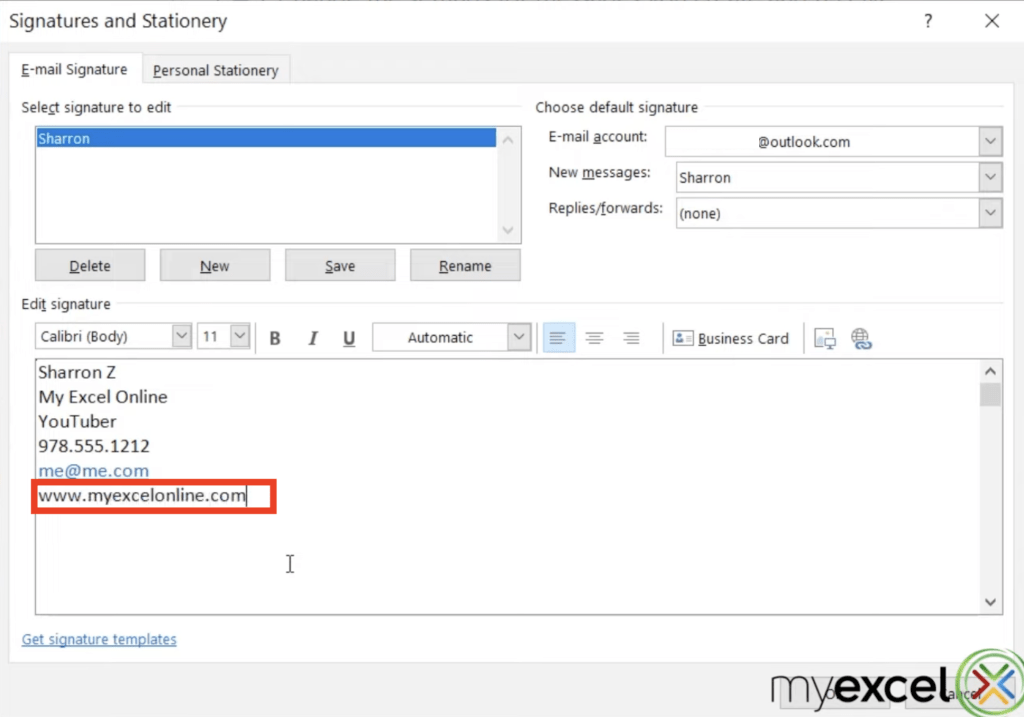
- Add website
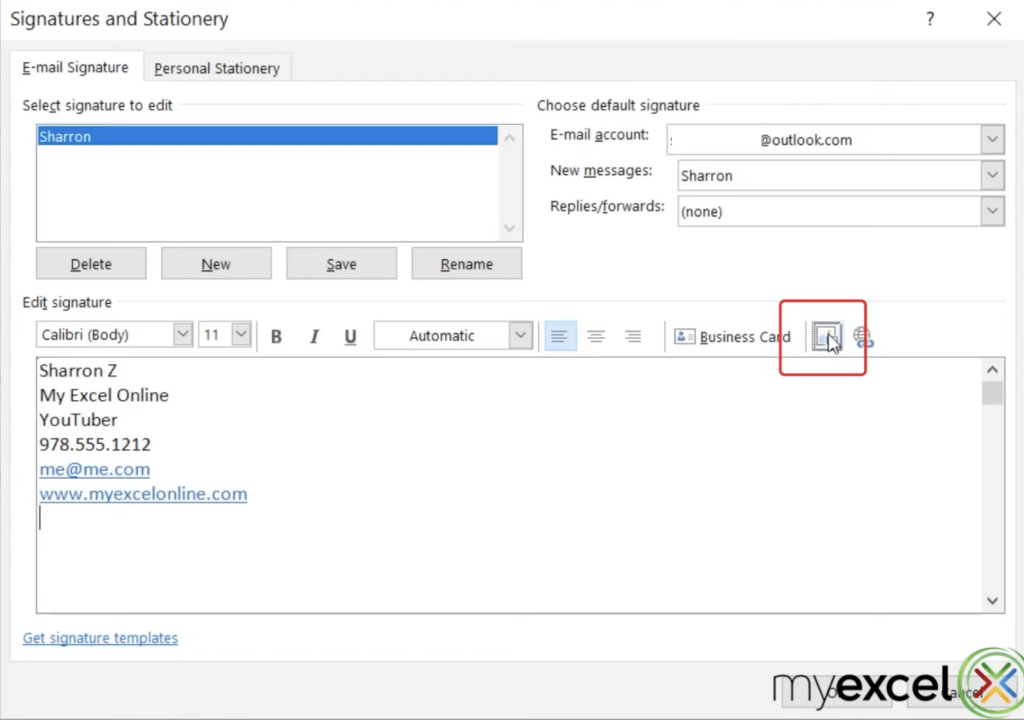
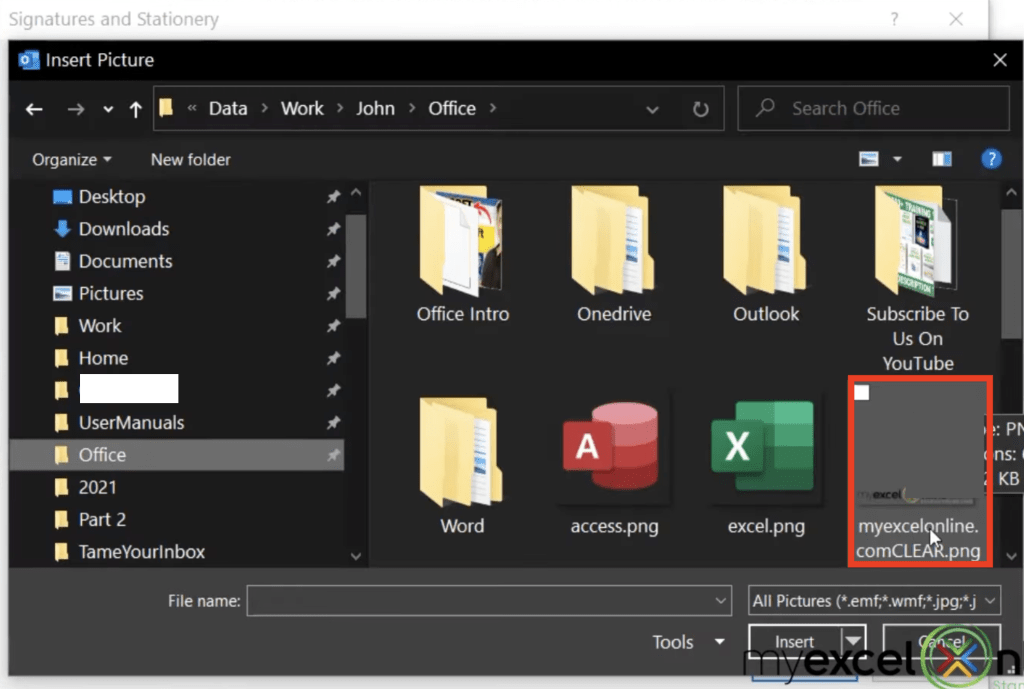
- Click on the image icon
- Select the logo and select Insert
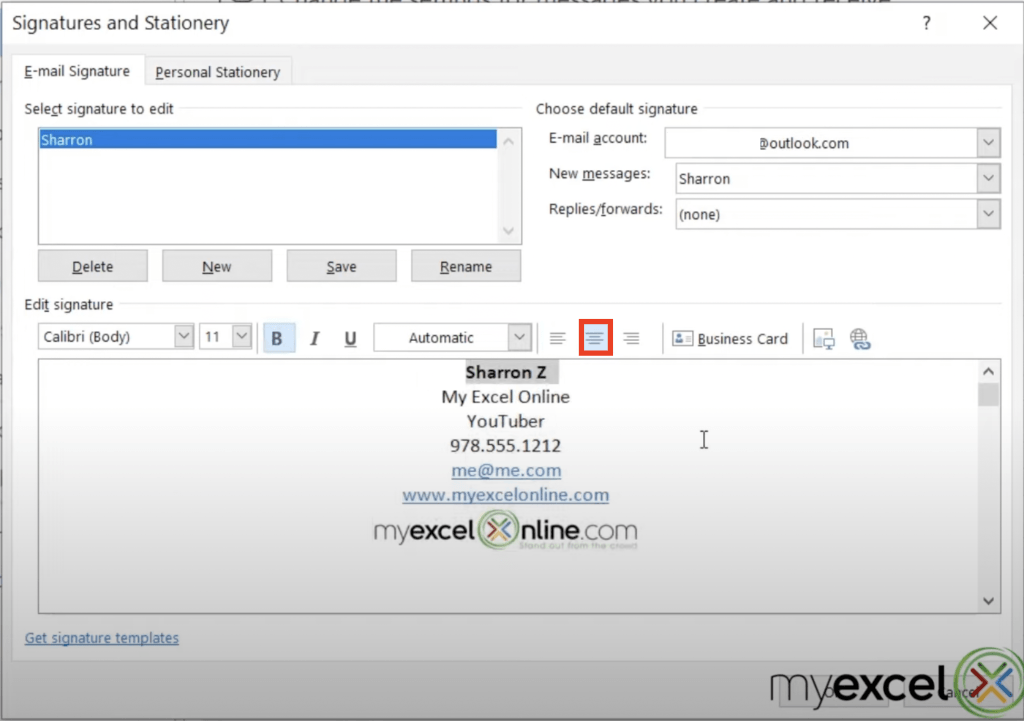
- Select the text and click on the middle align icon
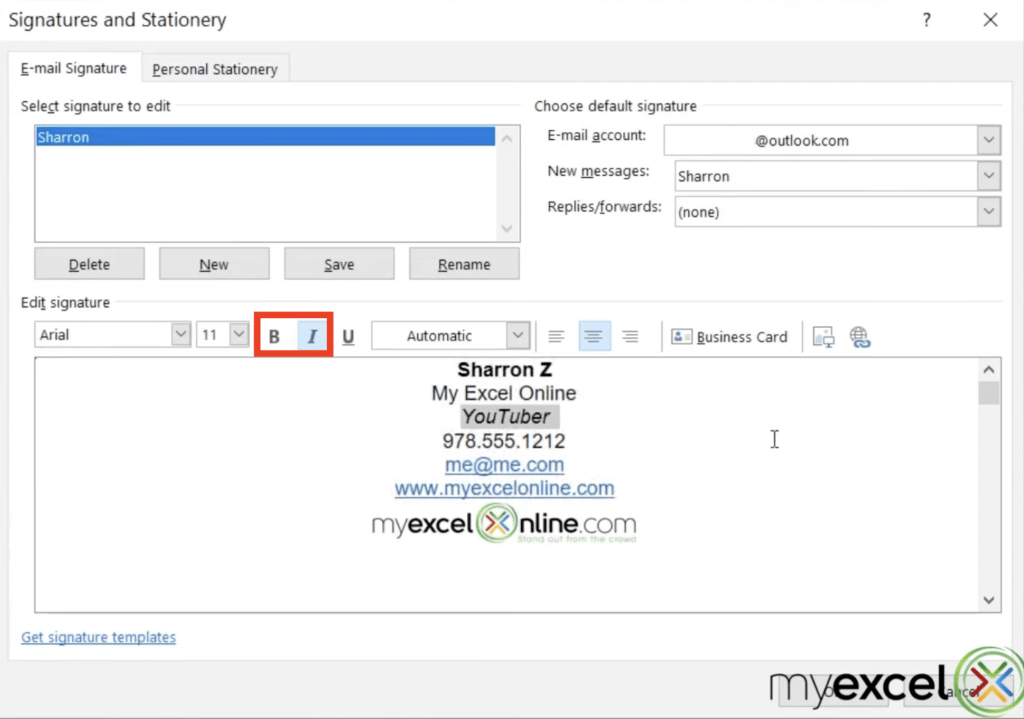
- You can bold or italicize the text by clicking on the icons below
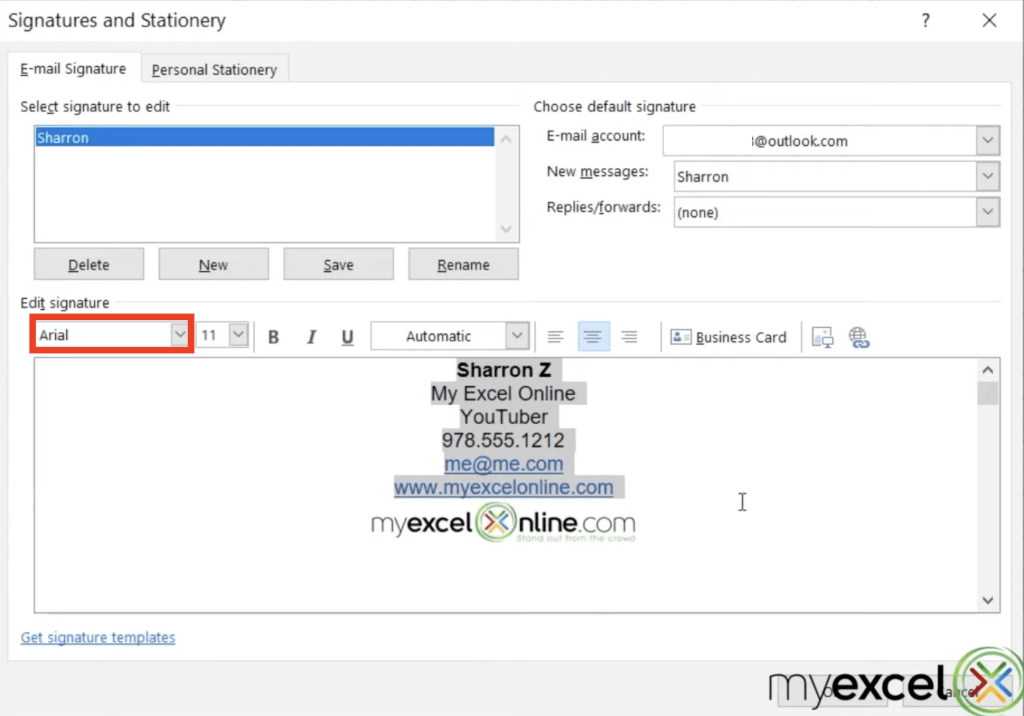
- You can change the font by clicking on the dropdown
Signatures for Different Email Accounts
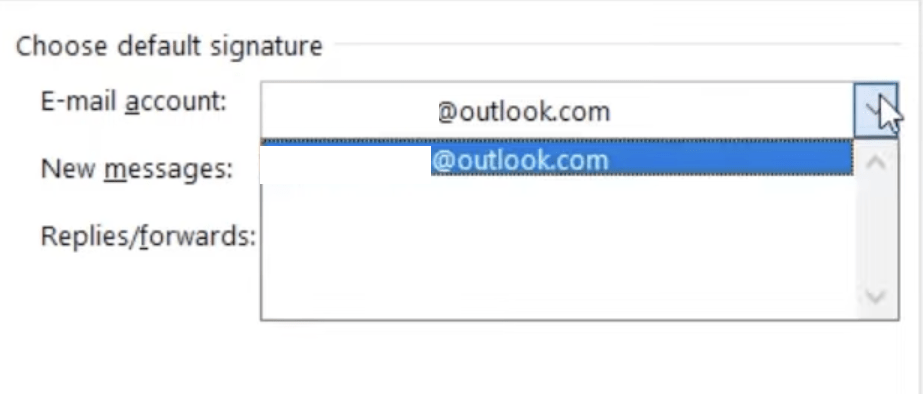
You can have different signatures for different email accounts. Follow the steps below to assign a new signature for a different account in Outlook:
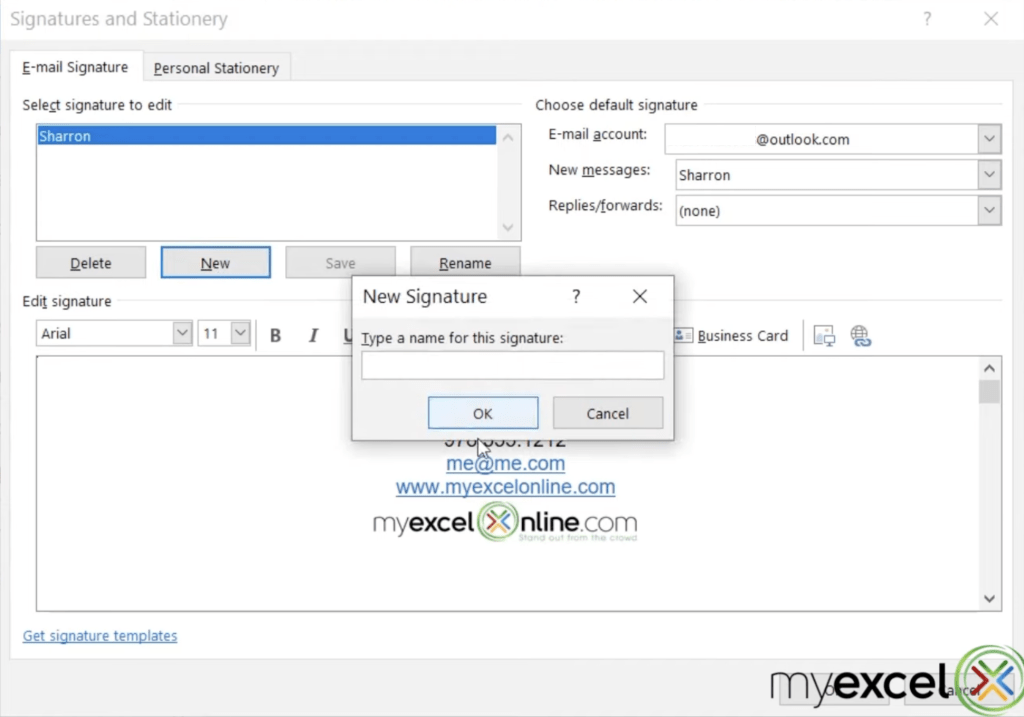
- Click on the New signature button
- A pop-up box will appear, then type in the name of the new signature and click on “OK”
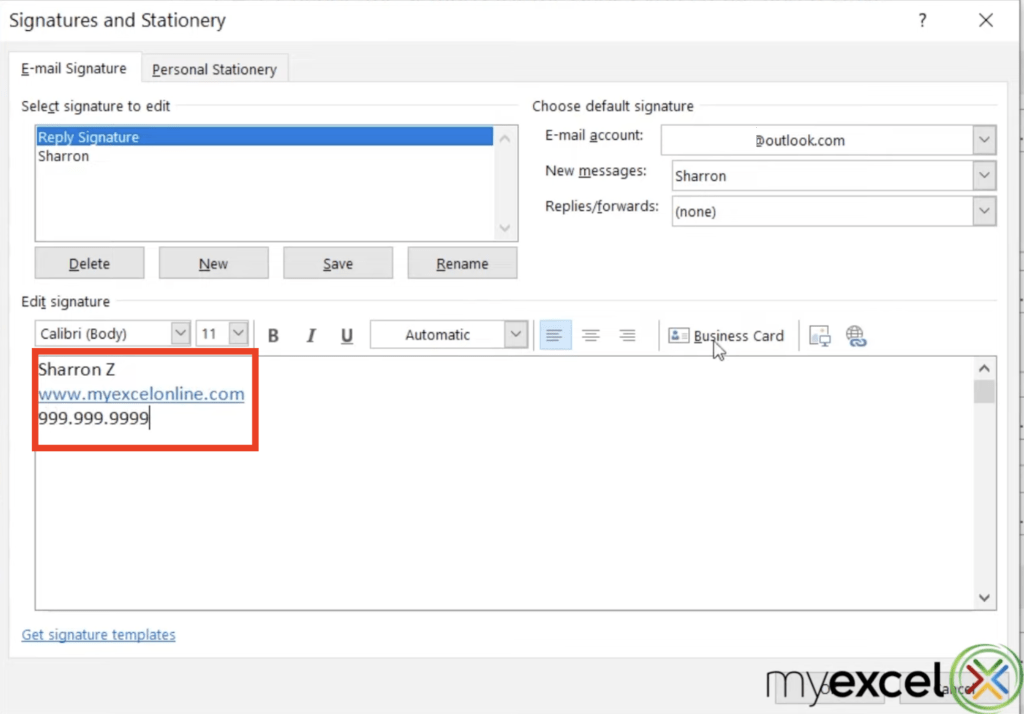
- Type in the new signature
- Choose a signature from the dropdown with the label E-mail account
- Click Save
Signatures for New Messages vs Replies/Forwards
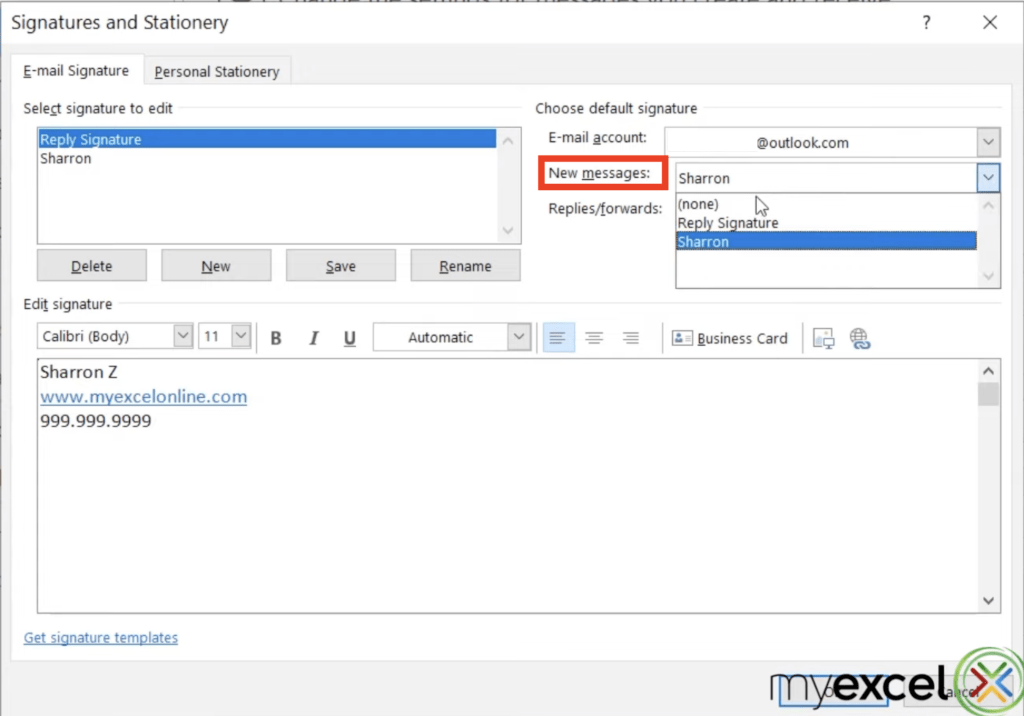
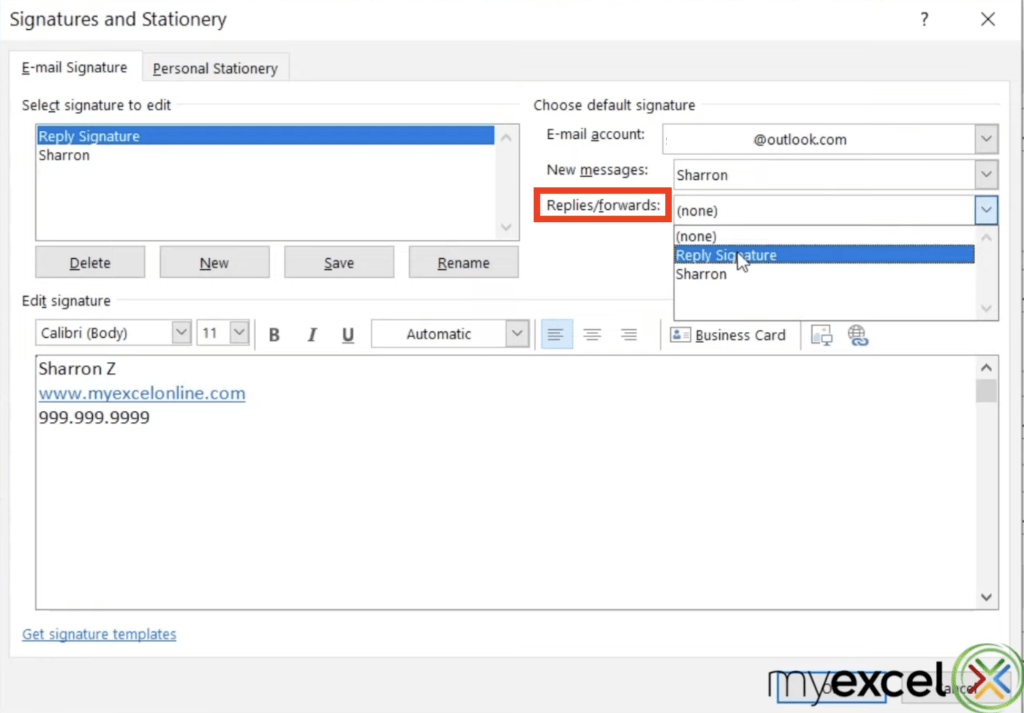
- Click on the New signature button
- A pop-up box will appear, then type in the name of the new signature and click on “OK”
- Type in the new signature
- Select a signature from the dropdown with the label New Messages. Choose the signature you want to send on every new message.
- Select a signature from the dropdown with the label Replies/Forward. Choose the signature you want to send on every reply or forward.
- Click Save
Now, go to New Email and you will find your New Message signature automatically added to your email.
When you try to reply or forward an email, you will find your Replies/Forward signature automatically added.
Another Way to Access Signature Settings
Follow the steps below to quickly find any settings using the search tool:
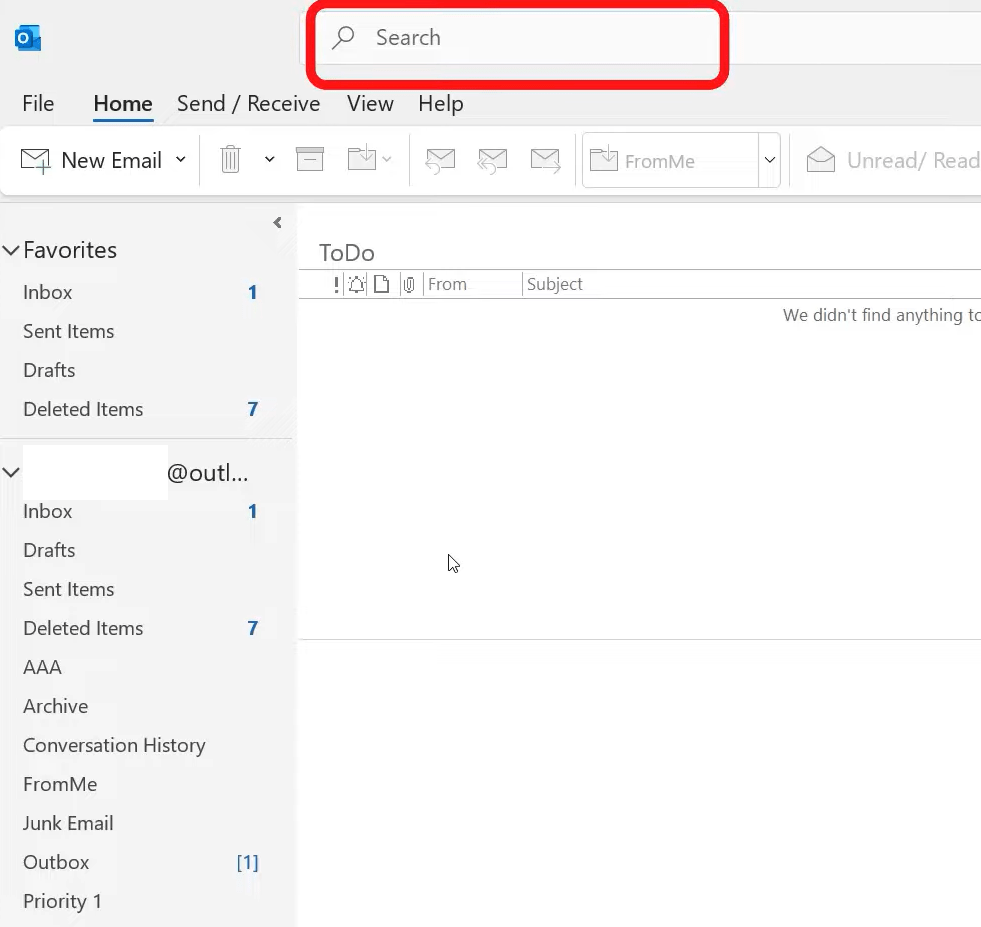
- Click on the search bar at the top
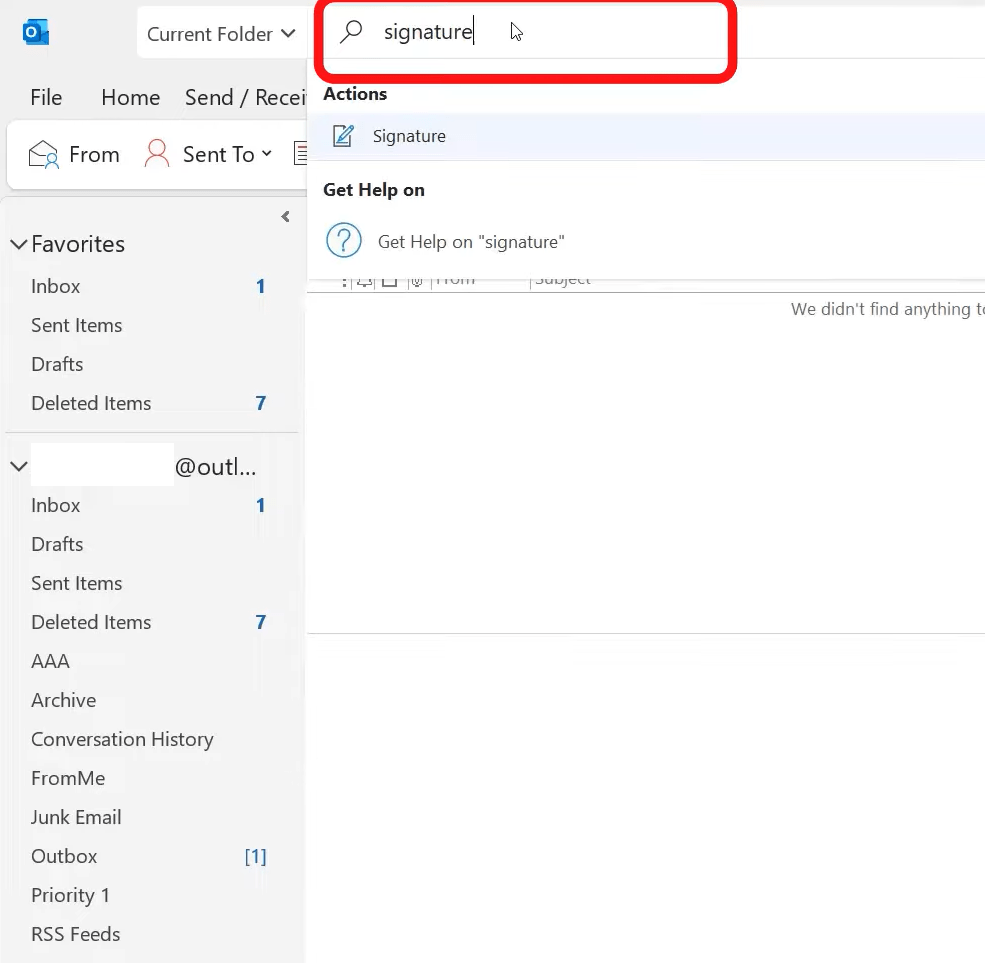
- Type in Signature
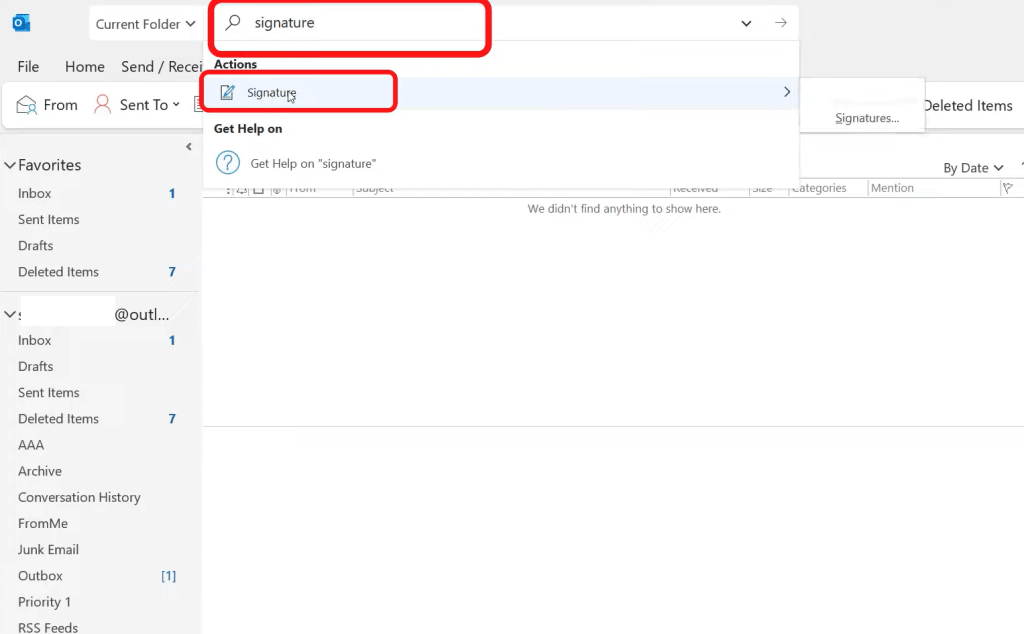
- A dropdown will appear with search results and then click on the signature
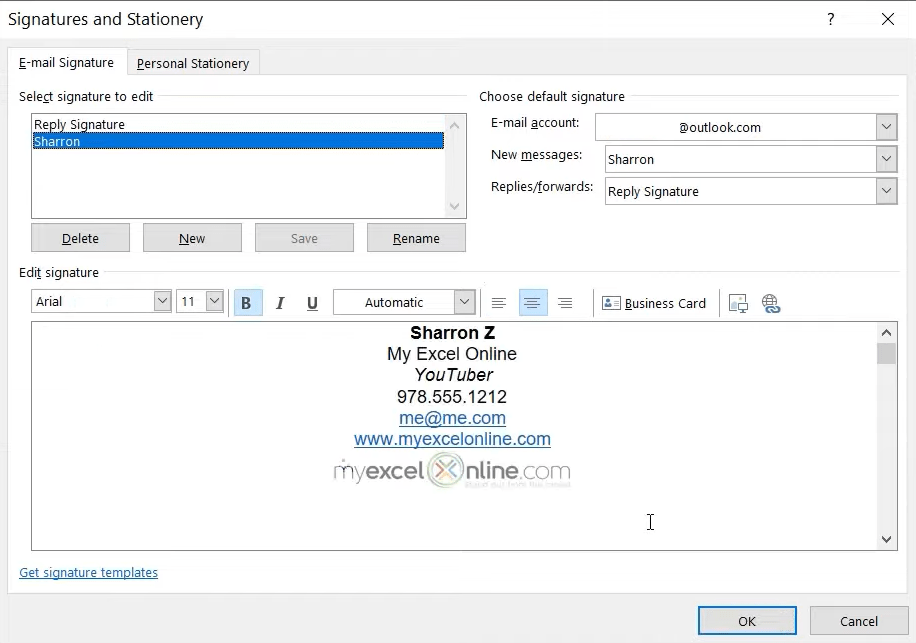
- The signature setting dialog box will show up
Now you can easily make any change or create a new signature using the signature setting dialog box.
Creating a Signature in Outlook.com
You can follow the steps below to easily add a signature to Outlook.com –
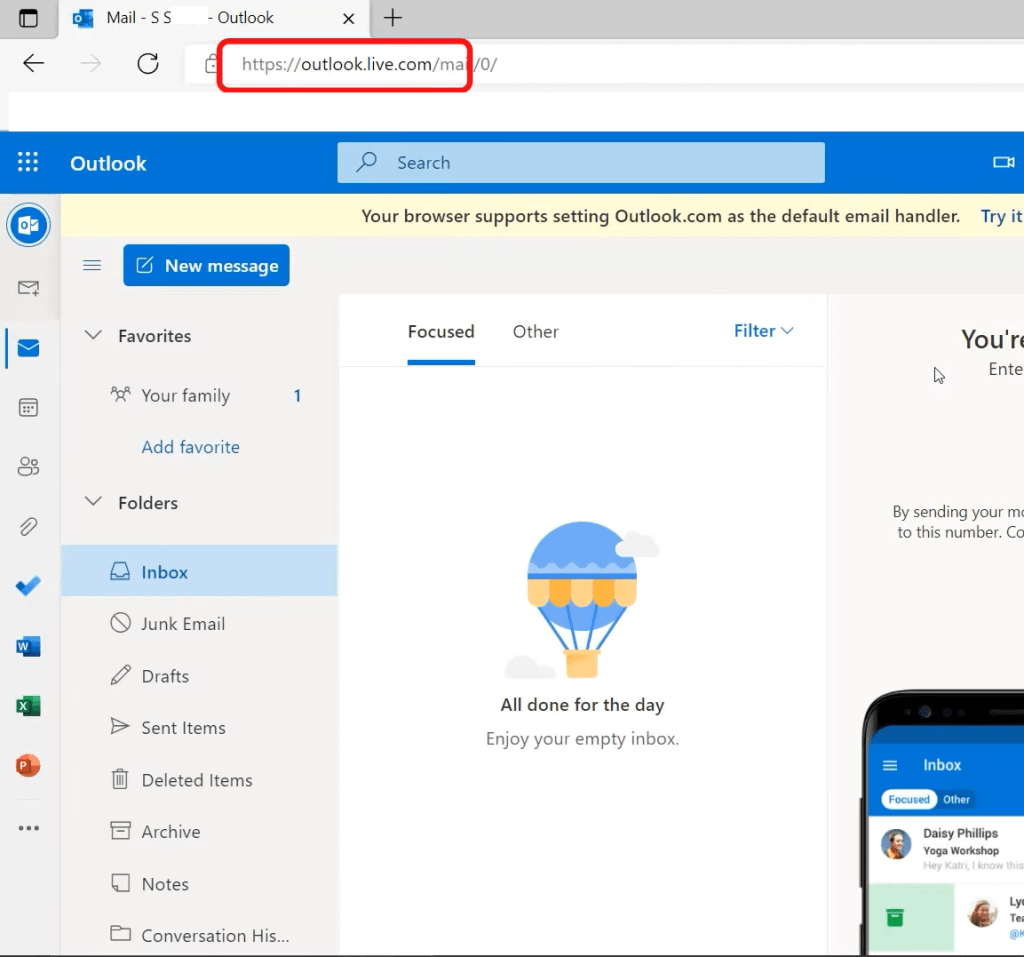
- Go to Outlook.com
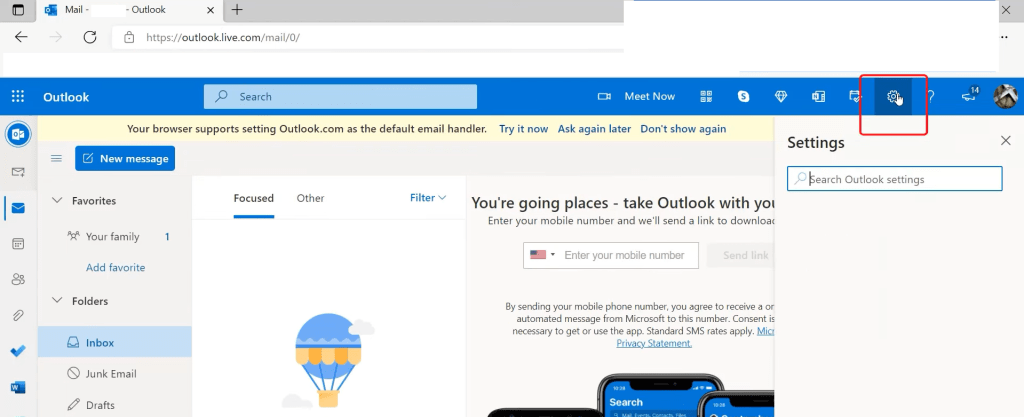
- Click on the settings cog-wheel on the top right of the screen
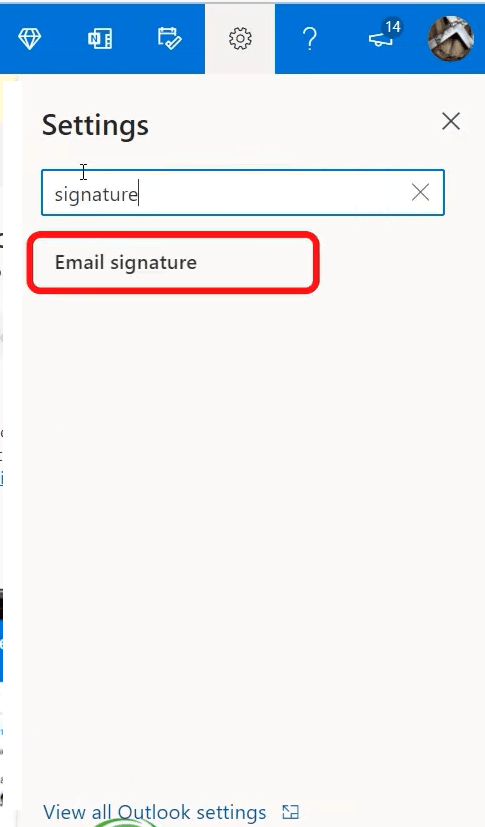
- A sidebar will open, search by typing in Signature and clicking on the search result
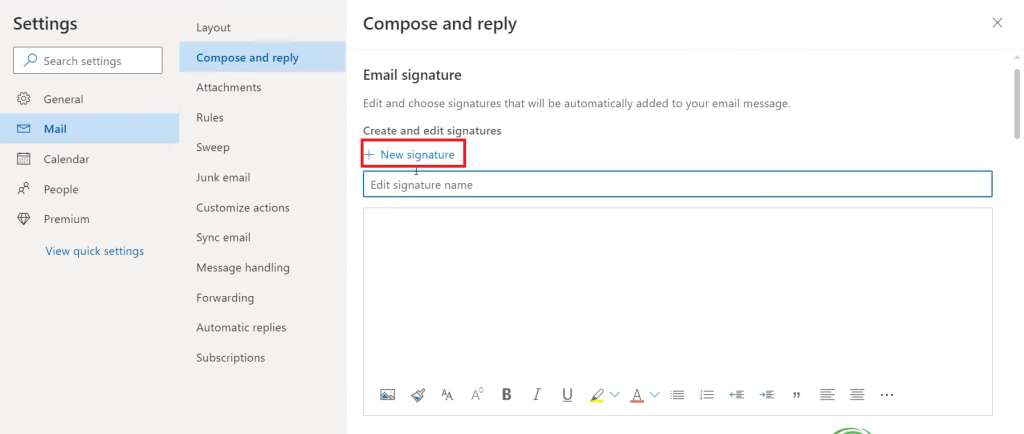
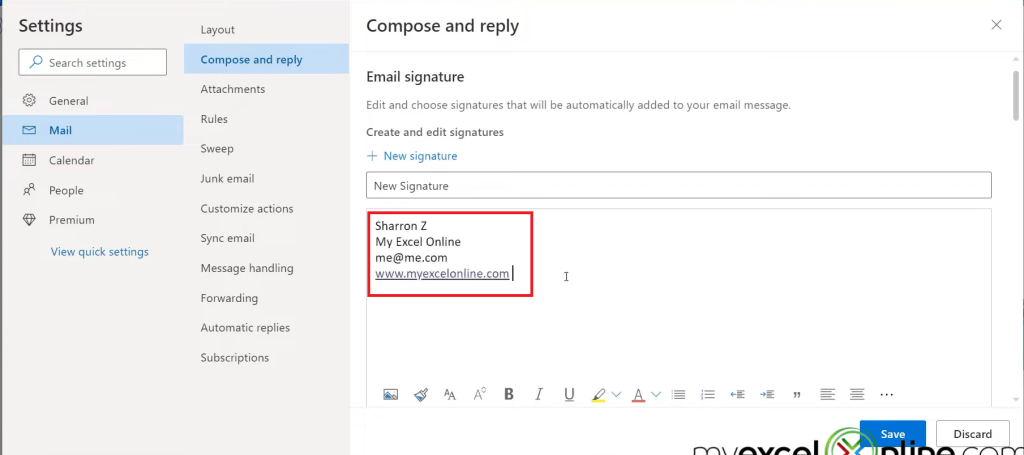
- A signature menu will open, click on Add signature
- Type in your signature and format it
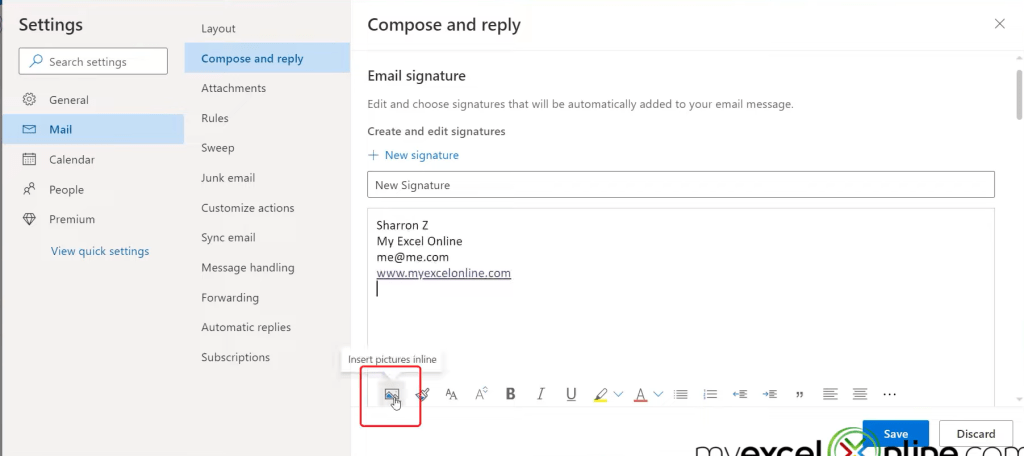
- Add a logo to your signature by clicking the button below
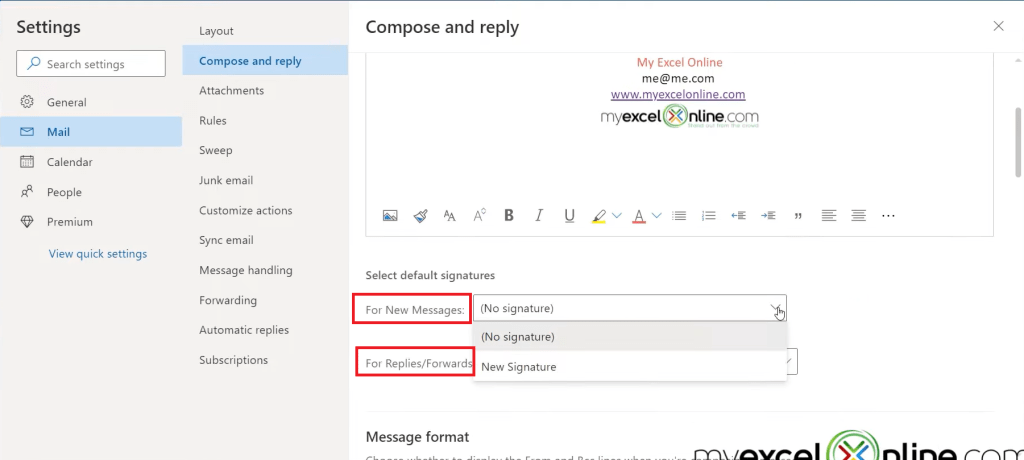
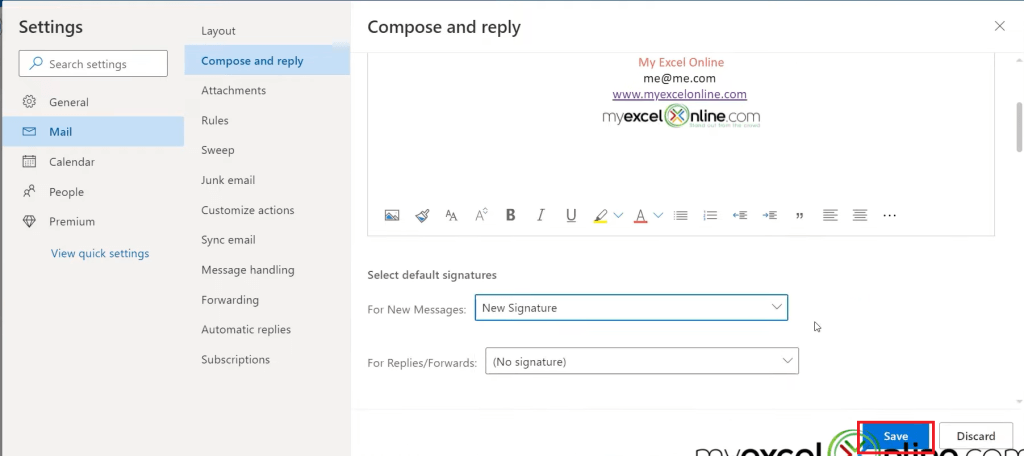
- Choose a signature for new message, replies / forwards option as shown before
- Click on Save
In this article, we have covered what a signature in Outlook is, how to set the settings for Outlook, how to edit an Outlook signature, how to set up different Outlook signatures for different email accounts, how to use an Outlook signature online, and MORE!
How to Fix Microsoft Outlook Error Connection Problems & Quick Solutions
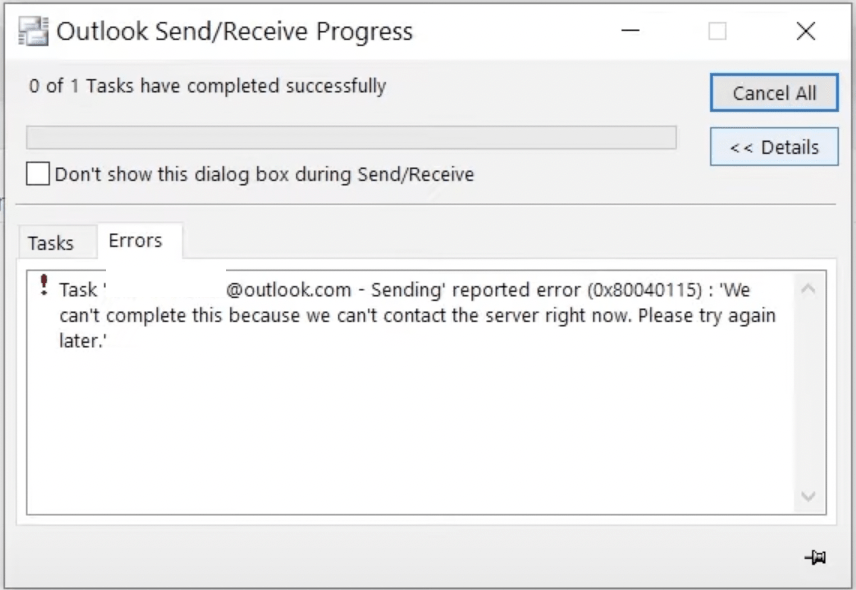
Unable to receive messages/emails? Having trouble sending out emails? Are emails not loading properly in Outlook?These are some of the most common errors faced by users and you should know how to fix them in order to enjoy using Outlook effortlessly.
- In this article, we will cover the Top 8 solutions to Troubleshoot Microsoft Outlook Errors –
- Relink Email Account to Microsoft Outlook
- Lost WiFi Connection Problems
- Repair Microsoft Outlook Email Account
- Microsoft Outlook Add-In Issues
- Rebuild the Microsoft Outlook Data File
- Microsoft Office Update
- Repair Microsoft Office
- Reinstall Microsoft Outlook
Watch this video on How to Fix Outlook Errors on YouTube and give it a thumbs-up!
Relink Email Account to Microsoft Outlook
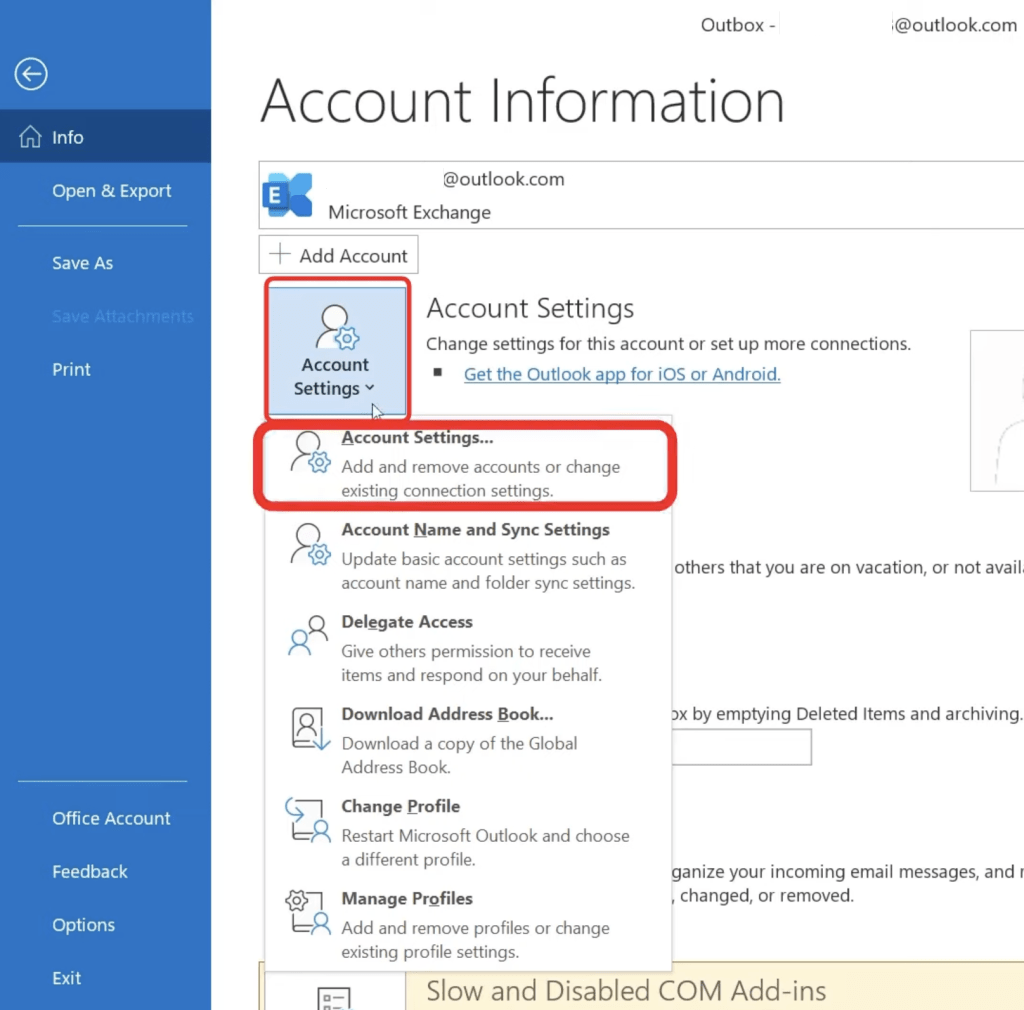
One of the reasons for the error message is that your account setting is incorrect. You can relink your email account to Microsoft Outlook to fix this Outlook error –
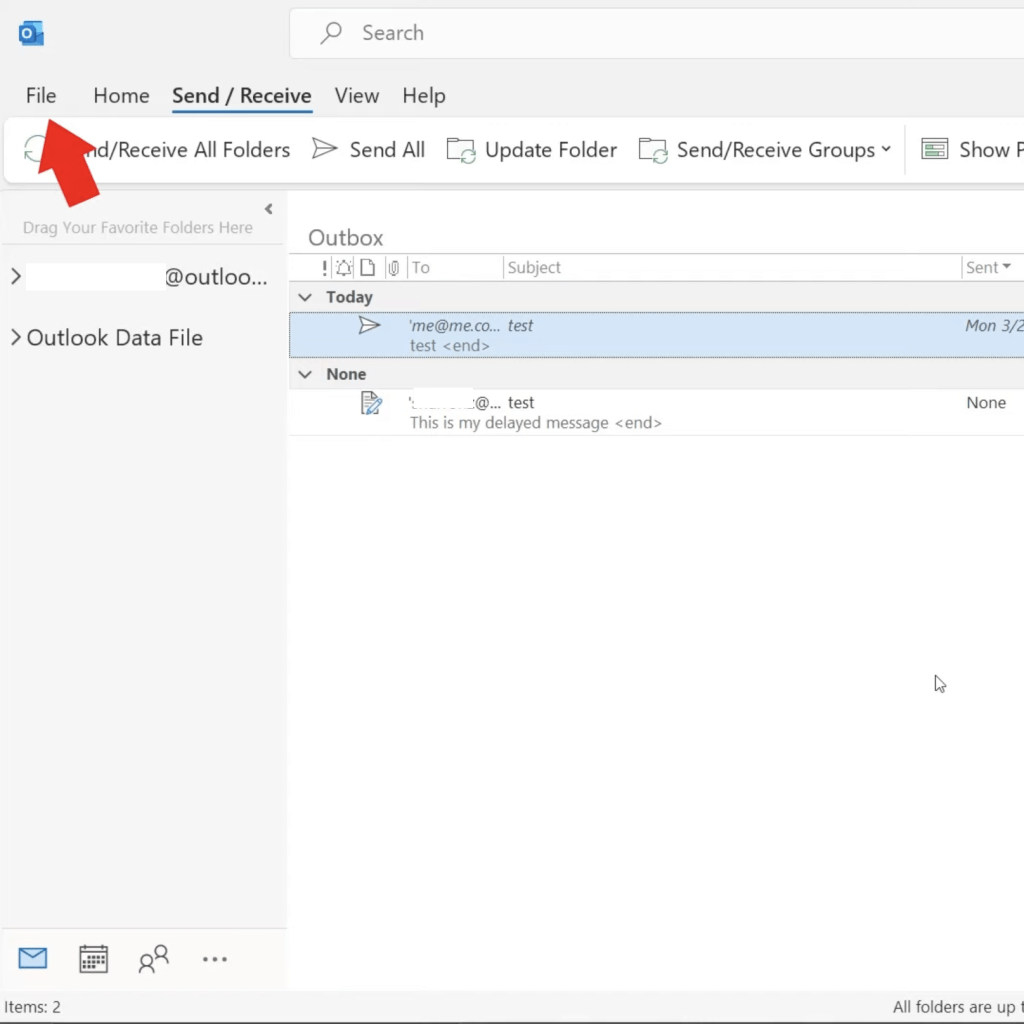
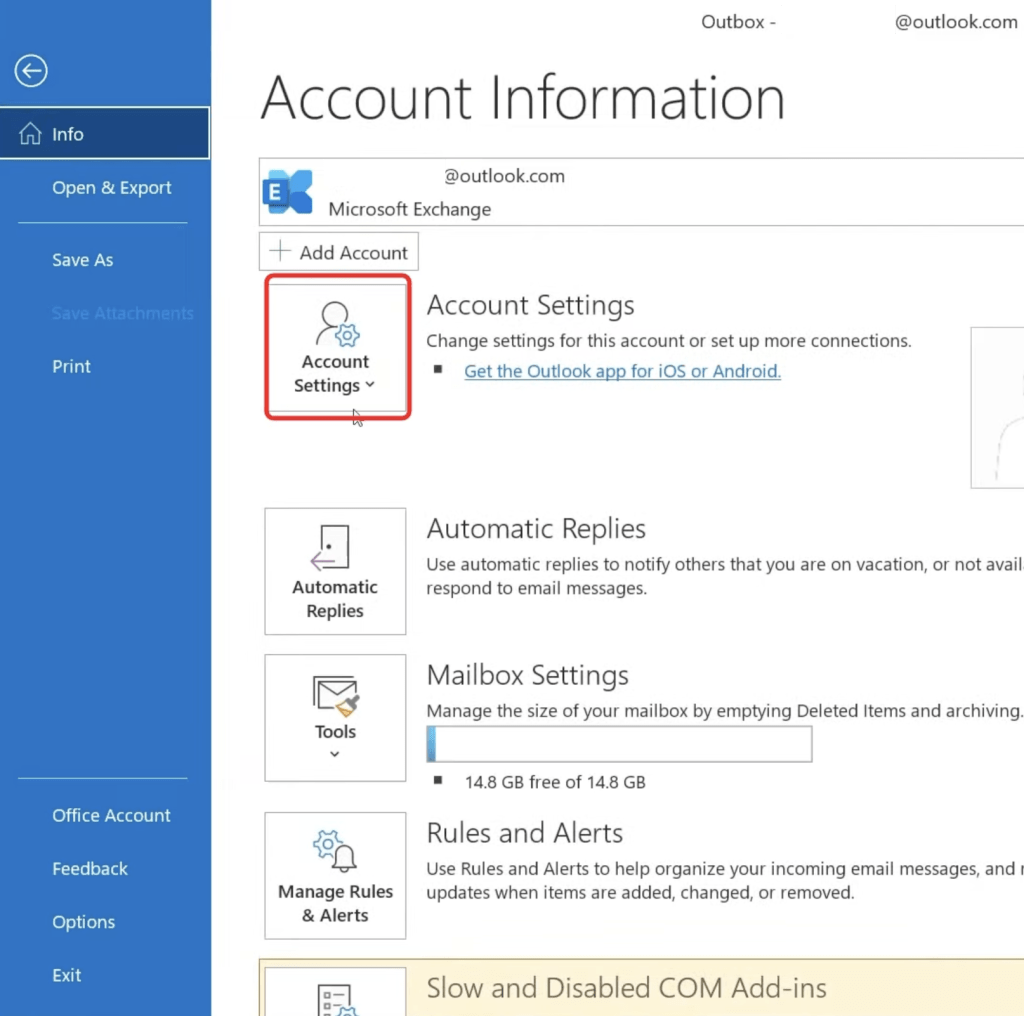
- Go to File
- Click on the Account Settings arrow
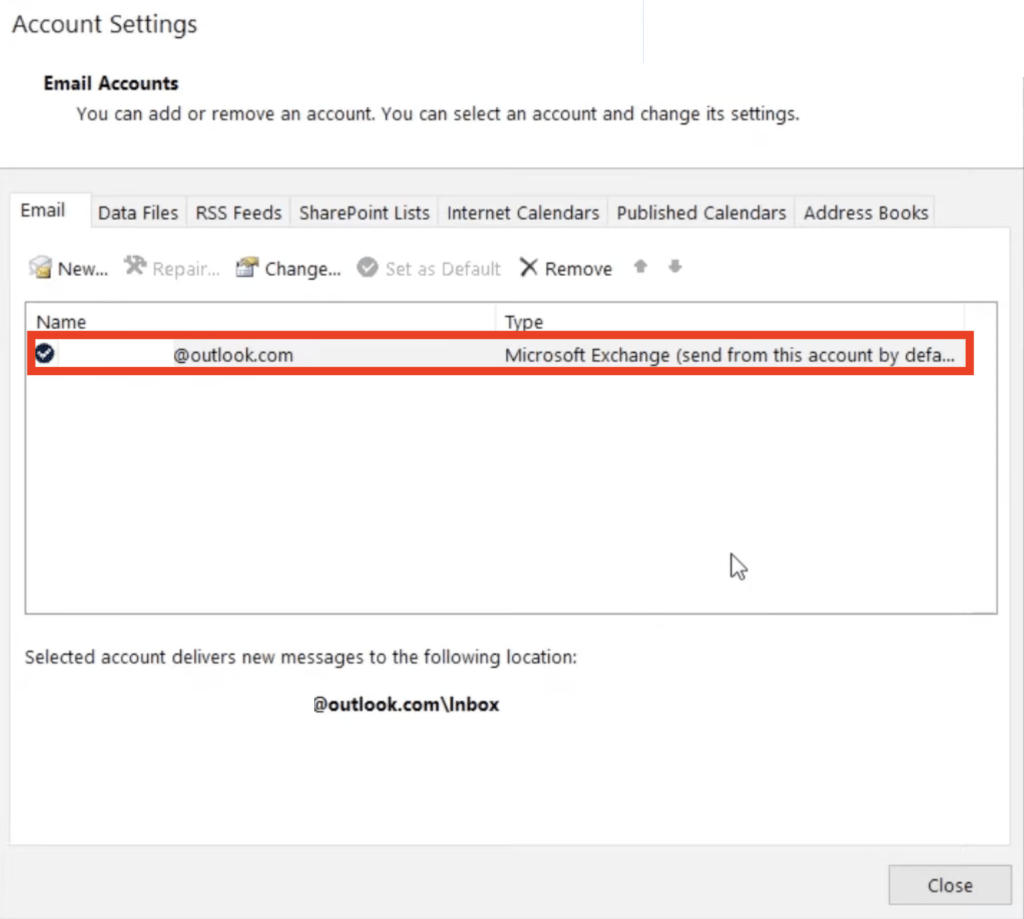
- From the dropdown, select Account Settings
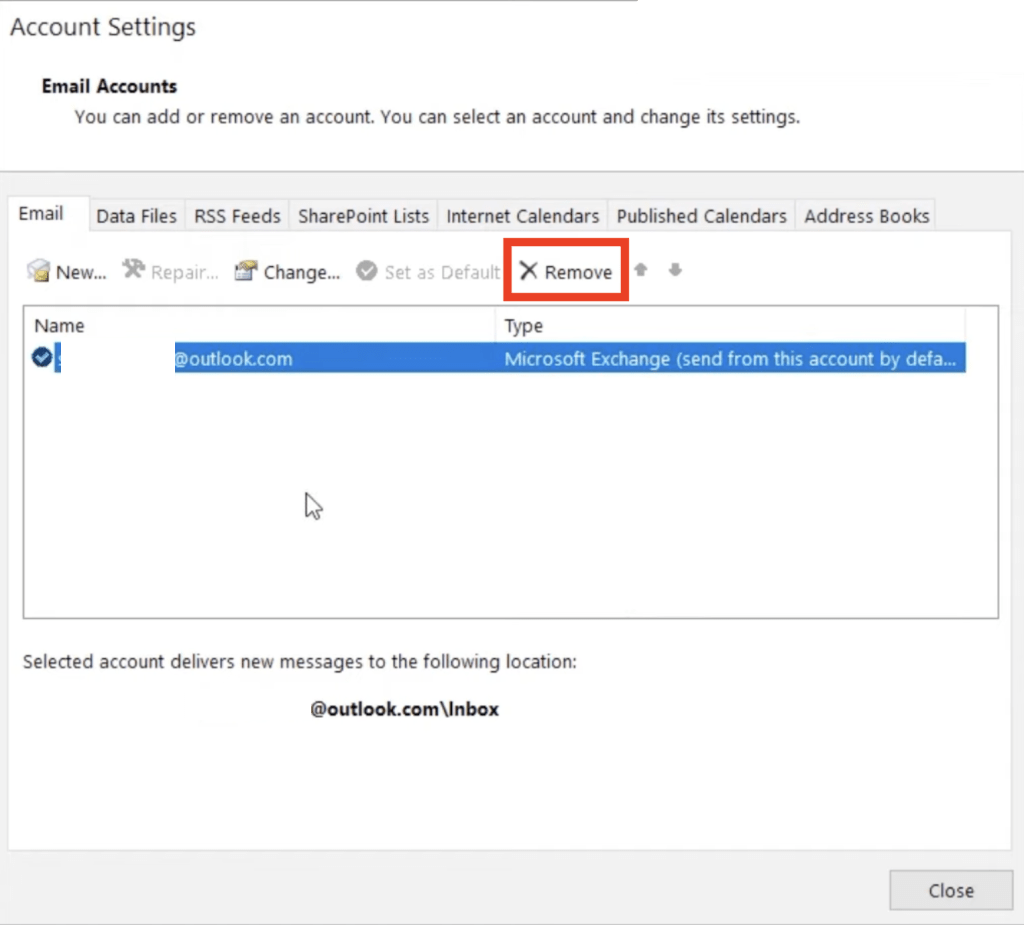
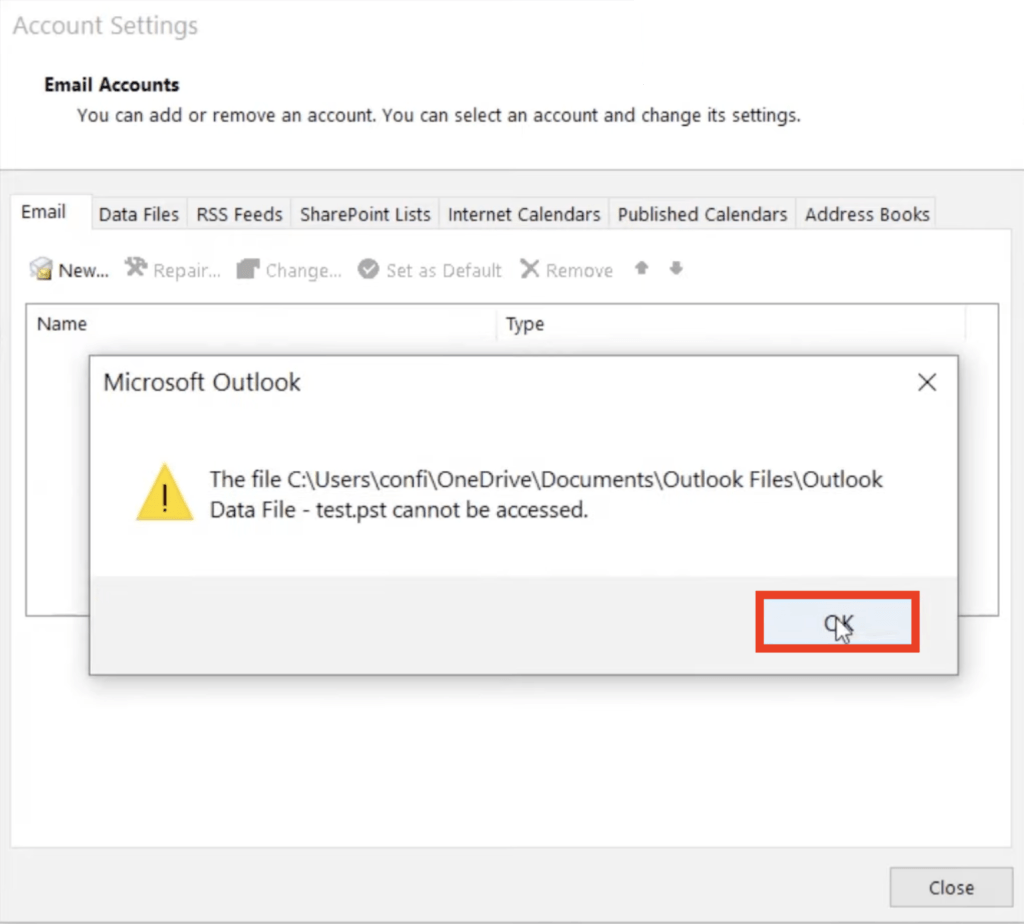
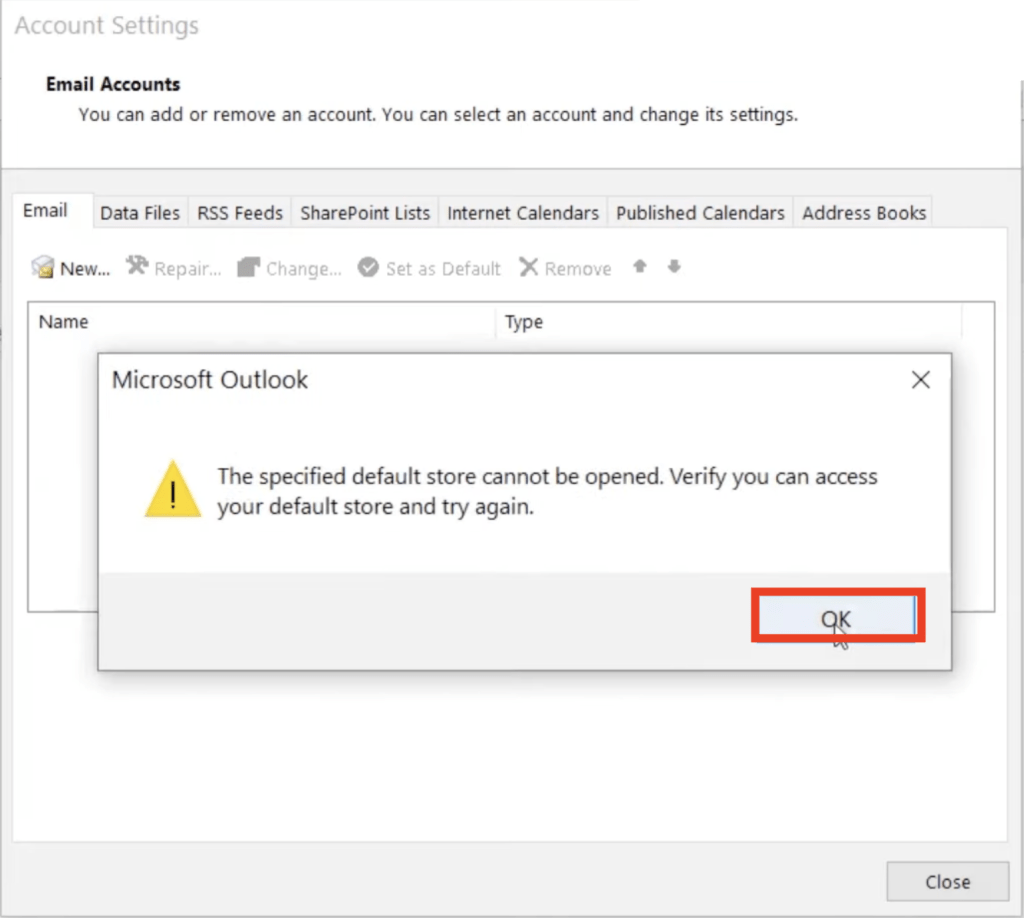
- In the dialog box, select the account
- Hit Remove
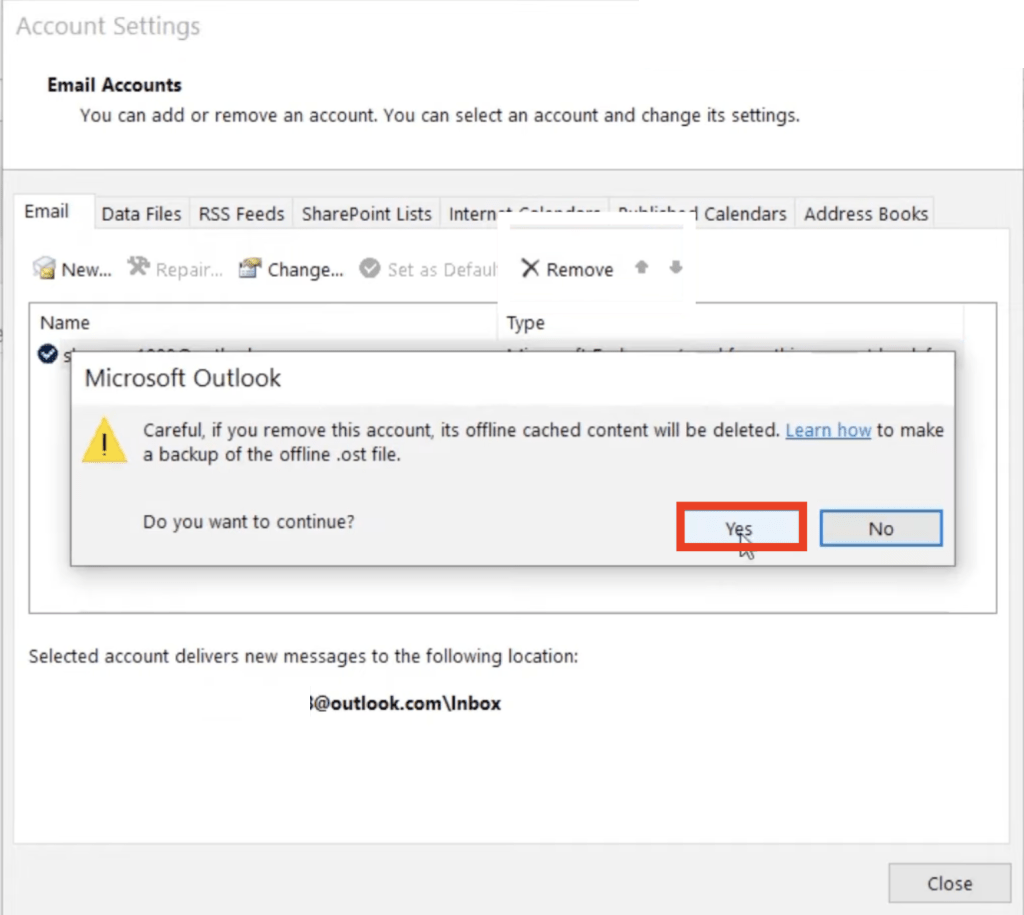
- In the warning message box, click Yes
- Click OK
- Click OK
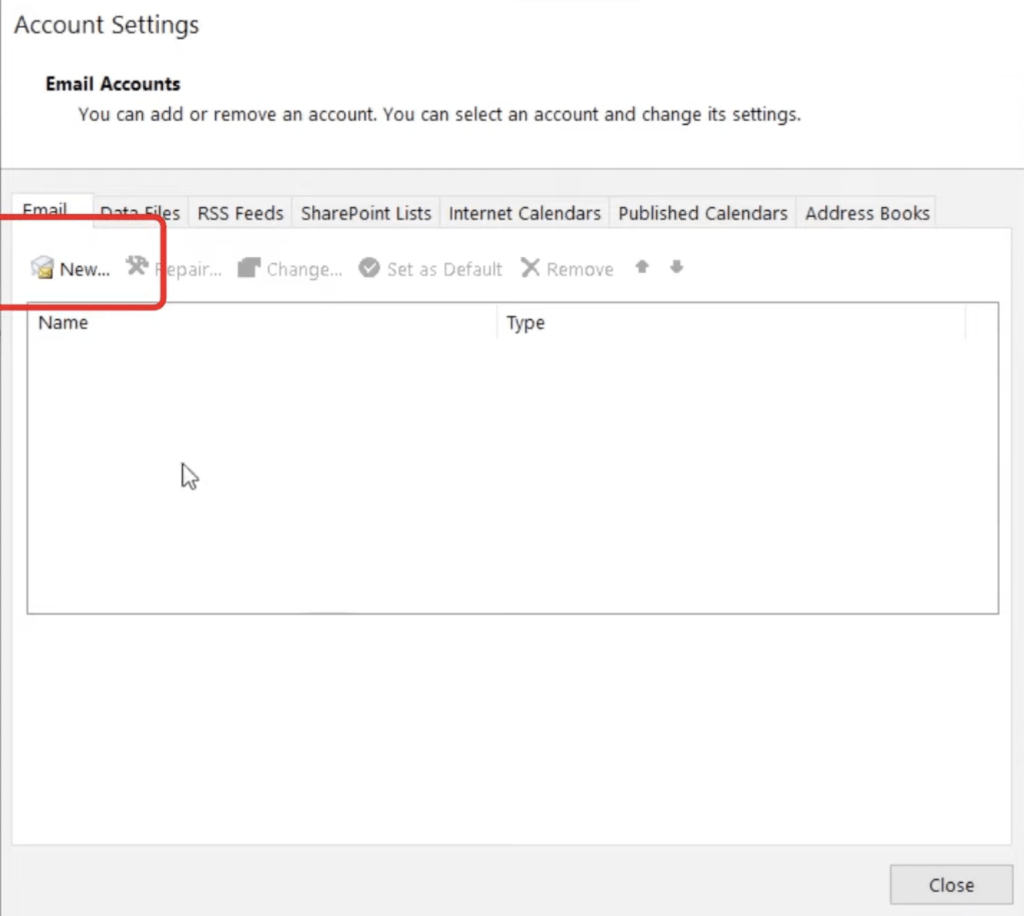
- Re-add the account by clicking New
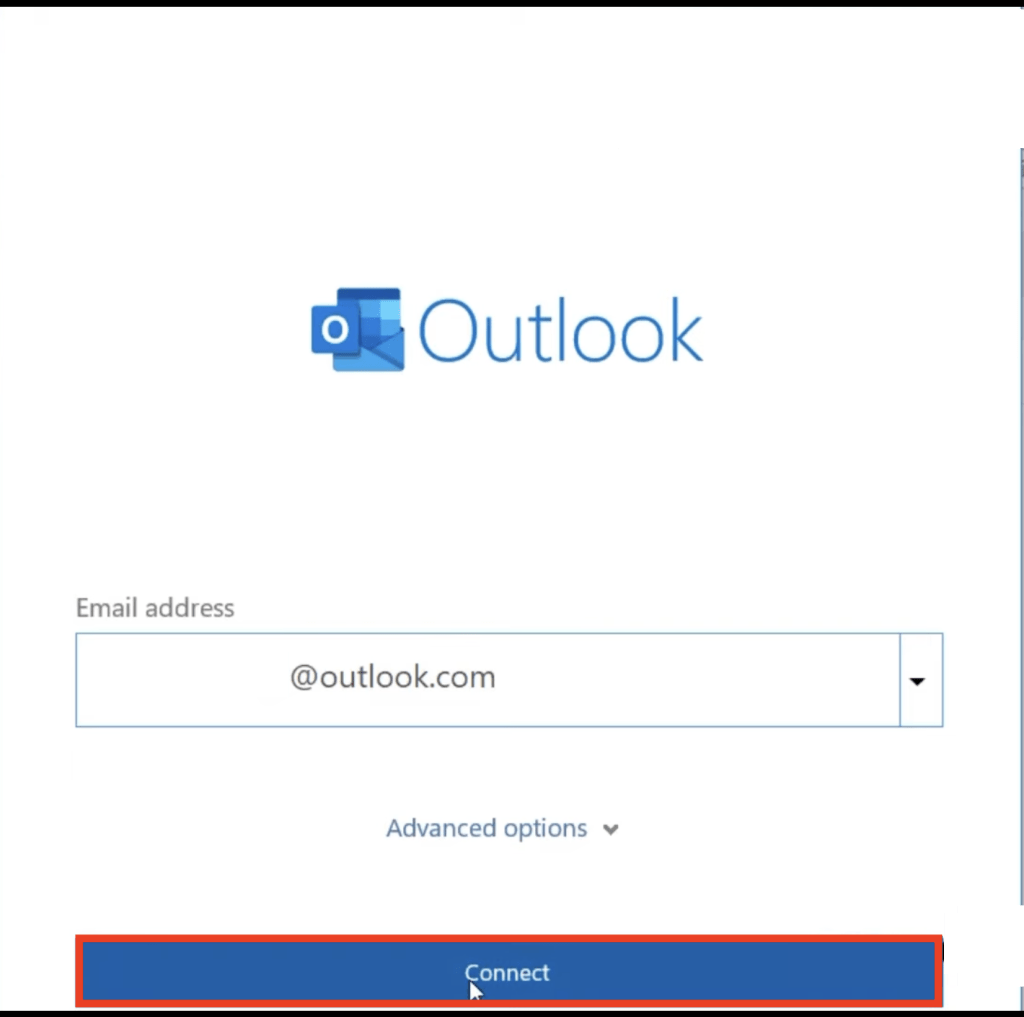
- Type your email address and click Connect
This will help you relink your existing account and possibly resolve the Outlook error.
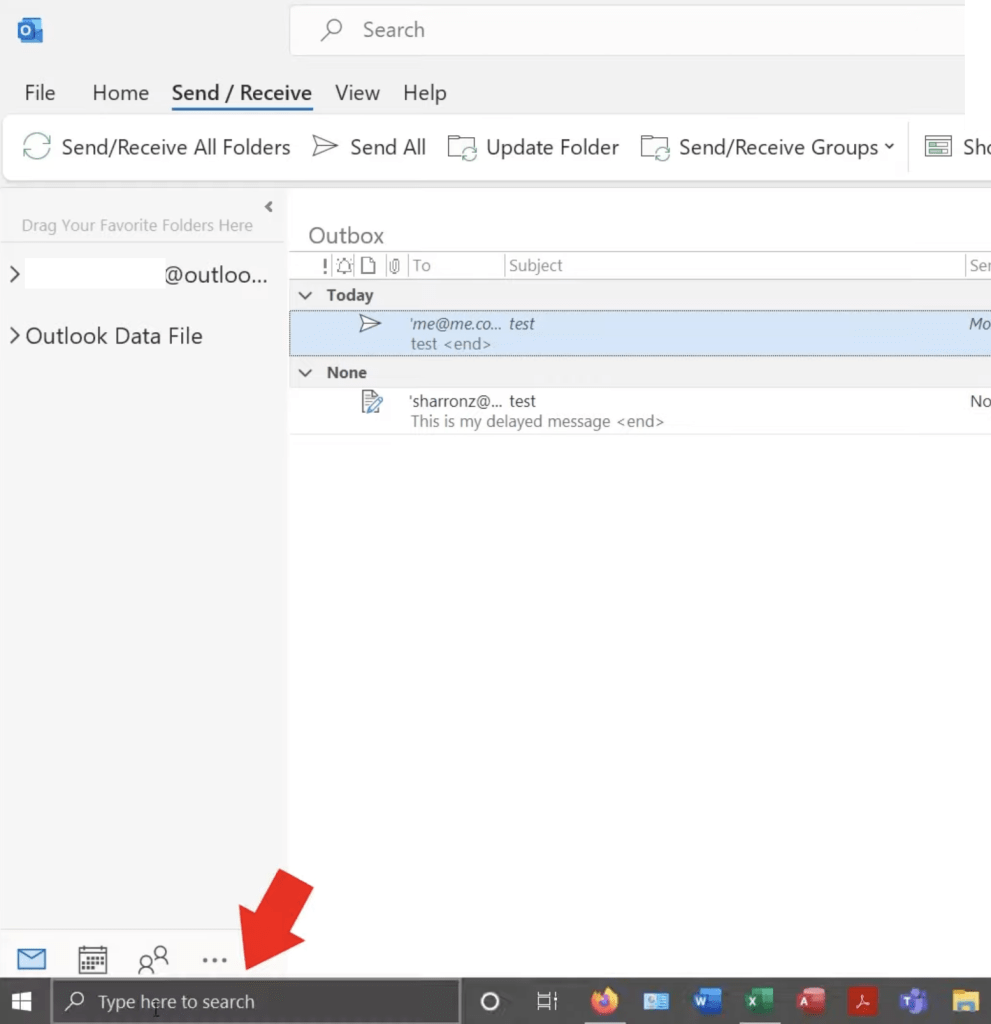
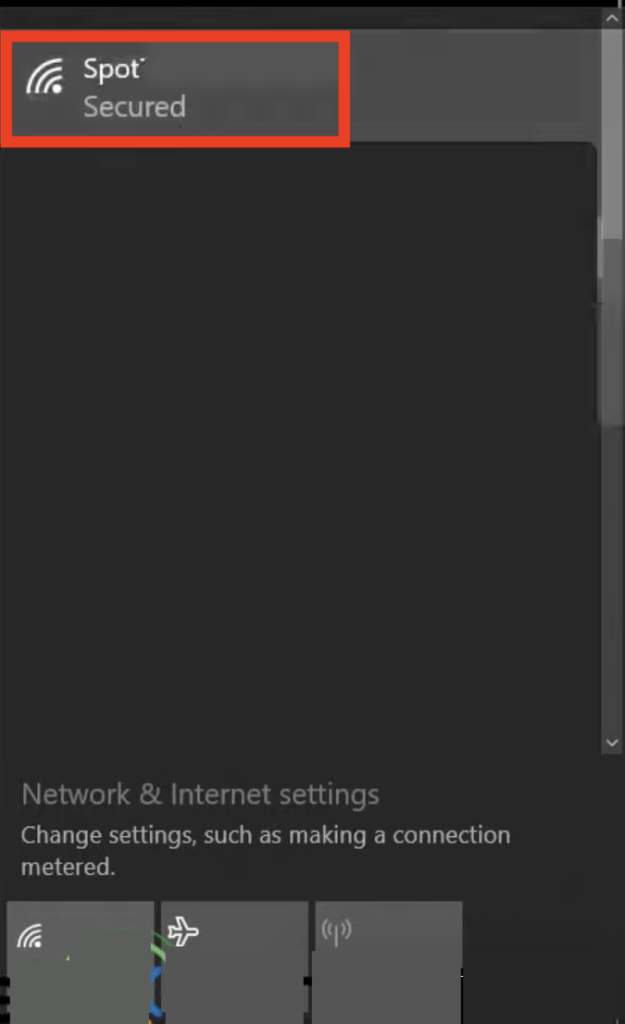
Another reason why you may be facing an error in Outlook could be that you are not connected to the internet. Let’s try and connect to the network –
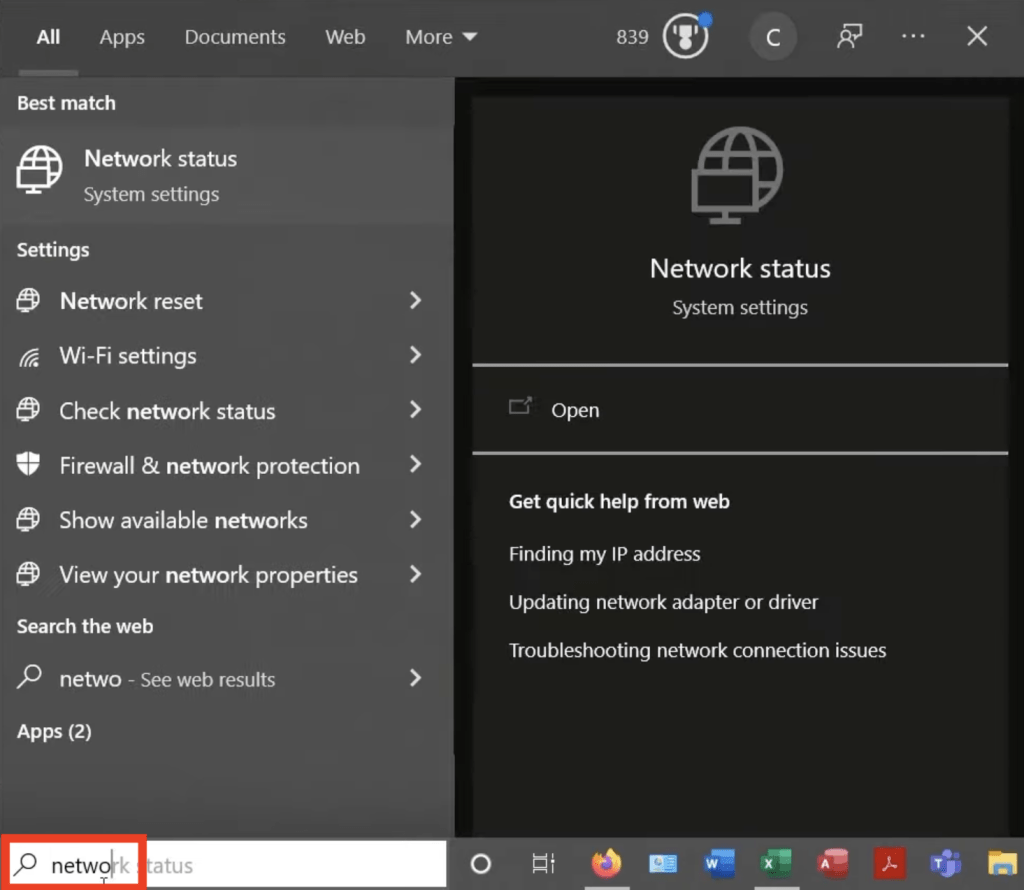
- Press the Search button on the taskbar
- Type Network
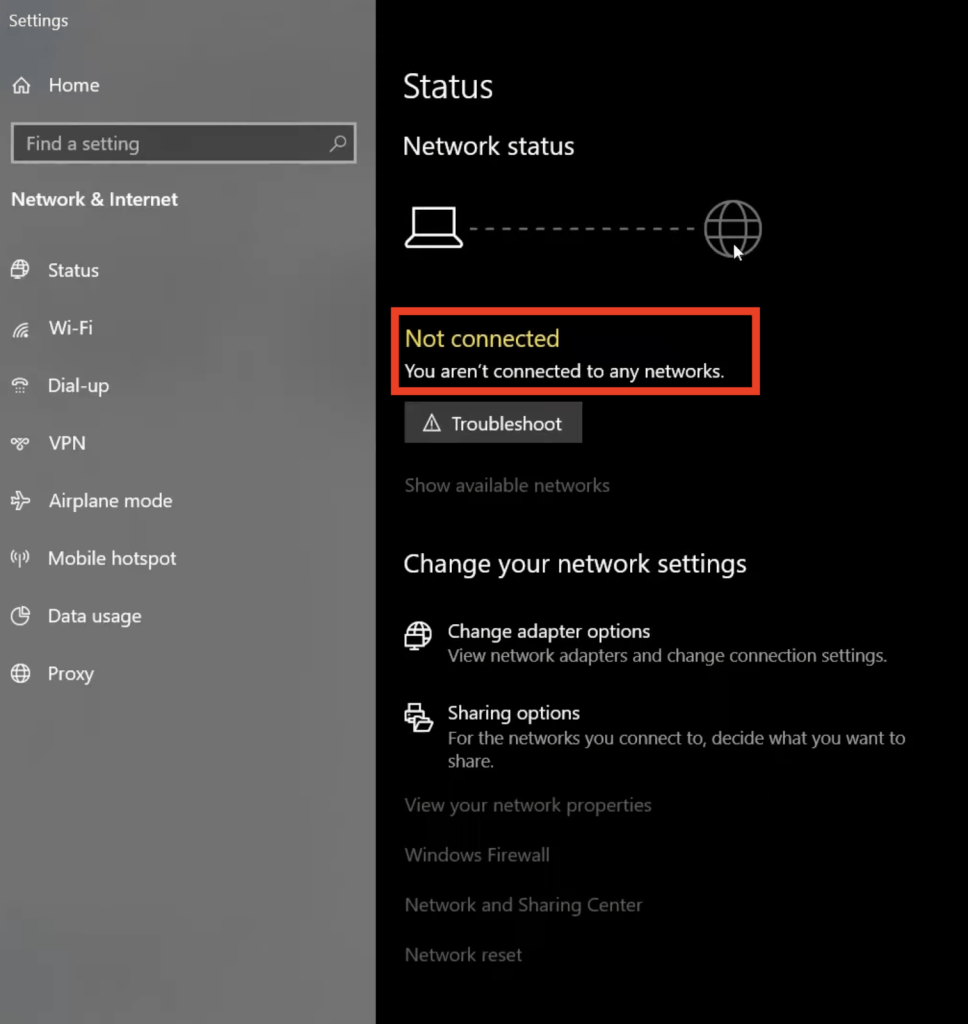
- You will see that you are not connected to the internet
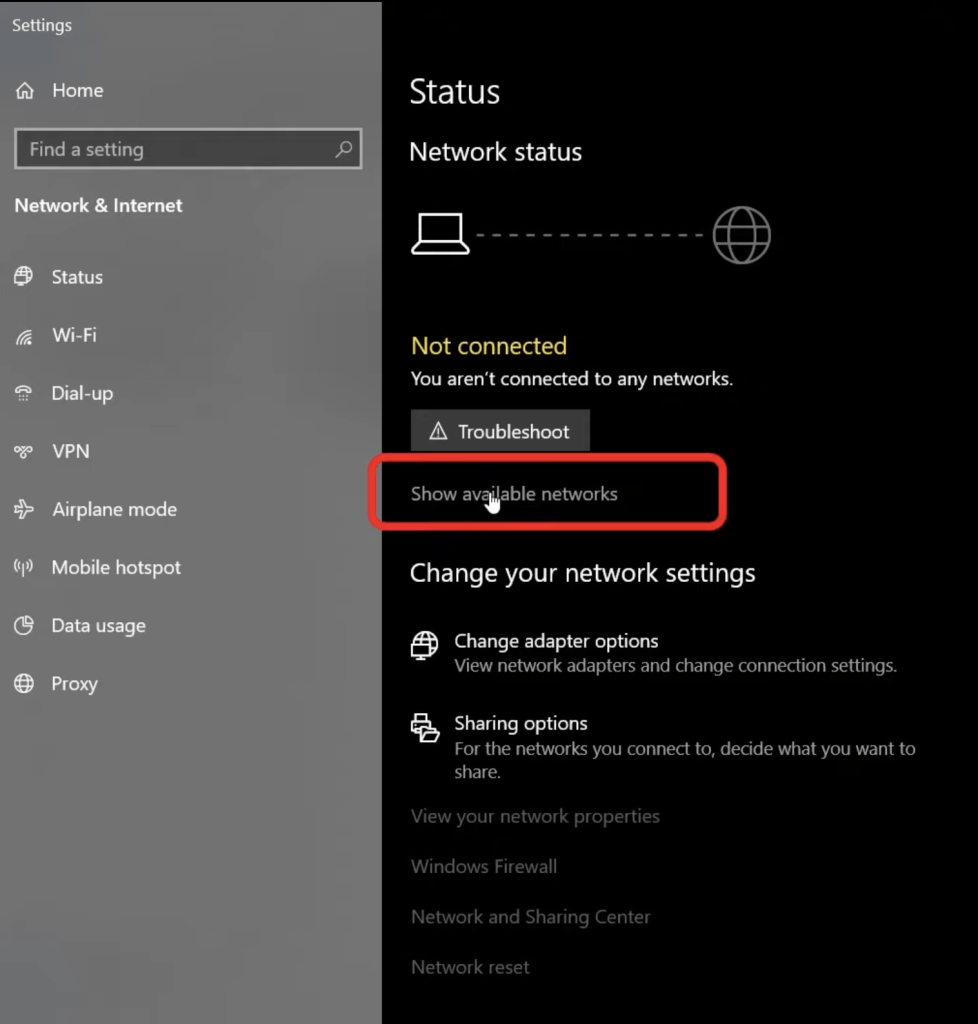
- Click on Show available networks
- Select a network and press Connect
Once you are connected to the internet, you can open Outlook and try to send your email.
Repair Microsoft Outlook Email Account
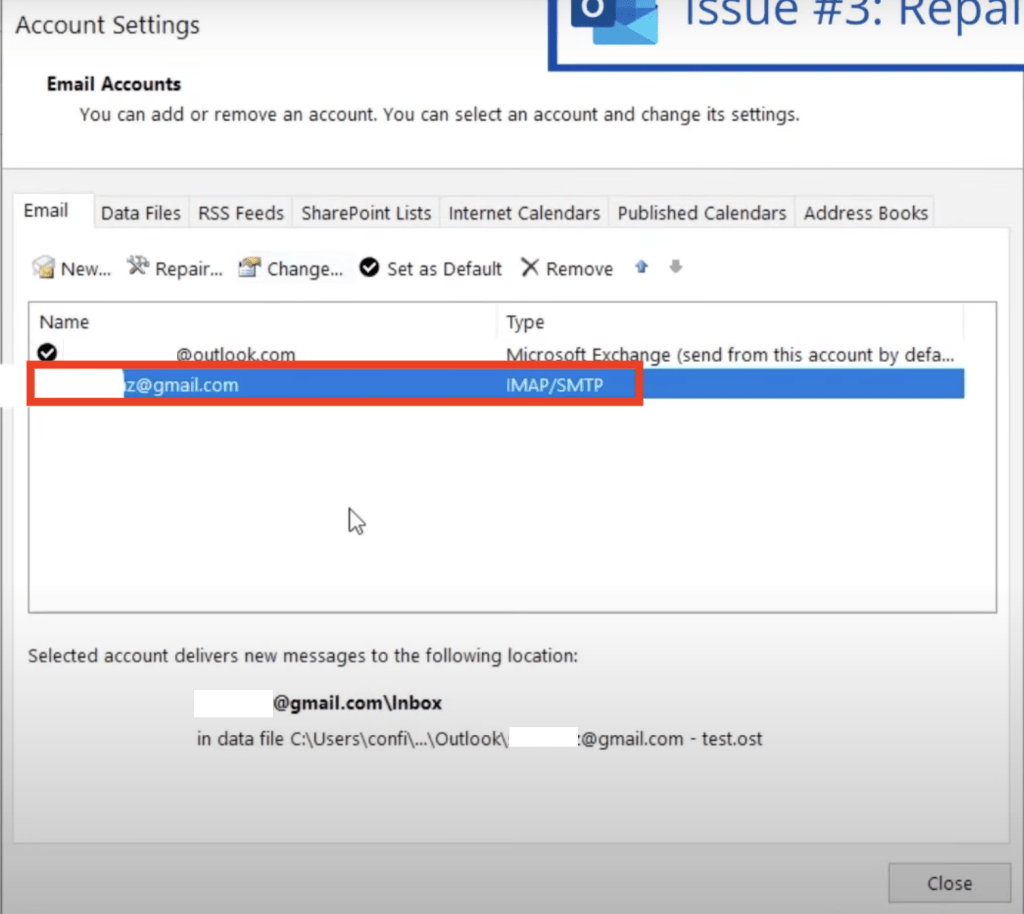
You can also try and repair your email account to resolve any Outlook account error –
- Go to File
- Click on the Account Settings arrow
- From the dropdown, select Account Settings
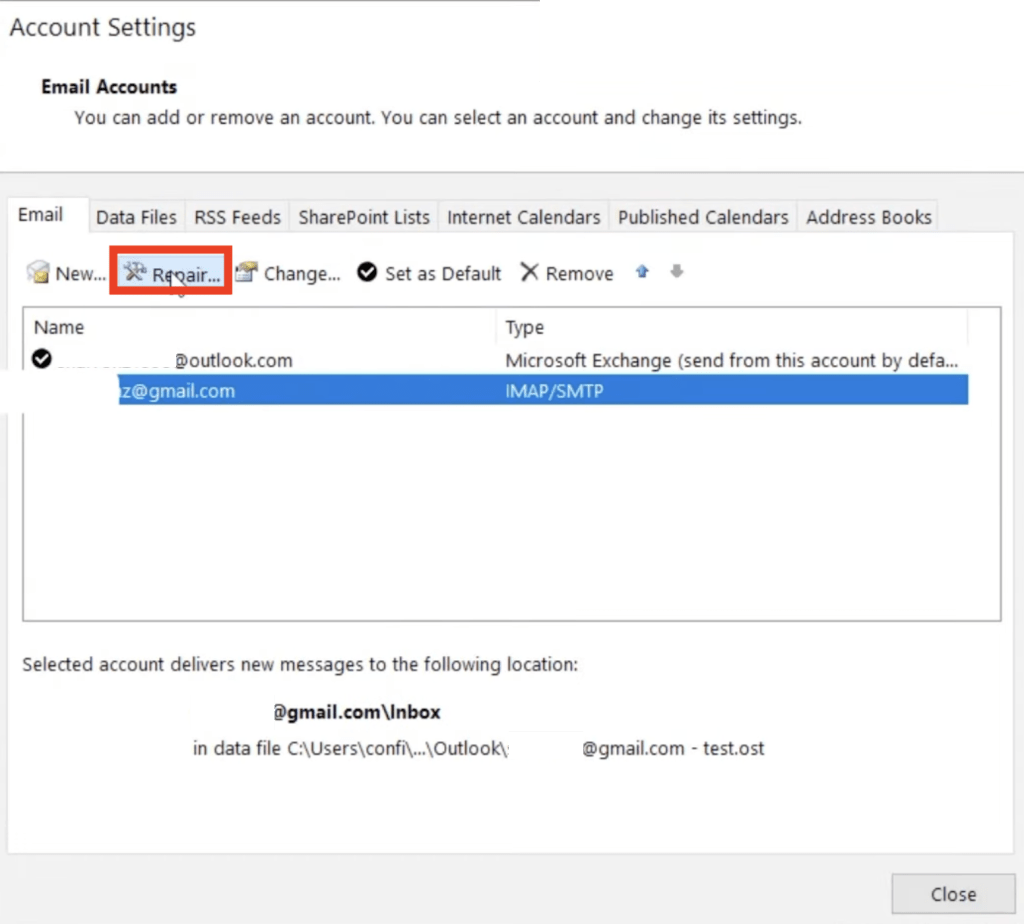
- In the dialog box, select your account
- Hit Repair
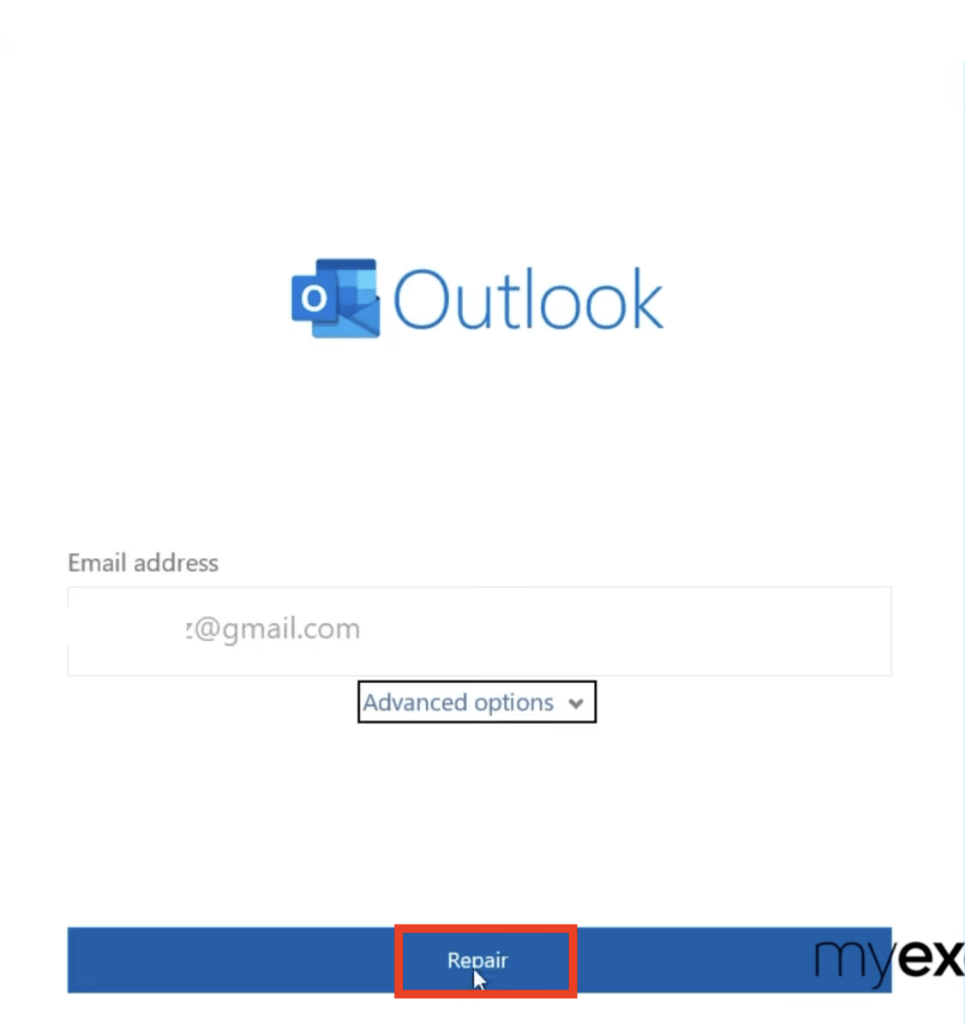
- In the wizard, type your email address and select Repair
- Click Done
This will repair your account of any connection error it has between Microsoft Outlook and that email account.
Microsoft Outlook Add-In Issues
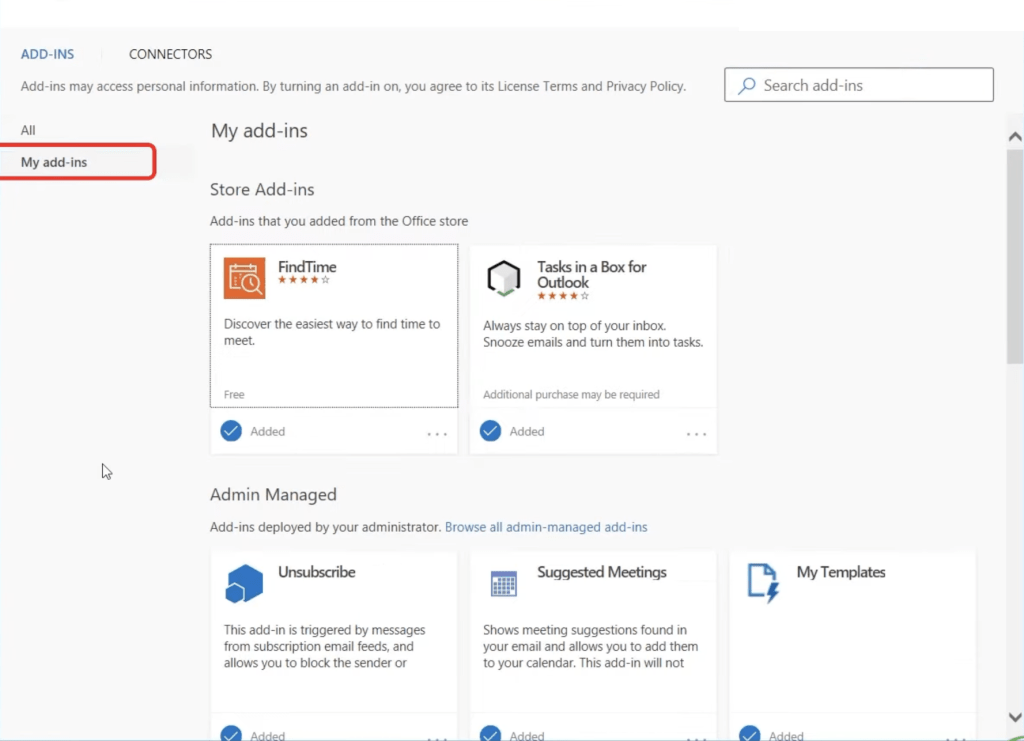
Add-ins in Microsoft Outlook can be used to automate and conquer your everyday tasks. They help in increasing productivity and making workflow easier. But, sometimes these add-ins can interfere with Outlook and cause errors.
- Go to Home > Get Add-ins
- Click on My Add-ins
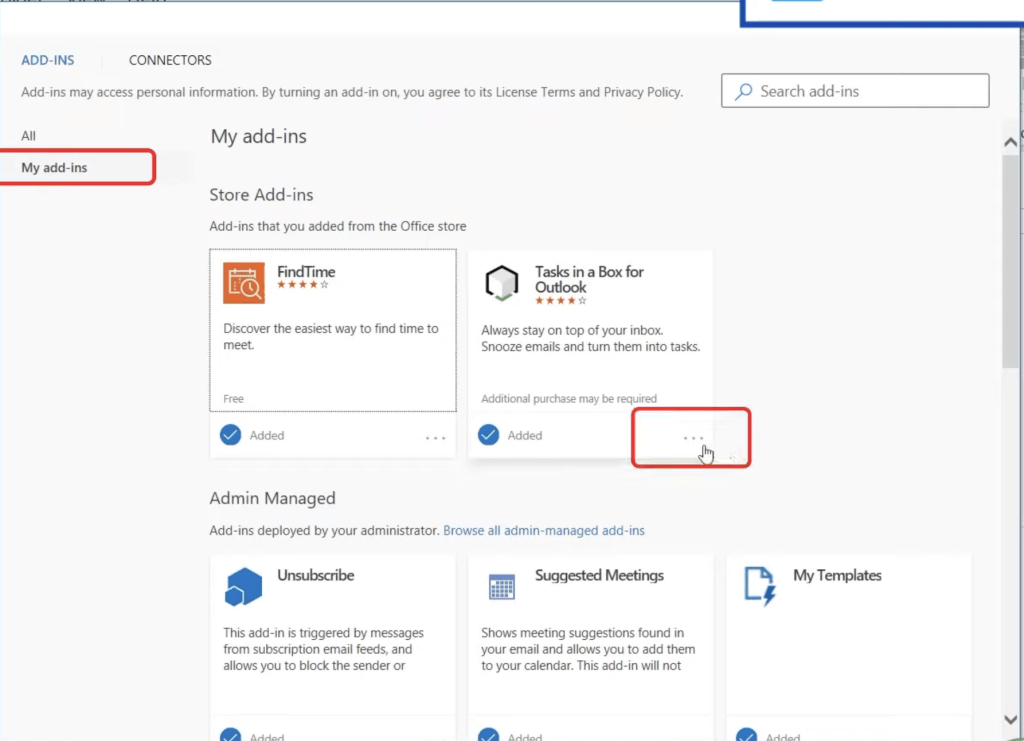
- Click on three dots of the app you want to remove
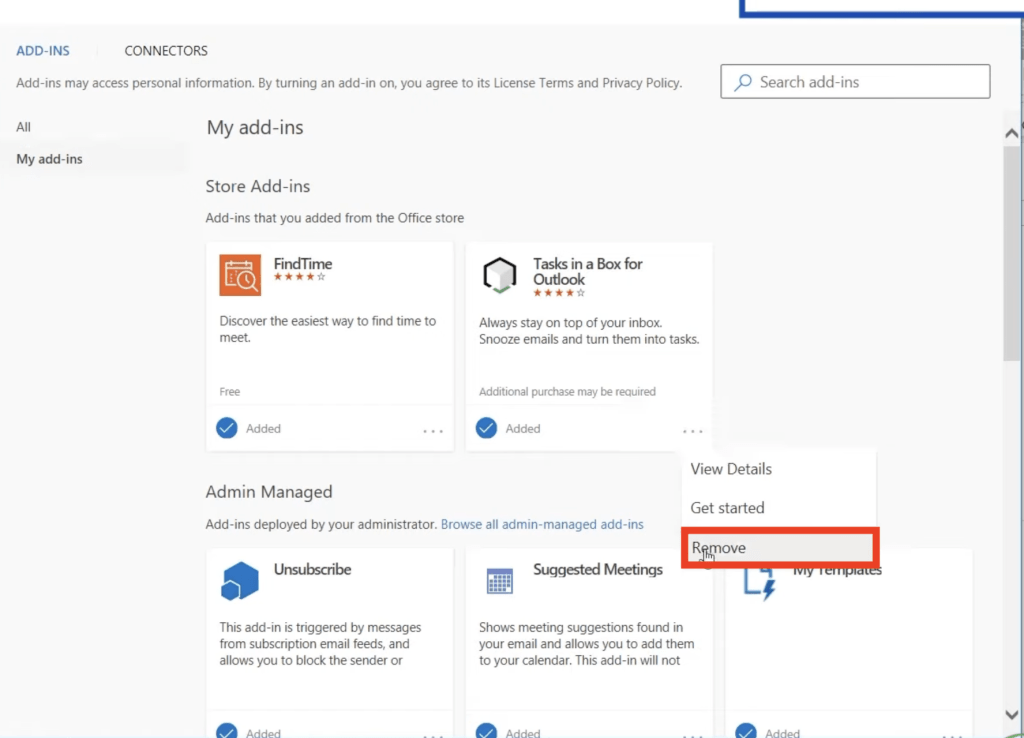
- Click Remove
Rebuild the Microsoft Outlook Data File
Microsoft Outlook data file is a file that holds all your information in Outlook including emails, calendar events, appointments, contacts, etc. Sometimes, these files can be corrupt and cause issues in Outlook.
You will then have to remove this file and load the backup file or start over.
- Go to File
- Click Account Settings > Account Settings
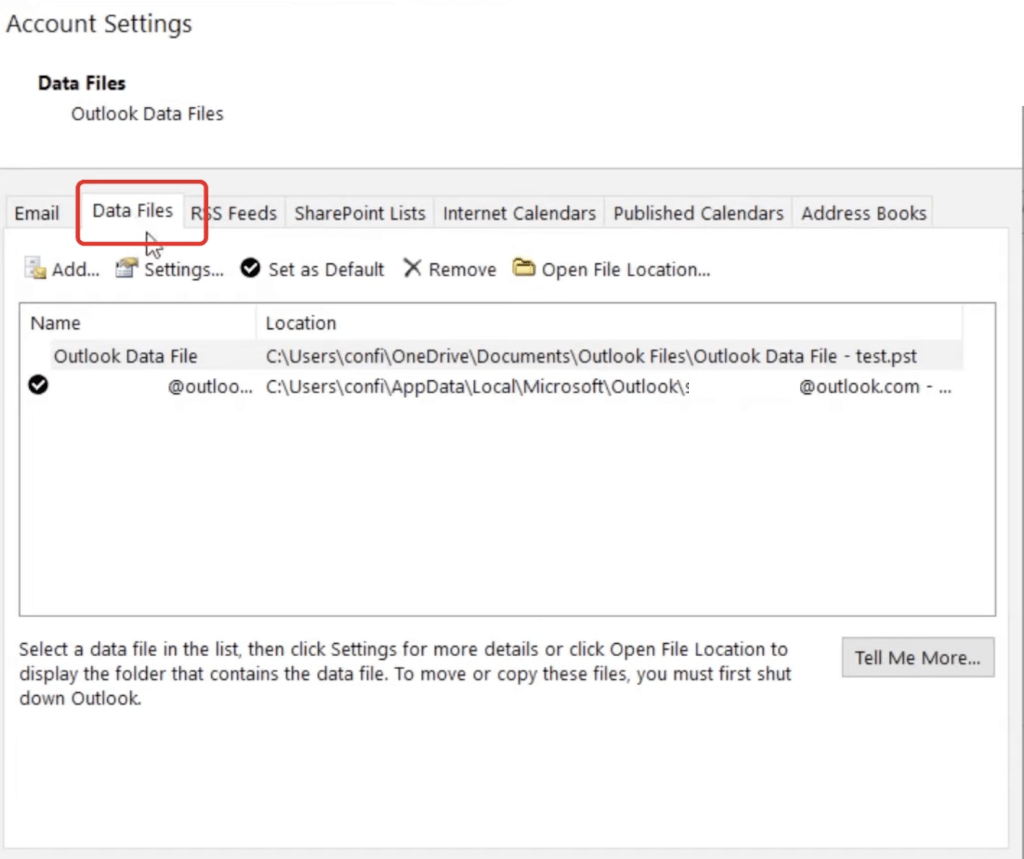
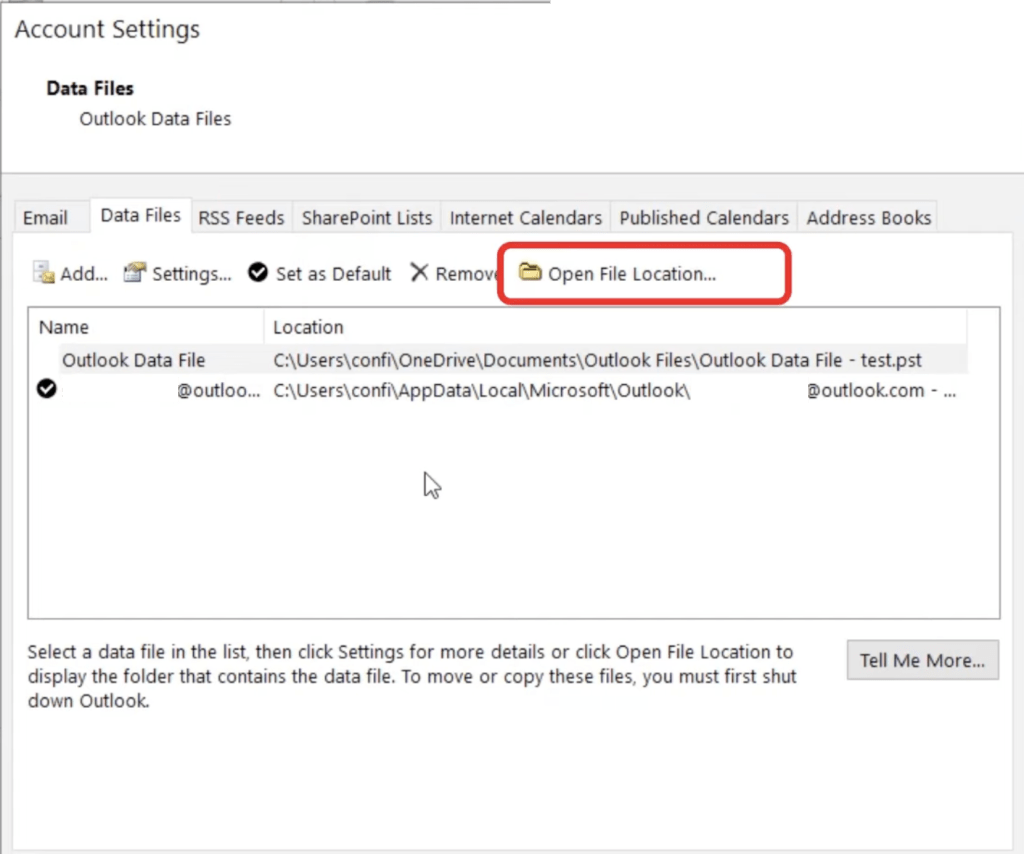
- Click on Data File
- Click on Open File Location
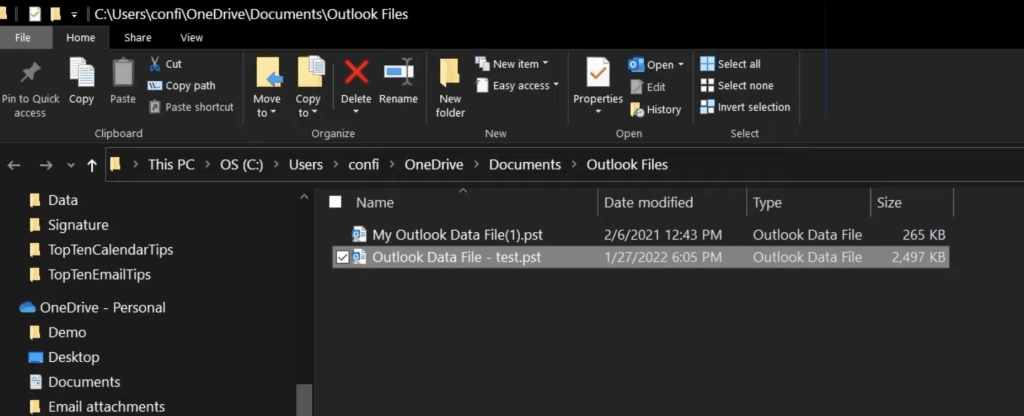
- A file explorer containing the data file will open. Delete the file
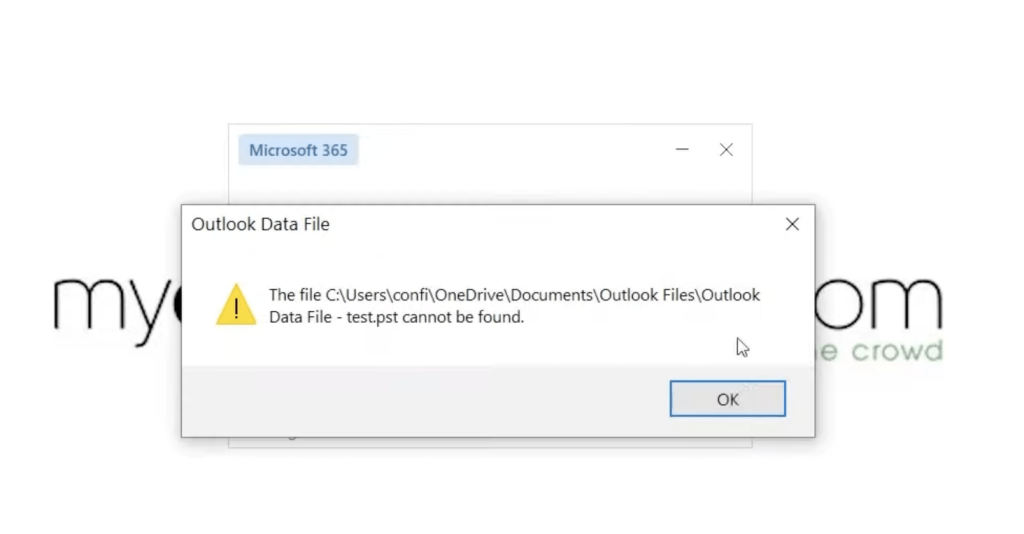
- Close Outlook and try to open it again
- An error message will be displayed
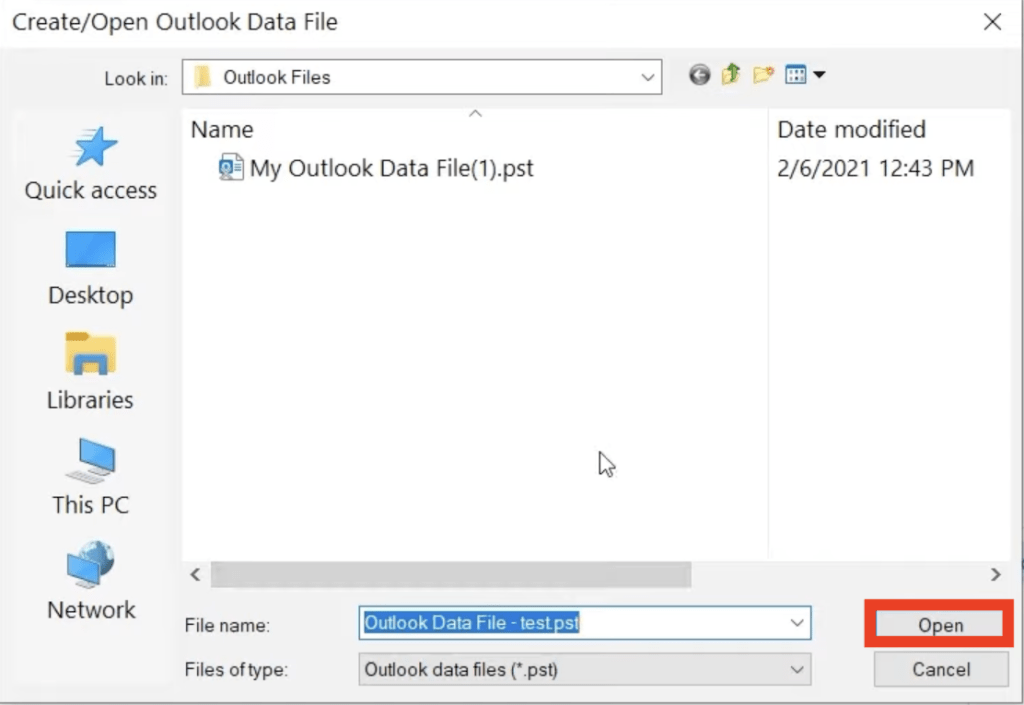
- Select the backup file and Click Open
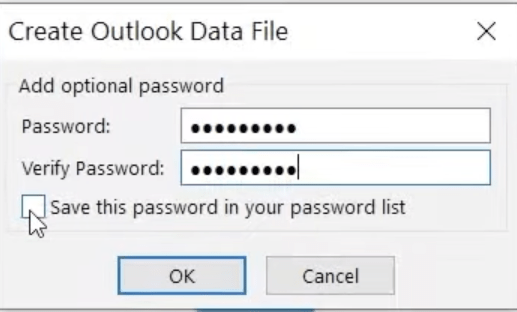
- Enter the password and click OK
Hopefully, this will resolve the issues you are facing while using Microsoft Outlook.
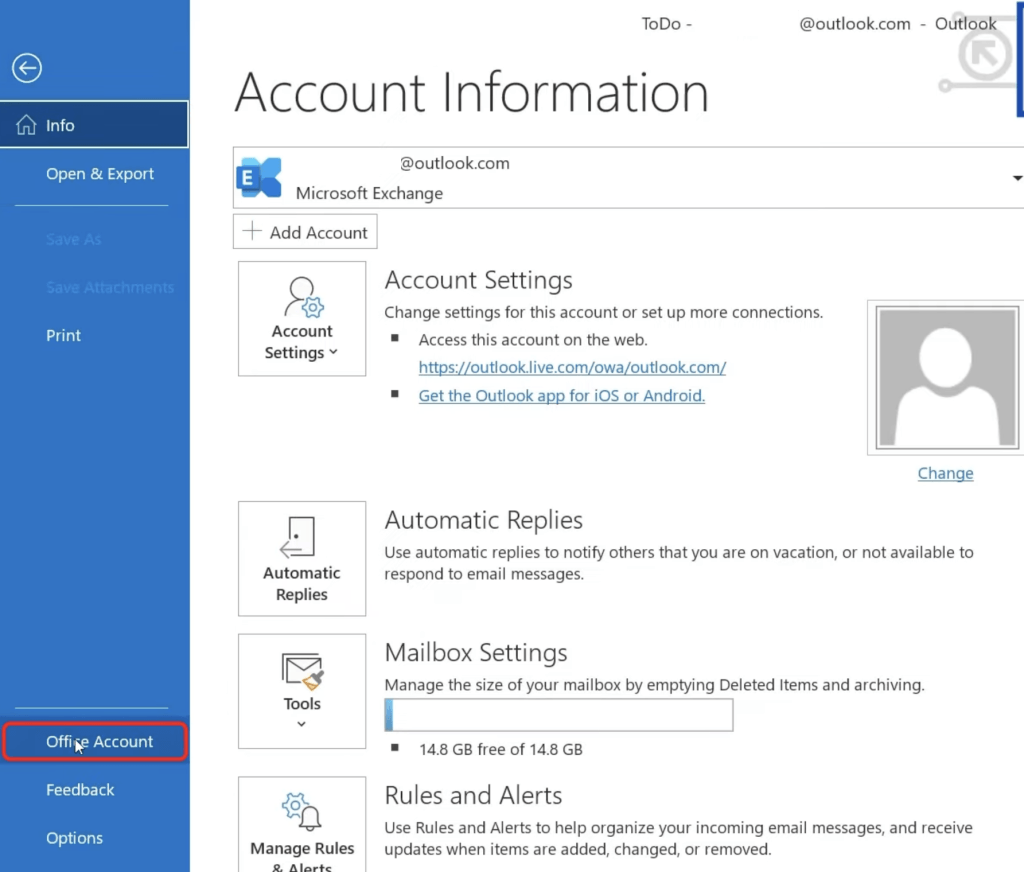
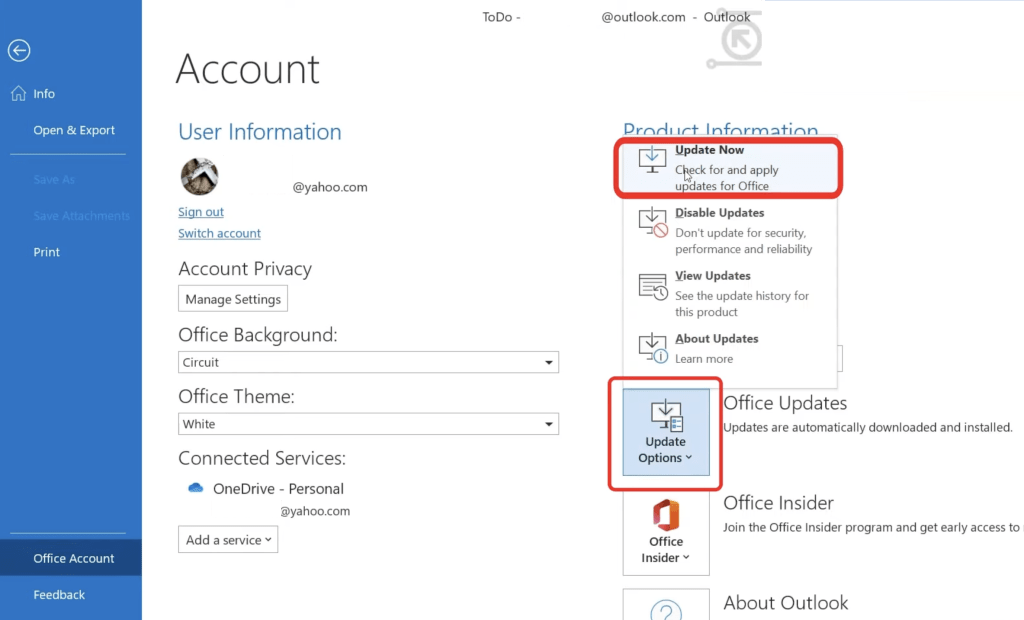
It might be a good option to update your Microsoft Office so as to eliminate any hindrance occurring because of using an old version of Outlook.
Another option to fix OneDrive sync issues is to reboot Microsoft Office. You can follow the steps below to repair the office:
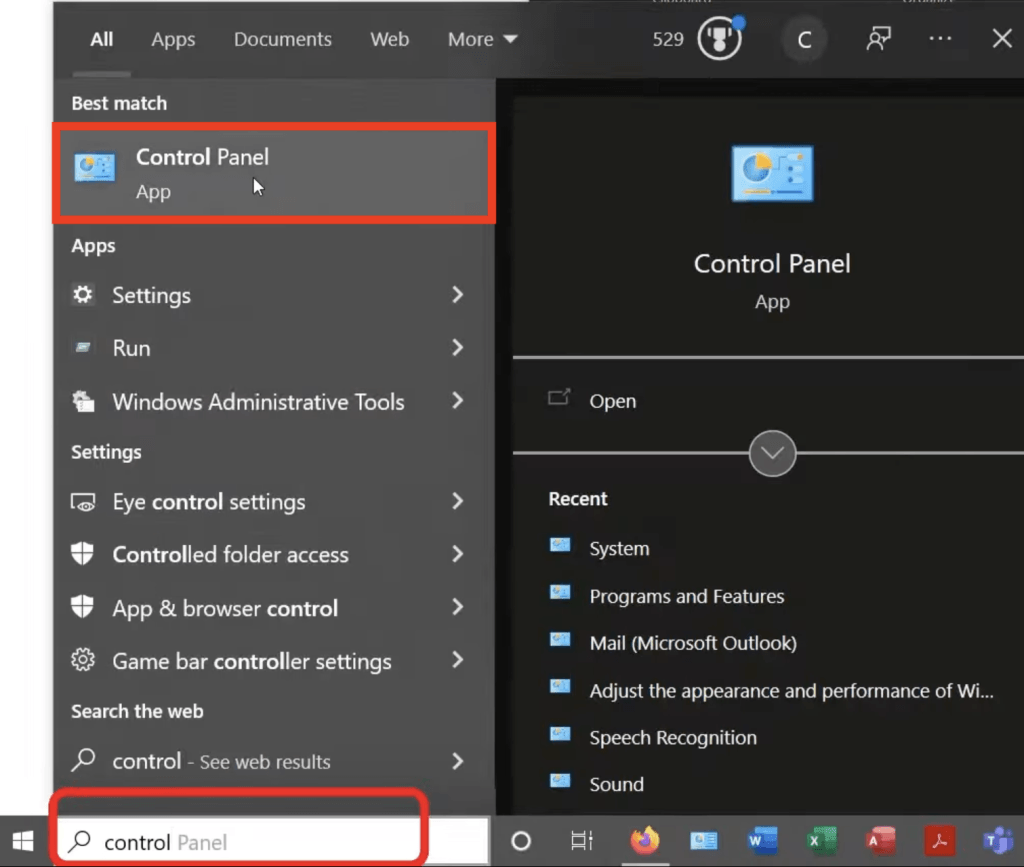
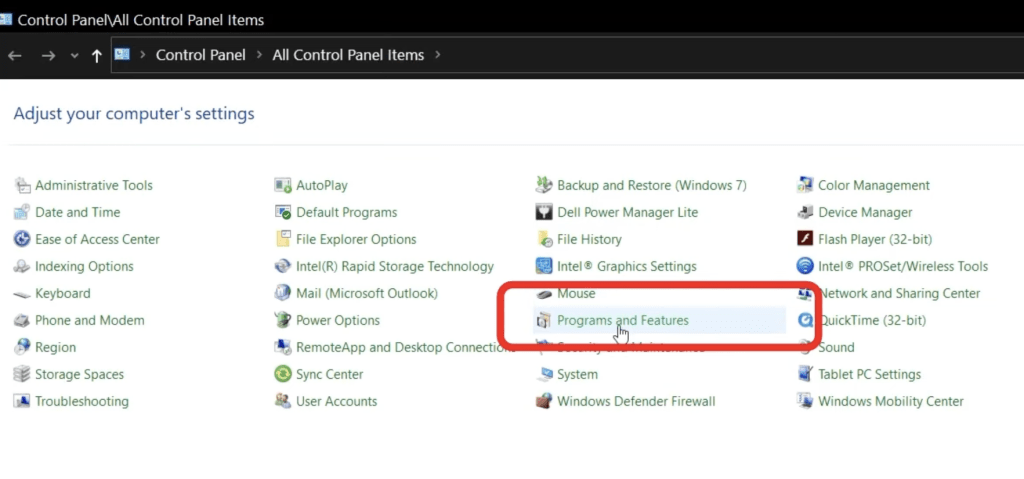
- Go to the search bar and type Control Panel
- In the Control Panel, go to Programs and Features
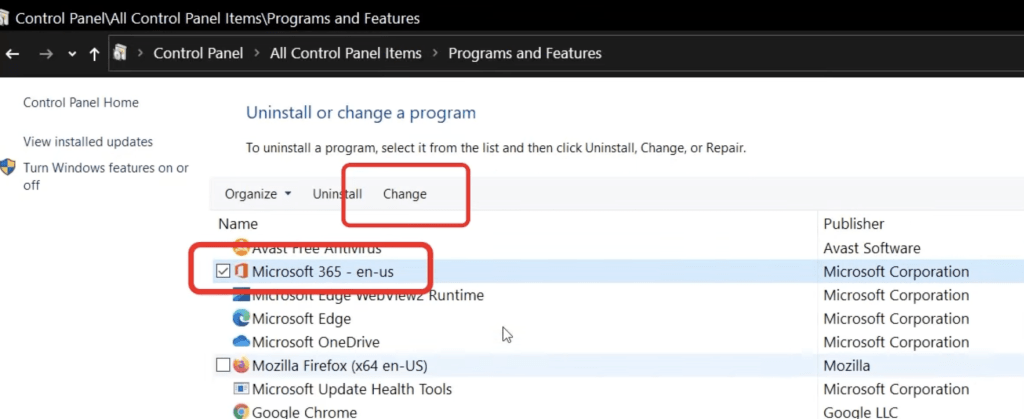
- Select Mircosoft Office and click on Change
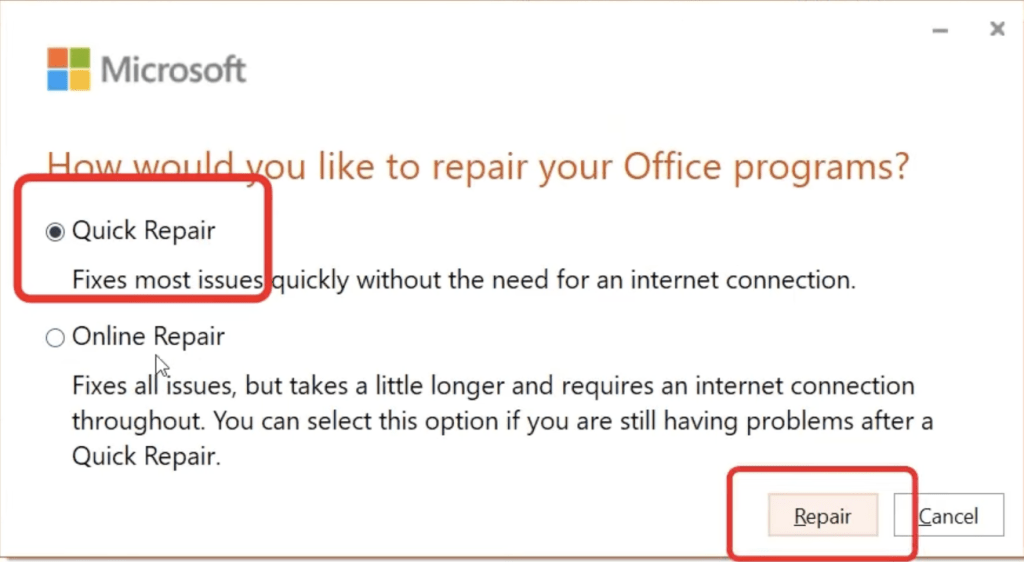
- In the dialog box, select Quick Repair and then Repair
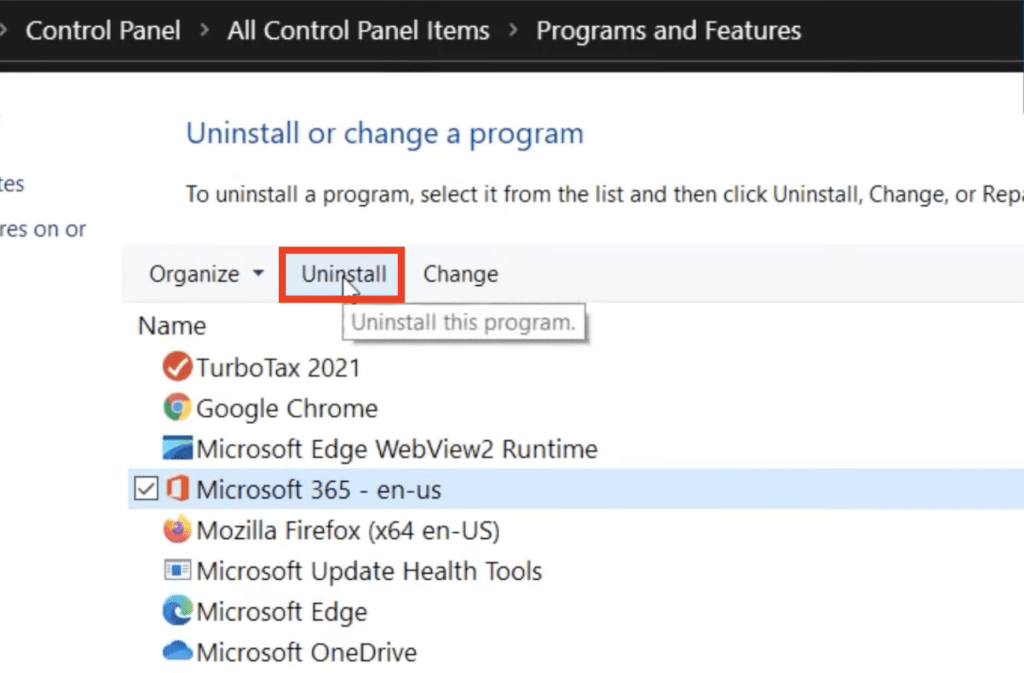
Finally, as a last resort, you can always uninstall your Microsoft Outlook and then reinstall it.
- Go to the search bar and type Control Panel
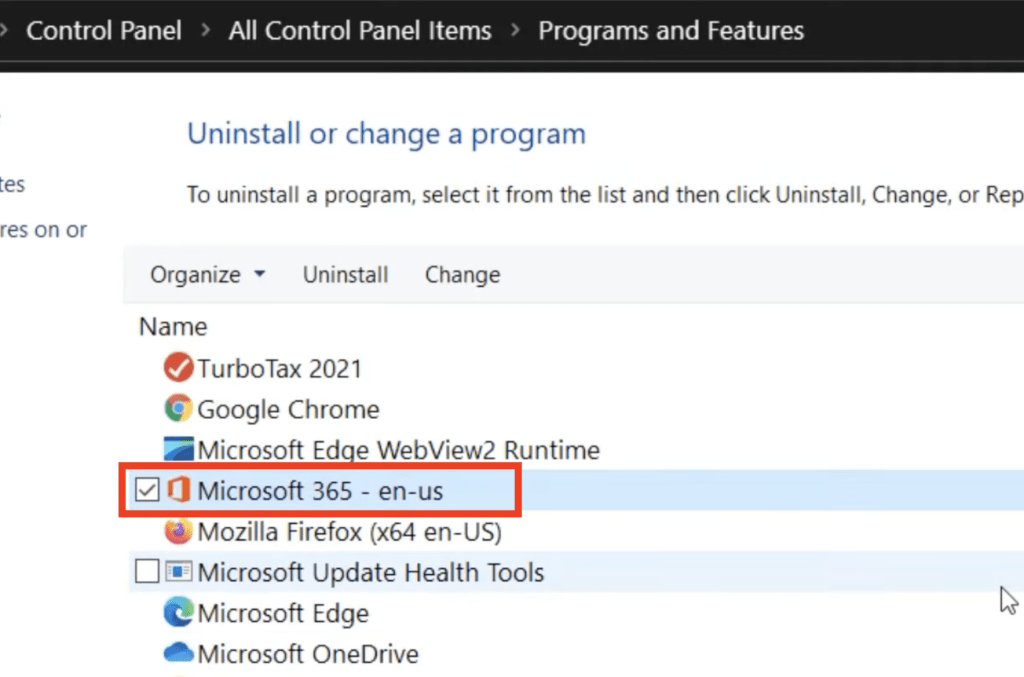
- In the Control Panel, go to Programs and Features
- Click on Microsoft Office
- Select Uninstall
- Using the wizard, you can uninstall and then reinstall Office
In this article, you have learned how to troubleshoot and fix connection problems in Microsoft Outlook and fix issues such as Microsoft Outlook account issues, WiFi connection issues, Add-In issues, Microsoft Office Issues, and more.
How to Set Up Outlook Automatic Reply & Out of Office Messages
Microsoft Outlook has an out-of-office messages feature that lets you automatically send replies with relevant information when you’re on vacation or don’t have access to your mail. There are several ways to customize Outlook’s automatic reply feature.
In this article, we will cover the following topics in detail –
Let’s look at each of these sub-topics one by one!
Watch this video on How to Setup Automatic Reply in Outlook YouTube and give it a thumbs-up!
Introduction to Outlook Automatic Reply
An Automatic reply email is a triggered response based on email received or an autoresponder email message. The purpose is to inform the customer that a company has received their inquiry.
It is used when you won’t be able to respond or read emails because you’re absent from work for a specified period.
It’s a proper business etiquette to set up an out-of-office reply any time you’re unable to check emails during regular work hours. They tell your contacts why your response will be delayed and how to get the information or whom to reach out to while you are away.
Turning on Automatic Reply in Desktop Version
-
-
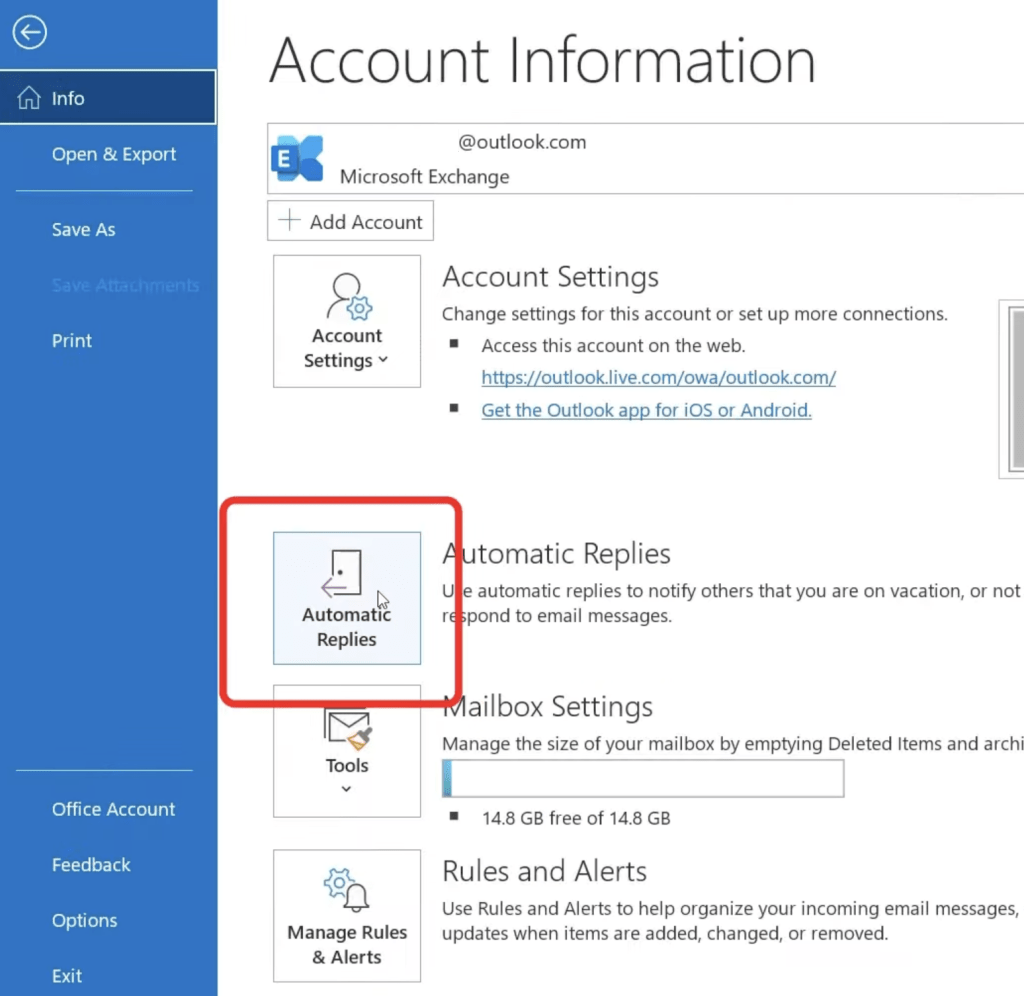
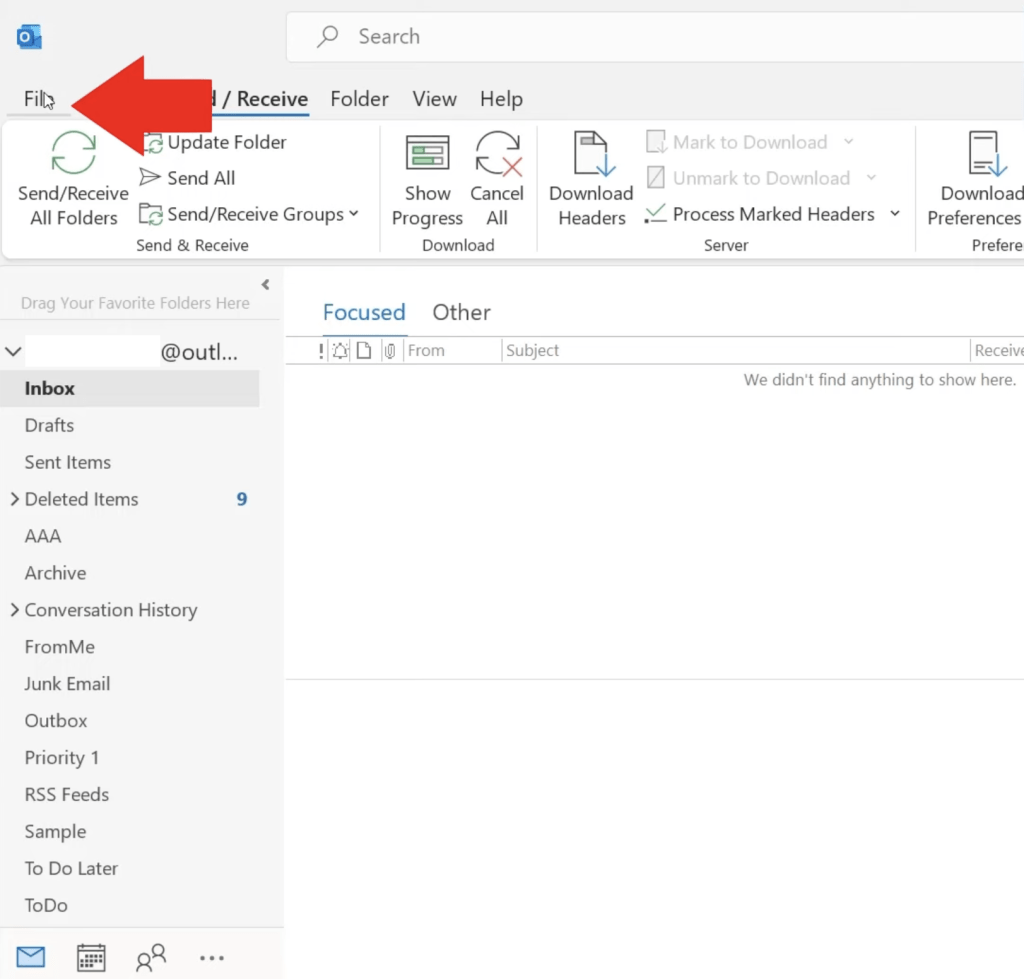
- Go to File
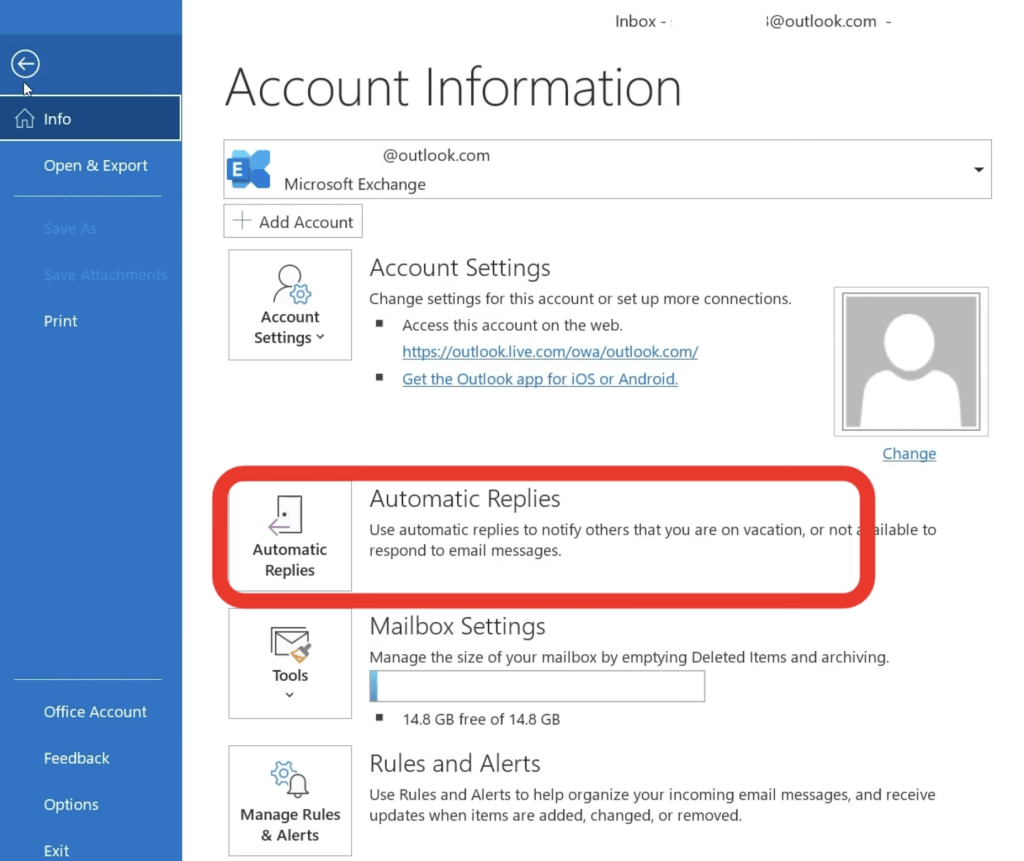
- Select the Automatic Replies box
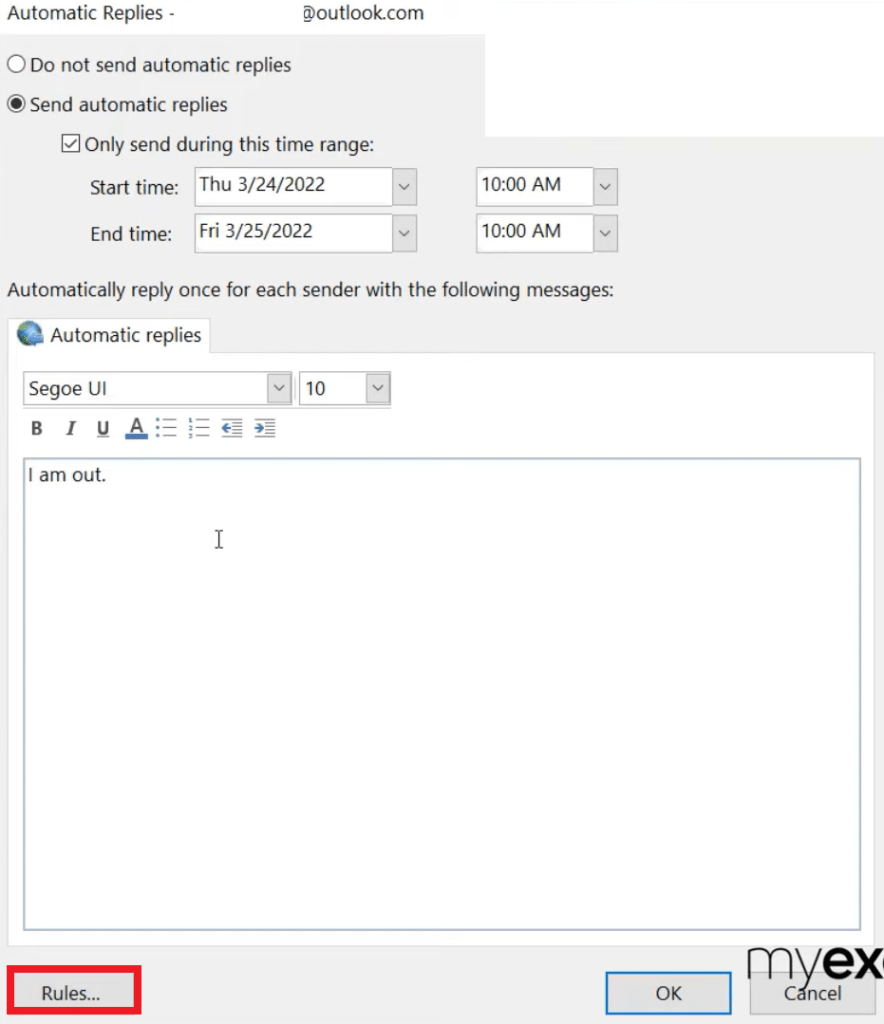
- In the dialog box, select Send automatic replies
- Check Only send during this time range box and enter the start time and end time.
This will ensure that the out of office message is sent only during the time frame mentioned. - Type in a message
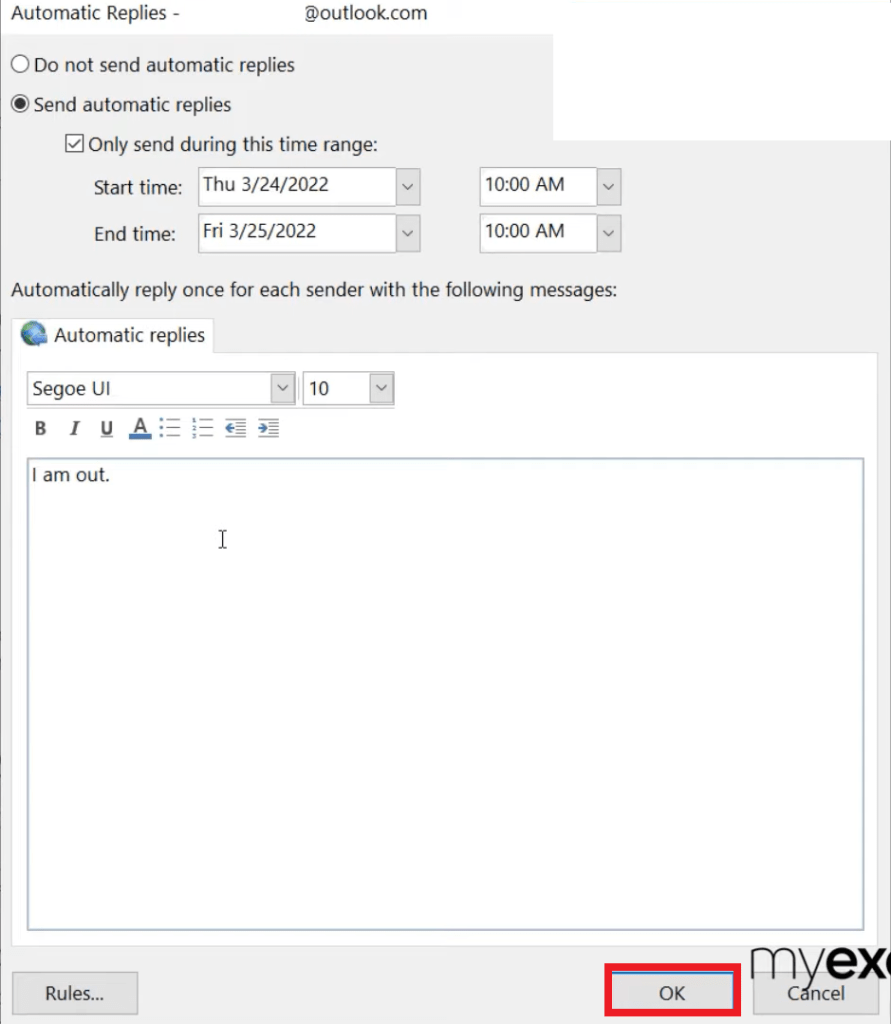
You can format the text using the toolbar to customize the appearance of your automatic reply. - Select OK
- Go to File
-
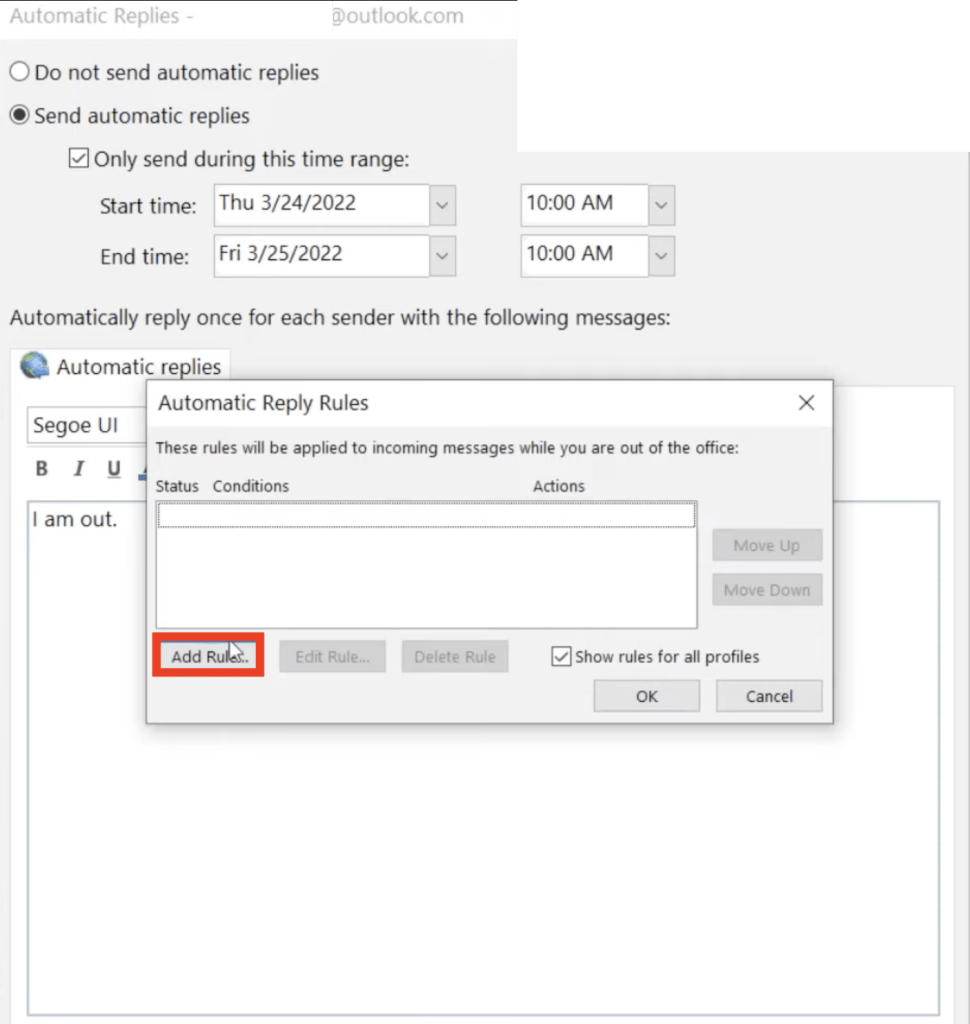
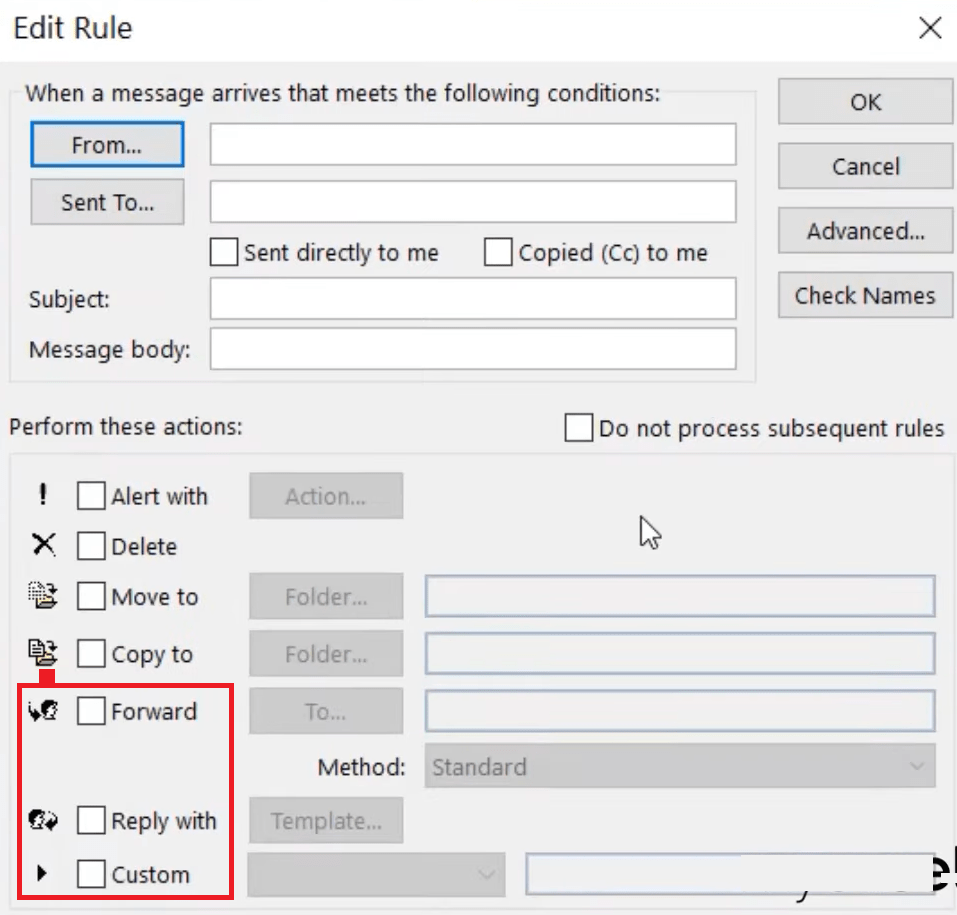
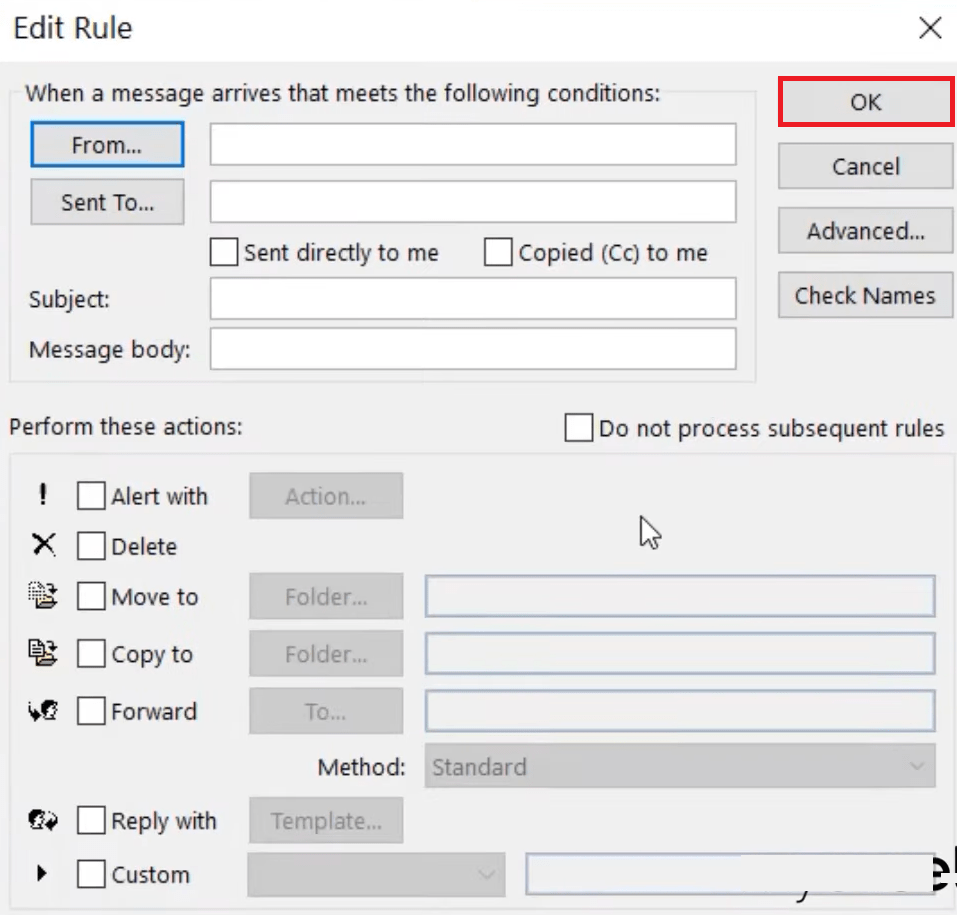
Using Microsoft Outlook, you can create rules to reply automatically to incoming messages while you are out of the office. After you have typed a message in the automatic replies text box, then:
Toggling Between Turning Reply On and Off
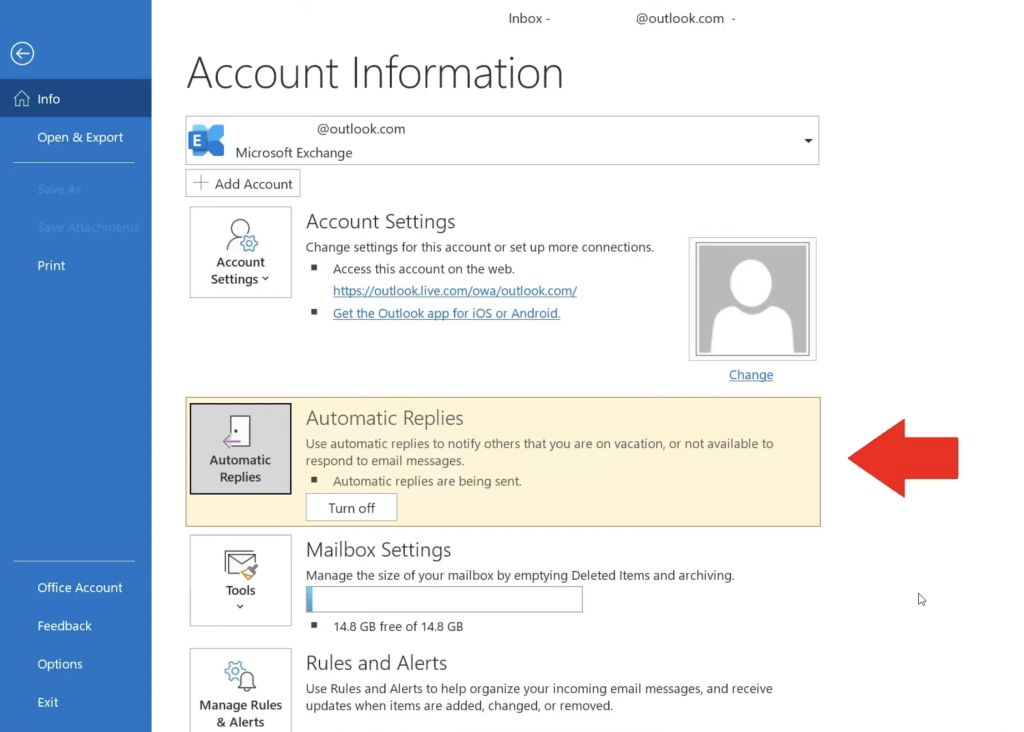
Once you have set your automatic reply, you will see that the Automatic Replies section is highlighted in yellow.
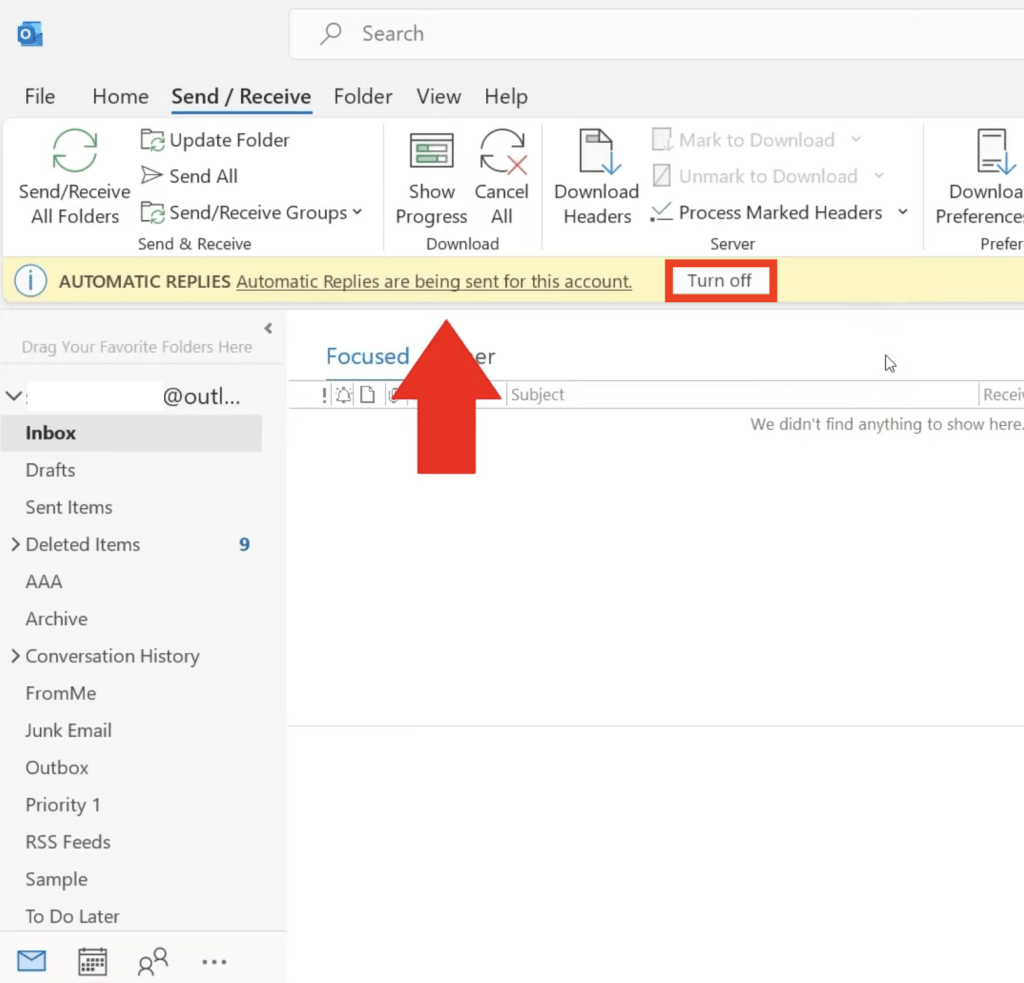
You will also find a message under the Outlook ribbon stating that the automatic reply feature is turned on. This will remind you to disable the automatic reply option once you are back in the office.
Simply, click on the Turn off if you no longer want to send an automatic reply.
To check whether your automatic reply message is working or not –
-
-
- Open any other mail account of yours (eg. Gmail account) and compose a mail.
- Send this mail to your Outlook account.
- Check your inbox of your other mail account.
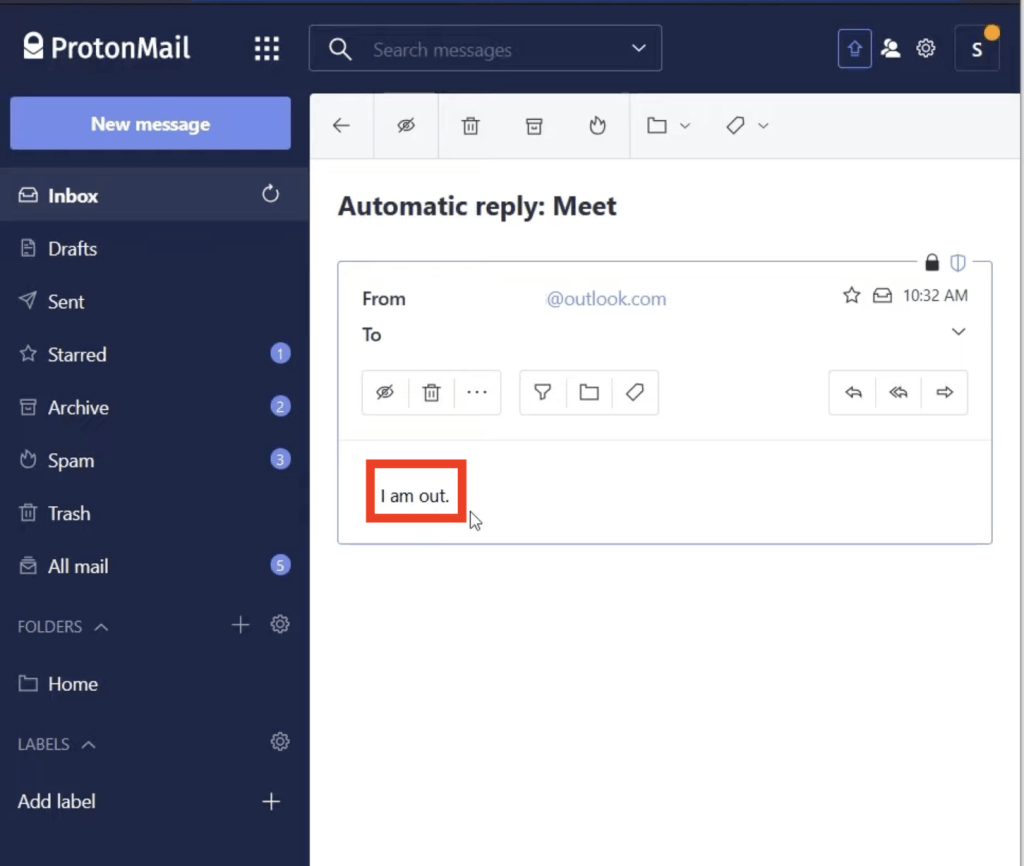
- You will see a new message in your inbox. Once you open it, you will find the same text message you have composed as your automatic reply message in your Outlook account.
-
This shows that your Automatic reply is working perfectly in your Outlook account.
Microsoft Outlook.com Online Version of Automatic Replies
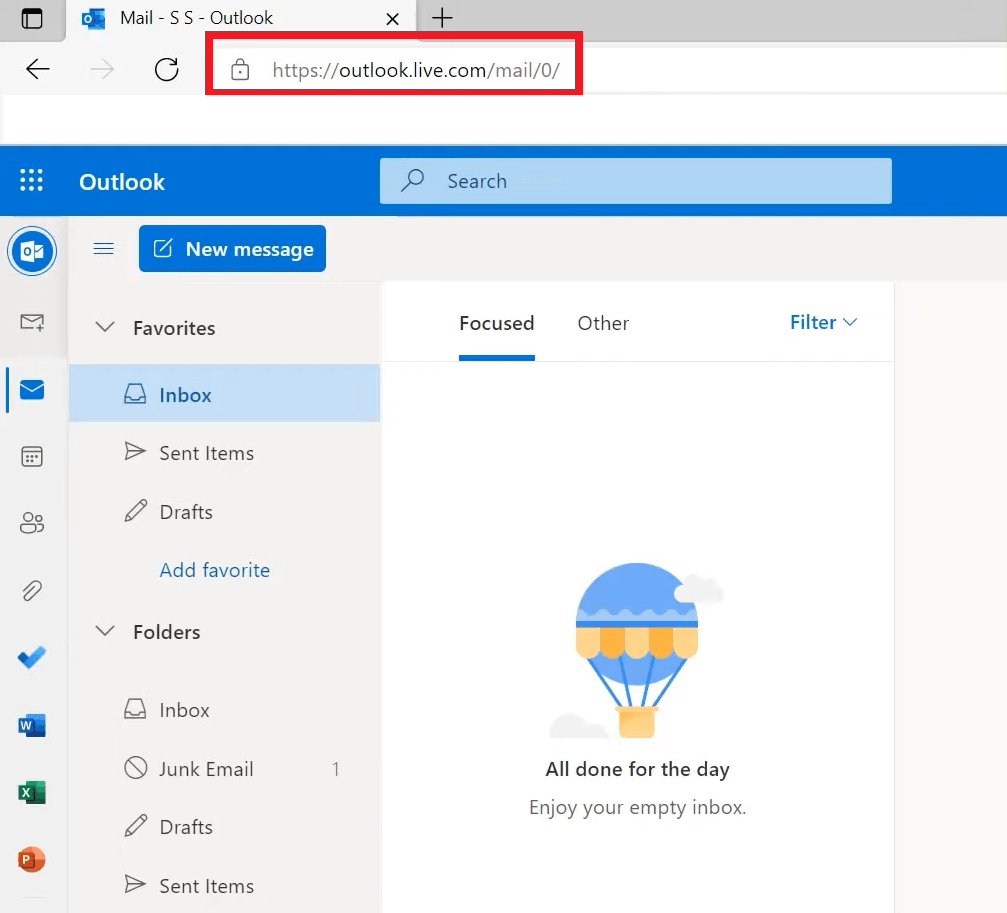
We can use Automatic replies not only Desktop version of Outlook but also on the online version at outlook.com.
-
-
- Open the Website – https://outlook.live.com/
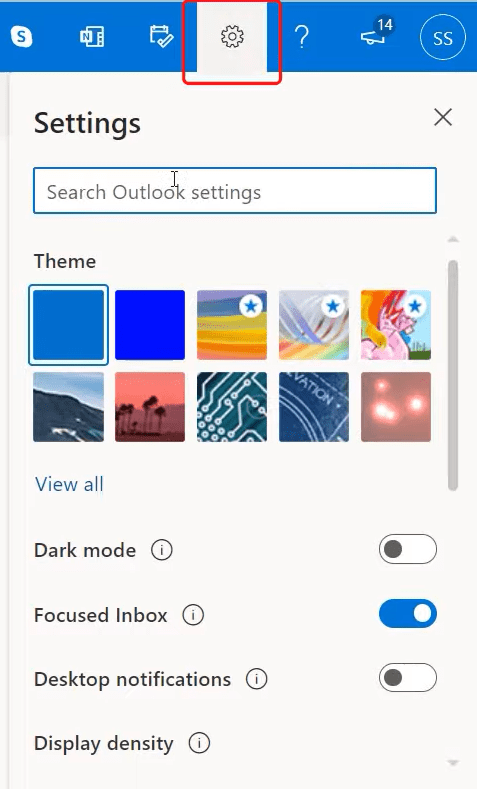
- Click the cog button in the top right of the toolbar to bring up the Settings menu.
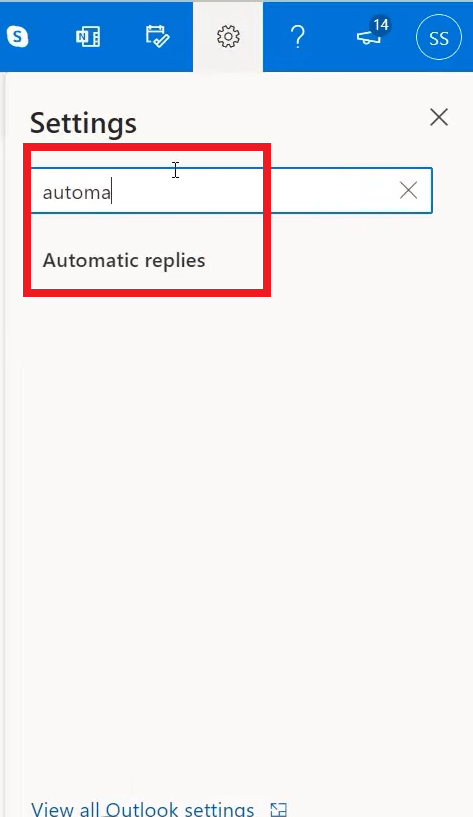
- Type Automatic replies on the Search tab of the setting menu and click on Automatic replies
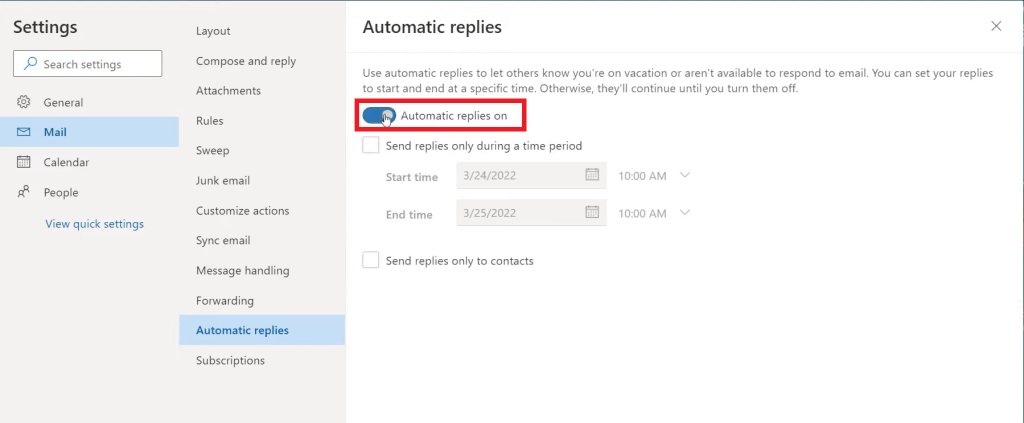
- Once the Automatic replies dialogue box is open, turn on Automatic replies
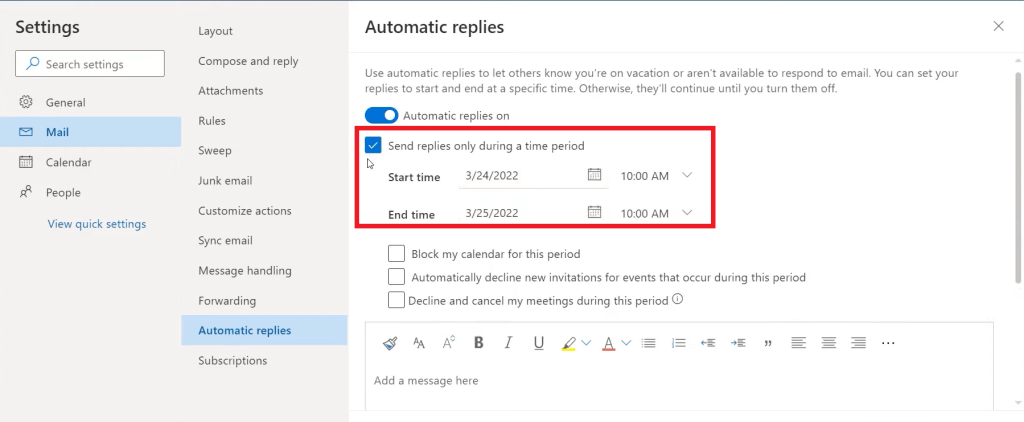
- Click the box Send replies only during this time period and fill in the start date and end time for the time you will be away from the office and won’t be able to check your emails.
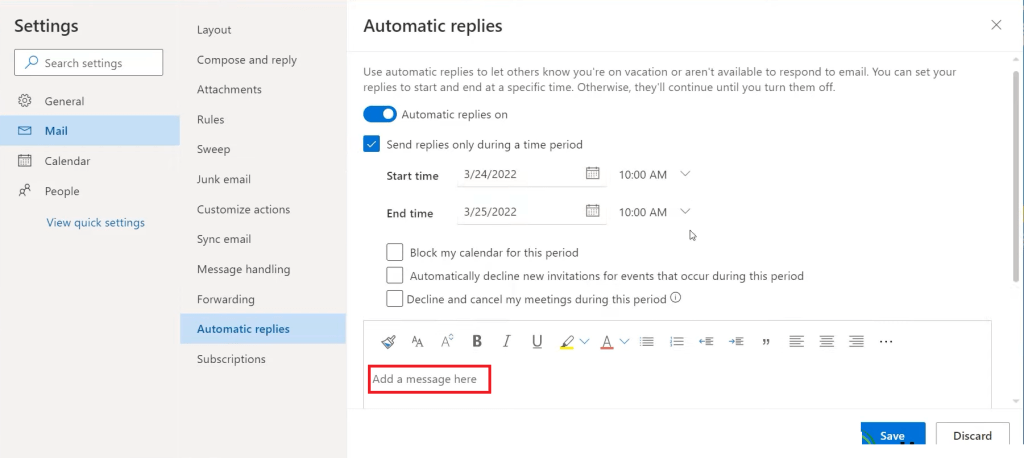
- Create a message which you want as an Automatic reply in the “Add a message here” dialogue box.
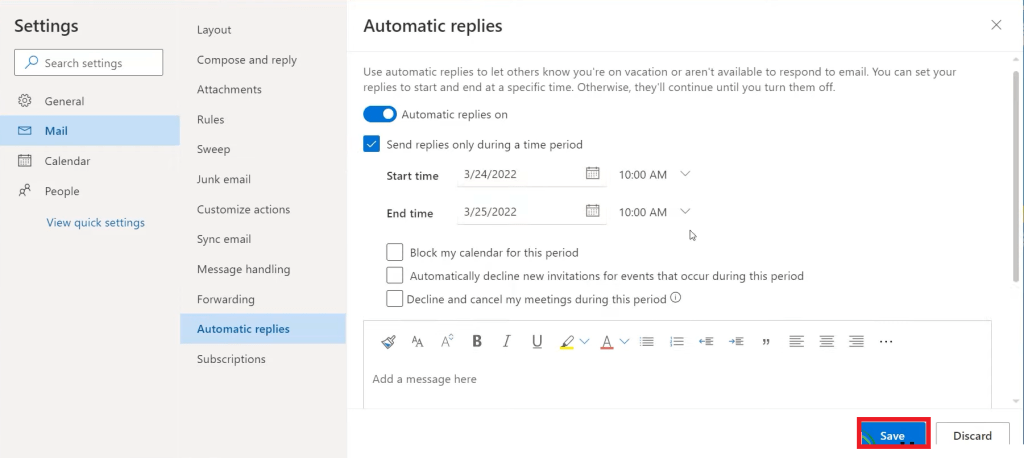
- Click on Save and your automatic replies setting will be saved
- Open the Website – https://outlook.live.com/
-
Options in Microsoft Outlook.com Not Available in the Desktop Version
There are a few extra features available on Outlook online version compared to the outlook desktop version. Once you have turned on the Automatic reply option and you have selected your time period, the following are the extra options available:
-
-
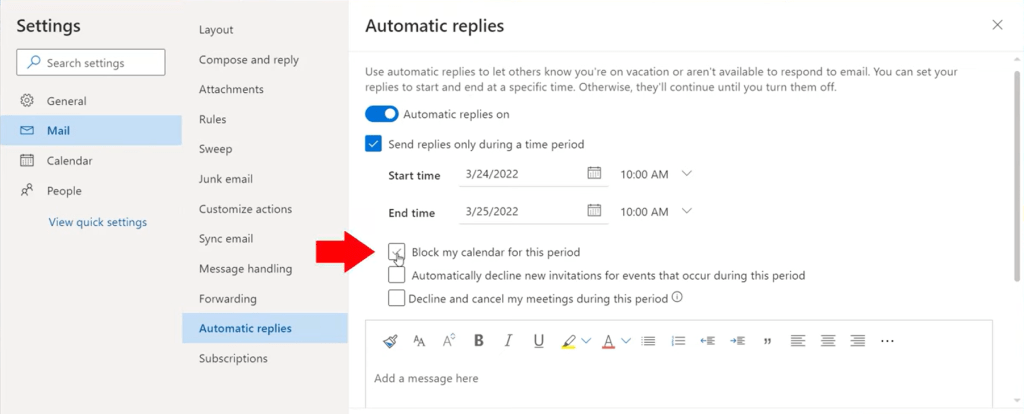
- Block my calendar – You can click this option if you are sharing your account with someone else, so people will know that you are out of the office.
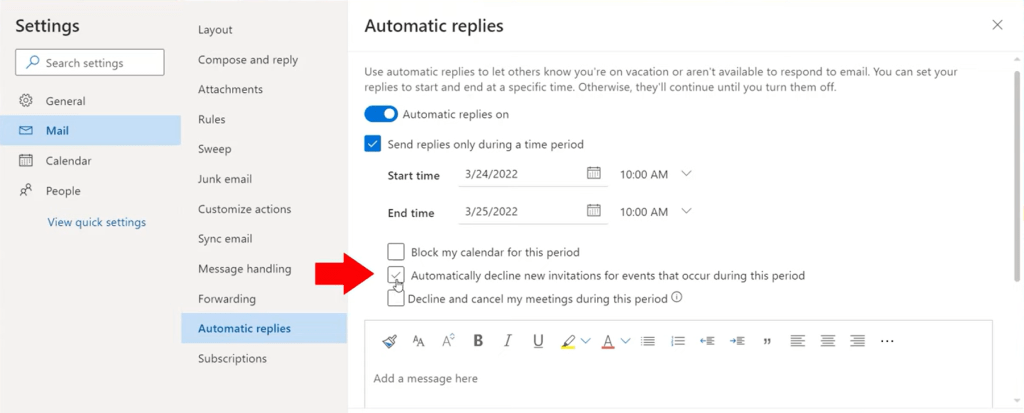
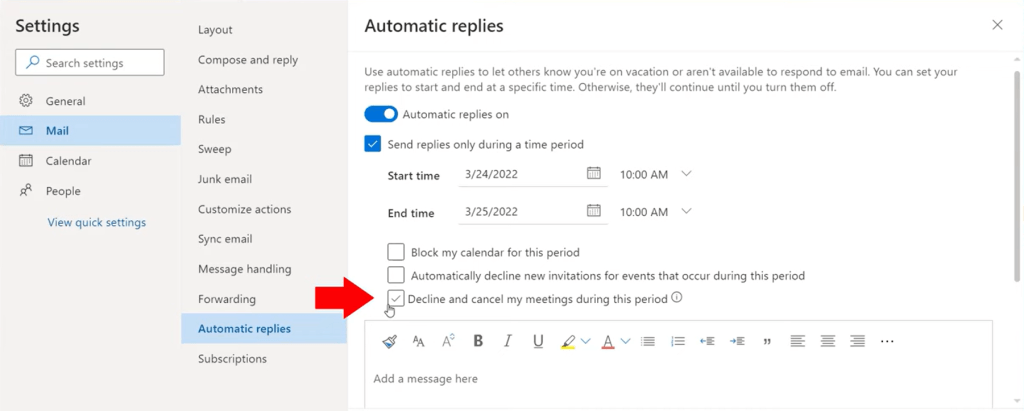
- Automatically decline new invitations – By clicking on this option, all new invitations that you receive during this period will be declined automatically. So, you will not have to worry about responding to any of the requests or meetings, or events you are receiving emails for.
- Decline and cancel my meetings – You can automatically decline or cancel any request for meetings scheduled during the period you are out of the office.
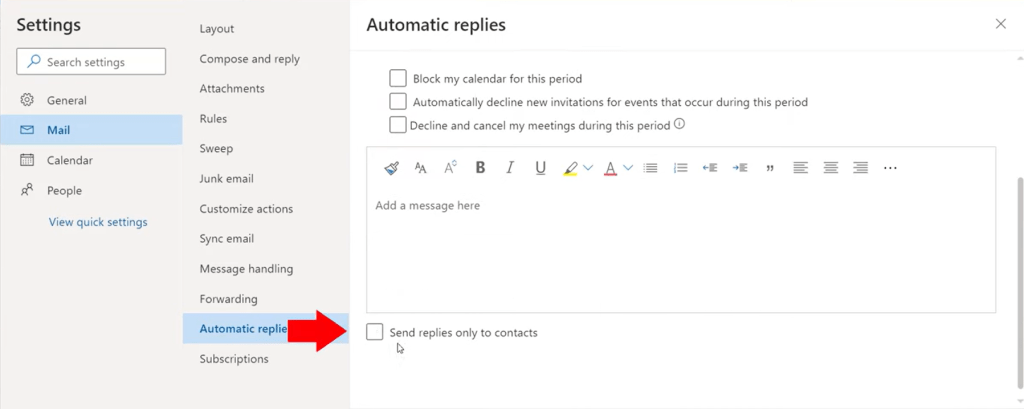
- Send replies only to contacts – Below the message box, there is an option of sending replies only to people in your contact list. By clicking on this option, your automatic reply will only be sent to those emails which you have received from your contact list while you are out. And if you are receiving messages from outside your contact list, then your automatic replies will not be sent to those people.
- Block my calendar – You can click this option if you are sharing your account with someone else, so people will know that you are out of the office.
-
In this article, we have learned how to set up Microsoft Outlook Automatic Reply & Out of Office Messages and send an automatic email reply to the email sender if you are out of the office or sick. We have also learned where to set Automatic Reply, set a custom reply for a specific person, how to turn automatic reply off, how to set Automatic Reply in the online version, and much more.
3 Ways to Get Microsoft Outlook for FREE
In this article, we are going to show you how to use the free online version of Microsoft Outlook, the free desktop version of Microsoft Outlook on Windows 10, and the free mobile version of Microsoft Outlook.
Here are the 3 ways to get Microsoft Outlook for FREE –
- FREE Online Version of MS Outlook
- FREE Desktop Version of MS Outlook
- FREE Smartphone Version of MS Outlook
Let’s look at each of these ways thoroughly!
Watch this video on How to get Microsoft Outlook for FREE on YouTube and give it a thumbs-up!
FREE Online Version of MS Outlook
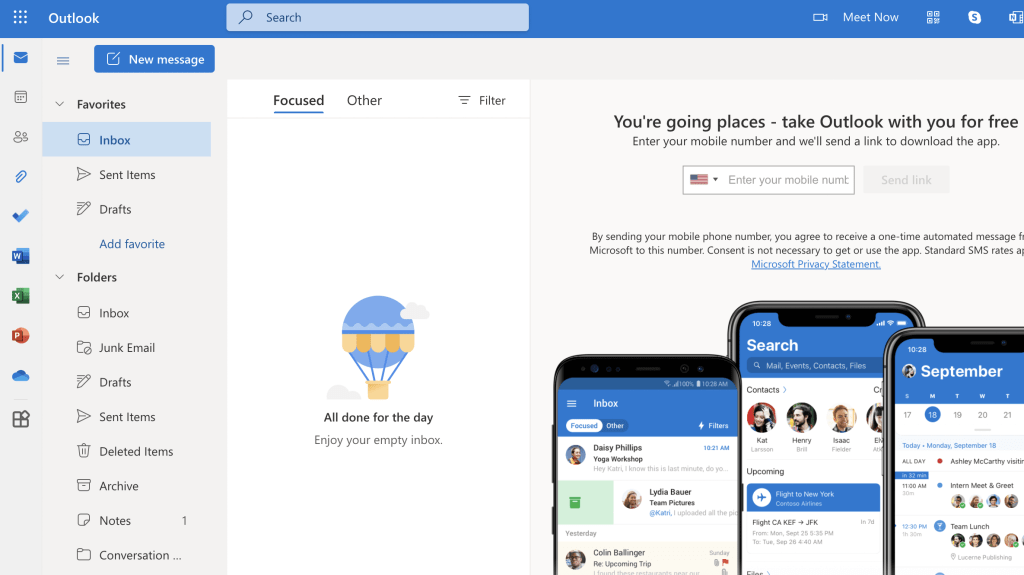
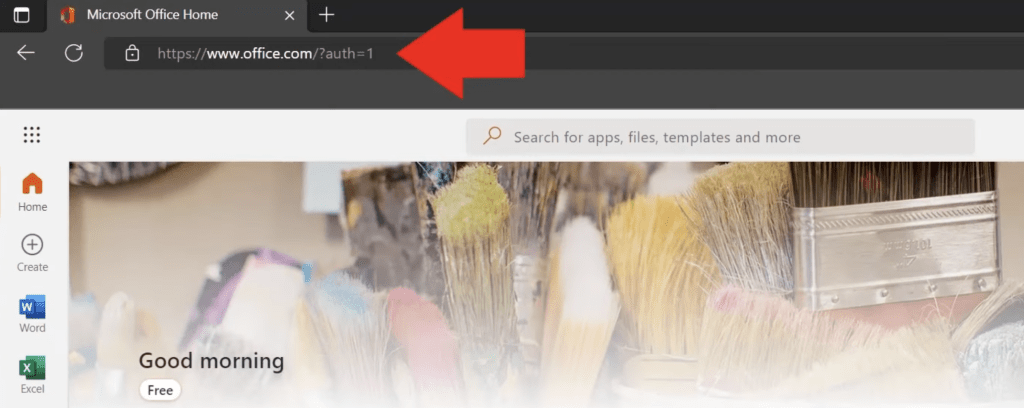
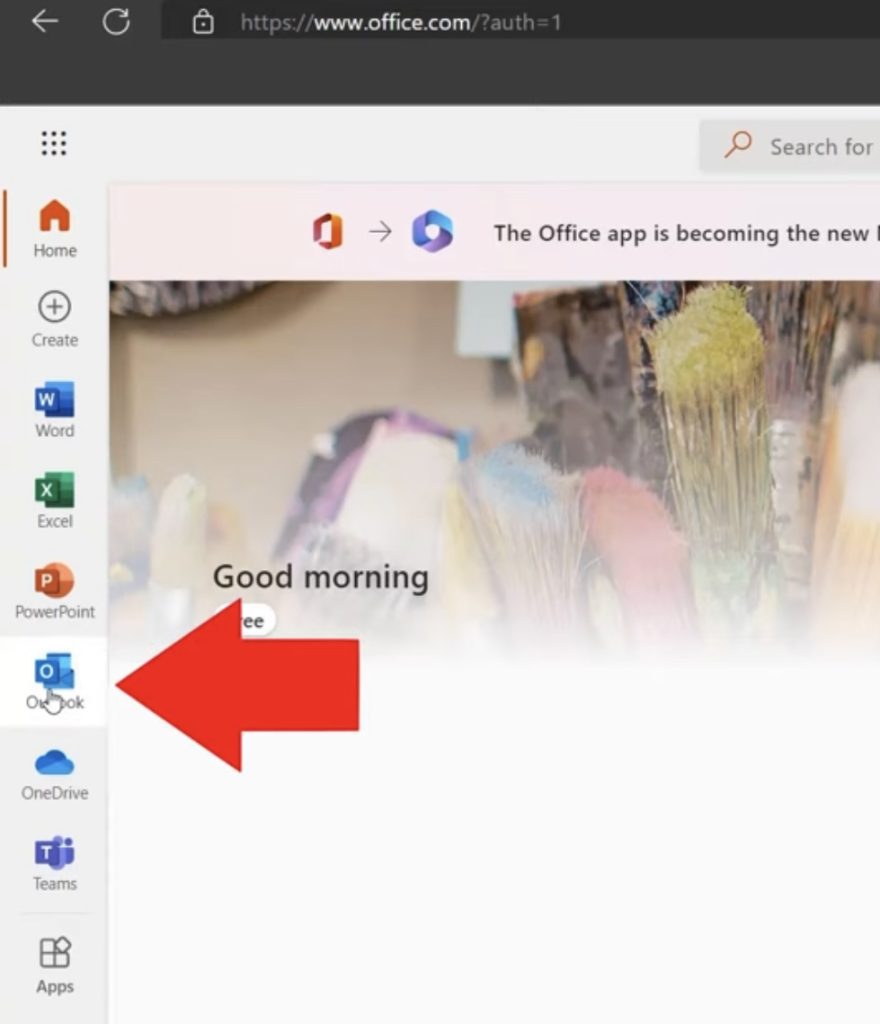
The first way to get Microsoft Outlook for free is to go to www.office.com and log in to your Microsoft account. If you don’t have an account, you can create it for free as well.
Go to the left-hand panel and select Outlook.
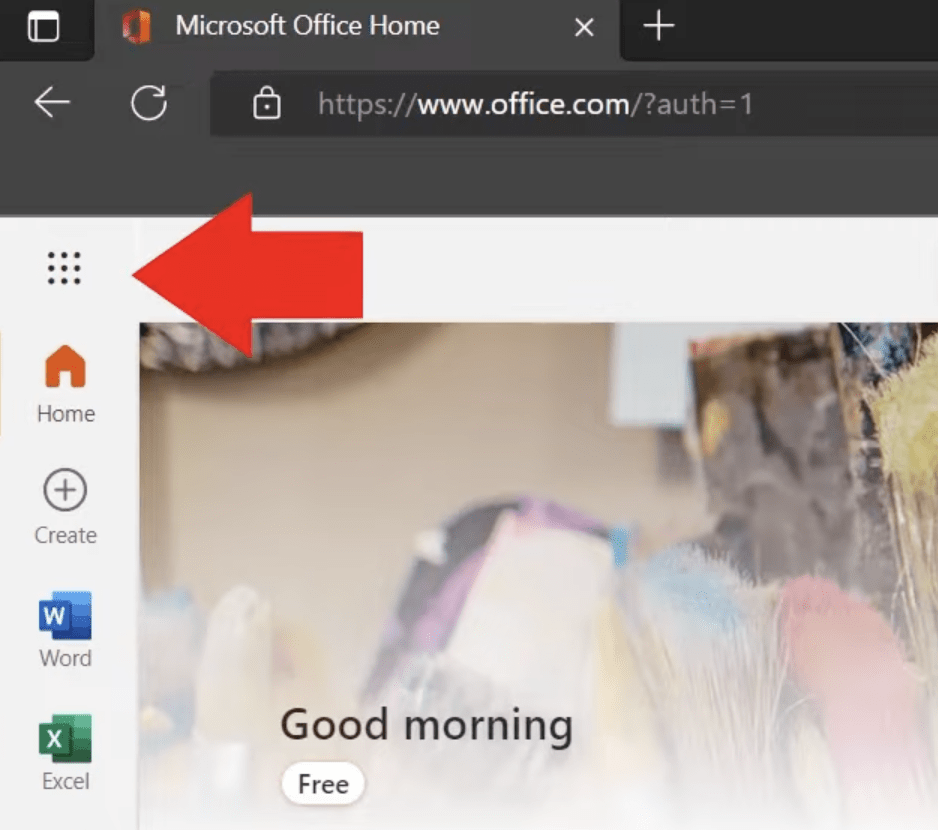
If you don’t see it there, you can go to the App launcher.
You will find Outlook in the list. If it is not visible, click on All Apps.
Click on Outlook.
FREE Desktop Version of MS Outlook
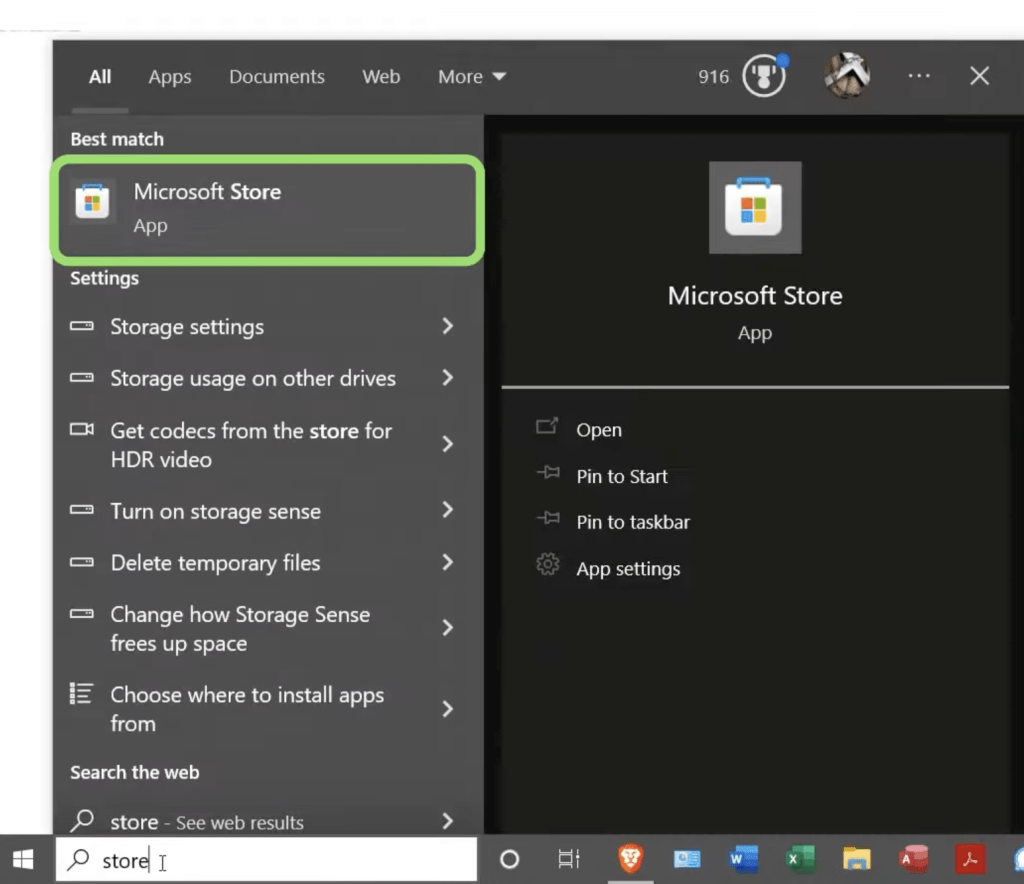
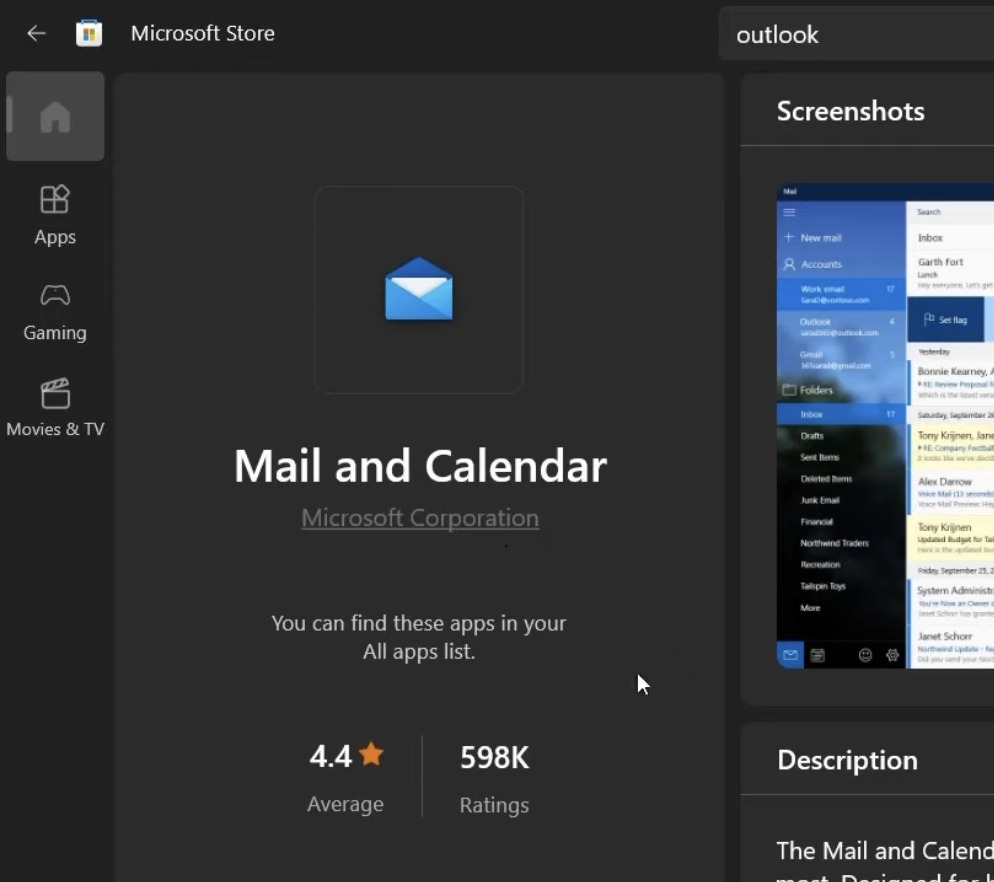
- Search Microsoft store on your desktop.
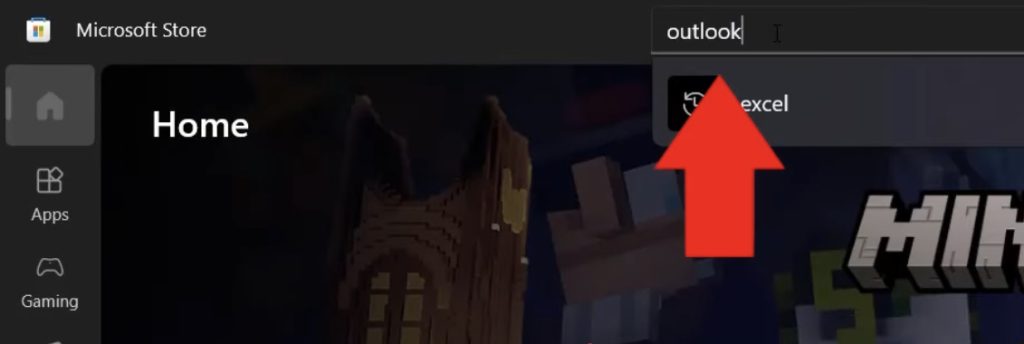
- Search Outlook inside the Microsoft Store app and click on the MS Outlook icon for instant search results.
- Click on the Install button to install it on your desktop. You can check that the author is Microsoft Corporation which means that the application is authentic.
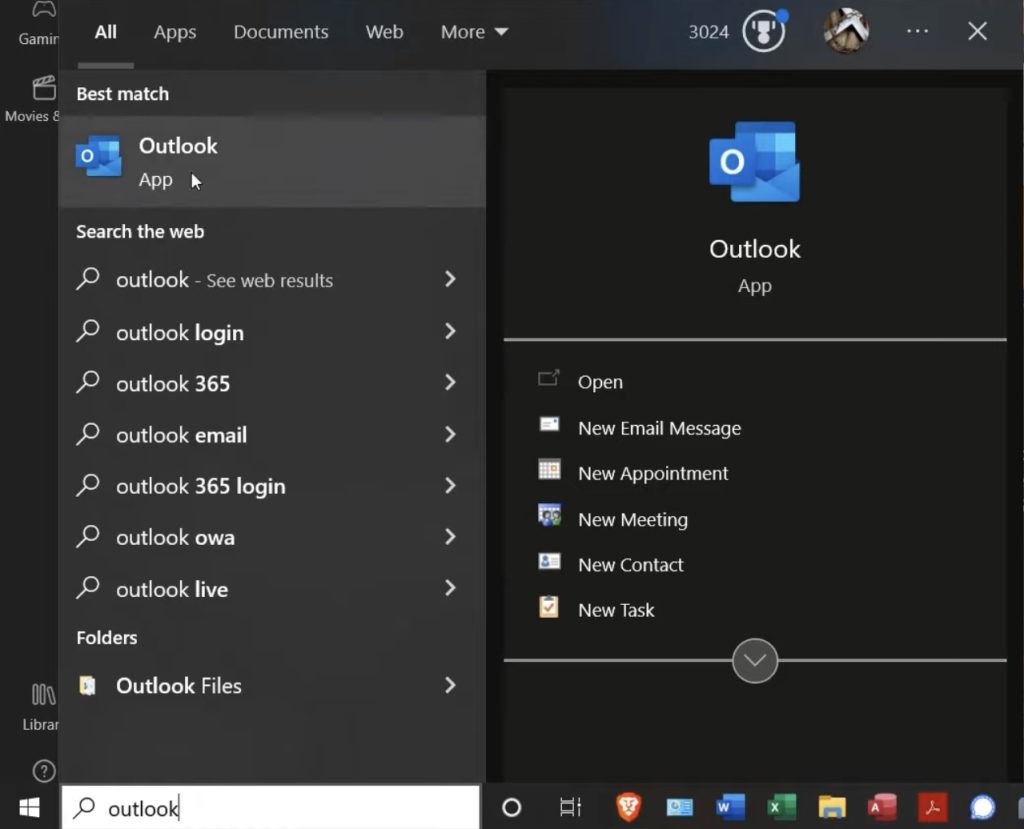
- Once installed, type Outlook in the search of your windows desktop and click on the Outlook icon to open it.
FREE Smartphone Version of MS Outlook
Easily get Microsoft outlook on your smartphone either on an iOS or android device.
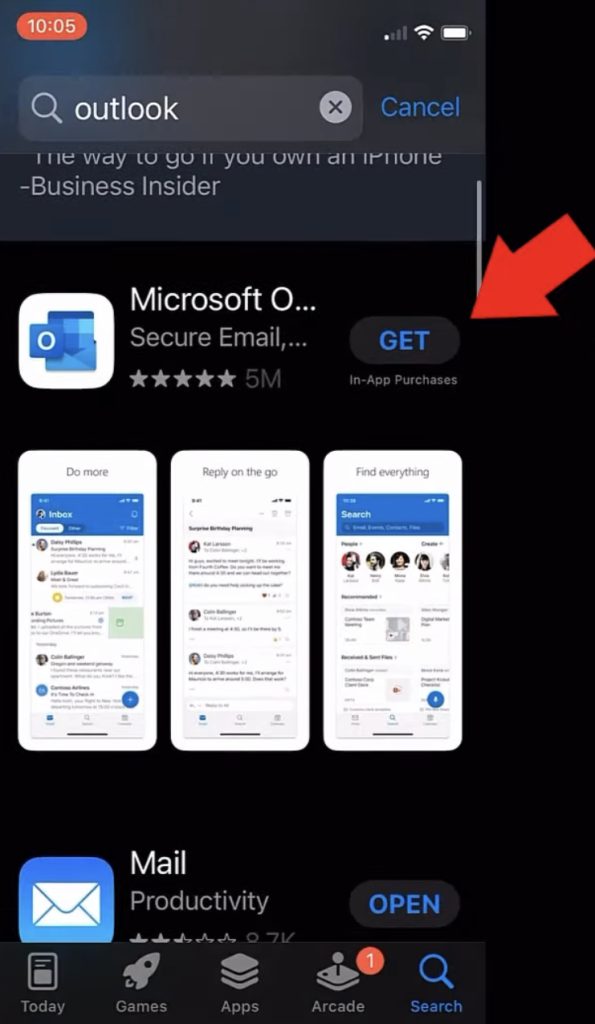
- Search MS Outlook in your app store or android play store and download it on your phone.
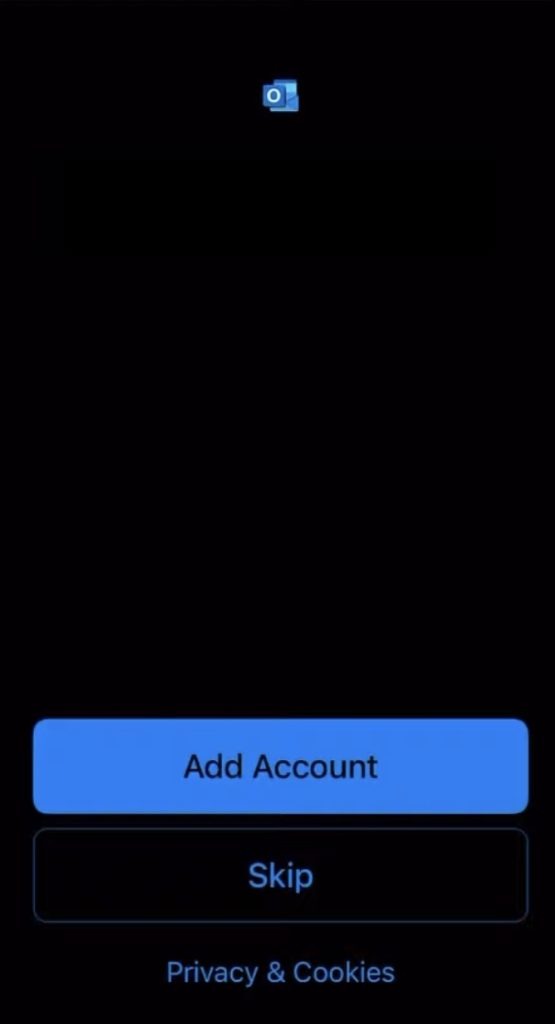
- Once downloaded open the app and find the option to log into your existing Microsoft account, or create one for free.
These were the three simple ways to get outlook for free. Please make sure that you’re logged into the same Microsoft account online, on your desktop, or on your phone so that you can see all past meetings are synced across devices.
John Michaloudis is a former accountant and finance analyst at General Electric, a Microsoft MVP since 2020, an Amazon #1 bestselling author of 4 Microsoft Excel books and teacher of Microsoft Excel & Office over at his flagship MyExcelOnline Academy Online Course.

