In today’s fast-paced digital world, efficient communication is key, and that includes the way we prepare and share presentations. With the growing trend of remote work and digital collaboration, the need for small-sized presentations has surged. This is not just to accommodate the varying bandwidth limitations faced by individuals but also to optimize for mobile device compatibility where every byte counts. Smaller PowerPoint file sizes mean quicker load times, easier sharing via email or cloud services, and ultimately, a smoother presentation experience for both the presenter and the audience.
Key Takeaways
- Open your PowerPoint file and go to the “File” menu, then choose “Save As.” Click on the “Tools” menu within the “Save As” dialog box and select “Compress Media” to initiate the compression process.
- By knowing how to compress videos in PowerPoint, you reduce file sizes, making the videos easier to share via email or online platforms, and the files occupy less storage space on your computer or hard drive.
- Compressing media in PowerPoint helps enhance performance and ensures your presentation is more likely to be compatible with different devices and platforms, while also considering the balance between compression and maintaining video quality.
Compressing Videos in PowerPoint
Compressing videos within PowerPoint is like giving your presentations a performance boost. It cuts down on unnecessary bulk, ensuring your slides glide smoothly from one to the next without the dreaded loading lag or compatibility issues. Imagine not having to worry about video playback stuttering during an important pitch or educational session. That’s the value of understanding video compression in PowerPoint. Below, I’ll walk you through the straightforward process of reducing your video size without compromising the impact of your visual aids. Whether you’re preparing for a boardroom presentation or a classroom lecture, mastering this skill can make a world of difference.
Table of Contents
The Art of Reducing Video Size in PowerPoint
Review the Quality of Your Images and Videos
Reflecting on the quality of the images and videos embedded in our presentations is a step we must not overlook. As we endeavor to compress them, reviewing their current state is crucial as it serves as our benchmark for post-compression results. By scrutinizing the resolution, frame rate, and audio clarity, we gain insights into what the audience will experience. A resolution that’s too low can render imagery pixelated, frame rate drops may disrupt smooth playback, and poor audio can overshadow the visual narrative.
It’s important to note how compression affects each element. Compressing your video files too much might lead to a fuzzy picture or muffled sound, which can detract from the overall impact. We must ensure the final version maintains a professional polish—it should look crisp on a big screen and clear through a projector—but not at the expense of file portability. Hence, it’s about striking that sweet balance.
Inserting Videos Directly vs. Linking to External Sources
When considering how to incorporate videos into a PowerPoint presentation, we’re faced with a crucial choice: embedding the videos directly into the slideshow or linking to external sources. Both methods have their merits, and the decision hinges on various factors such as the presentation’s purpose and the audience’s access to the internet.
Embedding videos ensures that the presentation is self-contained. There’s no reliance on internet connectivity which means zero buffering issues during playback. However, this comes with a significant increase in file size. On the other hand, linking to external sources, such as YouTube, helps maintain a slender file size. Accessibility becomes contingent on an active internet connection, which may not be ideal in all scenarios.
My recommendation is clear. If you are not transferring the presentation elsewhere or if internet access is reliable, link to the videos. Doing so is quite straightforward: under the Insert tab, click on the Video button and explore your options. But if you need a presentation that works offline, then consider embedding and compressing your videos. Remember, a presentation should not only capture the audience’s attention but also be approachable and sharable with ease.
Step-by-Step Instructions to Compress Videos
Accessing Compression Features in PowerPoint
STEP 1: First, embed a video into your PowerPoint slide.
STEP 2: For the most current versions of PowerPoint, click on the File tab.

STEP 3: In the File menu, find and click on the Info section.
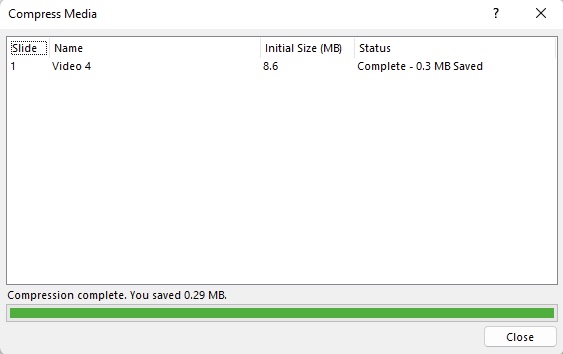
STEP 4: Look for and select the Compress Media option. This feature is essential for reducing your file size while maintaining quality.

STEP 5: You will be presented with several predefined quality settings. Carefully choose the one that best suits your needs, as this choice will affect the balance between file size and media quality.

STEP 6: Once you have selected the optimal setting, the compression process will begin. A progress bar will display the task’s completion status.
For older versions, such as PowerPoint 2011, the steps might slightly differ, but the goal remains the same.
Fine-Tuning Compression Settings for Optimal Results
Fine-tuning compression settings in PowerPoint is akin to being a skilled artist carefully mixing paint—it’s all about getting those details right for the perfect finish. Once you’re in the ‘Compress Media’ options, you’ll see choices such as ‘Presentation Quality,’ ‘Internet Quality,’ and ‘Low Quality.’ These settings are your paintbrushes for crafting the desired output.
‘Presentation Quality’ preserves the highest video quality suitable for, say, large screens and projections—it’s your go-to for a boardroom presentation. ‘Internet Quality’ strikes a reasonable balance, understandable for online sessions where file size matters but quality can’t be sacrificed. And ‘Low Quality’ minimizes the file size, a feasible option when sharing via email or other restrictions.
Remember to carefully experiment with these settings. If you choose a setting that’s too low, your video may seem a tad impressionistic when full resolution is needed. But a setting that’s too high can result in a bulky file, impeding easy sharing and playback.
After the compression, we must verify the output. Play the video to ensure the quality still conveys your message effectively, and remember, this isn’t a ‘set it and forget it’ task. Every video, every audience and every presentation may demand a different setting. Keeping this in mind, we can master the fine art of compression, ensuring our presentations are both visually stunning and remarkably optimized.
Tips and Tricks for Efficient PowerPoint Compression
Converting Images to JPEG Format Before Insertion
Before dropping images into our PowerPoint masterpiece, consider this: format plays a huge role in the file size. I’ve found that converting images to JPEG format before insertion can significantly reduce the overall size of the presentation. JPEG is ideal for detailed photographs, and its compression algorithm excels in maintaining an acceptable level of quality with a smaller file footprint.
The conversion process is simple. Right-click on your selected image and choose ‘Save as picture’. In the save dialog, select JPEG as the file format. Now, instead of a bulky PNG or BMP file, you have a streamlined JPEG ready for the slides.

Here’s why this method is brilliant: JPEGs tend to have smaller file sizes compared to formats like PNG, without a noticeable quality loss for your presentation needs. Plus, their universal compatibility ensures the images will look great on any device or screen they’re displayed on.

By converting to JPEG, your presentation becomes more storage-friendly and less of a burden to networks when shared. It’s a small step with a notable impact, particularly when you have multiple images to showcase.
Do Image Edits Outside PowerPoint for Smaller Files
Taking the time to edit images outside of PowerPoint is a game-changer for keeping files lean. I’ve observed many of us tweak pictures directly in the presentation software, perhaps for convenience. However, it’s worth noting that PowerPoint retains all the original data of the edited images, which can bloat your file size considerably.
To avoid this, I strongly recommend using a dedicated image editor—be it Photoshop for the pros or simpler tools like Paint or GIMP for basic adjustments. Make all your crops, color adjustments, resizes, or filters there. Only once you’re satisfied with the image, bring it into PowerPoint.
This practice has a two-fold benefit. First, it preserves the optimal quality of your visuals because dedicated editors offer finer control over the edits. And second, it keeps your PowerPoint file size in check, as the software only stores the final version of your image.
Let’s remember to tell PowerPoint to discard all excess editing data once the images are in place. It’s an additional precaution to ensure our presentations remain as lightweight as possible.
Alternate Methods for Slashing PowerPoint File Size
Turning a Bulky PPT into a Compressed PDF or ZIP File
When all else fails and you’re still grappling with a sizable PowerPoint file, consider flipping the script—turn that bulky PPT into a compressed PDF or ZIP file. The process is straightforward and can drastically reduce your file size, making it manageable for email and online sharing.
Transforming your PowerPoint into a ZIP file is essentially archiving it. Archive by right-clicking on the file, selecting ‘Send to’, and then choosing ‘Compressed (zipped) folder’. By doing this, you can reduce the size of the entire project, which is particularly useful when it’s chock-full of media and other hefty elements.
Another clever move is to convert the PPT to a PDF, especially when it’s heavy on text and static images. By using online PDF conversion tools like Adobe Acrobat, the process is a breeze. The resultant file is not only lighter but also more secure against unwanted modifications, and it maintains a consistent format across devices.
Here’s what to remember: subsequent compression of the PDF can further slim it down if needed. In essence, these techniques are the ace up our sleeve for sharing content-rich presentations without the bulk.
Real-world Applications for Compressed PowerPoint Files
When Is Compressing a PowerPoint File Beneficial?
Compressing a PowerPoint file is not just a best practice; it’s a strategic move that’s advantageous in myriad scenarios. For instance, when you’re gearing up to email a presentation, size limits can be your nemesis. A compressed file slips elegantly under those maximum capacity ceilings that email services impose.
Another situation where it shines is in facilitating smoother collaboration—think cloud storage and file sharing platforms. When working in teams, especially with bandwidth discrepancies, a smaller file ensures swift uploads and downloads, making the flow of ideas seamless.
Moreover, for those of us constantly on the go, a compressed PowerPoint is a must. Aside from freeing up valuable space on mobile devices, it also opens the door to remote accessing without painful waiting times. It’s an all-around win, enhancing accessibility, preserving quality, and boosting productivity. Whether presenting in person, sharing for review, or archiving, a lighter PowerPoint file is often the smarter choice.
Strengthening Your Presentation Profile with Reduced File Sizes
Reducing the file size of your presentations can significantly beef up your presentation profile. In a world where digital competency is paramount, being known for sleek, efficient, and easy-to-handle presentations can set us apart. A compressed PowerPoint lifts the burden on the recipient’s storage, conveys professionalism, and displays an understanding of digital etiquette.
Moreover, it can underline your skills in creating impactful presentations without overloading them with unnecessary data. This streamlining can directly affect your audience’s engagement and ensure smooth delivery whether you’re presenting in person or virtually.
By keeping your file sizes compact, you show a respect for people’s time and bandwidth limitations. Not to mention, smaller files are less likely to encounter compatibility issues, ensuring your content reaches your audience just as you intended—intact and effective.
Compressing PPT Files on Different Operating Systems
Differences between macOS and Windows Compression Techniques
Navigating the maze of presentation file compression reveals one stark truth: the methods can differ greatly between operating systems, specifically macOS and Windows. Knowing these differences is not only empowering, it’s practically essential for achieving optimal results.
macOS users typically leverage built-in tools like iMovie and QuickTime Player to compress their media files before integrating them into PowerPoint. The advantage here lies in the seamless ecosystem of Apple products. However, macOS PowerPoint has a limitation—it doesn’t allow users to compress music or video files directly within the application, unlike on Windows.
On the Windows side, PowerPoint comes equipped with a dedicated ‘Compress Media’ option that’s highly intuitive and doesn’t require external tools. It’s just a few clicks within PowerPoint’s interface to shrink videos to your desired quality. This built-in functionality caters well to users who prefer a one-stop solution without toggling between different software.
Having this cross-operating system awareness when it comes to compression is not trivial, as it nudges us toward tailored approaches rather than one-size-fits-all solutions. Being adept at using the specific techniques of both macOS and Windows ensures we are versatile presenters, capable of smart file management no matter the platform.
Cross-Platform Tools for Universal File Reduction
In the quest for universal file reduction, cross-platform tools are our knights in digital armor. These stalwarts bridge the operating system divide, making video compression a cinch whether you’re a macOS devotee or a Windows warrior.
One such savior is HandBrake, an open-source video transcoder available for both macOS and Windows. HandBrake shines with its ability to convert video from nearly any format to a selection of modern, widely supported codecs. It’s a favorite for its granular control over compression settings, plus it’s free.
Then there’s the stalwart Adobe Premiere Pro, recognized for professional-grade video editing and compression capabilities, with consistent performance across both platforms. It’s a bit more advanced, and while it might be overkill for simple compression tasks, it offers unparalleled fines autonomy for those desiring the highest precision.
Tools like these dispel the friction sometimes encountered when sending presentations across different OS environments. By adopting a cross-platform mindset, we take a significant step towards creating universally accessible PowerPoint files without worrying about file bloat or compatibility issues.
Conclusion
Achieving Stunning Presentations without Compromising Quality
Achieving stunning presentations without compromising on quality may seem like a balancing act, but it’s definitely within reach with careful planning and understanding of compression techniques. The goal is to create slides enriched with media that captivate your audience while ensuring the file remains manageable and functional.
Here are some indispensable tips to hit that sweet spot: consider the resolution of your images and tailor them to your presentation medium, use video clips judiciously, and compress only to a level that maintains professional quality. Optimization tools in PowerPoint, such as the ‘Compress Media’ feature, should become your allies in this endeavor.
Remember, a high-quality presentation isn’t solely defined by pixel counts or decibels—it’s about coherence, relevance, and delivery. By striving for a harmony between visual excellence and file efficiency, we can craft presentations that are both visually impressive and technically sound.
Exploring More Resources and Articles on File Compression
As we venture further into the digital realm, expanding our knowledge on file compression becomes crucial. Fortunately, the landscape is abundant with resources and articles that delve into the intricacies of compressing PowerPoint files effectively.
For those looking to deep dive, Adobe’s blog offers a treasure trove of insights about file compression. Websites like TechRepublic or Computerworld often publish tips and tricks on handling large files. Additionally, Microsoft’s own support pages provide guides tailored specifically for PowerPoint users.
It’s essential to stay abreast of the latest discussions in forum sites like Stack Exchange or Reddit, where tech enthusiasts and professionals frequently share their real-world experiences and hacks.
By making use of these resources, we not only hone our technical skills but also enrich our understanding of best practices, ensuring our presentations are the epitome of efficiency and engagement.
Frequently Asked Questions About Video Compression in PowerPoint
What’s the Most Effective Way to Compress PowerPoint Videos without Losing Quality?
The most effective way to compress videos in PowerPoint without losing discernible quality is by using the built-in ‘Compress Media’ feature. Rather than compressing blindly, I recommend choosing ‘Internet Quality’, which retains a high level of visual fidelity while significantly reducing the file size. This strikes a good balance between clarity and manageability, which is ideal for most situations. Always preview the video post-compression to ensure it meets your expected standard.
Are There Any Free AI PPT Tools to Help with Video Compression?
Yes, there are free AI-powered tools like Winxvideo AI that can help with video compression for PowerPoint. These tools leverage AI to maintain quality while dramatically reducing file size, sometimes by up to 90%. This is especially useful when dealing with large videos, as the AI can intelligently optimize frames and audio to keep the essence of the video intact despite the size reduction.
How to reduce File size in PowerPoint?
To reduce file size in PowerPoint, compress your media files via the ‘Compress Media’ feature under the File and Info tab. Also, resize and edit images externally, saving them as JPEGs before inserting, and where possible, link to videos instead of embedding them. Don’t forget to remove unnecessary fonts, animations, and transitions that can add to the file size.
How do I send a compressed powerpoint file via email?
To send a compressed PowerPoint file via email, first reduce its size by using the ‘Compress Media’ feature in PowerPoint. If it’s still too large, turn the file into a ZIP by right-clicking and selecting ‘Send to Compressed (zipped) folder’ (Windows) or ‘Compress [file name]’ (macOS). Attach the ZIP file to your email as you would with any other document. If the file still exceeds your email provider’s limit, upload it to a cloud service and share the link instead.

John Michaloudis is a former accountant and finance analyst at General Electric, a Microsoft MVP since 2020, an Amazon #1 bestselling author of 4 Microsoft Excel books and teacher of Microsoft Excel & Office over at his flagship MyExcelOnline Academy Online Course.


