In Microsoft Excel, the ability to convert columns to rows—or vice versa—is crucial for data analysis and presentation. This transformation enhances readability and facilitates comparisons between datasets or integration with other tools.
Key Takeaways:
- Transposing Defined: Transposing in Excel flips data orientation, converting columns into rows and vice versa, aiding in better data alignment.
- Methods for Transposing: Utilize functions like TRANSPOSE, Paste Special, and Power Query for efficient data reorganization.
- Keyboard Shortcuts: ALT + E + S + E + Enter is a rapid shortcut sequence for transposing data, optimizing workflow efficiency.
- Advanced Techniques: Power Query and formulas like INDIRECT+ADDRESS offer dynamic and precise ways to transpose data, ideal for complex datasets.
- Avoiding Errors: Prevent overlap and data type errors by selecting appropriate target areas and ensuring formula accuracy, enhancing overall data integrity.
Understanding the Need for Converting Columns to Rows
When you dive into the world of Excel, you quickly realize how fluid data needs to be. Sometimes, for better analysis or visualization, the data structured in columns needs to be reshaped into rows. This rearrangement can make your spreadsheets more readable and can be crucial when you’re trying to align datasets for comparison or integration into different software.
Quick Excel Overview: What is Transposing?
Transposing in Excel is like performing a pivot on your data. When you transpose data, you’re flipping the orientation; columns become rows, and rows become columns. It’s a handy feature when you’re faced with data that isn’t formatted correctly for your analytical needs.
By transposing, you reshuffle data into the right order without the laborious need to retype anything, preserving the integrity of your data while adapting its layout to suit your tasks better.
Table of Contents
The Basics of Converting Columns to Rows
Using the Transpose Formula for a Simple Swap
The TRANSPOSE function in Excel is useful for converting data from rows to columns or vice versa. Here are the precise steps:
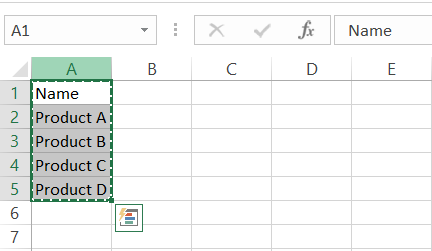
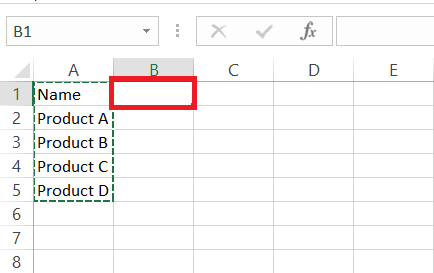
STEP 1: Select the cell where you want to convert columns to rows.
STEP 2: Insert formula “=TRANSPOSE(A1:A5)” to convert columns to rows.
STEP 3: Check out the result.
Using the Paste Special Dialog Box for a Simple Swap
Excel’s Paste Special dialog box is your go-to for a quick and fuss-free data transformation. To swap columns into rows:
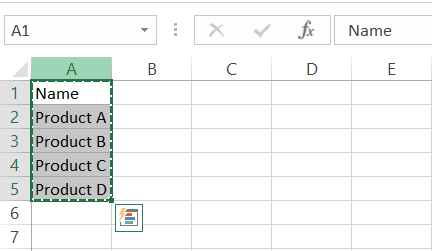
STEP 1: Select and copy the area of your spreadsheet you wish to transpose (e.g., A1:A5).
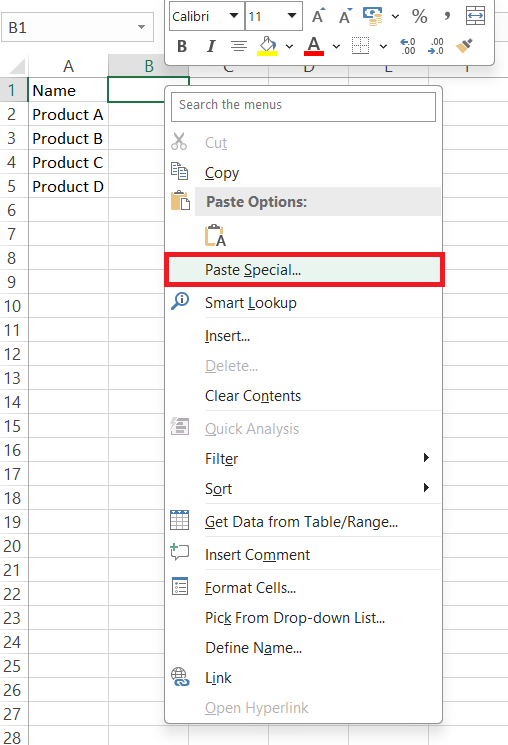
STEP 2: Right-click the cell where you want your transposed data to begin and select ‘Paste Special’.
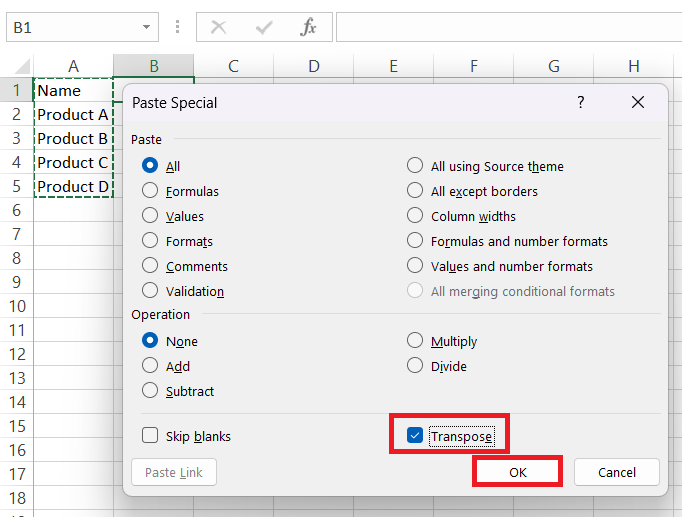
STEP 3: In the dialog box that appears, tick the ‘Transpose’ option.
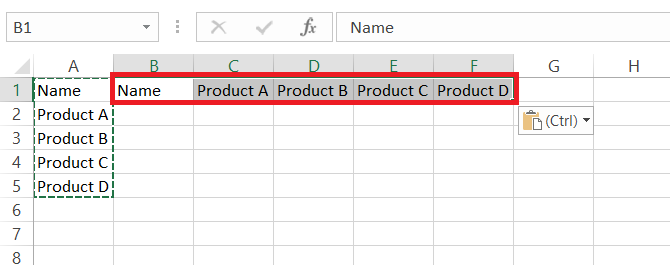
STEP 4: Hit ‘Ok’, and voila, your columns have become rows.
Not only does Paste Special save you time, but it also offers the flexibility to transpose more than just the cell values. You can choose to include formulas, formatting, or comments to maintain comprehensive data integrity during the switch.
Keyboard Shortcuts: Your Fast-Track to Transposing Data
Excel enthusiasts, rejoice! When you’re regularly converting columns to rows, keyboard shortcuts are your efficiency saviors. Here’s a quick and powerful sequence to transpose without breaking your workflow:
STEP 1: Select and copy the data set you want to transpose.
STEP 2: Go to your destination cell.
STEP 3: Hit ALT + E + S + E + Enter one after another, and your data hops from columns to rows swiftly.
These keystrokes could be your time-saving trick, leaving cumbersome click-through tasks in the dust.
Dive Into Advanced Excel Techniques
Power Query: A Dynamic Approach for Rearranging Data
Power Query emerges as a game-changer when you need a dynamic and robust way to transpose data in Excel. It takes the idea of rearranging data to a whole new level of efficiency and control. Here’s the step-by-step magic that unfolds with Power Query:
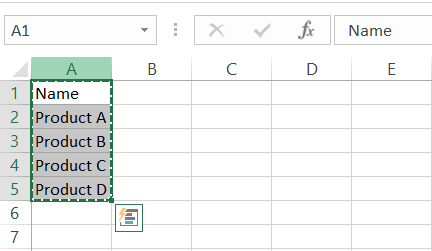
STEP 1: First, select the range you need to reshape.
STEP 2: Navigate to the Data tab, plunge into the ‘Get & Transform Data‘ section, and select ‘From Table/Range.
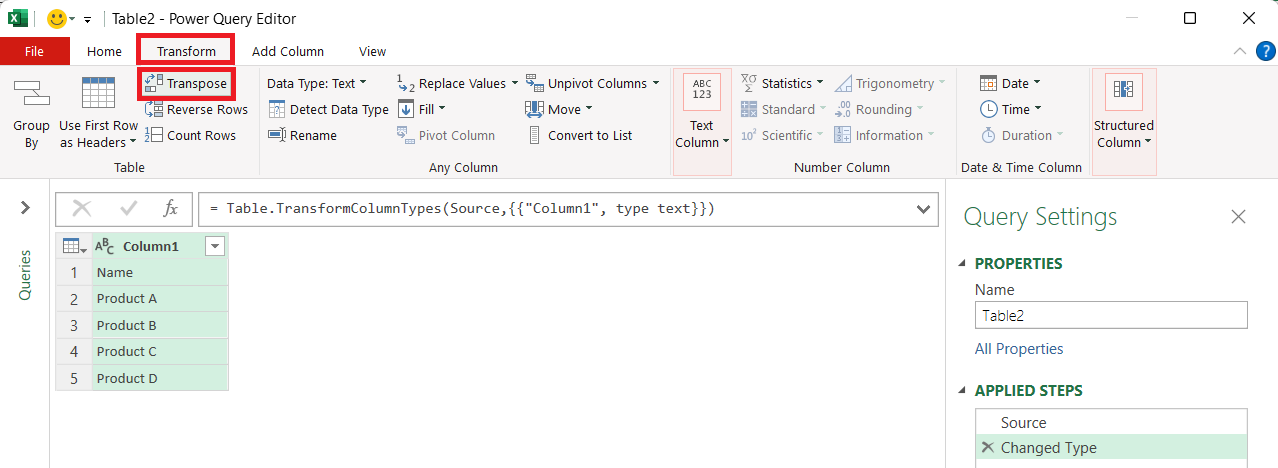
STEP 3: The Power Query Editor will pop up. Here, under the Transform tab, click the ‘Transpose’ button. And then close the Power Query Editor.
STEP 4: Check the result.
With Power Query, the transposition of data becomes refreshable and repeatable – perfect for any data that needs regular updating or restructuring.
Crafting Formulas: INDIRECT+ADDRESS and TRANSPOSE Functions
While the TRANSPOSE function in Excel is well-known for converting data format, another pair of functions, INDIRECT and ADDRESS, provides a unique approach to transposition. They offer a craftier, albeit a touch more complex, solution to flip rows and columns:
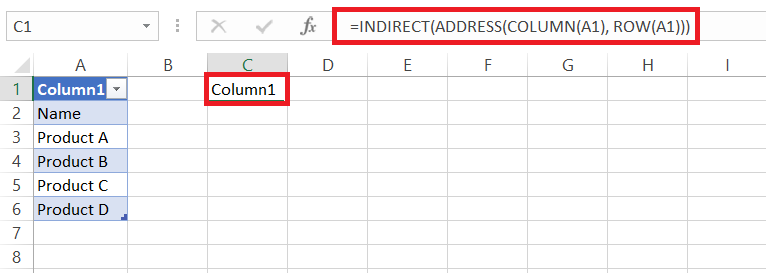
STEP 1: Write the formula =INDIRECT(ADDRESS(COLUMN(A1), ROW(A1))) in the desired location, which will be the new top-left cell of your rearranged data.
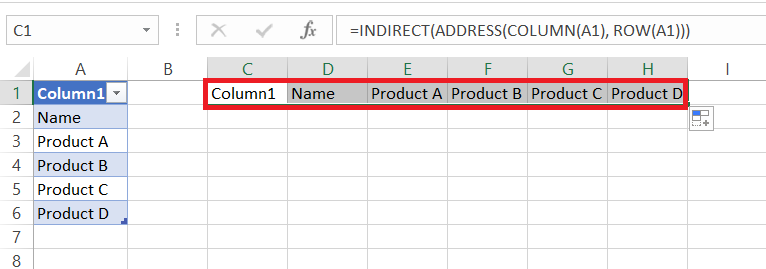
STEP 2: Copy this formula across the rows and columns you want your transposed data to cover. Dragging the fill handle (a small black cross on the corner of the cell) makes this quick and easy.
STEP 3: As a result, your original columns are now spread across rows, aligning with the layout you intended.
While this formula needs a bit more care—especially concerning absolute and relative references—it provides the flexibility of a non-array formula, which means you can edit individual cells post-transposition.
Just remember, formatting doesn’t follow automatically. But with a simple copy-paste of formatting (right-click, ‘Paste Special’, then ‘Formatting’), your transposed data can look just as good as the original.
Ensuring Accuracy and Efficiency
Overcoming the Overlap and Wrong Data Type Errors
Wrestling with overlap and wrong data type errors can throw a wrench in your data transformation efforts. To come out on top:
- Sidestep the overlap error by making sure you’re not trying to paste the transposed data where it overlaps the original dataset. To prevent this, always select a new, blank area in your spreadsheet before pasting.
- The wily #VALUE! error usually pops up when there’s a mismatch in data types or when incorrect formula input is provided in array formulas like TRANSPOSE. Ensure that your formulas are crisp and error-free by pressing
Ctrl+Shift+Enterrather than justEnterto confirm your array functions.
Remember, an ounce of error prevention is worth a pound of troubleshooting. Double-check everything before you commit to your Excel wizardry.
FAQs: Elevate Your Excel Skills
Can I Convert Multiple Rows to Columns from Different Workbooks?
Absolutely, you can convert multiple rows to columns from different workbooks. You just need to make sure both the source and target workbooks are open. Then, you can copy the rows you want to convert, go to the other workbook, and use the ‘Paste Special’ -> ‘Transpose’ function. Keep in mind that when using Excel Online, the ability to transpose data between workbooks may be limited compared to the desktop version.
Are there Alternative Formulas to the TRANSPOSE Function?
Yes, there are alternatives to the TRANSPOSE function, like using the INDIRECT and ADDRESS combination, or the INDEX and COLUMNS/ROWS functions, to rearrange your data in Excel. Each method offers its unique advantages, suited for different scenarios. Just keep in mind that while these alternatives may provide a solution, they often require a bit more complexity and finesse to implement correctly compared to the straightforward TRANSPOSE function.
How Do I Handle Blank Cells While Using the Transpose Formula?
When you use the TRANSPOSE formula and encounter blank cells, these empty cells will convert to zeros. To keep them blank, nest an IF statement within the TRANSPOSE function like so: =TRANSPOSE(IF(A1:G5="", "", A1:G5)). This formula checks each cell: if it’s empty, it remains empty; if not, the content gets transposed. Another workaround is to use the ‘Find and Replace’ feature to change those zeros back to blanks after the transposition.
What are Some Practical Use Cases for Converting Columns to Rows?
Here’s where turning columns into rows shines:
- Comparative Analysis: When side-by-side comparisons are needed, flipping data can align variables against different parameters for improved analysis.
- Database Management: Reformatting data to align with database fields makes data import/export tasks seamless.
- Reporting and Visualization: Row-to-column transformations optimize data layout for specialized reports or visual representations like charts and graphs.
In essence, whether it’s to match software input requirements or to make your spreadsheets more intuitive, switching data orientation proves indispensable in the analytical toolkit.
John Michaloudis is a former accountant and finance analyst at General Electric, a Microsoft MVP since 2020, an Amazon #1 bestselling author of 4 Microsoft Excel books and teacher of Microsoft Excel & Office over at his flagship MyExcelOnline Academy Online Course.


