Email templates can be a real-time-saver, especially if you’re sending similar messages frequently. Whether it’s a weekly report, a client follow-up, or a response to a common inquiry, having a template at your fingertips can make your workday much smoother. In this guide, I’ll show you how to create an email template in Outlook and get the most out of this handy feature. Let’s get started!
Key Takeaways:
- Email templates in Outlook save time and ensure consistent communication.
- Customizing templates with dynamic fields adds a personal touch to each email.
- Quick Steps streamline the process of using templates with just one click.
- Proper naming and organizing of templates ensures easy access and retrieval.
- Personalizing sections of templates can enhance engagement with recipients.
Table of Contents
Get a Head Start on Efficiency
What Is an Email Template in Outlook?
Imagine tapping into a world where sending out batches of emails doesn’t just save you a chunk of time but also enhances the consistency and professionalism of your communications. That’s precisely what an email template in Outlook can offer.
It’s a pre-defined email format that includes generic content applicable to recurrent situations or messages. So, whenever I need to send a similar email, instead of starting from scratch, I use a template as a base and make necessary tweaks to personalize. This approach is not only efficient but helps maintain a uniform tone and branding across all of my messages.
Why Use Email Templates?
Before we dive into the steps, let’s talk about why you’d want to use email templates in the first place. The primary reasons are:
- Efficiency: Save time by avoiding repetitive typing.
- Consistency: Ensure your messaging is consistent across all emails.
- Customization: Templates can still be personalized with placeholders for names, dates, and other specific information.
- Professionalism: Pre-built templates help maintain a polished and professional tone.
Master the Basics: Creating Your First Template
Step-by-Step Instructions to Set Up an Outlook Template
Setting up an email template in Outlook generally involves creating a new email, crafting and formatting your message, and then saving this as a template for future use. Here’s how we’d do it step by step:
STEP 1 – Open Outlook: We begin by launching Outlook and clicking on ‘New Email’ to start composing a fresh message.
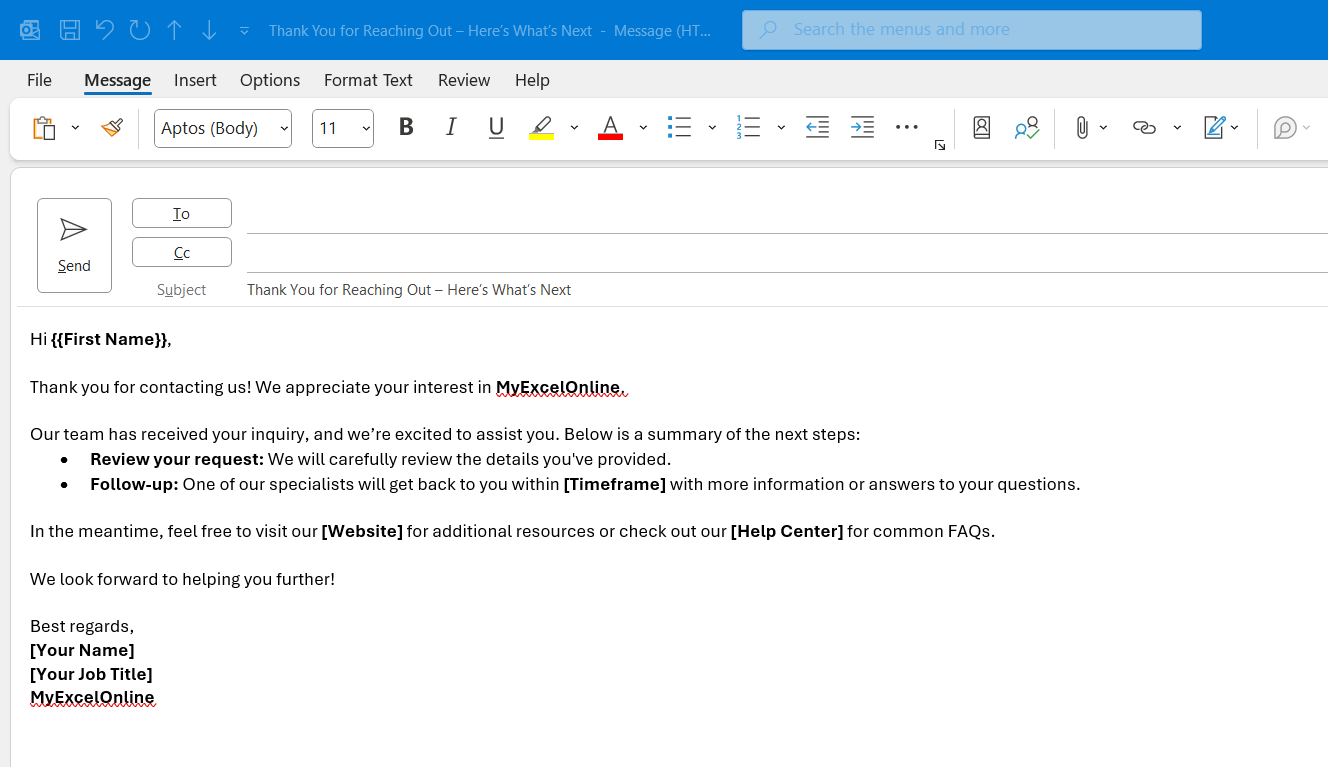
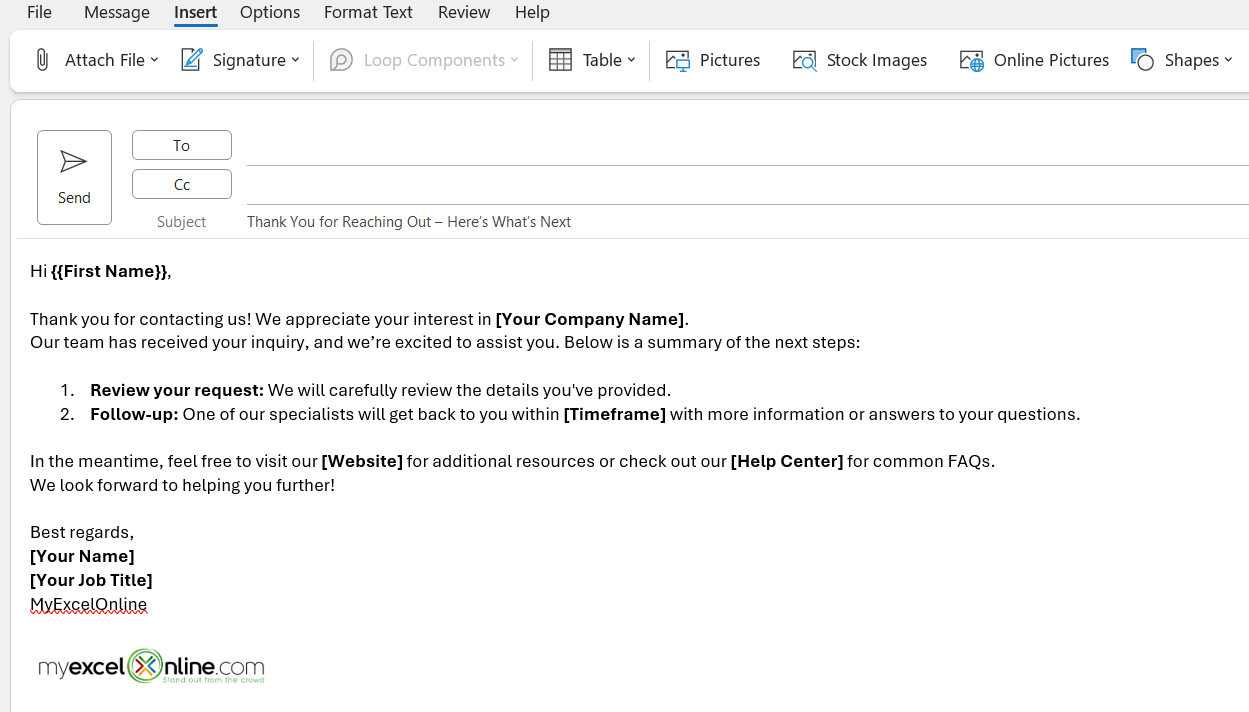
STEP 2 – Design Your Message: We put together the content that will be standard across each email sent from this template. This includes formulating a subject line, typing out the body of the email, and inserting any signatures or legal disclaimers needed.
STEP 3 – Customize with Formatting: We then move on to style the email. This is where creativity comes into play. Although there are no drag-and-drop builders, I can select from basic templates provided by Outlook, apply themes, change text formats, and even insert logos or images to reflect my branding.
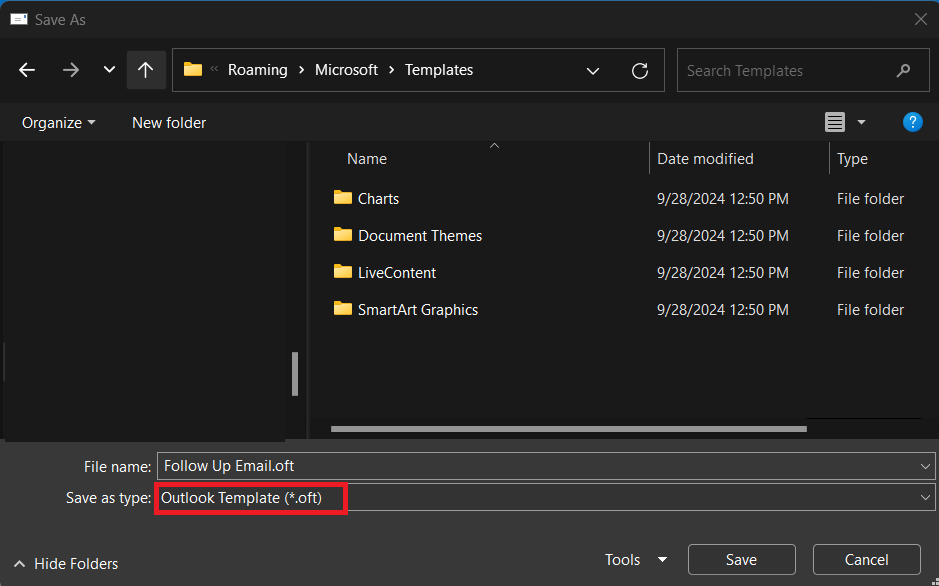
STEP 4 – Save as a Template: Once the email looks just right, it’s time to save it as a template. I navigate to the ‘File’ menu, select ‘Save As’, and in the Save as type field, choose ‘Outlook Template (*.oft)’. Before saving, I ensure to give it a clear and recognizable name that I will easily remember.
That’s it! The email template is now ready and can be reused anytime without having to recreate the same format again.
How to Access Template in Outlook
When it’s time to use the template, I follow these steps:
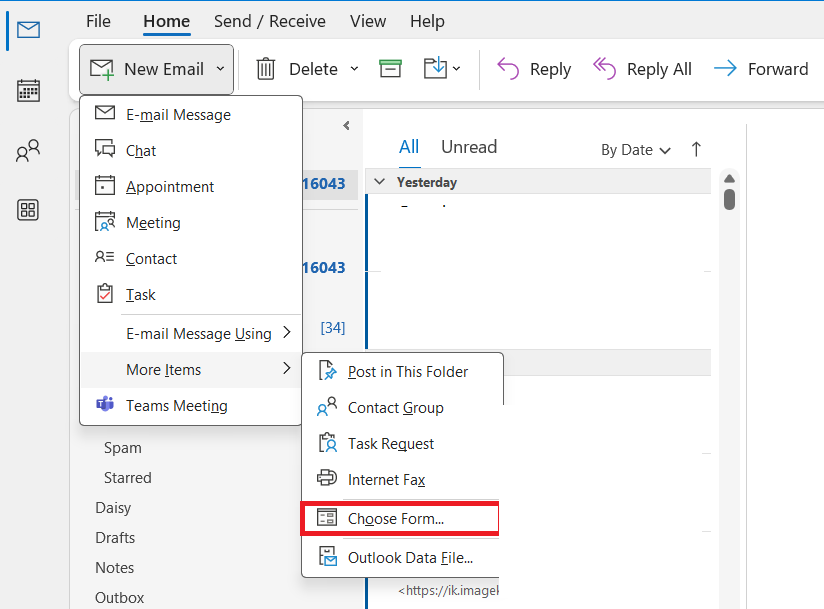
STEP 1: Go to Home > New Items > More Items > Choose Form.
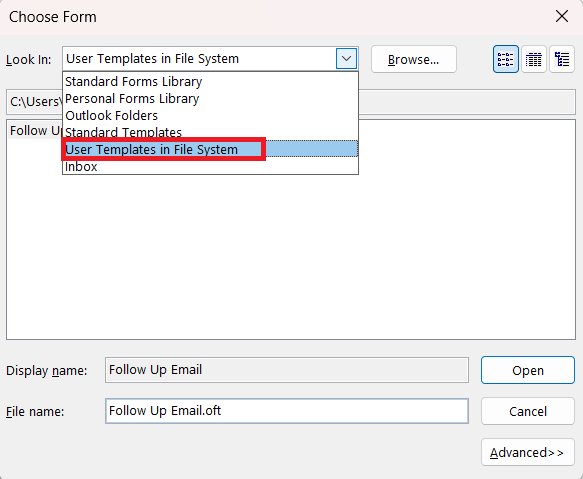
STEP 2: In the Choose Form window, select User Templates in File System under the Look In dropdown.
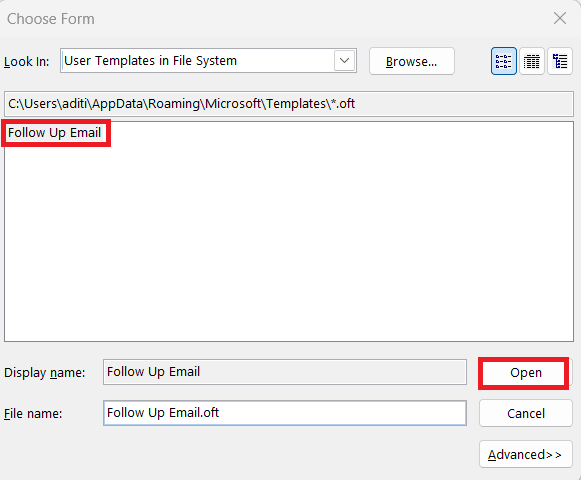
STEP 3: Find the template I want to use and click Open.
The template will pop up in a new email, and I just need to fill in the placeholders with the relevant information before sending it off. It’s a quick and easy process!
Elevate Your Email Game
Quick Steps for Using Your New Templates
Using Quick Steps to deploy email templates in Outlook is like having a conveyor belt for my daily email tasks—it moves things along efficiently and effortlessly. Quick Steps can perform a series of actions with a single click, such as replying to an email with a specific template or creating a new message using a template.
Here’s my approach to using Quick Steps with my email templates:
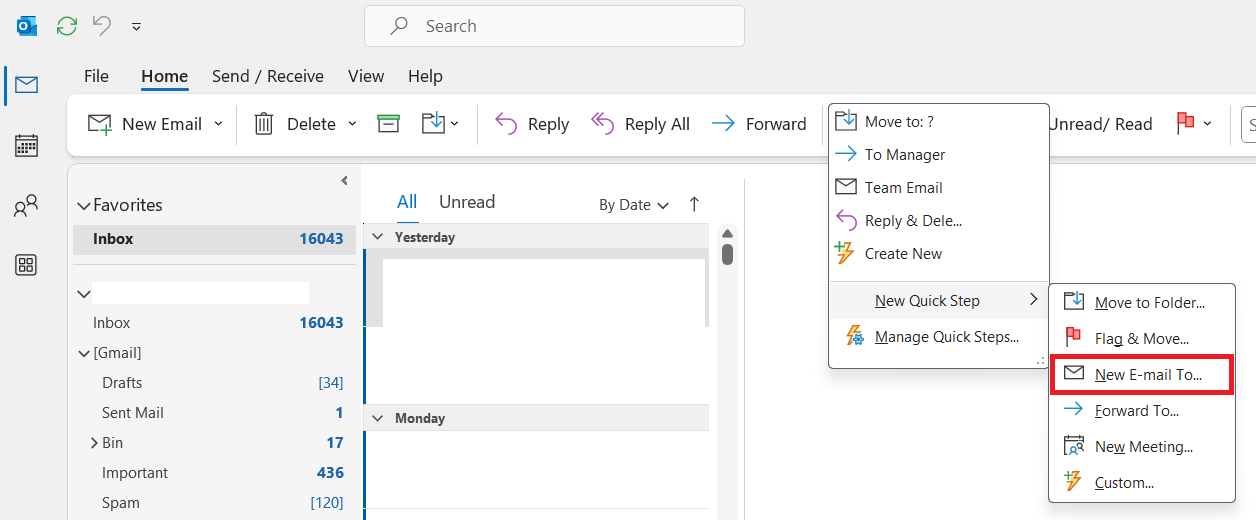
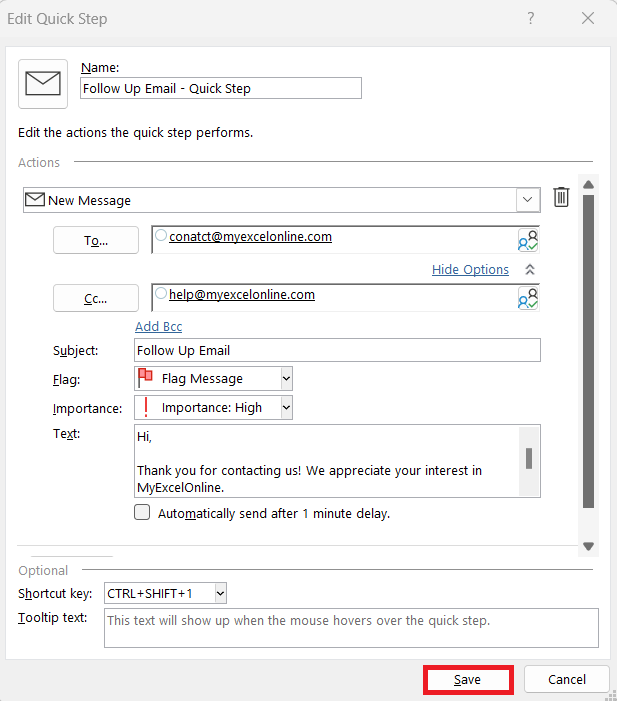
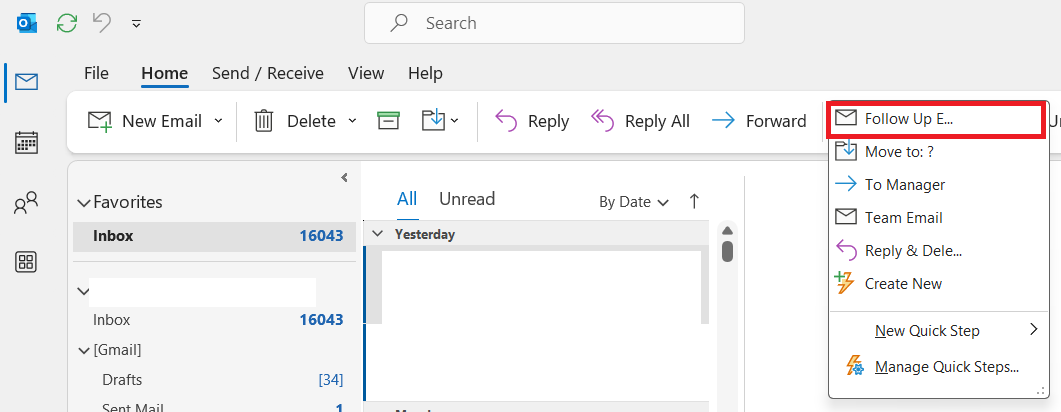
STEP 1: Click on Quick Steps in the Home tab. Choose ‘New Quick Step’ and select ‘New Message’.
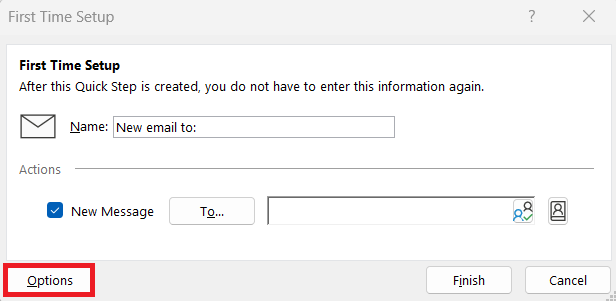
STEP 2: Choose ‘Show Options’ to add all necessary details.
STEP 3: Fill in the desired details and under ‘Text’, I add the content of my email template, if it’s a plain text template. Click Save.
When it’s time for the Quick Step to do its magic, I simply click on it in the Quick Steps gallery, and a new message with the pre-defined template content pops up—it’s like hitting the easy button on email setup.
Quick Steps has become a staple in managing my email efficiency. This feature really takes the guesswork out of routine communication, allowing me to focus more on meaningful tasks—and it can do the same for anyone looking to optimize their email strategy in Outlook.
Customize for Consistency
Saving and Naming Your Templates for Easy Access
Saving and effectively naming email templates is essential for swift retrieval and use, almost as if setting up a library of resources that can be accessed on-demand. Here’s how I streamline the process:
Once templates are created in Outlook, it’s crucial to save them for easy access. I meticulously name each template with something descriptive and straightforward. For example, if I have an email template for meeting follow-ups, I might name it “Meeting Follow-Up_Template.”
This ensures that when I look through a list of templates, there’s no guesswork involved—I can swiftly find the one I need without the hassle of opening and previewing multiple templates to identify the right one.
To save the templates, I follow the default file path which is typically C:\Users\UserName\AppData\Roaming\Microsoft\Templates. Adhering to this default path is important because it enables Outlook to easily locate and open the template from within the program. Deviating from this could complicate the process and potentially lead to those bothersome moments when you can’t find what you need.
By keeping these templates well-organized and appropriately named, I save valuable time that adds up in the long run, allowing for faster responses and a smoother workflow overall.
Enhancing Your Email Template with Personal Touches
Adding a personal touch to an email template is like the secret ingredient in a recipe—it’s the difference between good and great. To sufficiently customize an Outlook template, I use dynamic fields, also referred to as mail merge tags, which automatically insert the recipient’s name, company, or other personalized data when I prepare to send it off.
To enhance my email templates with personal touches, I start by identifying the places in the email where a personalized field could provide a warm, individual feeling, such as in the greeting or opening lines. For instance, including a dynamic field that auto-generates the recipient’s first name starts the email on a personal note, and this can set the tone for better engagement.
Moreover, I sometimes add a custom message or reference a recent event that’s relevant to the recipient. Doing this shows that I’m paying attention and that I value the relationship – beyond just the business it brings.
As a pro tip, while most of the email can be standardized, I always leave a section that prompts me to add a comment or a note pertinent to the specific recipient. This could be as simple as commenting on a recent collaboration or anticipating their needs based on previous interactions.
These small adjustments make a notable difference in how recipients perceive my emails. They demonstrate effort and attention to detail while maintaining efficiency, which is the perfect balance for effective email communication in a professional setting.
Frequently Asked Questions (FAQs)
Q1: What is an email template?
An email template is a preformatted and/or prewritten email that serves as a framework for constructing similar messages quickly and consistently, ensuring efficiency in communication.
Q2: How do I create a template in Outlook?
To create a template in Outlook, start by composing a new email, including the content, formatting, and any signatures. Once complete, go to ‘File’ > ‘Save As’ and select ‘Outlook Template (*.oft)’ as the file type, then give it a memorable name.
Q3: How do I access my saved templates?
To access saved templates in Outlook, go to the Home tab, click on New Items > More Items > Choose Form. In the Choose Form window, select “User Templates in File System,” find the desired template, and click Open.
Q4: Can I personalize templates?
Yes, templates can be personalized by using placeholders or dynamic fields, such as recipient names, dates, or custom messages. This allows you to send tailored emails while maintaining the efficiency of a pre-formatted template.
Q5: What is Quick Steps in Outlook?
Quick Steps is a feature in Outlook that automates multiple tasks with one click, such as applying a template, moving emails, or sending quick responses. It’s a great way to streamline repetitive email processes and boost productivity.
John Michaloudis is a former accountant and finance analyst at General Electric, a Microsoft MVP since 2020, an Amazon #1 bestselling author of 4 Microsoft Excel books and teacher of Microsoft Excel & Office over at his flagship MyExcelOnline Academy Online Course.


