Learn about Excel with our Free Microsoft Excel Online Course!
Key Takeaways
- To create curved text in PowerPoint, utilize the WordArt feature or the text box transformation tools to manipulate text into a desired curved shape, ensuring that it enhances the visual appeal and emphasis of the presentation.
- Enhance the curved text by applying formatting options such as 3-D Format for a three-dimensional effect, Shadow Effects for added depth, or Reflection Effects to simulate a mirrored surface, thereby making the text more engaging and distinct.
- Use curved text strategically in your PowerPoint presentations to highlight key phrases or statistics, animate titles or headings, creating a more dynamic and visually interesting slide that captures the audience’s attention effectively.
Why Mastering Curved Text Matters for Presentations
Mastering the technique of curving text can significantly elevate the quality of your PowerPoint presentations. It’s not just about aesthetic value; curved text can be a strategic tool in directing viewers’ attention and emphasizing key messages. By incorporating curved text thoughtfully, you provide visual cues that can guide your audience through the narrative of your presentation, ensuring that they engage with the content in a meaningful way.
Ultimately, when done correctly, curved text acts as an enhancement, accentuating the information rather than distracting from it. The ability to visualise and implement these design choices effectively is not just an asset, it’s a skill that can change the way your message is received and remembered.
Step-by-Step Guide to Crafting Perfect Circular Text
Creating text that bends and shapes itself perfectly around a circle can seem daunting, but with the right approach, it can be simple. Here is a concise guide to help you achieve that perfect circular formation.
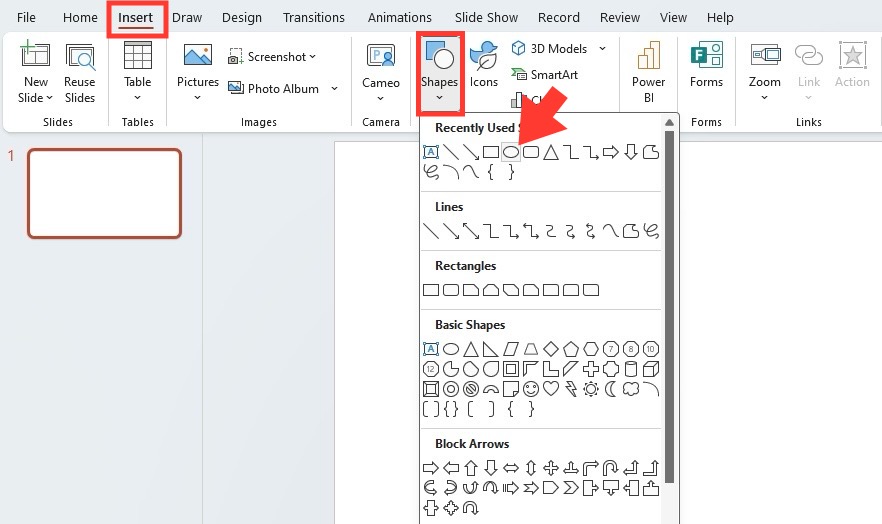
STEP 1: Insert Your Preferred Circle Shape: Navigate to the ‘Insert’ tab in PowerPoint and click on ‘Shapes’. Select the ‘Oval’ tool and, while holding down the ‘Shift’ key (to maintain a perfect circle), draw your shape on the slide.
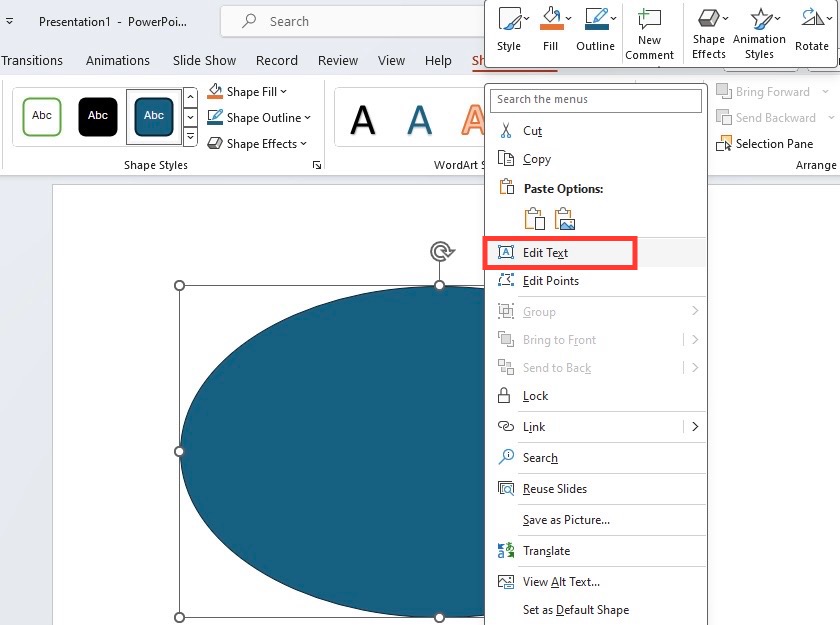
STEP 2: Add Text to Your Circle: Right-click on the circle and choose ‘Add Text’ from the context menu. Enter your desired words. At this point, the text is linear inside the circle, not curved around it.
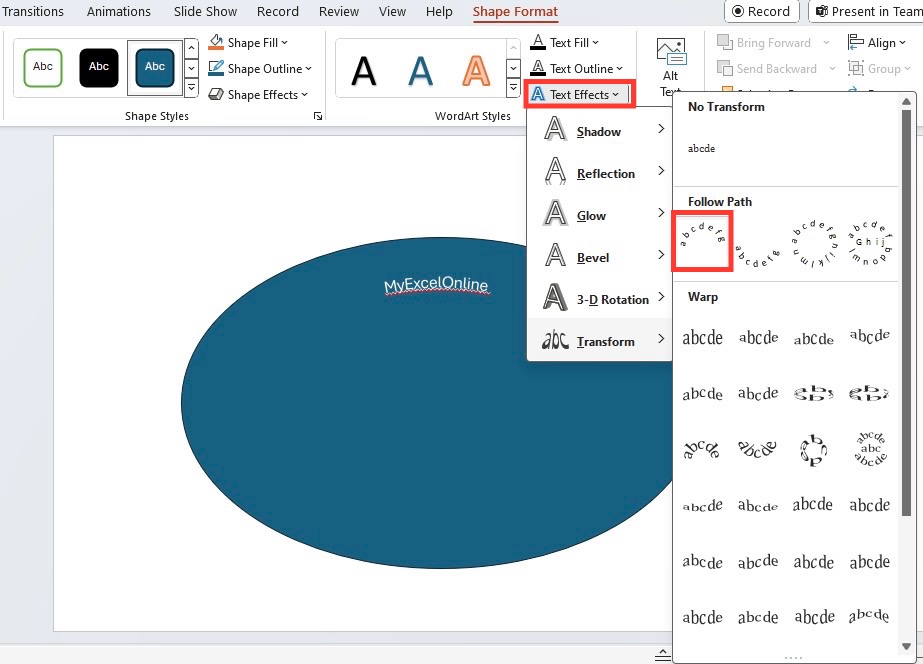
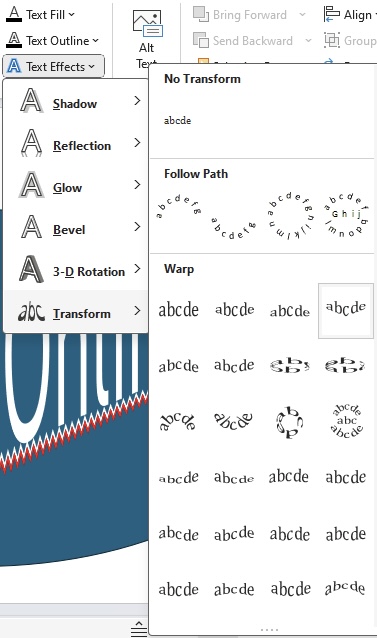
STEP 3: Convert to WordArt for Curving: With your text selected, head over to the ‘Format’ tab, click on ‘Text Effects’, and then choose ‘Transform’. You’ll see a variety of curving options—pick ‘Follow Path’ and then ‘Arch’.
STEP 4: Adjusting the Placement: If your text isn’t aligned as you wish on the circle, you can use the ‘Text Direction’ or ‘Align Text’ options under the ‘Format’ tab to fine-tune its positioning.
STEP 5: Control the Curvature: To get the text to curve around the circle appropriately, you may need to play with its size. You can adjust the font size or the shape size. If needed, you can also break your text into separate lines to better manage the curvature.
STEP 6: Final Touches: Review your circular text. Make sure it’s readable and aesthetically pleasing. Adjust the circle or text size as necessary, and ensure the text doesn’t overlap unless that’s part of your design.
Following this guide, with a dose of patience and practice, will lead to impressively precise circular text formations that are bound to elevate the professionalism and creativity of your PowerPoint presentations.
Table of Contents
Advanced PowerPoint Circle Techniques
Fine-Tuning Your Curved Text with Precision
For those who already have a grasp on the basics, adjusting the nuanced aspects of curved text can lead to a more refined and targeted design. Precision in fine-tuning is key to ensuring that the text not only follows a curve but does so with balance and elegance.
STEP 1: Select the Text Box: Click on your curved text to select it, ensuring you have access to all formatting tools.
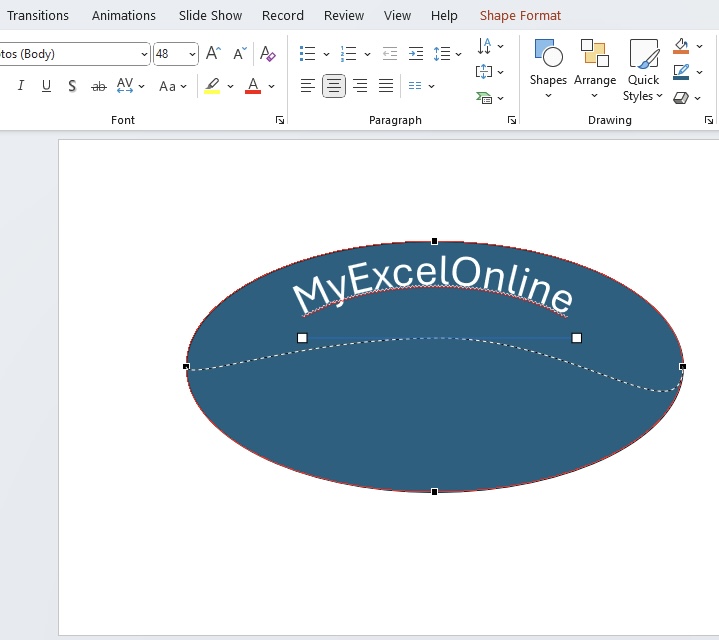
STEP 2: Use the Rotation Handle: At the top of the text box, you’ll find a rotation handle (it looks like a white circle). Clicking and dragging this handle allows you to rotate your text along the curve for more precise positioning.
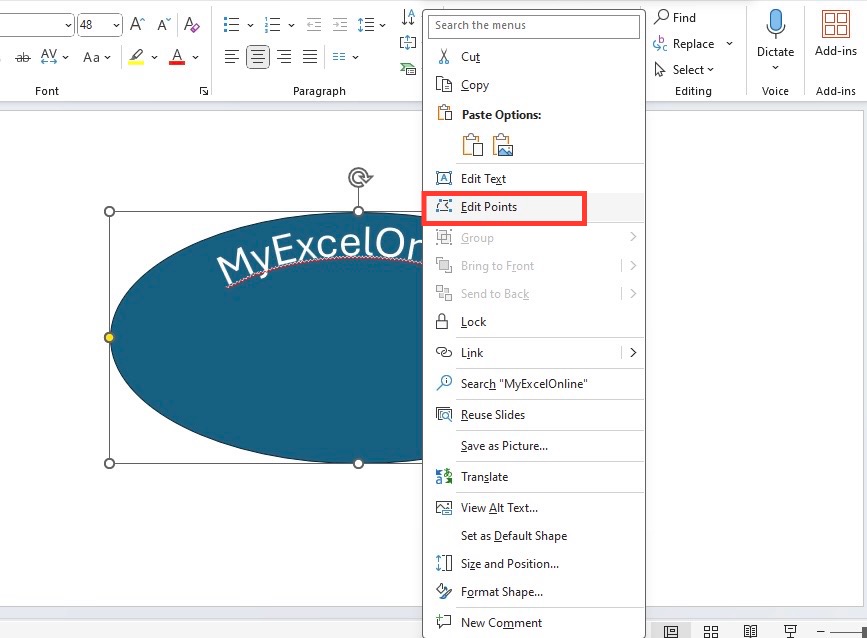
STEP 3: Edit Points for Custom Curves: For advanced curving, select ‘Edit Points’ under the ‘Drawing Tools’ format tab after right-clicking the shape. This feature allows for adjustments to the curvature at specific points, giving you a more hands-on approach to custom shaping.
STEP 4: Adjust Text Flow with the Transform Tool: ‘Text Effects’ under the ‘Shape Format’ tab houses the ‘Transform’ option, which provides additional curving styles for your text. Exploring these can further refine how the text flows along the path.
STEP 5: Preview Changes: As you adjust, keep an eye on your text. Preview your changes often to make sure that they contribute positively to your slide’s overall design and message.
Fine-tuning curved text is a careful balance of aesthetically pleasing curves and legibility. Precision editing ensures that the text is not only a design element but also serves its primary function of conveying information effectively.
Adding Flair with Special Effects and WordArt
Once you’ve curved your text to your liking, PowerPoint offers an array of additional effects to enhance and personalize the curved text’s visual impact, transforming simple words into compelling graphics with WordArt styles.
STEP 1: Select the Text: Click on your curved text to make it active, thereby enabling formatting options.
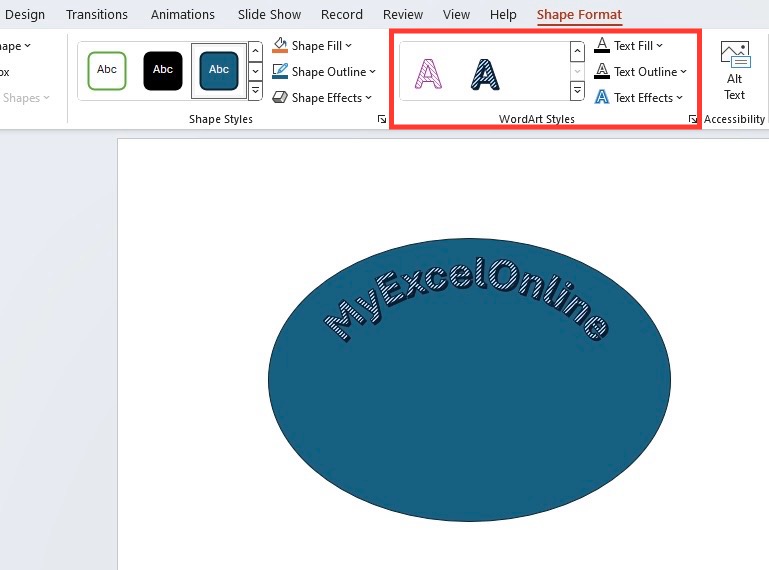
STEP 2: Navigate to WordArt Styles: In the ‘Format’ tab on the ribbon, go to the ‘WordArt Styles’ group to access a variety of pre-set styles that can instantly transform the look of your text.
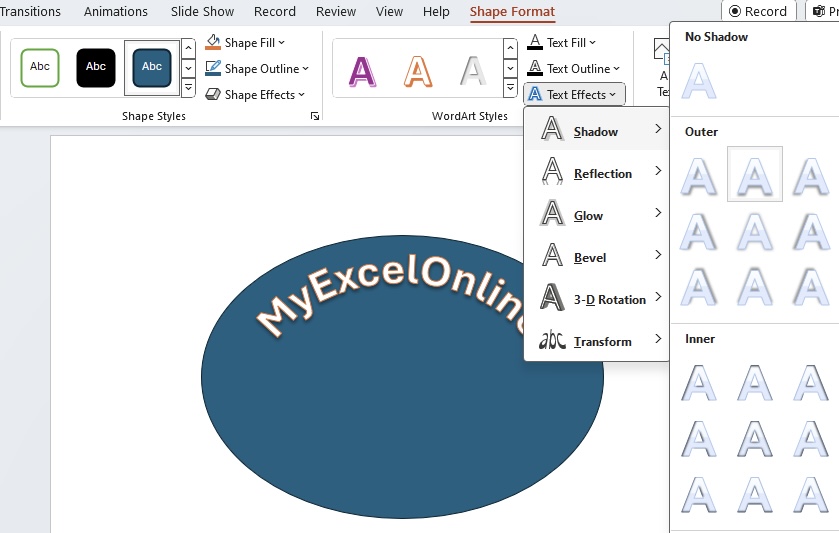
STEP 3: Explore Text Effects: Click on the ‘Text Effects’ button below the WordArt Styles. Here you can add shadows, reflections, glows, bevels, and 3D rotations to your text, customizing each to fit your presentation’s theme.
STEP 4: Fine-Tune with Options: Each effect option has a submenu that provides further customization, such as the angle and blur of a shadow, the intensity and color of a glow, or the perspective of a 3D rotation.
STEP 5: Combine for Greater Impact: Don’t hesitate to apply multiple effects. A subtle shadow combined with a bevel can make text pop off the page, while the right reflection can add a polished look.
STEP 6: Consider Contrast and Readability: As you add these flairs, it’s essential to maintain the readability of your text. Ensure there is sufficient contrast between the text and the background and avoid overcomplicating the design.
Incorporating special effects and WordArt can take your curved text from basic to dazzling and is a wonderful way to infuse personality into your presentation. However, it’s important to strike a balance — adding just enough flair to captivate your audience without overshadowing the message you wish to convey.
Making Your Curved Text Stand Out
Incorporating Animations and Transitions
Animations and transitions can be powerful tools in making your curved text the star of the show in a PowerPoint presentation. They can add drama, emphasize a point, or simply provide a touch of entertainment. Here’s how to animate your curved text effectively:
STEP 1: Select the Curved Text: Click on the curved text box you wish to animate to select it.
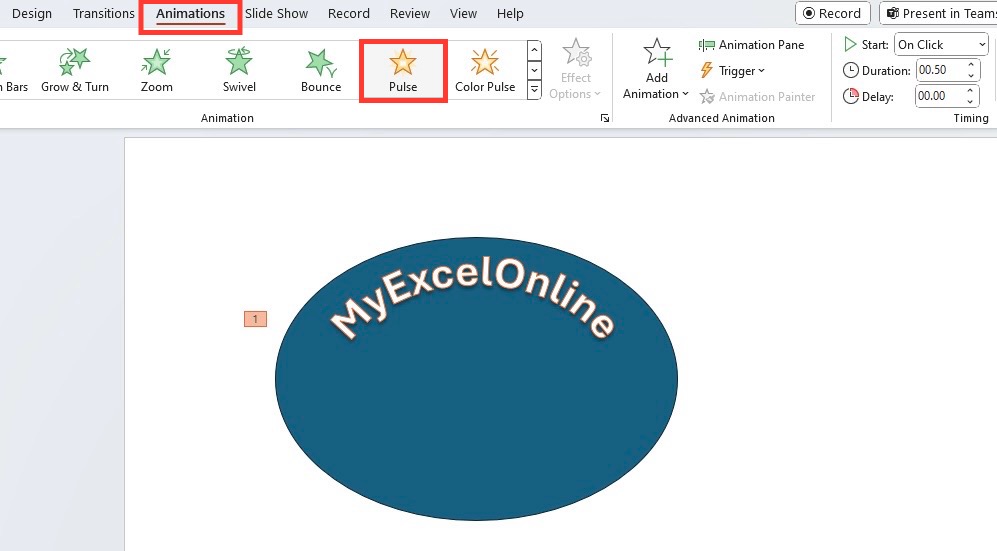
STEP 2: Access the Animation Tab: Click on the ‘Animations’ tab in the PowerPoint ribbon to explore the available animation options.
STEP 3: Choose an Appropriate Animation: Scroll through the options and choose an animation that complements the curvature of your text. For instance, a ‘Wheel’ effect can work well with circular text, enhancing the natural flow of the shape.
STEP 4: Customize Animation Settings: After selecting an animation, you can adjust settings like speed, duration, and start time. The ‘Animation Pane’ provides a comprehensive overview and customization space for complex sequences.
STEP 5: Preview the Animation: Use the ‘Preview’ function in the ‘Animations’ tab to play the effect and observe how the text enters, emphasizes, or exits the slide.
Animators often use the concept of “staging” to ensure that each animated element contributes to the clear conveyance of the story. Apply this principle by staging your curved text so that every entrance, emphasis, or exit serves a clear purpose. With thoughtful implementation, animations can make your curved text unforgettable and keep your audience engaged episode after episode.
Enhancing Readability with Color and Texture
To make curved text not only a design highlight but also easily legible, it’s important to use color, gradients, and textures thoughtfully. These elements can elevate the appeal of your presentation when applied with an eye for detail.
STEP 1: Select the Curved Text: Click on the curved text to bring up the relevant formatting options.
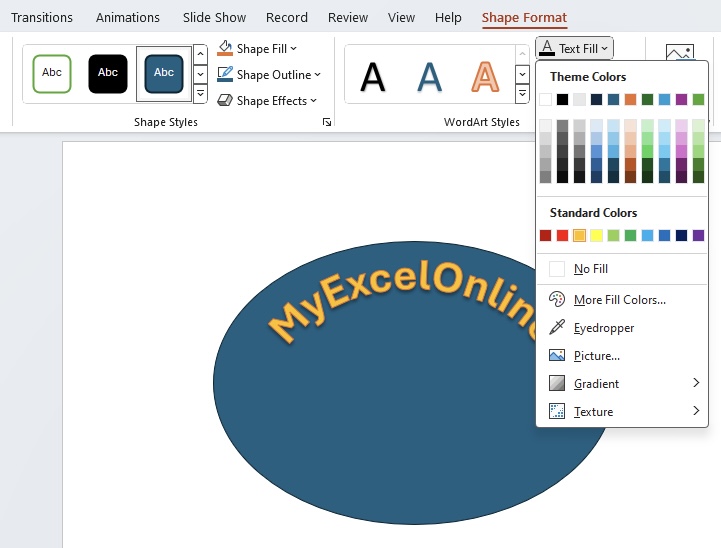
STEP 2: Play with Color: Go to the ‘Format’ tab, then choose ‘Text Fill’ to explore solid color options. Select a color that contrasts well with the background to enhance readability.
STEP 3: Experiment with Gradients: Within ‘Text Fill,’ there’s also a gradient option, which allows for a blend of colors. A well-chosen gradient can make text stand out and add depth, but be sure it transitions smoothly to keep the text readable.
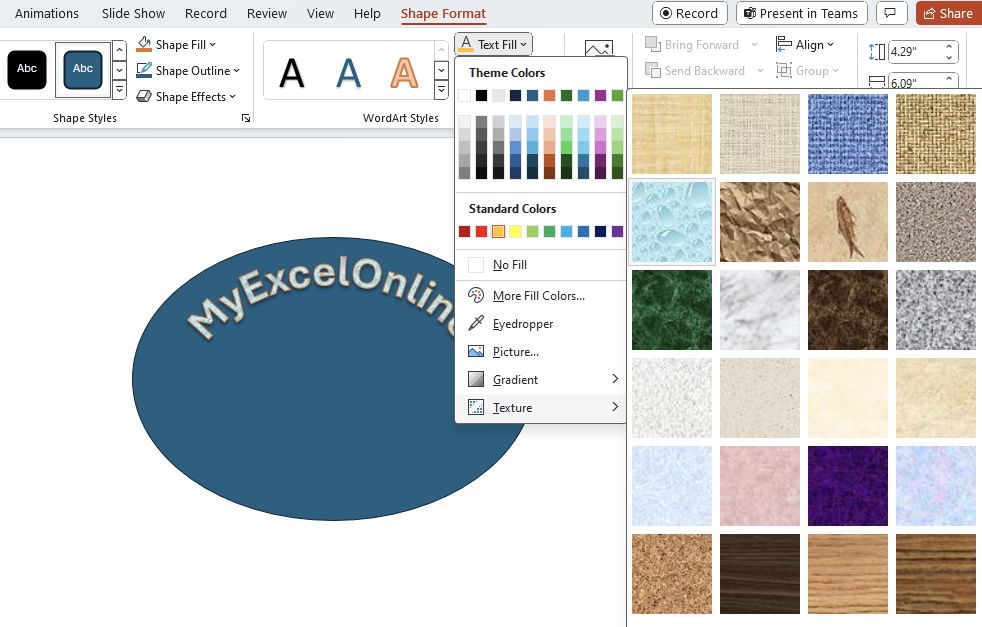
STEP 4: Add Texture: Under the same ‘Text Fill’ dropdown, there’s an option for texture fills. Adding a texture can give depth to your text, but like gradients, ensure it doesn’t distract from the legibility of the words.
By manipulating these visual elements with precision, you can significantly improve the impact of your curved text while reinforcing the overarching narrative of your PowerPoint presentation. However, moderation is key; too much of a good thing can become detrimental to your slide’s clarity and overall design harmony.
Troubleshooting Curve Crafting Challenges
Common Hurdles in Creating Curved Text Paths
Even for the experienced PowerPoint user, creating curves in text paths is not without its challenges. Recognizing and remedying these common issues will help you maintain a polished and professional presentation.
- Text Orientation and Direction: One common challenge is getting the text to curve in the right direction or orientation. Sometimes, it may appear upside down or backward when applied to a shape. This can typically be resolved by using the ‘Text Direction’ and ‘Rotate’ options to flip the text.
- Spacing Issues: Curved text might bunch up or stretch unevenly, creating awkward spaces between letters or words. Adjustments can be made by resizing the shape or altering the font size and character spacing in the ‘Format’ tab.
- Inconsistent Curvature: Achieving a smooth, consistent curve can sometimes be tricky, especially if the path shape is irregular. Using one of the basic shapes as a guide and adjusting the edit points can help ensure a smooth curve.
- Maintaining Editability: After curving, text can become difficult to edit or format. To avoid this, always ensure to have a copy of your original text before applying complex transformations, allowing you to go back and make edits if needed.
- Curve Extremes: Some curves can severely distort the text, making it unreadable. To avoid this, use subtle curves and ensure that the text remains horizontal enough to be legible.
- Compatibility Across Devices: Curved text can appear differently on various devices or when exported to other formats. To avoid surprises, always check your presentation on different devices and software versions before the final delivery.
Facing these challenges head-on and learning to navigate them efficiently will lead to a more seamless creation process and, ultimately, a more impressive final product.
Fixing Formatting Foibles for a Polished Look
Creating curved text in PowerPoint can sometimes lead to formatting inconsistencies that detract from the professional look of your presentation. Addressing these foibles is critical in achieving a polished and cohesive slide design.
- Adjust Letter Spacing: Uneven spaces between letters in curved text can be distracting. To address this, select your text box, go to ‘Format’, and then select ‘Character Spacing.’ Here you can refine the spacing to ensure consistency throughout your curve.
- Resize Text Proportionately: If your text appears too small or too large when following the curve, adjust the font size within the ‘Home’ tab, or resize the text box itself using the sizing handles at the corners.
- Smooth Jagged Edges: Sometimes, curving text can result in jagged or pixelated edges. You can counteract this by increasing the font size or by choosing a typeface that scales more gracefully.
- Align Text Within Shapes: If your text doesn’t look centered or aligned in your shape, use ‘Align Text’ tools in the ‘Format’ tab to position your text correctly within the shape.
- Check the Slide Master: Ensure that your slide design aligns with the overall Slide Master to avoid unexpected formatting changes when presenting.
- Consistency in Design Elements: Use the same or complementary styles, colors, and effects for curved text across different slides to maintain a professional and harmonious design.
- Test on Multiple Displays: Always preview your presentation on different screens to ensure that shading, gradients, and other effects render correctly and the curved text remains sharp and readable.
By systematically addressing these potential formatting issues, you ensure that your curved text enhances the slide presentation’s professionalism and visual appeal. Remember, attention to detail can make a significant difference in the overall impact of your presentation.
FAQ: Navigating the Curves of PowerPoint’s Text Features
PowerPoint’s curved text features provide a suite of creative options for presenters, but they also come with questions. Below are FAQs that help ease navigation through the curves of PowerPoint’s text functionalities.
Q: Can I curve individual words or letters differently within the same text box?
A: Yes, by converting each word or letter to its own shape using ‘Convert to Shape’ in the text effects options, you can then independently apply different curving styles and positions.
Q: Is it possible to animate curved text in PowerPoint?
A: Absolutely. Curved text can be animated just like regular text. Navigate to the ‘Animations’ tab and choose the desired entrance, emphasis, or exit animations for your curved text.
Q: How do I maintain font consistency when curving text?
A: The font should remain consistent as you curve the text. However, if seeing variations, ensure that no additional text effects have been applied that might alter the appearance of the font.
Q: Will my curved text be visible correctly on other computers?
A: It should be, but rendering differences can occur based on PowerPoint versions or operating systems. Always check your presentation on different devices, especially those that you expect to use during the actual presentation.
Q: How do I curve text both inside and outside of a circle?
A: To curve text inside a circle, use the ‘Text Effects’ transform options and choose ‘Follow Path’ with the desired curvature. For outside, you may need to increase the size of your text or shape to move the text to the outside edge.
Q: Are there any shortcuts to speed up the process of curving text?
A: While there is no direct keyboard shortcut for curving text, familiarizing yourself with the ‘Format’ tab options and using PowerPoint’s right-click context menus can make the process faster.
Q: Does curving text affect the ability to edit it later?
A: You can still edit curved text, but the interface can be slightly more cumbersome. It’s best to finish editing the content before applying the curve effect for convenience.
Remember, PowerPoint is a robust tool, and like any software, it has its complexities and peculiarities. As you work with its features, you’ll develop an intuitive sense of how to apply its capabilities to meet your presentation goals successfully.
John Michaloudis is a former accountant and finance analyst at General Electric, a Microsoft MVP since 2020, an Amazon #1 bestselling author of 4 Microsoft Excel books and teacher of Microsoft Excel & Office over at his flagship MyExcelOnline Academy Online Course.

