In Excel, comparison operators are essential tools for analyzing data and creating formulas. Among these, the “does not equal” sign is frequently used for comparing values, filtering data, and constructing logical tests. This article will delve into how to use the does not equal sign in Excel, its syntax, and practical applications.
Key Takeaways:
- Logical Operators Overview: Excel’s logical operators, including “Does Not Equal,” help simplify complex data by producing binary TRUE or FALSE results for better decision-making.
- Understanding <>: The “Does Not Equal” sign (<>), used to identify discrepancies between values, is crucial for tasks like data filtering and error checking.
- Practical Syntax: The formula =A1<>B1 returns TRUE if the values in cells A1 and B1 are different, aiding in tasks like data exclusion and comparison.
- Common Uses: This operator is widely applied in conditional formatting, data filtering, and IF functions to manage and analyze datasets more effectively.
- Advanced Applications: Combining <> with functions like COUNTIF and using it in array formulas enhances analytical capabilities, enabling complex data evaluations and insights.
Introduction to Excel’s Does Not Equal Operator
The Essence of Logical Operators in Excel
In Excel, we encounter a powerful toolkit for decision-making within spreadsheets: logical operators. These operators perform vital comparisons between values, guiding the logic flows in our data manipulation. Logical operators come into play when we’re faced with tasks requiring comparison to output a simple TRUE or FALSE—essentially boiling down complex data into binary simplicity.
These TRUE or FALSE values are instrumental when setting up conditions in formulas, filtering data, or applying conditional formatting.
Unveiling the Power of Does not equal sign
At the heart of complex data interrogation in Excel lies the Does Not Equal sign, represented by <>. This symbol might appear straightforward, but don’t let its simplicity fool you. When utilized to its full potential, <> is a key player in the game of data analysis and error checking. It helps me question data and assumptions, pointing out disparities and exceptions with ease.
For instance, instead of filtering a dataset for a single value, I can flip the script and instantly uncover everything that does not match that criterion. It’s a tool for exclusion, just as much as it is for selection, broadening our analytical capabilities beyond merely pinpointing equality.
Diving into the Syntax and Basics
Defining the Does Not Equal Sign
The “Does Not Equal” sign, symbolized as ‘<>’, is a relational operator indicating that two values are not equivalent. In Excel, this becomes elemental when I’m defining criteria in formulas. The sign precisely tells Excel to look for any cells where the content does not match a specified value.
=Value1 <> Value2
This operator is used to check if two values are not the same. When used in a formula, it returns TRUE if the values are different and FALSE if they are equal.
Example of <> sign
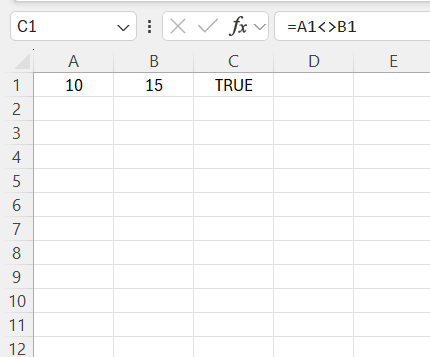
If you want to check whether the value in cell A1 is not equal to the value in cell B1, you would use the formula:
=A1 <> B1
A1 contains the number 10 and B1 contains 15, the formula will return TRUE because 10 does not equal 15.
It’s particularly useful when I need to exclude certain data points, analyze differences, or identify changes between two data sets. It’s part of a broader ensemble of comparative tools in Excel, but it stands out by focusing on non-equality, offering a distinct kind of filtering in decision-making processes.
Common Uses of the “Does Not Equal” Sign
Conditional Formatting
The “does not equal” operator is often used in conditional formatting to highlight cells that contain values different from a specific value.
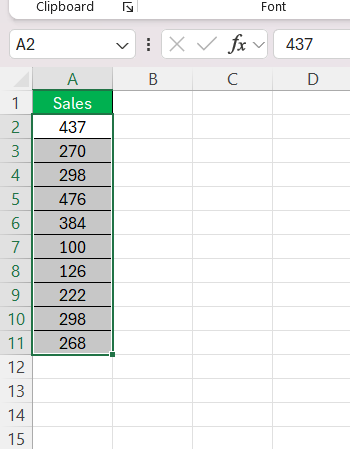
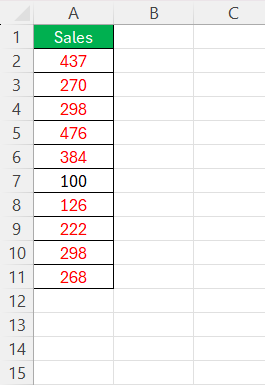
Example: To highlight all cells in a range (say A1) that do not equal 100:
STEP 1: Select the range A2:A11.
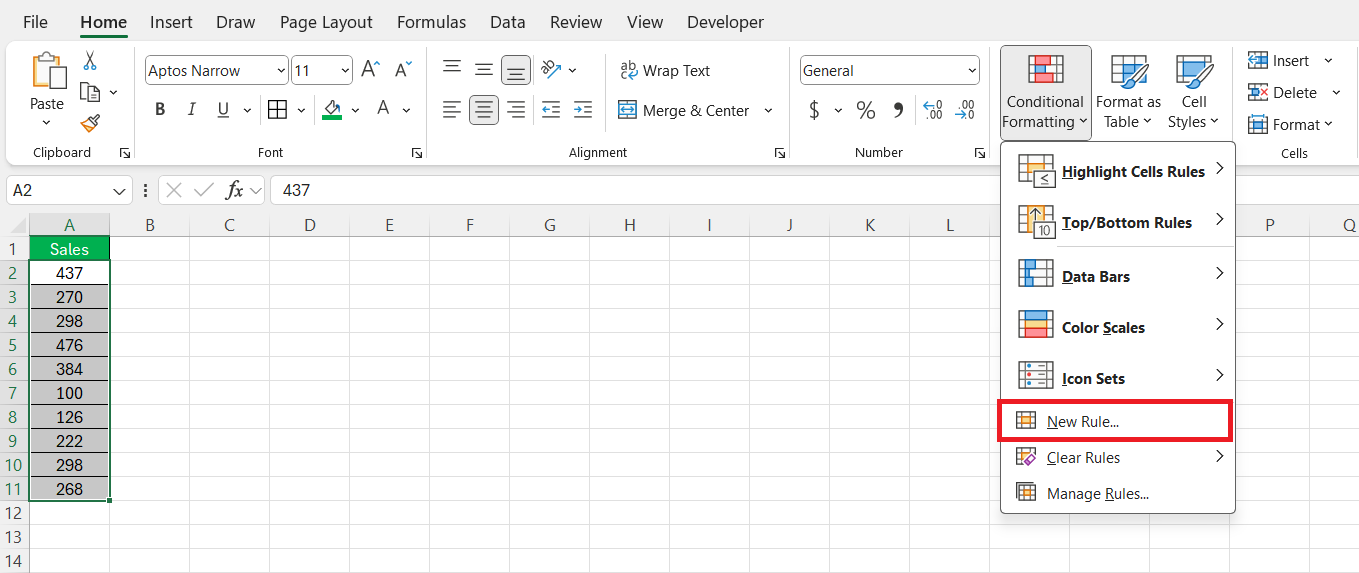
STEP 2: Go to the Home tab, click on Conditional Formatting > New Rule.
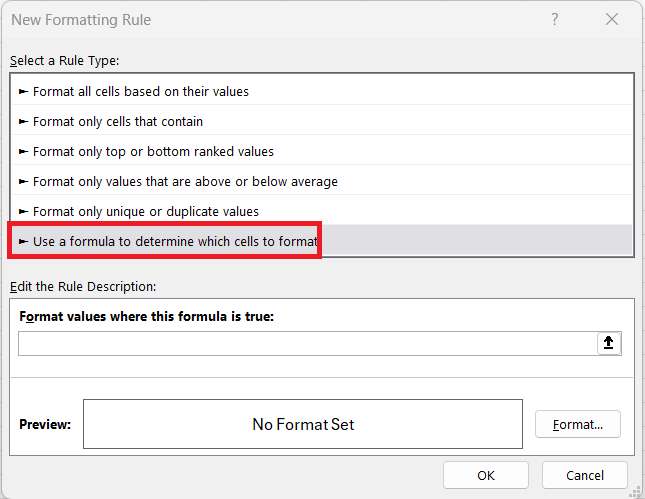
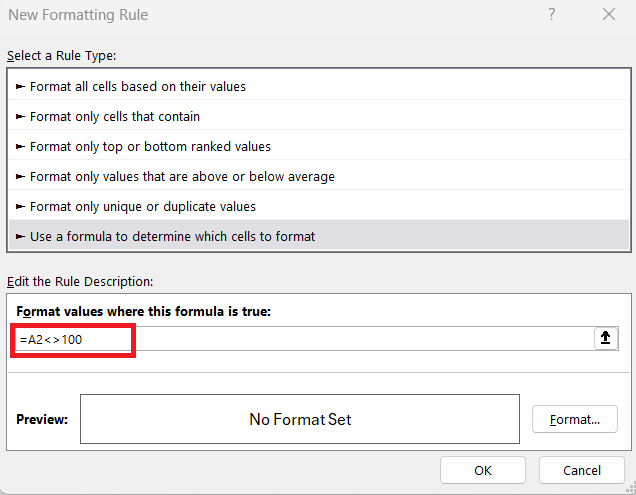
STEP 3: Select “Use a formula to determine which cells to format.”
STEP 4: Enter the formula =A2<>100.
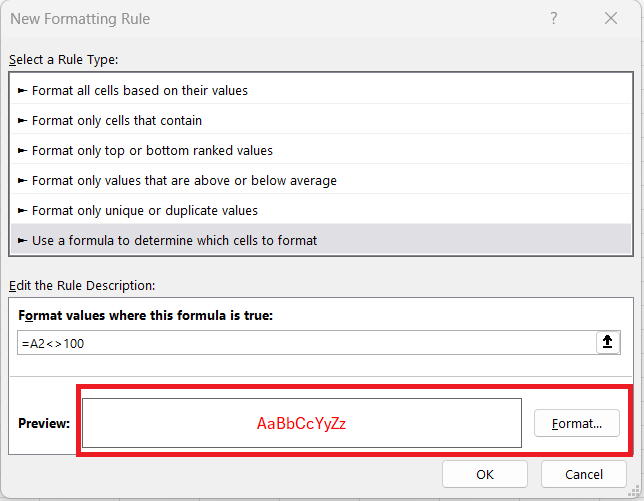
STEP 5: Choose a format and click OK.
All the values that are not equal to 100 will be in red font.
Filtering Data
The “does not equal” sign is useful for filtering data in Excel. For instance, if you have a list of sales data and want to filter out all entries that do not pertain to a specific product, you can use this operator.
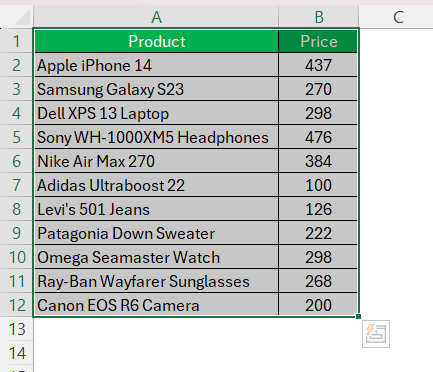
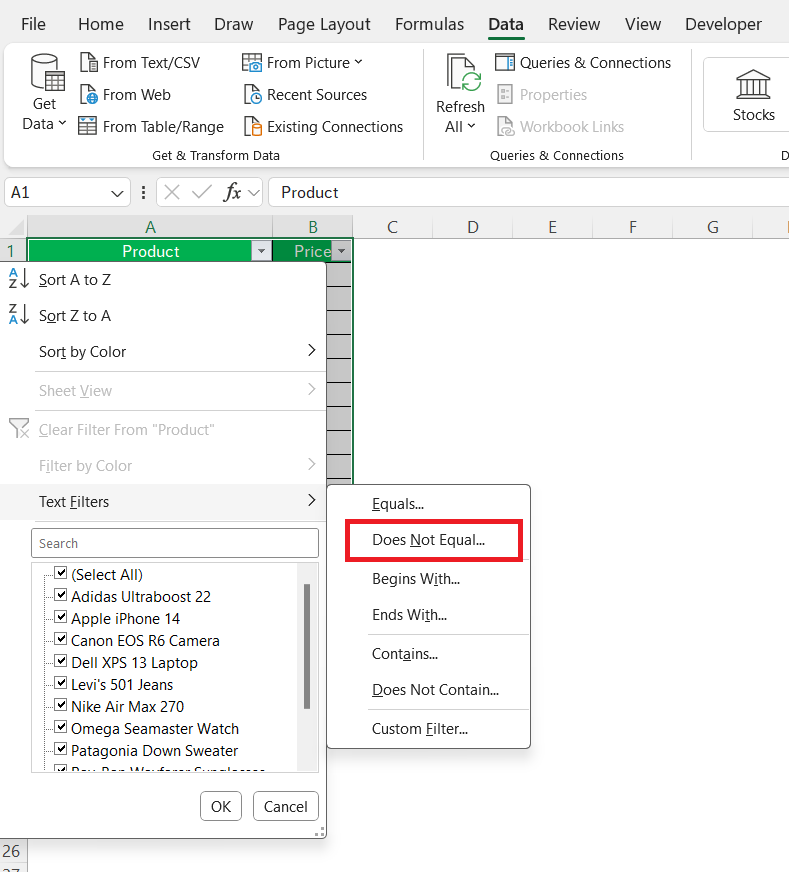
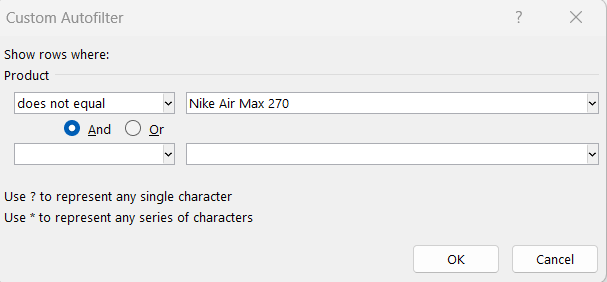
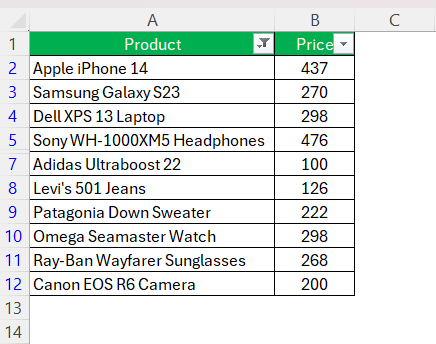
Example: If you want to filter out all sales entries that do not involve “Nike Air Max 270” in column A:
STEP 1: Select your data range.
STEP 2: Go to the Data tab and click on Filter.
STEP 3: In the filter dropdown in column B, choose Text Filters > Does Not Equal.
STEP 4: Enter “Nike Air Max 270” and click OK.
Nike Air Max 270 will be filtered out in column A.
Using “Does Not Equal” in IF Functions
The “does not equal” sign is powerful when used in combination with the IF function. It allows you to execute different actions based on whether two values are unequal.
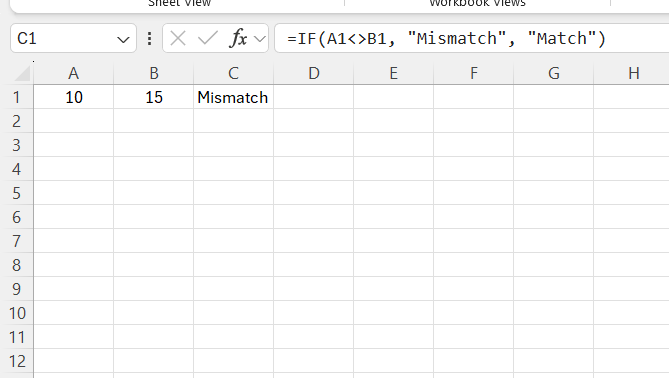
Example: You want to display “Mismatch” if the values in A1 and B1 are not equal:
=IF(A1<>B1, “Mismatch”, “Match”)
If A1 contains 10 and B1 contains 15, the formula will return “Mismatch”.
Advanced Applications
Combining “Does Not Equal” with Other Functions
The “does not equal” operator can be combined with other functions like COUNTIF, SUMIF, and AVERAGEIF to perform more complex analyses.
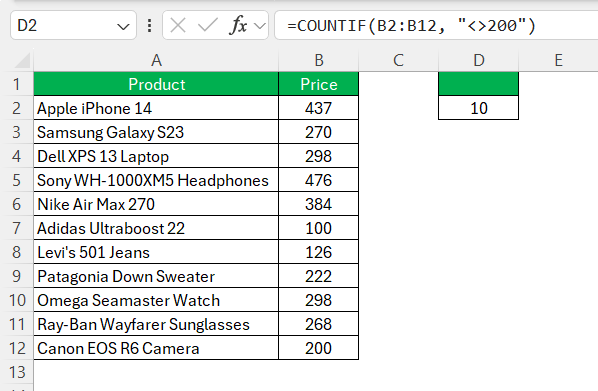
Example: To count how many cells in the range B2:B12 do not equal 200, you can use:
=COUNTIF(B2:B12, “<>200”)
Using “Does Not Equal” with Arrays
When working with array formulas, the “does not equal” sign can be used to perform operations across a range of cells.
Example: Suppose you want to sum all values in A1 that are not equal to100:
=SUM(IF(B2:B12<>100, B2:B12))
Does Not Equal Sign
This formula requires you to press Ctrl + Shift + Enter to create an array formula, which will return the sum of all non-zero values in the range.
Time-Saving Tips and Shortcuts
Save Time with Keyboard Shortcuts for Does Not Equal
Saving precious time in Excel often boils down to mastering keyboard shortcuts, and even though there is no direct shortcut for the ‘Does Not Equal’ sign, familiarizing ourselves with related shortcuts can streamline the workflow. Navigating quickly to the edge of data regions is done with Ctrl + Arrow Key, and pressing F2 lets me edit the selected cell where I can deftly insert the <> operator.
When using AutoSum (Alt + =), I can swiftly adjust the formula to include <>. The trick here is to weave these shortcuts naturally into routine use, which exponentially increases efficiency – particularly when dealing with large datasets that require the frequent use of ‘Does Not Equal’.
Frequently Asked Questions
What is <> sign in Excel?
<> is the symbol for the ‘Does Not Equal’ operator in Excel, used to compare two values and determine if they are not the same. When their values are different, the result is TRUE; if they’re the same, it returns FALSE. It’s essential for logical comparisons in data analysis, allowing me to explore and identify non-matching entries efficiently.
How to use does not equal in Excel?
To use the ‘Does Not Equal’ operator in Excel, simply place <> between two values or references in a formula. For example, =A1<>B1 returns TRUE if the value in cell A1 doesn’t match the value in cell B1, and FALSE if they do match. It’s versatile and can be integrated into numerous functions to refine data evaluation.
What are some common mistakes to avoid with the Does Not Equal sign?
Common mistakes when using the Does Not Equal sign include adding spaces between < and >, which Excel doesn’t recognize, resulting in errors. Another error is substituting <> with !=, a syntax Excel doesn’t interpret correctly. Always ensure the operator is directly followed and preceded by the cell reference or value without any spacing to avoid these pitfalls.
Can you use the Does Not Equal operator in Excel filters?
Certainly, the Does Not Equal operator can be effectively employed in Excel filters. When setting up a custom filter, choosing the “<>” operator followed by the value you wish to exclude streamlines your view to items not matching that criteria, making it quite straightforward to sift through data for non-conforming entries.
Why use <> in Excel?
Using <> in Excel allows us to sift through and analyze data by focusing on discrepancies rather than matches. It’s particularly handy for highlighting exceptions, auditing for errors, or performing unequal-based calculations. Employing <> provides us with deeper insights into our datasets and pushes beyond the surface of straightforward data comparisons.
John Michaloudis is a former accountant and finance analyst at General Electric, a Microsoft MVP since 2020, an Amazon #1 bestselling author of 4 Microsoft Excel books and teacher of Microsoft Excel & Office over at his flagship MyExcelOnline Academy Online Course.

