Learn about Excel with our Free Microsoft Excel Online Course!
Key Takeaways
- To insert a dotted line in PowerPoint, go to the Insert tab, select Shapes, and select the Line shape from the dropdown menu to draw the line on your slide.
- After drawing the line, right-click on it and choose Format Shape, then navigate to the Line tab and select Dashes to choose your preferred dotted line style.
- Apply the changes by clicking OK, and utilize the dotted line to guide the viewer’s attention, highlight information, or organize content on your slides for enhanced comprehension and aesthetic appeal.
The Visual Impact of Dotted Lines in Presentations
Dotted lines in presentations do more than just connect points; they serve as visual cues that can subtly influence the way your audience absorbs the slide’s content. Utilizing them effectively can break the monotony of a text-heavy slide or add a layer of sophistication to a simple graphic. They’re particularly potent in directing the viewer’s gaze in a specific sequence, creating a narrative flow that’s easy to follow. Moreover, by varying the pattern or color, they can categorically differentiate between themes or topics, adding not just visual appeal but also contributing to the communication clarity of your presentation.
Table of Contents
Starting with the Basics
Step 1: Opening Your PowerPoint Presentation
To kick things off, launch PowerPoint on your device and select the presentation you intend to amplify with dotted lines. You can either open a recent project from the opening menu or navigate to the file location where the presentation is stored. Once the presentation is up and running, you’re ready to take your slides to the next level with the addition of visually striking dotted lines!
Step 2: Navigating to Inserting a Line Feature
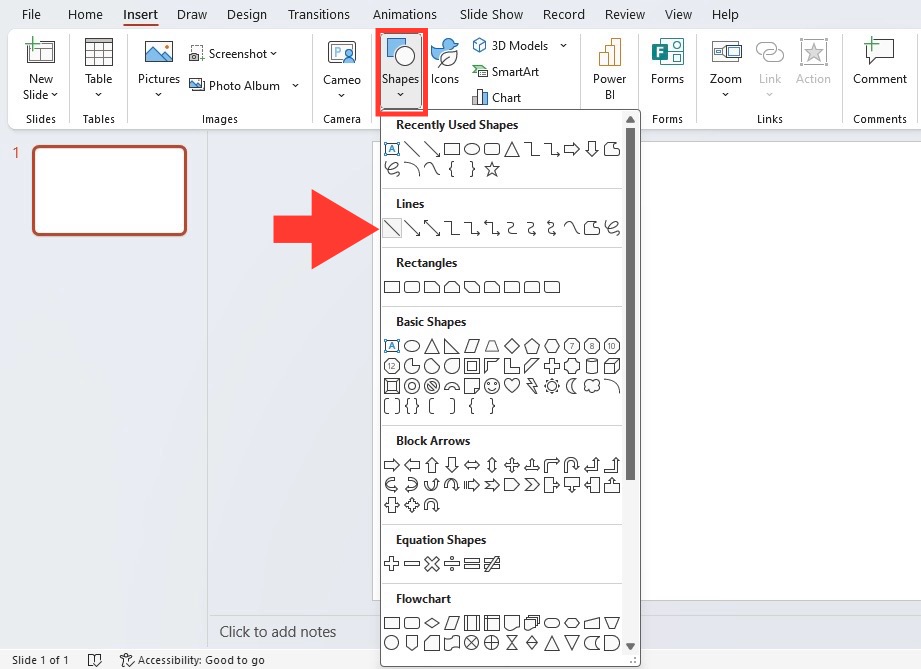
Once your presentation is open, find your way to the ‘Insert’ tab > ‘Shapes’ button in the Illustrations group. Click the drop-down menu with shapes and lines; click the ‘Lines’ section. By choosing the ‘Line’ option, you transform your cursor into a crosshair, the very tool you’ll use to draw your desired line on the slide.
Customizing Your Dotted Line
Step 3: Converting a Solid Line to Dotted
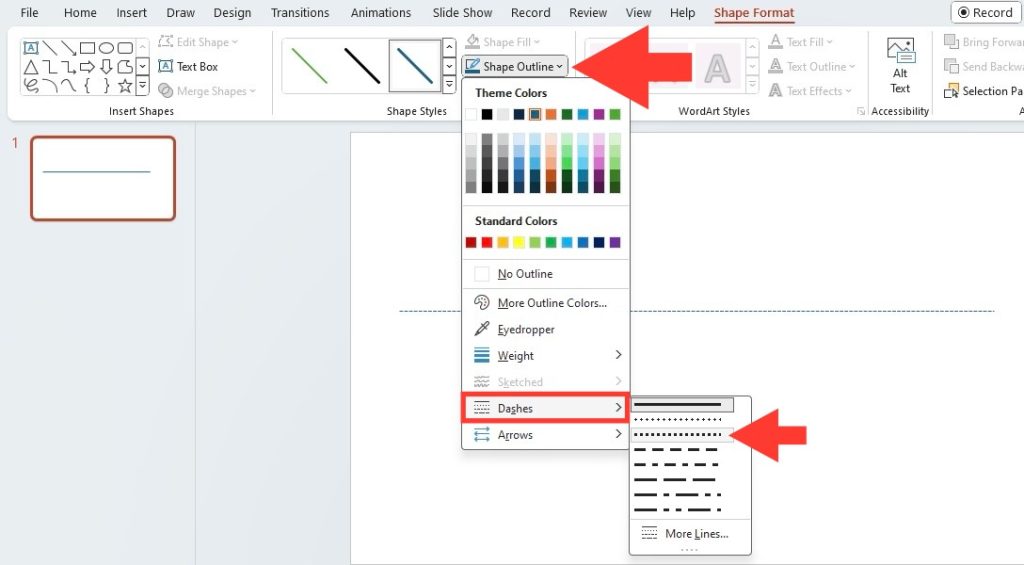
After you’ve drawn a solid line on your slide, converting it to a dotted one is just a few clicks away. Simply click on the line to select it, which will cause the ‘Shape Format’ tab to appear on the ribbon. Navigate to this tab, and find the ‘Shape Outline’ dropdown menu > ‘Dashes’. A side menu will unfold, presenting you with various dashed and dotted line styles. Choose the pattern that aligns with your design vision, and presto! The line on your slide now reflects your dotted line preference.
Step 4: Adjusting Line Thickness and Color
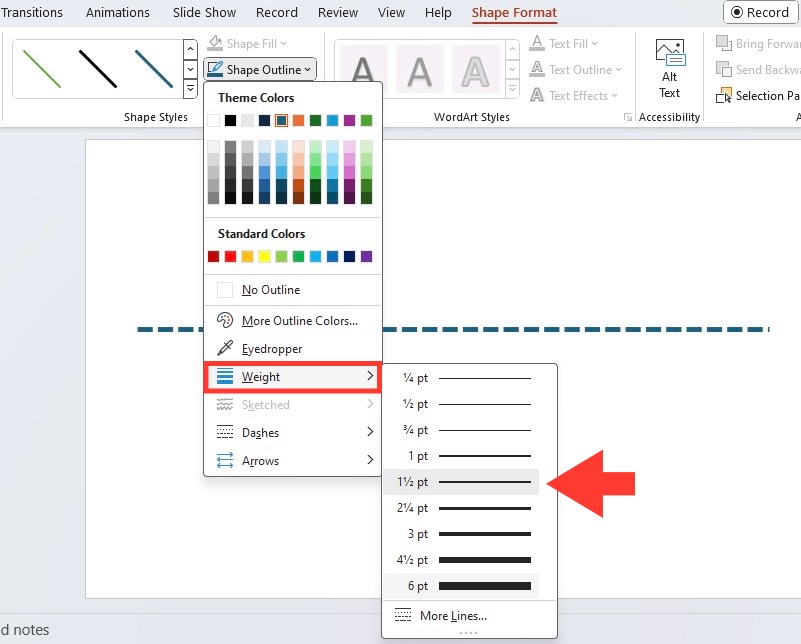
Personalizing the look of your dotted line can have a big impact on its effectiveness. After selecting the line, click on the ‘Shape Format’ tab again. Look for the ‘Shape Outline’ drop-down menu, and explore the ‘Weight’ option to adjust the line’s thickness—pick the one that makes your dotted line pop or blend in as required. For color alteration, the ‘Color’ option under the same ‘Shape Outline’ menu is your go-to. Here, you can harmonize your dotted line with the slide’s color scheme or choose a standout hue for emphasis. It’s all about enhancing the visual appeal and the communicative power of your presentation.
Creative Uses for Dotted Lines
Separating Sections Within Slides
Dotted lines are excellent tools for neatly dividing slides into distinct sections without creating a feeling of separation that might be too harsh. By using these lines, you can establish clear subsections for your audience, allowing them to mentally organize the slide’s content. They’re also useful in situations where you want to juxtapose differing ideas or concepts, yet maintain a cohesive slide design. Whether you’re differentiating topics, categorizing information, or simply framing a portion of your slide, dotted lines will serve the purpose while keeping the overall aesthetic intact.
Highlighting Key Points and Creating Emphasis
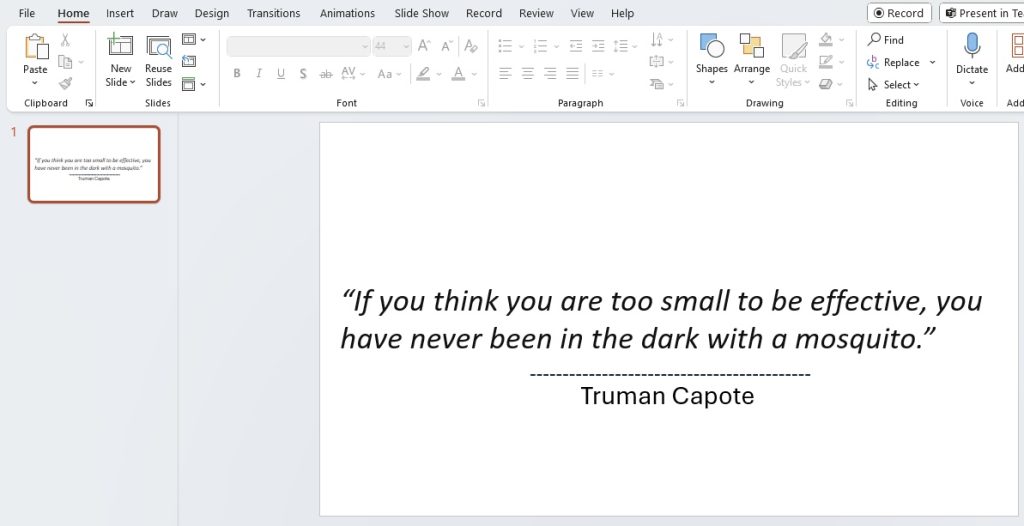
Dotted lines have the subtle power to spotlight key points and create emphasis where you need it most. Imagine surrounding a critical quotation, statistic, or a call-to-action with a dotted line—it instantly becomes a focal point, drawing the viewer’s eye and attention. These lines can be used around text boxes, images, or important data within charts and graphs, ensuring that the most significant parts of your presentation are unforgettable. The flexibility of altering their appearance means that you can adjust the visual weight of your emphasis to suit the slide’s context and content.
Troubleshooting Common Issues
How to Adjust Erratic Dots or Uneven Spacing
If you find yourself grappling with erratic dots or uneven spacing in your dotted lines, a bit of fine-tuning is in order. Start by selecting the line, then head back to ‘Shape Outline’, and delve into the ‘Dashes’ option once more. Explore different dash styles as some offer more uniform spacing than others. If the issue persists, try adjusting the line thickness through the ‘Weight’ option; sometimes, a slight change in weight can smooth out the inconsistencies. Be patient and tweak the settings incrementally—you’ll soon have a dotted line that meets your exacting standards.
Deleting or Modifying an Existing Dotted Line
At times, you may decide that a dotted line on your slide needs reevaluation. Fear not; adjustments are quite straightforward. To delete a line, simply click on it to select, then press the ‘Delete’ key—or right-click and choose ‘Delete’ from the context menu. Should you wish to modify rather than remove, clicking on the line brings up the ‘Shape Format’ tab where you can alter the line’s appearance. From color to thickness and dash style, you have the freedom to revamp the dotted line until it’s perfectly in line with your vision for the slide.
Advanced Dotted Line Techniques
Constructing Polygon Center Circles with Dotted Lines
For a creative twist, consider constructing polygon center circles using dotted lines to add an innovative geometric flair to your slides. Begin by selecting a center shape—a triangle, square, pentagon, or hexagon—from the ‘Shapes’ menu. Once placed on the slide, draw your dotted lines from each vertex to the shape’s center. To complete the effect, draw a circle around the polygon and apply the dotted line style. This creates segments that correlate to the sides of the polygon, making for a visually engaging element that’s both decorative and informative.
Enhancing Text Boxes with Dotted Line Borders
Text boxes encased in dotted line borders not only capture attention but also give your slides a polished, organized look. To create this effect, insert a text box and enter your content. Then, select the text box, navigate to ‘Shape Format’, and pick ‘Shape Outline. Choose a dotted line style from the ‘Dashes’ section. Play around with the color and weight until the border complements the slide’s aesthetic. This simple technique can dramatically elevate the visual appeal of a text box, transforming plain text into a standout, graphic element on your slide.
FAQs
What Are the Benefits of Using Dotted Lines in PowerPoint?
Dotted lines offer a subtle yet effective way to organize your content, guiding the audience’s eyes smoothly from one point to another. They can also highlight crucial information, making your presentation not only more visually appealing but also more focused and interactive. These simple marks can deliver a message of process, direction, or separation without overshadowing the content they support, enhancing the overall clarity and impact of your slides.
Can Dotted Lines Be Customized in Any PowerPoint Template?
Absolutely! It doesn’t matter which template you’re using; dotted lines can be customized to suit the style and visuals of any PowerPoint slide. This flexibility means you have the freedom to use them for various effects—whether it’s adjusting color, size, or dash style to match the theme of your presentation. Dotted lines are a universal feature, ready to up the ante on your slide’s design no matter your starting point.
John Michaloudis is a former accountant and finance analyst at General Electric, a Microsoft MVP since 2020, an Amazon #1 bestselling author of 4 Microsoft Excel books and teacher of Microsoft Excel & Office over at his flagship MyExcelOnline Academy Online Course.


