Excel Pivot Table Date Grouping is a very powerful feature in Excel that allows you to quickly group dates into years, quarters, months, weeks, days, hours, minutes and/or seconds. However, there are times when Excel Pivot Table dates cannot group that selection and we get an error message: Cannot group that selection. Instead of checking the dates one by one to find out where the error occurred, I will show you a quick way to fix the Cannot group that selection error message!
Key Takeaways
- The “Cannot group that selection” error in an Excel Pivot Table can be caused by adding the pivot table to the Data Model, having blank cells in the data source, or previously grouped items remaining in the field list.
- To fix the grouping error, users may need to fill blank cells in the data source, remove previously grouped items from the field list, or ensure the pivot table is not added to the Data Model.
- Excel Pivot Tables offer powerful date grouping features, but correct data preparation is critical to avoid the “Cannot group that selection” error and to effectively group dates by years, quarters, months, etc.
Table of Contents
How to Group Dates in Excel
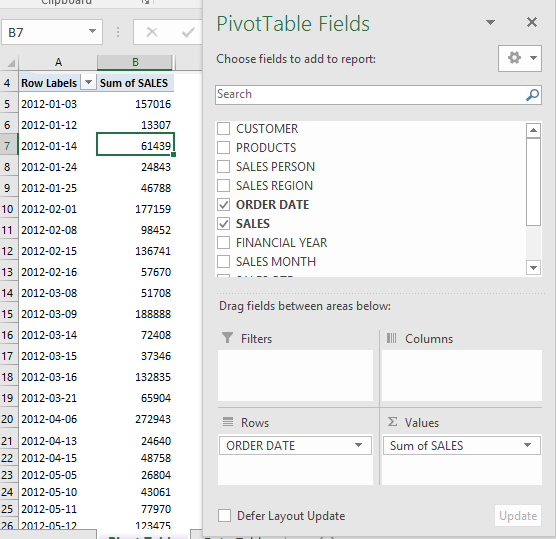
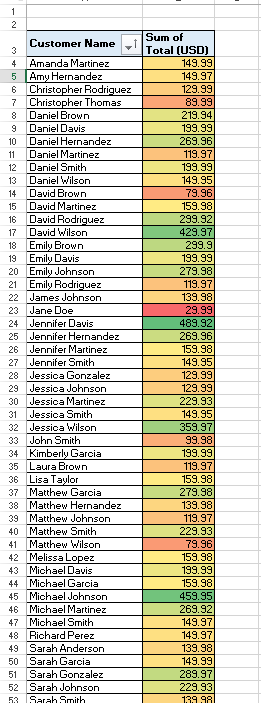
In the table below, you have a Pivot Table created with the sales amount for each individual day.
To learn how to create a Pivot Table in Excel – Click Here.
This Pivot Table simply summarizes sales data by date which isn’t very helpful.
You might want to see the total sales achieved per month, week, or year. Using formulas or VBA to get the work done will be too complicated.
Want an Easy Fix?? Try Excel Pivot Table Date Grouping!!
Follow the steps below to understand how to Group Dates in Excel Pivot Table:
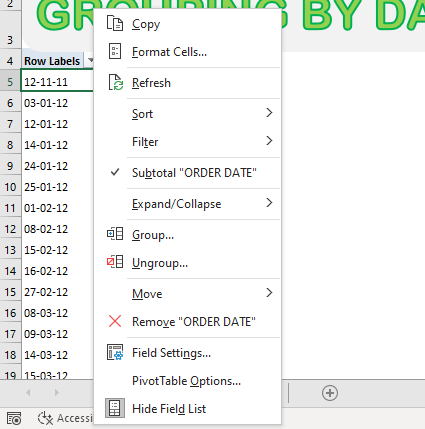
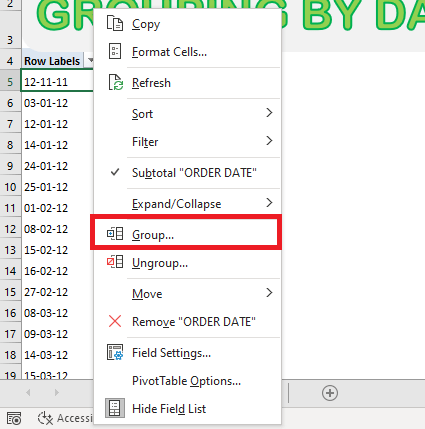
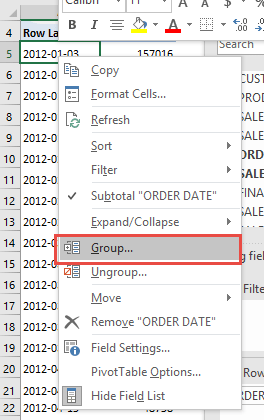
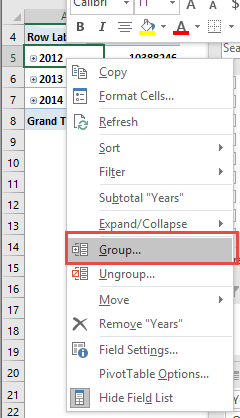
STEP 1: Right-Click on the Date field in the Pivot Table.
STEP 2: Select the option – Group
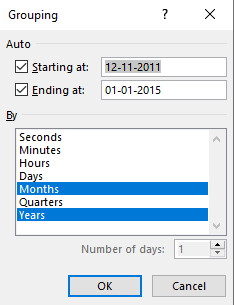
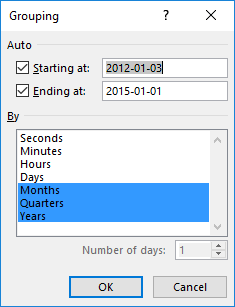
STEP 3: In the dialog box, select one or more options as per your requirement.
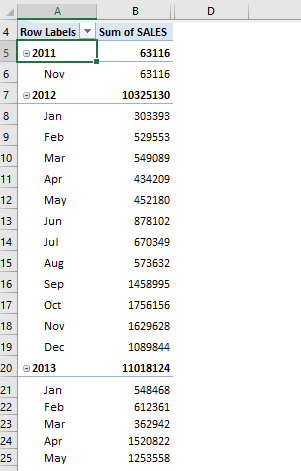
To Group Dates by Year and Month.
- Select Month & Year. Click OK.
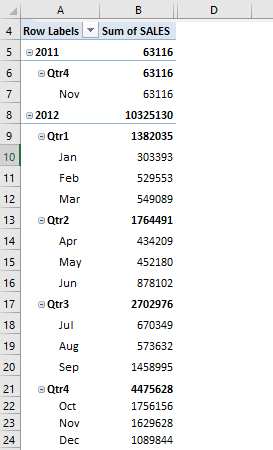
STEP 4: Your Pivot Table with Grouped Dates by Year & Month is ready!
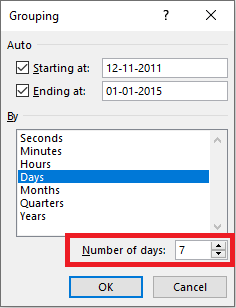
To group data by week,
- Select Days
- Type Number of days as 7
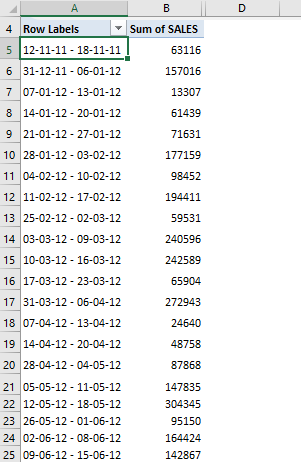
Your Grouped Dates by Week is ready!
Another way to access the Grouping dialog box, Go to Pivot Table Tools > Analyze > Group Selection
Reasons for “Cannot group that selection” Error in Excel Pivot Table Date Grouping
The most common reason for facing this issue is that the date column contains either
- Is Blank
- Contains Text
- Contains an Error.
If even one of the cells contains invalid data, the grouping feature will not be enabled.
Pivot Table won’t allow you to group dates and you will get a cannot group that selection error.
So, the ideal step would be to look for those cells and fix them!
Below are the 2 Quick and Easy methods to find the cells containing invalid data and disappear the errors!
Quick ways to Fix the “Cannot group that selection” Error
In the example below I show you how to get the Errors when Grouping By Dates:
Follow the step-by-step tutorial on how to fix error in Excel Pivot Table Date Grouping and make sure to download the Excel Workbook and follow along:
METHOD 1
STEP 1: Right-click on any row in your Pivot Table and select Group so we can select our Group type that we want:
However, we notice that we have an error!
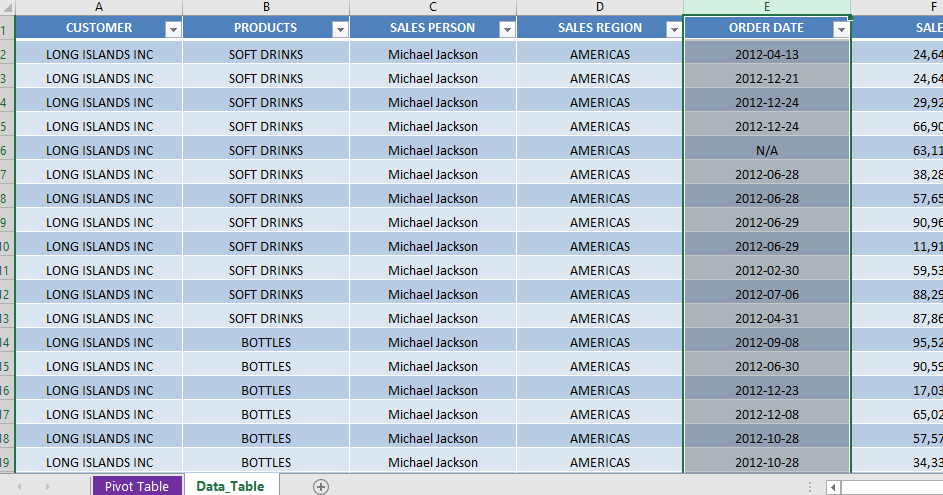
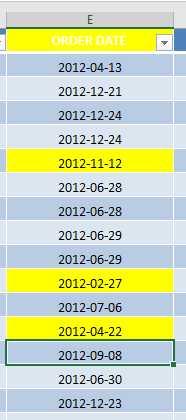
STEP 2: To check where our error occurred, go to the data table and highlight the column that contains our dates.
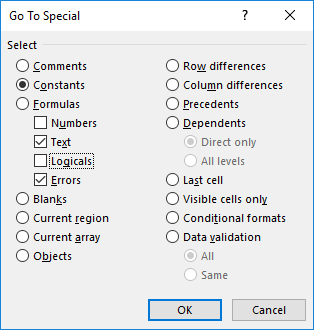
STEP 3: Go to Home > Find & Select > Go To Special:
Make sure the Constants, Text, and Errors are selected. This will select all our invalid dates (Errors) and text data (Text).
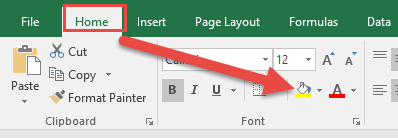
STEP 4: Excel has now selected the incorrect dates. To make each incorrect cell easier to view go to Home > Fill Color
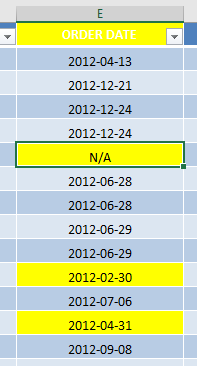
The invalid dates are now highlighted:
STEP 5: Manually replace the incorrect dates with the correct dates:
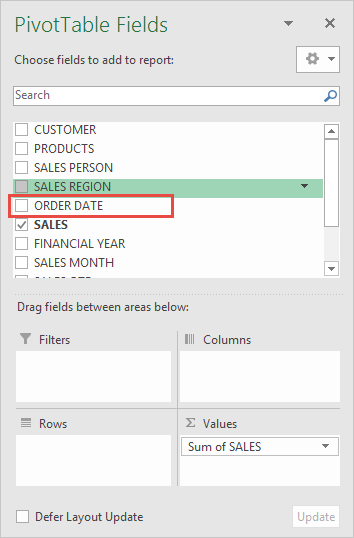
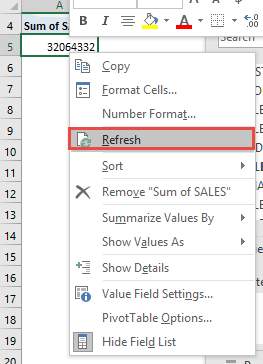
STEP 6: We need to Refresh our pivot table to load our new correct dates but first we need to “uncheck” the ORDER DATE field.
Right-click on the Pivot Table and click Refresh:
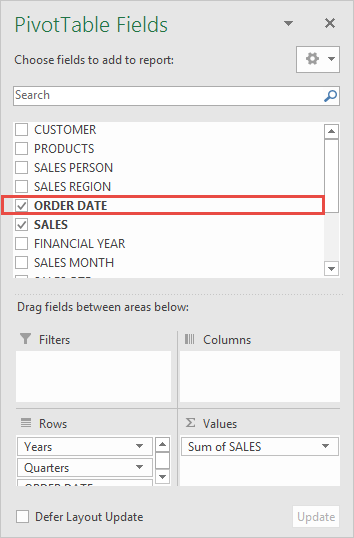
“Check” the ORDER DATE Field:
STEP 7: Right-click on the Pivot Table and click Group:
The Excel Pivot Table Date Grouping is now displayed! Your data is now clean!
Your Grouped Data looks like this:
METHOD 2
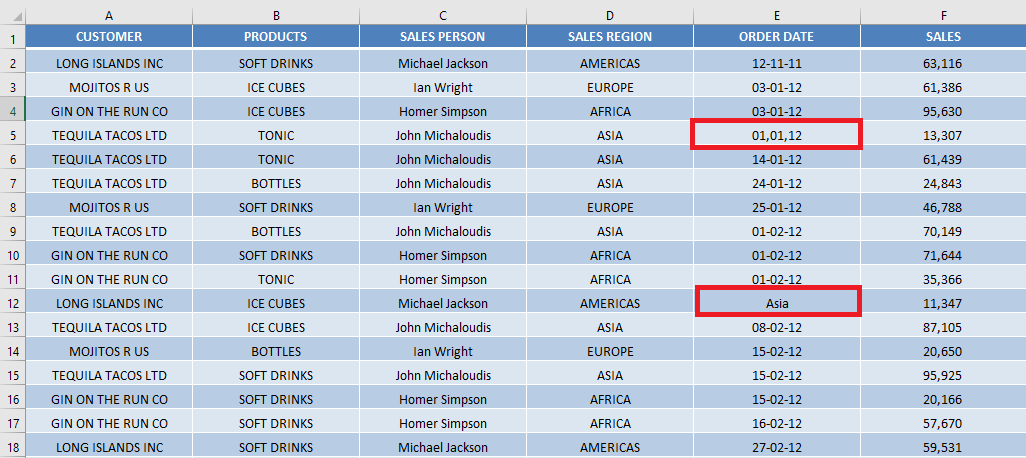
If you look at the Data Table, one of the cells contains a Date with incorrect format (Excel stores it as text) and a Text Value.
When you try to Group this Data, you will see that Excel Pivot Table not grouping dates and will display this Cannot group that selection error.
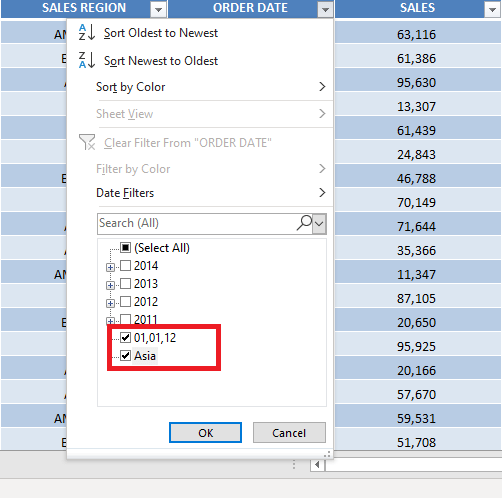
Now, to fix this you can simply use the filter button to find the cells containing incorrect format or text.
STEP 1: Go to Data > Filter icon
STEP 2: In the Filter dropdown, you will be able to easily spot these cells.
Select only those values.
Click OK.
STEP 3: Fix the error in those cells.
STEP 4: Go back to the Pivot Table, Select PivotTable Analyze > Refresh.
STEP 5: Try grouping the data again. Voila! It’s done now.
Preventive Measures to Avoid Future Grouping Errors
Best Practices for Data Management in Excel
Proper data management is not just about keeping your work organized; it’s about ensuring that all functionalities, including pivot table grouping, work seamlessly. Here are a few tips to keep things running smoothly:
- Ensure that all your data is formatted correctly, with dates, numbers, and text each in their appropriate cells.
- Regularly check for and remove any blank spaces or inconsistencies in your data, as these can cause errors.
- Keep your data tables clean and avoid unnecessary formatting that could confuse Excel’s pivot table algorithms.
- Always validate your data sets before you begin to build pivot tables, double-checking for complete rows and consistent data types.
- Consider using Excel’s Table feature before creating a pivot table, as it helps maintain structured references and can improve the accuracy of your pivot tables.
Remember, investing time in organizing your data upfront can save you a snapshot of frustration later. Think of it as setting a solid foundation for your data house!
Checklists Before Creating Pivot Tables
Before you dive into pivot table creation, running through a quick checklist can ensure a smooth experience. Here’s what you should verify:
- Data Range: Confirm that the range of your data includes all necessary rows and columns without any extras.
- Consistency: Check that all data formats are consistent, particularly date and number formats.
- Blanks: Look for and eliminate blank cells that might be hiding among your data, as they can cause grouping issues.
- Headers: Ensure each column in your data range has a unique and descriptive header.
- Duplicates: Remove any duplicate records that could skew your data analysis.
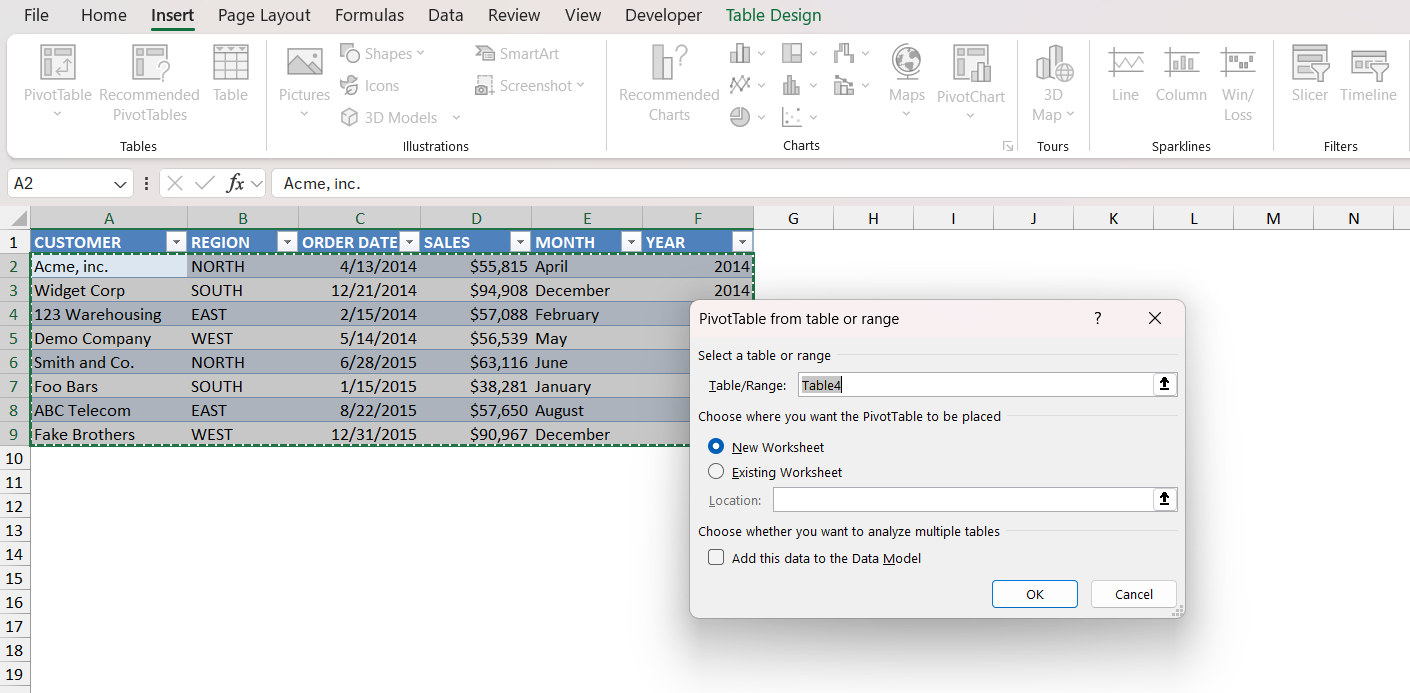
- ‘Data Model’ Option: If you don’t need to create relationships between multiple data tables, avoid checking ‘Add this data to the Data Model’ when creating your pivot table.
Ticking off these points will set you up for a pivot table that’s ready to handle grouping and other powerful data analysis tasks with ease. Plus, it’s a good habit that helps maintain the quality and integrity of your data analysis projects!
Frequently Asked Questions About Pivot Table Grouping
Why does my pivot table not allow me to group dates?
If you’re finding that your pivot table isn’t allowing you to group dates, there are a few common culprits to check:
- Mixed Data Types: Your date column might contain mixed data types, such as texts or blanks within the date fields.
- Leftover Grouped Fields: A grouped field from previous data analysis might still be present, blocking new groupings.
- Non-Date Formats: Ensure all your date entries are recognized by Excel as dates and not as text or other formats.
To resolve the issue, inspect your data carefully for these problems, convert any non-date formats to dates, and clear any previous groupings if necessary. Once corrected, Excel should allow you to group your dates efficiently.
Remember, Excel is particular about data integrity; it needs a bit of coaxing at times to play nice with pivot tables!
How can I fix the ‘Cannot Group Selection’ error if there are no apparent blank cells?
Even if no blanks are immediately visible, hidden quirks in your data might still lurk beneath the surface. Here’s how to fix that pesky ‘Cannot Group Selection’ error:
- Hidden Blanks: Cells may appear blank but contain an invisible character (like a space or an empty string from a formula). Use Excel’s “Find & Select” tool with the “Go To Special” > “Blanks” option to identify them.
- Data Type Mismatch: Ensure all data in the column you’re trying to group are of the same type; sometimes numbers could be formatted as text.
- Pivot Cache: Clear any old or outdated pivot cache that might store previous groupings and interfere with the current ones.
So, roll up your sleeves and play detective with your dataset. Once you uncover these hidden issues and rectify them, your pivot table should be ready to group selections without a hitch.
How do I enable selection in a PivotTable?
Enabling selection in a PivotTable is straightforward. You just need to ensure the PivotTable is not disabled or protected. Here’s how to do it:
- Click anywhere in your PivotTable to activate the PivotTable Tools on the ribbon.
- Go to the “Options” tab (called “Analyze” in some Excel versions).
- Check the “Enable Selection” option in the “Actions” group to turn on the ability to select.
With ‘Enable Selection’ turned on, you can highlight specific data points, cells, or entire sections within your PivotTables. Get ready to slice, dice, and analyze your data to your heart’s content!
How to enable grouping in Excel pivot table?
To enable grouping in an Excel pivot table, follow these steps:
- Prepare Your Data: Confirm that all data is properly formatted for the group type you want (e.g., dates or numbers).
- Create Your PivotTable: Select your data range and insert a PivotTable, making sure not to add the data to the Data Model if you wish to use the grouping feature.
- Select Data to Group: In the PivotTable, click on the item you want to group, such as a set of dates or numbers.
- Access Grouping Options: Right-click and choose ‘Group’ from the context menu.
- Set Grouping Parameters: Specify how you want to group your data – for dates, you can group by months, quarters, years, etc.
Once you’ve set your parameters, your PivotTable will display your data in the defined groupings. Now, you can get a clearer view and better insights from your dataset.
Happy analyzing! Remember, grouping can reveal patterns and trends that can be pivotal for your data stories.

Bryan
Bryan Hong is an IT Software Developer for more than 10 years and has the following certifications: Microsoft Certified Professional Developer (MCPD): Web Developer, Microsoft Certified Technology Specialist (MCTS): Windows Applications, Microsoft Certified Systems Engineer (MCSE) and Microsoft Certified Systems Administrator (MCSA).
He is also an Amazon #1 bestselling author of 4 Microsoft Excel books and a teacher of Microsoft Excel & Office at the MyExecelOnline Academy Online Course.

