Introducing the Microsoft Excel Ink to Text Pen. Revolutionize Note-Taking in Excel. Looking for a way to infuse some digital ink into your Excel spreadsheets? Say hello to your new go-to tool—the Excel Ink to Text Pen. Tailor-made for directly jotting down your numbers and notes within cells, their handwriting is magically transformed into precise Excel data. It’s innovation at the tip of your stylus!
Key Takeaways:
- Seamlessly integrate handwritten notes into Excel spreadsheets with the Excel Ink to Text Pen.
- Activate the Ink to Text Pen feature by adding the “Draw” tab to your Excel ribbon and following simple steps.
- Enhance productivity by utilizing features such as handwriting recognition, ink color selection, and conversion to shapes or equations.
- Optimize your experience with tips like practicing regularly, maintaining clear handwriting, and experimenting with different devices.
- Convert handwritten data into editable text within Excel using the Ink to Text Pen, bridging the gap between traditional and digital methods of data entry.
Table of Contents
Introducing the Excel Ink to Text Pen
Revolutionize Note-Taking in Excel
Looking for a way to infuse some digital ink into your Excel spreadsheets? Say hello to your new go-to tool—the Excel Ink to Text Pen. Tailor-made for directly jotting down your numbers and notes within cells, their handwriting is magically transformed into precise Excel data. It’s innovation at the tip of your stylus!
The Ink to Text Pen feature in Excel enables users to write or draw directly on their touch-enabled devices, such as tablets or touch-screen laptops and automatically converts the handwritten input into editable text. This functionality bridges the gap between traditional pen-and-paper note-taking and digital spreadsheet management, offering users a more intuitive and flexible way to interact with their data
Seamless Integration with Your Spreadsheets
Wave goodbye to clunky data entry and embrace the smooth, effortless integration of the Excel Ink to Text Pen with your spreadsheets. They can write freely, knowing that their strokes will be accurately aligned with cells, keeping everything tidy and organized. This tool is designed to understand the boundaries of Excel’s grid layout, ensuring a seamless transition from pen to performance.
How It Works
Add Draw Tab to Excel Ribbon
To add the “Draw” tab to your Excel ribbon, follow these steps:
STEP 1: Click on the “File” tab in the top-left corner of the Excel window.
STEP 2: Click on Options.
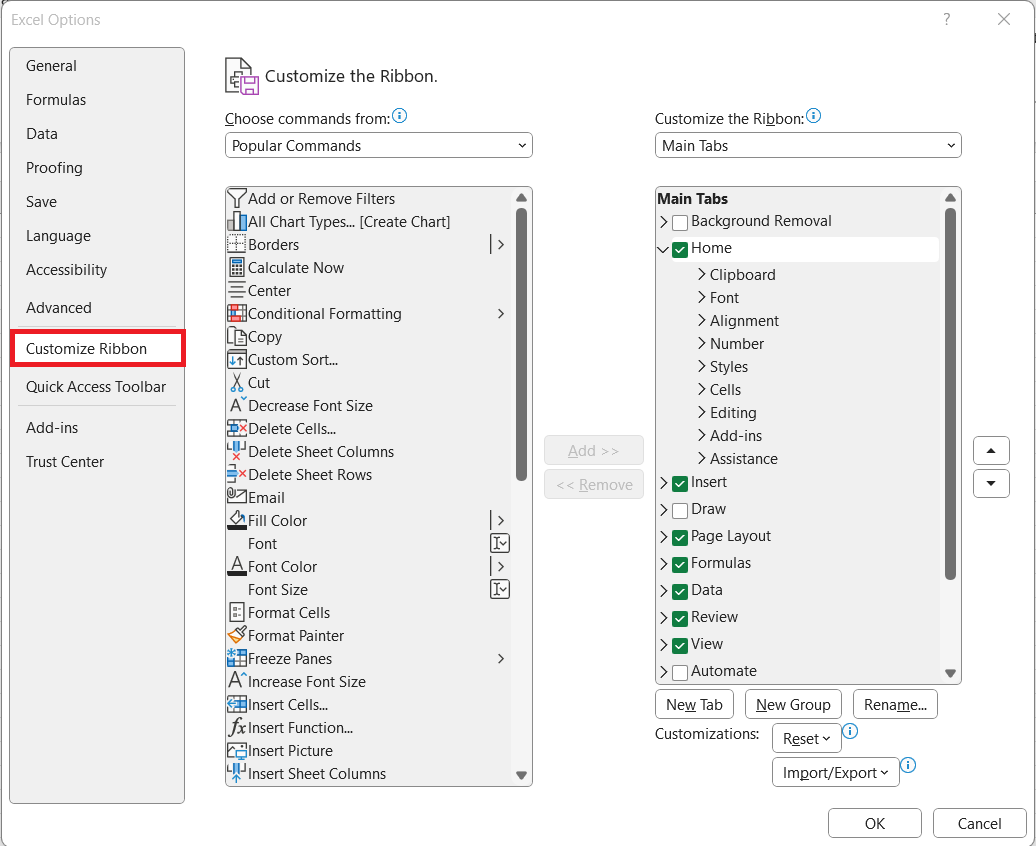
STEP 3: In the Excel Options dialog box, click on “Customize Ribbon” in the left-hand sidebar.
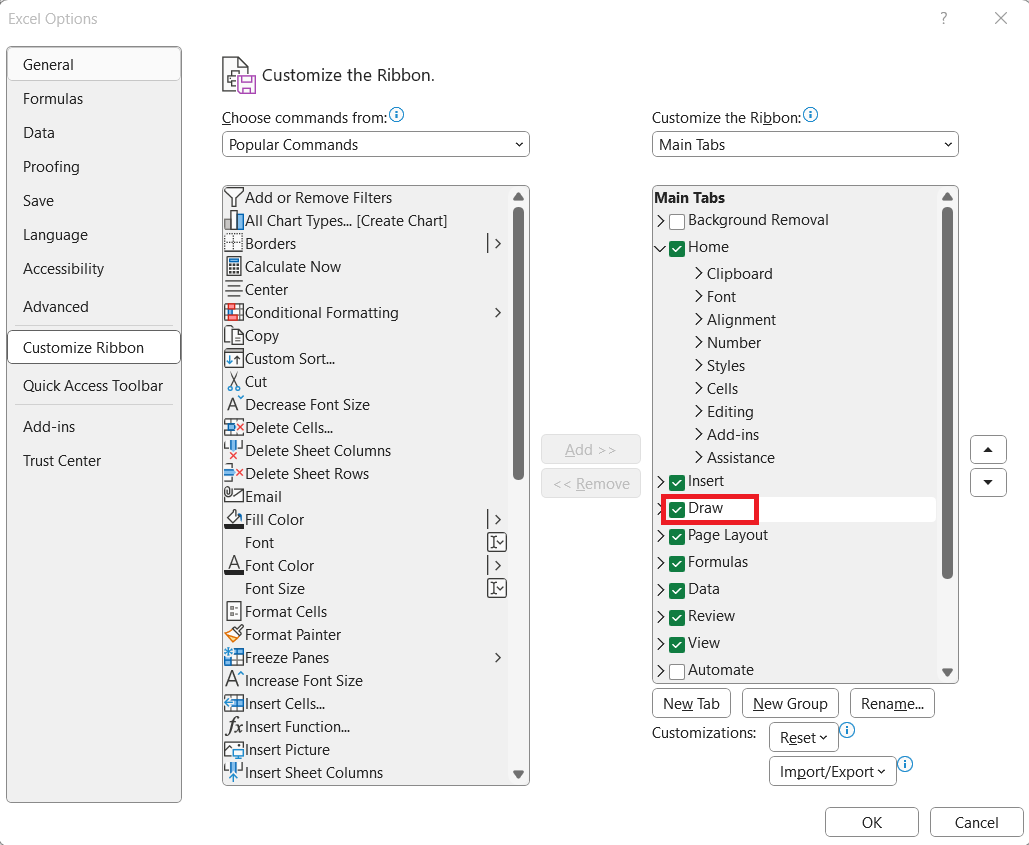
STEP 4: On the right-hand side of the dialog box, you’ll see a list of tabs under the “Customize the Ribbon” section. Click the checkbox next to “Draw” to add it to the ribbon. Click OK.
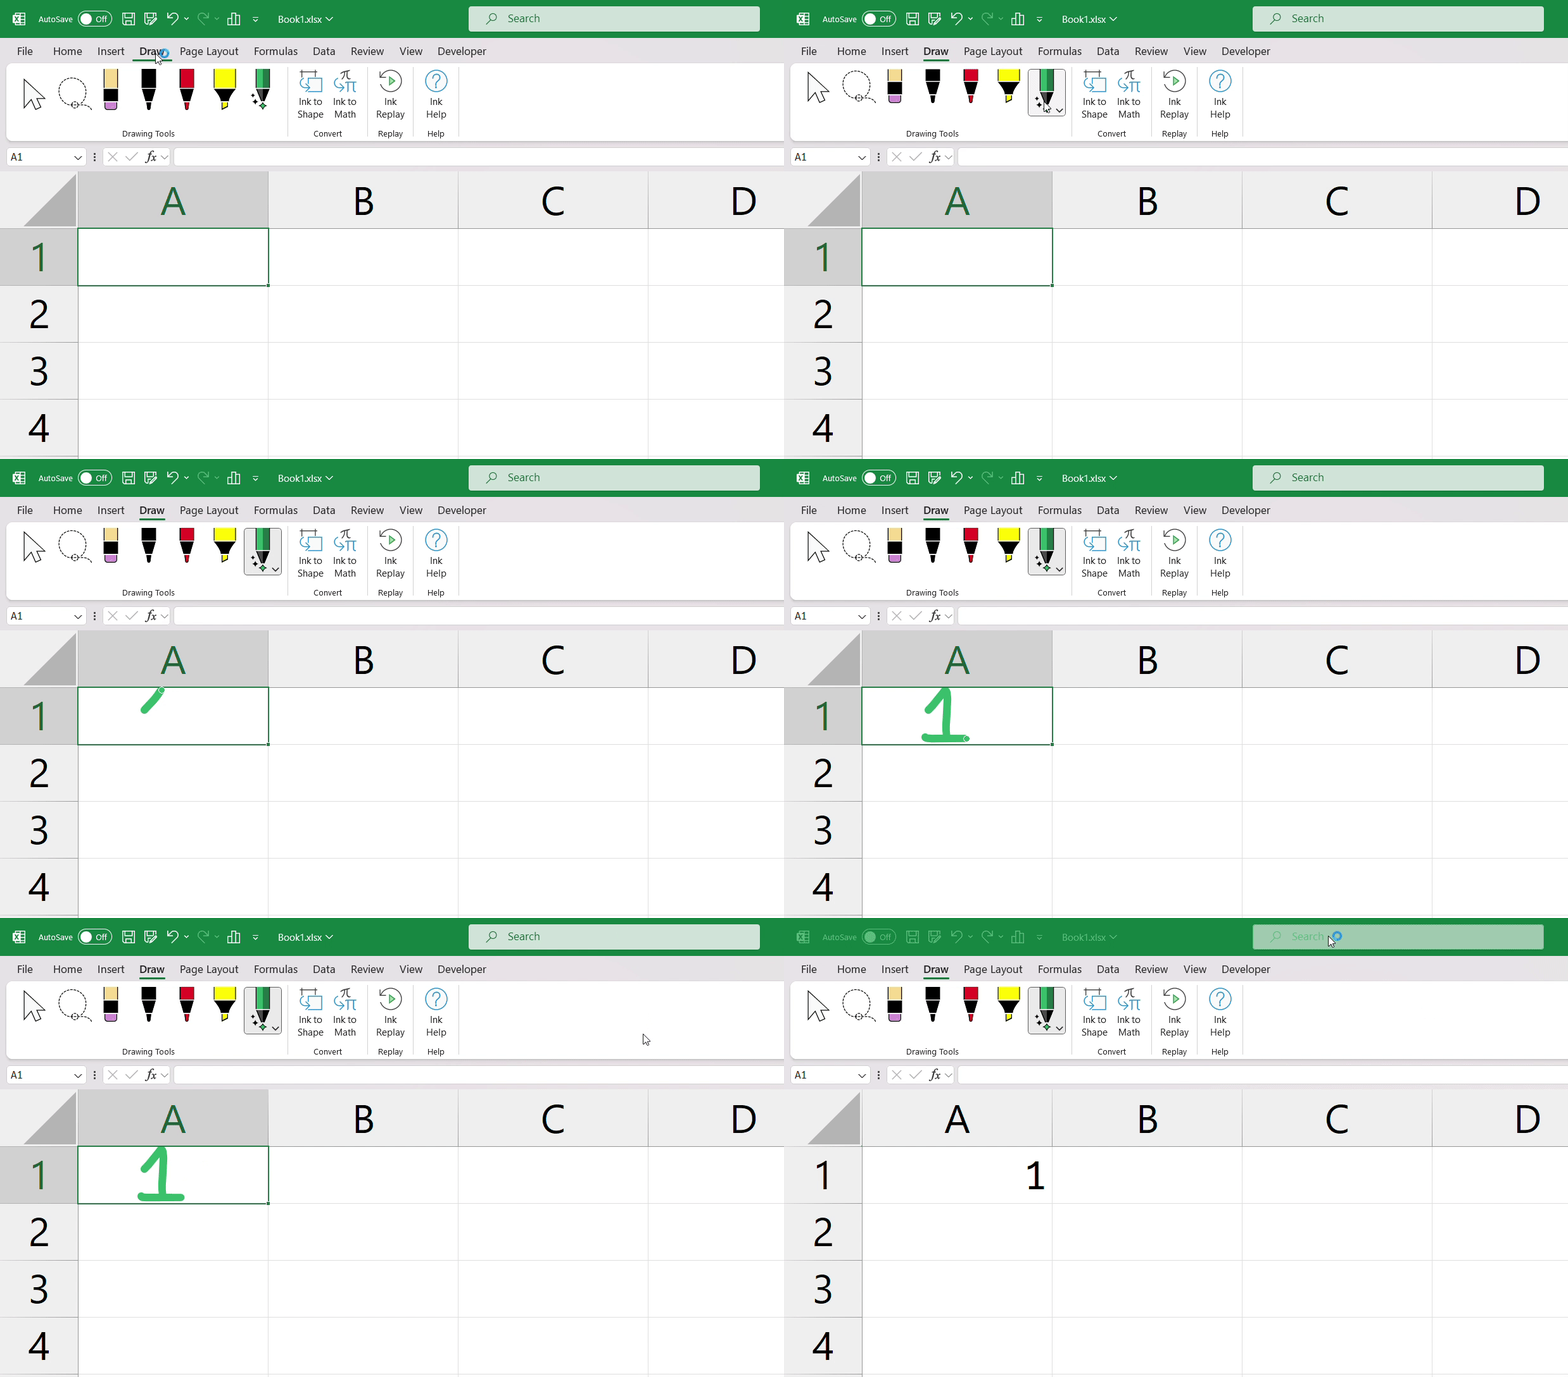
The Draw tab will be visible on the Excel ribbon.
Setting Up Ink to Text Pen
Before diving into using the Ink to Text Pen, ensure that you have a compatible device with touch capabilities and an active stylus or digital pen. Additionally, make sure your device supports ink input and that you have the necessary drivers installed.
To activate the Ink to Text Pen feature in Excel, follow these simple steps:
STEP 1: Click on the cell where you want to input handwritten text.
STEP 2: Navigate to the “Draw” tab on the Excel ribbon. Click on the “Ink to Text” option to activate the feature.
STEP 3: Once activated, you’re ready to start writing or drawing directly onto your Excel worksheet using your digital pen or stylus.
Utilizing the Ink to Text Pen Effectively
Now that you have the Ink to Text Pen activated, let’s explore how to make the most out of this feature:
- Handwritten Input: Write or draw directly onto the Excel worksheet using your digital pen. You can input text, numbers, symbols, or even simple diagrams.
- Recognition and Conversion: As you write, Excel will automatically recognize your handwritten input and convert it into editable text. The conversion process is instantaneous, allowing you to see the text appear as you write.
- Accuracy and Precision: The accuracy of the conversion largely depends on the legibility of your handwriting and the quality of your device’s touch input. Experiment with different writing styles and ensure a steady hand for optimal results.
- Advanced Features: Explore additional features within the Draw tab, such as ink color selection, erasing ink strokes, or converting ink to shapes or equations, to further enhance your productivity and creativity.
Tips for Optimizing Your Experience
To maximize your efficiency when using the Ink to Text Pen feature in Excel, consider the following tips:
- Practice Regularly: Like any new skill, proficiency with the Ink to Text Pen feature improves with practice. Dedicate some time to familiarize yourself with the tool and refine your handwriting for better recognition.
- Use Clear Handwriting: To ensure accurate conversion, write neatly and clearly. Avoid overly cursive or elaborate handwriting styles that may confuse the recognition algorithm.
- Experiment with Different Devices: Test the feature across various touch-enabled devices and stylus options to find the combination that works best for you.
- Combine with Other Input Methods: The Ink to Text Pen feature complements traditional keyboard and mouse inputs. Experiment with combining handwritten input with keyboard shortcuts and mouse actions for a seamless workflow.
Frequently Asked Questions (FAQs)
How do I get started with the Excel Ink to Text Pen?
To get started with the Excel Ink to Text Pen, open Excel, select a cell, go to the “Draw” tab on the ribbon, and choose the “Ink to Text” option to activate the feature.
What makes this pen different from a regular digital stylus?
The Excel Ink to Text Pen differs from a regular digital stylus by its ability to convert handwritten input directly into editable text within Excel, seamlessly integrating traditional pen-and-paper methods with digital spreadsheet management.
Can you convert handwriting to text in Excel?
Yes, you can convert handwriting to text in Excel using the Ink to Text Pen feature. Simply write directly onto the Excel worksheet using a compatible device with touch capabilities and watch as your handwritten input is automatically recognized and converted into editable text.
How do you use an ink pen in Excel?
To use an ink pen in Excel, activate the Ink to Text Pen feature by navigating to the “Draw” tab on the ribbon and selecting “Ink to Text.” Then, simply write or draw directly onto the Excel worksheet using a digital pen or stylus, and Excel will convert your handwritten input into editable text.
How to scan handwritten data into Excel?
You can scan handwritten data into Excel by first scanning the handwritten documents using a scanner or a mobile scanning app. Once scanned, save the scanned document as an image file. Then, insert the scanned image into an Excel worksheet by going to the “Insert” tab, selecting “Pictures,” and choosing the scanned image file. Finally, you can use the Ink to Text Pen feature to convert the handwritten content within the scanned image into editable text.
John Michaloudis is a former accountant and finance analyst at General Electric, a Microsoft MVP since 2020, an Amazon #1 bestselling author of 4 Microsoft Excel books and teacher of Microsoft Excel & Office over at his flagship MyExcelOnline Academy Online Course.


