Collaboration is essential in today’s work environment, and Microsoft Excel provides various ways to share workbooks with colleagues. Whether you need to work on a file simultaneously with your team or just want to grant others access, Excel makes the process straightforward. In this guide, I’ll walk you through the steps to share a workbook in Excel, covering different sharing methods and best practices.
Key Takeaways:
- Excel allows multiple users to collaborate on the same file in real-time, improving productivity.
- Uploading workbooks to OneDrive or SharePoint is essential for seamless sharing and editing.
- Version history helps track changes and restore previous versions when needed.
- Protecting worksheets and managing permissions ensures data security while maintaining accessibility.
- Shared workbooks have limitations, so planning ahead helps avoid issues with features like conditional formatting and macros.
Table of Contents
Introduction to Excel Collaboration
Unlocking Team Productivity with Shared Workbooks
I’ve found that Excel has completely changed the way teams handle data by making it possible to share workbooks. Instead of just sending files back and forth, this feature allows multiple people, including myself, to work on the same Excel file at the same time.
It has significantly boosted team productivity by creating a dynamic workspace where we can see real-time updates, make immediate changes, and collaborate seamlessly on data analysis and reporting.
Setting the Foundation for Collaboration
Step 1: Seamless Upload to the Cloud
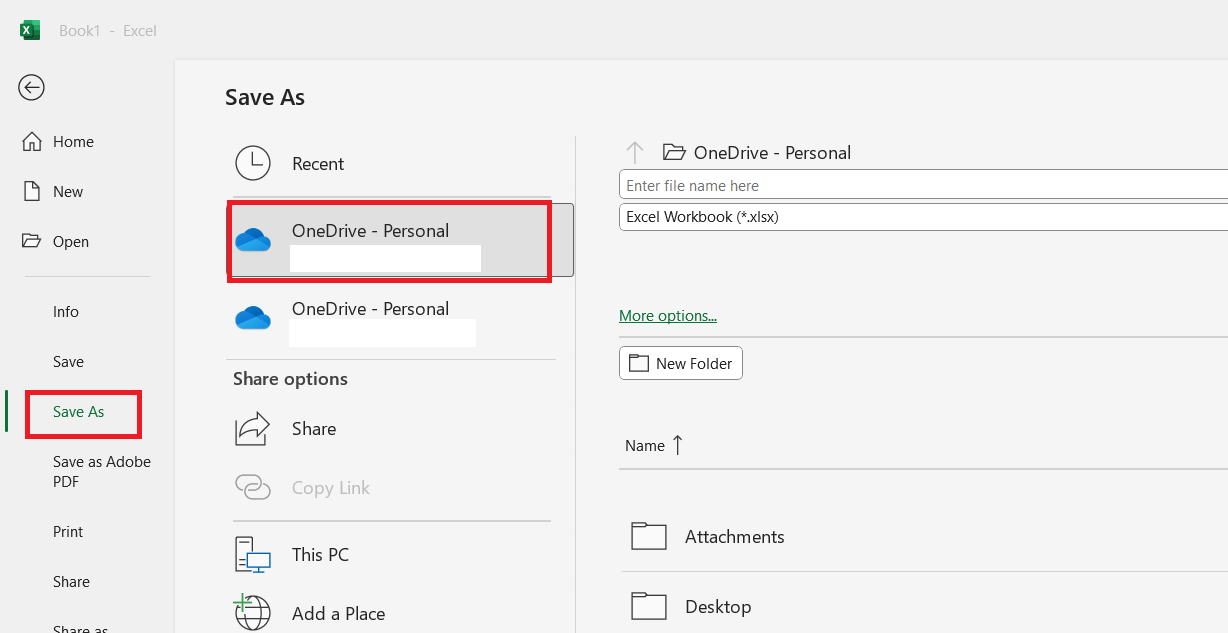
Before sharing can commence, uploading your Excel workbook to the cloud is essential—it’s the digital equivalent of placing your file on a public bulletin board where others can access it. OneDrive, Microsoft’s cloud solution, ensures that your workbook is accessible anywhere by you and your colleagues.
Uploading is as easy as clicking ‘File’, then ‘Save As’, and selecting OneDrive as the destination.
You’ll be prompted to sign in if you haven’t already, securing your data with your Microsoft account. A seamless upload is the first step in setting your team up for real-time collaboration.
Step 2: Sharing Your Workbook – The Essentials
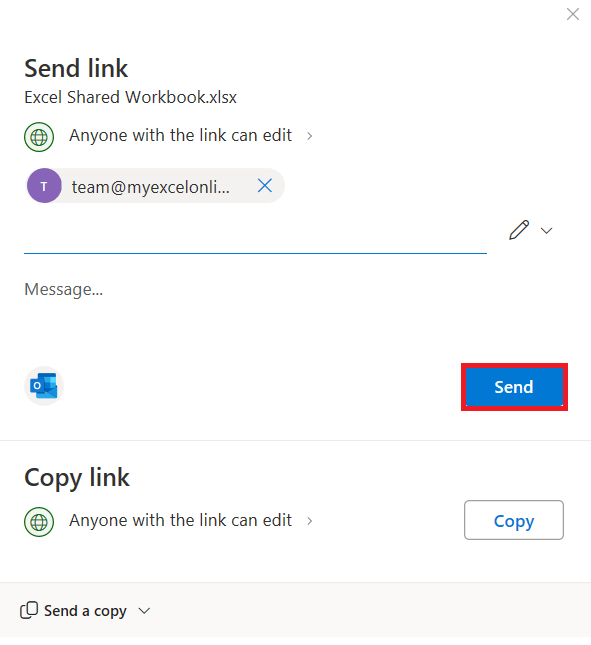
Once your workbook is securely perched in the cloud, it’s time to initiate sharing. Navigate to the ‘Share’ button in Excel Ribbon to crack open the door to collective input.
It’s crucial to select the right users for sharing; hence, consider privacy settings carefully when adding collaborators. Hit ‘Send’, then ‘Save’, and your workbook instantly transforms into a nexus of shared productivity.
Co-Authoring Made Simple
Real-Time Editing with Your Team
The magic of collaboration in Excel happens during real-time editing. As soon as multiple users are plugged into the workbook, it’s like having a team huddled around a single desk, albeit digitally. Each user’s presence is indicated by a cursor or selection cell highlighted in a unique color, and any changes made are instantly visible to all.
This is not limited to data entry—comments, formulas, and formatting updates occur live on the canvas of shared cells. Just imagine the synergy, as the workbook grows and evolves, driven by the collective expertise of your team.
Keeping Track of Changes and Edits
Keeping a clear record of changes and edits in an Excel workbook is pivotal when collaborating. Although traditional shared workbooks had a ‘Show Changes’ feature, Excel has evolved.
Now, changes are not tracked within the workbook itself, but by leveraging version history when the file is stored on the cloud. You can view who made specific edits and roll back to previous versions if needed. When multiple hands touch the same spreadsheet, it’s comforting to know there’s a way to trace every move, safeguarding against unintended alterations or data loss.
Protecting Your Collaborative Efforts
Understanding Worksheet Vs. Workbook Protection
Navigating Excel’s protection settings requires an understanding of the difference between securing an entire workbook versus individual worksheets. Protecting a worksheet restricts users from altering cell content, which is crucial when only specific data shards should remain immutable.
On the flip side, workbook protection deals with structural elements like adding or deleting sheets. While sheet protection can be applied without a glitch, it’s worth noting that workbook protection does not deter others from editing content within the sheets—hence it’s often paired with sheet protection for a robust defense.
Managing User Permissions and Access
When collaboration entails sensitive data, managing user permissions becomes a top concern. Excel lets you wield control over who does what within a shared workbook through access permissions. There are options for view-only access or full editing rights, with the possibility of additional restrictions on a per-sheet basis.
Determining who receives an invitation to the document—and the extent of their editing capabilities—is a balancing act of accessibility and security. Set these permissions upfront to safeguard your data while still fostering a cooperative environment.
Troubleshooting Common Hurdles
Overcoming Excel Shared Workbook Limitations
While Excel’s shared workbooks unlock collaborative possibilities, there are inherent limitations to this feature. Functions such as sorting and filtering by format, conditional formatting, and data validation may become restricted. To overcome these roadblocks, planning ahead is crucial—apply these functionalities prior to sharing.
Additionally, explore alternative features like tables and defined ranges that still work well in a shared context. Understanding these constraints helps in optimizing the workbook before sharing, ensuring a more seamless collaboration experience.
Merging Varied Copies Effectively
Even with the best-laid plans, you may end up with multiple copies of an Excel workbook that need merging. When several team members make changes offline or in separate files, consolidating these variations is a must. Excel’s ‘Compare and Merge Workbooks’ feature, although not readily visible in the ribbon, can be added to the Quick Access Toolbar.
With this tool, different versions can be stitched together, harmonizing data into a cohesive unit. Merged changes become readily apparent, enabling you to sift through individual edits and establish a unified, up-to-date workbook.
FAQ: Navigating Excel Collaboration Like a Pro
How do I enable sharing for an Excel workbook?
To enable sharing for an Excel workbook, first save it to OneDrive or SharePoint. Click the ‘Share’ button in the ribbon, choose the permission level, enter the email addresses of your collaborators, and send. If using an older version, click ‘Review’, then ‘Share Workbook’, check ‘Allow changes by more than one user’, and save.
Can I track changes made by my collaborators?
In modern versions of Excel that support co-authoring, you can’t track changes directly in the workbook. However, you can utilize the version history feature on the cloud platform where the workbook is stored, like OneDrive or SharePoint, to see past edits.
What limitations should I be aware of with shared workbooks?
When using shared workbooks, be aware that certain features are unsupported, such as conditional formatting, PivotTables, array formulas, and macros. Existing features can be used, but can’t be added or changed once sharing is enabled. Plan and apply necessary features before sharing.
How can I protect my shared workbook without restricting access?
To protect a shared workbook without restricting access, use the ‘Protect and Share Workbook’ feature. Enable this under the ‘Review’ tab to prevent turning off change tracking. While optional, set a password to ensure only authorized users can remove the protection.
How to Share an Excel workbook and allow editing?
To share an Excel workbook and allow editing, first save your document to OneDrive or SharePoint. Then, use the ‘Share’ button, enter the email addresses of people you wish to share with, set permissions to ‘Can edit’, and send your invitations. Collaborators will be able to make live changes.
John Michaloudis is a former accountant and finance analyst at General Electric, a Microsoft MVP since 2020, an Amazon #1 bestselling author of 4 Microsoft Excel books and teacher of Microsoft Excel & Office over at his flagship MyExcelOnline Academy Online Course.


