Microsoft Excel‘s vast array of features can be daunting, but mastering the Text to Columns tool is like uncovering a hidden path to data clarity and efficiency. This feature effortlessly spreads data across multiple columns, transforming cluttered sheets into organized, actionable information.
Key Takeaways
- Immediate Data Organization: Text to Columns splits data housed in a single column across multiple ones, instantly making your spreadsheet more organized and easier to navigate.
- Customizable Splitting: You can tailor data separation using delimiters like commas, spaces, or tabs for varied data types, or fixed-width splitting for uniformly structured data.
- Accessibility: The Text to Columns wizard is accessible via the Data tab under Data Tools, or through a quick keyboard shortcut (ALT + A + E), making it readily available for rapid data cleaning.
- Versatile Applications: This tool is invaluable for organizing contact lists, financial data, or any dataset where information is compacted into single columns, enhancing readability and analysis.
Table of Contents
Introduction to Text to Columns in Excel
Why Mastering Text to Columns is a Game-Changer
Excel can feel like a maze, with its array of features hidden behind menus and keyboard shortcuts. But once you master tools like Text to Columns, you’re equipped to navigate this maze much faster. It’s like finding a secret passage that leads straight to efficiency. Your data can transform from cluttered to crystal-clear in mere moments.
The Basics of Text to Columns Feature
Understanding the mechanics of Text to Columns is your first step to harnessing its power. It’s all about taking the data housed in a single column and spreading it out across multiple columns. This process is crucial, particularly when dealing with imported or copied data that doesn’t play nicely with your Spreadsheet’s format. By choosing the right delimiter—such as commas, spaces, or tabs—you can tidy up your worksheet in a snap. And for more uniform data, fixed-width cutting elegantly splits content based on character count.
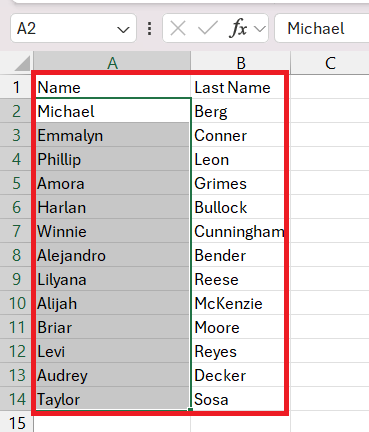
For illustrative purposes, imagine you’ve received a list where names and addresses are lumped together in one cumbersome column. Text to Columns can help you separate each element into its dedicated space.
Step-by-Step Guide to Using Text to Columns
How to Access the Text to Columns Wizard
Accessing the Text to Columns wizard in Excel is your golden ticket to data clarity. It’s the tool that allows you to wave goodbye to cluttered columns. Here’s how you can summon this nifty wizard:
Firstly, place your cursor in the Excel labyrinth:
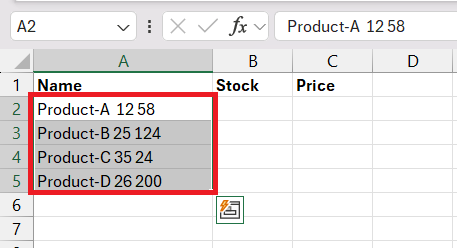
STEP 1: Select Your Data: Click on the column that’s in dire need of a split personality.
STEP 2: Navigate to the Wizard’s Den: Head up to the Data tab on Excel’s Ribbon, then locate the Data Tools section. Here lies the entrance to Text to Columns.
Alternatively, take the shortcut like an Excel ninja:
- Press ALT + A + E, initiating a keyboard shortcut sequence that leads you straight to the wizard, bypassing the need for a mouse completely.
Now customize your data split with the Text to Columns wizard. Let’s walk through how to tailor your data’s new look:
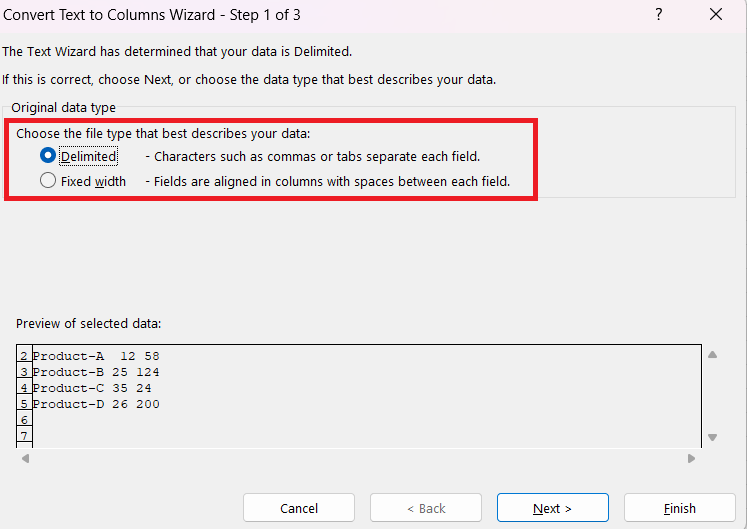
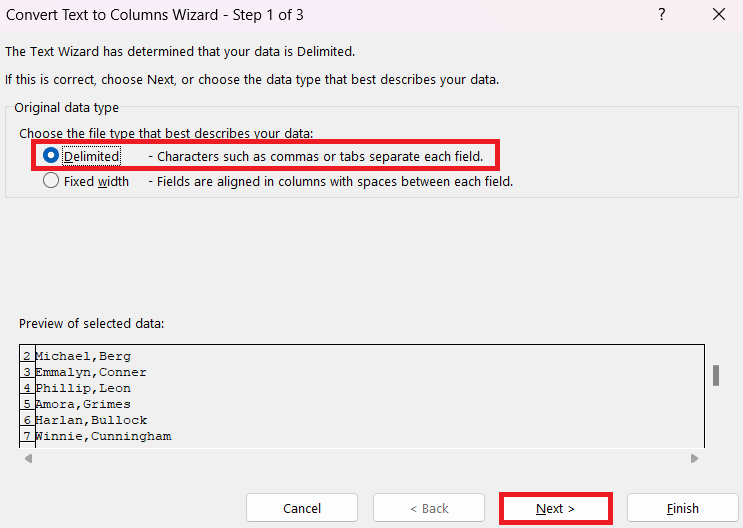
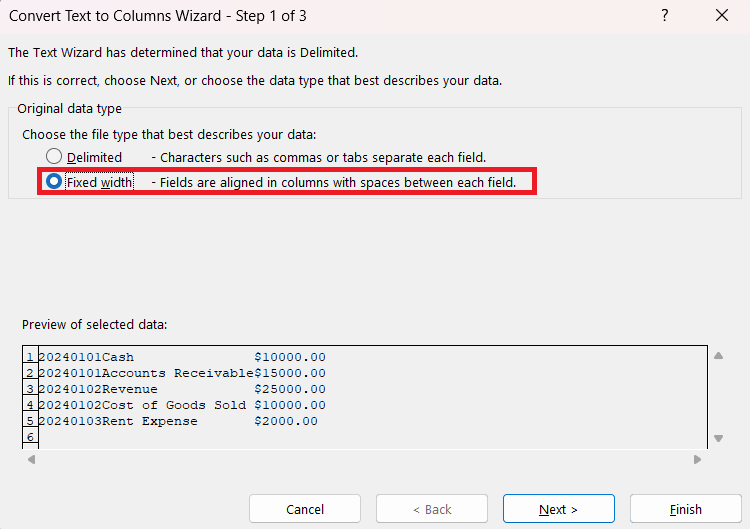
STEP 3: Summon the Wizard: After accessing Text to Columns wizard, choose between ‘Delimited’ or ‘Fixed Width’ based on your data’s characteristics.
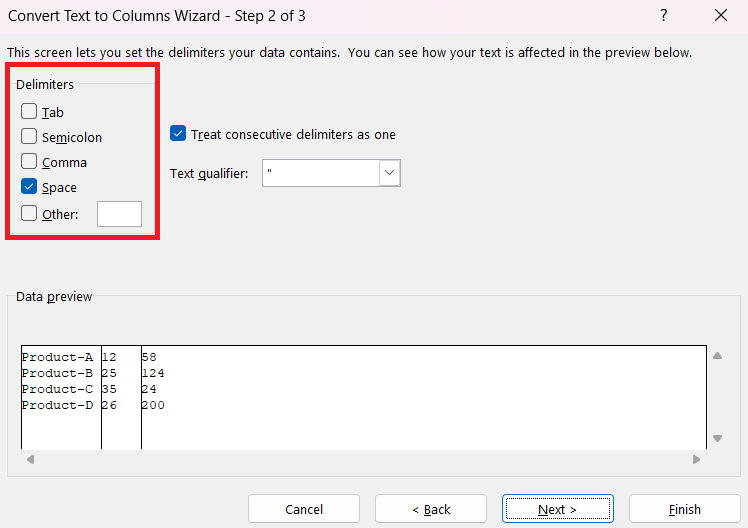
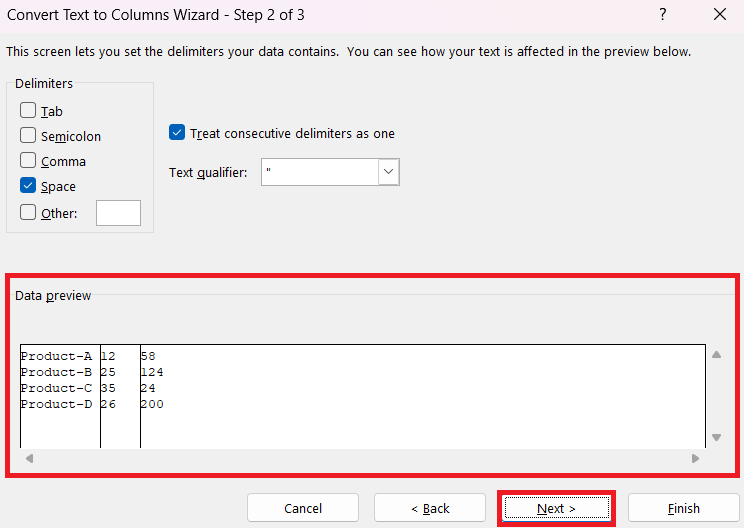
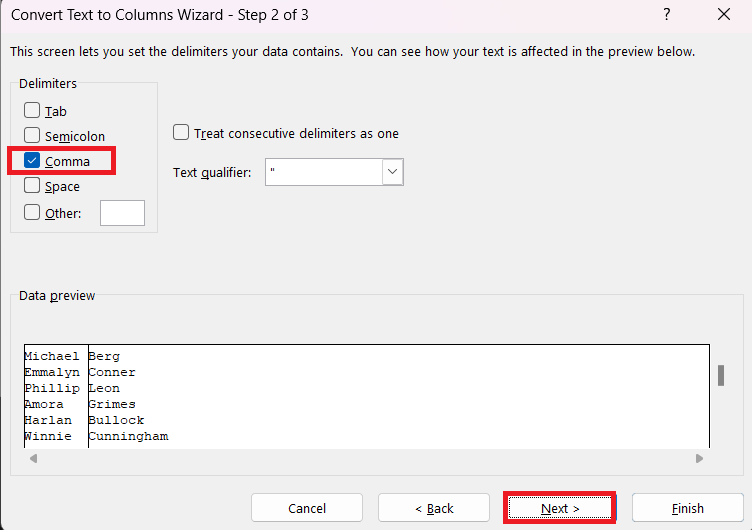
STEP 4: Define the Delimiters: If going the Delimited route, tick the boxes that match your data’s delimiters. This could be commas, tabs, semicolons, or spaces, and you can even define custom delimiters like slashes or vertical bars.
or this
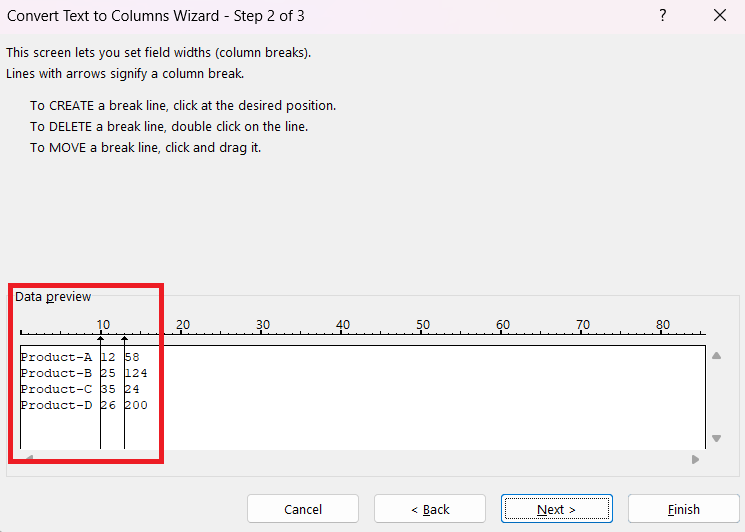
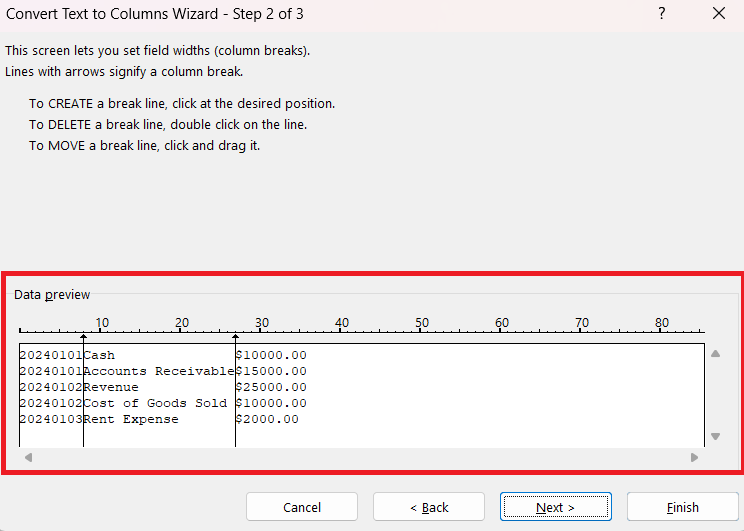
Arrange the Stops for Fixed Width: If Fixed Width brings out the best in your data, click on the data preview to set the column breaks. Drag or double-click to adjust these lines to align with the rhythm of your data’s pattern.
STEP 4: Preview the Transformation: As you make adjustments, Excel provides a real-time preview. Keep an eye on this to ensure you’re on track to split city—population: your data, well-organized.
Preview for Delimiters
Preview for Fixed Widths
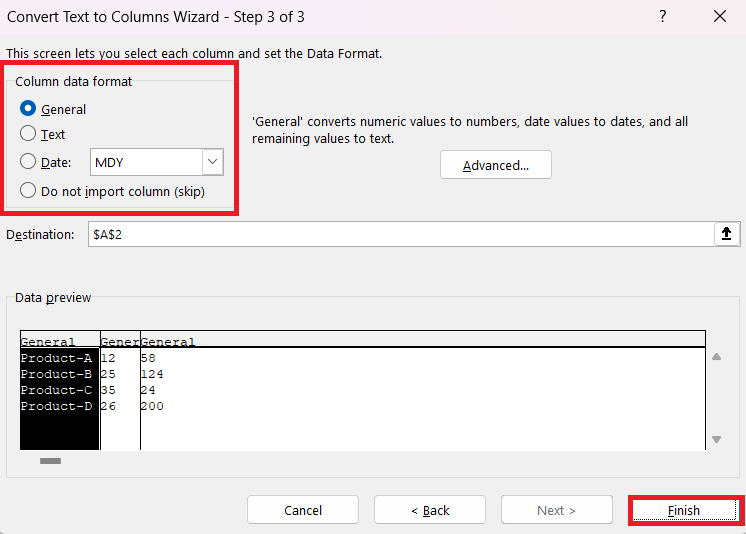
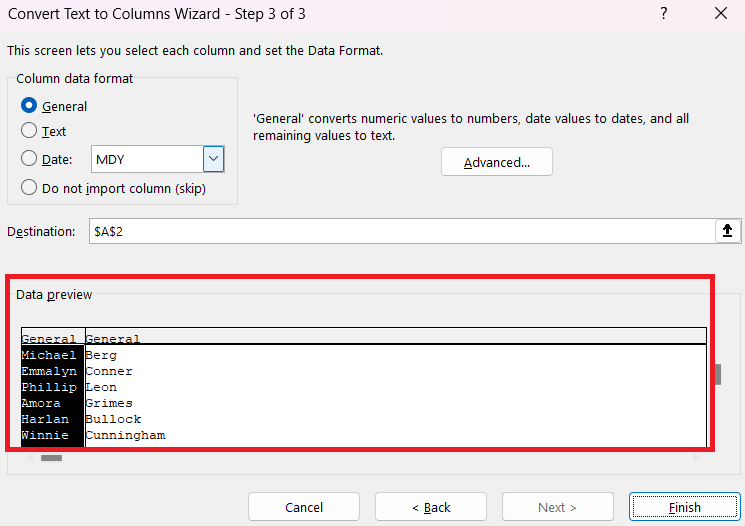
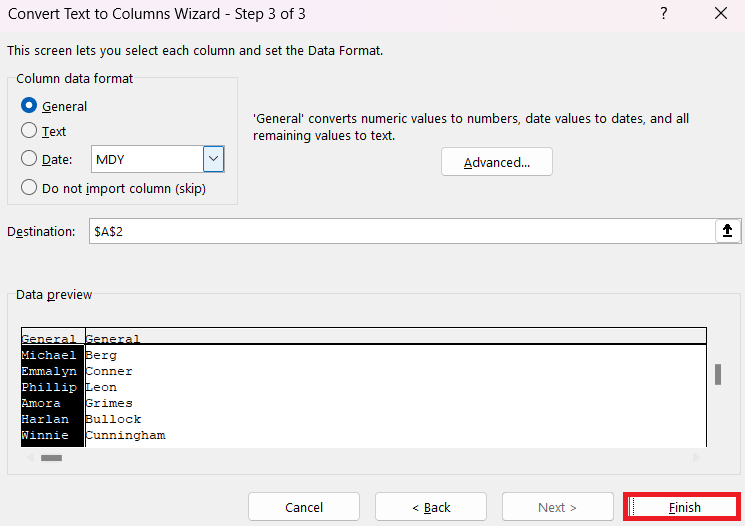
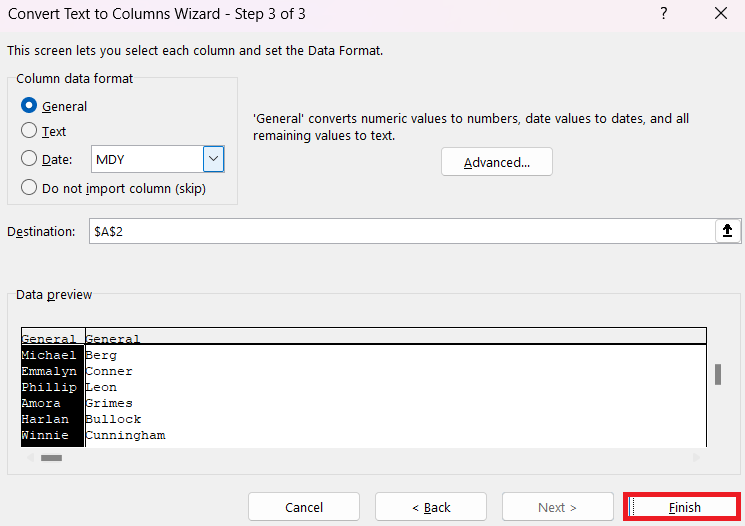
STEP 5: Select data format from among general, text, date or do not import column (skip). Leave it as is with general option selected and press “Finish”.
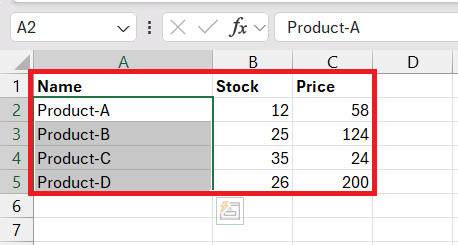
STEP 6: Your data instantly walks out in its new attire—all neat and orderly, each piece of information proudly in its own column.
Remember, the goal is to make your data not just presentable but functional and ready for whatever analysis task you have up your sleeve.
Practical Applications and Examples
Tidy Up Your Contact Lists by Separating Names
Tidying up your contact lists is like giving them a makeover; separating first and last names brings out their true individuality. It’s a common scenario—perhaps you have a lengthy list where ‘Jane Doe’ and ‘John Smith’ are cozily sharing a cell. The Text to Columns wizard can help turn that cozy pair into two friendly neighbors, residing in adjacent columns.
Here’s what you do:
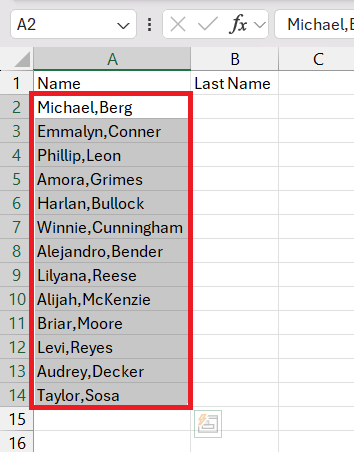
STEP 1: Select Your List: Highlight the column containing your full names with comma between first and last names.
STEP 2: Open the Text Wizard: Under the Data tab, look for ‘Data Tools’ and click ‘Text to Columns’.
STEP 3: Choose Your Style: Select ‘Delimited’. And click on Next.
STEP 4: Pick the Right Separator: Check the ‘Comma’ delimiter (uncheck others that don’t apply).
STEP 5: Take a Peek: Watch as Excel provides a preview, neatly aligning first and last names in separate columns.
STEP 6: Apply the Change: Hit ‘Finish’, and your contact list is instantly more organized and ready for use.
STEP 7: Check the result.
Now, each first name has its column, shaking hands but no longer sharing seats with the last names. It’s clean, it’s simple, and it sets the stage for more precise communication with your contacts.
This technique is especially beneficial for mailing lists, where personalization can significantly increase engagement rates, or when importing contacts from different sources that might not follow the same format.
Organizing Financial Data with Text to Columns
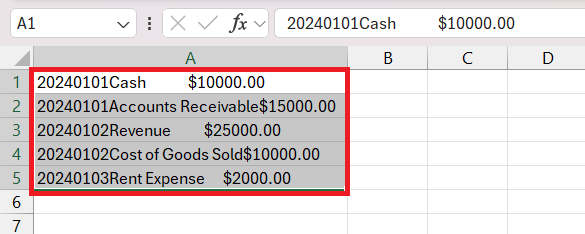
When you dive into the numbers, organizing financial data can feel like a herculean task. However, Text to Columns can be your unsung hero, particularly when you’re faced with reports where monetary amounts, dates, and transaction details are fused into one unwieldy column.
Here’s how to wrestle that financial data into submission with Text to Columns:
STEP 1: Highlight Your Details: Select the column with the entangled financial data.
STEP 2: Summon Your Tool: Through ‘Data Tools’ in the Data tab, click ‘Text to Columns’.
STEP 3: Choose Your Weapon: Opt for ‘Fixed Width’ this time as the data aligns with specific intervals.
STEP 4: Set Your Fixed Widths: Draw lines in the data preview where the splits should occur.
STEP 5: Preview Your Victory: Excel shows a live split of your data, aligning currency, dates, and details in neat, individual columns.
STEP 6: Finalize Your Strategy: Confirm, finish, and witness your financial data stand in orderly ranks, ready for analysis or reporting.
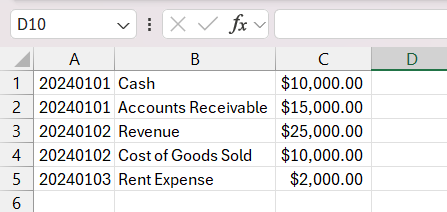
STEP 7: Check your result.
With transactions separated out and dates standing on their own, your Excel spreadsheet transforms from a daunting ledger to a clear financial map, guiding your decision-making.
Troubleshooting Common Issues
When Text to Columns Doesn’t Work as Expected
Sometimes, the Text to Columns wizard might not wave its wand quite right, leaving you with results that don’t match your expectations. If your data isn’t splitting as intended or you face other hiccups, here’s what you can do:
- Double-Check Delimiters: If Text to Columns isn’t splitting data, ensure you’ve checked the correct delimiters. If you’re expecting a space to be the separator, but commas are checked, your data won’t split properly.
- Look Out for Extra Spaces: Extra spaces can throw off your split. Run the TRIM function beforehand to remove unwanted whitespace.
- Inspect Your Data: If it’s a fixed width issue, make sure the data actually has uniform spacing. Irregularities can cause unpredictable splits.
- Column Overflows: Check if your data has overflowed into adjacent columns post-split. You might need to clear or move data to make space.
When faced with a tricky conversion, patience and a keen eye for detail are your best friends. Recalibrating your settings and prepping your data can often nudge the Text to Columns feature back on track.
Preventing Data Loss During Conversion
Preventing data loss during conversion with Text to Columns is about anticipation and protection. Loss usually rears its ugly head when existing data is accidentally overwritten or formats are misunderstood during the split. Here’s how to play it safe:
- Backup Your Data: Before you wield the Text to Columns feature, make a copy of your original data in another sheet or workbook. This safety net is invaluable.
- Check for Space: Ensure there are enough empty columns to the right of your selected data to accommodate the split without overwriting adjacent data.
- Convert Text to Numbers: If numerical values don’t calculate post-split, use the ‘Convert to Number’ feature by selecting the cells with a small green triangle, right-clicking, and choosing ‘Convert to Number’.
- Understand Date Formats: If converting dates, confirm that Excel understands your chosen format. Mismatched formats can lead to lost or inaccurate date conversions.
By following these preventative steps, you shield your data against inadvertent loss and maintain integrity throughout the conversion process.
Frequently Asked Questions (FAQs)
What’s the Difference Between Delimited and Fixed Width Options?
Delimited and Fixed Width are two different ways to separate text in Excel. Delimited allows you to split data using specific characters, like commas or tabs, as the boundaries. Fixed Width, on the other hand, divides text based on set character counts, regardless of the content. Choose Delimited for inconsistent lengths but consistent separators, and Fixed Width for consistently formatted data.
Can Text to Columns Handle Data with Multiple Lines in a Single Cell?
Text to Columns in Excel is designed to work with data that is spread across a single line in a cell. If a cell contains multiple lines of data, separated by line breaks, you’ll need to first replace the line breaks with a unique character and then use the Delimited option to separate the data.
How Can I Revert Back After Applying Text to Columns?
Once you’ve applied Text to Columns in Excel, there isn’t a direct way to reverse the action through the feature itself. However, you can quickly revert by using the Undo command (Ctrl + Z). It’s important to do this immediately after splitting, as Undo only works for recent actions.
Is There a Way to Use Text to Columns for a Range of Cells at Once?
Yes, Text to Columns can be used on a range of cells simultaneously. Simply select the range you wish to split before initiating the feature. Excel will apply the chosen Text to Columns settings to all selected cells in one go, saving time and maintaining consistency.
Where to find text to columns option in Excel?
You can find the Text to Columns option in Excel on the Data tab, nestled within the Data Tools group. It’s easily accessible from the Ribbon, and you can also reach it quickly by using the keyboard shortcut ALT + A + E. This shortcut opens the feature without navigating through menus.
John Michaloudis is a former accountant and finance analyst at General Electric, a Microsoft MVP since 2020, an Amazon #1 bestselling author of 4 Microsoft Excel books and teacher of Microsoft Excel & Office over at his flagship MyExcelOnline Academy Online Course.

