When working with sensitive or important documents in Excel, adding a watermark can be a great way to protect your data or convey a message. I’ve often found that a subtle watermark helps emphasize the confidentiality of my spreadsheets or brand them with a company logo. In this article, I’ll walk you through the steps to easily create and customize an Excel watermark, ensuring that your documents have that extra layer of professionalism or security.
Key Takeaways:
- I can easily add text or image watermarks in Excel to enhance document security and branding.
- Formatting the watermark’s size, color, and transparency is key to maintaining a professional appearance.
- Protecting the sheet or workbook ensures the watermark remains intact and uneditable by others.
- Watermarks can be printed by placing them in headers or footers and checking print settings.
- Removing or adjusting watermarks is straightforward, allowing me to adapt the document as needed.
Table of Contents
Dive into Excel Watermarks
Understanding the Role of Watermarks in Excel
In Excel, watermarks often play a critical role in safeguarding information and enhancing document presentation. By embedding a faint design or text behind the data, they subtly communicate the status or ownership of a spreadsheet without obstructing the view of the content.
For instance, when I’m sharing preliminary findings with peers, a ‘Draft’ watermark clarifies that the information is not yet finalized.
Furthermore, for documents containing sensitive data, watermarks can alert viewers to confidentiality, preventing unauthorized distribution.
What Is a Watermark in Excel?
A watermark in Excel is like a digital stamp; it’s an image or text that hovers in the background of your worksheet, signaling ownership, authenticity, or the status of the document. Unlike the visible and often bold data in the foreground, a watermark is meant to be subtle yet discernible upon closer inspection.
Whether it’s an image such as a company logo or a simple text like ‘Confidential,’ its presence is felt without interfering with the data’s legibility.
The Simple Steps to Add a Watermark in Excel
Inserting Text-Based Watermarks
For those pivotal moments when we need to articulate the status or categorize the Excel document, inserting a text-based watermark offers a straightforward solution. Here’s how I do it:
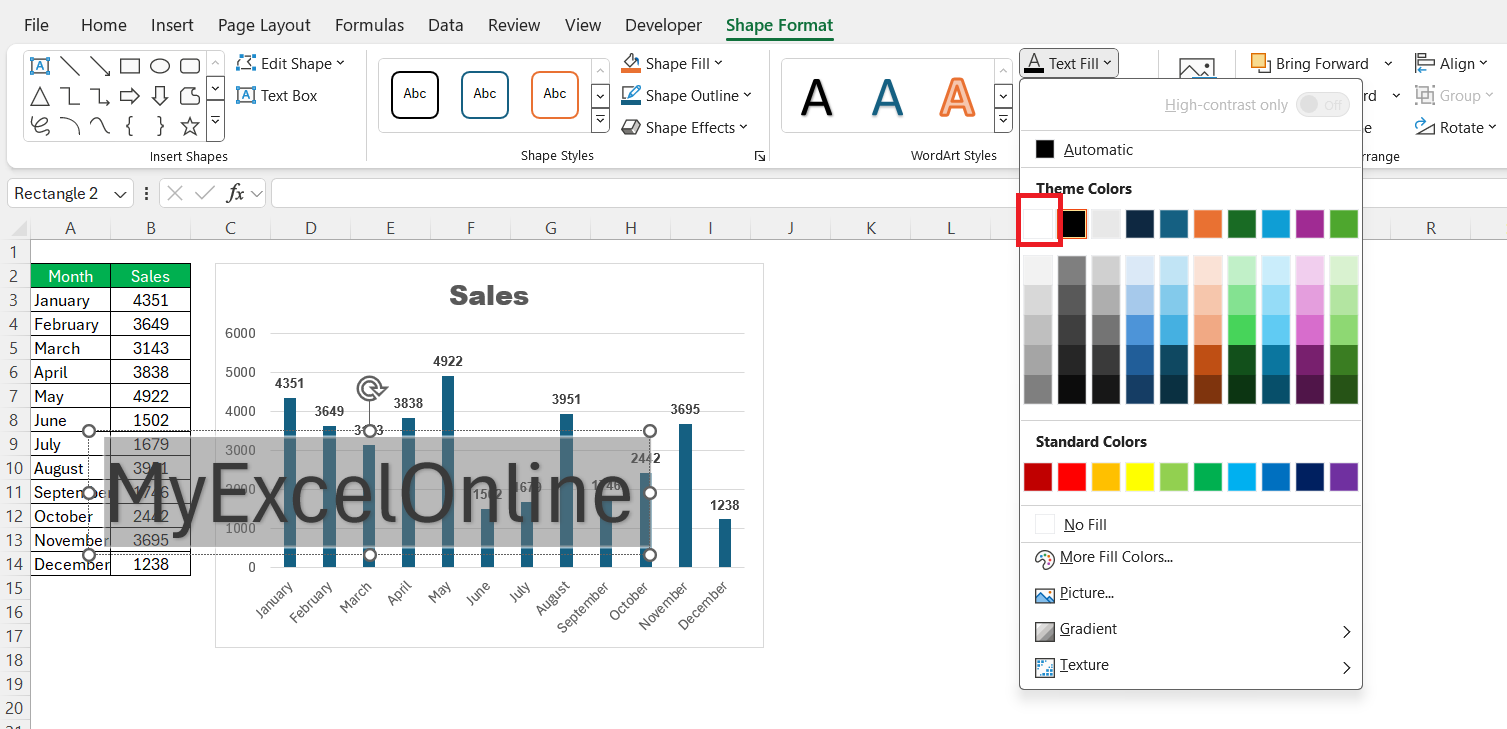
I begin by navigating to the ‘Insert’ tab, click on ‘Text’ and choose ‘WordArt.’
From there, I select a style.
Type the desired text—perhaps the company’s name—and press enter.
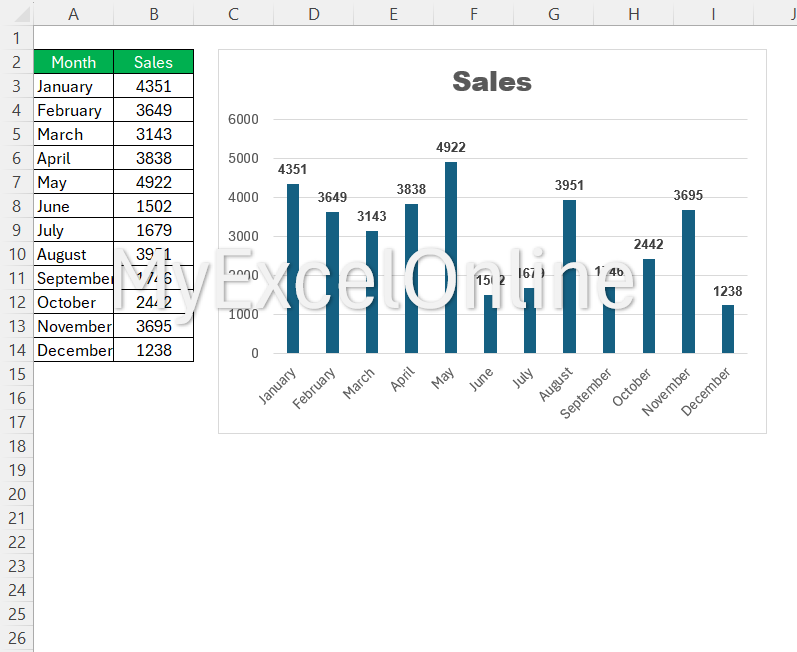
The finishing touches include changing the font to a light gray, rendering the watermark perfectly laid out yet unobtrusive.
The watermark will be added.
Adding Image Watermarks for Branding
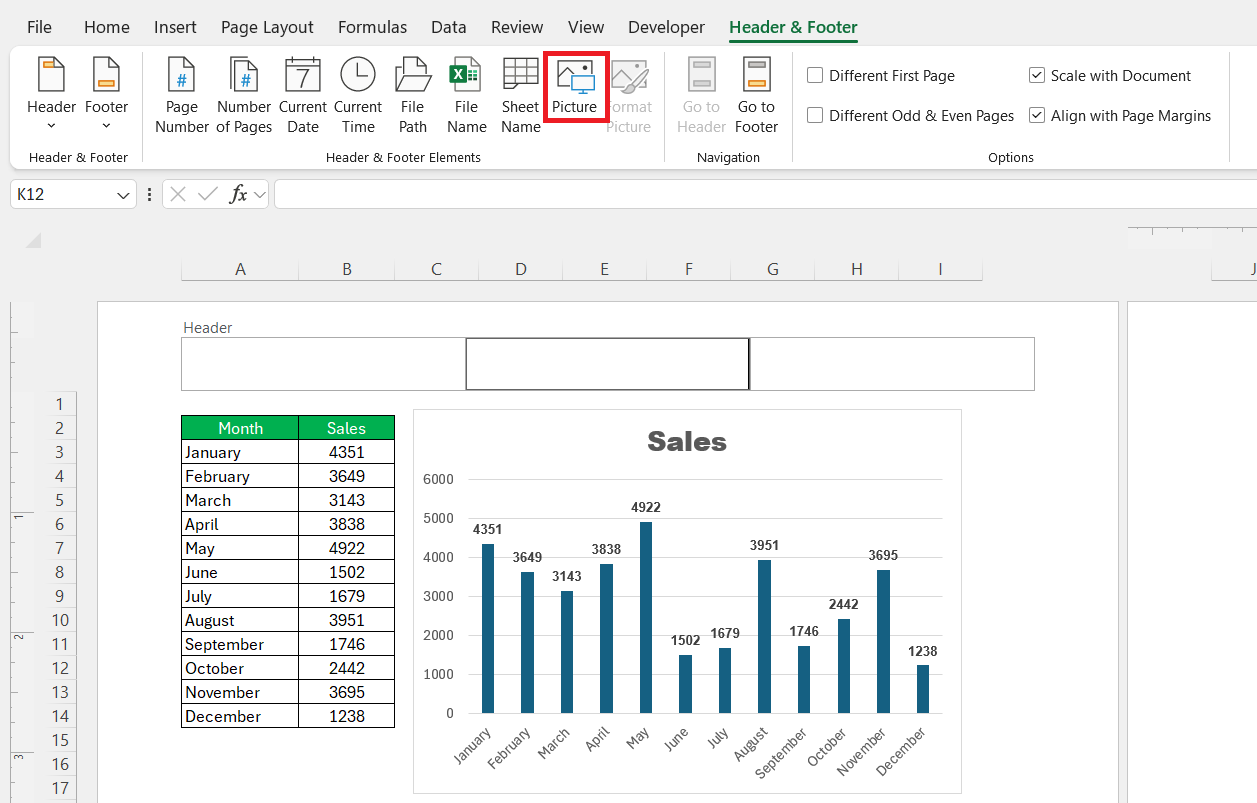
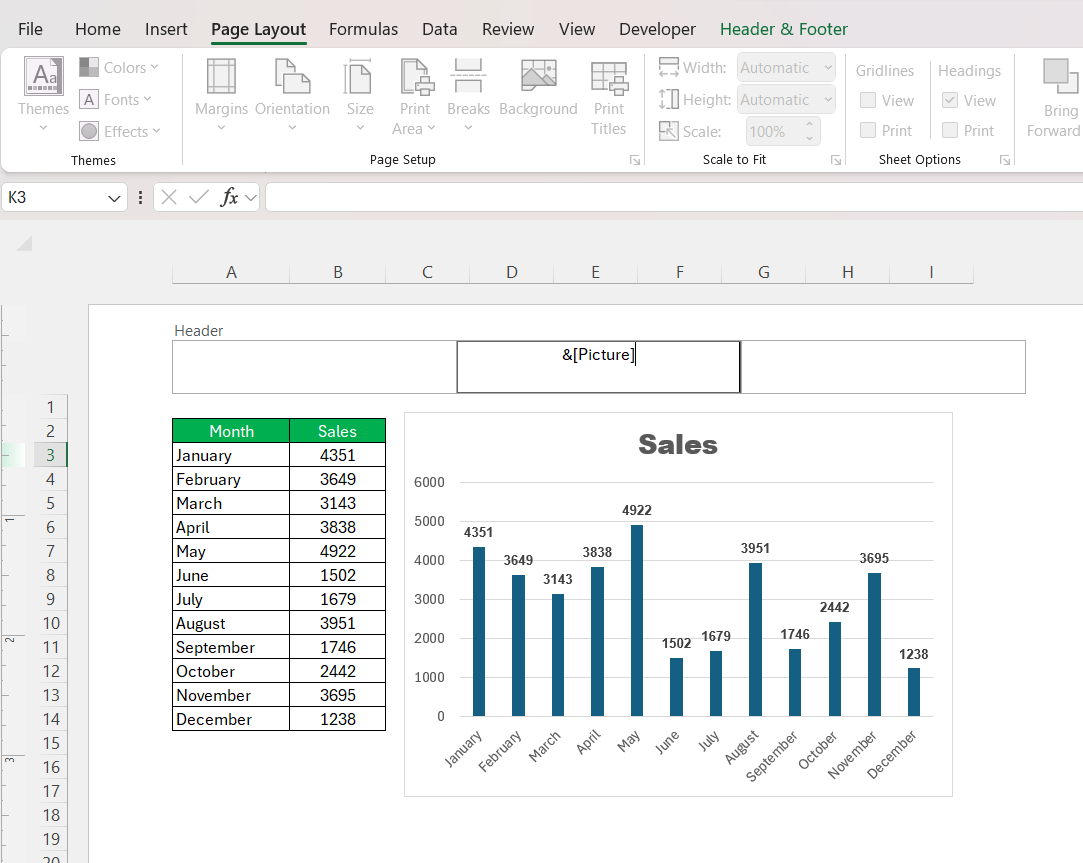
Adding image watermarks is a brilliant way for us to weave branding into our Excel documents. To begin, I head over to the ‘Insert’ tab and click on ‘Header & Footer.’
Within that view, I select ‘Header’ and choose ‘Picture’ from the menu.
I then upload an image file of a logo or any branding graphic to set as the watermark. The logo will be inserted into the worksheet’s header.
Perfecting Your Watermark Presentation
Resize and Format Your Watermark for Impact
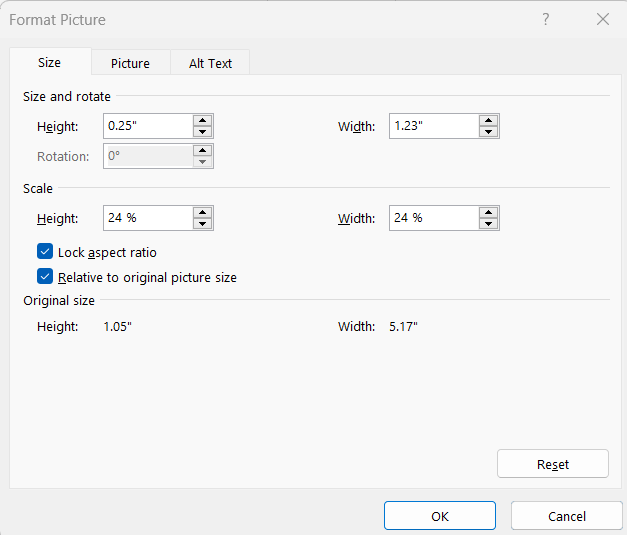
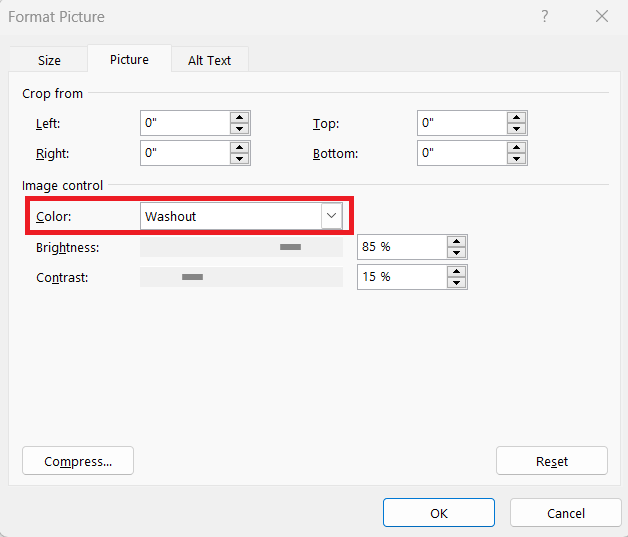
To ensure my watermark makes its intended impact without overpowering the content, resizing, and formatting are crucial steps. Once the watermark is in place, I click on it and select ‘Design’ from the top menu, proceeding to ‘Format Picture.’
In the emerging box, I input the new height and width dimensions or scale percentages until the watermark suits my needs.
If required, I could change the color to ‘Washout’.
I hit enter, and the changes take effect immediately, with the watermark now exuding the right balance of prominence and subtlety.
Beyond the Basics: Additional Watermark Insights
Making Your Watermark Permanent
Making my watermark permanent is a strategic move to maintain the integrity of the document. Once I’ve inserted the watermark and fine-tuned its presentation as earlier described, I protect the sheet by going to ‘Review’ and selecting ‘Protect Sheet.’
Here, I can set a password to prevent others from altering the watermark. Keep in mind, though, that permanence in Excel is relative; a knowledgeable user with the password can remove the protection.
Nevertheless, the process deters unintentional edits and fortifies the document’s consistency across multiple viewers.
Printing Excel Sheets with Visible Watermarks
When I need my watermarks to be visible on printed Excel sheets, I double-check during the print setup since it doesn’t always transfer from screen to paper automatically. I make sure to preview my document by choosing ‘File’ followed by ‘Print’ to access ‘Print Preview.’
It’s essential to remember that only headers and footers—and not background images—print by default, so proper placement within these areas is key for a successful printout with a visible watermark.
Need to Remove or Adjust? No Problem!
The Trouble-free Process to Remove Watermarks
If the time comes to remove a watermark from an Excel worksheet, I’ve found this to be a trouble-free process. For watermarks inserted through the ‘Header & Footer’ method, I go to the ‘Insert’ tab, click on ‘Header & Footer’, and select the header box where the watermark is located.
Then I simply highlight the &[Picture] or &[Text] code representing the watermark and press ‘Delete’ or ‘Backspace.’
Once done, clicking outside the header box saves the changes and voilà, the watermark is gone. This ensures the document’s appearance adapts to its evolving purpose with minimal effort.
Adjusting Watermark Visibility and Transparency
Crafting the right blend of visibility and transparency for a watermark can be likened to finding the perfect seasoning for a dish. To adjust the visibility, I format the text or image used as the watermark.
For text watermarks, I modify the font color to a lighter shade, or for images, I adjust the ‘Washout’ option until it’s faint yet discernible. Transparency comes into play when I work with image watermarks; here, I ensure the image file itself has the desired transparency before inserting it into Excel.
This affords a professional touch that marks the document without masking its contents.
Tips & Tricks for Excel Watermark Mastery
Ensuring Watermark Security in Shared Documents
When I share documents that contain sensitive information, ensuring watermark security is top of mind. To reinforce the security of a watermark, I combine it with Excel’s document protection features. This includes protecting the workbook structure and restricting editing access with passwords.
For text-based watermarks, using the ‘Protect Sheet’ feature is wise, and for watermarks that need to be more dynamic and secure against tampering or removal, I recommend a robust digital rights management (DRM) solution like Locklizard Safeguard.
This software provides additional functionality, such as preventing the taking of screenshots and setting document access conditions.
Important Nuances to Remember While Working with Watermarks
As I delve into the world of watermarks, there are subtle yet important nuances to bear in mind. Firstly, the recognition that watermarks in Excel are added into headers and footers, which means their behavior during scrolling and scaling differs from direct cell content.
Secondly, the scaling of the Excel sheet can affect the watermark appearance, especially when “Scale with document” settings are not checked.
Lastly, it’s pivotal to remember that watermarks don’t follow the ‘freeze panes’ feature; they remain stationary and don’t scroll with the data.
Nurturing an awareness of these nuances ensures that the watermark serves its purpose as intended, without unforeseen missteps or document layout issues.
FAQ: Master Excel Watermarks Effortlessly
How Do I Insert a Watermark in an Excel Worksheet?
To insert a watermark in Excel, go to the ‘Insert’ tab and click ‘Header & Footer.’ Click inside one of the header boxes, choose ‘Picture’ or ‘Text’ from the ‘Header & Footer Tools’ design tab based on your watermark choice, and follow the prompts to insert your image or text. The watermark will appear behind the content of your worksheet.
Can I Permanently Embed a Watermark in an Excel File?
While you cannot permanently embed a watermark in an Excel file, you can use security features to protect it. Insert the watermark as usual, and then navigate to the ‘Review’ tab and select ‘Protect Sheet’ or ‘Protect Workbook.’ Set a password to prevent others from making changes to the watermark.
What’s the Best Way to Format a Watermark in Excel?
The best way to format a watermark in Excel is to ensure it’s light and unobtrusive. For text, use a light gray color and adjust the font size to span appropriate areas. For images, use ‘Washout’ and ‘Transparency’ features to keep the watermark faint. Always preview it in ‘Page Layout’ view for adjustments.
How Do I Ensure My Watermark is Printed Alongside My Excel Data?
To ensure a watermark is printed with your Excel data, insert it in the header or footer section. Then, use ‘Page Layout’ view and ‘Print Preview’ to confirm its visibility. Check ‘Print’ settings to make sure headers and footers are included in the printout.
What is a watermark in Excel?
In Excel, a watermark denotes a faint background image or text placed behind the main content of a worksheet. It is used to mark the document for purposes such as indicating confidentiality, draft status, or property rights. Despite Excel lacking a dedicated watermark feature, we create them using the Header & Footer tools or by formatting images and text to achieve a watermark effect.
John Michaloudis is a former accountant and finance analyst at General Electric, a Microsoft MVP since 2020, an Amazon #1 bestselling author of 4 Microsoft Excel books and teacher of Microsoft Excel & Office over at his flagship MyExcelOnline Academy Online Course.


