Exporting notebooks in Microsoft OneNote can be a game-changer, especially for students, professionals, and anyone looking to preserve, share, or backup their work. I’ve seen firsthand how exporting notebooks can facilitate collaboration, ease transitions between devices, and safeguard against data loss. Trust me, regularly exporting your notebooks can save a lot of headache in the long run.
Key Takeaways
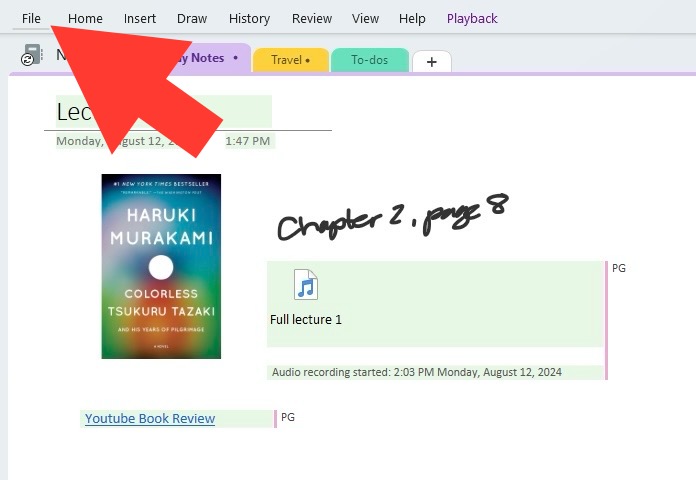
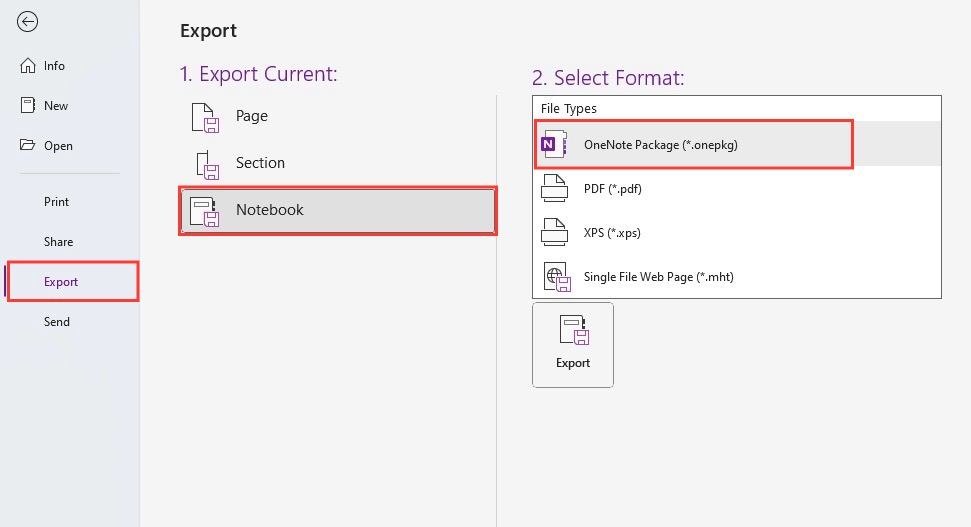
- To export OneNote notebooks, initially open each notebook in the OneNote desktop application, navigate to the “File” tab, select “Export,” choose to export the entire notebook, and select the OneNote Package (*.onepkg) format for future viewing or editing in OneNote.
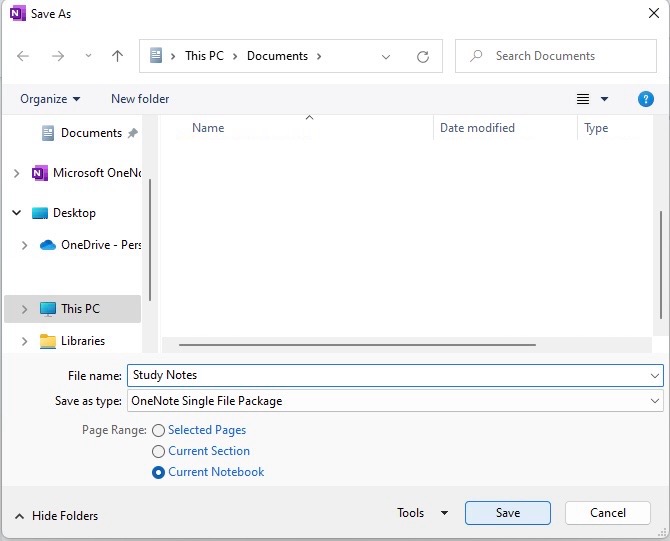
- After selecting the export format, click the “Export” button, designate a location to save the file on your computer and wait for the export process to complete, which may take longer for larger notebooks. Repeat these steps for every notebook you wish to save.
- Test the exported notebooks to ensure they are saved correctly by attempting to open them. Note that exporting full notebooks as opposed to PDFs of individual pages is limited to users on the Windows version of the OneNote desktop application, as Mac OS users can only export individual pages in PDF format.
Overview of Methods for Exporting in OneNote
OneNote provides us with multiple methods to export our content, each suited for different needs and scenarios. We can choose to export whole notebooks, individual sections, or single pages depending on our goal. The options range from using OneNote for Windows for a more comprehensive export to manual copy/paste for a simple transfer, or even exporting as a PDF for ease of sharing. An overview of these methods gives us a clear path depending on whether we’re aiming to move content outside of a specific Office 365 account or just share readable copies.
Exporting entire notebooks might be ideal for a full backup or migration, whereas exporting individual pages or sections can be perfect when you’re only looking to share specific content. Each method aligns with our end goals, ensuring we have the flexibility and control we need over our work.
Table of Contents
Step-by-Step Export Procedures
Exporting via OneNote on Windows
When I’m set to export entire notebooks or sections using OneNote on Windows, I follow a methodical process. Firstly, I ensure my notebook is fully synced with OneDrive before exporting to avoid any missing data. Here’s my step-by-step guide:
STEP 1: Open OneNote and access the notebook you wish to export.
STEP 2: Click on the ‘File’ menu, then hover over ‘Export’.
STEP 3: Choose the scope of your export – whether it’s a single page, section, or entire notebook.
STEP 4: Pick ‘OneNote Package’ (*.onepkg) if you aim to keep a dynamic, editable version of your notes.
STEP 5: Click ‘Export’, and select where you want to save the file on your local machine.
These steps result in a .onepkg file that I can open on any computer with OneNote, ensuring my notes are portable and preserved.
Preserving Your Privacy During Exports
Removing Sensitive Information Before Export
Before exporting notebooks, particularly when sharing them, I take careful steps to ensure sensitive information is not inadvertently included. Here’s how I manage this crucial step:
- I thoroughly review each section and page for sensitive content, such as personal identification numbers or confidential notes.
- For text, I can simply delete or edit out the information. For images that contain sensitive data, I either remove them entirely or use an image editor to redact the sensitive portions.
- I also consider the metadata that might be included with my notes, such as authorship data or creation dates, and clear these details if necessary.
- Sometimes, I find it necessary to create a copy of the notebook to manually remove sensitive content while retaining the original for my personal use.
Keeping a keen eye on this process protects my privacy, and that of others who may be mentioned in my notes. It’s always better to err on the side of caution and remove too much rather than too little.
This cautious approach keeps sensitive information secure, which is particularly important when sharing notebooks with peers, collaborators, or an online audience.
Password Protecting Your Notes and Notebooks
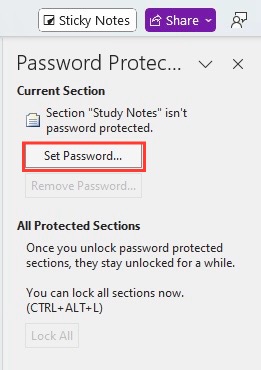
Password protection in OneNote is my go-to for safeguarding individual sections within my notebooks. While I can’t password protect an entire notebook, securing specific sections is straightforward and adds an additional layer of privacy.
To set it up:
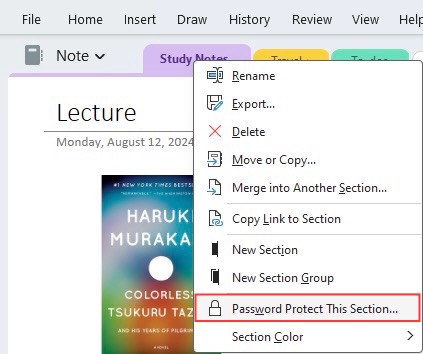
STEP 1: Right-click on the section tab I want to protect.
STEP 2: Select ‘Password Protect This Section’ from the context menu.
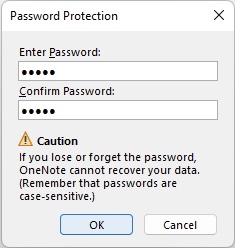
STEP 3: Click on ‘Set Password’, enter my desired password, and confirm it.
Once a section is locked, anyone trying to access it will need to input the correct password. But, do remember:
- Password protection is not available for OneNote for the web or OneNote for Windows 10 app.
- It’s vital not to forget the password, as Microsoft cannot retrieve it for me.
With these simple steps, I ensure that my sensitive notes are kept away from prying eyes, whether they are stored locally on my device or synced to the cloud.
Enhance Accessibility and Sharing
Sending a Copy of a Page to Collaborators
Sharing a page from my OneNote notebook with collaborators is especially seamless, thanks to OneNote’s built-in sharing features. This is how I usually do it:
STEP 1: Open the page I want to share within OneNote.
STEP 2: In the menu bar, I click on ‘File’ and then ‘Share’.
STEP 3: From the options, I choose ‘Send a Copy’ or ‘Email Page’, depending on the version of OneNote I am using.
STEP 4: Select the format – typically Word or PDF – if I want the recipient to view the content without the need to have OneNote.
STEP 5: Lastly, I enter the email addresses of my collaborators and hit ‘Send’.
And voilà, the page is on its way to my peers, allowing for collaborative review or input. This method ensures that even those without OneNote can access the shared content.
The simplicity of sharing a page keeps the workflow moving and encourages efficient communication among team members. It’s an invaluable feature I often use to keep everyone in the loop.
Troubleshooting Common Export Issues
Overcoming Export Limitations on Different Platforms
Dealing with the various platforms on which OneNote operates, I’ve encountered a few limitations when it comes to exporting notebooks. For instance, OneNote for Windows 10 doesn’t offer as many export options as the 2016/2021 versions. Similarly, exporting on MacOS can be different, and the web version of OneNote provides even fewer choices.
To circumvent these limitations, I’ve developed a couple of strategies:
- For OneNote for Windows 10: I use the ‘Print’ function to ‘print’ to PDF which allows me to save pages, sections, or entire notebooks in a universally readable format.
- On MacOS: I take advantage of OneNote’s ability to export individual pages as PDF files, which I can then collate into one document if needed.
- For OneNote Online: Since there’s no direct export feature, I make sure to sync the notebook with the desktop app and export from there.
These workarounds ensure that, no matter the platform restrictions, I can export the content from my OneNote notebooks in a format that suits my needs.
What to Do When Exports Fail
When exports fail, which can happen for a variety of reasons such as network issues, file size limitations, or platform restrictions, I don’t panic. Instead, I troubleshoot methodically. Here are the steps I take:
- Check Internet Connection: A stable connection is crucial for syncing and exporting large notebooks.
- Reduce Notebook Size: Occasionally, I may need to divide larger notebooks into smaller sections to prevent timeout errors during the export process.
- Update OneNote and Operating System: Ensuring both are up-to-date often resolves compatibility issues that can cause export failures.
- Use Save-As: If all else fails, saving individual pages as PDFs is a reliable alternative.
- Contact Support: As a last resort, if persistent issues arise, reaching out to Microsoft Support can lead to problem-specific solutions.
By targeting common problems that arise during the export process, I’m able to minimize disruption and ensure that I can access and share my work as needed.
FAQ: Simplifying Your OneNote Experience
How can I export my OneNote notebooks with private information securely?
To securely export your OneNote notebooks with private information, first remove any sensitive content manually. Then, consider password-protecting sections that contain sensitive data before exporting. Finally, export the notebook as a OneNote package and store it securely, using encrypted drives or secure cloud storage services. Remember, the safety of your data also depends on the security of your storage location.
Are there any limitations to exporting notebooks from OneNote?
Yes, exporting notebooks from OneNote comes with limitations. Depending on the OneNote version, you might encounter restrictions such as not being able to export entire notebooks or lack of support for institutional accounts. Additionally, format compatibility when moving between different platforms can pose challenges. Always check your specific OneNote version for its capabilities.
Can you export an entire OneNote?
Absolutely, you can export an entire OneNote notebook, particularly when using OneNote 2016/2021 on Windows. Choose ‘Notebook’ under the ‘Export’ option and select a format, typically a OneNote package (.onepkg) to maintain its structure. Remember, this will create a ZIP file containing all the notebook content. For other versions, the process may vary or require different steps.
John Michaloudis is a former accountant and finance analyst at General Electric, a Microsoft MVP since 2020, an Amazon #1 bestselling author of 4 Microsoft Excel books and teacher of Microsoft Excel & Office over at his flagship MyExcelOnline Academy Online Course.

