Many times, you might have faced a situation where need to do a bunch of tasks repeatedly while working on an Excel worksheet. You may need to insert a blank row or column, add a black border, red fill to a cell, etc. to multiple cells, and repeating the same task again and again can be quite time-consuming.
Key Takeaways:
- The F4 key in Excel quickly repeats the last action, saving time on repetitive tasks.
- Using F4 for formatting or data entry can significantly streamline workflows.
- F4’s repeat function applies instantly to actions like bolding text, inserting rows, or applying borders.
- While F4 can’t handle multi-step tasks, breaking actions down into single steps can maximize its usefulness.
- On Mac, Command + Y often serves as a functional alternative to F4’s repeat action.
Table of Contents
Using Keyboard Shortcuts (F4)
If you want to repeat action in Excel, like inserting a column/row, formatting cells, copy & pasting, etc, then you can use the keyboard shortcut F4 which will repeat your last action (in most cases).
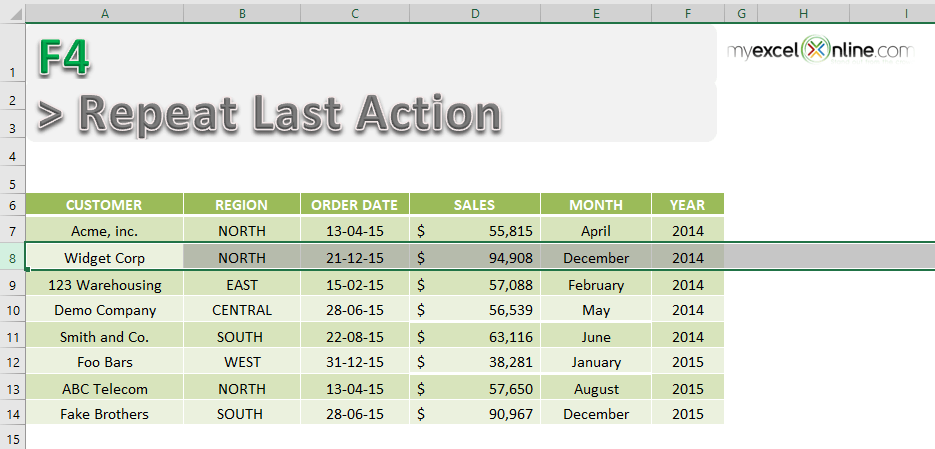
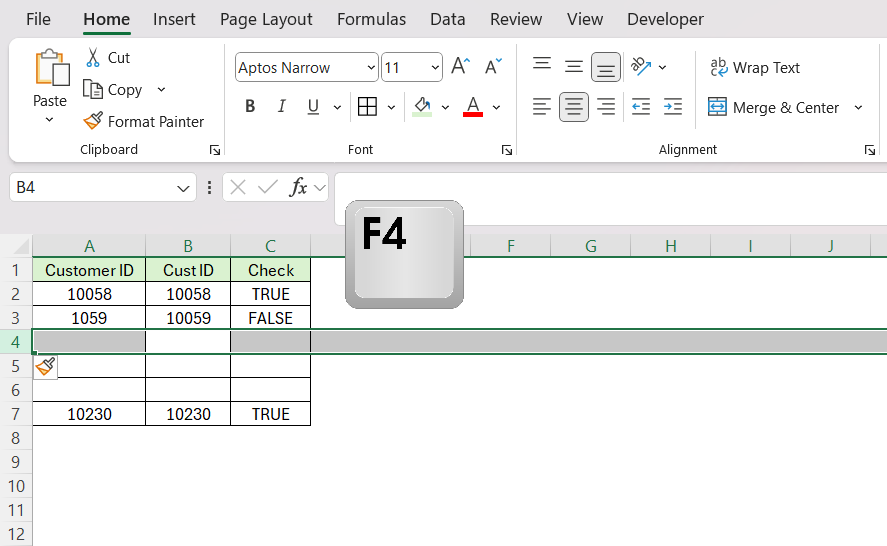
If you want to insert blank rows multiple times using f4 keyboard shortcut, follow the steps below:
STEP 1: Select the row above which you want to insert a blank row.
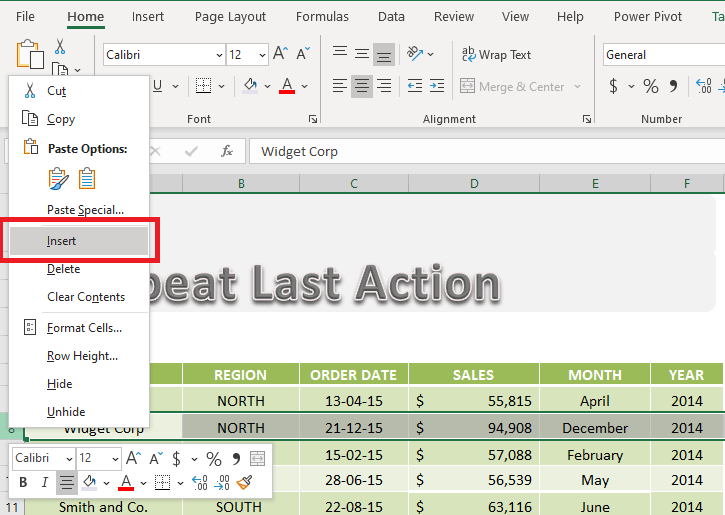
STEP 2: Right-Click and select Insert.
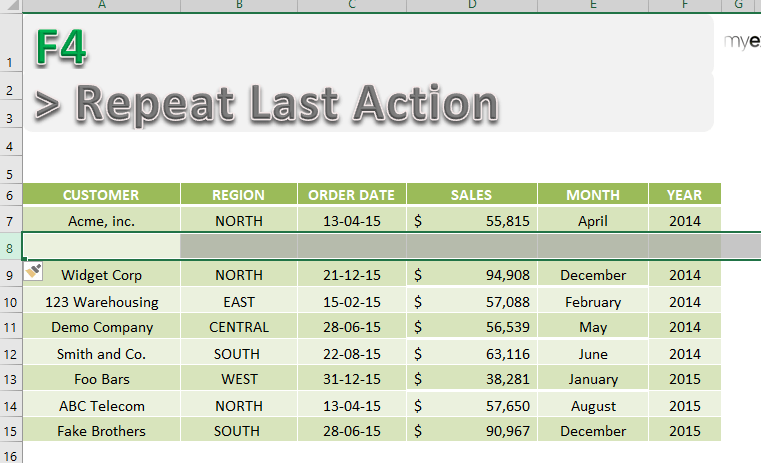
A new row is added!
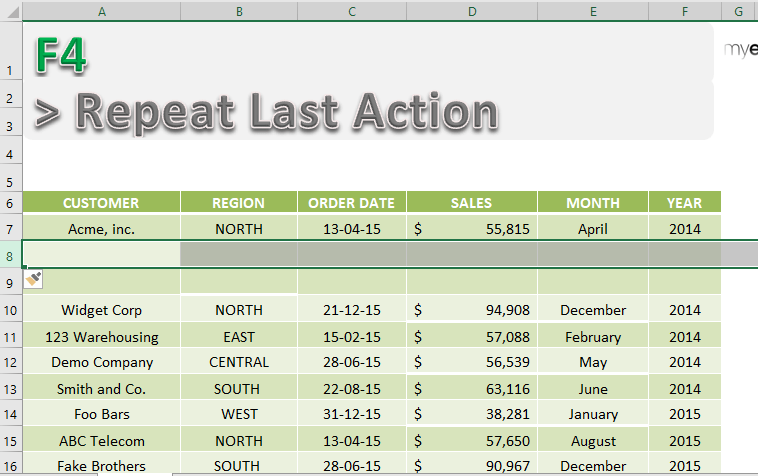
STEP 3: To repeat this action, simply press F4.
This is how you can repeat last action Excel.
Using Keyboard Shortcut (Ctrl + Y)
Previously, you have used the shortcut F4 to redo a task in Excel. In the same manner, you can use the keyboard shortcut Ctrl + Y to get the task to repeat again!!
Instead of using a keyboard shortcut, you can even add the Repeat Command in your QAT!
Let’s try the repeat command to redo the last action in Excel!
Using Repeat Command
Another easy way is to add the Repeat command on the Quick Access Toolbar and simply click on it to repeat the last action multiple times.
To add Repeat Command in QAT, do as follows:
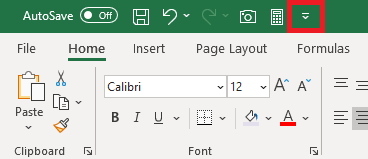
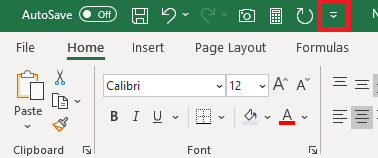
STEP 1: Select the small arrow on the top of the ribbon to access the Quick Access Toolbar.
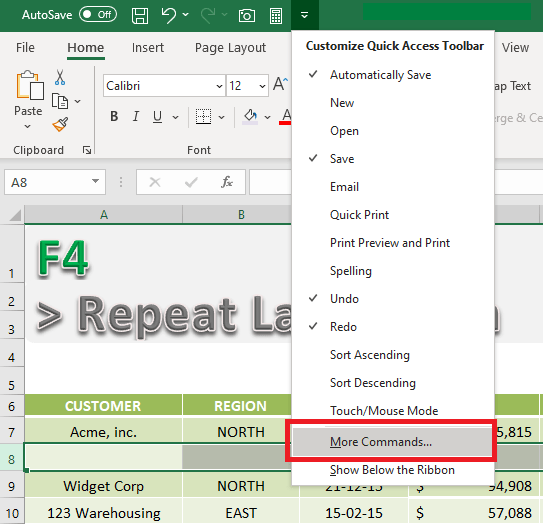
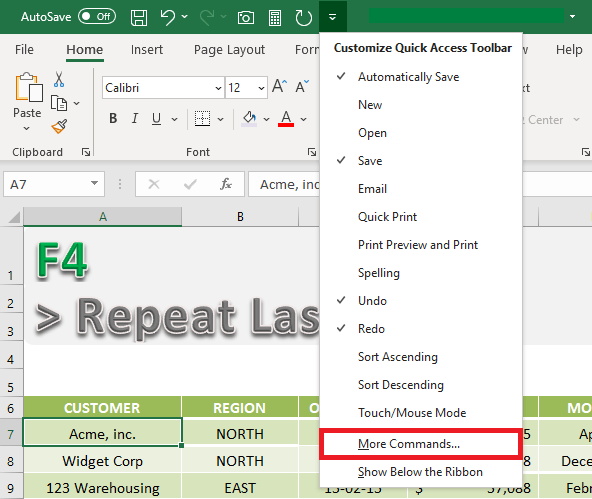
STEP 2: Select More Commands from the list.
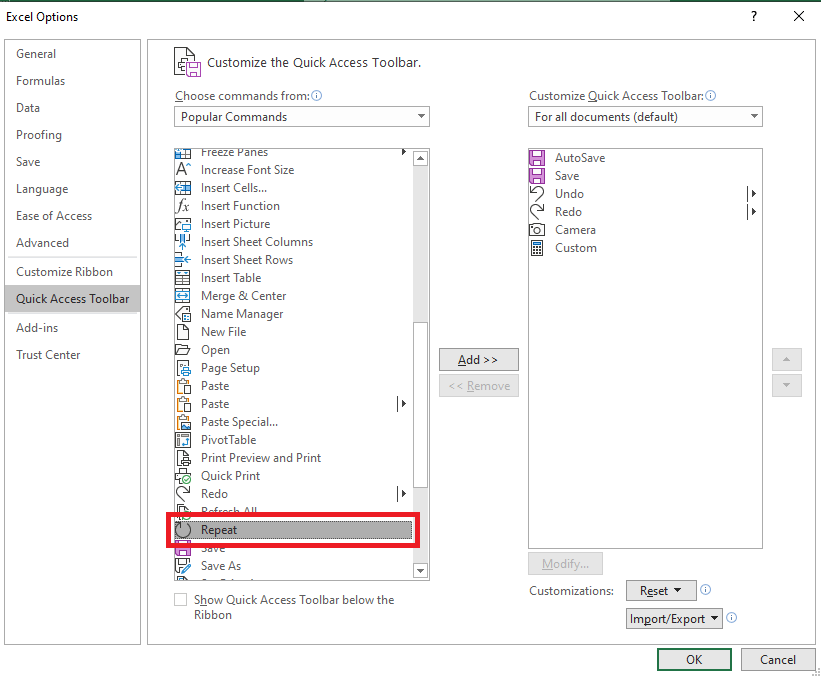
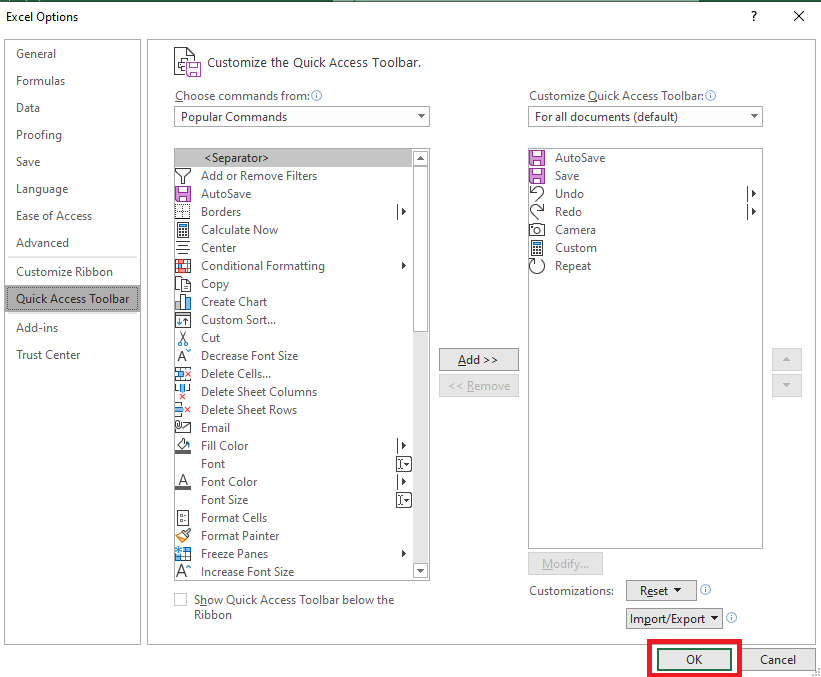
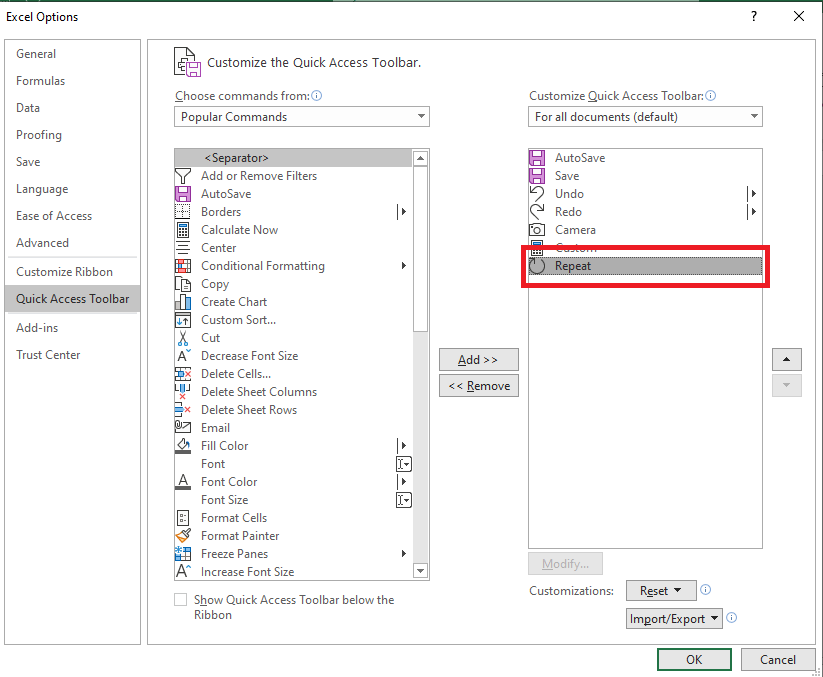
STEP 3: In the Excel Options dialog box, from the list of commands under Popular Commands select Repeat.
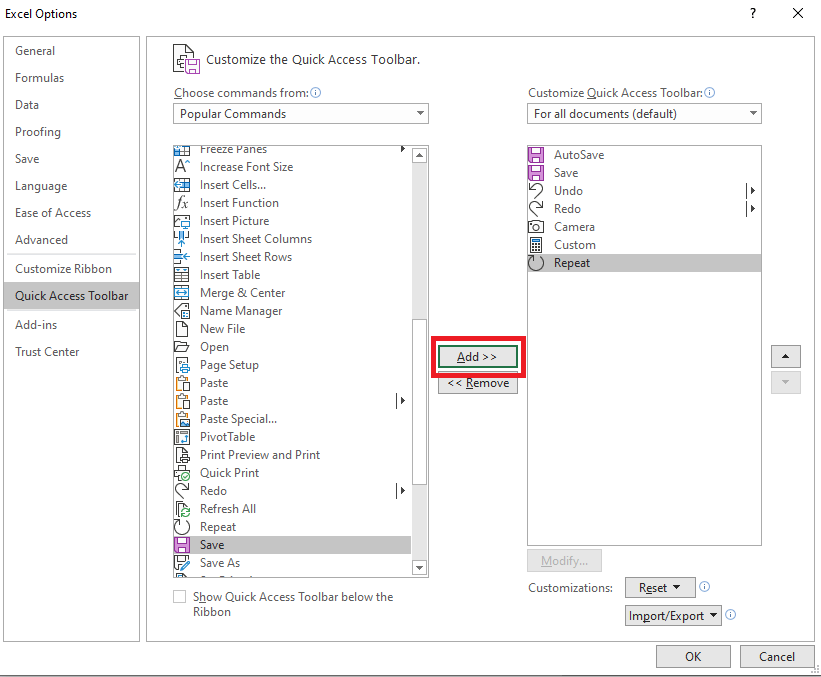
STEP 4: Click on Add and then you will see Repeat added to the right.
STEP 5: Click OK.
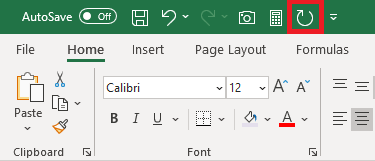
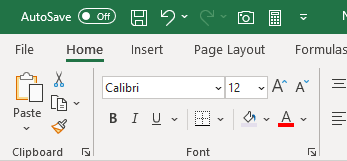
Repeat Command is now added to your QAT. You can now easily Redo the last action by simply clicking on it.
You can remove this command from the QAT. To do that:
STEP 1: Select the small arrow on the top of the ribbon to access the Quick Access Toolbar.
STEP 2: Select More Commands from the list.
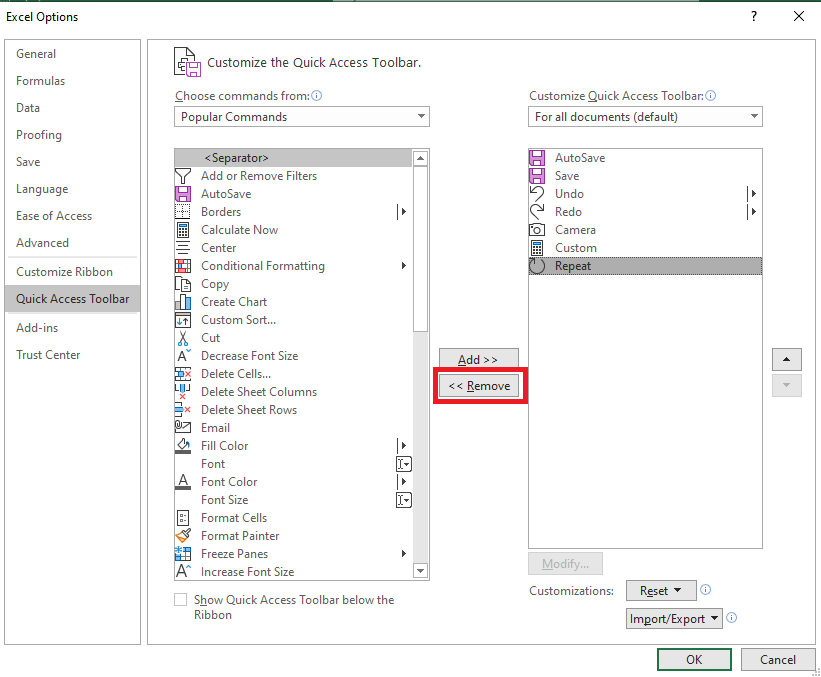
STEP 3: Under Customize Quick Access Toolbar, select Repeat.
STEP 4: Click Remove and then click OK.
Repeat Command is now no longer part of the Quick Analysis Toolbar!
Step-by-Step Guide to Using F4
Repeating Your Last Action with Ease
Suppose you’re working on a report, and you want to bold several headers. Here’s what I used to do: select a cell, click the Bold button, then move to the next cell and repeat the process. It took forever!
Now, with F4, it’s a breeze. Here’s how:
STEP 1: Select your first header cell.
STEP 2: Click the Bold button (or use Ctrl+B as a shortcut).
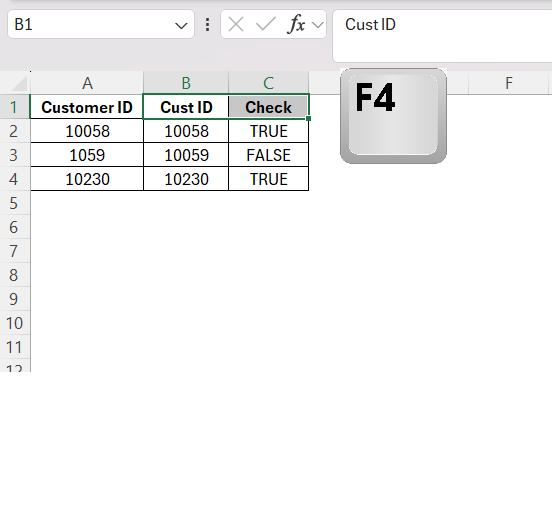
STEP 3: Move to the other header and hit F4.
Boom! The bold formatting is applied instantly. Keep pressing F4 as you move through the cells, and you’re done in seconds. This repetitive task automation is what makes F4 a significant time-saver in my toolkit. It’s a shortcut that works across the board, whether I’m working on a simple task or managing large-scale data sets.
Practical Examples of F4 in Action
I’ve often found myself in scenarios where practical applications of the F4 key have saved me a tremendous amount of time. For example, if I formatted a cell with bold text and a border, and then needed to apply the same formatting to numerous other cells, I would simply select the next cell and tap F4, watching the formatting clone itself with each press.
Another instance is when adding rows consistently throughout a dataset. After inserting one row, pressing F4 while selecting adjacent cells inserts additional rows with the same context.
Beyond the Basics: Advanced Tips
Limitations and Flexibility of the F4 Shortcut
Though the F4 shortcut is undeniably helpful, it does have its boundaries. Primarily, it is constrained to repeating the last action only and doesn’t store a history of past actions, which means I must use it immediately after the action I wish to repeat. Additionally, it cannot replicate actions that involve multiple steps or selections. For instance, I couldn’t use F4 to repeat a series of steps taken to create a pivot table.
However, its flexibility should not be understated. In instances where it might not seem immediately applicable, I’ve found creative workarounds. By breaking down complex tasks into simpler repeatable actions, I can frequently still benefit from the F4 shortcut’s convenience. It’s a testament to the versatile nature of Excel and the tools it offers to adept users.
Creative Uses of F4 for Efficient Data Management
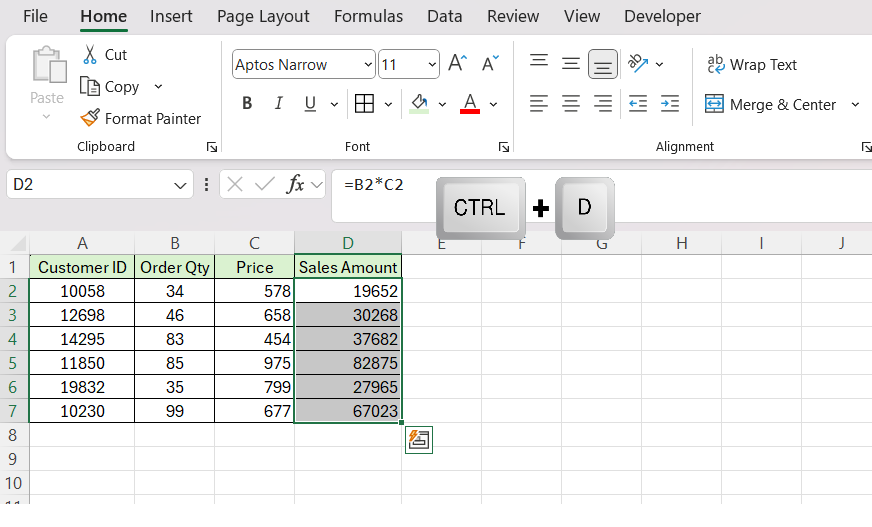
Beyond the obvious repetition of actions, I’ve utilized the F4 key in more creative endeavors for effective data management. By combining it with other shortcuts, such as Ctrl+D for filling down the contents of the top cell in a column, I expand its utility.
Moreover, the F4 key is not limited to formatting and simple cell manipulation; I’ve used it to replicate complex functions like setting print areas or data validation rules across multiple sheets. By understanding and harnessing the full range of its capabilities, I’ve turned mundane tasks into efficient processes that maximize both time and effort.
Real-world Scenarios for F4 Efficiency
Time-saving Tricks in Everyday Tasks
In everyday tasks, the time saved using F4 can be monumental. Tasks such as uniformly formatting reports or swiftly adjusting numerous data entries become almost instantaneous. After I format a title cell with bold text and centered alignment, pressing F4 allows me to apply the same style to other titles in a fraction of the time it would take manually.
It’s not just about the single actions either – during extensive data cleansing, where I delete specific rows or columns repeatedly, F4 becomes a non-negotiable ally. This routine leverage of F4 often translates into hours saved over the course of a project.
The Role of F4 in Complex Projects
Within the sphere of complex projects, I value the F4 key as an integral component of my workflow efficiency. When dealing with large datasets that necessitate intricate formulas and consistent formatting, the F4 shortcut minimizes the effort required to ensure consistency. As I build financial models, for example, I might set up a complicated cell reference that needs to be applied across hundreds of cells. Through a simple press of F4, I can replicate this action instantly, ensuring uniformity and accuracy. In data analysis endeavors imbued with recurrent tasks, the F4 key not only expedites the process but also assists in maintaining a focused and error-free working environment.
Troubleshooting Common Issues
Overcoming Obstacles with the F4 Shortcut
Navigating obstacles with the F4 shortcut in Excel involves a blend of foresight and quick adaptation. Sometimes, I face situations where F4 doesn’t perform as expected, usually when the last action encompasses elements that cannot be repeated directly. This could be actions like sorting, which are inherently not repeatable. To overcome such hurdles, I often dissect multi-step processes into elemental parts that can be replicated with F4, or I sequentially execute smaller tasks, utilizing F4 with each step to ensure efficiency isn’t compromised.
To guarantee success, I stay aware of the sequence of actions, so F4 always targets the correct one. If faced with limitations, I explore alternative methods or shortcuts, ensuring that F4 remains a strong ally rather than a source of frustration.
Ensuring Success with the Repeat Function
To ensure success with Excel’s repeat function, a clear understanding of its scope and constraints is fundamental. I make a habit of keeping my actions simple and one-step when planning to use F4. Upon completion of an action, like formatting a cell, I immediately hit F4 to carry on that action through the desired cells without interruption. This is because if I execute a different action in between, I would inadvertently change the last action that F4 is programmed to repeat.
Tactful planning and sequential execution are key. It’s a matter of crafting a smooth workflow where the F4 shortcut can be most effective. So, I’m always cautious about my sequence of actions, and I refrain from interspersing different tasks when I plan on using the repeat function extensively.
Frequently Asked Questions
What Exactly Does the F4 Key Do in Excel?
In Excel, the F4 key is renowned for its repeat functionality. It swiftly repeats the last action I’ve taken, whether it’s an alteration in cell formatting, an entry of data, or the application of a formula. This key saves me from the tedium of repeatedly navigating the same set of commands for every individual cell, row, or column, streamlining my workflow in a significant way.
How to repeat the last command in Excel?
To repeat the last command in Excel, I simply press the F4 key after completing an action. Whether I’ve adjusted a cell’s format, added a new data series, or performed any number of individual tasks, hitting F4 immediately reenacts that exact command on the currently selected cell or range.
How Can I Customize Excel to Better Utilize the F4 Shortcut?
Customizing Excel to better utilize the F4 shortcut typically revolves around incorporating it into my routine tasks. However, I also can access Excel’s options and customize the Quick Access Toolbar or Ribbon to rearrange commands for more efficient F4 use. Additionally, creating macros for complex, multi-step operations and binding them to shortcut keys that include F4 can extend the key’s functionality beyond its native repeat action.
Is There an Alternative to F4 on Mac Systems?
On Mac systems, where the F4 key might operate differently due to hardware configurations, I find that using the Command key in conjunction with Y (⌘ + Y) often emulates the repeat action similar to F4 on Windows. It’s a reliable alternative that maintains workflow efficiency when I’m working with Excel on a Mac.
Why won’t F4 repeat work in Excel?
If the F4 repeat function isn’t working in Excel, it’s generally due to one of a few reasons. Sometimes, the command I’m trying to repeat involves multiple steps, which F4 can’t replicate. In other scenarios, I may have inadvertently performed a different action that became the ‘last action,’ thereby changing the F4 command target. Additionally, specific Excel settings or system configurations can override the default function of the F4 key.
John Michaloudis is a former accountant and finance analyst at General Electric, a Microsoft MVP since 2020, an Amazon #1 bestselling author of 4 Microsoft Excel books and teacher of Microsoft Excel & Office over at his flagship MyExcelOnline Academy Online Course.

