Filling in blank cells in Excel is a common task, whether you’re dealing with incomplete datasets or cleaning up data for analysis. Excel provides several methods to fill in the blanks, each suitable for different situations. In this guide, we’ll explore various techniques to efficiently fill in blanks in Excel, making your data more consistent and easier to work with.
Key Takeaways:
- Impact of Blank Cells: Blank cells can affect data analysis, and filling them appropriately enhances clarity and communication.
- Filling Techniques: Excel offers various methods to fill in the blanks, including copying the value above, inserting specific values, and using formulas.
- Efficiency with Shortcuts: Mastering keyboard shortcuts and Autofill in Excel saves time and increases productivity in data management tasks.
- Troubleshooting: Verification and validation are essential to ensure that filled cells are accurate and relevant, preventing errors in data analysis.
- Data Management Best Practices: Maintaining clean and consistent datasets is crucial for accurate reporting and efficient data entry processes.
Table of Contents
Introduction to Excel Proficiency
Understanding the Impact of Blank Cells
When working with Excel, understanding the impact of blank cells on data analysis is key. Zero-filled cells add clarity by distinguishing between intended zeroes and truly empty cells. This clarity is vital when collaborating, as it minimizes confusion and enhances communication. We’ll explore the nuances of blanks in Excel.
The Essentials of Mastering Excel
Mastering Excel isn’t just about understanding its features—it’s about knowing how to apply them to real-world scenarios to enhance productivity and decision-making. Essential skills include data organization, formula creation, pivot table generation, and visual representation of data.
I’ve realized that proficiency also involves developing an intuitive sense of where and how different Excel functions can streamline workflows and yield deeper insights.
How to Fill in the Blanks in Excel
Method 1 – Filling Blanks with the Value Above
One of the most common needs is to fill blank cells with the value directly above them. This is especially useful in datasets where categories or labels are only mentioned once, with blank cells underneath.
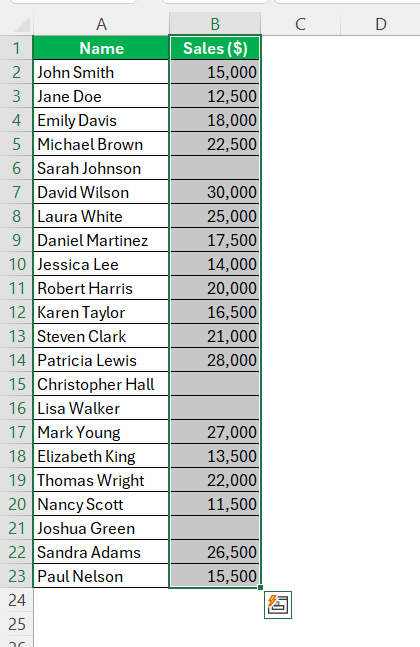
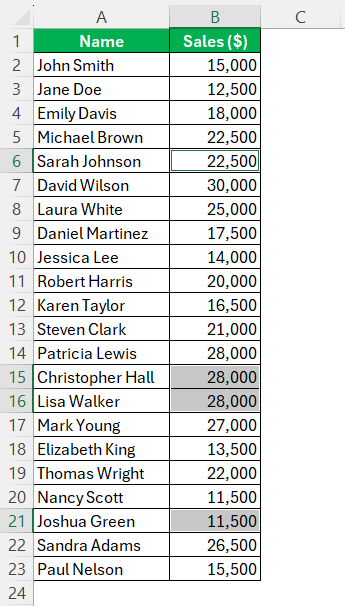
STEP 1: Select the Range: Highlight the range of cells where you want to fill in the blanks.
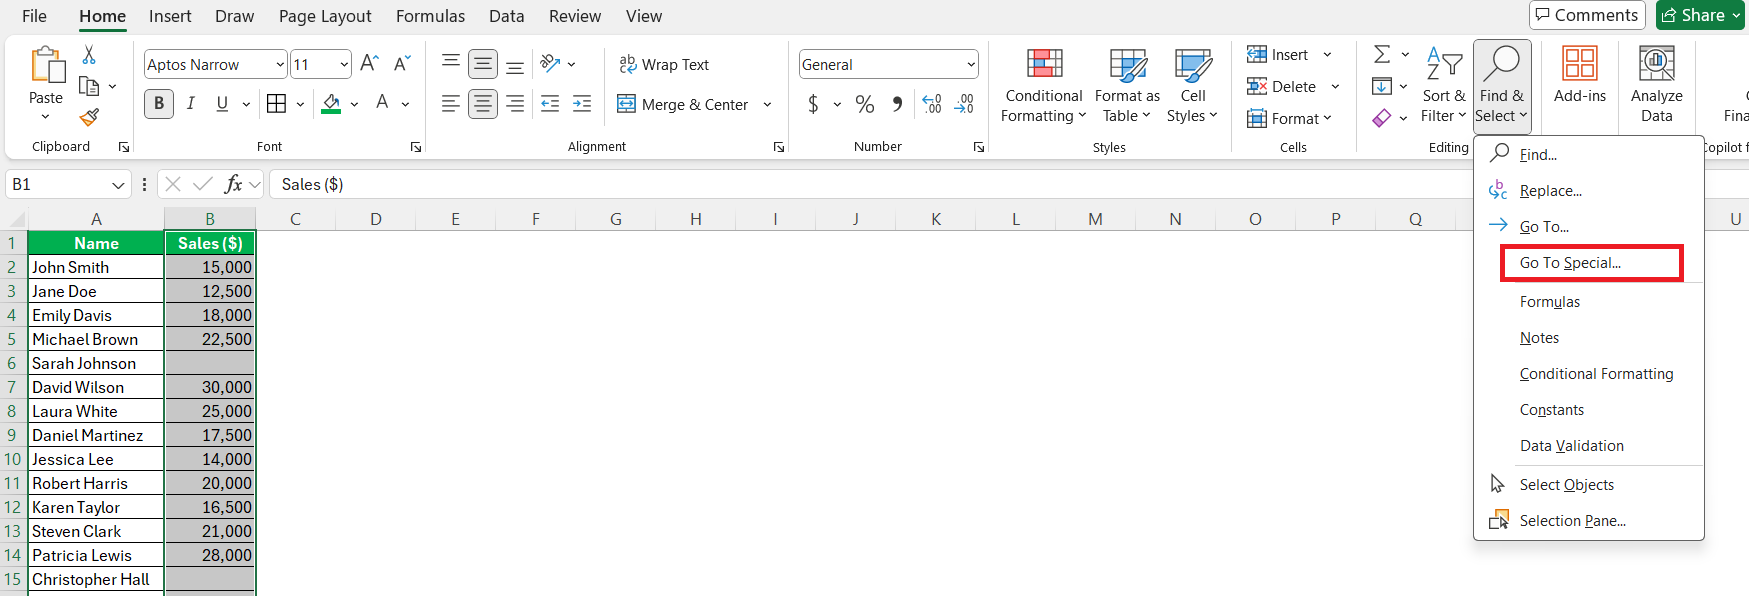
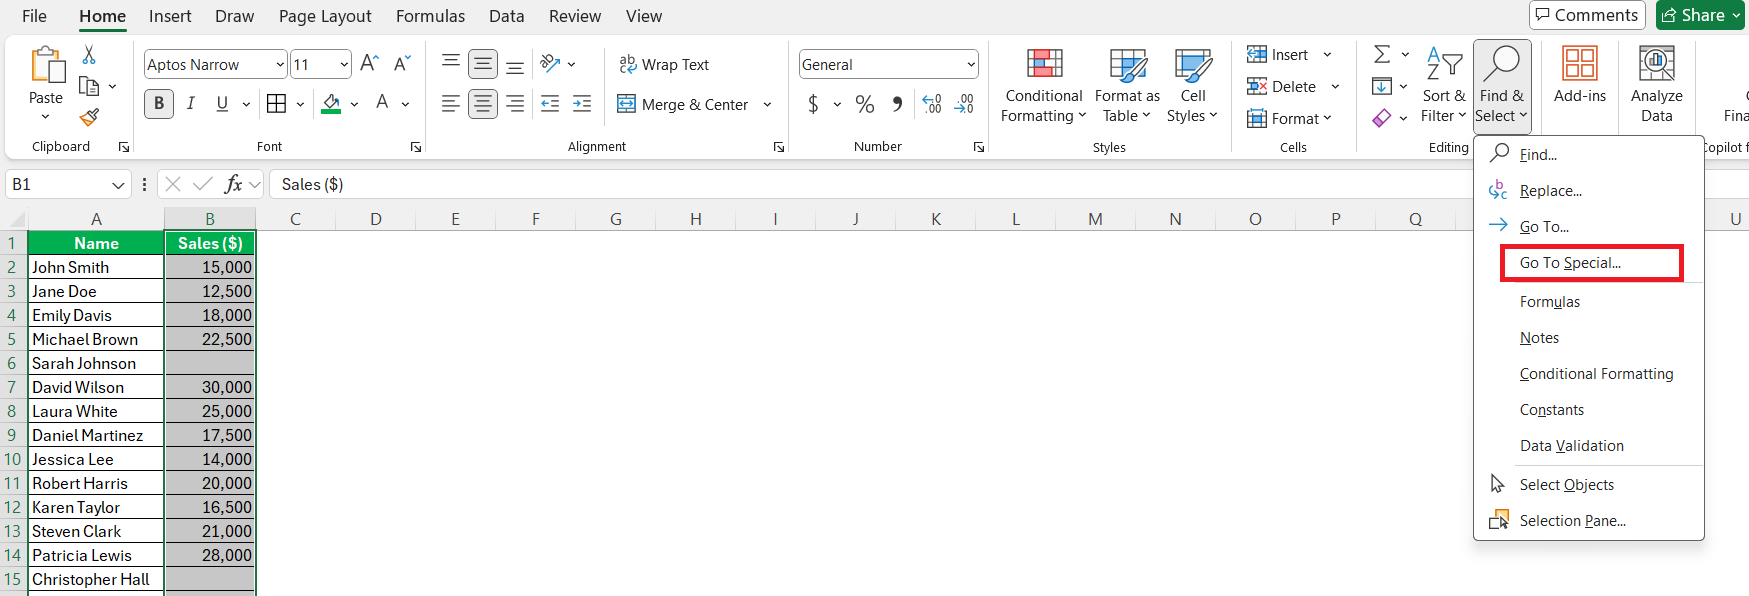
STEP 2: Go to ‘Find & Select’: In the Ribbon, go to the “Home” tab, then click “Find & Select” and choose “Go To Special…”.
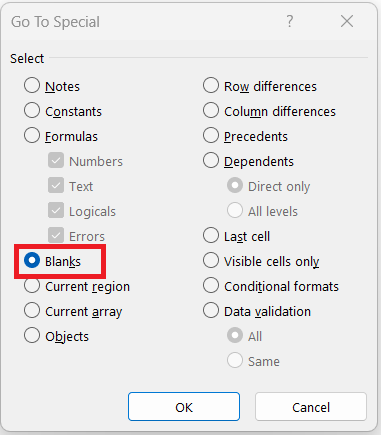
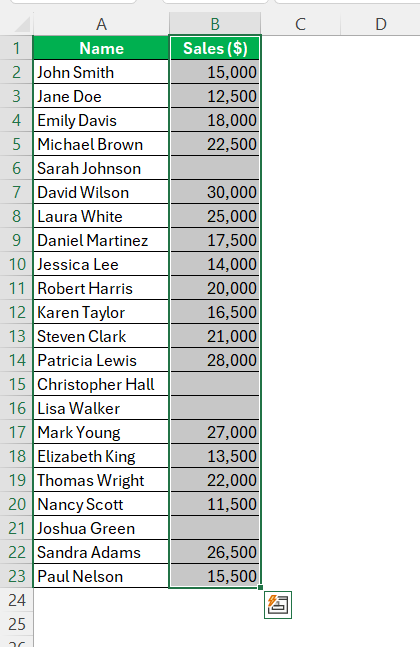
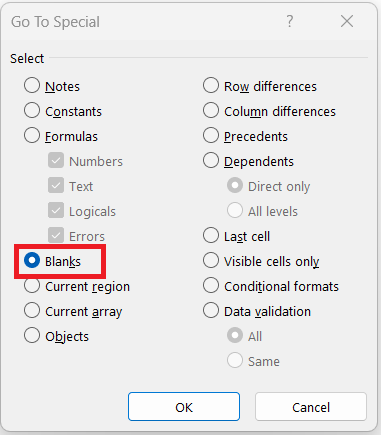
STEP 3: Select Blanks: In the “Go To Special” dialog box, select “Blanks” and click “OK”. This will select all the blank cells in the chosen range.
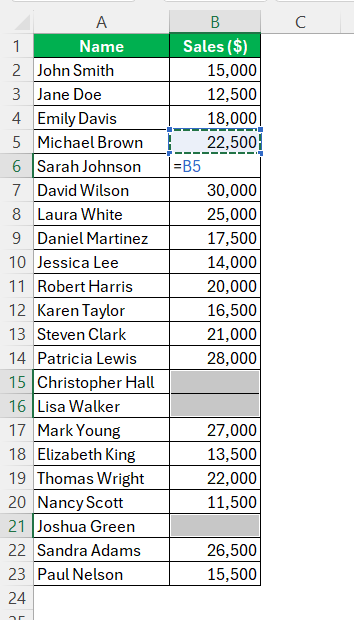
STEP 4: Enter the Formula: Without clicking anywhere else, type = and then press the up arrow key. This will create a reference to the cell directly above the current blank cell.
STEP 5: Fill the Formula: Press Ctrl + Enter to fill all the selected blank cells with the value above.
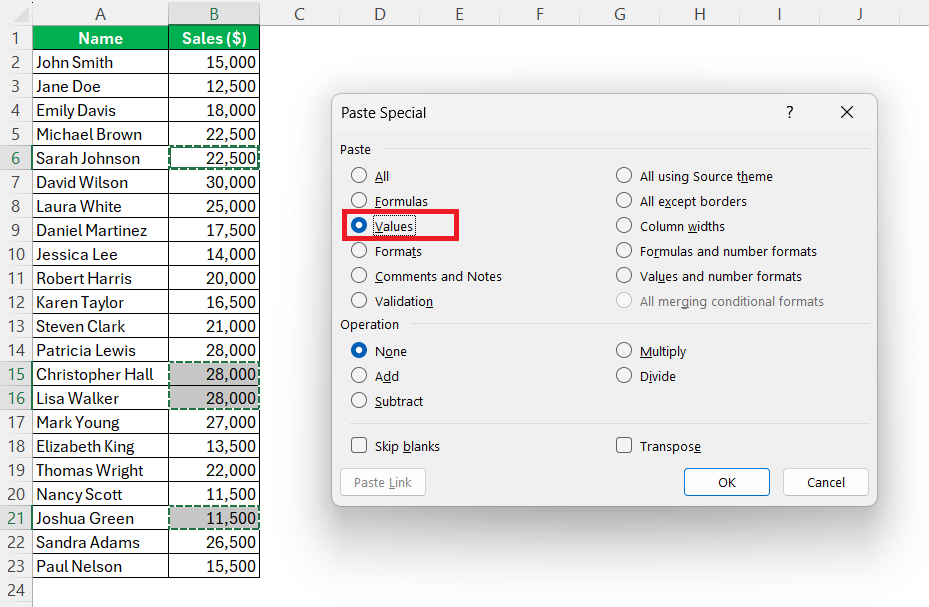
STEP 6: Convert to Values (Optional): If you want to replace the formulas with the actual values, select the range again, copy it (Ctrl + C), and paste it as values (Ctrl + Alt + V, then choose “Values” and press “OK”).
Method 2 – Filling Blanks with a Specific Value
Sometimes, you may want to fill all blanks with a specific value, such as “N/A”, “0”, or any other placeholder.
STEP 1: Select the Range: Highlight the range of cells where you want to fill in the blanks.
STEP 2: Go to ‘Find & Select’: Click on “Find & Select” in the “Home” tab, then choose “Go To Special…”.
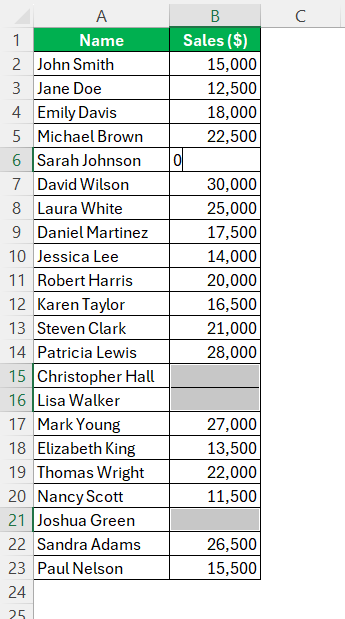
STEP 3: Select Blanks: In the “Go To Special” dialog box, select “Blanks” and click “OK”. All blank cells in the range will be selected.
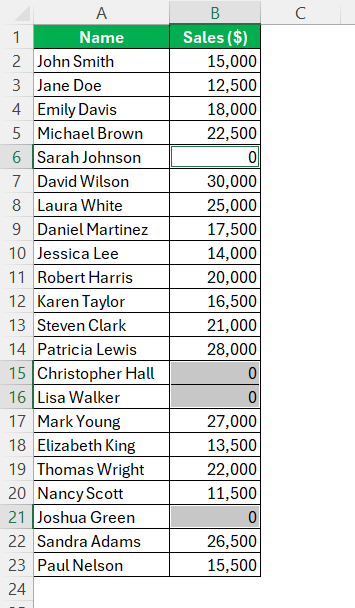
STEP 4: Enter the Value: Without clicking anywhere else, type the value you want to fill the blanks with (e.g., “N/A” or “0”).
STEP 5: Fill the Cells: Press Ctrl + Enter to fill all the selected blank cells with the specified value.
Method 3 – Filling Blanks Using Excel Formulas
Excel formulas can also be used to fill in blanks based on other data or specific conditions. Two commonly used formulas is IF.
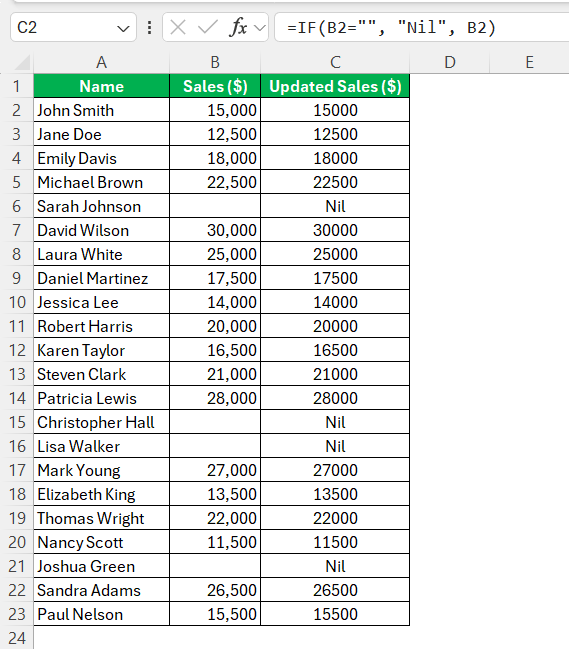
You can use the IF formula to fill in blanks conditionally. For example, you can check if a cell is blank and then fill it with a specific value or a value from another cell.
=IF(B2=””, “Nil”, B2)
In this example, if cell B2 is blank, it will be filled with “Nill”. If not, it retains its original value.
Method 4 – Filling Blanks with VBA (Advanced)
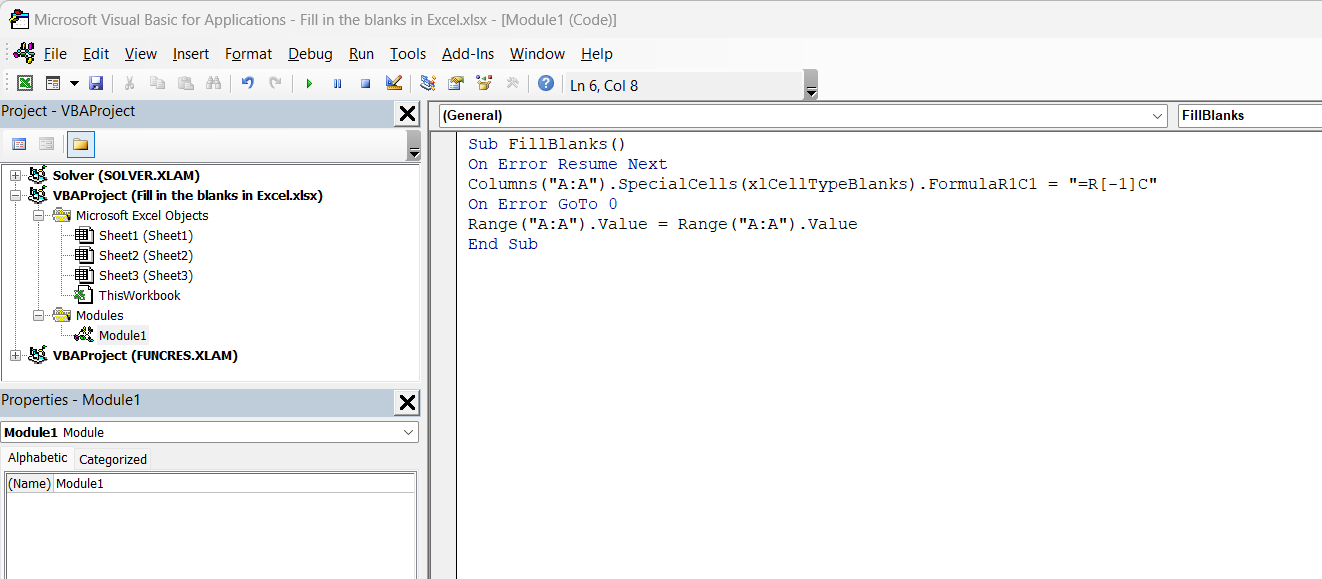
For repetitive tasks or more complex requirements, you can use VBA (Visual Basic for Applications) to automate the process of filling in blanks.
Sub FillBlanks()
On Error Resume Next
Columns("A:A").SpecialCells(xlCellTypeBlanks).FormulaR1C1 = "=R[-1]C"
On Error GoTo 0
Range("A:A").Value = Range("A:A").Value
End Sub
This script fills in the blanks in column A with the value above and then converts the formulas to values.
Saving Time with Keyboard Shortcuts and Autofill
Learn Quick Keys for Everyday Use
Incorporating quick keys into daily Excel use shaves seconds per task, which accumulates to hours saved over time. Memorizing shortcuts like Ctrl+C (copy), Ctrl+V (paste), and Ctrl+Z (undo) is a must for frequent users. Additionally, Ctrl+Shift+L quickly toggles filters on and off, while Alt+E, S, V enables special paste options with a few keystrokes.
Master the Art of Autofill in Excel
Autofill in Excel isn’t just a tool—it’s an art. By grasping the patterns in your data, Autofill can project your intentions and replicate data accurately. When I drag the handle across cells, Excel looks for numeric patterns, dates, or even custom lists I’ve established, and fills accordingly. This functional finesse can transform hours of data entry into a mere drag-and-drop exercise. It’s crucial, however, to review the filled data as Autofill works off a pattern which can sometimes vary from my intentions.
Troubleshooting Common Issues
Ensuring Accuracy When Filling Blanks
To ensure accuracy when filling in blanks, I always recommend a two-pronged approach: verification and validation. Verification involves double-checking that the methods used—be it a formula, Autofill, or a macro—have correctly identified and filled the blank cells as intended.
Validation comes with reviewing the logic of the filled data; it requires checking not only for the presence of data but also for its relevance and correctness within the context of the dataset. Regular checks and adopting a vigilant eye toward outliers or anomalies can guard against inaccuracies.
Overcoming Challenges with Excel Formulas
Overcoming challenges with Excel formulas starts with understanding the error messages and knowing the common pitfalls. For instance, circular references or unmet criteria in functions can wreak havoc. To troubleshoot, I start by evaluating the formula logic step by step, and then I utilize the Excel Formula Auditing tools to trace precedents and dependents.
Familiarizing oneself with Excel’s error-checking features and being meticulous about range selections helps avoid many of these issues altogether.
Integrating Fill Blanks Techniques into Data Management
Streamlining Data Entry and Analysis
Streamlining data entry and analysis in Excel can transform a tedious chore into a swift, smooth process. By designing templates with pre-set formulas and data validation rules, I make sure that consistency is maintained across datasets.
I often use tables with structured references, which adjust automatically as data is added or removed. The combination of data validation and conditional formatting proactively prevents errors during data entry, while pivot tables and charts assist in real-time analysis without extensive manual setup.
Best Practices for Maintaining Clean Data Sets
Maintaining clean data sets is fundamental for accurate analysis and reporting. The best practices include creating a backup before making changes, cleaning and validating data to prevent errors, and using appropriate techniques for consistent data entry.
I advocate for regular audits of data to catch and rectify inconsistencies early. Also, documenting the processes and methodologies used is crucial not just for reproducibility but also for onboarding new team members seamlessly.
FAQ Section
Why is it important to fill in the blank cells in Excel?
Filling blank cells in Excel ensures data integrity, facilitates accurate calculations, and enables the proper functioning of formulas and sorting features. It prevents misunderstandings and misinterpretations that arise from missing information, especially when analyzing large datasets.
Can I automatically fill in the blank cells with a specific value or formula?
Yes, Excel allows you to automatically fill blank cells with a specific value or formula using functions like ‘Go to Special’ followed by a formula input, or by creating macros for more complex tasks. Add-ins like Ablebits can further streamline the process.
What are the risks of leaving blank cells in an Excel worksheet?
Leaving blank cells in an Excel worksheet can lead to inaccurate calculations, misinterpretations of data, and potential errors in functions that require a complete dataset. It may also disrupt sorting and filtering operations.
How can I prevent errors when using the fill function in Excel?
To prevent errors when using the fill function in Excel, always check your formulas before filling, replace blanks with zeros if necessary for accurate calculations, and use Excel’s data validation features to ensure the correct input. Regularly review your data for accuracy post-fill.
How do you get Excel to fill in the blanks?
To get Excel to fill in the blanks, use the ‘Go To Special’ feature (Ctrl + G), choose ‘Blanks’, enter the value or formula in the first blank cell, and press Ctrl + Enter to apply it to all selected blanks. Use Autofill for patterns.
John Michaloudis is a former accountant and finance analyst at General Electric, a Microsoft MVP since 2020, an Amazon #1 bestselling author of 4 Microsoft Excel books and teacher of Microsoft Excel & Office over at his flagship MyExcelOnline Academy Online Course.

