Learn about Excel with our Free Microsoft Excel Online Course!
Key Takeaways
- Utilize the ‘Find and Replace’ tool in Microsoft Word through the Editing group on the Home tab or by pressing Ctrl + H (Windows) or Command + H (Mac) to swiftly locate and alter specific text or phrases in your document.
- Enable advanced search features, including the use of wildcards for pattern search, match case for exact replacements, and formatting options to replace text with specified attributes like font style and size, enhancing precision and efficiency.
- After performing replacements, always review the document to ensure all changes were made accurately, and no unintended modifications occurred, thus maintaining the integrity of the text.
Streamlining Your Editing Workflow with Key Features
Streamlining your editing process is a breeze when you harness some key features of Word‘s Find and Replace tool. Have you ever needed to update a certain date or name throughout an entire document? Find and Replace makes this simple. You can also leverage its power to switch out fonts and styles—imagine updating headings from bold to italic in a flash. Plus, it’s not just about words; you can search for punctuation marks, spaces, and even specific formatting styles. With these features at your fingertips, you can transform your workflow, elevating productivity to impressive new heights.
Table of Contents
Getting Started with Find and Replace
How to Access Find and Replace in Word
Ready to take the plunge into efficiency? Accessing Find and Replace in Word on your Windows device is straightforward:
STEP 1: First, open the document you want to work on.
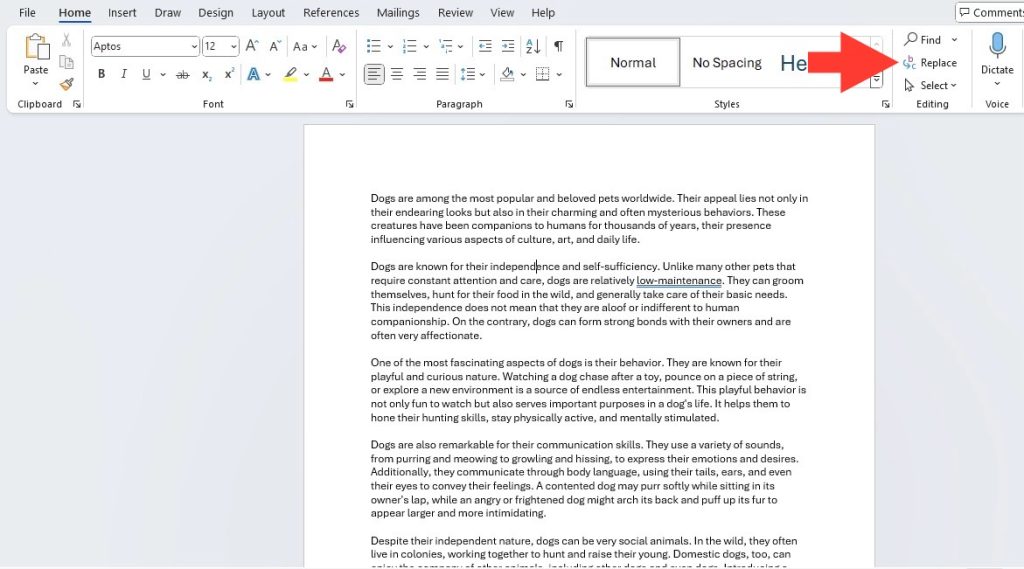
STEP 2: Then, you can either press the keyboard shortcut Ctrl+H or, if you prefer using the menu, go to the Home tab and click on the ‘Replace’ option in the Editing group.
This is your stepping stone into a world where editing long documents doesn’t have to be grueling. With Find and Replace, those edits you’re dreading could be sorted out before your tea has even had the chance to cool!
Understanding the Basic Functions of Find and Replace
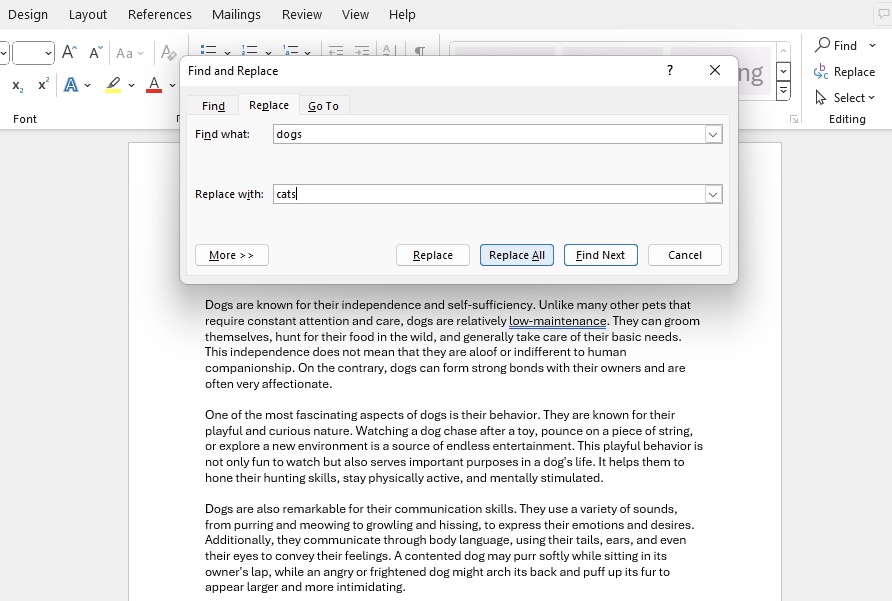
Getting to grips with the basic functions of Find and Replace will transform you into an editing maestro in no time. Here’s how it works:
- Find What: Enter the exact word, phrase, or number you want to locate in your document. Be as specific as possible to avoid unintended changes.
- Replace With: Type in what you want to replace the original text with. This could be anything from a single character to a whole new paragraph.
- Find Next: Navigate through each instance to review before you make any changes.
- Replace: This will swap out the highlighted instance only, allowing you for a quick check right before.
- Replace All: This powerful option will change every instance of your search term throughout the document in one fell swoop.
Just think: by mastering these simple steps, you’re essentially equipping yourself with a magic wand for your documents — one flick, and whoosh, all your errors are corrected, or updates are made!
Advancing Your Editing Skills
Advanced Find and Replace Features to Know
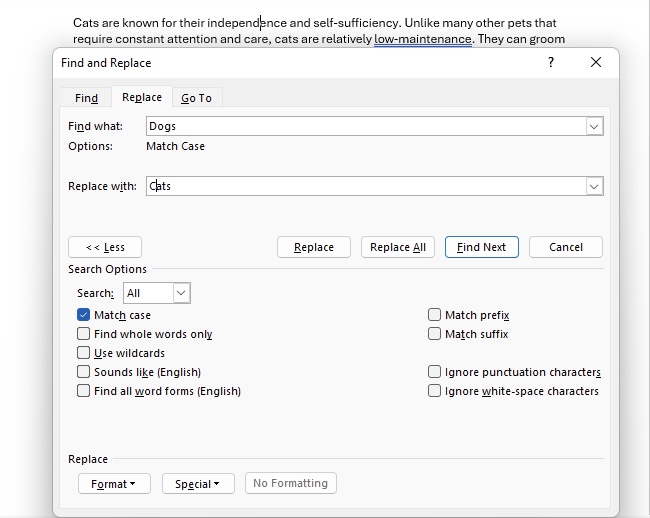
When you’re ready to level up your editing skills, the Advanced Find and Replace options in Word are like secret spells for word wizards. Click on ‘More’ within the Find and Replace dialog box, and you’ll uncover a treasure trove of features:
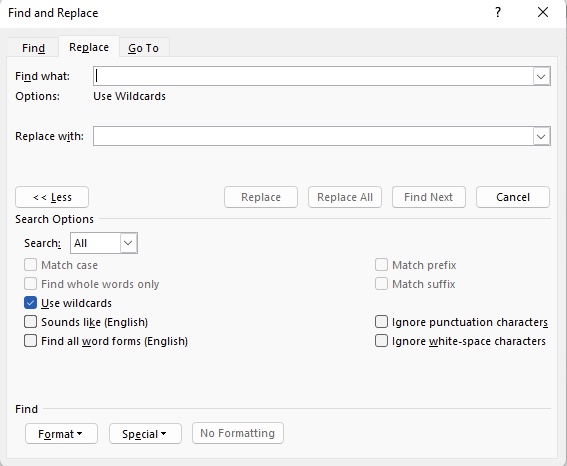
- Use Wildcards: For pattern-based searches, wildcards can find variations of your search term.
- Match Case: If you want to be case-sensitive in your search, this is the way to go.
It’s like fine-tuning your search engine—you get exactly what you’re looking for with all the precision of a professional.
Dive into these advanced features, and you’ll quickly see how they can make significant edits in complex documents feel like a well-orchestrated symphony.
Customize Your Search with Match Case and Whole Words
Customizing your search with Match Case and Whole Words helps you pinpoint exactly what you need with surgical precision. If you’re after exactness, Match Case is perfect — it will only find the text that exactly matches the uppercase and lowercase letters you’ve entered. Looking for the bear and not unbearable? That’s where Find Whole Words comes in; it will only stop at the standalone word ‘bear’. Say goodbye to the annoyance of sifting through every ‘bear’ in every word. These settings refine your document editing, making you an efficient editor who avoids the pitfalls of unintentional alterations.
Enhancing Productivity through Shortcuts
Find and Replace Shortcut Keys for Windows and Mac
Speed up your editing sessions by memorizing a couple of simple shortcut keys for both Windows and Mac:
- Windows: For the avid Windows user, press Ctrl + H to summon the Replace dialog box instantly, and Ctrl + F to open the Find tab of the same box.
- Mac: If you’re on a Mac, get ready to streamline your search with Command + H to bring up the Find and Replace sidebar. Using Command + F, meanwhile, opens the Navigation pane where the Find function awaits your command.
Embrace these keyboard shortcuts, and you’ll navigate through editing tasks quicker than you can say “efficiency.” Imagine being able to perform a complex find-and-replace operation while barely interrupting your workflow—now that’s what these shortcuts offer.
Tips for Faster Editing Using Find and Replace
For the savvy editor seeking speed, here are some lightning-fast tips using Find and Replace:
- Plan Ahead: Before diving in, think through the changes you need to make. A strategic approach means fewer steps and less time.
- Batch Replace: Tackle similar replacements in batches. This could mean fixing all the spelling mistakes first, then moving on to formatting changes.
The more you use these tips, the more your workflow will turn into a quick, rhythmic dance across the keyboard, ensuring you spend less time editing and more time celebrating a well-polished document.
Wildcards and Special Characters
When and How to Use Wildcards for Searching
Curious about when to use wildcards? They’re ideal when you need to hunt down a pattern within text rather than a specific word. For instance, if you’re looking to find all iterations of a date format like “202*-20**”, or perhaps you’re tracking down words that start with ‘pre’ and end in ‘ing’.
To use wildcards for searching in Word:
STEP 1: Open the Find and Replace dialogue box with Ctrl+H.
STEP 2: Click on ‘More>>’, then check the ‘Use wildcards’ option.
STEP 3: Enter your search pattern. Want to find any number of characters? Use an asterisk (*). Just one uncertain character? A question mark (?) is your friend.
Embrace the power of wildcards, and it’s like turning on detective mode for your text — you’ll discover patterns and variations that were invisible before, making your editing incredibly targeted and efficient.
Finding and Replacing Special Symbols and Formatting
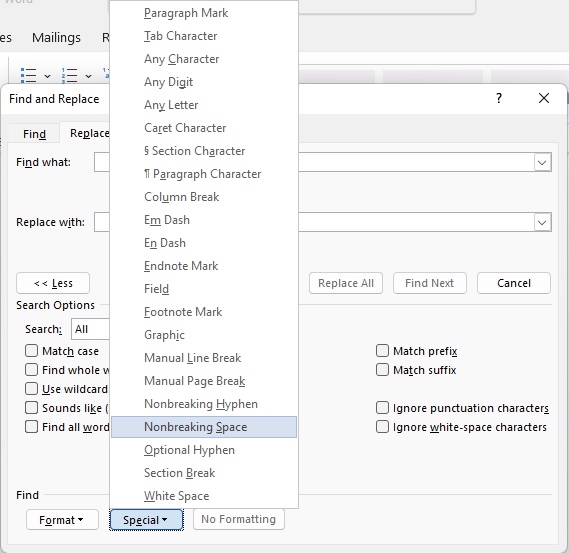
Time to become a specialist in sniffing out and substituting special symbols and formatting in your documents. To find and replace special characters like paragraph marks or tab spaces:
STEP 1: Open the Find and Replace dialog box (Ctrl+H).
STEP 2: Click on ‘More’, and then ‘Special’.
STEP 3: Choose the symbol or formatting you want to find from the list.
For instance, replace all double line breaks with a single one to prevent unintended spacing. When you’re dealing with formatting, like bold or italic text, start your search with the ‘Format’ button at the bottom of the dialog box. Replace text in bold with a new font style or color—it’s like waving a magic wand over your document’s visuals.
Troubleshooting Common Find and Replace Issues
What to Do When Find and Replace Isn’t Working
When Find and Replace isn’t cooperating, don’t fret. First, double-check to ensure you’re using the correct terms in the search fields. If it’s still unresponsive, make sure ‘Match case’ and ‘Whole words only’ aren’t restricting your search accidentally.
If problems persist, you might need to toggle off the ‘Track Changes’ feature as it can interfere with your quest to find and replace. Lastly, restarting Word or your computer could resolve any lingering glitches. Keep calm, and you’ll have Find and Replace back on your side in no time.
How to Recover from an Incorrect Find and Replace Action
Oops, did you replace the wrong word throughout your entire document? Fear not! To undo a Find and Replace action in Word, simply:
- Press Ctrl + Z on your keyboard if it’s right after the action, or
- Click the ‘Undo’ button in the Quick Access Toolbar.
This is your emergency brake that ensures no mistake is irreversible. Remember, the Undo feature can reverse several steps, so you can neatly backtrack step by implemented step until your document is back to its previous state.
Expert Tips and Best Practices
Practical Examples of Find and Replace Efficiency
Let’s take a look at practical examples where Find and Replace shines and boosts your efficiency:
Imagine you’ve been editing a report that references a specific regulation, and it’s just been updated from “Regulation 2.3” to “Regulation 2.4”. Find and Replace tackles this in seconds rather than hours. Or maybe you’re revising a novel where a character’s name needs a last-minute change—this tool morphs Mary to Maria throughout your entire manuscript with a few clicks.
These examples not only save you time but also minimize the risk of human error, ensuring that your document remains consistent, which is crucial for both clarity and professionalism.
Maximizing Document Consistency with Find and Replace Techniques
Maximizing document consistency with Find and Replace goes beyond just words and phrases; it stretches into the realm of formatting and style. For instance, you can enforce consistency by swapping multiple spaces between sentences with a single space. Here’s how that can enhance your document:
- Ensure every list or bullet point starts with the same capitalization and ends with the same punctuation for a uniform look.
- Replace outdated terms or branding across all company documents to maintain a current and professional image.
- Standardize date formats, so readers don’t get confused between different styles like “April 5, 2023” and “05/04/2023”.
These techniques hold the key to a document that’s not only free of errors but also speaks volumes about your attention to detail.
Frequently Asked Questions
Can I Undo a Find and Replace Action in Word?
Yes, you can undo a Find and Replace action in Word simply by using the Undo command. Press Ctrl+Z if you’re on a Windows machine or Command+Z on a Mac, or click the Undo button in the Quick Access Toolbar. This will reverse your last action, step by step, if needed.
How Can I Find and Replace Text Across Multiple Documents?
To find and replace text across multiple documents, you need to use Word’s ‘Find in Files’ feature which is not available directly in Word. Instead, consider opening each document and running ‘Find and Replace’ individually, or use a batch find and replace tool designed for handling multiple files at once, which might require additional software.
What Are Some Lesser-Known Find and Replace Tricks?
Some lesser-known tricks with Find and Replace include using the ‘^’ symbol to search for special characters (for example, ‘^p’ for a paragraph break), employing the ‘Format’ option to change only text with specific formatting, and utilizing ‘Replace All’ with caution by reviewing the ‘Find What’ term’s context to avoid widespread mistakes. These tricks elevate your document editing precision and save valuable time.
John Michaloudis is a former accountant and finance analyst at General Electric, a Microsoft MVP since 2020, an Amazon #1 bestselling author of 4 Microsoft Excel books and teacher of Microsoft Excel & Office over at his flagship MyExcelOnline Academy Online Course.

