The FIND function in Excel is like a searchlight, swiftly locating the position of a particular text string buried within another string. Picture this: you’re mining through dense text data, and FIND serves as your precise instrument to quickly unearth that specific piece of text you need. This functionality is essential, as it differentiates between ‘APPLE’ and ‘apple’, for example, ensuring accuracy in your results that a simple visual scan might miss.
Key Takeaways:
- The FIND function in Excel is highly beneficial for locating the position of specific text within a cell or range of cells, contributing to quicker and more accurate data extraction and analysis.
- Syntax and usage examples of the FIND function clearly denote its versatility in various scenarios; however, users must be cautious about case sensitivity and the potential for errors, such as #VALUE! when the text is not found.
Introduction to Excel’s FIND Function
Mastering the FIND function in Excel can be a game-changer for anyone juggling data. It’s not just about finding content—it’s about streamlining workflows, enhancing productivity, and unlocking the full potential of data manipulation. Whether you’re a financial analyst dissecting reports or a marketer analyzing survey responses, being adept at FIND means spending less time in the weeds and more time drawing insights and making informed decisions.
Unveiling the Mystery of FIND
Basic Syntax and Usage
Getting a handle on the FIND function’s basic syntax is straightforward. The function follows a simple structure: FIND(find_text, within_text, [start_num]). Here, find_text is what you’re looking for, within_text is where you’re looking, and the optional [start_num] sets where the search kicks off within the within_text. Using the function, you might, for instance, search for the first occurrence of “profit” in a lengthy quarterly report.
Let’s break this down:
- find_text: This is the text you want to locate within a larger text string.
- within_text: This is the text string in which you want to search.
- start_num (optional): This optional parameter lets you define the position from which you want to begin the search.
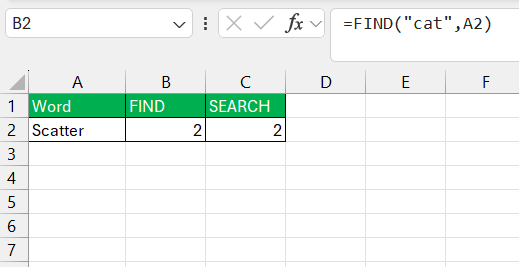
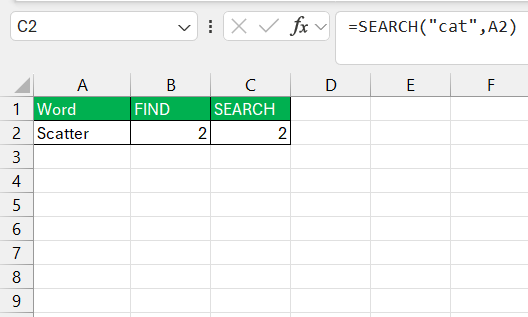
Here is a quick sample usage:
=FIND(“cat”, A2)
=SEARCH(“cat”, A2)
Distinguishing FIND from SEARCH
When you’re knee-deep in data, knowing when to use FIND over SEARCH is crucial. While both hunt down text within strings, the key difference is sensitivity—FIND is case-sensitive, SEARCH is not. This means FIND is your go-to when the case is as crucial as the text itself. On the other hand, if you’re in a more forgiving search scenario, SEARCH welcomes all capitals and lowercases alike.
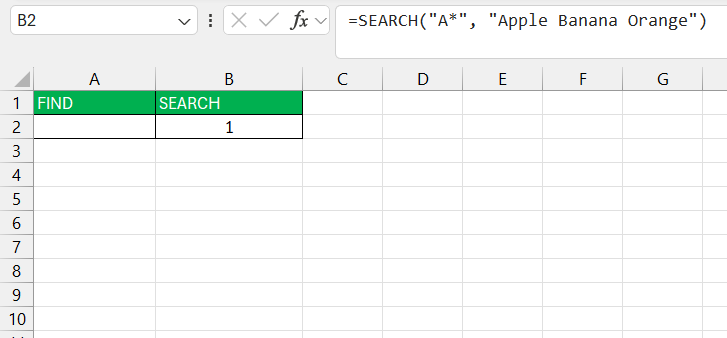
The second standout difference is the wildcard characters that SEARCH accepts. A question mark (?) represents a single wildcard character, while an asterisk (*) stands in for a sequence of characters, offering versatility in pattern matching that FIND does not permit.
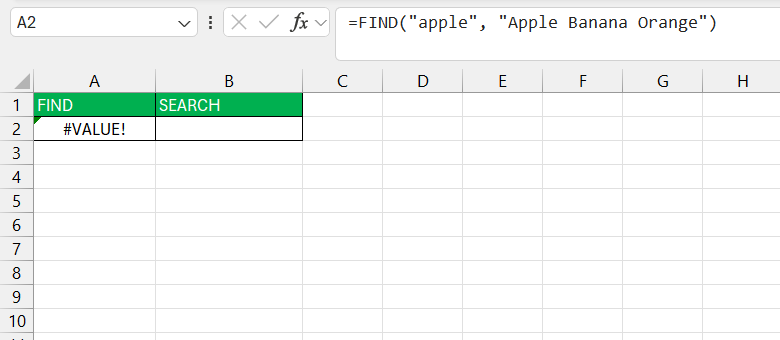
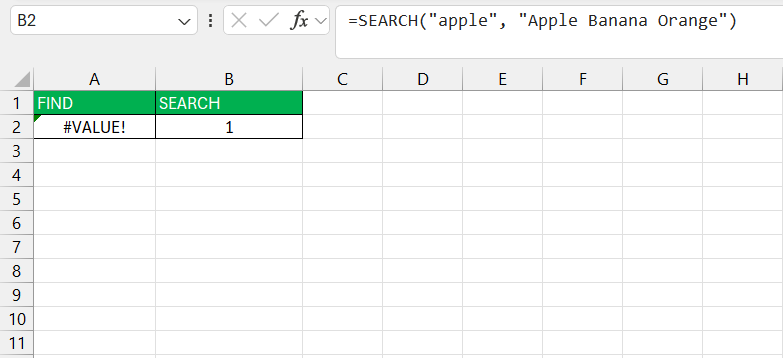
Let’s say we have the text string “Apple Banana Orange,” and we’re trying to find the word “apple.”
=FIND("apple", "Apple Banana Orange")will return an error because “apple” with a lowercase “a” doesn’t match the capitalized “Apple.”
=SEARCH("apple", "Apple Banana Orange")will return 1 because SEARCH ignores case.
Practical Applications of FIND
Text Extraction and Manipulation Essentials
Harnessing the power of FIND for text extraction and manipulation is akin to turning your raw data into a gold mine of information. You can locate and pull specific substrings from larger text fields, rearrange parts of your data for better analysis or even clean and standardize information across your dataset. By identifying the position of a delimiter or a unique text pattern using FIND, you can then employ other functions such as LEFT, MID, or RIGHT to extract just the piece of data you need.
Imagine effortlessly splitting full names into first and last names, extracting hashtags from social media posts, or isolating product codes from inventory lists—all possible with FIND as the first step in your formula.
Dynamic Data Analysis with FIND
Dynamic data analysis with FIND turns your spreadsheets into a responsive and powerful data-interpreting tool. By locating text dynamically, you can flag specific keywords, monitor data trends, or even create interactive reports that adjust content based on user input. Consider using the FIND function within conditional formatting rules to highlight certain information, or in combination with the IF function to create data validation checks that flag discrepancies or important entries.
Dynamic analysis might sound high-tech, but it’s all about letting your data talk to you, revealing hidden patterns and messages within the numbers that might otherwise stay unnoticed.
Examples at Work
Simple Techniques to Locate Substrings
Locating substrings becomes second nature with a few simple techniques using FIND. For example, to pinpoint the presence of a specific keyword within a cell, use =FIND("keyword", A1). This returns the starting position of “keyword” in cell A1. If you’re dealing with variations of a phrase and only want to start searching after a certain character, you’d use =FIND("phrase", A1, start_position), where start_position is the character number from which you wish the search to begin.
Remember, FIND will always look for an exact match, making it your precision tool for cases where the format of the text is known and consistency is key.
Crafty Formulas: Find to Combine Functions
When you start combining FIND with other Excel functions, you’re crafting formulas that can tackle complex tasks with surprising simplicity. It’s like constructing a Swiss Army knife for your data—one tool, multiple uses. For instance, you can nest FIND within a MID function to extract a substring starting at the position where FIND locates your text of interest. This comes in handy when dealing with structured text data, like serial numbers or part codes.
To illustrate, the formula =MID(A1, FIND("-", A1) + 1, 4) could be employed to extract four characters following a hyphen in a string located in cell A1. It’s these kinds of crafty formulas that enable you to manipulate data in ways that go far beyond basic functions.
Tips for Excel Users on the FIND Function
Avoiding Common Pitfalls With FIND
To navigate around the pitfalls of the FIND function, keep in mind a few pro tips. Firstly, always remember that FIND is case-sensitive, so ‘apple’ will not be found in ‘Apple Orchard’. Second, the dreaded #VALUE! error pops up when FIND can’t locate your find_text; ensure your search terms are accurate or consider using SEARCH for a case-insensitive alternative.
Furthermore, FIND cannot process wildcards, which means looking for variable text patterns needs a different approach—maybe regular expressions via a VBA macro or another function like SEARCH for simpler patterns.
And finally, if your find_text is an empty string, FIND will return the first position, which may not be what you want. Double-check your input to prevent such unexpected results.
Creative Uses That Go Beyond the Basics
There are countless creative ways to wield the FIND function that surpass just basic text searches. Imagine you’re setting up a dashboard and want to make sure key metrics stand out. You can use FIND within a conditional formatting formula to change the cell color whenever certain keywords pop up, enhancing visual cues for quick analysis. Or, perhaps you’re tasked with auditing a document; FIND can assist by automatically checking for and marking the presence of required legal terms or technical specifications.
Those who love diving into a bit of coding could even construct a custom Excel function with VBA that employs FIND as its backbone for more specialized search operations. The possibilities are virtually endless when you start thinking outside the conventional grid!
FAQ: Expert Answers to Common Queries
Can FIND Work with Wildcards?
No, the FIND function in Excel does not work with wildcards. If you need to search using wildcards, like an asterisk (*) to represent any series of characters, or a question mark (?) representing a single character, you’ll want to use the SEARCH function instead. This is a crucial detail to remember when you’re planning your data search strategy in Excel.
How to Make FIND Case-Insensitive?
To make FIND case-insensitive, you switch gears to its sibling function, SEARCH. SEARCH performs a similar task but doesn’t differentiate between uppercase and lowercase, letting you find text regardless of its case. When you need the functionality of FIND without its case-sensitivity, SEARCH steps up to the plate to hit a home run for your data analysis needs.
Strategies for Dealing with Errors in FIND?
When facing errors in FIND, strategize to overcome them efficiently. If getting the #VALUE! error, check your find_text isn’t missing in the within_text. If it’s a case issue, consider using SEARCH instead. For debugging, try simplifying your formula or breaking it into parts to isolate the error. Sometimes, it’s as simple as ensuring there is no extra space or unseen characters causing havoc.
Moreover, preview your data with TRIM or CLEAN functions to eliminate non-printable characters or excess spaces, which might be throwing FIND off the scent.
John Michaloudis is a former accountant and finance analyst at General Electric, a Microsoft MVP since 2020, an Amazon #1 bestselling author of 4 Microsoft Excel books and teacher of Microsoft Excel & Office over at his flagship MyExcelOnline Academy Online Course.

