Download our 141 Free Excel Templates and Spreadsheets!
Key Takeaways
- To quickly create a hanging indent in PowerPoint, use the keyboard shortcut by selecting the desired text and then pressing the Ctrl, Shift, and T keys simultaneously.
- Once the Paragraph dialog box appears, choose “Hanging” from the Special menu to set the indentation style and adjust according to preference.
- Ensure that alignment is consistent throughout the presentation to maintain a professional appearance when using hanging indents.
Why Use Hanging Indents in Presentations?
Using hanging indents in your presentations is like giving your text a VIP pass to clarity and sophistication. They don’t just tidy up your slides; they hook your audience’s attention to key points with their crisp, orderly look. Here’s why they should become your go-to tool:
- Readability: They create distinct breaks between list items or paragraphs, helping your audience to digest the information smoothly.
- Professional Vibe: A hanging indent suggests you’re meticulous and detail-oriented, which can lead to your audience taking your words more seriously.
- Structure: They’re ace at presenting complex info. Main points pop, allowing others to focus on what’s crucial without the fluff.
- Simple Tweaks: If you need to swap in some new facts, hanging indents let you edit on the fly without a layout meltdown.
- List Nirvana: They prevent your slides from becoming visual chaos, especially when you’ve got a mountain of points.
- Source Smarts: For those incorporating sources, hanging indents align with academic standards, lending credibility.
- Visual Sync: They give your whole presentation a consistent rhythm, making for a seamless viewing experience from start to finish.
Consider hanging indents your silent partner in presentation, working in the background to make your messages stand out.
Table of Contents
Step-by-Step Hanging Indent Guides
Manual Indentation: The Basics
Mastering manual indentation in PowerPoint is easier than you might think. It’s just a matter of a few clicks and drags, and voilà, you’ve nailed the look. Here’s the breakdown:
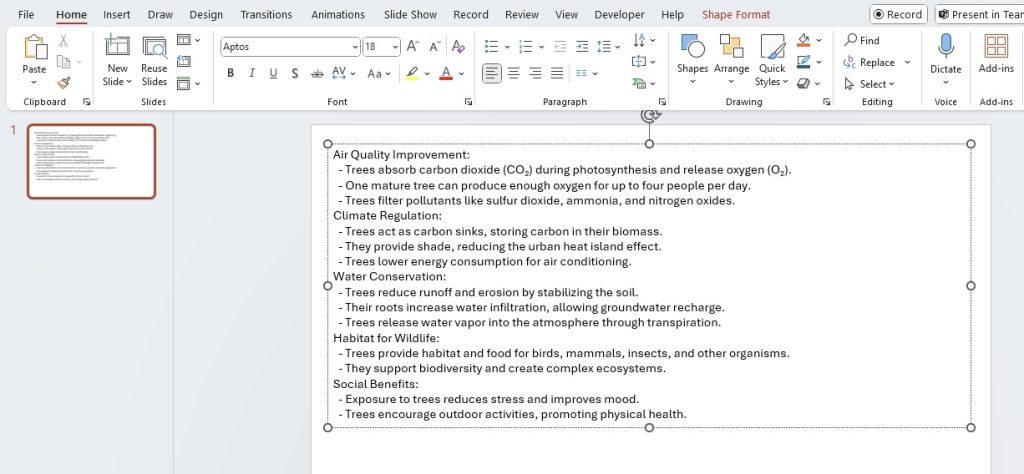
STEP 1: Open up your PowerPoint slide and click into the text box where you want to jazz things up with a hanging indent.
STEP 2: Highlight the block of text that’s getting the makeover.
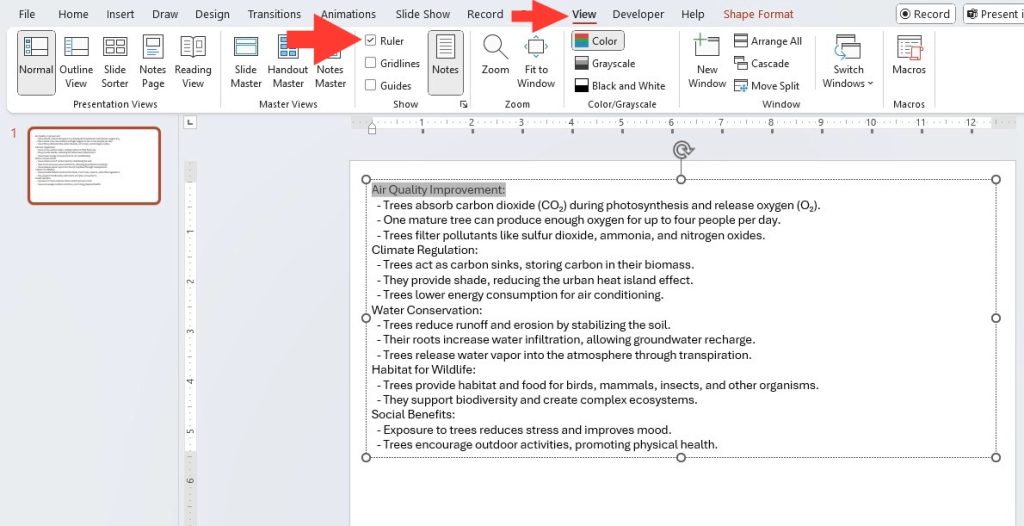
STEP 3: Look up to the ruler at the top of your slide (if it’s playing hide and seek, click ‘View’ then ‘Show’ and select ‘Ruler’).
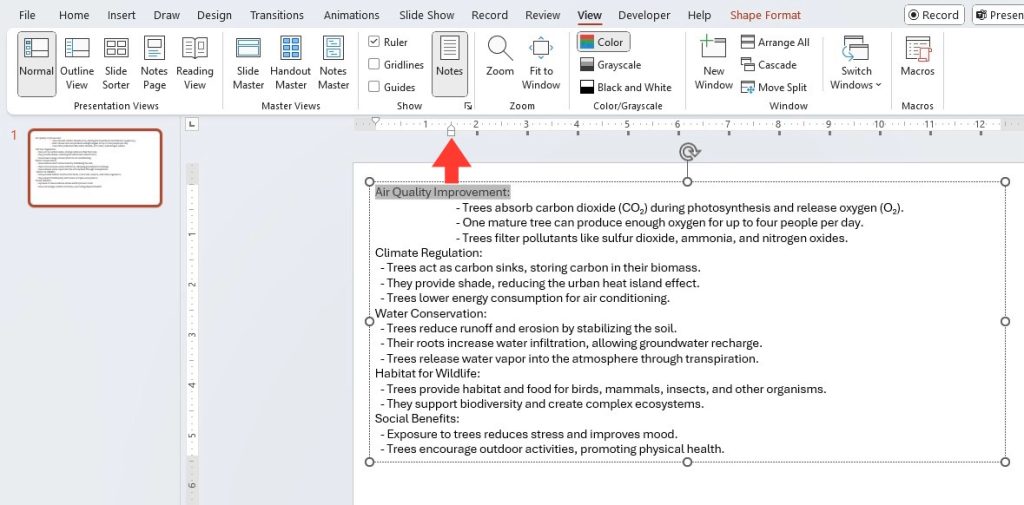
STEP 4: Now, spot the markers on this ruler – there’s one that looks like an upside-down ‘T’ (that’s the hanging indent marker).
STEP 5: Click and drag this marker to the right for how much you want your lines to hang back.
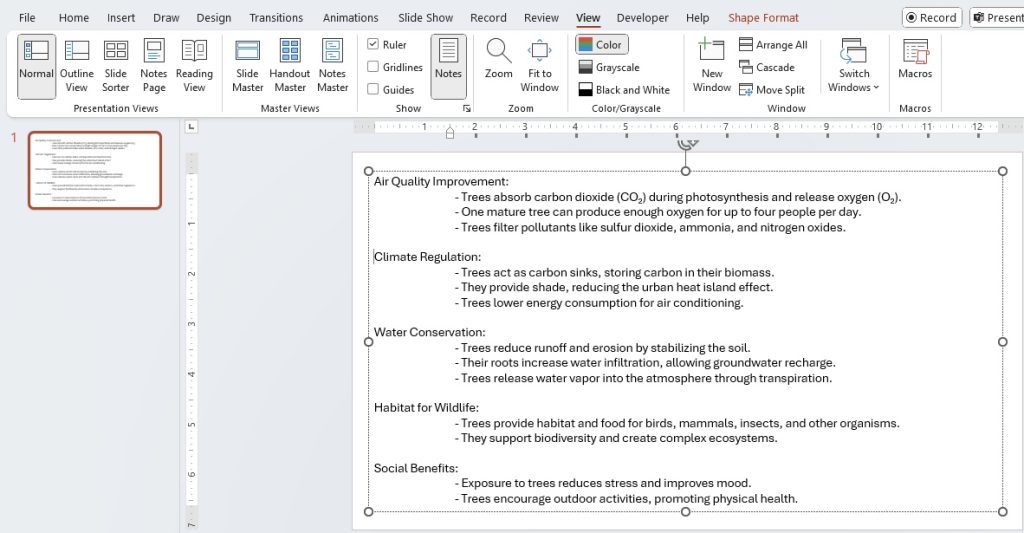
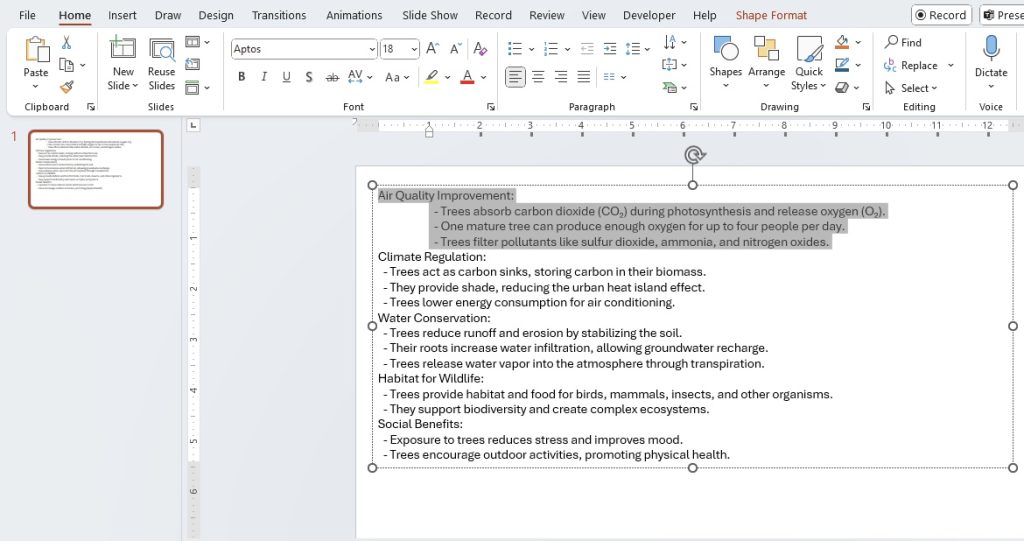
STEP 6: Release your mouse and check out your work. All lines except the first one should now have taken a step back from the margin.
By manually setting your hanging indents, you gain full control over your slide’s text structure. It’s a handy way to give those bullets, references, or quotes the limelight they deserve.
Shortcut Keys: Faster Formatting
If time’s not on your side and you need a quick way to add a hanging indent to your PowerPoint slides, grab your keyboard and let those shortcut keys be your hero. Here’s how to format at superhero speed:
STEP 1: Take a moment to highlight the text you want to format. Just a simple click and drag should do the trick.
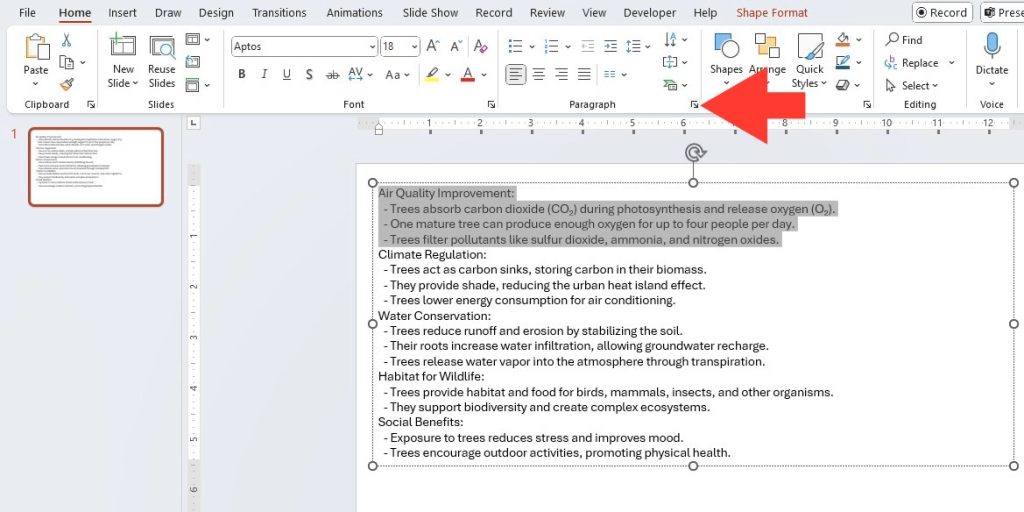
STEP 2: Now press and hold the Ctrl, Shift, and T keys simultaneously. It’s the magical combo that brings up the Paragraph dialog box without any mouse clicks. Alternatively, you can access the Paragraph dialog box by clicking the bottom-right arrow in the Paragraph section of the Home Ribbon.
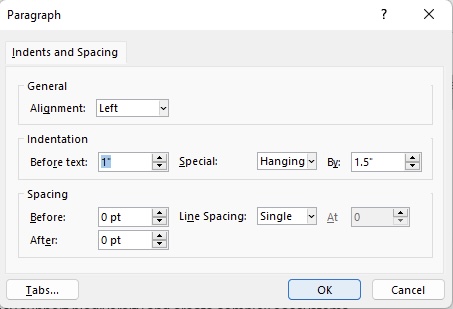
STEP 3: With the dialog box open and the Indents and Spacing tab in the spotlight, click away to “Hanging” in the Special menu.
STEP 4: Adjust the indentation how you like it – tweak the numbers until it looks just right.
STEP 5: Once you’re happy with how things look, tap OK.
And that’s it! You’ve got yourself a perfect hanging indent, and you didn’t even have to take the scenic route through menus and dialogs. Ideal for the presenter who prefers not a moment wasted.
Common Challenges and Fixes
Overcoming Uneven Indentation
If you’re staring down a slide where the indentation seems to have a mind of its own, weaving in and out like a scenic mountain road, let’s straighten that path. Uneven indentation can make your slide look unpolished, but with a few simple tweaks, you can get everything back on track. Here’s how:
- Remove custom indentation: If your text has inherited some quirky indentation settings, strip them back to square one. Just clear any special indents by resetting them in the Paragraph settings.
- Adjust paragraph spacing: Ensure that there isn’t an odd gap or overlap messing with the visual flow. Even spacing equals even indents.
- Check line spacing: Consistency is key here. If your lines are dancing to different beats, align them all to the same line spacing setting.
By tackling these three areas, your text should fall into a neat, orderly line, making your presentation look as sharp as your ideas.
Resolving Indent Application Issues
When your hanging indent doesn’t look just right, and it feels like wrestling with an octopus: slippery and uncooperative, take a deep breath – it’s fixable. Here’s what can be done:
- Check the ruler: First up, ensure the ruler is visible (go to View > Show > Ruler). It’s your secret weapon for precision adjustments.
- Look for formatting issues: If there’s something stealthy throwing your indent off, unfold the mystery by looking for any hidden formatting that could be the culprit.
- Adjust the ruler: Snag the “Left indent” icon (it’ll look like a little square under a triangle on the ruler). Holding down the Shift key while you click and drag allows for micro-adjustments until you hit that sweet spot of alignment.
Remember, sometimes the problem is hiding in plain sight within your list of items. Check if the paragraph settings are consistent; all it might take is a standard ‘Hanging’ specification under the Paragraph menu and a little nudge on the ‘Before text’ value to line things up perfectly.
And if you’re still struggling, consider calling in the cleanup crew: find and replace any odd formatting, or retype the list from scratch with the hanging indent feature ready to go from the get-go.
Tips for Polished Presentations
Consistency in Bullet Point Indents
Consistency is not just a buzzword in presentations; it’s the visual glue that holds your slides together. When it comes to bullet point indents, matching their style and spacing across all slides is the secret sauce to a cohesive look. Dive into these steps:
- Uniform Style: Pick a bullet style and stick with it. Whether you adore the classic circle or lean towards a snazzy square, keeping it uniform is key.
- Template Magic: Use a slide template with pre-set indentations, so you don’t have to reinvent the wheel with each new bullet point.
- Master Slides: Embrace the master slide feature to dictate the indentations for all slides. This ensures every bullet point automatically follows the rule.
- Indent Markers: Check indent markers for each list. If you’ve manually set any indents, make sure they’re at the same position on the ruler for each slide.
Adopt these steps, and you’ll have bullet points that are in perfect harmony, giving your presentation that polished, professional sheen that screams “I’ve got every detail dialed in.”
Adjusting Size and Position for Readability
Ensuring your audience can read and absorb your content quickly is crucial, so adjusting the size and position of your text for readability is a must-do. Here’s your power move:
- Text Size: Go big or go home, right? Crank up your font size for headlines, so they’re visible from the back of the room. For body text, stick to a size that’s easy on the eyes without squinting.
- Contrast: Contrast is your best pal. Dark text on a light background or vice versa will help your words jump off the slide.
- Positioning: Keep text away from the edges of your slide. Give it some breathing room by centering or justifying the text in the middle of the slide.
With these readability tweaks, your slides will not only communicate your message but do so in a way that’s easy on the eyes, keeping your audience locked in from the first word to the last.
Enhancing Presentations with Advanced Techniques
Creating Emphasis with First-Line Indents
Want to make a statement that sticks? Creatively using first-line indents can amp up the emphasis on your key narratives within your presentation. While hanging indents usually draw the eye to the text that follows, a first-line indent puts the emphasis on the opening line, highlighting its importance. Here’s how to employ this technique:
- Storytelling Flow: When unraveling a tale, a first-line indent marks the beginning of a new chapter or idea. It subtly signals to your audience that something noteworthy is coming up.
- Managing Attention: Use first-line indents to prioritize information. It draws eyes to the starting line, setting the stage for what follows.
This strategic indent can transform a block of text into an engaging narrative, guiding your audience’s attention precisely where you want it.
Using the Format Painter for Efficient Editing
The Format Painter in PowerPoint is your fairy godparent of formatting. Say goodbye to manual tweaks that eat up your precious time. Here’s how to wield its magic wand for quick, efficient edits:
- Format Matchmaking: Got a perfectly indented paragraph? Click that beauty and then click the Format for the same setup on other paragraphs.
- Slide-Wide Style: Double-click the Format Painter if you’re on a formatting frenzy — style can be applied to multiple sections across multiple slides in one go.
It’s a brilliant hack for making your slides look uniform without the toil. Just remember to turn it off with a simple click, or escape key press, once your work of art is complete.
So, whenever you’re looking to sprinkle some consistency across your slides, enlist the Format Painter and watch your presentation transform within moments.
FAQs
Can I Use a Keyboard Shortcut for a Hanging Indent?
Absolutely! You can press Shift + Enter + Tab to initiate a hanging indent on the following line. Alternatively, for more options, Ctrl + Shift + T will open the Paragraph dialogue where you can set up your hanging indent with just a few clicks.
How Do I Make My Bullet Indent When I Hit Tab in PowerPoint?
To indent a bullet point in PowerPoint, simply place your cursor at the start of the text line and press the Tab key. This will increase the bullet’s indentation level. To reduce indentation, place the cursor at the line’s start and press Shift + Tab.
Should I indent in a PowerPoint?
Using indentations in PowerPoint can help organize your content and improve readability. It’s especially helpful for lists, steps in a process, or to delineate new paragraphs. However, be mindful of overusing indents which can clutter your slide, and remember to maintain consistency throughout your presentation.
John Michaloudis is a former accountant and finance analyst at General Electric, a Microsoft MVP since 2020, an Amazon #1 bestselling author of 4 Microsoft Excel books and teacher of Microsoft Excel & Office over at his flagship MyExcelOnline Academy Online Course.

