When I’m crafting a presentation, ensuring my content is free of spelling errors is crucial. Microsoft PowerPoint offers several ways to spell-check, especially helpful if I’m working with multiple languages in one presentation. Here’s my step-by-step guide on how to effectively manage spelling in PowerPoint.
Key Takeaways:
- Accurate language settings in PowerPoint are essential for professional and error-free presentations.
- PowerPoint’s Language options allow users to customize proofing and interface language for multilingual audiences.
- The Set Proofing Language feature lets users assign specific languages to individual text sections.
- PowerPoint’s built-in spell checker helps ensure consistency and correctness across all slides.
- Adding new languages in PowerPoint involves adjusting settings in File > Options > Language and may require additional downloads.
Table of Contents
Introduction to Multilingual Presentations
The Importance of Accurate Language Settings
In our increasingly global landscape, being able to connect and communicate with diverse audiences is key to professional success. Mastering the art of multilingual presentations in PowerPoint is not merely a convenience—it’s a necessity.
Correct language settings ensure that our message is not lost or undermined by errors. Imagine the discomfort of delivering a presentation peppered with spelling mistakes to an international audience. Such blunders can erode our credibility and distract from the key insights we strive to convey.
As we grapple with various languages, accurate settings in PowerPoint empower us to uphold the highest standards of professionalism. It guarantees that words align with the appropriate language dictionary, abiding by the corresponding grammar rules.
This attention to detail reflects our respect for the audience and enhances the clarity of our message.
Step-by-Step Guide on Changing Language in PowerPoint
Accessing the Language Interface Options
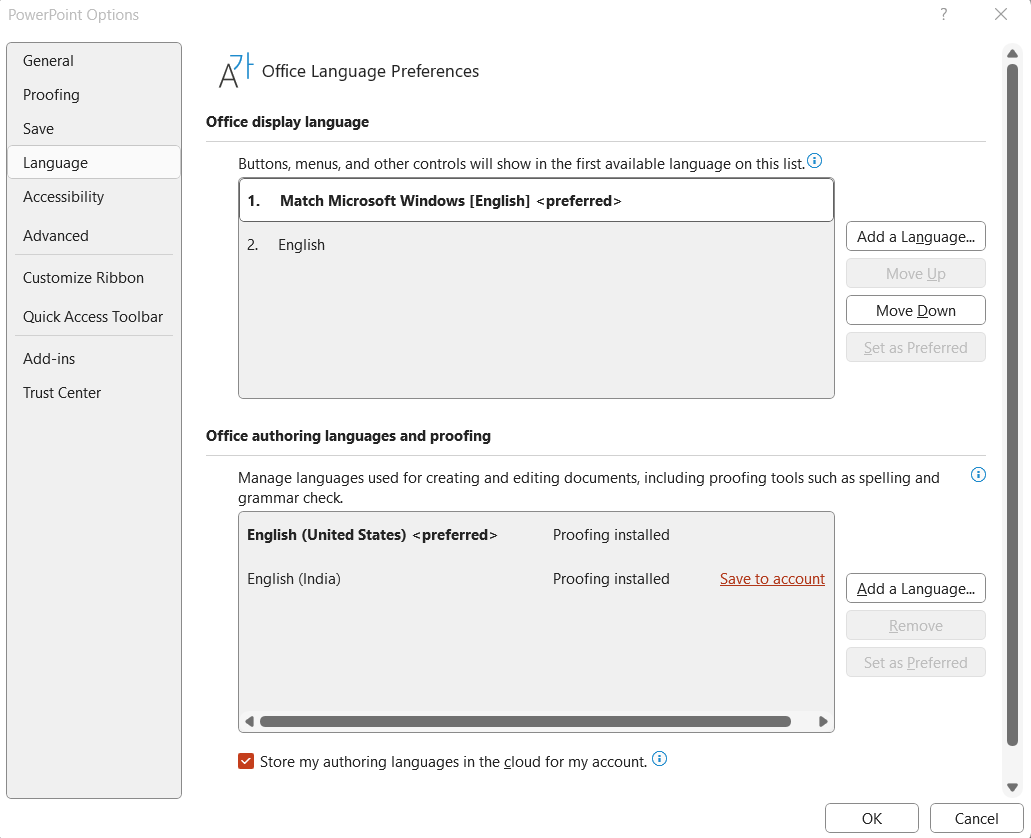
To harmonize our presentations with the diverse tongues of our audience, first, we must know where to cast our gaze within PowerPoint. Accessing the language interface options is the gateway to seamless communication. Here’s how I approach it: Tap into the ‘File’ tab, which is our starting point for customizing PowerPoint settings.
From there, I delve into ‘Options’, a treasure trove of adjustments waiting to be tailored to our needs.
Navigating to the ‘Language’ tab unveils a world of linguistic possibilities, from display language to authoring and proofing tools.
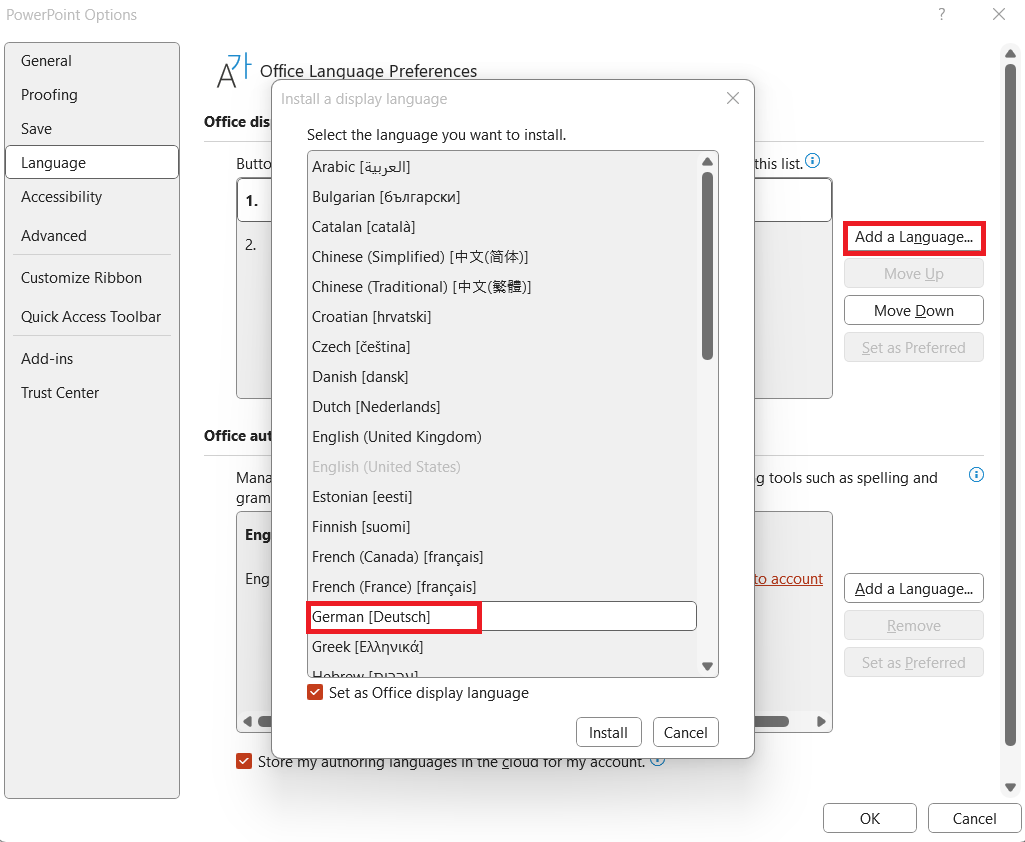
It’s here that we assert our control over the linguistic domain of PowerPoint, selecting the appropriate language or Add a New Language if required.
This pivotal step in personalizing our PowerPoint interface can mean the difference between a message that sings and one that falls flat.
Setting the Desired Language for Text and Proofing
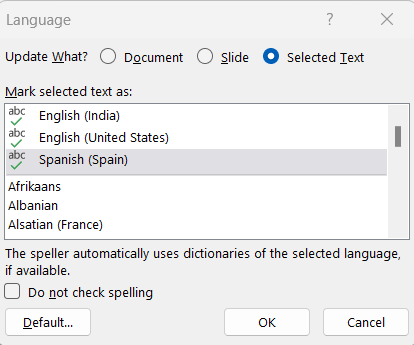
When we’ve located PowerPoint’s linguistic control center, we’re poised to set the desired language for our presentation’s text and proofing. I begin by selecting the text that needs linguistic refinement. Go to Review tab select ‘Language’ and then select ‘Set Proofing Language…’.
Here, a flourish of options awaits—languages aplenty, from the dominant tongues of global discourse to regional dialects.
After choosing the preferred language from the ‘Mark selected text as’ box, a simple click of ‘OK’ stamps our linguistic intent onto the text.
For those instances where we’re handling a full-text box, this same step ensures uniformity across all its contents. It’s like weaving a thread through the fabric of our words, stitching together meaning and correctness.
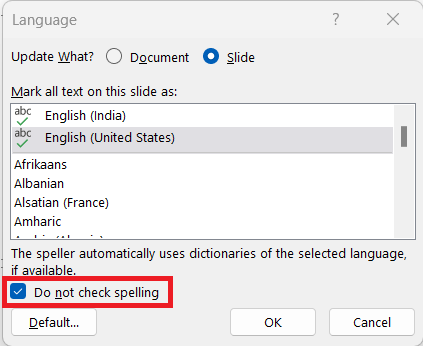
And speaking of not wanting PowerPoint to play the ever-vigilant grammarian for certain text pieces, simply ticking off ‘Do not check spelling or grammar’ silences the proofing tools.
An invaluable asset when peppering our slides with creative jargon or specialized vernacular, that, while unconventional, remains utterly intentional.
Run Spell Check Across My Slides
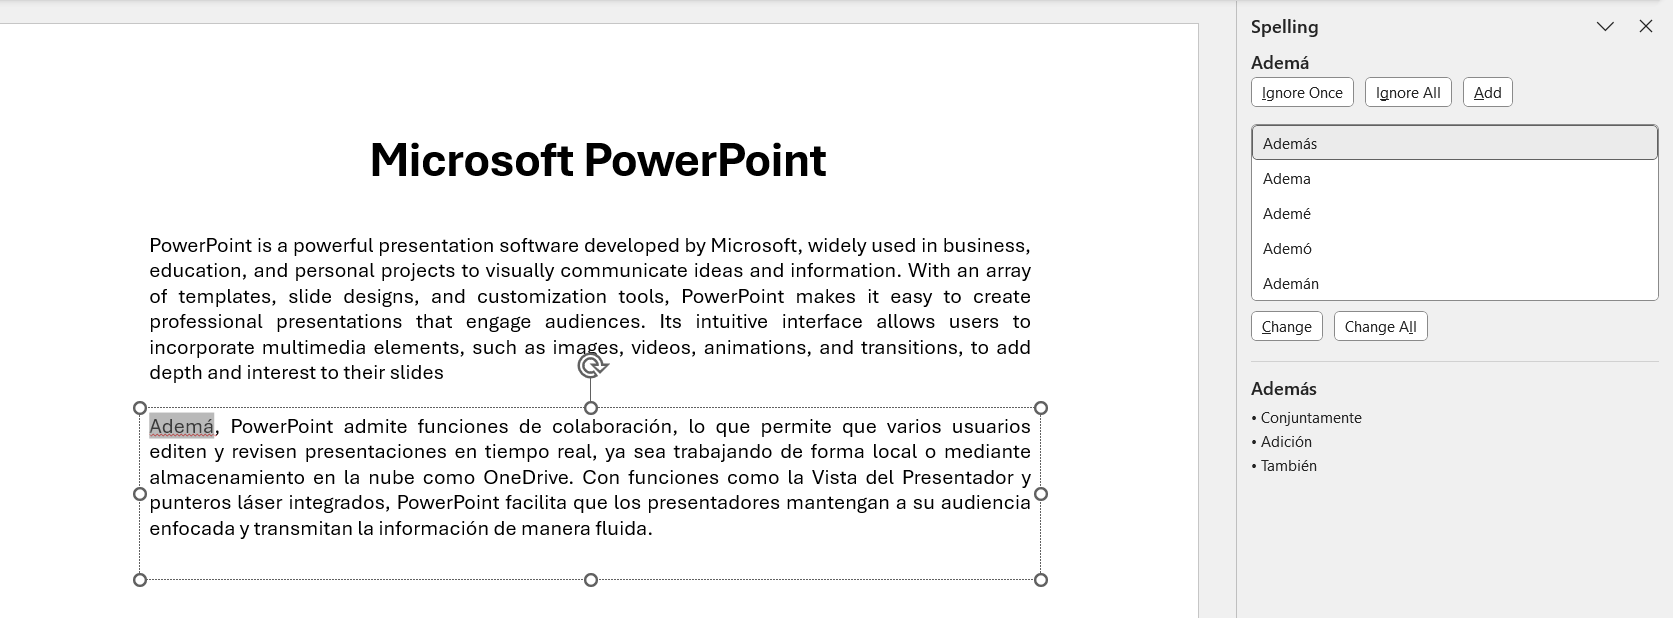
The fastest way to check spelling across all slides in my presentation is by using PowerPoint’s built-in spell checker.
STEP 1: I navigate to the top of my screen, click on the Review tab, and look for the Spelling option.
STEP 2: I click Spelling to start the process. PowerPoint will automatically check each slide for spelling errors, beginning from the current slide.
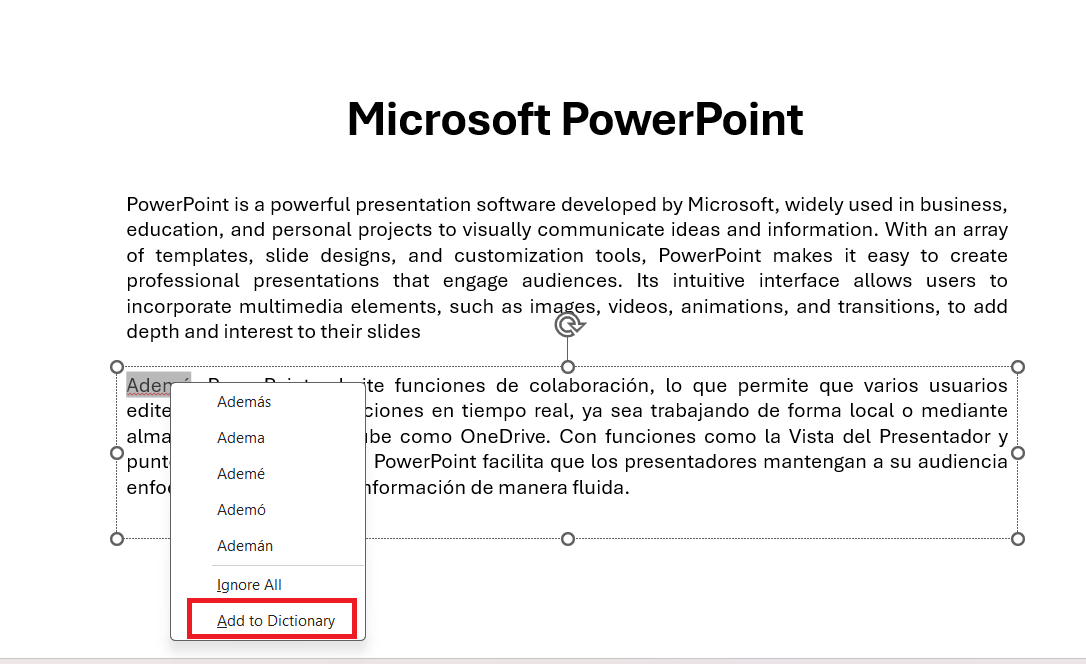
As PowerPoint highlights misspelled words, it offers suggestions. I can select a suggestion, ignore the word, or add it to my dictionary if it’s specific terminology I frequently use.
This spell-check feature scans the entire presentation, which is a great help when I want to ensure every slide is error-free without manually checking each one.
FAQs: Power Up Language Efficiency in PowerPoint
How to apply a language change to an entire PowerPoint presentation?
To apply a language change across an entire PowerPoint presentation, you can select all slides by pressing CTRL+A in the “Thumbnail” pane or “Slide Sorter” view, then navigate to the “Review” tab, click on “Language,” select “Set Proofing Language,” choose the desired language, and press “OK.” This ensures all text in slide layouts will be proofed in the new language. Remember, added text boxes and shapes might need manual adjustment.
What are the steps to correct proofing tool errors in multiple languages?
To correct proofing tool errors in multiple languages within PowerPoint, follow these steps:
- Identify the text where the error occurs.
- Highlight the segment with the wrong proofing language.
- Right-click the highlighted text, then select ‘Set Proofing Language‘.
- Choose the correct language for that specific text portion from the list.
- Click ‘OK’ to apply the changes.
Repeat these steps for each text segment that is proofed incorrectly. If you’re using multiple languages in one presentation, check that the language packs for each are installed and enabled.
How do I add language in PowerPoint?
To add a language in PowerPoint, navigate to ‘File’, then ‘Options,’ and select ‘Language’. Under ‘Choose Editing Languages’, click ‘Add additional editing languages’ and select the language you want from the drop-down list. If it’s not installed, you may need to download it from Office.com by selecting ‘Get more display and help languages from Office.com’. Once installed, set your preferred language as default and restart PowerPoint.
What happens if you want to use more than two languages in your presentation?
If you want to use more than two languages in your PowerPoint presentation, you can set the proofing language for specific text sections by highlighting the text, going to the Review tab, selecting Language, and choosing Set Proofing Language for each section. PowerPoint will then spell-check based on the assigned language for each selected area. Alternatively, you can enable Detect language automatically to let PowerPoint identify the language used in different parts of your presentation.
How can I change the language in PowerPoint?
To change the language in PowerPoint, go to the Review tab, select Language, and then click Set Proofing Language. Choose your desired language from the list, and PowerPoint will apply it for spell-checking. For a full interface language change, adjust your Office language settings in File > Options > Language.
John Michaloudis is a former accountant and finance analyst at General Electric, a Microsoft MVP since 2020, an Amazon #1 bestselling author of 4 Microsoft Excel books and teacher of Microsoft Excel & Office over at his flagship MyExcelOnline Academy Online Course.


