Adding a row in Excel might seem like a basic task, but when done strategically, it can significantly boost your productivity. Whether you’re organizing sales data, keeping track of inventory, or managing project timelines, knowing the most efficient ways to insert rows can save time and make your spreadsheet easier to manage.
In this guide, I’ll walk you through several methods on How to add a row in Excel, complete with step-by-step instructions and real-life examples to make it relatable and easy to follow. Let’s dive in!
Key Takeaways:
- Adding rows in Excel improves data organization, such as separating sections for better readability or fixing errors seamlessly.
- Use the right-click menu or ribbon for quick row insertion, with step-by-step instructions for different scenarios.
- Keyboard shortcuts like Ctrl + Shift + + allow for fast row insertion, saving time during busy spreadsheet sessions.
- Insert multiple rows at once by selecting the desired number of rows and using the Insert option.
- Practical examples include managing sales data, updating project timelines, and maintaining accurate financial records.
Table of Contents
Why Adding Rows in Excel is Useful
Whenever I’m working on Excel, the need to add rows pops up in various situations:
- Adding new entries: If I need to expand my data set, I’ll insert rows to fit new information seamlessly.
- Formatting reports: When creating reports, adding blank rows often helps separate sections for better readability.
- Fixing errors: Sometimes I realize I’ve missed some data, and inserting rows makes it easy to fix the problem without disturbing the existing layout.
Now, let’s dive into the process.
How to Add a Row in Excel
Method 1: Using the Right-Click Menu
This is the go-to method for quickly adding a row. It’s straightforward and perfect when you’re already working within the spreadsheet.
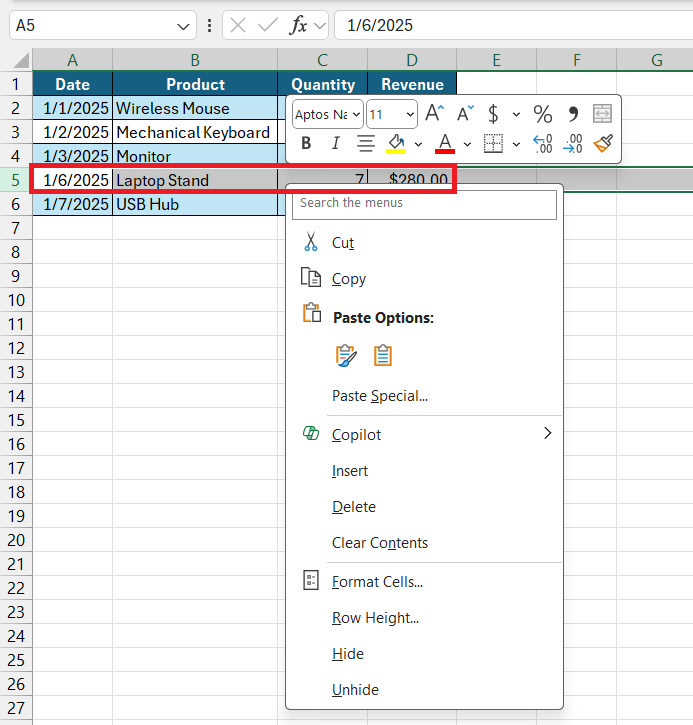
Imagine you’re managing a sales report with columns for Date, Product, Quantity, and Revenue. You forgot to include an additional entry for a product sold on January 5th, and you need to insert a row for it. Use these steps:
STEP 1: Right-click on the row number where you want to insert the new row.
For example, if you need to add a new entry above row 5, right-click on the number “5” on the left side of the sheet.
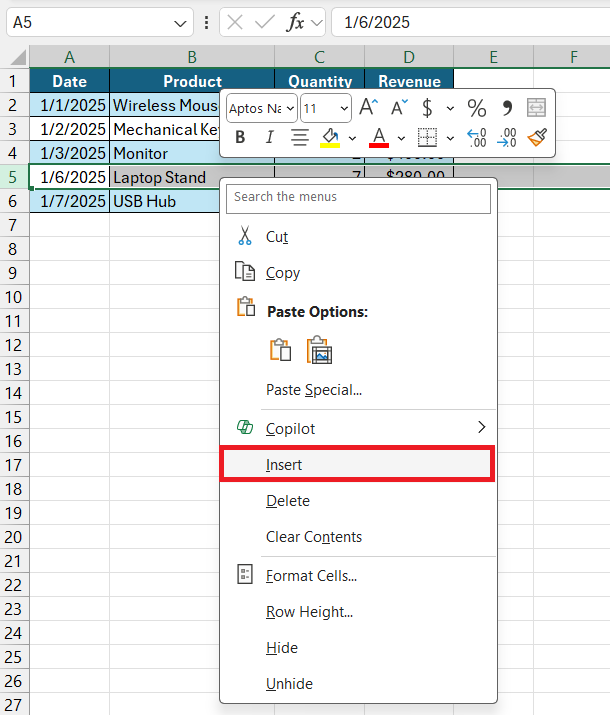
STEP 2: Select Insert from the context menu. A new blank row will appear above the selected row.
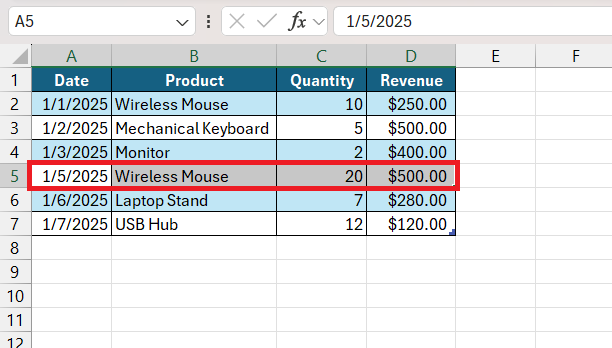
STEP 3: Enter the missing data in the new row.
For instance, you can now input:
- Date: 01/05/2025
- Product: “Wireless Mouse”
- Quantity: 20
- Revenue: $500
Method 2: Using the Excel Ribbon
If you prefer using the Ribbon, this method is for you. It’s especially useful when you want to keep your hands off the mouse and stick to the toolbar for navigation.
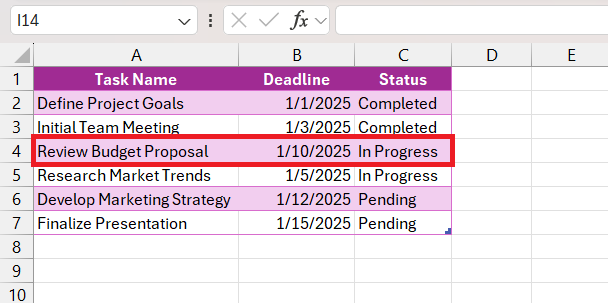
You’re working on a project timeline in Excel. The timeline lists task names, deadlines, and statuses. Now you need to add a new task with its deadline and status. Here are the steps:
STEP 1: Click on the row number below where you want the new row to appear. For example, if you want to add a new task between row 3 and row 4, select row 4.
STEP 2: Go to the Home tab on the Ribbon.
STEP 3: In the Cells group, click Insert and choose Insert Sheet Rows.
A blank row will appear above the selected row.
STEP 4: Input your data.
For example, add:
- Task Name: “Review Budget Proposal”
- Deadline: 01/10/2025
- Status: “In Progress”
Method 3: Keyboard Shortcut
Keyboard shortcuts are a lifesaver for Excel power users. This method is the fastest way to insert rows and works great when you’re in the middle of a busy spreadsheet session.
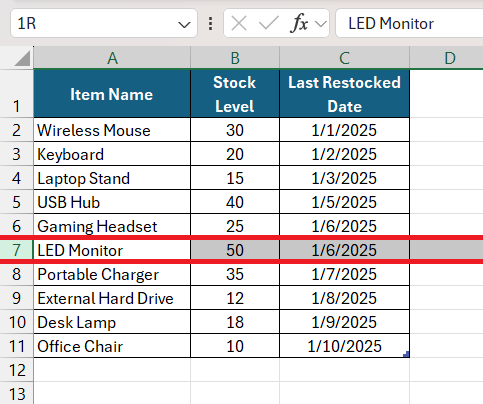
Imagine you’re keeping track of inventory levels. You notice a new shipment for an item that isn’t listed yet, and you need to add it quickly.
STEP 1: Select the entire row where you want to insert the new row above.
For example, click anywhere in row 7 if you want the new row to appear above it.
STEP 2: Press Ctrl + Shift + + on your keyboard
On a Mac, use Cmd + Shift + + instead.
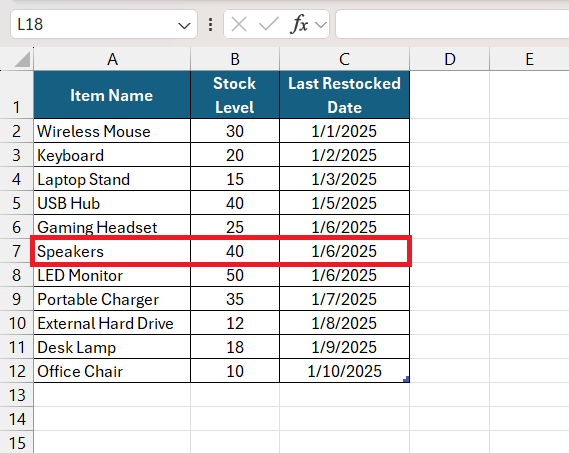
STEP 3: A new row will appear instantly. Enter your data.
For instance:
- Item Name: “Speakers”
- Stock Level: 40
- Last Restocked Date: 1/6/2025
Method 4: Adding Multiple Rows at Once
Sometimes, you need to insert more than one row, such as when expanding a dataset to accommodate a batch of new entries.
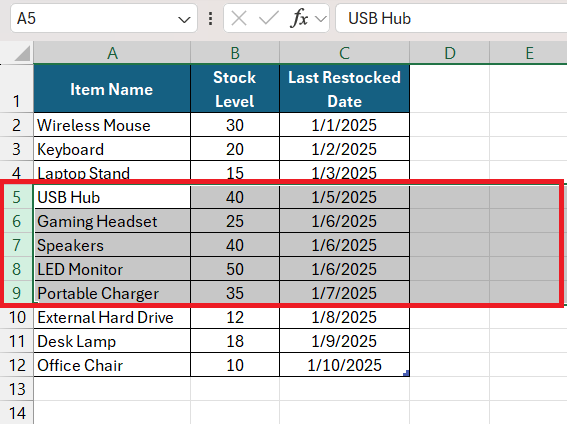
You’re creating a customer feedback log. Your manager hands you a list of five new customer reviews to include in the spreadsheet. Instead of adding rows one by one, you can add all five at once.
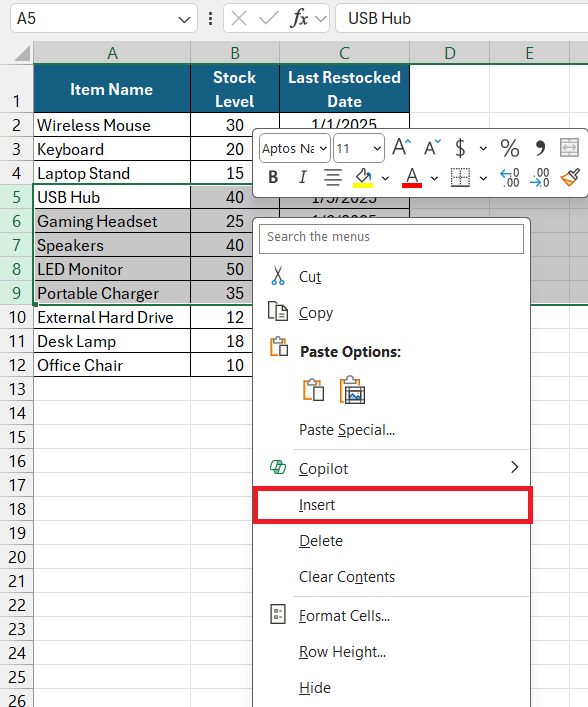
STEP 1: Select the number of rows you want to insert.
For example, if you need five new rows, select five existing rows starting from where you want the new rows to appear.
STEP 2: Right-click on the selected rows and choose Insert.
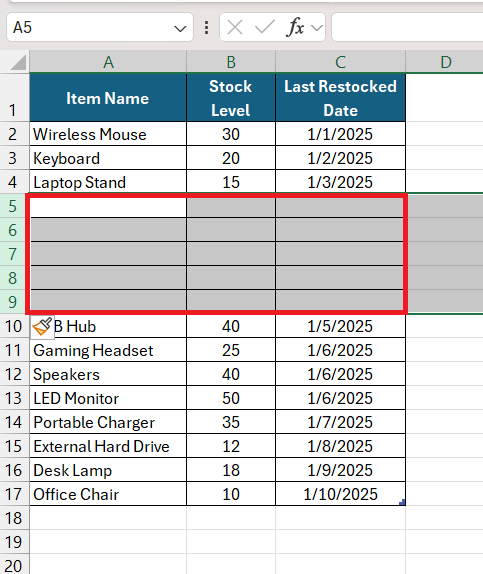
STEP 3: Check the result, Excel will add the same number of blank rows.
Real-Life Applications
Accounting: Adding Rows for New Transactions in a Ledger
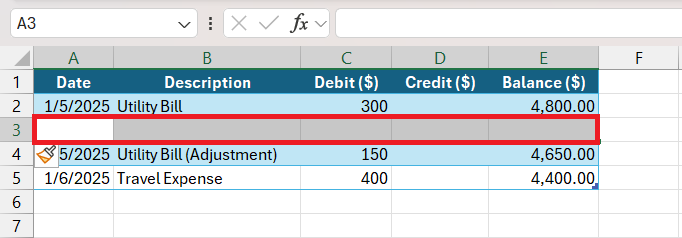
In accounting, keeping an accurate record of financial transactions is crucial. For example, you might have a ledger with columns for Date, Description, Debit, Credit, and Balance. Let’s say you receive a utility bill that wasn’t recorded yet. To include this transaction, you’ll need to add a new row in the ledger.
Using the Right-Click Method or Ribbon Method, you can easily add the new transaction where needed and maintain the flow of data.
Project Management: Updating Timelines with Additional Tasks or Milestones
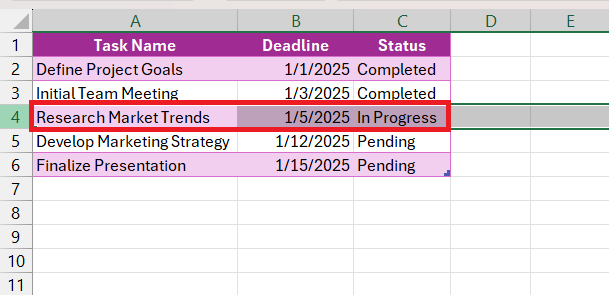
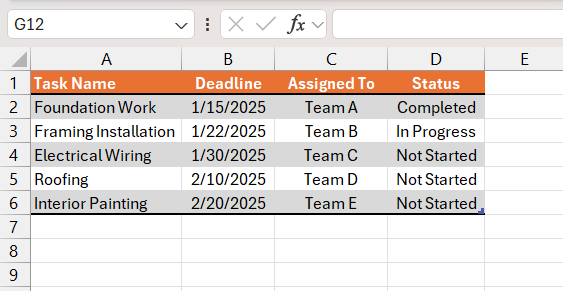
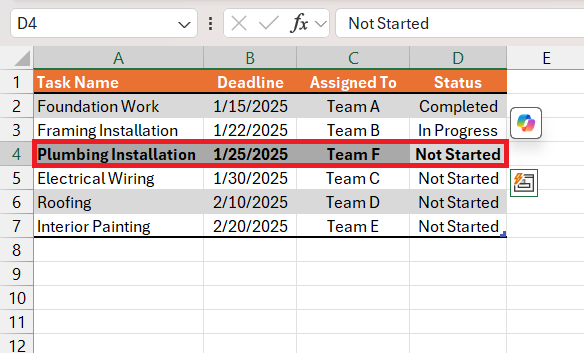
In project management, timelines are dynamic. As projects evolve, new tasks or milestones often need to be added. For example, you might be managing a construction project, and your timeline includes columns for Task Name, Deadline, Assigned To, and Status.
Your project timeline currently looks like this:
Now, you’ve decided to include a new task for plumbing installation.
These detailed examples highlight how adding rows can keep your data organized, accurate, and ready for action. Whether you’re reconciling accounts, tracking inventory, or planning projects, mastering this skill ensures your spreadsheets stay professional and efficient.
FAQ: Insert Rows in a Flash
How do you add a new row in Excel?
To add a new row in Excel, I select the row below where I want the new one to be, right-click, and choose ‘Insert’ from the context menu. Alternatively, I use the ribbon: Home tab > Insert > Insert Sheet Rows, or I can use the keyboard shortcut by pressing Ctrl + Shift + + (Plus key). This action swiftly adds a blank row above my selected row.
What is the fastest way to insert a new row in Excel using a keyboard?
The fastest way to insert a new row in Excel using the keyboard is to select the row below where the new one should go and press Ctrl + Shift + + (Plus key). This method requires minimal effort and provides immediate results, making it highly efficient for rapid data entry or spreadsheet modifications.
Can I insert multiple rows at once with a shortcut?
Yes, I can insert multiple rows at once with a shortcut in Excel. To do so, I select the number of existing rows corresponding to the number of new rows I want to insert. Then, I use the keyboard shortcut Ctrl + Shift + + (Plus key), and multiple blank rows will be inserted above the selected rows instantly.
How do you add up rows on Excel?
To add up rows on Excel, I use the SUM function. For example, to sum the values in rows 1 through 5 of column A, I type =SUM(A1:A5) into a cell where I want to display the total. This function calculates and displays the sum of the values within the specified range of cells efficiently.
John Michaloudis is a former accountant and finance analyst at General Electric, a Microsoft MVP since 2020, an Amazon #1 bestselling author of 4 Microsoft Excel books and teacher of Microsoft Excel & Office over at his flagship MyExcelOnline Academy Online Course.

