Learn about Formulas with our 101 Advanced Excel Formulas & Functions Examples!
Key Takeaways
- To add dial-in numbers to a Microsoft Teams meeting, simply create a new Teams meeting in Microsoft Outlook, input the meeting details, and send the invite to participants. Dial-in information is automatically included in the invitation for eligible users without further action required.
- If dial-in numbers are not showing up on the Teams meeting invitations, IT administrators may need to check and update licenses through the Microsoft Teams Admin Center to ensure the necessary audio conferencing capabilities are enabled.
- Within an ongoing Microsoft Teams meeting, hosts can dial out to a number by clicking the ellipsis (three dots), selecting “Call” followed by “Dial a number,” entering the phone number, and then pressing enter. Charges for this service will be determined by the organization’s telephony provider.
Is Your Organization Set Up for PSTN Conferencing?
Before you dive into dial-in numbers, it’s essential to determine whether your organization has everything in place for PSTN (Public Switched Telephone Network) conferencing. PSTN conferencing is the feature that allows meeting participants to join via telephone. You’ll need to check if your Microsoft Teams account is enabled for PSTN calling and conferencing. If you’re unsure about this setup, it’s time to touch base with your IT administrator. They can confirm whether the necessary licenses have been purchased and applied to your organization’s Microsoft Teams setup.
Table of Contents
Step-by-Step Guide to Adding Dial-In Numbers
Verify Audio Conferencing Availability
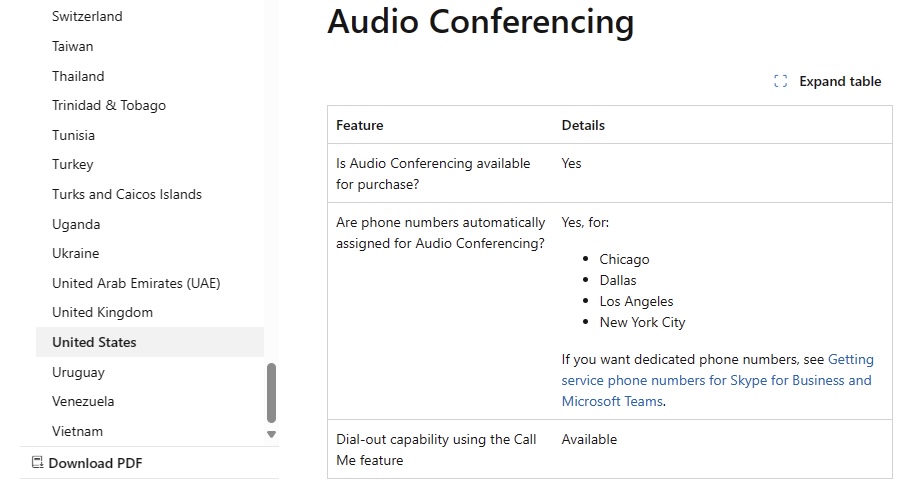
Before you can start adding dial-in numbers to your Teams meetings, you’ll want to verify that Audio Conferencing is available in your region. Microsoft provides a comprehensive list of countries and regions where Audio Conferencing, Calling Plans, and other phone system features are available. To do this:
STEP 1: Navigate to the “Country and region availability for Audio Conferencing and Calling Plans” page on Microsoft’s website.
STEP 2: Select your country or region from the list provided to check the availability of Audio Conferencing services.
License Acquisition and User Assignment
Getting your team ready for dial-in conferencing involves two critical steps – acquiring the right licenses and assigning them to your team members who’ll be scheduling or leading the meetings.
Your first move is to purchase Audio Conferencing licenses – these are essential for each user that plans to set up Teams meetings with dial-in numbers. You’d be glad to know this process is pretty straightforward:
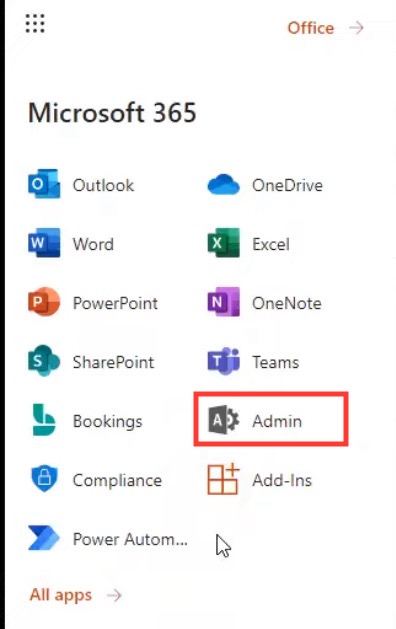
STEP 1: Visit the Microsoft 365 admin center and navigate to the Billing section to purchase the necessary licenses.
STEP 2: Once purchased, you’ll then assign these licenses to the appropriate users in your organization through the admin center.
As a helpful tip, don’t forget to also assign Communications Credits licenses to the same users – they’re a handy add-on, and the best part? They’re free.
Configuring Your Microsoft Teams Environment
Obtain Service Numbers for Your Conferencing Bridge
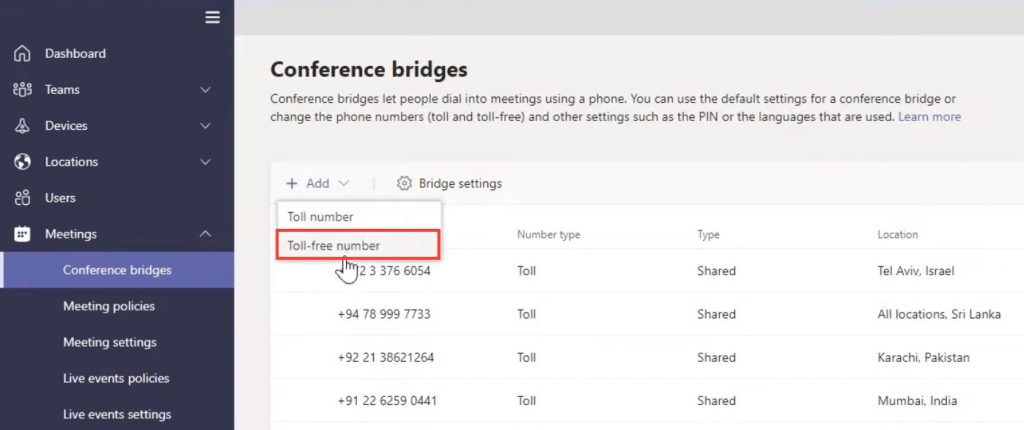
For your organization to effectively use audio conferencing within Teams meetings, you’ll need special phone numbers known as service numbers. These numbers will connect participants to your conferencing bridge, enabling dial-in access to meetings.
Here’s how to get them:
- Use the Microsoft Teams admin center: You can acquire service numbers directly through the admin center. This is the most straightforward method but is based on availability within your country or region.
- Port existing service numbers: If your organization already has existing service numbers from a different provider, they can be transferred to Microsoft 365 or Office 365. It’s a bit like moving your existing phone number to a new cell phone.
- Request new numbers via a form: In some instances, you might need specific numbers or area codes that aren’t available through the admin center. For these cases, a request form can be used to obtain new numbers.
After securing your service numbers, the next step is to assign them to your conferencing bridge so that they appear on meeting invites.
Designate a Default Number and Manage Language Settings
Now that you have your service numbers, the next stage is to designate a default number for your organization and tailor the language settings to suit your team’s needs. This step ensures a personalized and user-friendly experience for both meeting organizers and participants.
To set your primary number and adjust language settings:
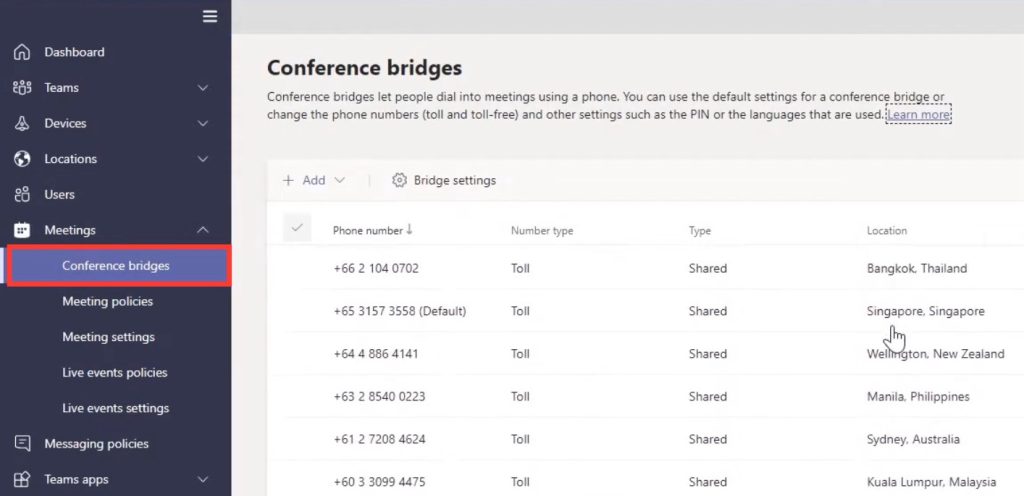
STEP 1: Open the Microsoft Teams admin center.
STEP 2: Navigate to ‘Meetings’ > ‘Conference bridges.’
STEP 3: Select the phone number you intend to set as default.
STEP 4: Click ‘Edit’ and choose the desired default language for the auto attendant—the system that greets callers and guides them through menu options.
Remember, if you have dedicated numbers, you can customize the language settings specific to your organization’s requirements, enhancing the caller experience significantly.
Personalizing Meeting Invitations
Customize Meeting Invite Details
Creating a personalized experience for your meeting invitees can begin with the invitation itself. In Microsoft Teams, you have the option to customize the meeting invitations to align with your company brand or provide additional information.
To customize meeting invites, here’s what to do:
STEP 1: Within the Teams admin center, locate ‘Meetings’ > ‘Meeting settings.’
STEP 2: Here, you can add custom details such as help and legal links, a text message for attendees, or even a small company logo.
These custom touches not only provide clarity and assistance to participants but also reinforce your company’s brand image with every invite sent.
Integrate Dial-In Number with Meeting Invites
Integrating the dial-in number with your Teams meeting invites is a seamless process once you’ve got everything set up. You’ll want to ensure that every invite you send out includes the dial-in options so participants can join by phone if needed.
Here’s the process to make this integration a breeze:
- For Outlook Scheduled Meetings: Simply create a new Teams meeting within your Outlook calendar, and the dial-in details, along with the conference ID, will be included automatically in the invitation.
- For Teams Scheduled Meetings: When scheduling a meeting directly in Teams, make sure you have PSTN conferencing enabled on your account. Again, the necessary dial-in details should populate the invite without further input needed from you.
By following these steps, you offer attendees a straightforward and reliable way to connect to your meetings, ensuring a smoother experience for everyone involved.
Advanced Setup for Seamless Audio Access
Assigning Individual Dial-In Numbers
When you require a more personalized approach for certain team members or departments, assigning individual dial-in numbers can come in handy. This allows for a consistent meeting experience and can be useful for those who frequently host conferences.
Here’s what you need to do to assign individual numbers:
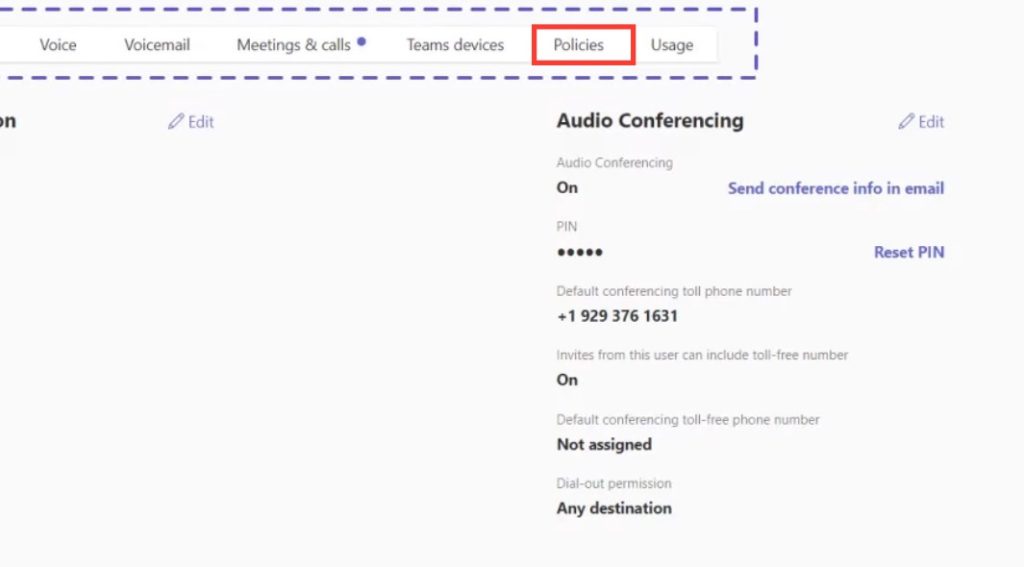
STEP 1: In the Microsoft Teams admin center, navigate to ‘Users’ and then select the specific user.
STEP 2: Click on ‘Policies’ and then ‘Edit.’
STEP 3: Under ‘Audio Conferencing,’ you can choose a specific service number to assign to the user from your pool of available numbers.
By assigning individual numbers to users, you provide them with a static, recognizable number for all their meetings, making it easier for regular participants to connect and engage.
Additional Meeting Options and Resources
To optimize your Microsoft Teams meetings further, explore additional settings and resources that can enhance the meeting experience.
Here’s a brief look at what you might consider:
- Meeting Options: Tailor participant permissions, decide who can bypass the lobby, and determine who can present in the meeting. You can access these settings directly from the Teams meeting invitation by clicking on ‘Meeting options.’
- Dial-in Number Lookup: Participants sometimes need access to alternative dial-in numbers, especially if they’re joining from different regions. Using the ‘Find a local number’ link at the bottom of the invitation can be a lifesaver, as it provides a full list of available dial-in numbers based on the user’s location.
- Audio Conferencing Settings: Delve into audio conferencing settings in the Teams admin center for more customization options—such as setting entry and exit announcements or adjusting meeting PIN requirements.
- Resources and Documentation: Microsoft offers extensive documentation and support resources online. Utilize these to stay updated on best practices, troubleshooting steps, and new feature releases.
Investing time in understanding these additional options will ensure your team is equipped with all the resources needed for efficient and productive meetings.
Helpful Tips for Teams Audio Conferencing
Managing Users and Permissions Effectively
Effectively managing users and their permissions is fundamental in maintaining a secure and smooth-operating Teams environment. Here’s how you can manage users and permissions effectively:
- Utilize Groups: Organize users into groups based on department, location, or role. This enables you to assign permissions and licenses to multiple users at once, simplifying the management process.
- Review Permissions Regularly: Conduct periodic audits of user permissions, ensuring that access levels are appropriate and that former employees or those who have changed roles have their permissions updated accordingly.
- Implement Role-Based Access Control (RBAC): RBAC ensures that users have access only to the information and features necessary for their roles, helping to prevent unauthorized access and potential data breaches.
By staying on top of user management, you create a secure and efficient environment that supports productivity and safeguards sensitive information.
Utilizing PowerShell for Conference Management
PowerShell is an invaluable tool for managing your Teams audio conferencing settings on a granular level. It provides efficiency and control beyond what you can achieve via the admin center alone.
Here’s why PowerShell can be your ally:
- Bulk Actions: Perform actions on multiple users at once, such as assigning dial-in numbers or changing conferencing policies.
- Advanced Configuration: Access settings that may not be available in the admin center for tailored meeting experiences.
- Automation: Create scripts to automate recurring tasks, saving time and reducing the risk of human error.
Whether you’re setting the default conferencing number with Set-CsOnlineDialInConferencingUser cmdlet or managing licenses with Set-MsolUserLicense, PowerShell commands offer a level of precision and efficiency essential for larger organizations.
Overcoming Common Challenges
Troubleshooting Dial-In Number Issues
When participants encounter issues with dial-in numbers, it’s crucial to troubleshoot effectively to ensure minimal disruption to your Teams meetings. Here are proactive steps for addressing common challenges:
- Verify the Number: Double-check the dial-in numbers provided in the meeting invite to ensure they are correct and active.
- Check License Status: Confirm that the affected users have the appropriate audio conferencing licenses assigned to them.
- Network Check: Encourage users experiencing connection issues to check their network, as a poor signal can affect call quality.
- Audio Device Settings: Guide users to verify that their audio devices (headphones, microphones) are properly configured and selected in Teams settings.
- Update Teams: Ensure that all users have the latest version of Microsoft Teams installed, as updates can resolve known bugs and introduce improvements.
If these steps fail to resolve the issue, consulting Microsoft’s support and documentation may be necessary for more specific troubleshooting advice.
Navigating Global Dial-In Restrictions
When dealing with global teams, it’s possible to run into dial-in restrictions due to varied telecommunications regulations. Navigating these restrictions requires an understanding of the challenges and how best to approach them:
- Country Restrictions: Some countries may not support dial-in conferencing or may have specific legal requirements. Review Microsoft’s availability list to determine if there are limitations for certain regions.
- Alternate Methods: If dial-in is not available, encourage the use of Teams’ VoIP capabilities, or consider providing alternate dial-out options where the meeting can call participants directly.
- Communications Credits: Setting up Communications Credits in Teams can allow for dial-out capabilities to countries where dial-in numbers aren’t available.
Understanding these restrictions and preparing with alternative options ensures that your global team members remain connected and engaged, regardless of location.
Maximizing the Impact of Teams Meetings
How Training Can Elevate Your Team’s Meeting Experience
Investing in Microsoft Teams training can profoundly enhance your team’s meeting experience. When your team is adept at utilizing Teams features, they can achieve:
- Efficient Collaboration: Training helps team members use file sharing, real-time editing, and collaboration tools more effectively during meetings.
- Better Engagement: Knowing how to leverage features such as breakout rooms, meeting notes, and live reactions can make for more interactive and productive meetings.
Remember, the more confident your team feels using Microsoft Teams, the smoother and more successful your meetings will be.
The Role of Consulting Services in Enhancing Meeting Efficiency
Consulting services can be a game-changer in taking your Teams meetings to the next level. Here’s how they can make a difference:
- Custom Solutions: Consultants can tailor Teams to fit your business needs perfectly, integrating it with existing workflows or software.
- Expert Guidance: Benefit from best practices and strategies to optimize meeting structures, agendas, and follow-up actions for maximum efficiency.
A consultant’s expertise can lead to cutting-edge meeting experiences and ultimately, a more productive team.
FAQs About Adding Dial-In Numbers in Teams
What Do I Need Before I Can Add Dial-In Numbers?
Before adding dial-in numbers to Teams meetings, you need:
- Microsoft Teams enabled for your organization.
- Audio Conferencing license or Microsoft 365 E5 subscription.
- PSTN infrastructure configured if you are using direct routing.
Make sure to check with your IT admin for these prerequisites.
How Can I Assign a Dial-In Number to An Individual User?
To assign a dial-in number to an individual user:
- Ensure you have service numbers available.
- In Teams admin center, under ‘Voice’ > ‘Phone numbers’, assign a number to the user.
- They will receive this number on all their Teams meeting invites.
Why is Teams meeting not showing dial in option?
If Teams meetings aren’t showing the dial-in option, it could be because:
- Audio Conferencing isn’t enabled.
- The user organizing the meeting doesn’t have an Audio Conferencing license.
Check with your IT admin for proper setup and license assignment.
John Michaloudis is a former accountant and finance analyst at General Electric, a Microsoft MVP since 2020, an Amazon #1 bestselling author of 4 Microsoft Excel books and teacher of Microsoft Excel & Office over at his flagship MyExcelOnline Academy Online Course.

