When I first started working with time calculations in Excel, I quickly realized how useful it can be for tracking hours worked, managing schedules, or even planning events. Adding time in Excel is straightforward once you know the right functions and formatting tips. Let me walk you through the step-by-step guide on how to add time in Excel.
Key Takeaways:
- Excel’s TIME function is essential for precise time management and calculations.
- Basic arithmetic can efficiently add time values in Excel, especially for quick sums.
- Custom formatting helps handle time that exceeds 24 hours.
- Keyboard shortcuts, like “Ctrl + Shift + ;” for current time, enhance productivity.
- Consistent time entry practices, such as uniform formats and dropdown lists, prevent errors.
Unlocking Excel’s Time Management Capabilities
The Basics of Time Addition in Excel
When juggling numbers and deadlines, managing time efficiently in Excel is essential. At its core, time addition in Excel boils down to inputting times as recognizable values and using simple arithmetic. Many are unaware that Excel can interpret time entries in cells, allowing for easy addition.
Key Functions for Managing Time
When diving deeper into Excel’s time management toolbox, there is one function worth mentioning: the TIME function.
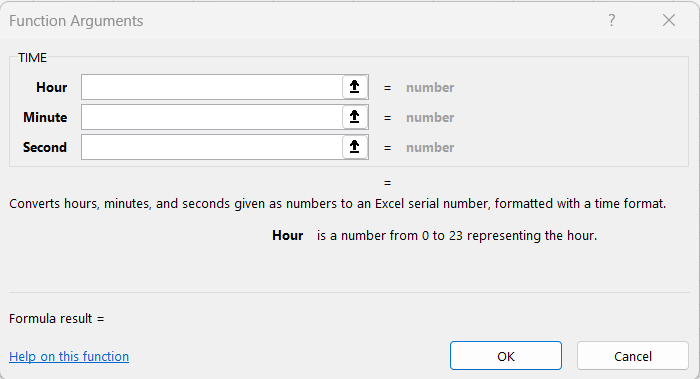
The TIME function allows the creation of a time value from individual hour, minute, and second components. Imagine needing a precise timestamp on a financial report; this is where the TIME function shines, streamlining the combination of separate time units into a singular, coherent value.
Step-by-Step Guide to Adding Time Values
Simple Formulae for Quick Calculations
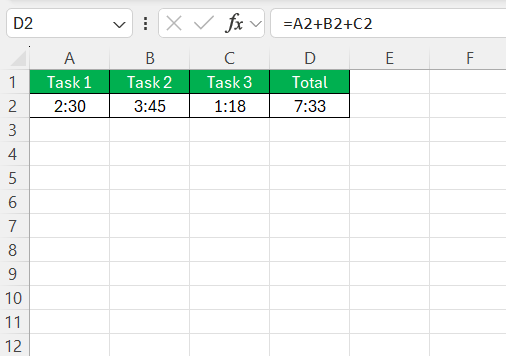
Efficiency is crucial when adding time in Excel, especially for those frequently working with schedules or timesheets. Simple formulas offer a straightforward approach to making quick calculations. One might, for instance, add up hours worked over several days using basic addition: “=A2+B2+C2”, where each cell (A2, B2, C2) contains time values.
This directly gives the sum of times, assuming the cells are properly formatted. It’s handy to remember that for straightforward time addition, there’s no need for complex function wizardry—just plain arithmetic will do the job.
Utilizing Time Functions for Enhanced Accuracy
For a more nuanced control over time calculations and to boost accuracy, leveraging Excel’s TIME function is indispensable. By dissecting time into its hour, minute, and second components, the function crafts a time that’s incredibly precise.
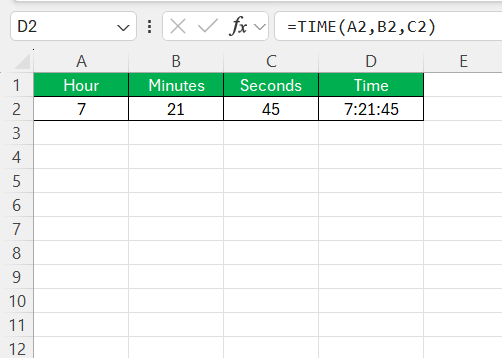
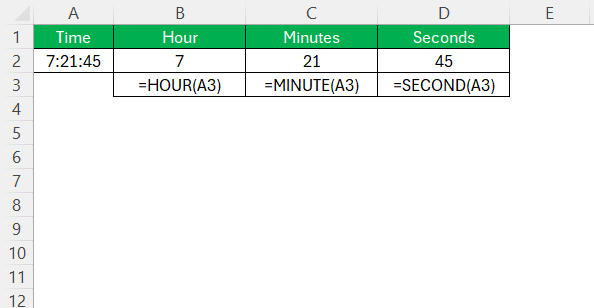
Consider the task of creating a custom time—such as 7 hours, 21 minutes, and 45 seconds. The formula would read: “=TIME(7, 21, 45)”, resulting in an Excel-recognized time value.
Using the TIME function isn’t just about accuracy, but also about convenience when dealing with data that isn’t in conventional time format—like a series of numbers meant to represent time intervals. It’s a powerful feature when compiling reports or tracking project timelines where specificity down to the second is required.
Overcoming Time Calculation Challenges
Dealing with Time Formats and Conversions
Time formats and conversions in Excel can sometimes appear labyrinthine, yet they’re critical for maintaining data consistency and readability. Below are two tips that might prove to be time-savers:
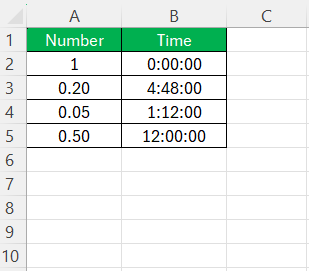
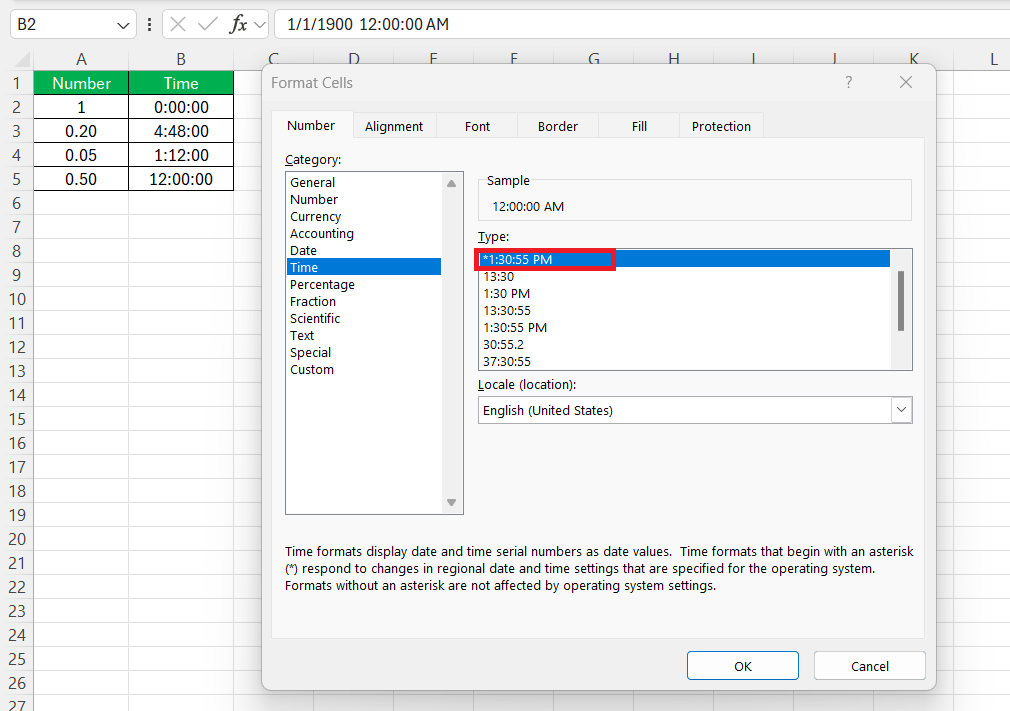
- Understanding Excel’s Time Serial Number: Excel stores times as decimal fractions, with the value of “1” representing a full 24-hour period. Getting to grips with this concept is paramount when converting numbers to time format or vice versa.
- Converting Between Time Units: When you need to convert time to a specific unit, functions like HOUR, MINUTE, and SECOND extract those respective values from a time value.
As for time formats, the beauty lies in Excel’s custom formatting options. You might want to format a cell to display time as hours and minutes only, or include seconds, or even show the time elapsed which exceeds 24 hours.
Mastering the “hh:mm:ss” custom format manipulation works wonders here.
Streamlining Your Workflow with Shortcuts
Keyboard Shortcuts for Time Manipulation
Streamlining the process of time manipulation in Excel can significantly enhance productivity, and keyboard shortcuts are the crux of this efficiency. Implementing shortcuts spares users the tedium of navigating through menus and ribbons.
For time management, particularly, here are a couple of nifty shortcuts:
- To enter the current time into a selected cell quickly, you use “Ctrl + Shift + ;” (semicolon). This instantaneously stamps the cell with the present time, a boon for time logging and timestamping.
- When you need to format a selection of cells to display time, the “Ctrl + 1” shortcut is a lifesaver. It opens the Format Cells dialog box, where you can swiftly choose the desired time format.
Best Practices for Efficient Time Entry
Adopting best practices for efficient time entry in Excel is not just about speed, but also about consistency and accuracy. Here are some tips that can help:
- Uniformity in Data Entry: Stick to a single-time format across your dataset to prevent confusion and errors in calculations. Decide whether you’ll use the 24-hour clock or AM/PM format and apply it consistently.
- Use Dropdowns for Recurring Time Entries: If certain time intervals are frequently used, consider creating dropdown lists in cells where these entries repeat. This reduces the chance of manual entry errors and accelerates the data entry process.
- Auto-Fill for Repetitive Times: For time values that recur in a pattern, the auto-fill handle can be dragged down or across cells to fill them with the appropriate sequences of time, saving considerable data entry time.
FAQs on Excel Time Addition
What is the formula on how to add time in Excel?
To add time in Excel, simply use the plus sign between time values, like “=A2 + B2”. For adding hours, you can use a formula “=A2 + TIME(N, 0, 0)” where ‘N’ is the number of hours to add, or “=A2 + (N/24)” for more than 24 hours.
What is the correct format for entering time data in Excel?
For standard time data entry in Excel, type the hours and minutes separated by a colon, such as 3:15 for three hours and fifteen minutes, and append ‘a’ or ‘p’ for AM or PM if needed. Excel will format it as hh:mm AM/PM.
How do I add hours or minutes that exceed a 24-hour period?
To add time surpassing 24 hours in Excel, use the SUM function and format the cell with custom format “[h]:mm” or “[h]:mm:ss” to properly display total hours and minutes or seconds, even if they exceed a day.
How to sum the hours and minutes in Excel?
To sum hours and minutes in Excel, use the SUM function, like “=”SUM(A1:A5)”, where A1 through A5 contain the time data. Ensure cells are time-formatted and the total cell can handle more than 24 hours if needed.
How do I add 15 minutes to a time in Excel?
To add 15 minutes to a time in Excel, use the formula “=A1 + (15/1440)” where A1 is the cell containing the initial time. The division by 1440 converts minutes into Excel’s time fraction for a day.
John Michaloudis is a former accountant and finance analyst at General Electric, a Microsoft MVP since 2020, an Amazon #1 bestselling author of 4 Microsoft Excel books and teacher of Microsoft Excel & Office over at his flagship MyExcelOnline Academy Online Course.

