Sorting data in Microsoft Excel is a fundamental task that helps organize and analyze information efficiently. Whether you need to arrange names alphabetically, order numbers from smallest to largest, or sort by any other criteria, Excel provides powerful tools to accomplish this with ease. By following a few simple steps, you can quickly transform a cluttered dataset into a structured, meaningful format. This guide will walk you through the methods on how to alphabetize in Excel, ensuring you can manage your data effectively.
Key Takeaways:
- Efficient Organization: Sorting data in Excel helps transform a cluttered dataset into a structured format, enhancing readability and usability.
- Alphabetization: Sorting columns alphabetically improves navigation and highlights duplicates, making data management more efficient.
- Sorting Multiple Columns: Excel allows sorting by multiple criteria, ensuring comprehensive data organization without disrupting row integrity.
- Row Sorting: Excel can also sort rows alphabetically, maintaining data relationships across columns.
- Problem-Solving: Anticipating and addressing common sorting issues, such as hidden rows or column headers, ensures a smooth sorting process.
Table of Contents
Introduction
The Importance of Alphabetization in Data Organization
Alphabetizing your data is like tidying up your work desk — it not only looks better, but it also makes finding things a whole lot easier. When you organize your data with A’s at the beginning and Z’s at the end, or vice versa, you’re setting the stage for effortless navigation through even the most complex spreadsheets.
Imagine having all of your related data snuggle up next to one another; this not only shines a light on any duplicates you may want to ditch but also allows for seamless grouping and categorization at your fingertips. And let’s not forget, a well-arranged dataset is a joy to read and a breeze to use!
Excel as a Tool for Sorting Information Efficiently
Excel really flexes its muscles when it comes to sorting your data with precision and ease. It’s like having a super-efficient personal assistant who’s a whiz at organizing — from a jumbled mess to neatly ordered columns and rows in just a few clicks.
Think of Excel’s sorting feature as a magic wand that quickly rearranges your data, whether it’s names, dates, numbers, or even a mix of all three. Plus, with the ability to sort by multiple criteria, Excel ensures your data isn’t just alphabetized; it’s customized to your specific needs, making it a breeze to extract valuable insights or present information in the most coherent way possible.
How to Alphabetize Columns in Excel
Step-by-Step Guide to Sort a Single Column Alphabetically
Sorting a single column in Excel is as easy as pie. Just follow these straightforward steps:
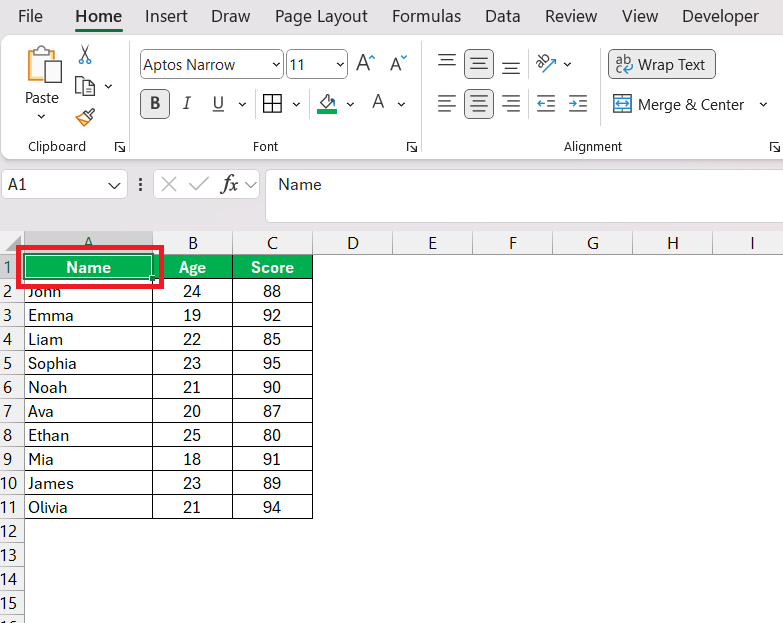
STEP 1: Click on any cell within the column that has to be alphabetized.
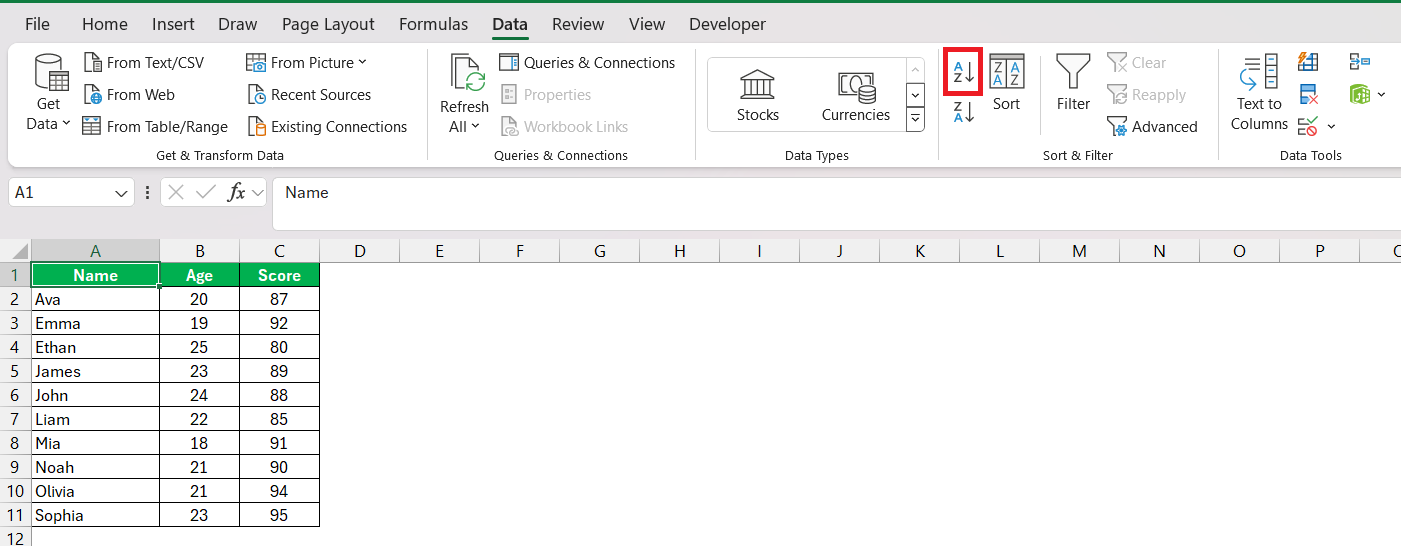
STEP 2: Navigate to the ‘Data’ tab, and find the powerhouse ‘Sort & Filter’ group.
STEP 3: Now, it’s decision time: click ‘A-Z’ to sort in ascending order, or ‘Z-A’ for descending. Voilà! Excel does its thing and presents your column in the chosen alphabetical order.
By tapping into these simple steps, your data will dance into alignment right before your eyes. And the best part? Your rows will remain perfectly intact, ensuring that every piece of information stays with its rightful owner.
Tips for Alphabetizing Multiple Columns While Preserving Row Integrity
When you’re juggling multiple columns, keeping them in sync is key. Preserving row integrity is like maintaining a dance routine flawlessly; every step must be in harmony with the music. Here’s how to ensure your multi-column data doesn’t miss a beat:
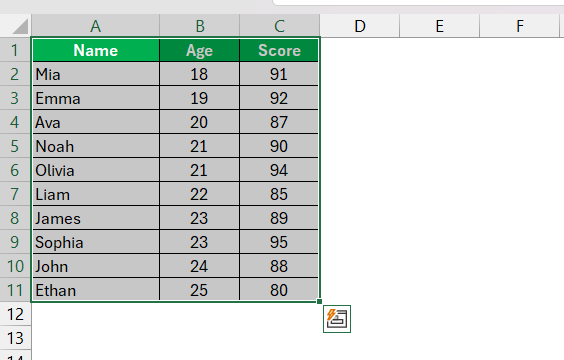
STEP 1: Start by selecting the range that encompasses all the columns you need to sort. No cell should feel left out!
STEP 2: Again, head over to the ‘Data’ tab and put ‘Sort & Filter’ to work.
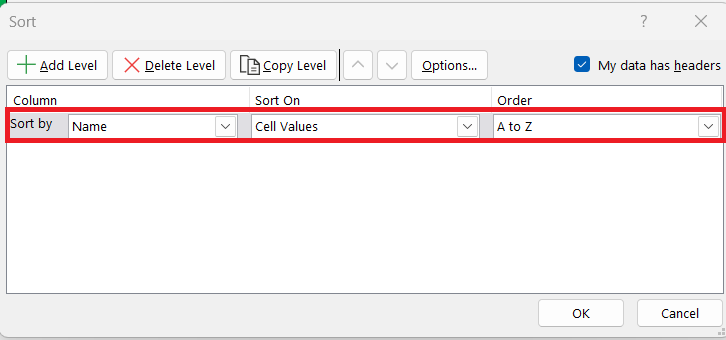
STEP 3: Click ‘Sort,’ and the Sort dialog box will pop up to serve your needs.
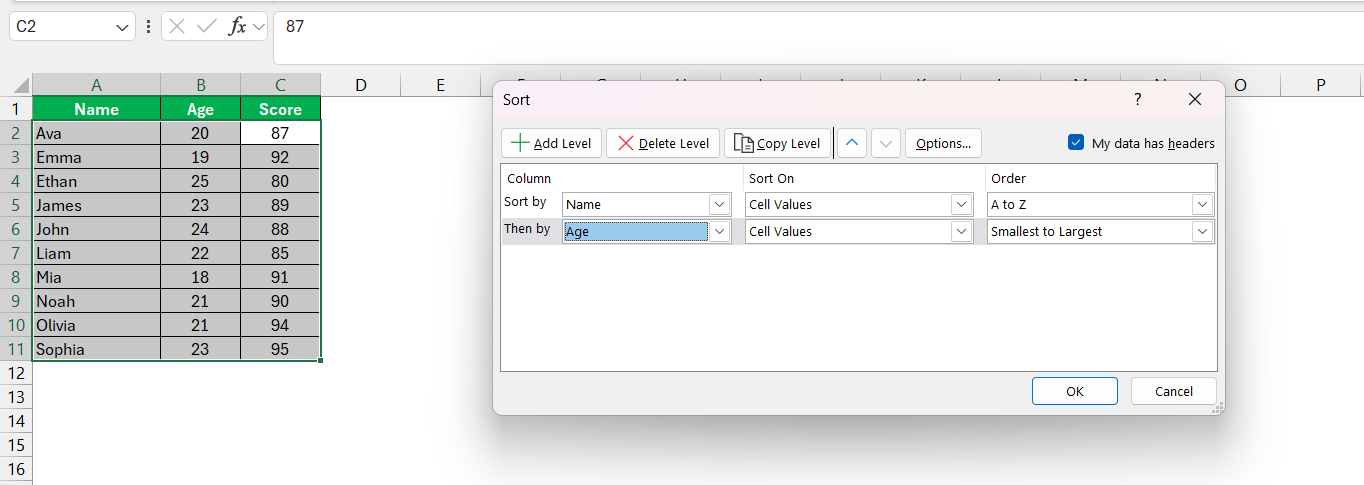
STEP 4: In the dialog box, start with your primary column under ‘Sort by’. This is your lead dancer.
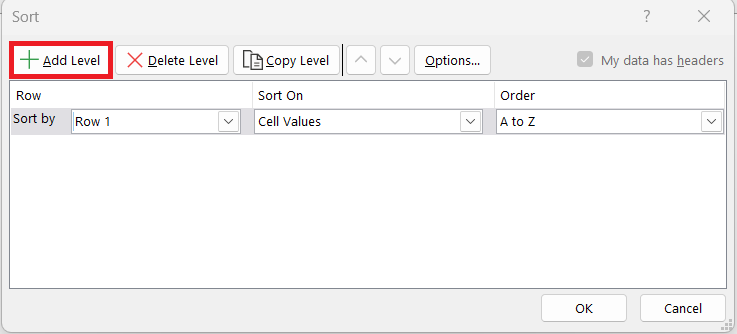
STEP 5: If you need backup dancers, add levels by clicking ‘Add Level’ to include additional columns.
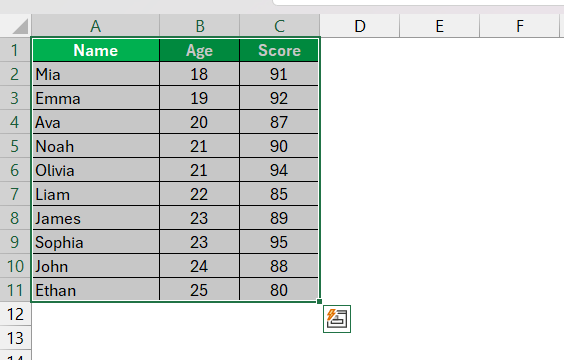
STEP 6: For each column, you can specify whether you want them to tango in ascending or descending order. Once you’ve set the rhythm, hit ‘OK,’ and watch the rows maintain their integrity while each column gets sorted.
Remember to always confirm that the ‘My data has headers’ checkbox is ticked correctly to prevent your headers from getting swept up in the sorting soirée.
Alphabetizing Rows in Excel
How to Sort Rows Alphabetically without Disrupting Data
Sorting rows alphabetically while keeping your data in check is a bit like doing a card trick without messing up the deck. Here’s how you can sort rows alphabetically in Excel without causing a data mix-up:
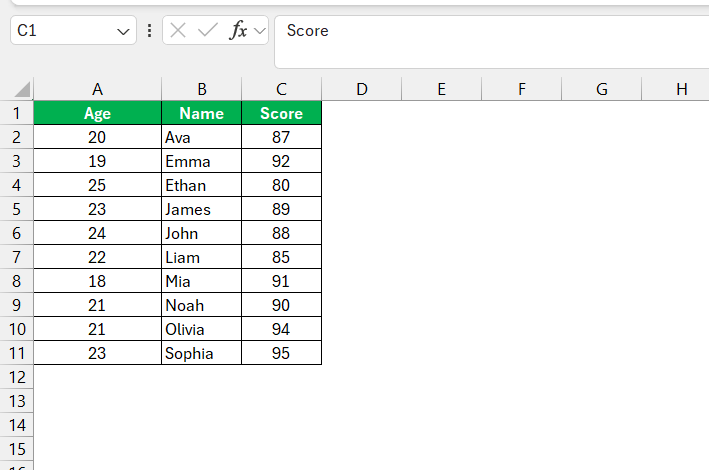
STEP 1: Firstly, decide which row is your master of ceremonies—the one you wish to sort by. Then go ahead and select the entire range of data. This is your audience.
STEP 2: Swing by the ‘Data’ tab, and in the ‘Sort & Filter‘ area, click ‘Sort.
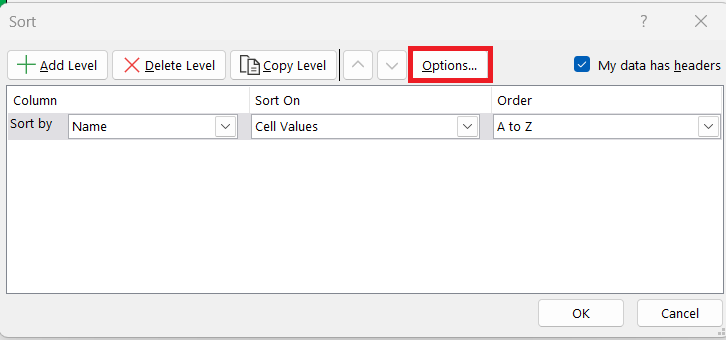
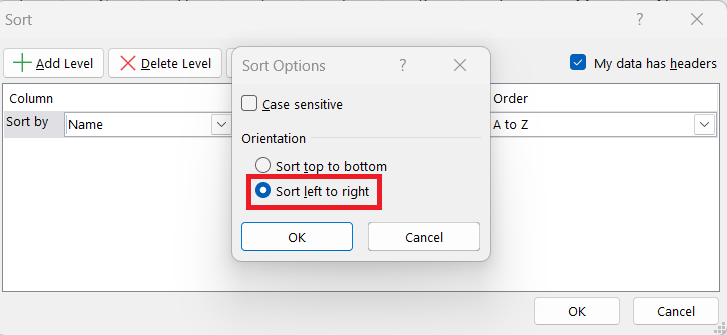
STEP 3: Here’s where you take a detour: click on the ‘Options’ button.
STEP 4: Switch the ‘Sort direction’ to ‘Left to Right’.
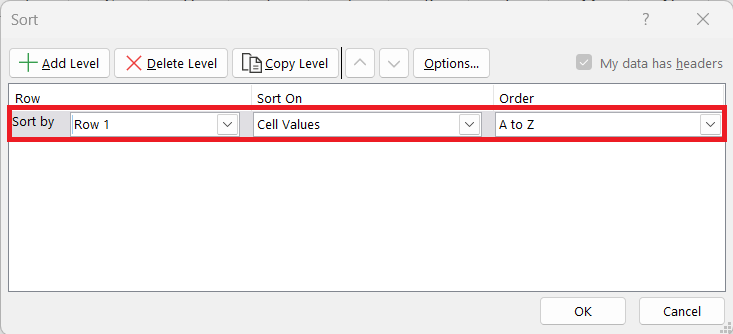
STEP 5: Now choose the row you want to alphabetize by using the ‘Sort by’ dropdown.
Excel will align your rows alphabetically without a single card — er, cell — out of place.
And just like that, you’ve preserved the relationship between your data across columns, all while achieving the clean, alphabetical order you wanted.
Tackling Common Issues
Solutions for Problems When Sorting Alphabetically in Excel
Sometimes, sorting alphabetically in Excel isn’t all sunshine and rainbows. You might hit a snag or two. Here’s how you can overcome common problems:
- If blank or hidden rows and columns are throwing you a curveball, do a bit of prep work. Unhide any hidden data and fill in or remove blanks to get everything on the same page before sorting.
- When column headers try to cut in on the sorting dance, make sure to tick the ‘My data has headers’ checkbox in the Sort dialog box. This will keep headers out of the sorting spotlight.
- If Excel is mixing up your data upon sorting, give it a gentle nudge by using the ‘Sort Warning’ dialog. If it pops up, select ‘Expand the selection,’ and Excel will maintain the relationship between cells.
Anticipating these issues and knowing how to handle them will save you from a data disaster and maintain your reputation as a spreadsheet virtuoso.
Best Practices to Avoid Data Mismatch During Alphabetization
To keep your Excel data in harmonic sequence and gracefully sidestep mismatches during alphabetization, consider these best practices as your golden rules:
- Use Headers Wisely: Always identify your headers. Excel can tell them apart from your data, ensuring they never get misidentified as a row to be sorted.
- Select Carefully: Before you sort, select the exact range of data you want to alphabetize. By doing so, you prevent unrelated data from crashing the sorting party.
- Check for Integration: Ensure your data is integrated — that columns and rows are related correctly and there are no stray cells that could tangle up the results.
- Double-Check for Hidden Issues: Weed out any hidden rows or columns and blanks that might make your data sort go haywire.
- Backup: Create a copy of your data before you perform any major sort. This is your safety net so you can always revert back if the high-wire act goes awry.
- Sort Step by Step: When handling multiple columns, sort them one at a time, from the most important to the least. This meticulous approach keeps your data in line.
By sticking to these best practices, you’ll be ensuring a smooth and error-free alphabetization process. A tidy, mistake-free spreadsheet is not a myth; it’s a well-organized reality!
Enhancing Your Excel Skills
Keyboard Shortcuts to Speed Up Alphabetizing Tasks
Who doesn’t love a good time-saver? Keyboard shortcuts are your best friends when it comes to whipping through alphabetization tasks in Excel. Here’s a medley of key combinations that’ll have you sorted with super speed:
- To quickly open the Sort dialog box, press Alt + D + S. This little combo acts like a direct line to your sorting controls.
- If you’re ready to sort a column in ascending order, you can bypass the ribbon entirely by pressing Alt + A + S after selecting the data.
- For descending order, switch it up with Alt + A + S + D just as smoothly.
These keyboard shortcuts are the secret ingredients to increasing your efficiency and making alphabetization a breeze. Remember, with great shortcut power comes great productivity!
FAQs
How do I sort alphabetically in Excel without mixing data?
To sort alphabetically without mixing up your data, start by selecting the entire range you want to sort. Then head to the ‘Data’ tab, click on ‘Sort,’ and ensure the ‘My data has headers’ option is selected if you have headers. Choose the column you want to alphabetize, select your desired order (A to Z or Z to A), and hit ‘OK.’ This keeps your rows intact while sorting the selected columns alphabetically.
How Do I Alphabetize a Column or Row Without Mixing Up My Data?
To alphabetize a column without mixing data, select the entire column except the header, and click ‘Sort A to Z’ or ‘Sort Z to A’ on the ‘Data’ tab. For rows, first, select all the data you wish to sort, then choose ‘Sort’ under the ‘Data’ tab, click ‘Options,’ switch to ‘Sort left to right,’ select the row in the ‘Sort by’ box, and click ‘OK.’
Can Excel Alphabetize Based on Last Names or Secondary Criteria?
Absolutely, Excel can sort by last names or other secondary criteria. First, if your data starts with full names, use Excel functions to separate last names into a new column. Then, use the ‘Sort’ feature in the ‘Data’ tab. Choose the column with the last names as your primary sort field. If needed, add secondary sort criteria by clicking ‘Add Level’ and selecting from the available options to refine your sort order.
How do I sort alphabetically in Excel with multiple columns and rows?
Sorting alphabetically with multiple columns and rows is all about control. First, select your data range. Next, head to the ‘Data’ tab and press ‘Sort.’ Use the ‘Sort by’ drop-down to pick your primary column and decide on an order. For additional columns, click ‘Add Level’ to add them as secondary criteria. This method keeps your rows together and respects the relationship between the data in each row.
How to sort a column in Excel alphabetically and keep rows together?
To sort a column alphabetically while keeping rows together, follow these steps:
- Select the entire range of cells or the columns you want to sort.
- Navigate to the ‘Data’ tab and click ‘Sort’.
- In the Sort dialog box, choose the column you wish to sort by from the ‘Sort by’ drop-down menu.
- Select ‘A to Z’ or ‘Z to A’ for the order.
- Ensure ‘My data has headers’ is checked if applicable.
- Click ‘OK’ to apply, and your selected column will be sorted alphabetically, with the rows intact.
John Michaloudis is a former accountant and finance analyst at General Electric, a Microsoft MVP since 2020, an Amazon #1 bestselling author of 4 Microsoft Excel books and teacher of Microsoft Excel & Office over at his flagship MyExcelOnline Academy Online Course.

