Keeping track of hours worked is essential, whether you’re managing payroll, tracking project hours, or analyzing employee productivity. Fortunately, Excel makes this process easy with simple formulas and formatting options. In this guide, I’ll walk you through the steps on How to calculate hours worked in Excel using different methods, including basic time subtraction, handling overnight shifts, and calculating total hours with overtime.
Key Takeaways:
- Excel simplifies time tracking with formulas and formatting options for payroll, project hours, and productivity analysis.
- Setting up a timesheet requires accurately recording start and end times, using military time for clarity, and managing unpaid breaks.
- Basic time subtraction calculates hours worked, while IF functions handle overtime, and custom formatting ensures proper display of long durations.
- Effective presentation using conditional formatting, summaries, and charts improves clarity and decision-making.
Table of Contents
Introduction: Harness the Power of Excel for Timesheets
What are Work Hours?
Work hours are more than just the period an employee clocks in and out of their job. They represent the dedicated time for which the employee is scheduled and contractually obliged to provide their services, and they directly influence productivity and payroll. In essence, work hours capture the labor that powers businesses and organizations.
Setting Up Your Excel Timesheet Template
Establish Start Time and End Time
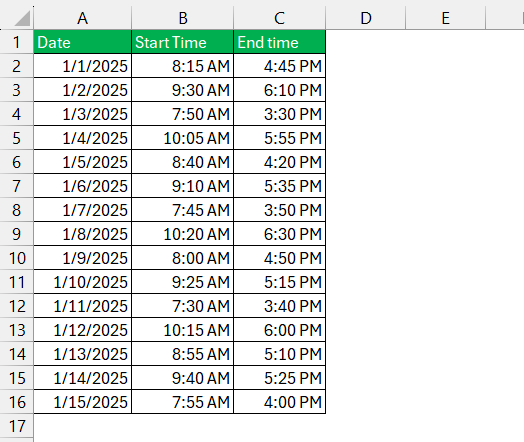
To calculate hours worked, the first and perhaps most crucial step in setting up your Excel timesheet lies in accurately establishing the start time and end time for each work period. Each entry should be recorded in its respective cell, which serves as the foundation for your subsequent calculations. Here’s a straightforward approach:
- Label columns appropriately: Clearly label one column for the start time and another for the end time.
- Input times consistently: Enter times using a standard format, such as ‘HH:MM AM/PM’, to ensure consistency and avoid confusion.
Remember, careful attention to inputting times at this stage helps prevent errors downstream, laying the groundwork for a reliable timesheet.
Convert to Military Time for Clarity
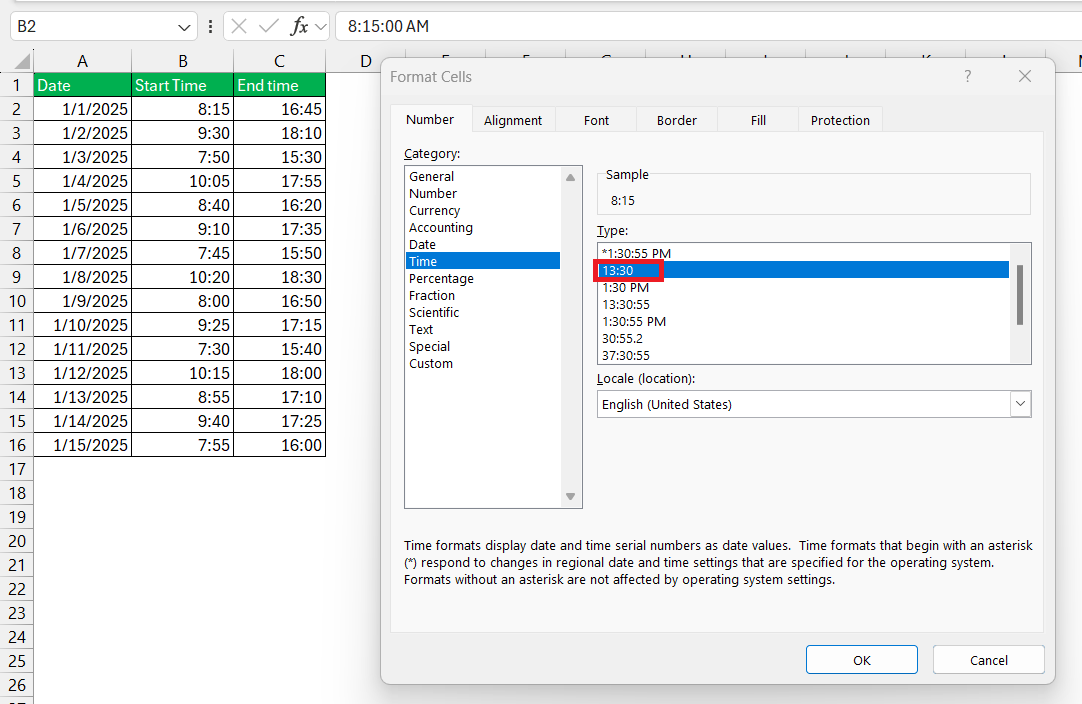
For clarity and precision, converting standard times into military time (the 24-hour clock system) is highly beneficial when working with Excel timesheets. This eliminates the AM/PM confusion and simplifies time calculations. Here’s how to make the switch:
- For times from 1:00 AM to noon (12:00 PM), enter the time as is, but remove the AM suffix (e.g., 08:30 for 8:30 AM).
- For times from 1:00 PM to midnight, add 12 to the hour component and enter the result without the PM suffix (e.g., 16:00 for 4:00 PM).
By consistently using military time, you reduce the potential for errors in your calculations and make your timesheet universally understandable.
How to Calculate Hours Worked
Subtract Start Time from End Time to Find Duration
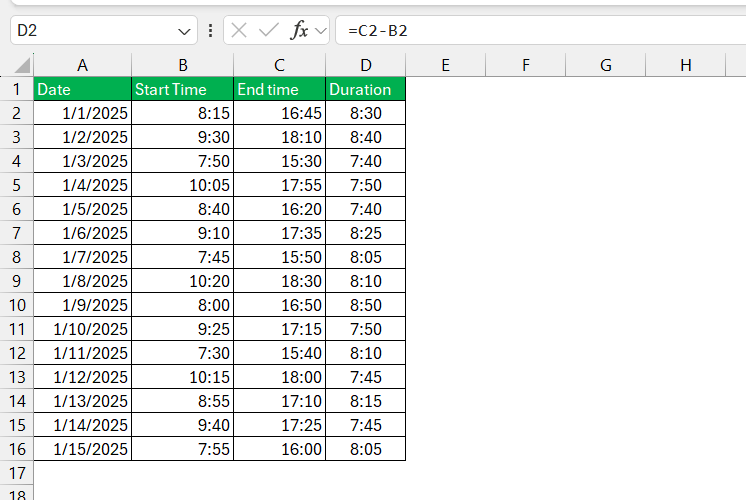
Now, let’s calculate the total hours worked by subtracting the start time from the end time for each work session. In Excel, use this simple formula: =END TIME - START TIME. If your Start Time is in cell B2 and End Time is in C2, your formula will look like =C2 - B2.
This formula is effective when both times fall within the same day. Make sure to format the result cell to display time accordingly, either in ‘HH:MM’ or in decimal hours if preferred. For example, if a task starts at 9:00 and ends at 16:00, the result will show a total of 7 hours worked.
Remember to pay close attention to the time format of your cells to ensure accurate calculation of the duration.
Manage Unpaid Breaks and Downtime
Effectively managing unpaid breaks and downtime is critical for an accurate account of work hours. In Excel, here’s how you can subtract these periods from the total work duration:
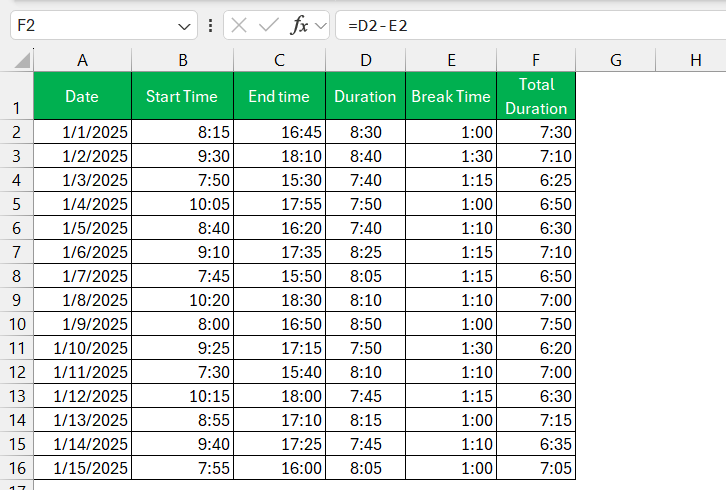
- Deduct the duration of any unpaid breaks directly from the total hours worked. For instance, if a 1-hour lunch break occurs, you would adjust the calculation to account for this.
- To compute, you can use a formula that might look like this:
=TOTAL HOURS - BREAK TIME. For example, if an employee worked from 9 AM to 5 PM with a 1-hour break, and the TOTAL HOURS is calculated in cell D2, and the BREAK TIME is in E2, the formula would be=D2 - E2.
This adjustment results in the net hours worked, reflecting the actual time the employee has been productive for the business. You’ll ensure that you’re providing accurate payroll and maintaining fair labor practices by doing this.
Fine-Tuning Your Timesheet with Advanced Functions
Timesheet Overtime Calculation Formula
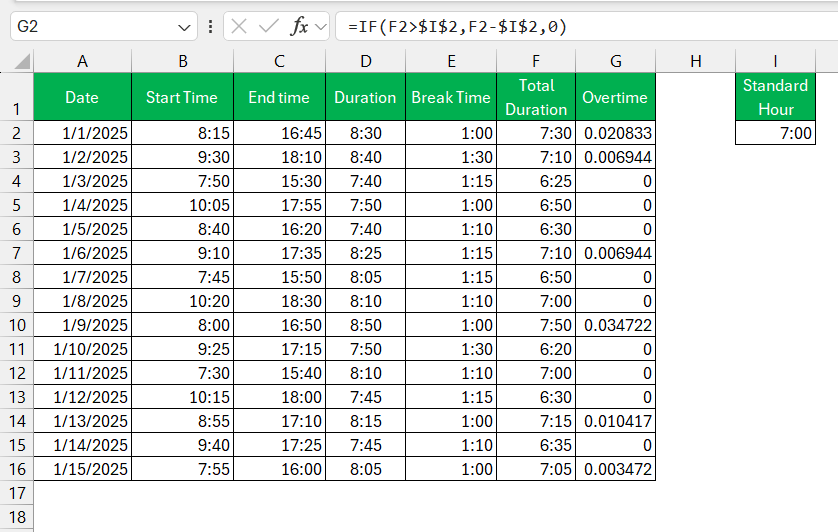
Calculating overtime becomes straightforward with the right formula. Overtime is any time worked beyond the standard work hours typically outlined by employment standards. Let’s say the regular workday is 8 hours; hours worked beyond this are considered overtime. In Excel, you can use the IF function to calculate overtime:
=IF(TotalHours>StandardHours, TotalHours-StandardHours, 0)
Where TotalHours is the cell that contains the sum of hours worked in a day, and StandardHours is the threshold above which overtime pay applies. This formula will give you the total overtime hours worked, which you can then multiply by the overtime rate to calculate additional pay due.
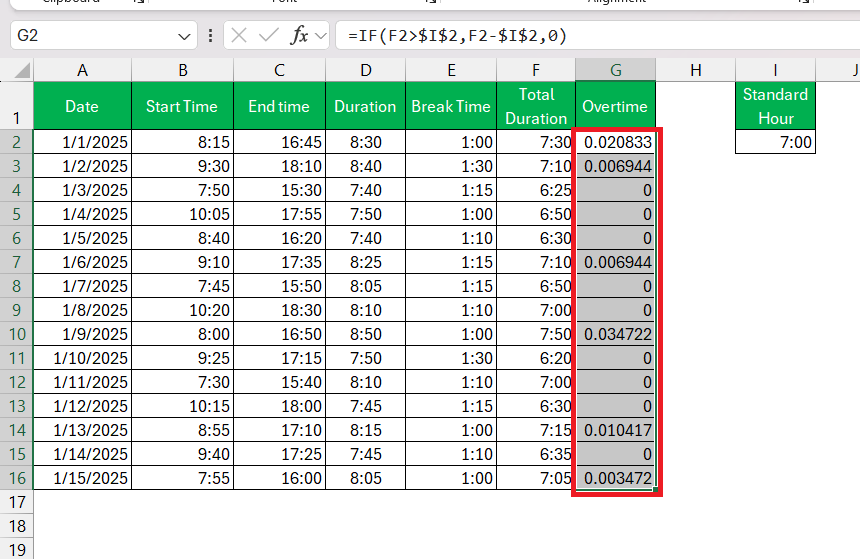
Formatting Time Durations to Read Easily
For durations that exceed 24 hours, standard time formatting in Excel will not suffice, as it might not display the total number of hours correctly. Use a custom format to ensure durations are easy to read and understand:
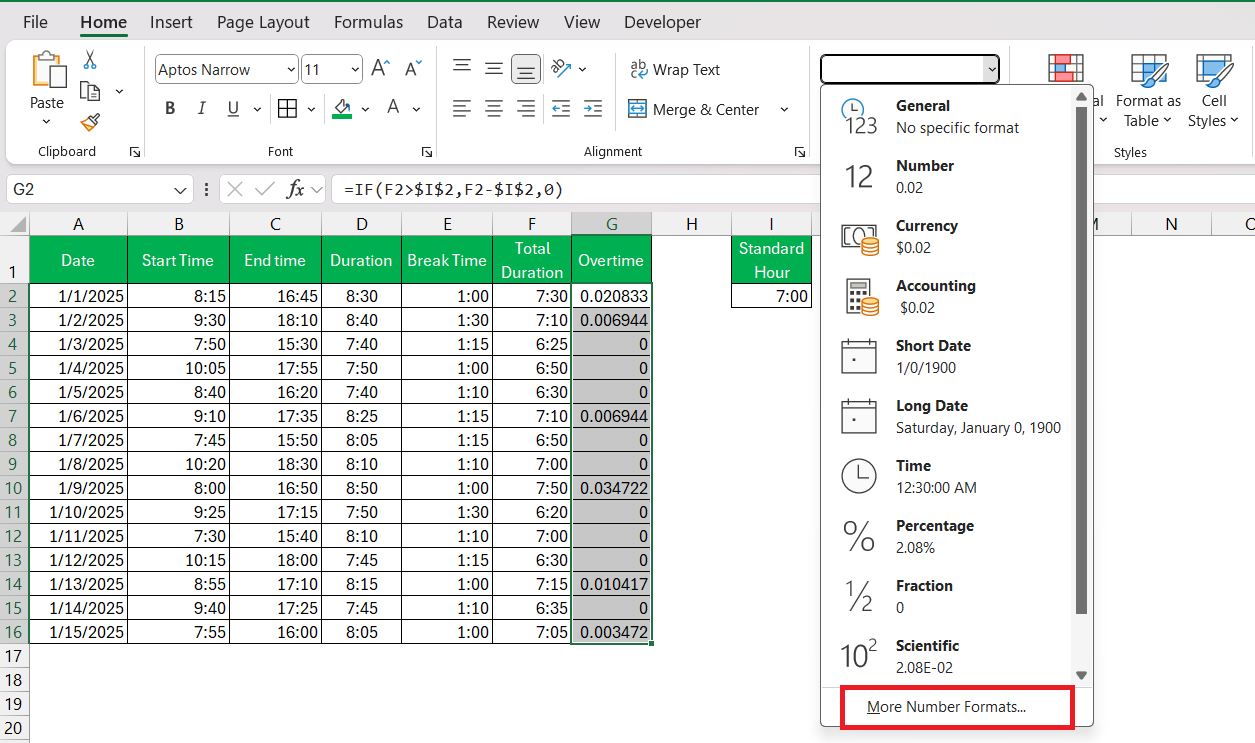
STEP 1: Select the cell with the duration.
STEP 2: Go to the Home tab, in the Number group, click More Number Formats.
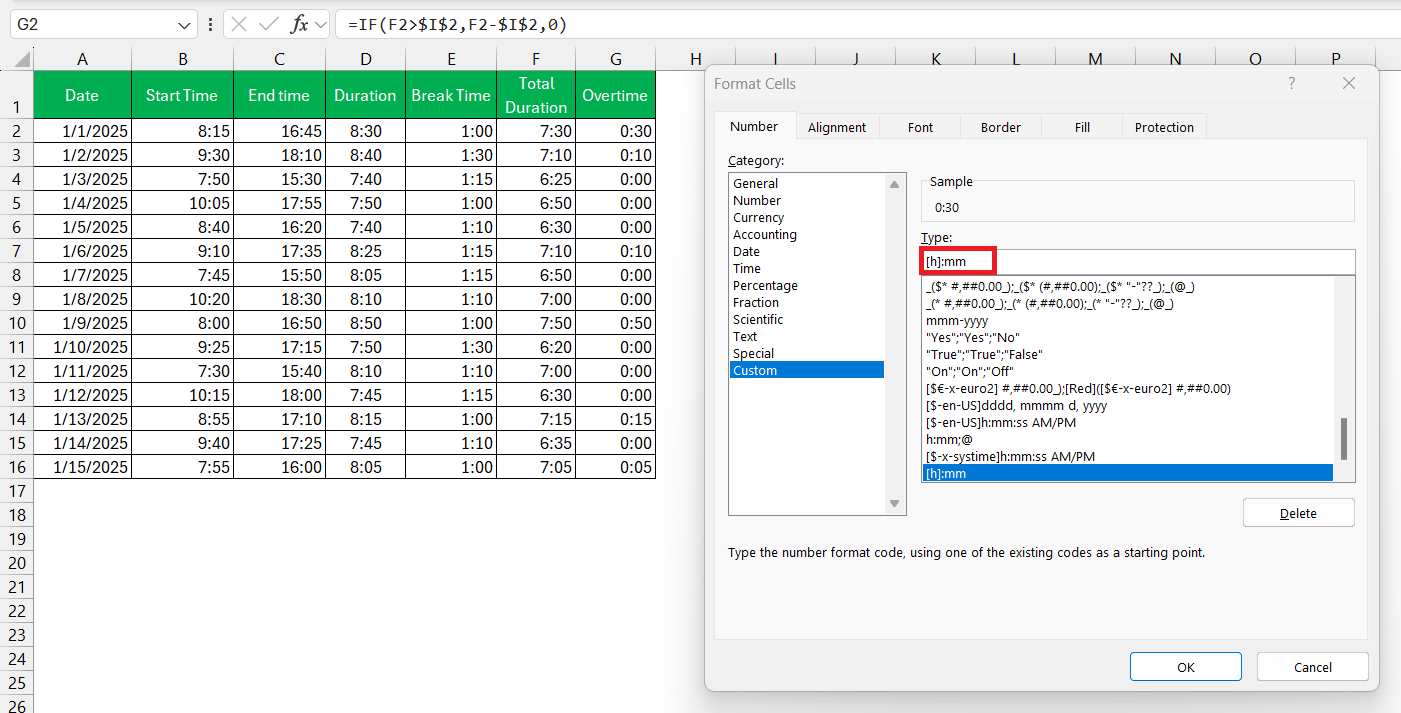
STEP 3: In the Format Cells dialog, select Custom. Type [h]:mm for hours and minutes, and [h]:mm:ss for hours, minutes, and seconds if needed.
By using the square bracket syntax [h], Excel knows to display the total hours, even if that number exceeds 24, without “rolling over” as a clock would. This provides clear, unambiguous records for long shifts or cumulative work hours.
Tips and Tricks for Mastering Excel Timesheets
Presenting Results for Clarity and Precision
After your calculations are complete, it’s time to present the results in a clear and precise manner. Here’s my recommended approach:
- Use a custom time format or convert the times to decimals as mentioned previously. This ensures clarity when dealing with durations that extend beyond the typical HH:MM format.
- Apply conditional formatting to highlight inconsistencies, such as negative durations, which can indicate errors in data entry.
- Create summarized cells that provide total hours worked, average daily hours, and total overtime, making it easy for viewers to digest the essential information at a glance.
- Utilize charts and graphs to visually represent the data, such as bar graphs to depict each employee’s total hours worked over a period.
- Remember, by presenting your results effectively, you can enhance understanding and make informed decisions based on precise time tracking data.
Key Functions Every Timesheet Handler Should Know
To master timesheets in Excel, you should familiarize yourself with several key functions:
- SUM: Adds up total hours worked. Formula example:
=SUM(B2:B8). - DATEDIF: Calculates the difference between two dates, useful for accruing vacation or tracking tenure.
- NETWORKDAYS: Tallies the number of working days between two dates, excluding weekends and specified holidays.
- TEXT: Converts dates and times into a text string in a specified format, which can be handy for creating understandable labels or summaries.
- VLOOKUP or XLOOKUP: Looks up data in a table based on a certain criterion, useful for finding employee rates or other related information.
Being proficient with these functions will significantly enhance the accuracy and efficiency of time tracking in Excel.
FAQ: Navigating Common Excel Timesheet Challenges
How do I calculate the difference between two times in Excel?
To calculate the difference between two times in Excel, simply subtract the start time from the end time. Enter your times in two cells, then in a third cell, use a formula like =End Time - Start Time. Ensure both times are in the same format and the cell with the formula is also formatted to display time. If your times cross midnight, consider using the MOD function to account for the day change.
How Can I Calculate Average Hours Worked Per Week in Excel?
To calculate the average hours worked per week in Excel, use the AVERAGE function on a range of cells containing the total daily hours worked for the week. For instance, if you’ve recorded total hours in cells B2 through B8 for a week, use =AVERAGE(B2:B8). This will give you the average hours worked per day, which you can multiply by the number of working days to find the weekly average.
Are There Any Shortcuts to Inputting Time Data Efficiently?
Yes, there are shortcuts in Excel that can make inputting time data more efficient. For instance, Ctrl+Shift+: inserts the current time into a selected cell. Additionally, you can use Ctrl+; to insert the current date. To swiftly enter data in a series, use Excel’s AutoFill feature by dragging the fill handle over the desired range of cells.
What is the Best Way to Calculate Time Differences Across Various Timezones?
The best way to calculate time differences across various timezones in Excel is to use the TIME function to adjust the time accordingly. Convert the start time to UTC, apply the timezone difference using the TIME function, and then convert the end time to UTC. Finally, subtract the adjusted start time from the end time. For accurate conversion, you may utilize external data or add an additional column specifying the time zone difference for each entry.
How do I sum multiple time values in Excel?
To sum multiple time values in Excel, use the SUM function, which adds up the time values across multiple cells. Enter each time value into its own cell, then select another cell and enter =SUM(range) replacing ‘range’ with your specific range of cells with times. Make sure you format the result cell correctly as a time, such as [h]:mm or [h]:mm:ss, to capture total hours accurately, especially if they exceed 24 hours.
John Michaloudis is a former accountant and finance analyst at General Electric, a Microsoft MVP since 2020, an Amazon #1 bestselling author of 4 Microsoft Excel books and teacher of Microsoft Excel & Office over at his flagship MyExcelOnline Academy Online Course.

