Working in Excel on a Mac, I frequently need to move or duplicate data between cells, sheets, or workbooks. Cutting, copying, and pasting are fundamental operations, and mastering them can make Excel tasks much faster and easier. Let me walk you through How to Cut Copy Paste in Mac Excel.
Key Takeaways:
- Mastering Cut, Copy, and Paste in Mac Excel boosts efficiency and simplifies data management tasks.
- Using keyboard shortcuts like Command + C (Copy), Command + X (Cut), and Command + V (Paste) saves time and effort.
- The ‘Paste Special’ feature offers precision by pasting only values, formulas, or formats as needed.
- Advanced techniques like ‘Visible Cells Only’ and transposing data enable customized copying and reorganization.
- Avoiding common pitfalls, such as overwriting data with blanks, ensures smooth and reliable operations.
Table of Contents
Introduction to Effortless Data Management
The Power Trio: Cut, Copy, Paste
The power trio of Cut, Copy, and Paste commands are the unsung heroes in our daily data management ballet. They are the essential gears in our productivity engine, allowing us to rearrange, duplicate, and transfer content with just a few key taps. In Mac Excel, these commands become even more potent, carving a seamless path through our spreadsheet tasks. These actions are akin to a master painter effortlessly moving colors across a canvas, creating order from chaos and efficiency from time-consuming manual labor.
How to Cut Copy Paste in Mac Excel
Essential Keyboard Shortcuts for Mac Excel Users
For Mac Excel users, harnessing the full potential of keyboard shortcuts can significantly expedite workflow. Let me introduce you to some critical combinations that should become second nature. The Command + C for Copy)
and Command + V (Paste) are your bread and butter, making data replication a breeze.
Don’t forget Command + X (Cut), for times when you need to move data without leaving a trace behind.
Command + A (Select All) empowers us to swiftly select large datasets for bulk actions. Meanwhile, Command + Z (Undo) is there to save us from our missteps, rewinding actions as if they never happened. With practice, these shortcuts become embedded in our muscle memory, transforming us into more productive and efficient Mac Excel maestros.
Diving Deeper: Advanced Copying and Pasting Techniques
Exploring ‘Paste Special’ Features for Customized Control
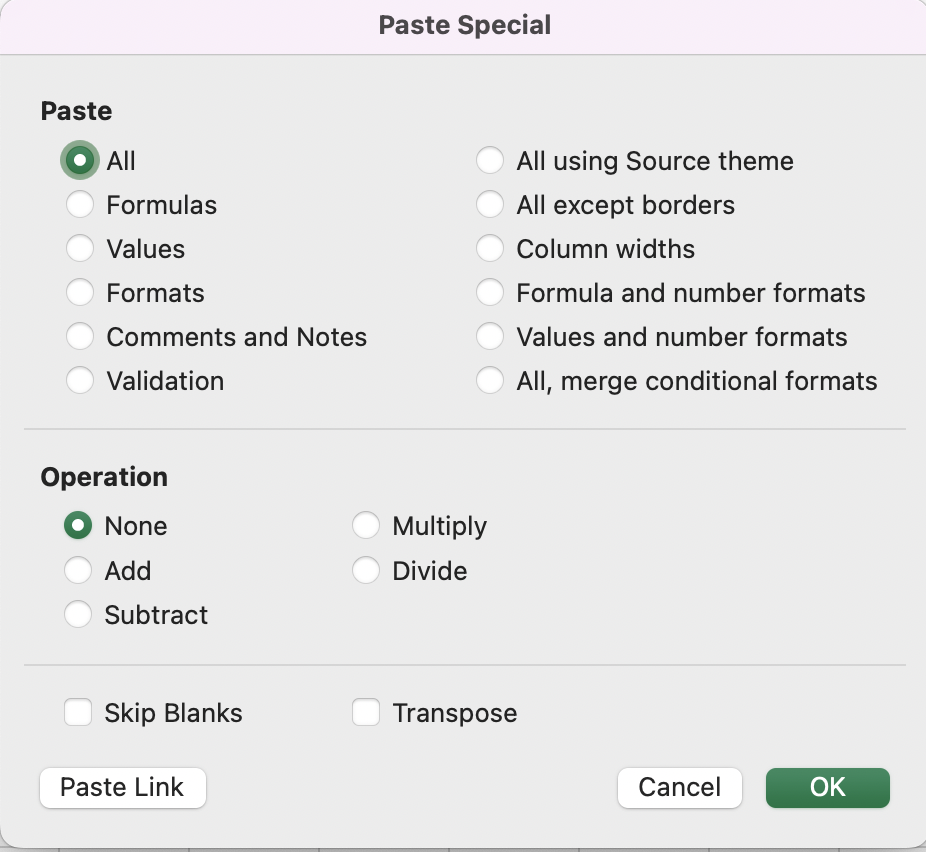
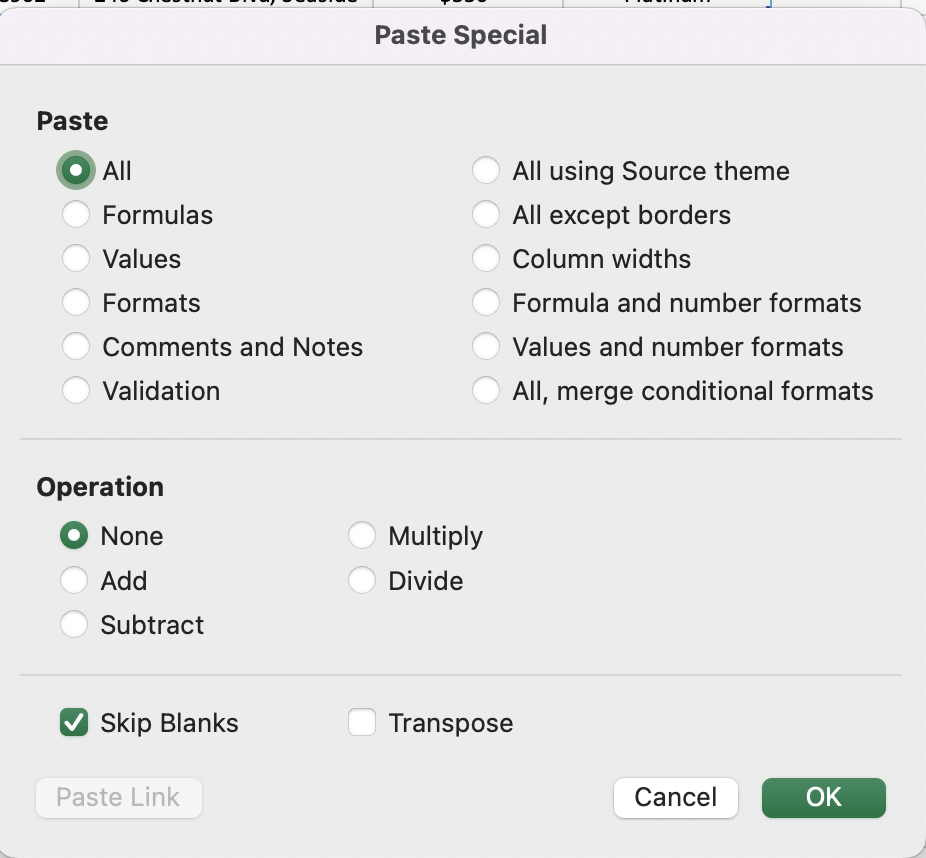
The ‘Paste Special’ feature in Mac Excel acts as a precision instrument for customized control over the data we transfer between cells. By exploring ‘Paste Special’, we command the ability to paste only the intricate pieces that matter, such as formulas, values, formats, or comments separately. For instance, when we copy cell content that has been meticulously formatted and merely wish to replicate the formula without altering the destination cell’s formatting; ‘Paste Special’ becomes our ally.
Through ‘Paste Special’, we can opt for options like ‘Formulas & Number Formatting’ or ‘Values & Source Formatting’, giving us the flexibility to meld the pasted data into its new environment seamlessly. Additionally, the feature even caters to advanced needs such as transposing data, which is akin to rotating the axis of our data matrix, or linking cells, which ensures that any updates in the source are reflected in the destination cell.
Leveraging the Power of Visible Cells Only Option
The “Visible Cells Only” option in Mac Excel is an incredibly powerful feature when dealing with large datasets containing hidden rows or columns. It allows us to selectively copy and manipulate only the cells that are visible, neatly bypassing any data that we’ve chosen to filter out or collapse. This is particularly useful when summarizing data, ensuring that only the most relevant information is copied and utilized, preserving the integrity and relevance of our analysis. Follow these steps:
STEP 1: Select the rows and columns to be copied, it may include the hidden rows.
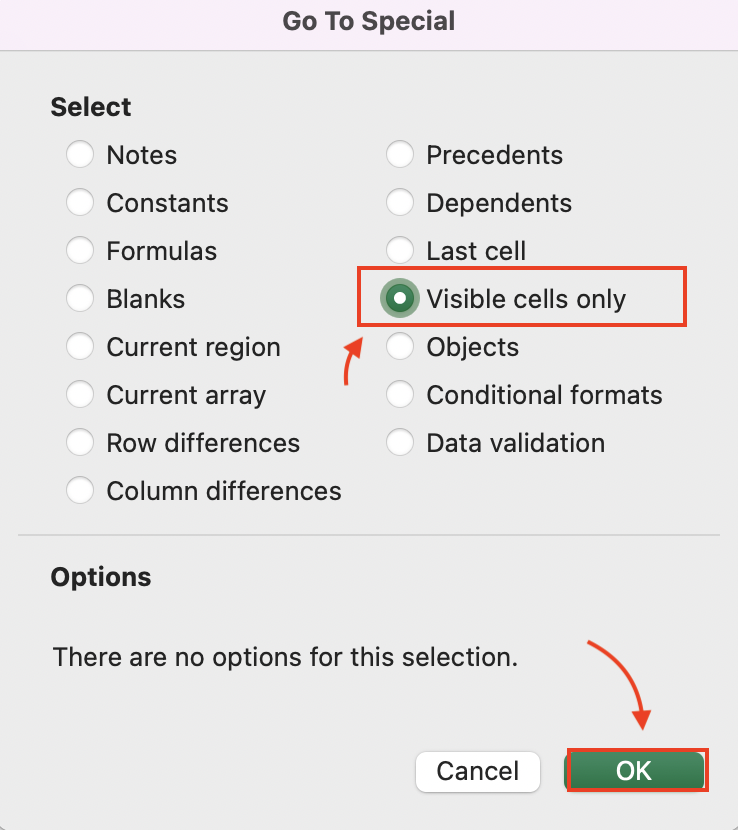
STEP 2: Now to exclude the selection of hidden rows go to – “Find & Select” in the Home menu tab and click on “Go to Special”.
STEP 3: Select “Visible Cells Only” and press okay.
STEP 4: You’ll notice only visible cells are selected. And use simple steps of copy (CMD + C) and paste (CMD + V).
Imagine we’re working with financial spreadsheets laden with quarterly data; utilizing the ‘Visible Cells Only’ function enables us to copy totals from each quarter without dragging along the detailed transactions that fall beneath. With the handy shortcut Command + Shift + C, we activate this feature effortlessly, allowing us to copy only visible cells.
Transform Your Data with Ease
Copy and Paste Mastery: From Columns to Rows
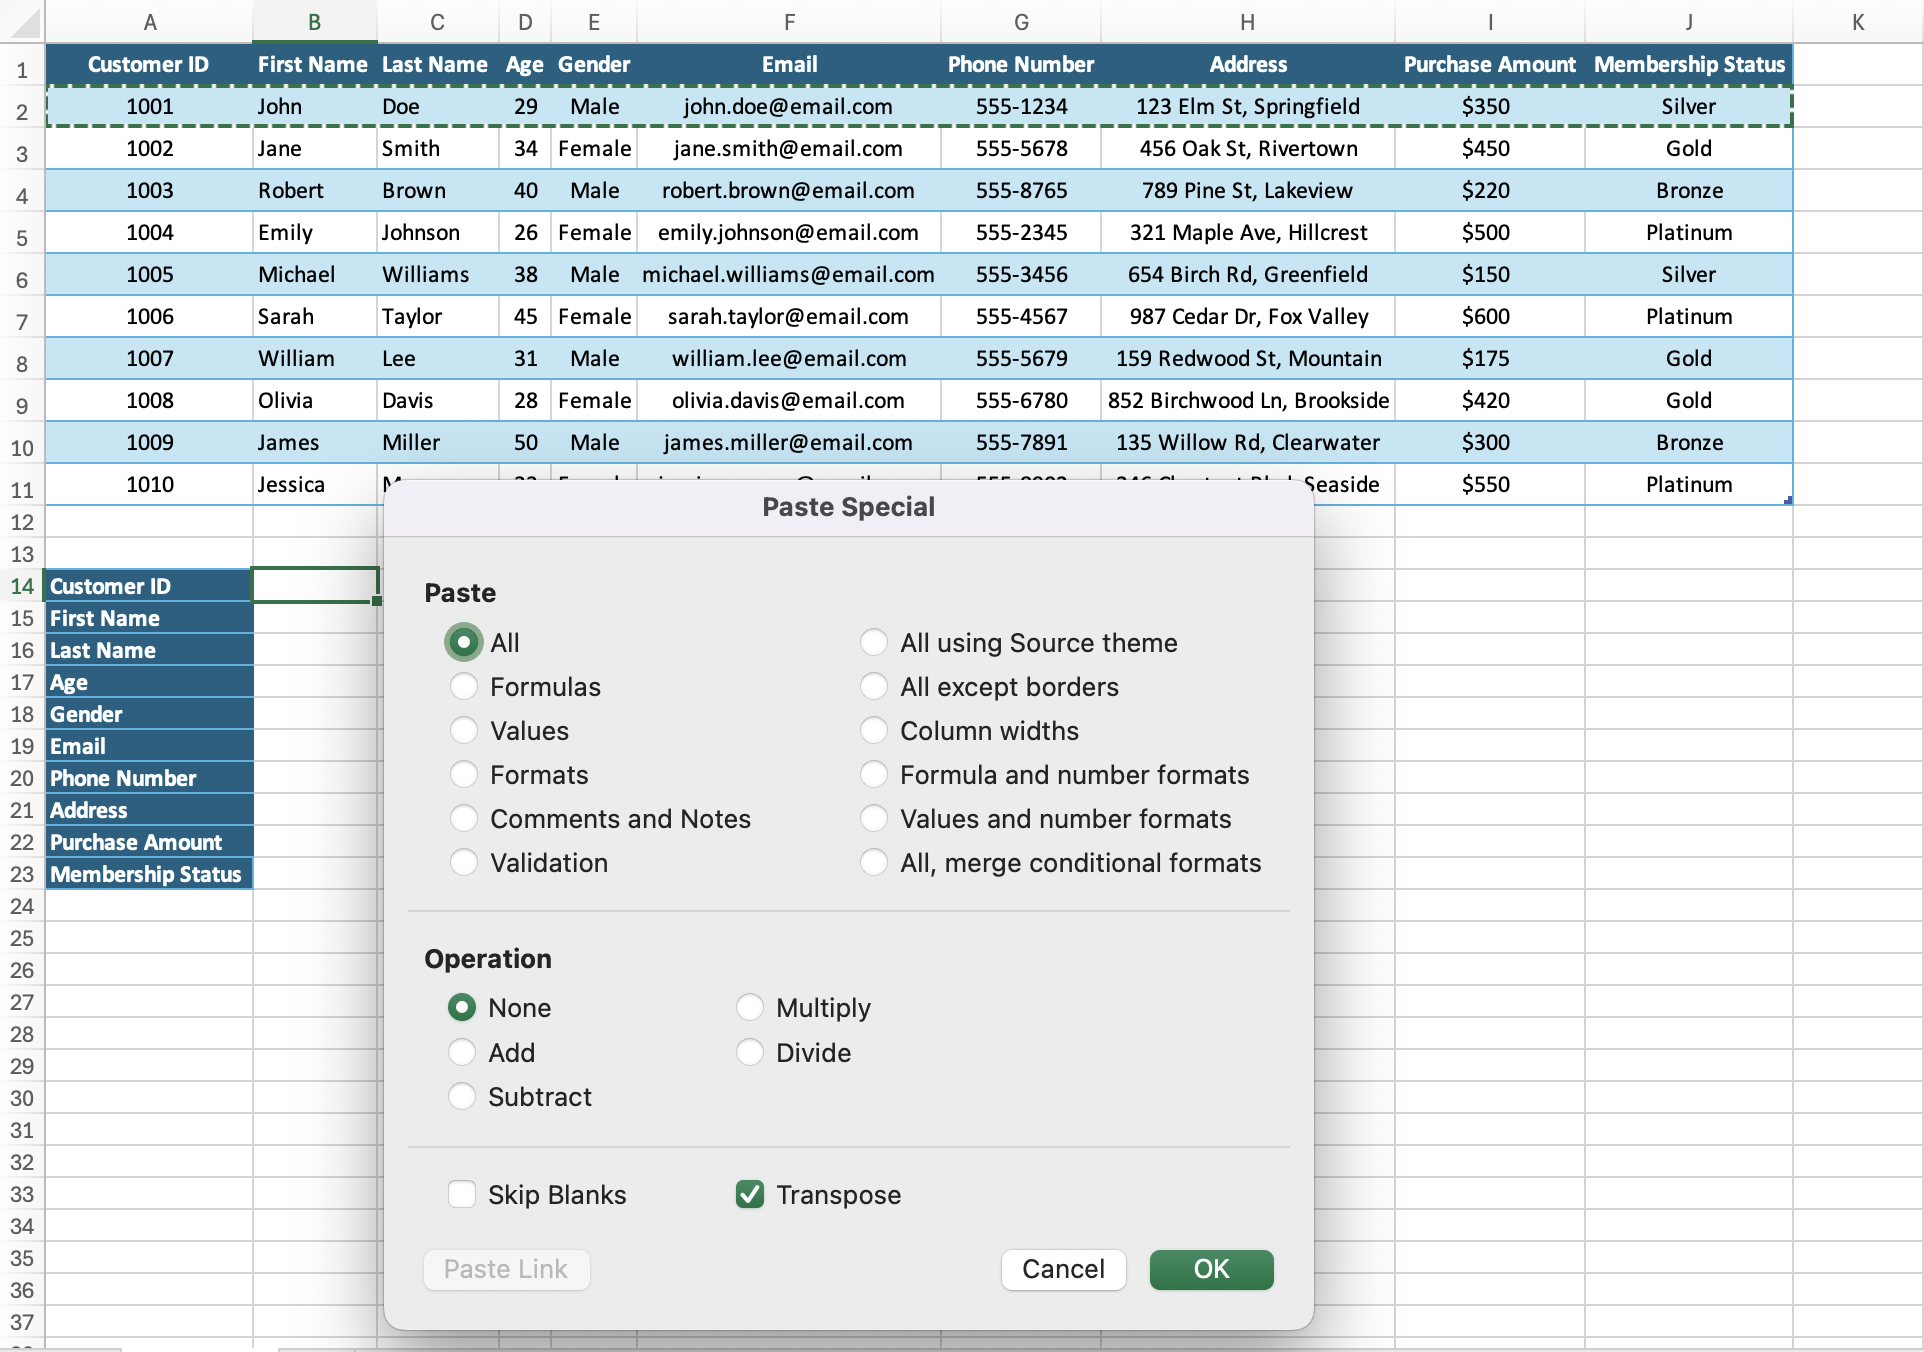
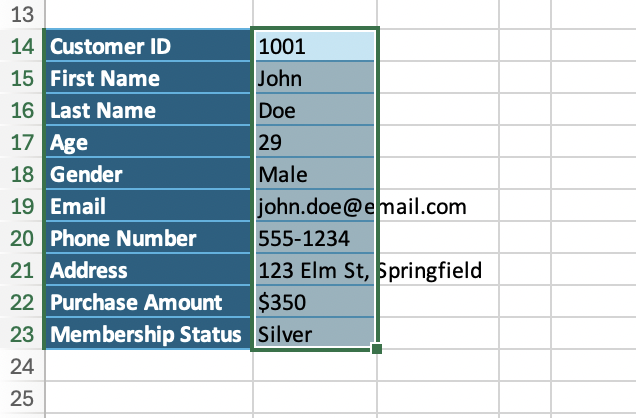
Achieving copy and paste mastery when transposing data from columns to rows in Mac Excel feels almost like performing a choreographed dance with our data. It’s about transforming the vertical into the horizontal and vice versa—reorganizing information in a way that best suits our analytical needs. Whether we’re restructuring a financial report or reformatting survey data, the transposition of columns and rows is a key maneuver.
Employing this technique is simple. We copy the column data and then, using ‘Paste Special,’ select the Transpose option, which expertly flips the axis of our data.
This isn’t just about changing the look; it’s about redefining the data’s narrative to tell a different story, presenting a new perspective for clearer insights.
Mastering this skill ensures that our data is not just a static grid but a dynamic, adaptable entity.
Addressing Copy and Paste Quirks on Mac Excel
Avoiding Data Loss When Copying Blank Cells
Avoiding data loss when copying blank cells in Mac Excel demands attentiveness. It can be frustrating when, after copying a range of cells, we realize that the blank cells within our selection have overwritten valuable data at our destination. To circumvent this issue, we need to deselect the option “Skip blanks” during the ‘Paste Special’ process. This way, we ensure that our destination cells retain their pre-existing content when encountering blanks in the source range.
It’s a safeguard for our data, preserving information that might otherwise be lost in the transfer. Carefully manipulating this feature allows us to maintain the integrity of both our source and destination datasets, ensuring that the process of copying and pasting enhances our workflow rather than complicating it.
FAQ: Quickly Troubleshoot Your Excel Queries
How do you cut copy paste in Mac?
To cut, copy, and paste on a Mac, select the item with your cursor, then press Command + C to copy or Command + X to cut. To paste the item, place your cursor where you want it to go and press Command + V. This method works for text, files, and folders in macOS.
How do I prevent formatting issues when pasting in Excel for Mac?
To prevent formatting issues when pasting in Excel for Mac, use ‘Paste Special’ and choose ‘Values’ to paste data without source formatting or ‘Match Destination Formatting’ to adapt pasted data to the style of the destination cells.
Can I copy cell width settings along with data in Mac Excel?
Yes, in Mac Excel, you can copy cell width settings by choosing ‘Paste Special,’ and then selecting ‘Column Widths.’ This ensures the width of your columns remains consistent with the data you’re transferring.
How do you cut a cell in Excel on a Mac?
To cut a cell or range of cells in Excel on a Mac, select the cells, then press Command + X. Move to the destination, then press Command + V to paste. This moves the data, clearing it from the original location.
John Michaloudis is a former accountant and finance analyst at General Electric, a Microsoft MVP since 2020, an Amazon #1 bestselling author of 4 Microsoft Excel books and teacher of Microsoft Excel & Office over at his flagship MyExcelOnline Academy Online Course.

