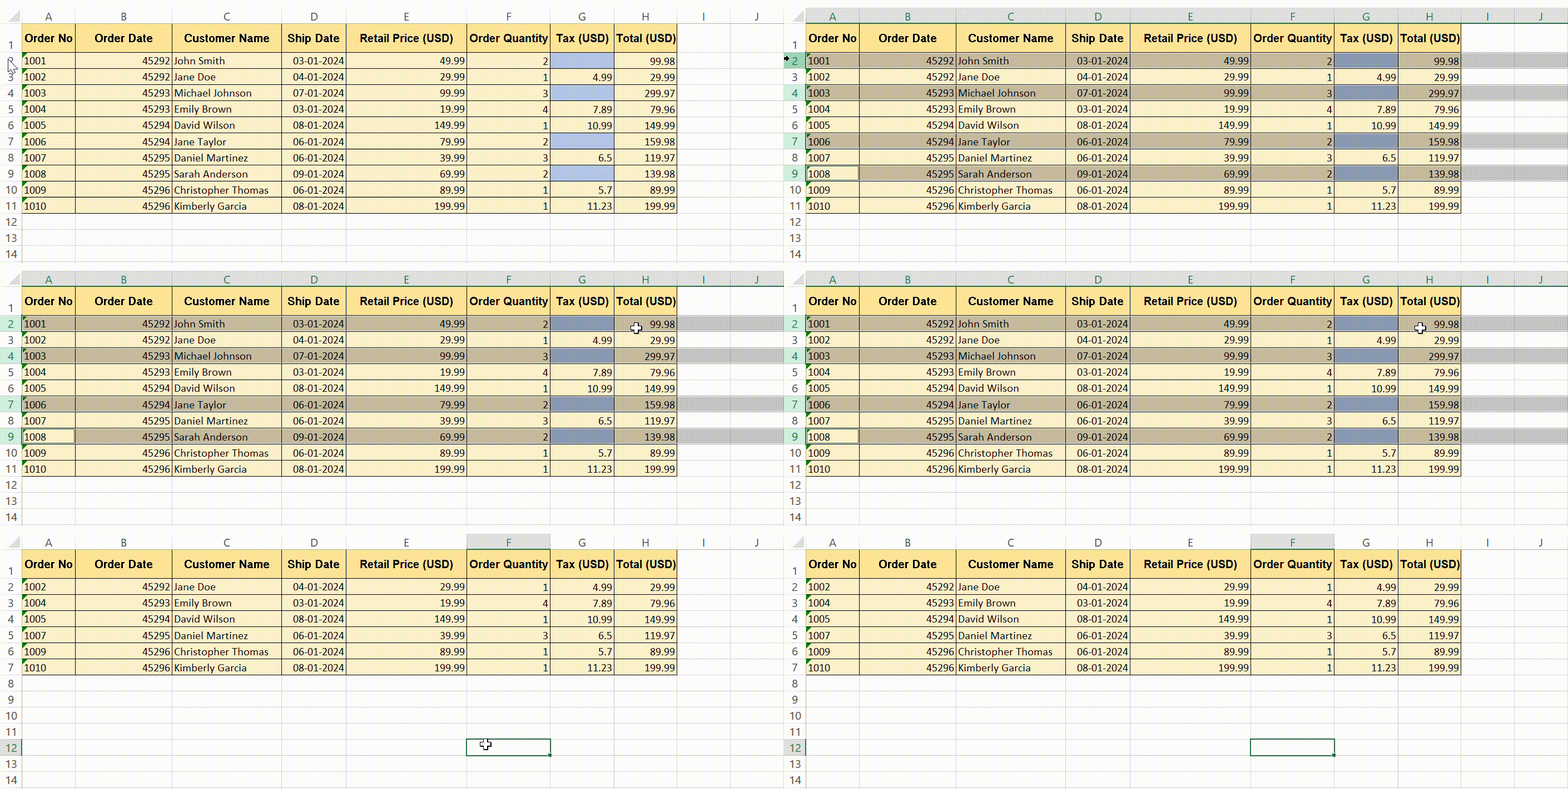
Mastering row deletion in Microsoft Excel is crucial for enhancing efficiency in data management. By understanding quick deletion techniques and row management basics, users can streamline their workflow, significantly reducing time spent on mundane tasks and focusing more on critical data analysis. In this article, we will cover the different methods on how to delete rows in Excel.
Key Takeaways:
- Utilize shortcut keys like Shift + Space and Ctrl + – to delete rows quickly, boosting productivity.
- Combine mouse clicks with keyboard commands for precise row selection and deletion.
- Employ the Excel Filter feature for deleting rows based on specific criteria, ensuring data integrity.
- Address common row deletion challenges by checking for merged cells and ensuring the sheet is unprotected.
Table of Contents
Mastering Row Deletion in Excel
Why Quick Deletion Matters
Excel, as a potent tool for data analysis, often requires you to manage and organize vast amounts of data efficiently. Quick deletion matters because it streamlines your workflow, reduces the time spent on mundane tasks, and allows more room for focus on critical data processing and analysis. Faster deletion means less frustration and improved productivity, giving you the flexibility to handle large datasets with ease.
Basic Concepts of Row Management
Understanding row management in Excel is pivotal for smooth navigation and data handling. Rows run horizontally across the spreadsheet and are identified by numbers on the left side. To manage rows effectively, you’ll need to know how to select them properly. Clicking on the row number highlights the entire row, while dragging across multiple row numbers selects several rows.
Additionally, mastering how to insert, move, and resize rows is essential for organizing your data. Row height can be adjusted to improve readability, and entire rows can be hidden or unhidden as needed, depending on what parts of your data need to be visible.
Shortcut Keys to Speed Through Row Deletion
Keyboard Shortcuts for Instant Results
Keyboard shortcuts are not just about speed — they’re also about precision. In Excel, you can delete rows rapidly using a couple of key presses. For instant results:
STEP 1: Shift + Space: This combination will select the entire row where your cursor is presently located.
STEP 2: Ctrl + – (Minus key): Once a row is selected, hitting these keys together will immediately delete the selected row.
Remember, using keyboard shortcuts helps you keep your hands on the keyboard and maintain a faster workflow, minimizing the frequent switching to the mouse. These quick key combinations work like magic, enhancing your data management efficiency considerably.
Mouse and Keyboard Combo for Efficiency
While keyboard shortcuts are highly efficient, combining mouse clicks with keyboard commands can sometimes offer enhanced control and efficiency. If you prefer using the mouse to navigate your spreadsheet, here’s how you can delete rows with a mouse and keyboard combo:
STEP 1: Select Row with Mouse: Click on the row number to highlight the entire row. For multiple rows, click and drag over the row numbers or hold down the Shift key and click on the sequence of row numbers you wish to select.
STEP 2: Delete with Keyboard: With the desired rows highlighted, press Ctrl + - (Minus key) on the keyboard. The combination of these actions leverages the precise selection capability of the mouse with the swift deletion command of the keyboard.
The versatility of this method enables you to quickly pinpoint and remove the rows you need without relying solely on keyboard navigation, which can be particularly beneficial when working with large datasets where scrolling through rows is necessary.
Deletion Techniques for Different Scenarios
Handling Single and Multiple Rows
When you need to delete rows in Excel, whether it’s just one or a batch, the process can be intuitively handled with little effort. Here’s how you can do it:
Handling Single Rows:
To remove a single row, first click on the row number to select the entire row. Press Ctrl + - to delete the row instantly.
Handling Multiple Rows:
STEP 1: If you want to delete consecutive rows, click on the first row number and drag to the last row you want to delete or use Shift + click to select the range of rows.
STEP 2: Again, press Ctrl + - to delete all selected rows at once.
For non-consecutive rows, you would hold the Ctrl key while clicking on each row number to select them and then use the Ctrl + - shortcut to delete them all simultaneously.
These speedy techniques help you maintain the flow of your work without getting bogged down by the details of row management, ensuring you can stay focused on your analysis or reporting.
Using Criteria for Targeted Row Removal
Sometimes, your datasets might be large and complex, necessitating the removal of rows based on specific criteria, such as a value, a date, or even a color. Here’s a quick way to do this:
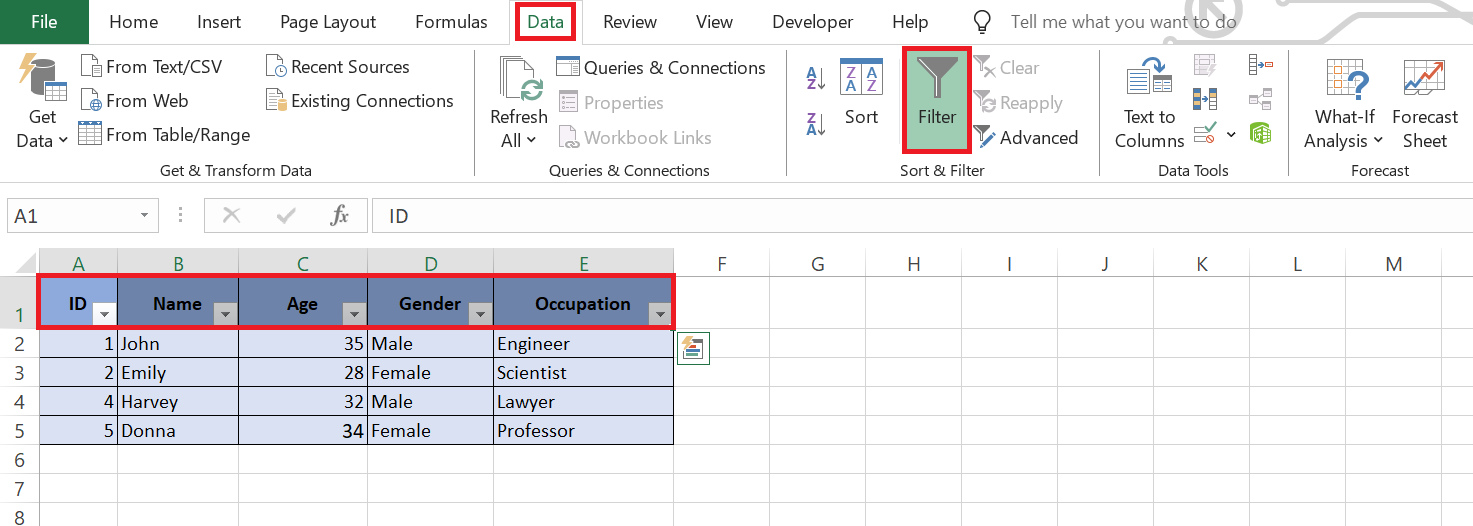
STEP 1: Start with the Excel Filter feature: Apply a filter by selecting your data range and clicking on the ‘Filter’ button in the ‘Data’ tab.
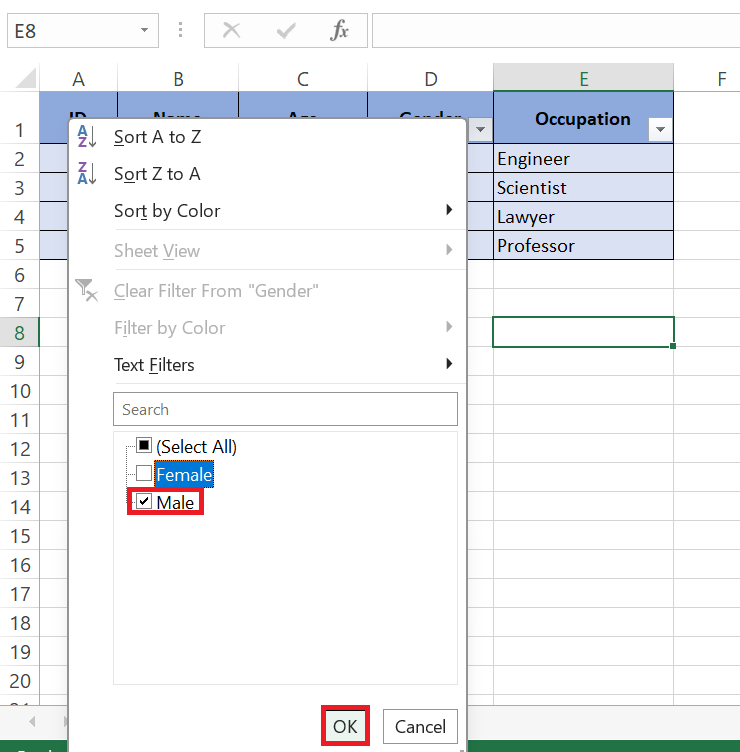
STEP 2: Specify your criteria: Choose the criteria for the cells you wish to filter. For example, here you can select “Gender” as just “Male”
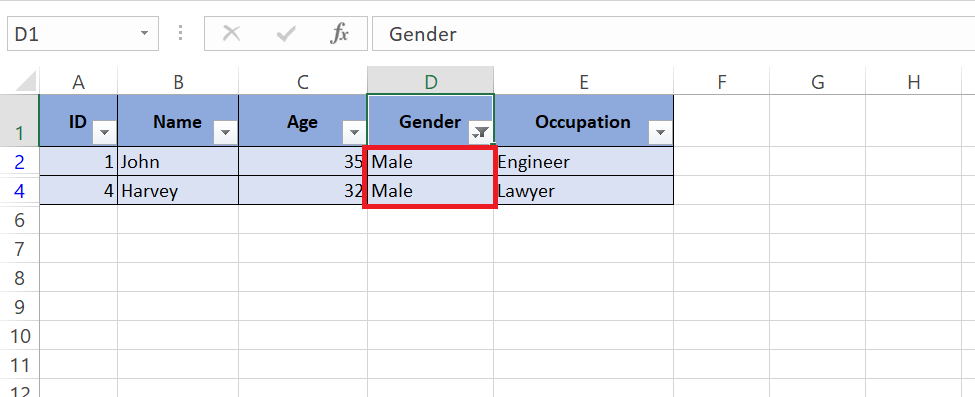
STEP 3: After clicking on “Ok” below is the filtered data set.
STEP 4: Once the data is filtered, select the rows: Click on the row headers for the rows that you want to delete.
STEP 5: Now, simply press Ctrl + - to delete all selected rows. Then remove the filter to see the fresh data set.
This method ensures that you’re only deleting rows that meet your predefined criteria, preventing the accidental removal of vital data. It’s a targeted approach that proves exceedingly useful when dealing with extensive and detailed information.
Step-by-Step Examples for Fast Deletion
Removing Rows Based on Cell Content
Eliminating rows based on specific cell content is straightforward in Excel, and doing this speeds up tasks like cleaning data or condensing data sets. Follow these steps to remove rows swiftly:
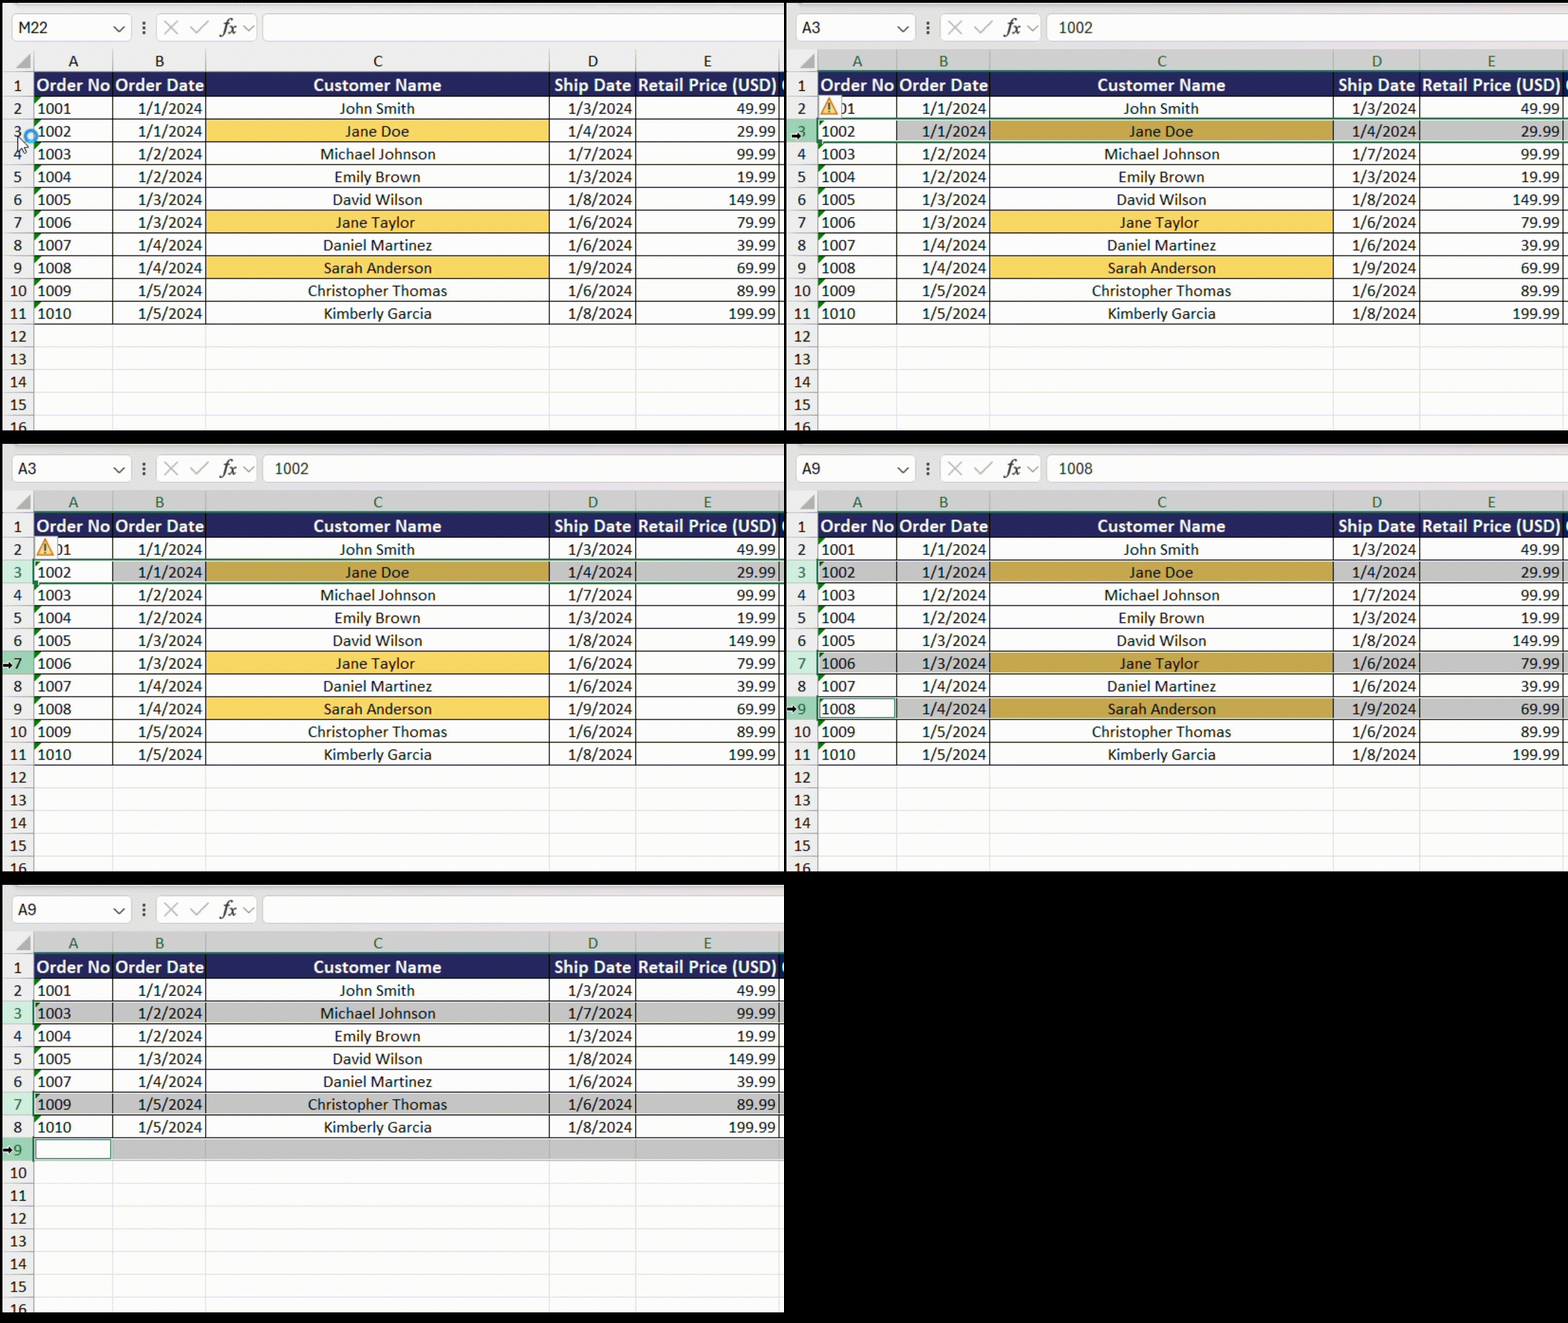
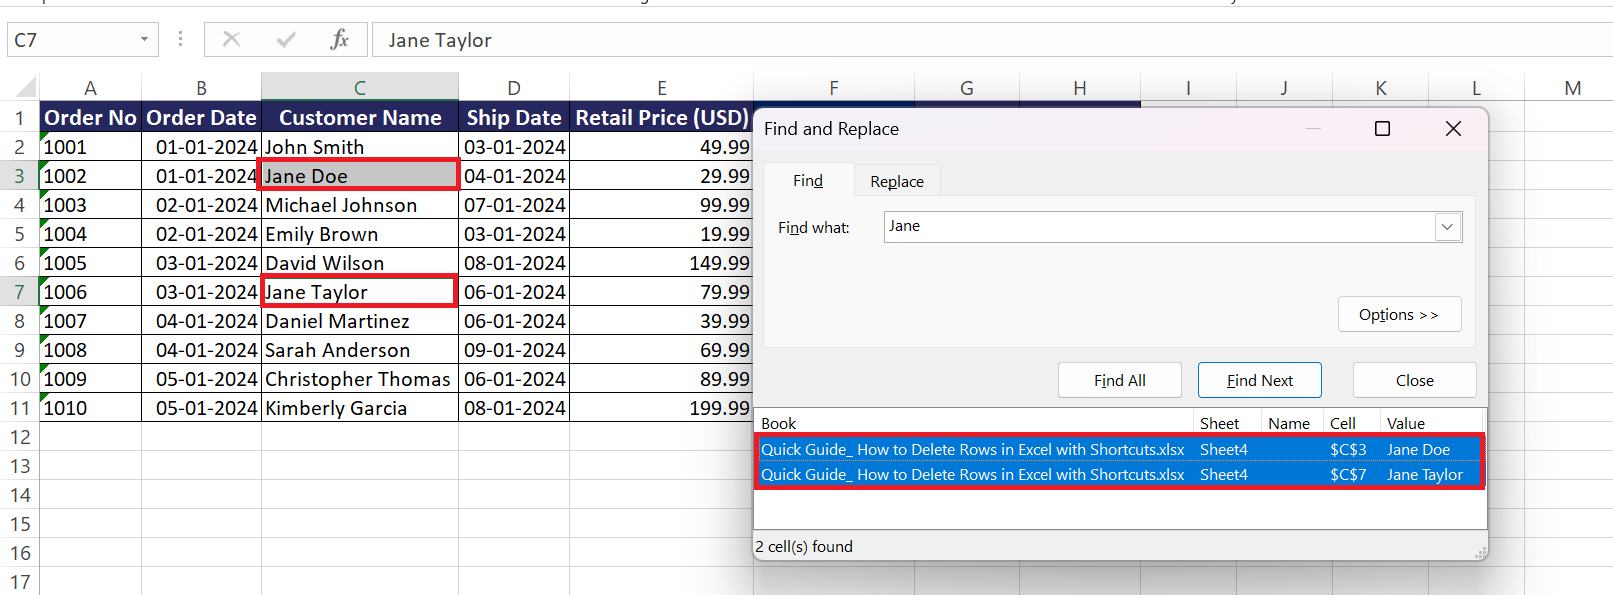
STEP 1: Locate the Content: Use the ‘Find and Replace’ feature (Ctrl + F) to locate the cells containing the content in question (for instance, ‘Jane’).
STEP 2: Find All Instances: After you’ve entered the value in the ‘Find what’ field, click ‘Find All’. The dialog box will list all instances where the cell contains ‘Jane’.
STEP 3: Select Rows: Highlight all the instances shown in the ‘Find and Replace’ window, or press Ctrl + A to select all found items.
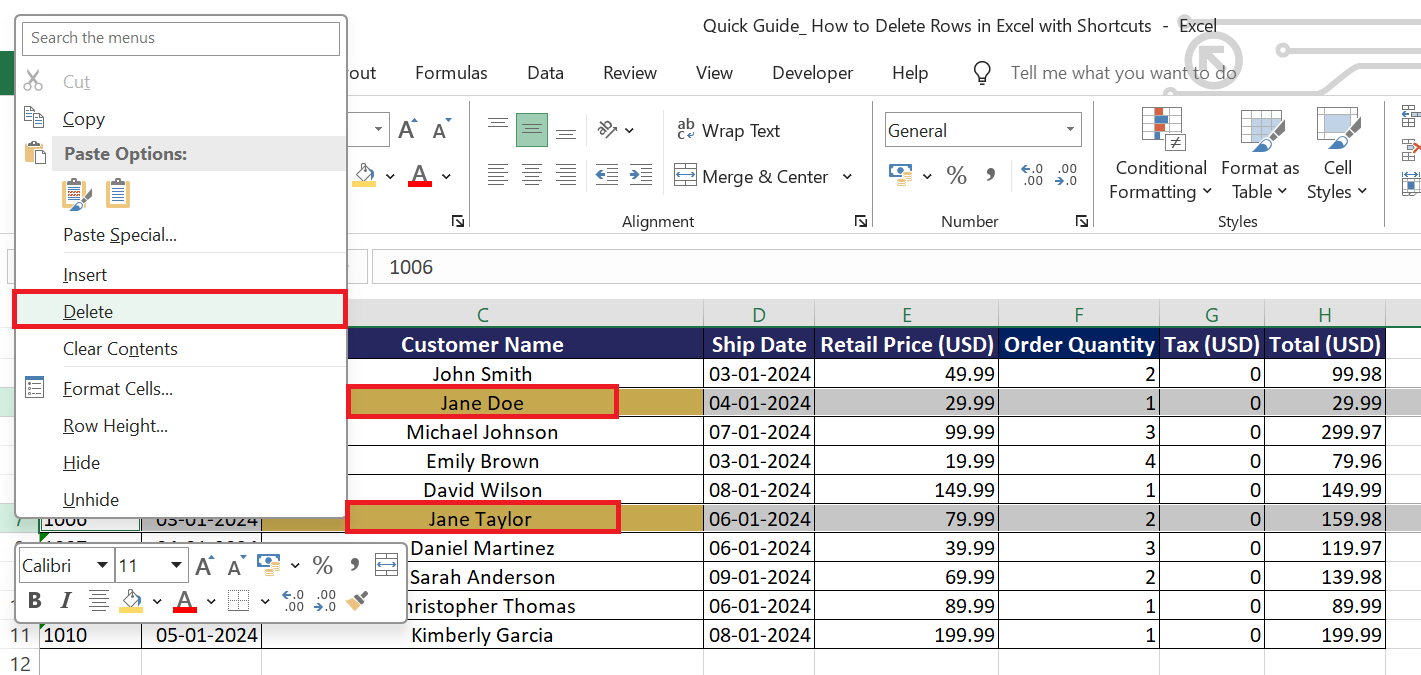
STEP 4: Delete Rows: Close the ‘Find and Replace’ dialog box. Right-click on one of the highlighted cells . Choose ‘Delete’ from the pop-up menu.
By removing rows based on cell content, you ensure the data you’re left with is exactly what you need, free of unnecessary or irrelevant information.
Troubleshooting Row Deletion Issues
Addressing Common Challenges
As you work your way through row deletion in Excel, you might encounter certain challenges. Common issues include accidentally deleting the wrong row, dealing with rows that won’t delete because they’re part of a merged cell or a table, and figuring out why the delete function is grayed out or inoperative.
To address and overcome these issues:
- Check for Merged Cells: Unmerge any merged cells in your selection to ensure that the rows can be deleted.
- Unprotect Sheets: If the sheet is protected, certain actions might be restricted. Make sure to unprotect the worksheet before attempting to delete rows.
- Review Table Settings: If your data is in a table format, ensure that the filters are turned off or adjusted properly before deleting rows.
Understanding how to navigate these common pitfalls will make the row deletion process smoother, and your overall experience with Excel more productive.
Tips for Avoiding Data Mishaps When Deleting
Deleting rows might seem straightforward, but it’s essential to proceed with caution to avoid any unwelcome data mishaps. To ensure you protect your data integrity:
- Backup First: Before making bulk changes, save a copy of your Excel file, so you have a point to return to if things go awry.
- Double-Check Selections: Take a moment to verify you’ve selected the right rows. A quick glance can save a lot of trouble.
- Use Undo: Excel’s undo feature (
Ctrl + Z) is your friend. If you delete a row in error, use it to reverse the action immediately. - Employ Table Filters: Use filters to review the data you’re planning to delete, ensuring you only remove what’s intended.
- Limit Permissions: If you’re working in a shared document, consider restricting permissions for who can delete rows to avoid accidental loss of important data.
By following these tips, you can create a safety net for your data management activities and avoid the common pitfalls that can lead to data loss or additional work.
Advanced Shortcuts for Power Users
Embracing Excel’s Go To Special Command
Excel’s Go To Special command is a real powerhouse for those who need to manage and manipulate data on a granular level. Here’s how you can use this feature for deleting rows effectively:
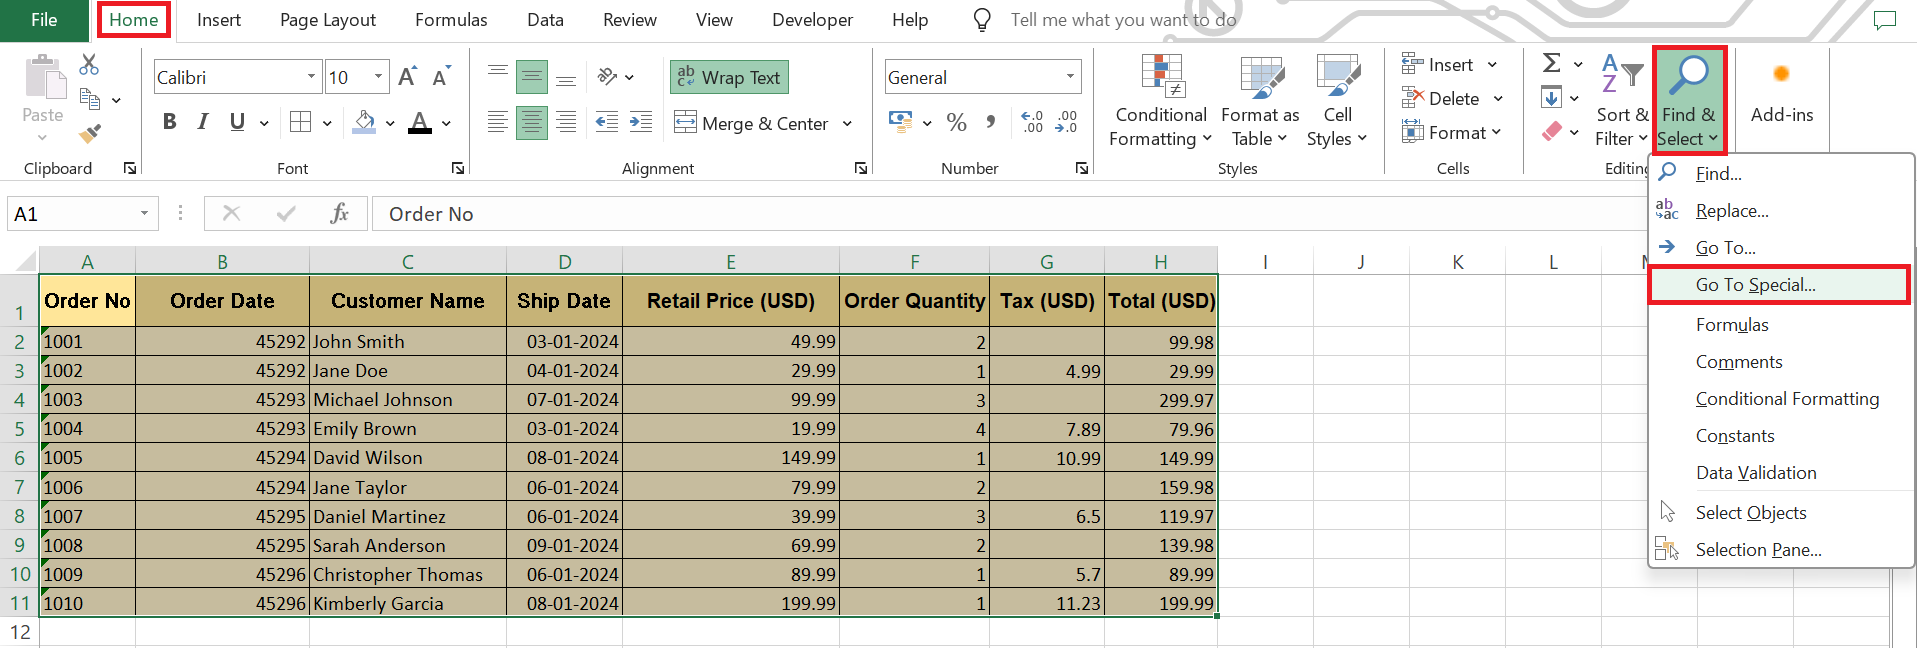
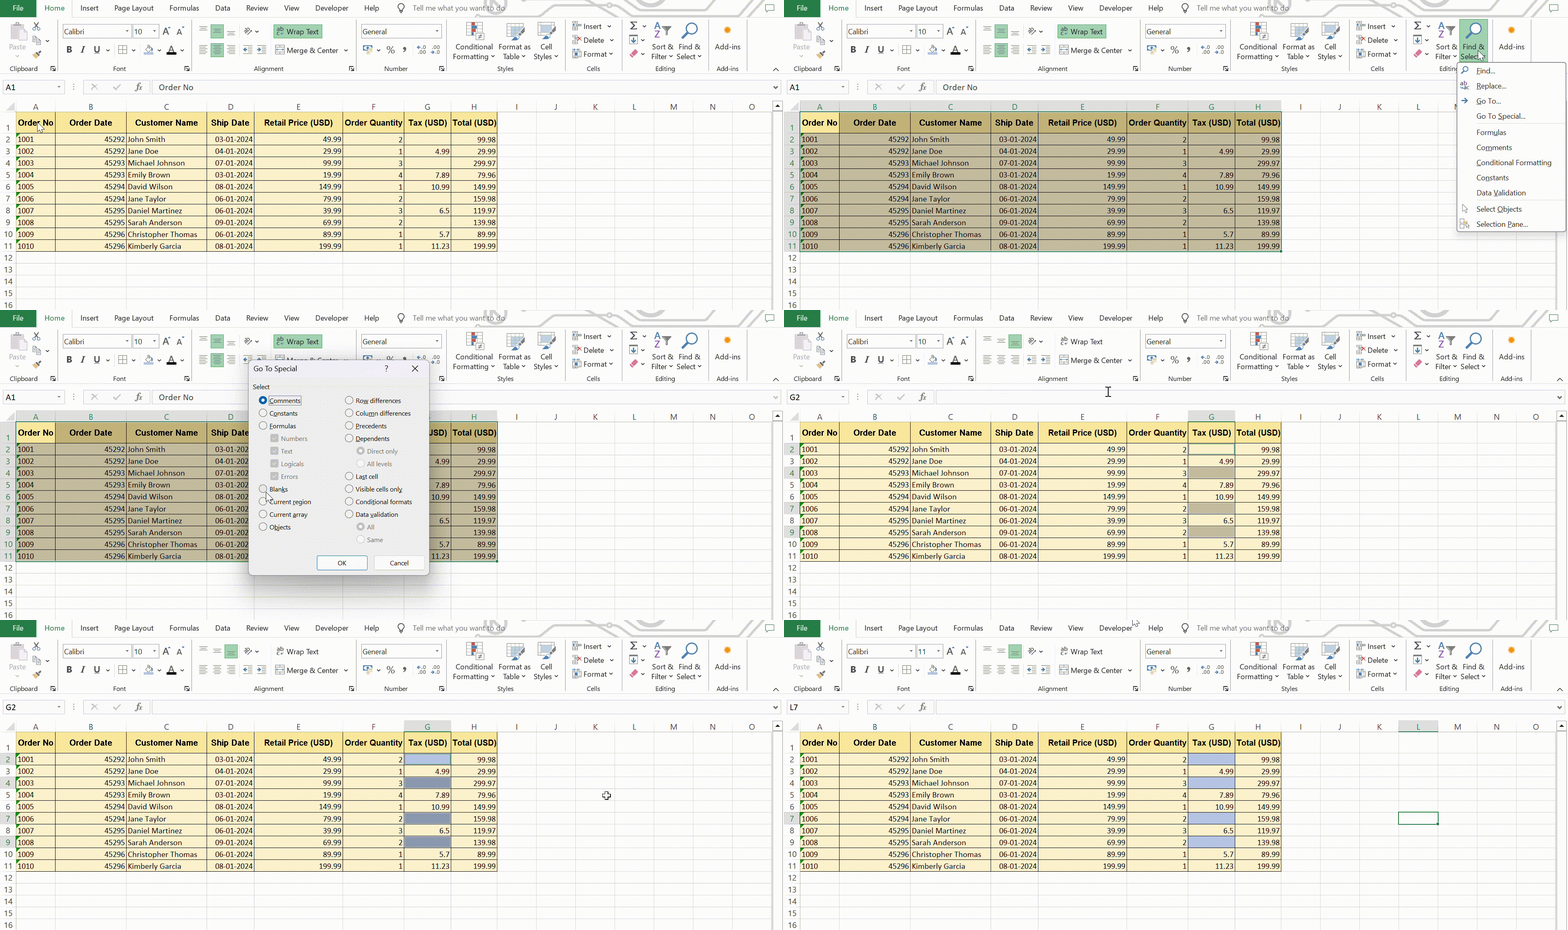
STEP 1: Select Your Range: Highlight the range of cells or the entire table where you want to search for criteria, such as blank cells.
STEP 2: Find & Select: Go to the ‘Home’ ribbon and click on the ‘Find & Select’ dropdown, then click on ‘Go To Special’.
STEP 3: Choose Blanks: In the Go To Special dialog box, opt for the ‘Blanks’ to highlight all the empty cells within your selected range.
STEP 4: Delete Rows: Once all empty cells are selected visually, press Ctrl + - and confirm to delete the entire rows.
This command is particularly useful when you’re working with datasets that may have numerous empty cells scattered throughout that you want to clean up quickly and efficiently.
Creating Custom Macros for Personalized Shortcuts
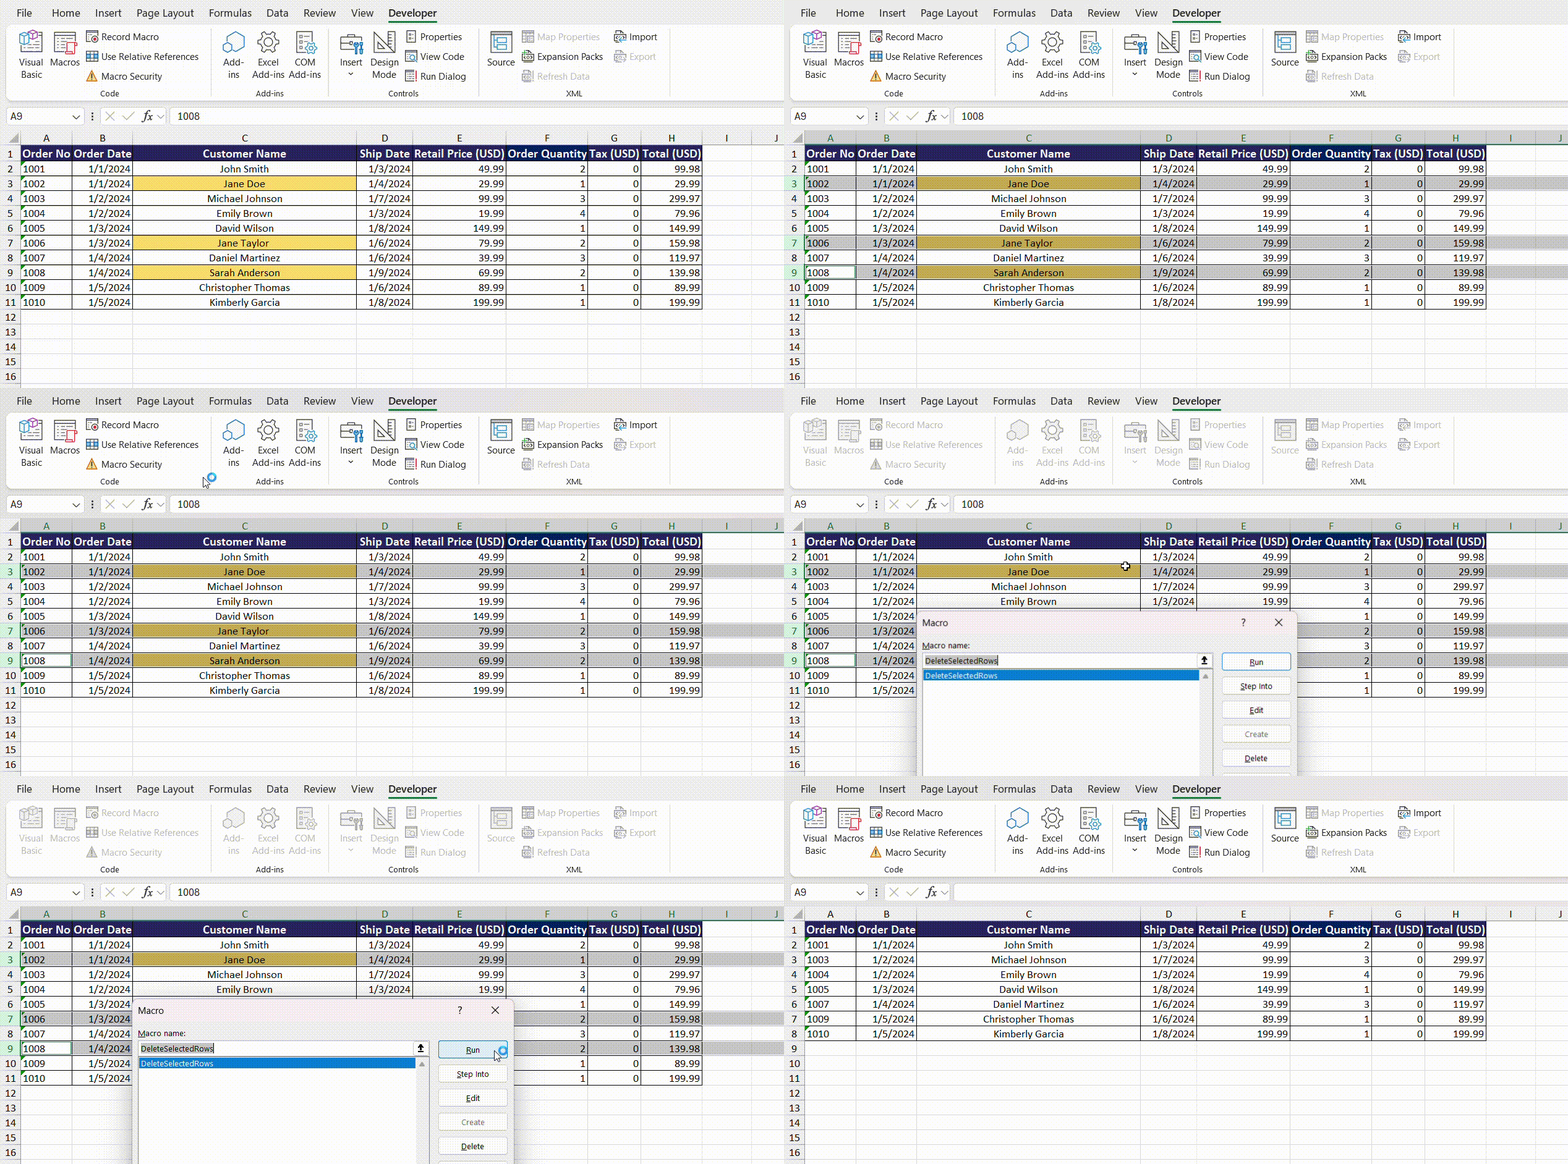
Creating custom macros in Excel equips you with personalized shortcuts, especially for complex tasks that aren’t covered by default keyboard shortcuts. Here’s a way you can create a macro to delete rows:
STEP 1: Press Alt + F11 to open the Visual Basic for Applications (VBA) editor.
STEP 2: Go to ‘Insert’ and choose ‘Module’ to open a blank module window.
STEP 3: Type a simple macro, such as:
Sub DeleteSelectedRows()

Selection.EntireRow.Delete

End Sub
STEP 4: Go to the Developer tab and select ‘Macros’. Select the macro in the dialog box and select ‘Run’.
This macro will delete any rows you have selected when you run it. You can assign this macro to a shortcut key or a button on the ribbon for easy access.
Remember to save your workbook as a macro-enabled file (.xlsm) to ensure your macros are saved. With custom macros, repetitive tasks are no longer a hindrance, and you get a workflow truly tailored to your needs.
FAQ: Your Row Deletion Questions Answered
How can I delete every other row with a shortcut?
To delete every other row in Excel, there isn’t a direct keyboard shortcut. However, you can use the filter or conditional formatting to highlight alternate rows and then delete them manually. One approach is to use a formula in an adjacent column to identify the rows to be deleted and then sort and delete them based on that criteria.
Can I undo a row deletion if I make a mistake?
Yes, if you delete a row and immediately realize it was a mistake, press Ctrl + Z to undo the deletion. This keyboard shortcut steps back through your recent actions, allowing you to recover your data quickly. However, saving your work frequently can ensure you have a recovery point if you’ve conducted other actions since the deletion.
What are the limitations of using shortcuts for row deletion?
Using shortcuts for row deletion is speedy but has limitations, such as not being able to delete rows based on complex criteria directly. Shortcuts are unable to differentiate between content, so can’t selectively delete rows without additional steps like filtering. Also, they may not work as expected if cells are merged or within protected sheets, and they can’t be used to delete non-contiguous rows without first selecting them individually or in groups.
Is it possible to delete rows based on cell color using a shortcut?
Deleting rows based on cell color directly using a shortcut isn’t possible in Excel. You first need to use the ‘Filter by Color’ feature to isolate the rows, and then delete them. To do this, apply a filter to your table, use ‘Filter by Color’, select the desired color, and then delete the filtered rows. Shortcuts can assist in the deletion after filtering.
How to delete all rows below certain row or active cell in excel?
To delete all rows below a certain row or active cell in Excel, select the row by clicking the row number. Then press Ctrl + Shift + Down Arrow to highlight all subsequent rows. Press Ctrl + - to delete. This combination selects and deletes from the active cell down to the last row of the sheet.
John Michaloudis is a former accountant and finance analyst at General Electric, a Microsoft MVP since 2020, an Amazon #1 bestselling author of 4 Microsoft Excel books and teacher of Microsoft Excel & Office over at his flagship MyExcelOnline Academy Online Course.


