Microsoft Excel is a powerhouse for organizing, analyzing, and visualizing data—but with great power comes the need for control. As spreadsheets become more complex and collaborative, protecting key cells from accidental edits becomes essential. Locking specific cells helps preserve formulas, maintain formatting, and ensure data integrity, especially when files are shared with colleagues or clients. In this guide, you’ll learn exactly how to lock cells in Excel, along with practical tips and best practices to make your spreadsheets more secure and foolproof. Whether you’re a beginner or brushing up, this step-by-step walkthrough has you covered.
Key Takeaways:
- Locking cells in Excel protects important formulas and formatting from accidental changes.
- All cells are “locked” by default—but protection only activates when the worksheet is protected.
- You can selectively unlock editable cells and protect only the areas you want to secure.
- Advanced features like “Allow Edit Ranges” offer granular control for collaborative environments.
- Always pair locked cells with visual cues (like shading) to guide users and prevent confusion.

Download excel workbookHow-to-Lock-Cells.xlsx
Table of Contents
Understanding Cell Protection in Excel
Why I Lock Cells in Excel
Before diving into the technical steps, I think it’s important to understand why locking cells is so useful. For me, it isn’t just about preventing others from tampering with my hard work—it’s also about ensuring that the spreadsheet functions as intended. For example, I often create complex financial models or data dashboards that rely on carefully constructed formulas. If someone accidentally overwrites or deletes a formula, it can throw off all my calculations. By locking key cells, I can give collaborators the freedom to enter or adjust data where appropriate, while protecting the formulas and references that power the spreadsheet.
Furthermore, cell locking is invaluable when I’m distributing templates. I can allow users to input data only in specific areas, keeping the structure and critical logic intact. From budgeting to project management, cell protection adds a layer of reliability to every Excel workbook I create.
The Basics: How Cell Locking Works in Excel
One thing I learned early on is that simply “locking” a cell in Excel doesn’t do anything by itself. By default, all cells in an Excel worksheet are set to be locked. However, this setting only takes effect when the worksheet is protected. In other words, it’s a two-step process:
- First, I specify which cells should be locked or unlocked.
- Then, I protect the worksheet to activate the lock settings.
Let me break down the process that I personally follow whenever I need to lock specific cells in Excel.
Step-by-Step Guide to Lock Cells in Excel
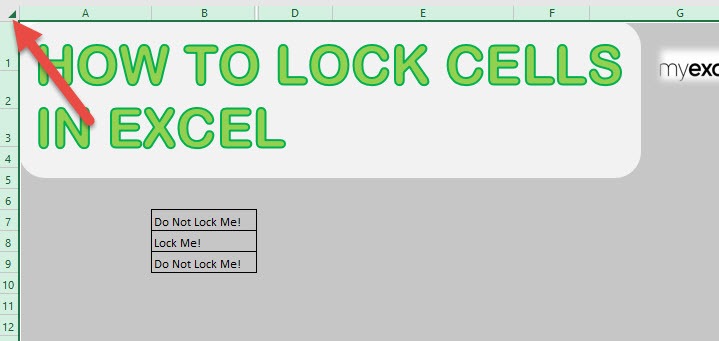
STEP 1: Select all of the cells by clicking the upper left corner:
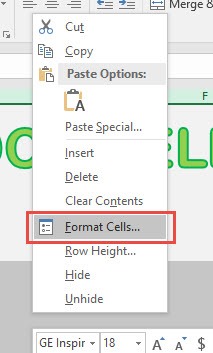
STEP 2: Right-click any cell and select Format Cells:
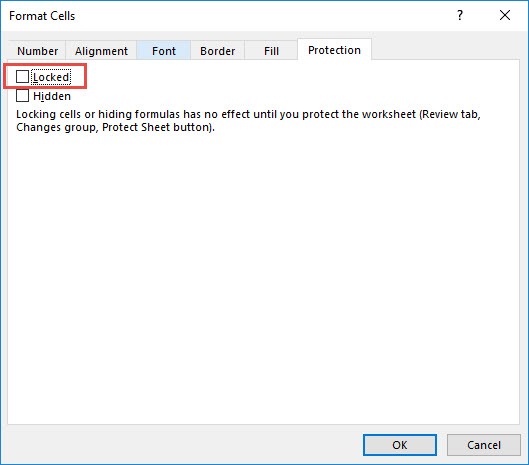
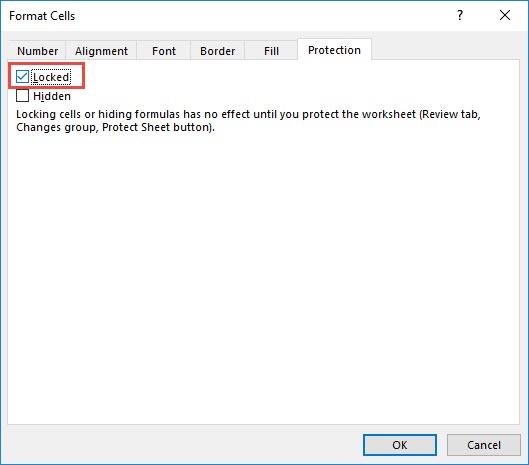
STEP 3: Ensure Locked is unticked. This will unlock our entire sheet. Click OK.
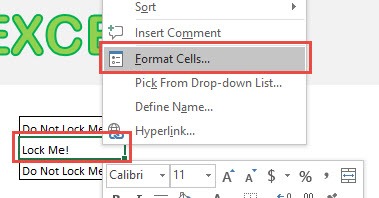
STEP 4: Right-click on our target cell and select Format Cells:
STEP 5: Ensure Locked is ticked this time. This will lock our target cell. Click OK.
STEP 6: Now it is time to protect our Excel sheet and see the locking in action!
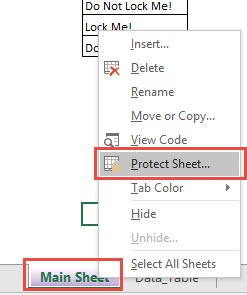
Right-click on the Worksheet Name and select Protect Sheet (or go to the ribbon menu and select Review > Protect Sheet)
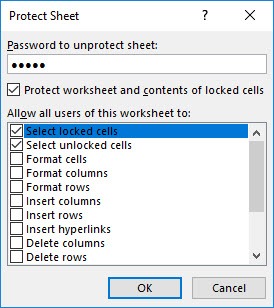
STEP 7: Type in a password and Click OK. In our example, I typed in excel as the password.
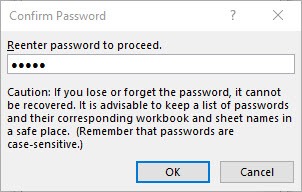
STEP 8: Retype the password and Click OK.
STEP 9: If you try editing your target cell now, Excel will not allow you to…And you are able to edit the other cells just fine!
Tips and Advanced Techniques I Use
Over time, I’ve picked up a few tricks that make cell locking even more powerful and flexible:
- Locking cells in multiple sheets: If I’m working with several similar sheets, like monthly tabs in a budget, I repeat the process for each worksheet individually. There’s currently no way to lock cells across all sheets at once in Excel’s standard interface.
- Highlighting locked cells: For clarity, I sometimes use cell shading or borders to visually indicate which cells are locked. This is especially helpful when sharing templates with others.
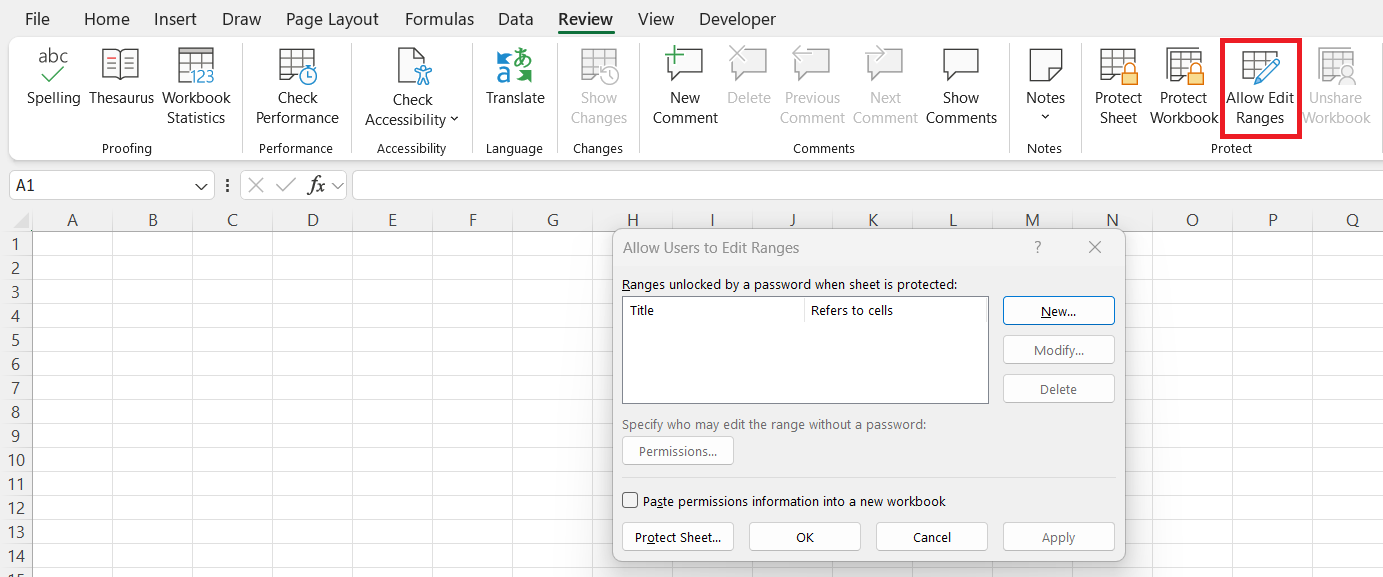
- Using “Allow Edit Ranges” for more control: In the Review tab, I found the “Allow Users to Edit Ranges” feature. It lets me specify certain ranges that specific users can edit, even if those cells are generally locked. This is handy in collaborative environments where different team members are responsible for different sections.
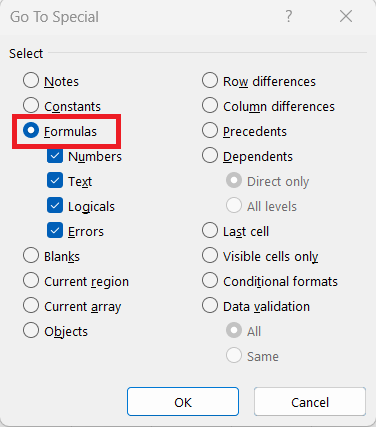
- Locking only formulas: Occasionally, I use Excel’s “Go To Special” feature (Home > Find & Select > Go To Special > Formulas) to quickly select all cells with formulas, then lock them, leaving the rest of the sheet editable.
- Protecting workbook structure: If I want to prevent users from adding, deleting, or moving worksheets, I use the “Protect Workbook” feature under the Review tab.
Frequently Asked Questions
Q1: Why doesn’t locking a cell immediately prevent editing?
Locking a cell alone does nothing until the worksheet is protected. Excel treats all cells as “locked” by default, but that setting is inactive until you apply worksheet protection. It’s a two-step process: set the locked/unlocked status, then activate protection. Skipping step two is a common mistake, especially for new users.
Q2: Can I lock only certain parts of my sheet and leave others editable?
Absolutely. You can unlock all cells first, then lock only the specific ones you want to protect. Once you protect the sheet, only the locked cells will be restricted. This method is especially useful for forms, dashboards, or templates where users need to input data in designated cells.
Q3: Is there a way to let users edit specific locked ranges without sharing the sheet password?
Yes, Excel’s “Allow Users to Edit Ranges” feature lets you assign editing permissions to certain users or ranges even on a protected sheet. You can use this to manage who edits what—great for shared workbooks or team input areas. It adds an extra layer of flexibility without compromising security.
Q4: What’s the difference between Protect Sheet and Protect Workbook?
“Protect Sheet” locks individual cells or sheet elements (like formulas or formatting). “Protect Workbook,” on the other hand, prevents structural changes like adding, deleting, or moving entire worksheets. You’ll often use both features together to fully safeguard your file’s content and layout.
Q5: Can I apply cell locking across multiple sheets at once?
Unfortunately, Excel doesn’t support batch cell locking across multiple sheets via the standard UI. You’ll need to repeat the process sheet by sheet. However, if you’re comfortable with VBA, you can write a macro to automate it—handy for large workbooks with consistent formatting.

Bryan
Bryan Hong is an IT Software Developer for more than 10 years and has the following certifications: Microsoft Certified Professional Developer (MCPD): Web Developer, Microsoft Certified Technology Specialist (MCTS): Windows Applications, Microsoft Certified Systems Engineer (MCSE) and Microsoft Certified Systems Administrator (MCSA).
He is also an Amazon #1 bestselling author of 4 Microsoft Excel books and a teacher of Microsoft Excel & Office at the MyExecelOnline Academy Online Course.
