Printing an Excel spreadsheet can sometimes feel like a daunting task, especially if your worksheet is packed with data or formatted unconventionally. However, with a bit of preparation and the right approach, I’ve found that printing Excel spreadsheets can be a breeze. Let me walk you through the step-by-step process on How to Print an Excel Spreadsheet Like a Pro.
Key Takeaways:
- Setting a clear print area ensures only the needed data appears on your printout, saving time and resources.
- Properly adjusting orientation, margins, and scaling enhances the professional look and readability of your printed spreadsheets.
- Including gridlines, titles, and comments improves data interpretation for your audience.
- Previewing your print setup helps catch errors, ensuring your document prints exactly as intended.
- Efficiently managing multiple sheets or specific elements like charts and formulas simplifies complex printing tasks.
Table of Contents
Introduction to Excel Printing Mastery
Ensuring Your Spreadsheets Look Professional on Paper
Printing Excel spreadsheets effectively is crucial for presenting data in a clear and professional manner. Despite living in an increasingly digital age, the need for tangible, printed documents persists.
Regrettably, even the most meticulously crafted spreadsheets can often translate poorly from screen to print – sections run off the page, gridlines disappear, and what was once a pristine layout looks disjointed.
How to Print an Excel Spreadsheet
Quick Tips to Optimize Workbook Layouts
Optimizing workbook layouts before hitting the print button is an essential step toward producing clear, comprehensible hard copies. To start, always review your workbook’s structure; are the tabs organized logically? Does the placement of data make sense on paper, just as it does on the screen? Also, it’s wise to standardize fonts and sizes, ensuring that headers, data, and labels are distinct and readable.
After this basic housekeeping, consider these quick tips: utilize text-wrapping for cells with lengthy content, align data to aid in a reader’s flow, and minimize the use of multiple colors which may not translate well in print. Break down wide tables into sections if possible; this approach can help to avoid size issues when rows and columns extend beyond a single printed page.
Setting Your Print Area Like a Pro
Setting your print area effectively in Excel is a game-changer for creating professional-looking documents. My experience has shown that printing without first defining the print area often leads to incomplete or excessive information on the paper, which can be frustrating.
We can prevent this by setting the print area. Follow these steps :
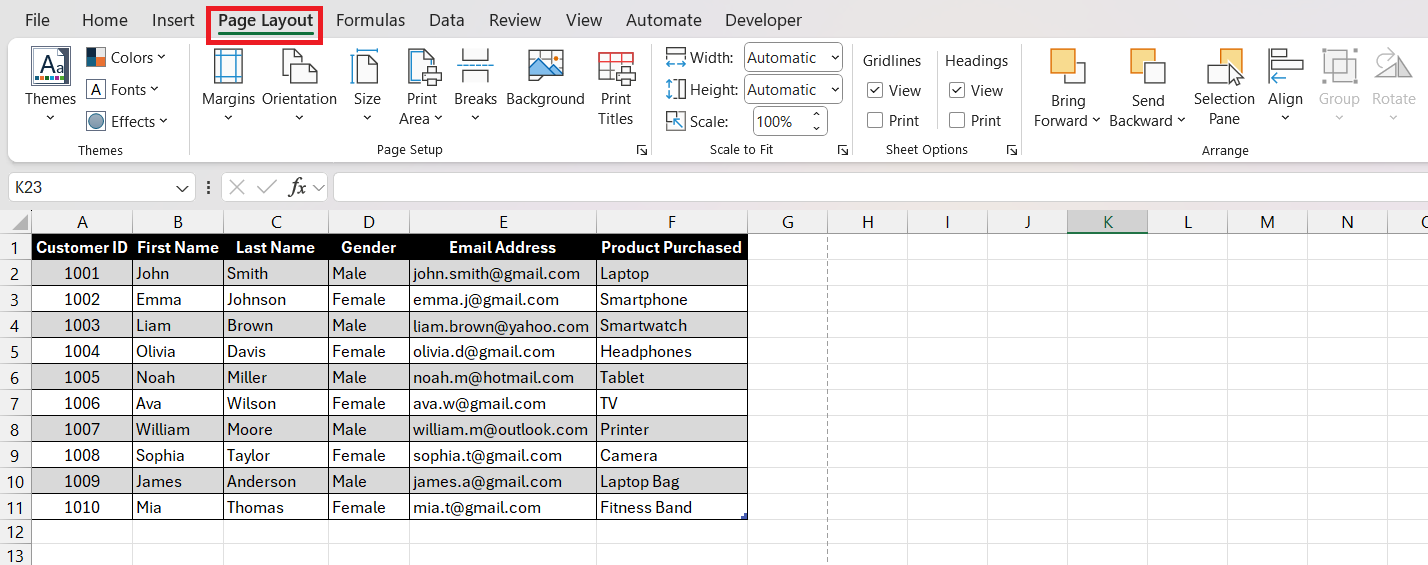
STEP 1: Simply select the cells you need, head over to the ‘Page Layout’ tab.
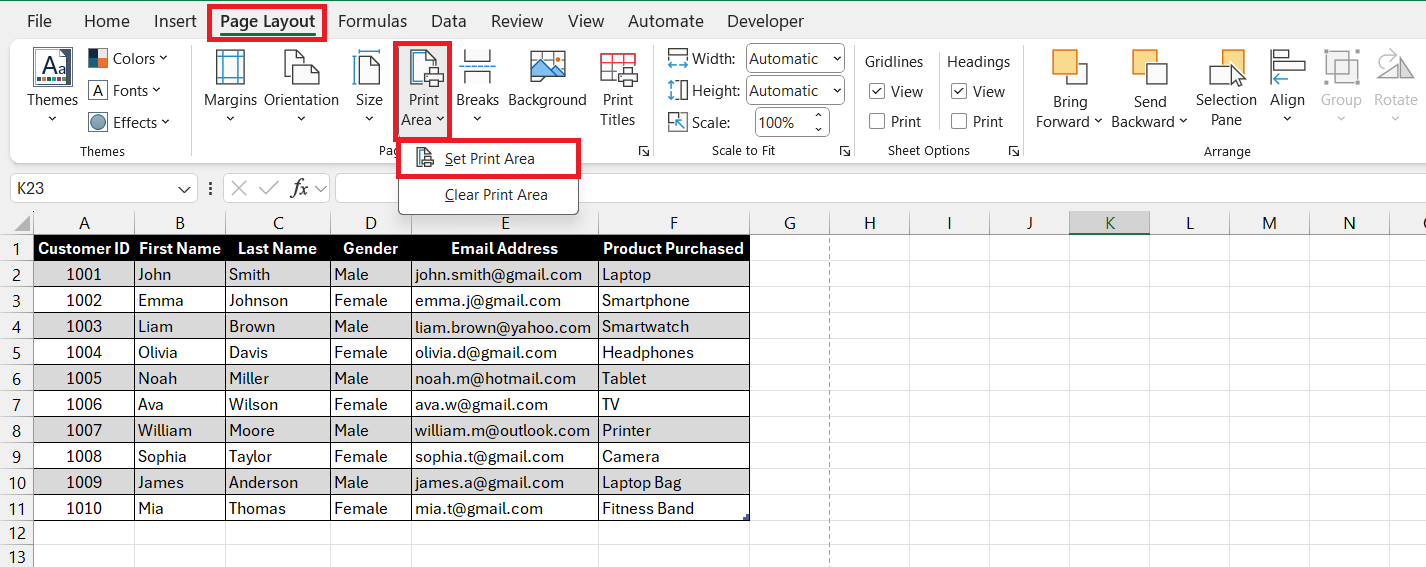
STEP 2: Click ‘Print Area’ followed by ‘Set Print Area’. This action tells Excel exactly what you want to include in your printout.
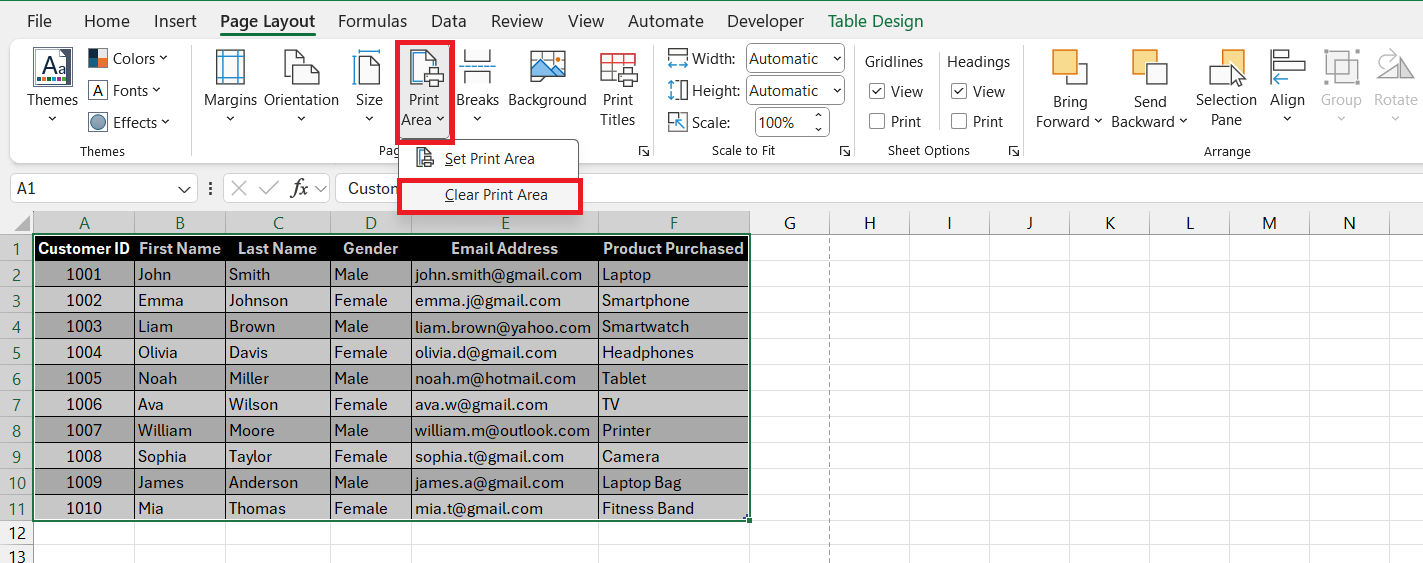
If you change your mind or need to adjust what’s included in the print area, don’t fret. It’s as straightforward as selecting ‘Clear Print Area’ from the same menu and starting the process anew.
Remember, the printer will now only pay attention to your predefined sections. This laser-focused method allows for multiple print areas within the same document, showcasing only the most pertinent data.
Customizing the Print Setup
Orientation, Margins, and Scaling: A Closer Look
Orientation, margins, and scaling are the cornerstones of a properly configured print setup in Excel. Addressing these three aspects is key to achieving the ideal layout on paper.
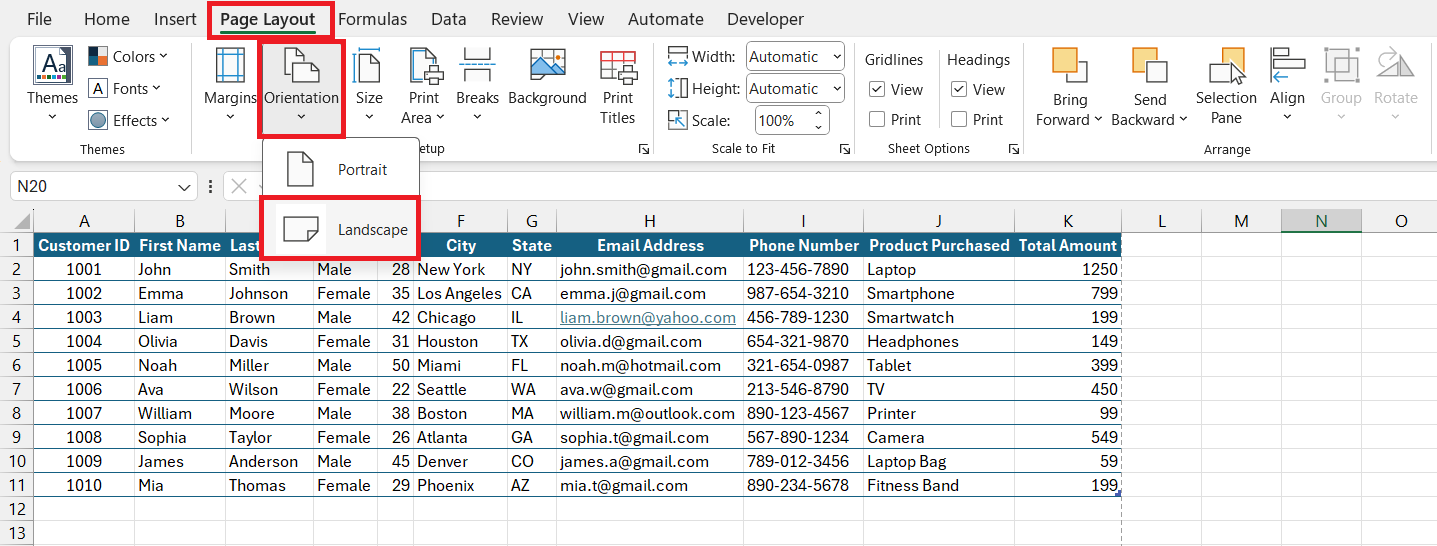
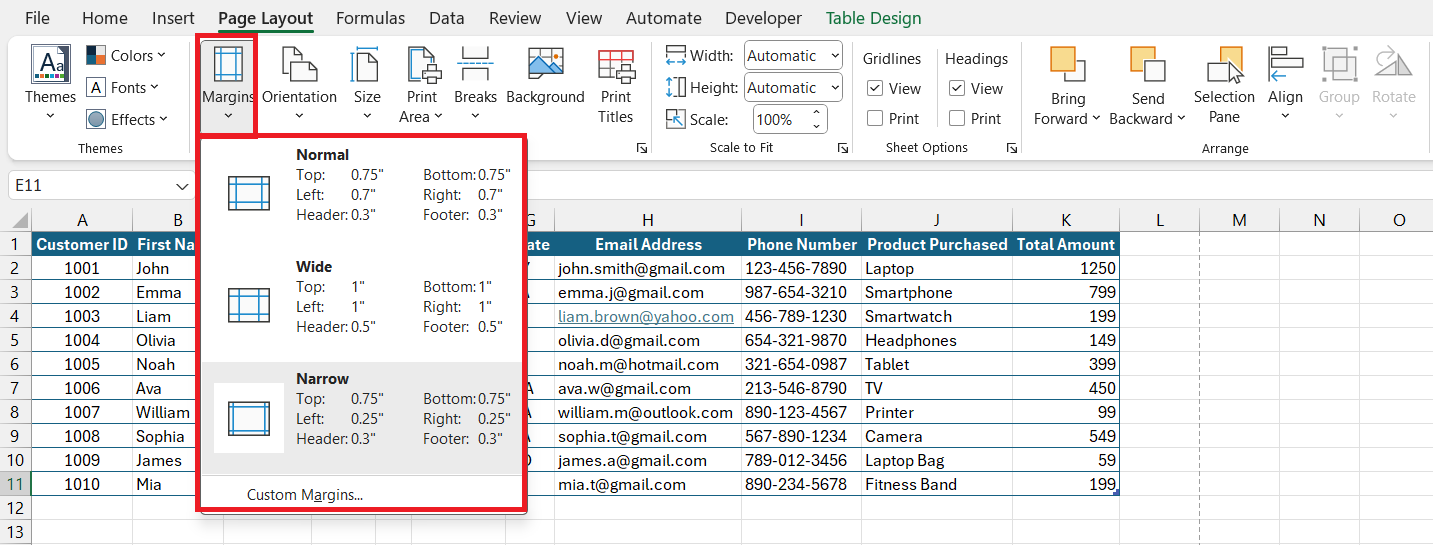
For orientation, landscape mode often suits wider data sets with numerous columns, while portrait mode complements longer datasets. Switching between orientations is straightforward – within the ‘Page Layout’ tab, click the ‘Orientation’ dropdown to toggle as needed.
Margins bear significance as well. They frame your data aesthetically and functionally, leaving enough room for binding or notetaking without compromising the data display. After clicking ‘Margins’ in the ‘Page Layout’ tab, you can choose ‘Narrow’ for more content per page or tweak the dimensions to your preference in ‘Custom Margins’.
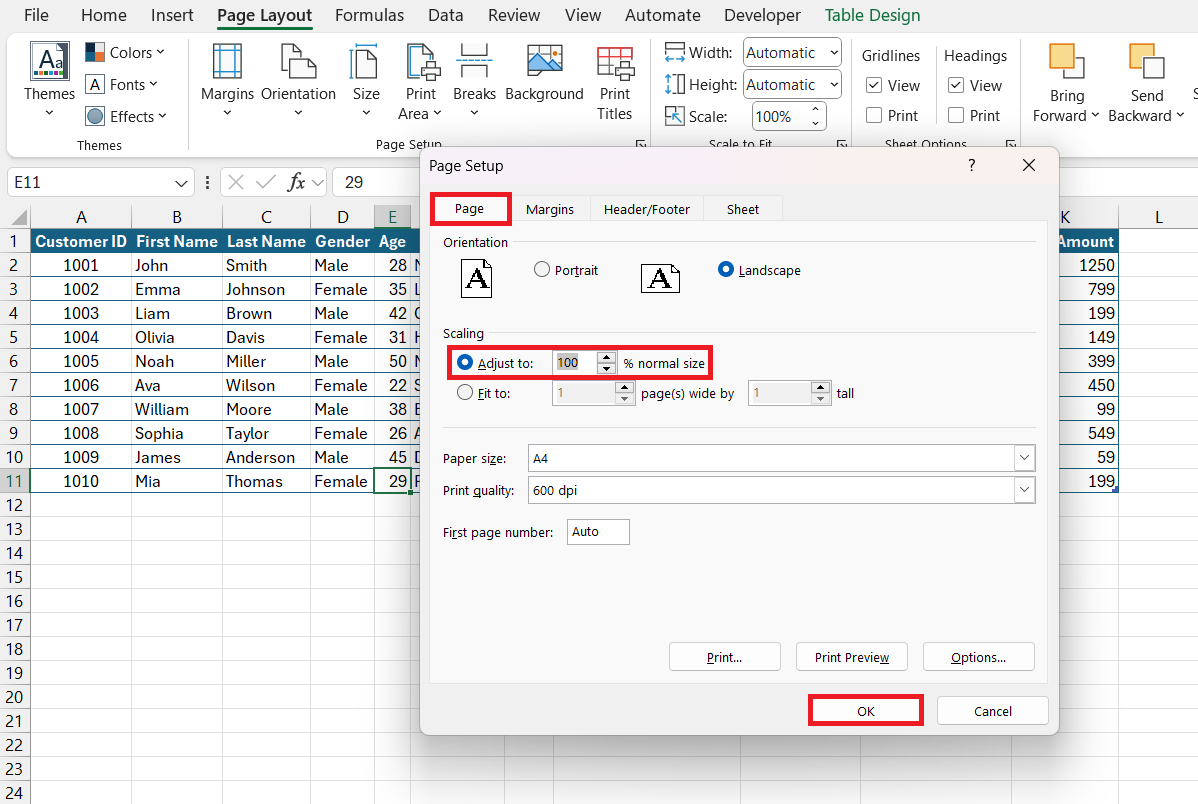
Scaling is the adjustment of your spreadsheet size to fit the designated print area. From making the entire sheet fit onto one page to enlarging specific sections for emphasis, scaling controls the presentation’s impact and readability. Open up the ‘Page Setup’ dialog box from the ‘Page Layout’ tab, and under the ‘Page’ option, you can scale by percentage or direct Excel to fit the sheet across a specified number of pages.
By mastering orientation, margins, and scaling, you ensure that your spreadsheet is not just legible but visually balanced and primed for your reader’s ease.
How to Tackle Multiple Sheets and Complete Workbook Seamlessly
Tackling multiple sheets for printing need not be a herculean task. Excel has built-in features that can streamline this process, ensuring that you can print across various sheets without skipping a beat. Here’s how I manage it:
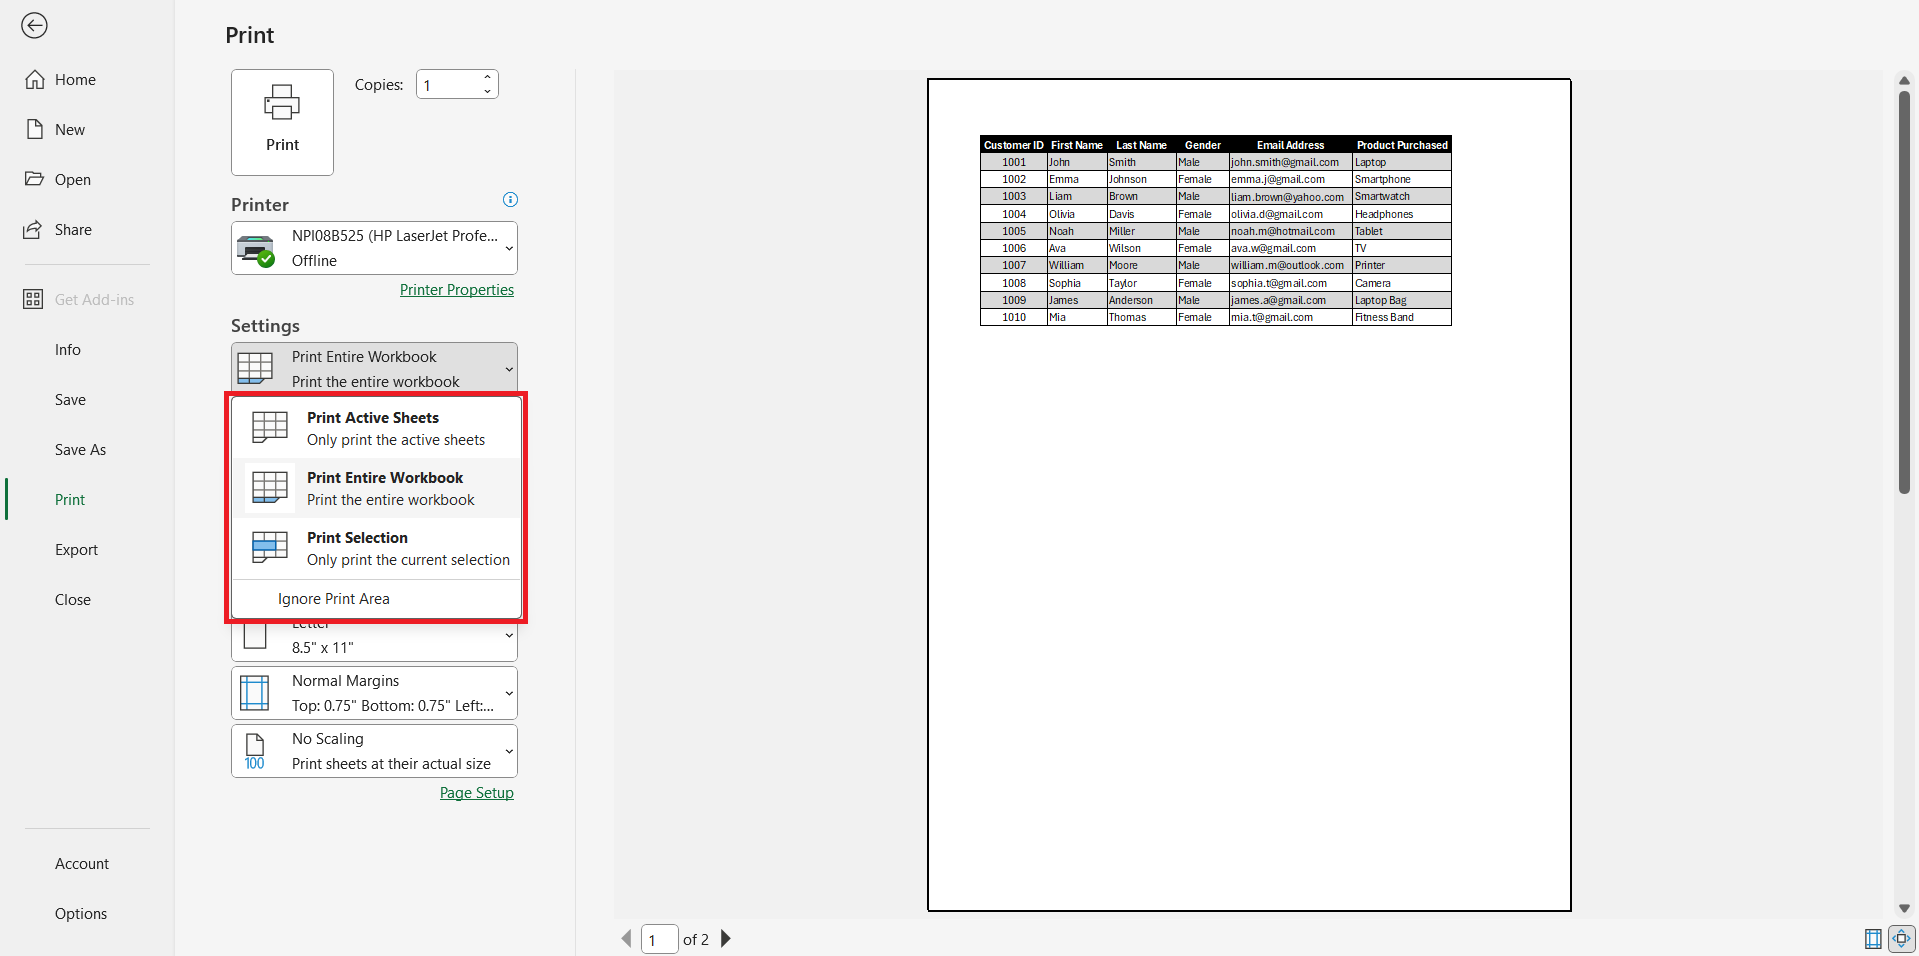
To print a sheet or a complete workbook hit Ctrl + P or click on File > Print and proceed with the appropriate requirement.
Before you proceed, always preview the number of pages at the bottom of the Preview pane to confirm the correct range has been selected. This prevents inadvertently printing undesired areas.
Lastly, remember to ungroup your sheets after printing. If you leave them grouped and start editing, changes apply to all grouped sheets, which can inadvertently alter your data.
By exercising these tips, we can say goodbye to the dread of printing multiple sheets and embrace a more seamless, error-free approach to presenting our data in its best light.
Advanced Excel Print Options
Enhancing Readability with Gridlines, Titles, and Comments
Enhancing the readability of printed Excel spreadsheets is vital for effective communication. A spreadsheet that’s clear and approachable in print is more likely to be used and appreciated. For starters, gridlines often serve as guides that keep your data aligned and easy to follow. While these lines are visually helpful on screen, they don’t print by default. Follow these steps to include gridlines and titles :
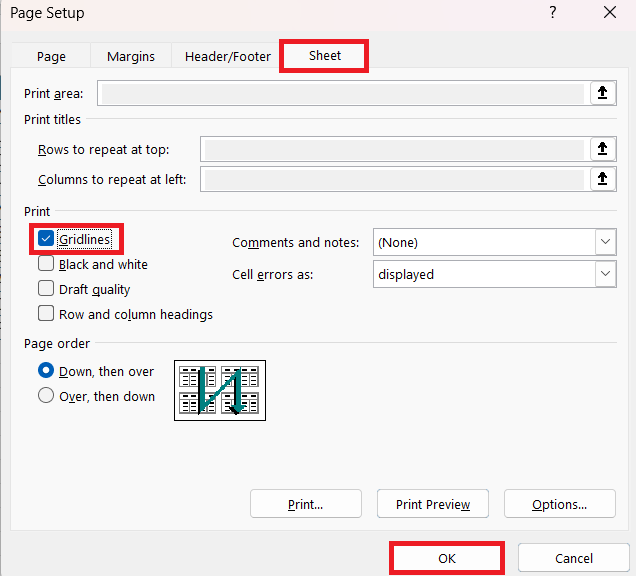
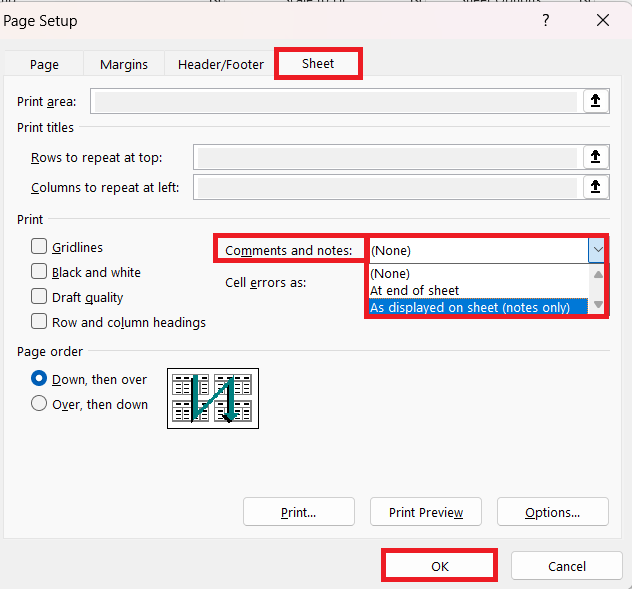
STEP 1: To include them, navigate to the ‘Page Layout’ tab and click on the arrow icon to open “Print Setup” dialog box.
STEP 2: Now navigate to the “Sheet” tab. Under the “Print” section you can enable printing of “Gridlines” by checking the box beside it.
STEP 3: To enable comments, under the same “Print Section”, select one of the options available beside the “Comments and notes:” label.
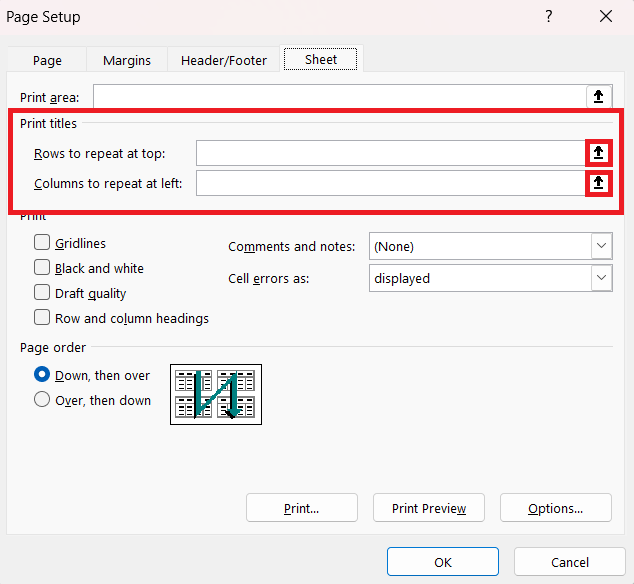
Print titles, meanwhile, are the row or column labels that are typically necessary on every page to contextualize the data. Imagine flipping through multiple pages and having to remember what each column means — it would be a daunting task.
Under the “Sheet” tab of the “Page Setup” dialog box, under the “Print Titles” click on the up arrow icon, once you click on the arrow, select the required rows or columns to repeat.
With these readability enhancements — gridlines, titles, and comments — you can trust that your spreadsheet remains interpretable and informative, even on paper.
Handling Complex Printing Scenarios
Printing Charts, Formulas, and Special Ranges
Mastering the art of printing specific Excel elements such as charts, formulas, and designated ranges can elevate your reporting to a new level. Let’s dive in and explore how to accomplish this with precision and efficiency.
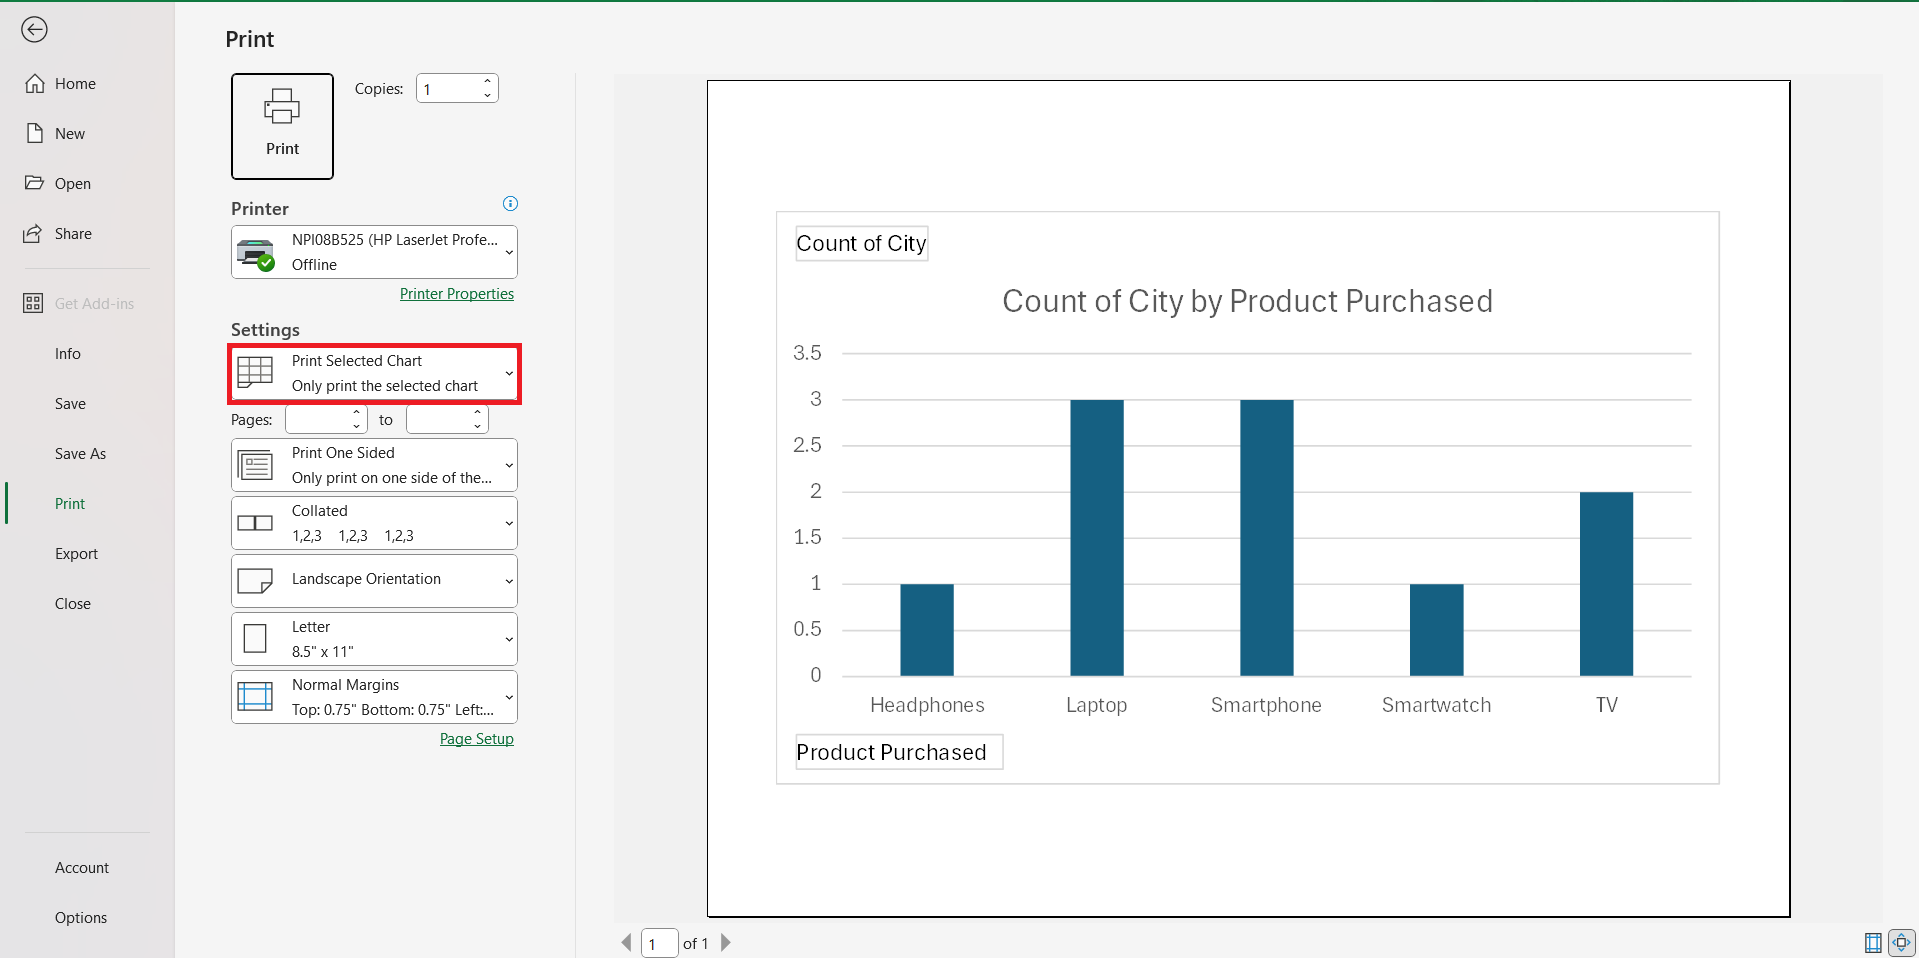
When you’re tasked with printing a chart, Excel simplifies the process. Simply select the chart, then press Ctrl + P to open the Print menu. In the Print Preview window, your selected chart is highlighted. By default, Excel selects the ‘Print Selected Chart’ option under ‘Settings’.
You always want to preview before printing to ensure the chart looks exactly as intended. If further adjustments are needed, you can modify chart properties beforehand and retry.
Printing formulas is another story. This might be necessary for auditing or educational purposes. Navigate to ‘Formulas’ in the ‘Show Formulas’ section on the ‘Formulas’ tab and ensure they’re visible on the sheet.
Now, the printed result will display the formulas rather than the values they compute.
These powerful, yet underutilized, printing capabilities can greatly benefit us in situations where presenting specific parts of a workbook is more pertinent than printing the entirety of a sheet.
Double-checking Settings and Preferences
Double-checking settings and preferences in Excel before printing is somewhat of a safety net against wasted prints and ensures the final document truly meets our expectations.
One habit I’ve formed is to always give the ‘Page Setup’ dialog box one more glance. It holds the key to refining our document’s appearance on paper and contains valuable settings like page orientation, scaling options, margins, headers, footers, and print area. This final review can catch any last-minute oversights.
Additionally, considering printer-specific settings is essential. Different printers offer unique features and limitations — color output, duplex printing, and paper sizes. Ensure that your printer settings within Excel align with the physical printer’s capabilities and the specifications of your project.
Taking a moment for this final verification can be the difference between a printout that’s precisely what we had in mind and one that requires a return trip to the drawing board.
FAQ: Your Pressing Excel Printing Questions Answered
Can I preview how my Excel spreadsheet will print?
Yes, you can preview your Excel spreadsheet before printing. Simply click ‘File’ then ‘Print’ to see the print preview. Alternatively, use the shortcut Ctrl + F2 to directly enter Print Preview mode. Here, you can browse through the pages and spot any issues before committing to print.
How do I print a large Excel sheet on one page?
To print a large Excel sheet on one page, go to the ‘Page Layout’ tab, open ‘Page Setup’, click the ‘Page’ tab, and under ‘Scaling’, select ‘Fit to’ and set it to ‘1 page’ for both width and height. Always review in ‘Print Preview’ to check readability before you print.
Is it possible to print just a selected portion of my Excel workbook?
Yes, it is possible. Simply highlight the portion you want to print, go to ‘File’, then ‘Print’, and under ‘Settings’, choose ‘Print Selection’. This will print only the highlighted area of your workbook.
What if I need to print different sections across multiple sheets at once?
If you need to print different sections across multiple sheets at once, select the first sheet and the range, then hold down Ctrl (or Shift for adjacent sheets) and click other sheet tabs. Choose ‘Print Selection’ under ‘Print’ settings, confirm in ‘Print Preview’, and print.
How do I make an Excel spreadsheet printable?
To make an Excel spreadsheet printable, configure print options: Set print area in ‘Page Layout’ > ‘Print Area’, adjust scaling in ‘Page Setup’, choose correct orientation, include gridlines and headers if needed, and use ‘Print Preview’ to ensure it looks as expected.
John Michaloudis is a former accountant and finance analyst at General Electric, a Microsoft MVP since 2020, an Amazon #1 bestselling author of 4 Microsoft Excel books and teacher of Microsoft Excel & Office over at his flagship MyExcelOnline Academy Online Course.

