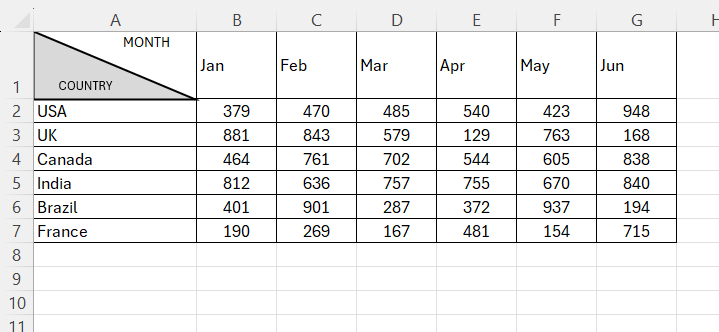
I’ve often come across situations where I need to split cell diagonally in Excel, especially when working with tables where I want to display two different headers within the same cell, like “Price/Quantity” or “Date/Time.” If you’re looking to split cell diagonally in Excel, here’s how you can do it quickly and easily.
Key Takeaways:
- Splitting a cell diagonally in Excel is a purely visual formatting trick, not an actual division of the cell into two functional parts.
- You can split a cell using Excel’s “Format Cells” option by applying a diagonal line through the Borders tab.
- Using shapes, like a right triangle, offers more design flexibility for creating a diagonal effect within a cell.
- While diagonal splits are visually appealing, they come with limitations, such as the inability to reference split sections separately in formulas.
- It’s crucial to ensure legibility by using contrasting colors, clear fonts, and adjusting text alignment when using diagonal splits.
Table of Contents
Introduction to Diagonal Cell Splitting in Excel
Unveiling the Magic of Excel’s Flexibility
Excel is not just a powerhouse for crunching numbers and data analysis; it’s also a canvas for creative data presentation. I’ve always found its robust set of features allows us to present information in ways that are both insightful and eye-catching.
One such feature is the ability to split cells diagonally, which adds a layer of sophistication to our spreadsheets. This flexibility is the magic I’m eager to explore with you today.
The Basics of Cell Formatting
Before diving deep into the more advanced techniques like diagonal splits, it’s essential to grasp the basics of cell formatting in Excel. Think of formatting as the art of sprucing up the spreadsheet, where we can adjust the visual aspects of cells to improve our data’s clarity and impact. By tweaking font sizes and colors, adding borders, and employing cell shading, we can transform a basic table into a well-organized and visually appealing masterpiece.
Imagine a monthly budget table—by simply changing category headers to a bold font, applying distinct colors to different income and expense types, and adding borders for separation, we give life and meaning to the raw numbers. Clever cell formatting makes our data not only look professional but also becomes significantly easier to read and analyze.
For example, consider using alternating row colors (also known as zebra striping) to enhance readability, or use a contrasting fill color to immediately draw the eye to the most crucial figures. Remember, a well-formatted cell is like a signpost that guides the observer’s attention to where it’s needed the most.
Step-by-Step Guide on How to Split Cells Diagonally
Using Format Cells Option
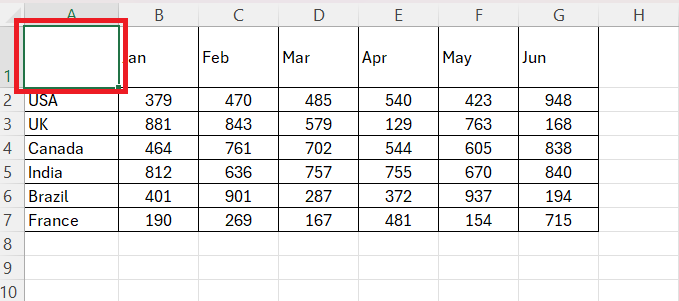
STEP 1: Select the cell I want to split. Let’s assume I’m working with a table, and I want to split cell A1 diagonally.
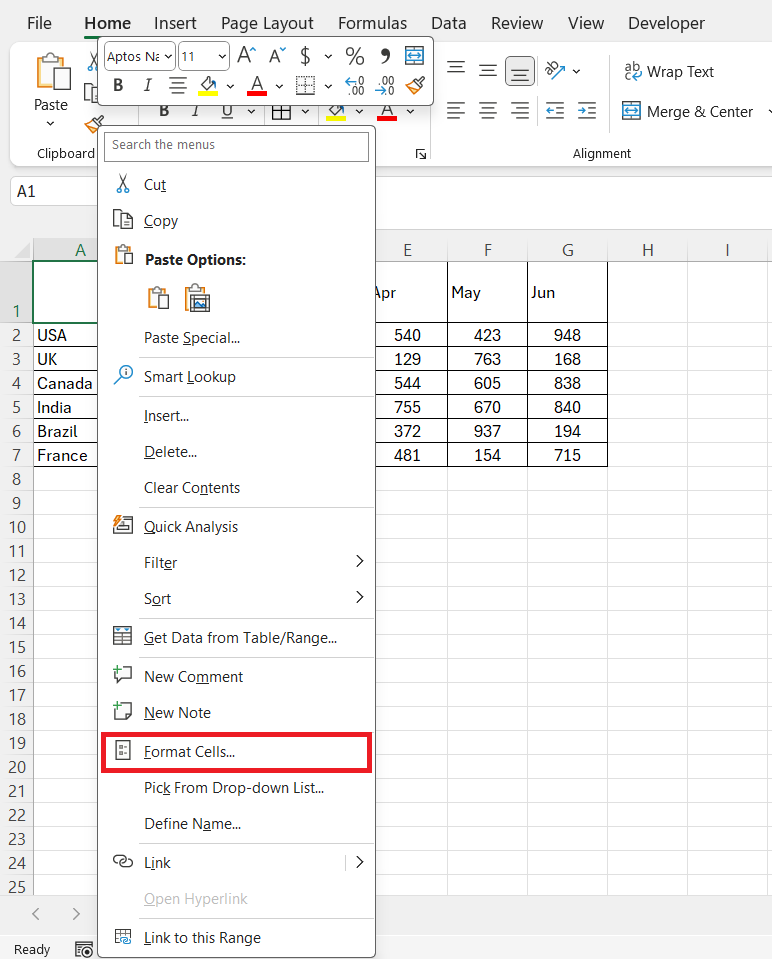
STEP 2: Right-click on the selected cell and choose Format Cells.
This opens up the Format Cells dialog box, where all the magic happens.
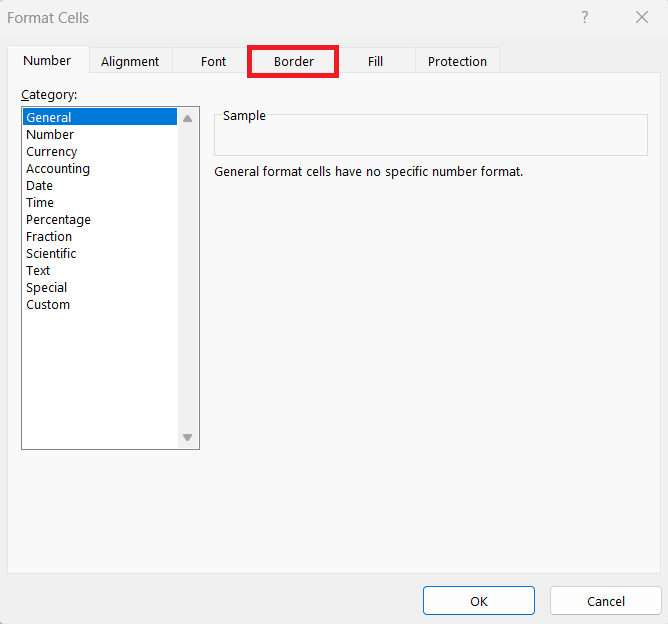
STEP 3: In the Format Cells dialog, I switch to the Borders tab. Here, I can see options for different border styles.
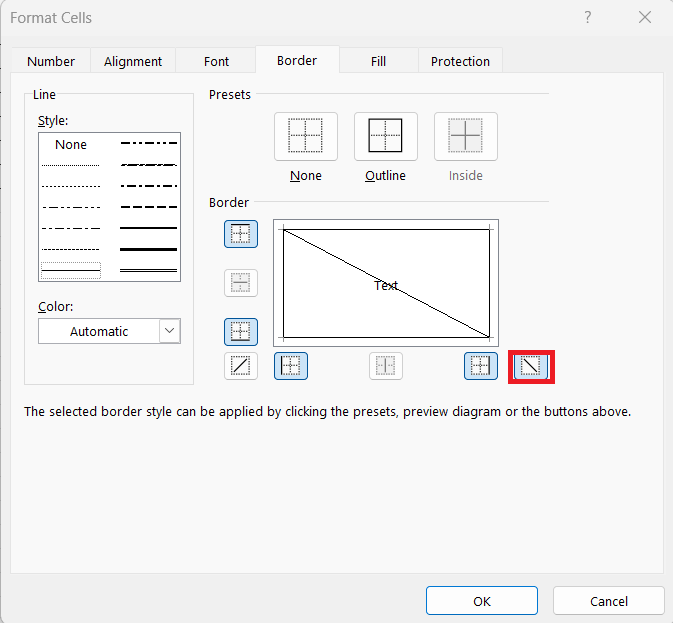
STEP 4: On the Borders tab, I select one of the two diagonal line options: either the one that goes from the bottom-left to the top-right or the reverse. Once I’ve chosen the diagonal, I click OK to apply the formatting.
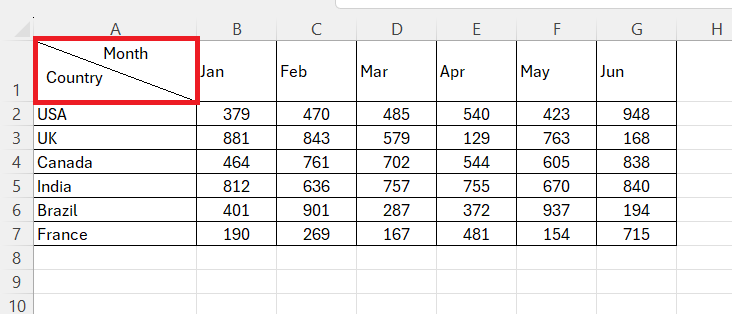
STEP 5: Now that the cell is split visually, I add text to it. To display text on both sides of the diagonal, I typically use a couple of spaces to position my words correctly. For example, I might type “Month” and then several spaces before typing “Country” so that each word appears on either side of the line.
Using Shapes
An alternative to splitting a cell diagonally using borders is to use the Insert Shape feature. I sometimes do this for more flexibility in design.
Here’s how:
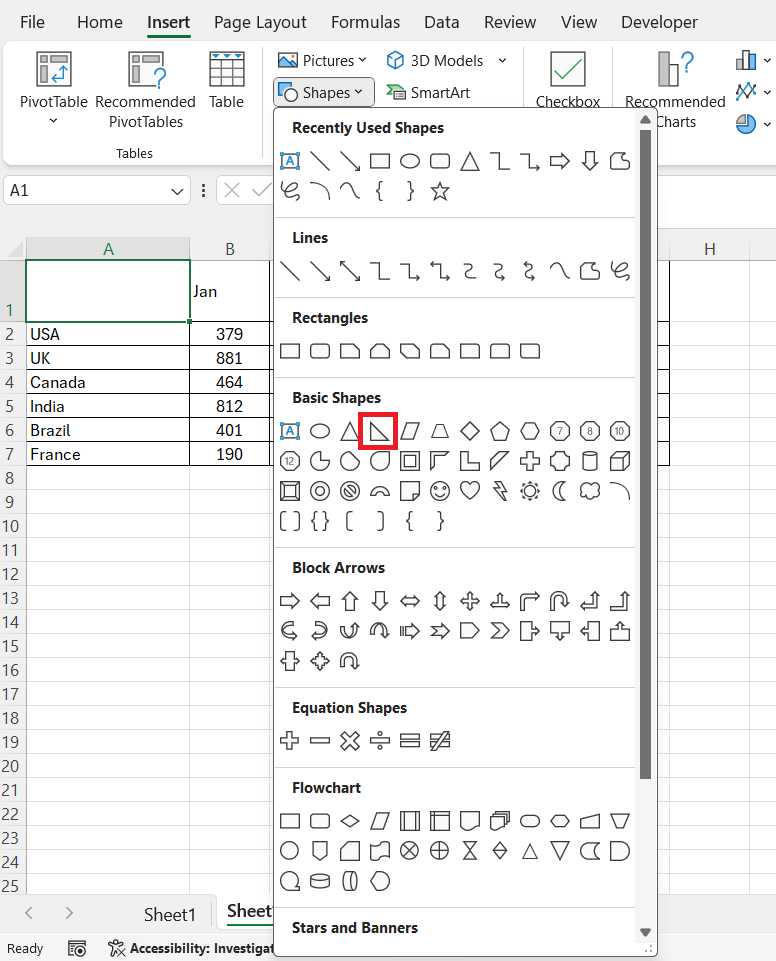
STEP 1: Go to the Insert tab.
STEP 2: Click on Shapes and select a Right Triangle.
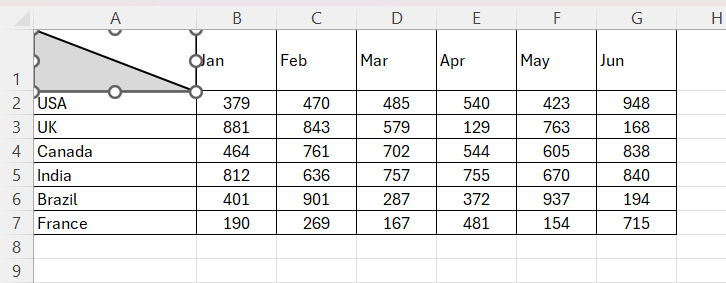
STEP 3: Draw the triangle within the cell, resize it to fit the half, and format it with different colors or outlines.
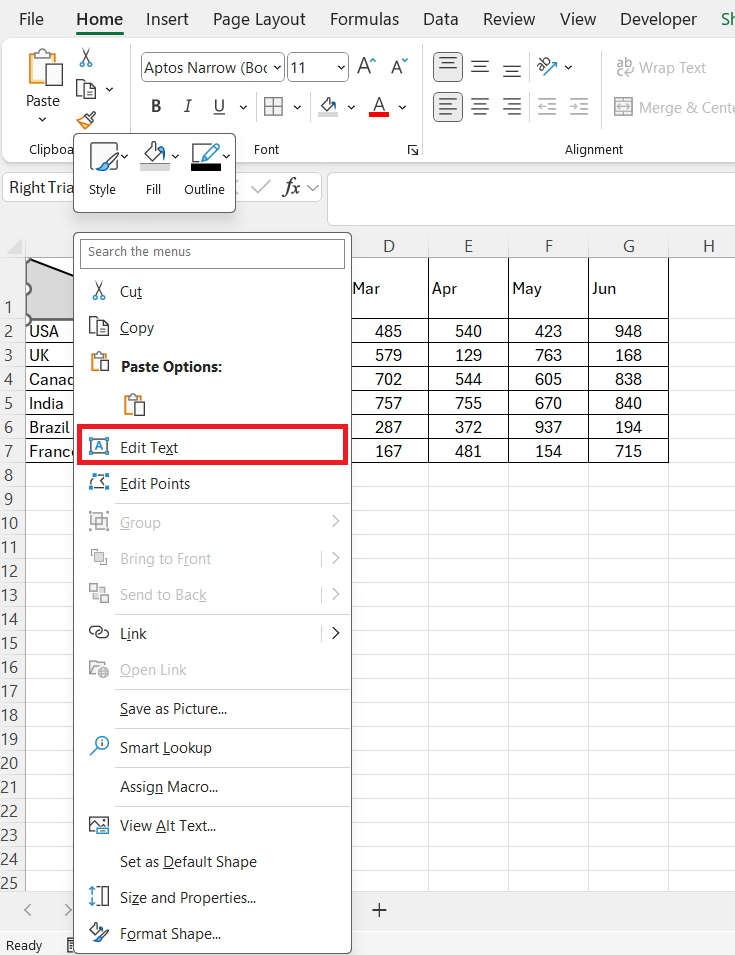
STEP 4: Right-click on the shape and select ‘Edit Text’.
STEP 5: Add text inside and outside the shape to split cell diagonally.
Using shapes can make the diagonal split more visually striking and customizable.
Creative Tricks for Mastering Diagonal Splits
Enhancing Readability with Visual Split Cells
When it comes to enhancing the readability of our spreadsheets, it’s time to wield the double-edged sword of visual split cells with care. By inserting a diagonal line in a cell, we effectively create two separate sections within it, each with its own unique potential for labeling. This is ideal for when I need to compare related metrics side-by-side or contain related data points clearly.
Imagine, for example, a project management chart where tasks and responsible parties need clear delineation. A diagonally split cell does this beautifully, maintaining the elegance of the design without sacrificing the relationship between the elements.
To ensure that the readability doesn’t suffer as a result of this creative formatting, we should pair our split cells with contrasting text colors or highlights, making each part of the split cell distinct yet part of a cohesive whole. Additionally, we might adjust the alignment and font size so that each section of the split cell is clear and legible from a glance, keeping in mind that effective communication is the ultimate goal.
To sum up, the real knack lies in striking the right balance between cosmetic appeal and the pure functionality of clear data presentation. With diagonal splits done right, our spreadsheets can enjoy the best of both worlds.
Limitations of Diagonal Splitting in Excel
Although splitting a cell diagonally can be a useful trick, it’s important to understand the limitations. Excel treats each cell as a single data point, so when you split cell diagonally, you’re not actually dividing it into two functional cells. The diagonal split is purely visual, which means:
- You cannot reference the top-left and bottom-right separately in formulas. They are still part of the same cell.
- Sorting or filtering data that involves diagonally split cells can be tricky.
- It’s mainly a formatting technique, so don’t expect it to function like merged or divided cells in other applications (such as tables in Word).
FAQs – Splitting Cells in Excel
What Is Splitting a Cell Diagonally?
Splitting a cell diagonally in Excel is a formatting technique that allows us to visually divide a single cell into two triangular sections. It’s done by adding a diagonal line within the cell, giving the appearance that it has been split. This method retains the cell as a single entity while providing visual cues to represent different data types or categories within the same cell space. It’s particularly useful for headers where two attributes need to be displayed succinctly.
How do I Ensure my Data Remains Legible When Splitting Cells Diagonally?
To keep data legible when splitting cells diagonally, focus on simplicity. Use bold and straightforward fonts for clarity, and opt for high-contrast colors to ensure the labels stand out against the cell’s background. Additionally, adjust the font size so that it fits comfortably within each section of the split cell. Be selective with borders to define areas without clutter, and always preview your changes to make sure the information is easily accessible despite the diagonal formatting.
Can I Apply Different Formatting to Each Section of a Split Cell?
Yes, while Excel doesn’t allow for different formats within the actual split sections of a cell, there’s a creative workaround. Once a cell is split diagonally, I can simulate different formatting by using text and background colors that contrast each other. This helps in creating a distinct visual separation. For text alignment, I carefully position text in each section so it appears separate, maintaining the illusion of individual formatting.
Are There Any Limitations to the Types of Data that Can Be Inserted into Diagonally Split Cells?
Indeed, Excel does impose limitations on diagonally split cells since the split is purely visual—technically, the cell remains a singular entity. Therefore, we can’t directly insert different types of data into each of the split sections. Instead, we have to enter all the data as a single unit and then use positioning and formatting tricks to give the illusion that the cell contains distinct data types. It’s worth noting, this method is more about visual organization and isn’t suited for cells that require individual data processing.
How to split cells in Excel?
To split cells in Excel, choose the cell, navigate to the ‘Home’ tab, click on ‘Borders,’ and select ‘More Borders.’ In the ‘Format Cells’ box that appears, under the ‘Border’ tab, apply a diagonal line. For actual data splitting across multiple cells, use the ‘Text to Columns’ feature under the ‘Data’ tab, which separates the contents of one cell into different cells based on your specified delimiter such as commas or spaces.
John Michaloudis is a former accountant and finance analyst at General Electric, a Microsoft MVP since 2020, an Amazon #1 bestselling author of 4 Microsoft Excel books and teacher of Microsoft Excel & Office over at his flagship MyExcelOnline Academy Online Course.

