Easy GIF Control: How to Stop GIFs in PowerPoint Presentations
Introduction to GIFs in Presentations.
Since their inception in 1987, the popularity of GIFs has skyrocketed, morphing from a niche image format to a staple of digital expression.They're not just for social media - infusing presentations with GIFs has become a prevalent trend, making them more vibrant and engaging.
Introduction to GIFs in Presentations
Since their inception in 1987, the popularity of GIFs has skyrocketed, morphing from a niche image format to a staple of digital expression. They’re not just for social media – infusing presentations with GIFs has become a prevalent trend, making them more vibrant and engaging.
Learn about Excel with our Free Microsoft Excel Online Course!
The Challenge of Controlling GIFs in Slides
One might think using GIFs in presentations is a walk in the park, but there’s a catch: controlling them is not as intuitive as you’d hope. Upon switching to a slide with a GIF, it starts playing immediately, with no option for mouse-click pauses. This can throw off the timing of your talk and potentially distract your audience.
Getting a grip on these lively images is crucial for maintaining the professional flow of your presentation. Let’s dive into how to stop GIFs in PowerPoint.
Key Takeaways
- To pause a GIF from continuously looping during a PowerPoint presentation, press the “1” key. To resume the animation, press the “~” key.
- It’s important to optimize the GIF’s file size for PowerPoint presentations by reducing the color palette, compressing the images, and shortening the animation length to ensure smooth playback and avoid slowing down the presentation.
- While PowerPoint doesn’t provide direct control over GIF playback, you can manage the animation by preparing your GIF files beforehand so that they play as desired upon transitioning to the relevant slide.
Understanding the Basics of PowerPoint GIF Animation
What is an Animated GIF?
An animated GIF is akin to a flipbook tucked into a digital image file. It’s a series of pictures or frames compiled into one graphic, displayed in succession to create the illusion of motion. Unlike videos, GIFs are silent and loop automatically, usually lasting just a few seconds. With their small file size and compatibility with almost all web browsers and multimedia software, including PowerPoint, they are perfect for injecting some liveliness into static content.
Why Use GIFs in Your Presentation?
GIFs can be an incredibly effective visual aid in your presentations. They have the unique ability to add humor, clarify complex ideas, and inject dynamism into your slides. By visually breaking down processes or highlighting important trends, they become an instantaneous source of engagement.
They’re also time-efficient and less resource-intensive than videos. Where a video clip might be overkill or cumbersome due to its size, a GIF delivers a similar visual impact with far less loading time, keeping your presentation file manageable and ensuring a smooth run-through.
Step-by-Step Guide to Stop GIFs in PowerPoint
How to Insert a GIF in PowerPoint
To bring your PowerPoint slide to life with a GIF, you just need to follow a few straightforward steps:
For Windows:
STEP 1: Choose the slide where the GIF will show.
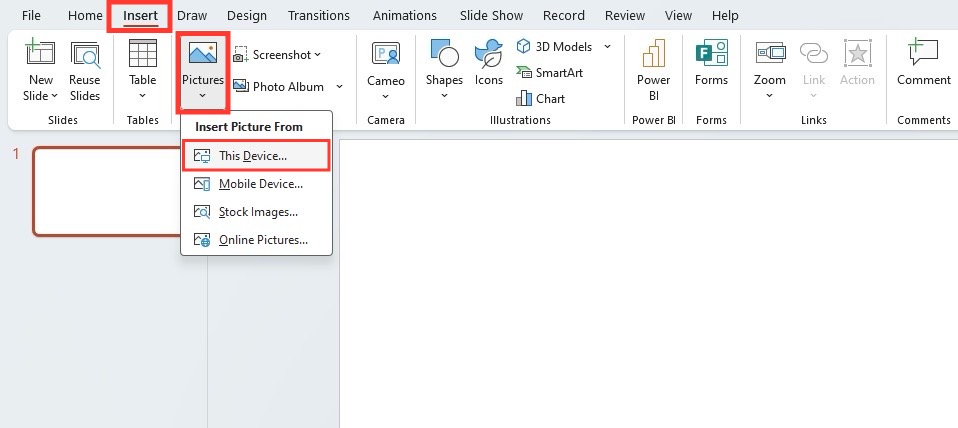
STEP 2: Navigate to Insert > Pictures. A menu will appear, prompting you to choose a picture source.
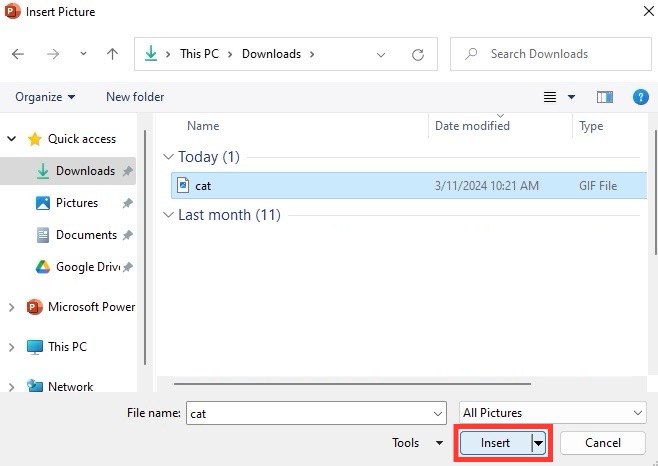
STEP 3: Select your GIF file from your chosen location and click ‘Insert’.
For macOS:
STEP 1: Click on the desired slide.
STEP 2: Under the Insert tab, look for Picture > Picture from File.
STEP 3: Browse, pick your GIF file, then click ‘Insert’.
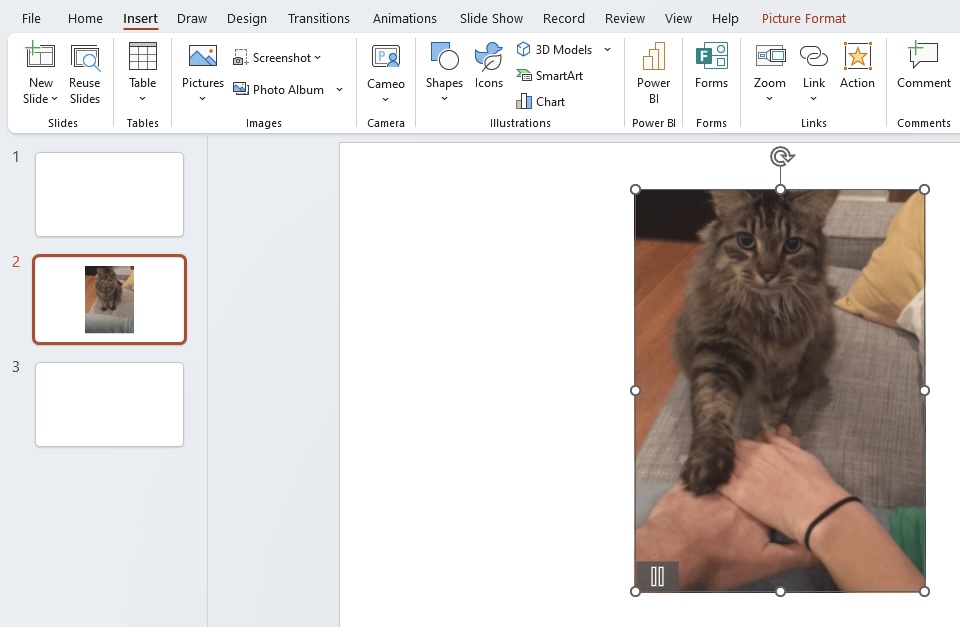
Voila! Your GIF is now ready to charm the audience as part of your presentation!
Methods to Pause or Stop an Animation
When you find yourself needing to take control of an animated frenzy during a presentation, remember these easy methods to pause or stop a GIF on PowerPoint:
- To pause a GIF, press the “1” key.
- To resume without a slide jump, hit the “~” key.
- Note: Shortcut keys like “S” or “+” might show as pause options, but they don’t always work as expected.
- To delete multiple effects at once from the Animation Pane, press “Ctrl”, select the effects, and hit “Delete”. To wipe every animation from a slide in a single go, click the first animation, hold “SHIFT” as you select the last, and press “Delete”.
- If the Animations pane is not visible, switch to Normal view, then reveal it via the Animations tab.
Remember, the goal is to maintain elegance in your execution, so acquaint yourself with these controls beforehand to ensure a performance as smooth as silk.
Additional Tips for Optimizing GIF Usage
Adjusting the Animation Loop Frequency
To fine-tune the loop frequency of your GIFs so they don’t dominate your presentation, you can take a couple of approaches:
- Before you embed your GIF into PowerPoint, adjust the loop setting using animation editing software like Photoshop or an online tool designed for GIF loop count changes.
- Photoshop steps: Open the GIF, navigate to the Timeline panel, change the loop option from “Forever” to “Once” or a specified number of times, and save your changes.
- Online tools: Upload your GIF, select the loop count, and download the edited version.
- For a more tech-savvy approach, ascertain the duration of a single GIF loop and employ JavaScript to pause the GIF at the end of its loop. This involves adding a bit of code to your presentation, though it may be more complex and not directly related to PowerPoint.
By adjusting the animation loop frequency, you ensure your GIFs only play as long as necessary to compliment your message without becoming a distraction.
Some Limitations When Using GIFs in Presentations
GIFs can spice up your presentations but come with their own set of limitations:
- Limited Color Palette: GIFs can only display 256 colors, which sometimes results in a visible reduction of image quality, especially for photographs.
- No Transparency: One of the drawbacks of using a GIF is that they can’t handle transparency, unlike PNGs. This means you can’t have a smooth, see-through background.
- Non-croppable Nature: Unlike other static images, you can’t use PowerPoint’s crop tools on GIFs. You’d need to pre-edit them using an external tool if cropping is essential.
- Large File Sizes: Although typically smaller than videos, GIFs can become quite hefty, especially if they’re lengthy or detailed. This can bog down your presentation.
- Automatic Play: As mentioned, GIFs begin automatically without an option to start on a click, which could throw off the timing of your presentation if not managed properly.
Being aware of these constraints helps you make informed decisions about how and when to use GIFs in your PowerPoint presentations.
Advanced Techniques for Managing GIFs
Create a GIF Directly in PowerPoint
Creating a GIF directly within PowerPoint is a neat trick that can add a layer of customization and uniqueness to your presentation. Here’s how you can do this:
- Decide the Shape and Size: The shape and size of your GIF should correspond to the slide aspect you’re using, typically widescreen at 16:9.
- Select and Insert an Object: Go to the Insert tab, choose an object or icon from Illustrations, then place it on your slide. Find professional icons from resources like PresentationLoad.
- Duplicate and Modify: Duplicate the slide (Ctrl+Shift+D) and make any alterations to your object for the second frame of your GIF, such as repositioning or changing color.
- Apply Morph Transition: Apply the Morph transition to the duplicate slide for fluid animation between slides.
- Export as an Animated GIF: Via File > Export, choose ‘Create Animated GIF’, select file size, and decide how long each slide shows before switching.
With these steps, you’ll have a bespoke GIF that’s tailored exactly to your presentation’s thematic needs and aesthetic.
Turn Off All Animations for a Minimalist Approach
For a clean, simple, and distraction-free presentation, you may decide to disable all animations. Here’s an effortless approach to achieve a minimalist look:
STEP 1: Go to the ‘Slide Show’ tab and click ‘Set Up Slide Show’.
STEP 2: In the dialog box that appears, find the ‘Show options’ section.
STEP 3: Check the box next to ‘Show without animation’, and all animations and transitions will be stripped from your presentation when you run the slide show.
STEP 4: To disable animations on individual objects, select the object.
STEP 5: Navigate to the ‘Animations’ tab and open the animations gallery.
STEP 6: Select ‘None’ to sever the ties between that object and animation’s whims.
These methods ensure that your presentation sticks strictly to the content, perfect for formal or serious settings where you need attendees to focus solely on the message imparted, undisturbed by visual flair.
Best Practices for Seamless Presentations with GIFs
Sharpen Your Presentation Skills with Controlled GIFs
Incorporating GIFs strategically can seriously enhance your presentation prowess. To sharpen these skills, remember to:
- Practice Timing: Know exactly when your GIF will play and for how long. Rehearsing with the GIFs ensures seamless integration with your verbal delivery.
- Define Purpose: Each GIF should have a clear reason for inclusion. Ask yourself, does it elucidate a point? Add necessary humor? Keep it relevant.
- Learn Audience Adaptation: Understand the temperament of your audience. GIFs may be perfect for a light-hearted crowd but less so for a formal conference.
Controlled use of GIFs suggests you’re not only tech-savvy but also considerate of your audience’s focus and engagement levels. It’s all about finding the right balance.
Leveraging Professional Tools and Solutions
Take your presentations up a notch by leveraging professional tools and solutions for enhanced GIF management:
- Dedicated Software: Advanced presentation software such as PresenterMedia offers extensive control over GIFs, including timing and looping adjustments, directly within your slides.
- Online Platforms: Websites like GIPHY provide a large library of GIFs with integrated tools to customize and optimize them for PowerPoint compatibility.
- Third-Party Apps: PowerPoint add-ins, like Power-user, can offer additional animation features and controls for smoother GIF integration.
By harnessing these professional resources, you ensure that your GIF usage is not only effective but also refined and adapted to professional standards.
These tools are particularly beneficial for those who frequently incorporate multimedia into their presentations and seek to create a lasting impression while maintaining strict control over their content.
Conclusion: The Fine Art of Balancing Entertainment and Control
Incorporating GIFs Without Compromising on Professionalism
While GIFs can add a sprinkle of fun to your presentations, they should not sidetrack from the professional quality of your delivery. Maintaining this equilibrium involves:
- Choosing Wisely: Select GIFs that supplement your message without being overbearing. The content should align with your brand’s tone and image.
- Sizing Appropriately: GIFs should be just the right size on the slide – visible enough to be effective without overpowering the text or other vital content.
By thoughtfully incorporating GIFs, you communicate that you value audience engagement and are adept at current presentation trends, yet you don’t sacrifice substance for style.
Summing Up the GIF Management in PowerPoint
In summary, mastering GIF management in PowerPoint is about harnessing their potential while steering clear of pitfalls. From inserting and playing GIFs with ease to optimizing their usage without losing control, you’ve got a variety of strategies at your disposal. By understanding the nature of loops, employing professional tools, and adhering to best practices, your presentations can be both engaging and polished. Always tailor your approach to GIFs to fit the context and audience, ensuring your professional touch isn’t lost amidst the animated excitement.
By wrapping up these skills, you’ll have your audience captivated and your message delivered with the precision and flair that only well-managed GIFs can provide.
Frequently Asked Questions About Removing Loops from GIFs
Can I Permanently Disable GIF Animations in PowerPoint?
Yes, you can permanently disable GIF animations in PowerPoint. To achieve this, go to the Slide Show tab, choose Set Up Slide Show, and under the Show options, select Show without animation. This will prevent GIFs from playing during the slideshow.
Are There Any Tools to Control GIF Loops Outside of PowerPoint?
Yes, several online tools, like ezgif.com, allow you to edit GIF loop settings outside PowerPoint. You can adjust the number of times your GIF loops or stop the loop altogether before inserting it into your presentation.
How do I enable an animated gif in powerpoint?
To enable an animated GIF in PowerPoint, insert it like a regular image: Go to the slide where you want it, click on the Insert tab, select Pictures, then browse and choose your GIF file. Once inserted, the GIF will animate automatically during the slideshow.
John Michaloudis is a former accountant and finance analyst at General Electric, a Microsoft MVP since 2020, an Amazon #1 bestselling author of 4 Microsoft Excel books and teacher of Microsoft Excel & Office over at his flagship MyExcelOnline Academy Online Course.


