When diving into the world of workbook management, ‘Track Changes’ in Excel is like having a guardian angel for your data – they keep a watchful eye over every modification. This invaluable tool records all edits made to a document, providing a transparent history of adjustments. If you’ve ever pondered how to ensure data integrity or facilitate smooth collaboration, using ‘Track Changes’ will be your answer.
Key Takeaways
- Excel’s track changes feature provides a comprehensive audit trail and enhances collaboration by allowing users to see who made changes, what changes were made, and when they were made. The feature includes options to highlight changes directly on the screen for instant visibility, and to retain a change history for a specified duration, ensuring that users can review and understand edits over time.
- The ability to accept or reject changes in Excel gives users control over revisions made to a spreadsheet. Tracking changes can be tailored to specific needs, for example, by not showing changes on-screen to collaborators but collecting all edits in the background, allowing for meticulous review and oversight once the document is returned.
- Disabling the track changes feature is also a straightforward process in Excel, returning the document to a standard state without the change tracking overlay. Additionally, Excel provides a method to monitor the most recent cell change, enabling users to stay updated on the latest modifications without sifting through the entire change history.
Table of Contents
Enabling and Utilizing the Feature
Step-by-Step Activation of Track Changes
Enabling the ‘Track Changes’ feature in Excel is straightforward and just takes a few clicks:
STEP 1: Open your workbook and select the Review tab.
STEP 2: Within the Track Changes group, find and click on the Track Changes option.
STEP 3: From the dropdown, choose Highlight Changes.
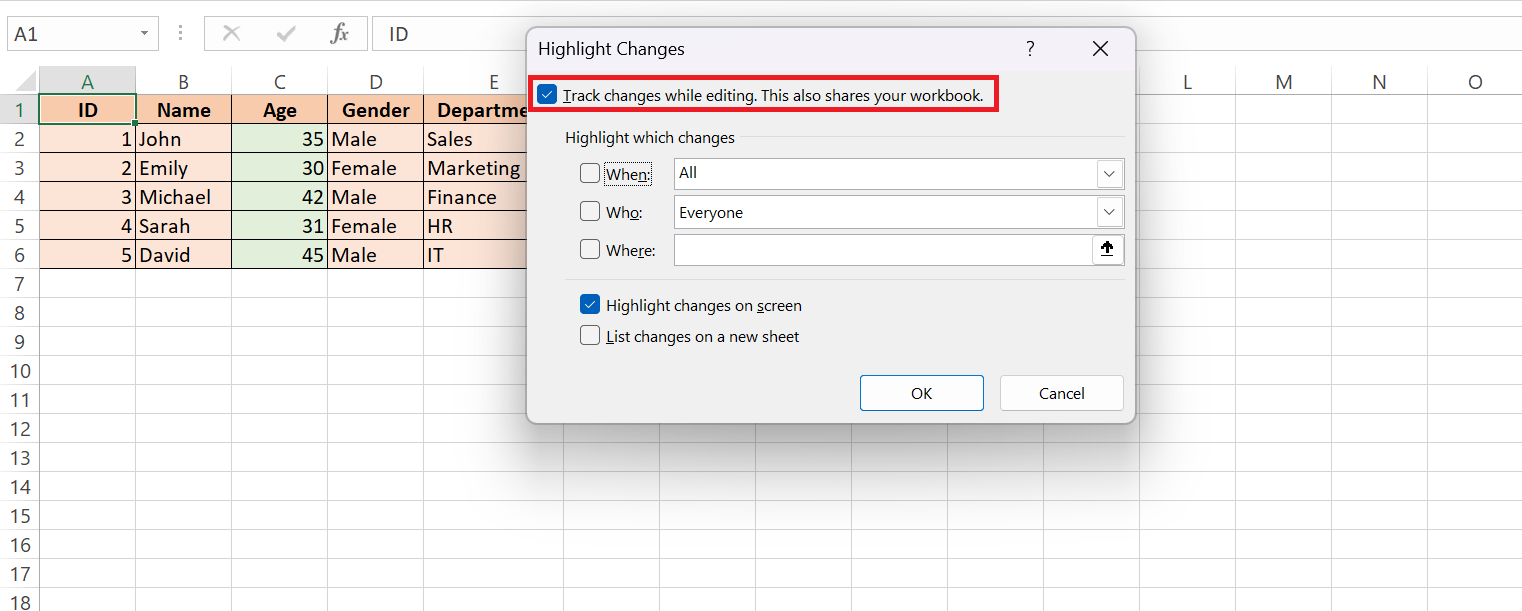
STEP 4: In the dialog box that pops up, tick the ‘Track changes while editing’ checkbox. This step shares your workbook as well.
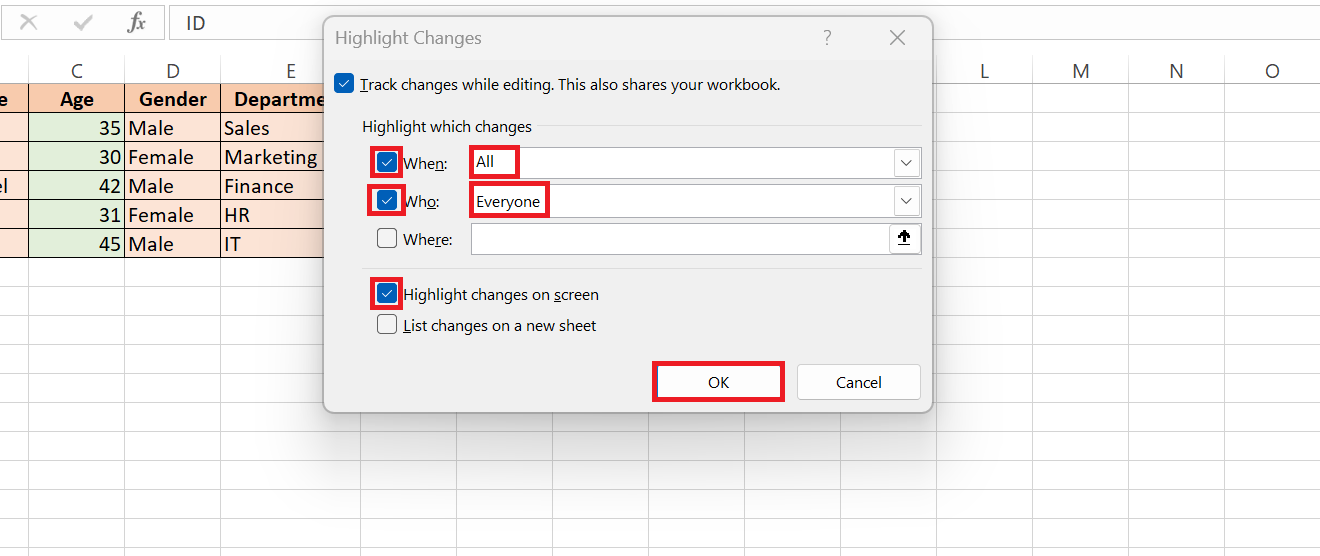
STEP 5: If necessary, define the ‘When’, ‘Who’, and ‘Where’ for changes you want to track. Lastly, Click OK.
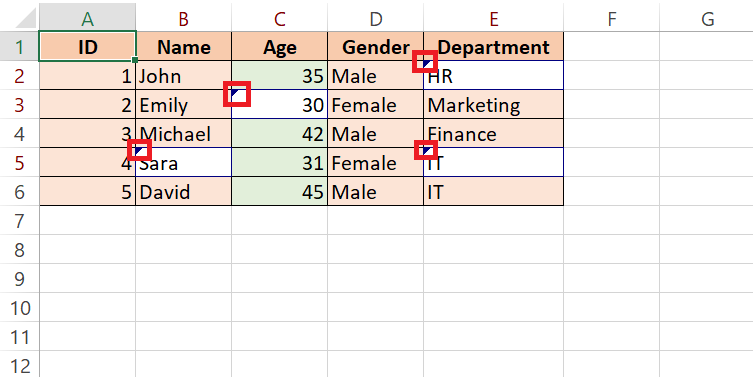
STEP 6: You’ve successfully activated Track Changes and can see a small blue triangle appearing on the cells in which the values have been changed and can be tracked through this function.
Keep in mind, once ‘Track Changes’ is enabled, the workbook becomes a ‘Shared Workbook,’ which may affect some Excel functionalities.
Customizing Your Change Tracking Preferences
Tailoring the ‘Track Changes’ feature to suit your needs amplifies its power. Here’s how you can customize your change tracking preferences for a harmonious workflow:
- Open the ‘Highlight Changes’ dialog box under the ‘Review’ tab.
- Check the ‘Highlight changes on screen’ option to visibly see edits as they happen.
- Through the ‘When’ section, focus on a specific timeframe to track changes, such as only spying on the shifts made since your last review.
- Using the ‘Who’ dropdown, filter alterations by specific users if your workbook has multiple collaborators.
- The ‘Where’ option lets you limit tracking to particular ranges within your sheet. This is perfect if you’re only concerned with particular sections of your workbook.
- If you don’t wish to make any changes, the default options already provide a comprehensive tracking scope, capturing all edits by everyone and everywhere in the workbook.
- Once satisfied, confirm your preferences with a click on ‘OK’ – you’ll see a prompt to save your workbook.
Customizing these settings ensures you’re not inundated with notifications, but rather, you’re alerted to the changes that truly matter to you and your team. Coordination is key, so make sure that all collaborators are on board with these settings to streamline the tracking process.
Insights into Tracked Changes
Accepting or Rejecting Edits Made by Collaborators
The real magic of collaboration happens when you sift through the proposed tweaks to your Excel workbook. It’s your call to accept or reject edits, and Excel makes the decision process methodical and straightforward. If you’re unsure about a change, you can review it in isolation, ponder its implications, and then make an informed decision.
STEP 1: Navigate to the Review tab and click on ‘Track Changes’.
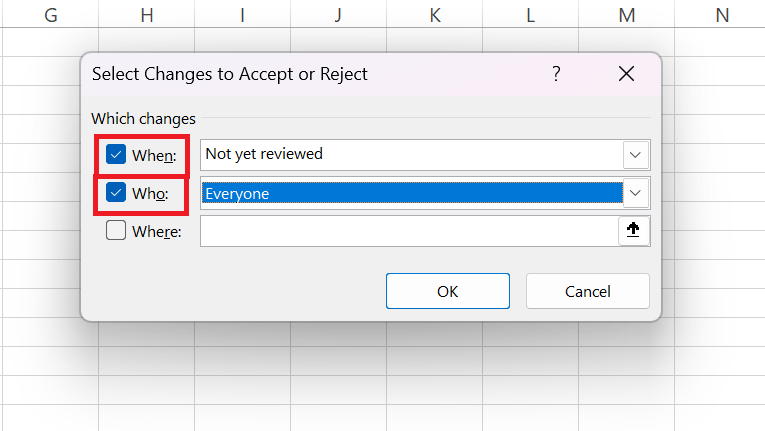
STEP 2: Select ‘Accept/Reject Changes’, and a dialog box will appear. Set your criteria for ‘When’, ‘Who’, and ‘Where’.
STEP 3: Press OK, and Excel will guide you through each change chronologically. For every edit, use the Accept or Reject button to decide its fate in your workbook.
It’s worth noting that you can also handle all alterations in one go by clicking ‘Accept All’ or ‘Reject All’. However, it’s often wiser to review each change individually to ensure no critical data is overlooked.
Managing the History of Changes
Saving and Viewing the Change Log
Maintaining and inspecting the change log in Excel is essential for fostering a well-documented and transparent work history. To do so efficiently, follow these directions:
To Save the Change Log:
- Activate ‘Track Changes’ as discussed in previous sections.
- Go to the ‘Review’ tab and choose ‘Track Changes’, followed by ‘Highlight Changes’.
- Make sure you opt for ‘List changes on a new sheet’, which does exactly what it says – it compiles every change into a neatly organized table on a fresh worksheet.
- This ‘History’ worksheet can then be saved just like any other Excel data. Simply click ‘Save’ on your workbook, and voila, the log is preserved.
To View the Change Log:
- Open your workbook and look for the ‘History’ worksheet – this is where all the action is logged.
- The ‘History’ sheet will display a table with columns indicating the time of the change, the cells affected, the previous content, the updated content, and the name of the user who made the edit.
- This overview not only keeps you informed about past actions but also highlights any conflicting changes when two users edit the same cell.
It’s a good practice to consult this log regularly, especially in a dynamic team environment where data is frequently adjusted. The log serves as a powerful reference point for unraveling how your workbook’s content has evolved.
Ensure you’re always working with the most recent version of the worksheet to have the latest change log. Whenever in doubt, the change log is a reliable source to confirm or clarify any uncertainties.
Keeping a Record: When to Save and How to Archive
Keeping a meticulous record of changes in Excel is indispensable, especially when you’re managing a document over a prolonged period or with numerous editors. Knowing when to save and how to archive can be the difference between order and chaos in your data universe.
When to Save:
- Save immediately after enabling ‘Track Changes’ to initiate the revision history.
- Make it a routine to save frequently, especially after significant edits or before closing the workbook.
- Before and after reviewing and accepting/rejecting changes to capture the ‘before’ and ‘after’ states.
How to Archive:
- Regularly back up your workbook by saving copies with distinctive timestamps or version numbers in the file names.
- Use the ‘Keep change history for [x] days’ option to manage the duration for which past edits are stored. Adjust the ‘[x]’ value under ‘Track Changes’ options according to your project’s lifespan and requirements.
- Consider exporting the ‘History’ sheet regularly before the change log exceeds its time limit and is purged by Excel. Store these history records securely.
- For ultra-important data, think about creating a dedicated archival process that includes physical storage solutions like external drives, or cloud services for digital backups.
Recording and archiving changes shouldn’t be an afterthought. Figure out an archiving routine and stick to it with religious zeal. Whether you face an unexpected audit or a colleague needs to trace historical edits, this goldmine of data lineage will save the day.
Key Benefits of Tracking Changes for Excel Users
For Excel users, tracking changes is akin to having a powerful ally in the realm of spreadsheet management. Firstly, it amplifies accountability in teamwork, as you can see who made which changes and when. This transparency fosters trust and clarity, particularly in collaborative environments. Secondly, it acts as a safety net, allowing you to spot and correct errors swiftly. No longer will unintended modifications slip through unnoticed. Thirdly, the feature streamlines the review process. Rather than scouring through rows and columns, you can swiftly zero in on the alterations. Also, think of it as a communication facilitator; comments attached to changes can provide context or rationale behind data adjustments. Lastly, it ensures historical data integrity, giving you the ability to revert to previous states if needed.
- Monitor team contributions
- Quick error identification & correction
- Simplified review process
- Communication facilitator through comments
- Historical integrity maintenance
Let’s not forget the peace of mind that comes from having a detailed record of your spreadsheet’s evolution. Whether you need to audit past figures or reconcile discrepancies, tracking changes in Excel offers a secure and reliable method to manage data effectively.
Transitioning Away From Tracking
Disabling Track Changes When No Longer Needed
When your collaboration phase wraps up or when you’re ready to finalize your spreadsheet, turning off ‘Track Changes’ is a clear next step. Here’s how to bid adieu:
- Head over to the ‘Review’ tab and in the ‘Changes’ group, click on ‘Track Changes’ followed by ‘Highlight Changes’.
- Uncheck the ‘Track changes while editing. This also shares your workbook’ option to stop recording further amendments.
It’s important to note that once you turn off ‘Track Changes’, the change history is deleted. But if you want to preserve the history,
- Use ‘List changes on a new sheet’ before disabling the feature.
- Copy the history sheet to another workbook and save it for future reference.
Remember, when ‘Track Changes’ is off, collaboration functionality like simultaneous editing might not be available, so coordinate with your team before you make this change. And don’t forget to save your workbook after disabling the tracking to secure any last-minute changes.
Cleaning Up: Removing Highlighted Changes Post-Review
Once you’ve accepted or rejected tracked changes in your workbook, you might want to remove the residual highlights to clean up your worksheet:
- Revisit the ‘Review’ tab, and on ‘Track Changes’, opt for ‘Highlight Changes’.
- In the ‘Highlight Changes’ dialog, clear the ‘Highlight changes on screen’ option. This action stops Excel from marking the changed cells, providing a more pristine view of your data.
- Additionally, if your workbook was shared, you could unshare it by selecting ‘Share Workbook’ under the ‘Review’ tab and unchecking the ‘Allow changes by more than one user at the same time’ box.
By completing these simple steps, you’ll be left with a tidier workbook where you can focus on your data’s insights rather than the history of its edits. And of course, save your workbook to cement these changes.
FAQs on Excel Change Tracking
Can Track Changes Be Used on All Types of Excel Workbooks?
No, ‘Track Changes’ can’t be used with all types of Excel workbooks. It is only available for workbooks saved in the traditional .xlsx format, not in older versions like .xls, and it’s also incompatible with workbooks that contain Excel tables. Additionally, certain Excel features cannot be used when ‘Track Changes’ is active in a shared workbook.
How Do I Track Changes in Excel on a Mac?
Tracking changes in Excel on a Mac follows a similar process to Windows. Open the workbook, go to the ‘Tools’ menu, and select ‘Track Changes’ followed by ‘Highlight Changes’. Then, specify your tracking options and select ‘OK’ to start tracking. Remember, the workbook will need to be saved before changes can be tracked.
How to track changes in Excel spreadsheet?
To track changes in an Excel spreadsheet, first, share your workbook by saving it if you haven’t already. Go to the ‘Review’ tab, select ‘Track Changes’, and then choose ‘Highlight Changes’. Check the option to ‘Track changes while editing’ and adjust other settings to your preference. Click ‘OK’, and Excel will begin to track and highlight any changes.
John Michaloudis is a former accountant and finance analyst at General Electric, a Microsoft MVP since 2020, an Amazon #1 bestselling author of 4 Microsoft Excel books and teacher of Microsoft Excel & Office over at his flagship MyExcelOnline Academy Online Course.


