If you’ve ever been frustrated by Excel’s Autocorrect feature, you’re not alone. While it’s designed to help by automatically fixing typos and formatting, sometimes it gets in the way, especially when working with specialized data, formulas, or custom text. I’ve had my share of moments where Excel’s “helpfulness” led to unnecessary edits, so I decided to take control and turn off Autocorrect in Excel.
Here’s how to turn off autocorrect in Excel –
Key Takeaways:
- Excel’s Autocorrect feature can assist with typos but may disrupt specialized data or custom text.
- Disabling Autocorrect helps maintain control over unique entries and avoids unwanted changes.
- You can selectively turn off specific Autocorrect features to customize it for your needs.
- Autocorrect can be leveraged for faster data entry using personalized abbreviations.
- The undo shortcut (Ctrl + Z) is a quick way to reverse unwanted Autocorrect changes.
Table of Contents
Introduction to Excel Autocorrect
The Purpose of Autocorrect in Excel
Excel’s Autocorrect feature is a double-edged sword. Its primary purpose is to assist us in maintaining accuracy and efficiency as we input data. Imagine typing away in a spreadsheet, and Autocorrect diligently fixes those common mishaps that can occur when fingers fly across the keyboard.
“Teh” becomes “The” and “adn” straightens out to “and” without a second thought on our part. This convenient functionality was designed with the best of intentions to save us the trouble of constantly stopping to correct our typos.
Why You Might Want to Turn It Off
However, the very tool that’s meant to streamline our workflow can sometimes be a hindrance. Here’s why I often hear people wanting to give Autocorrect the boot: It can mistakenly assume that specialist terminology or unique data entries are mistakes, leading to erroneous ‘corrections’ that could distort data integrity.
Imagine meticulously typing out chemical compound names or a series of codes only to have Excel ‘helpfully’ alter them. In accounting tasks, entering specific financial codes that resemble regular text phrases can result in unwanted changes. Or, when working with languages other than English, Autocorrect’s standard settings may conflict with the input.
For anyone needing complete control over their data entries, these ‘helpful’ Autocorrect interventions can become pesky, time-consuming problems. Disabling Autocorrect can save a lot of frustration and ensure the precision of the data.
How to Turn Off Autocorrect
Navigating the Options Menu in Different Excel Versions
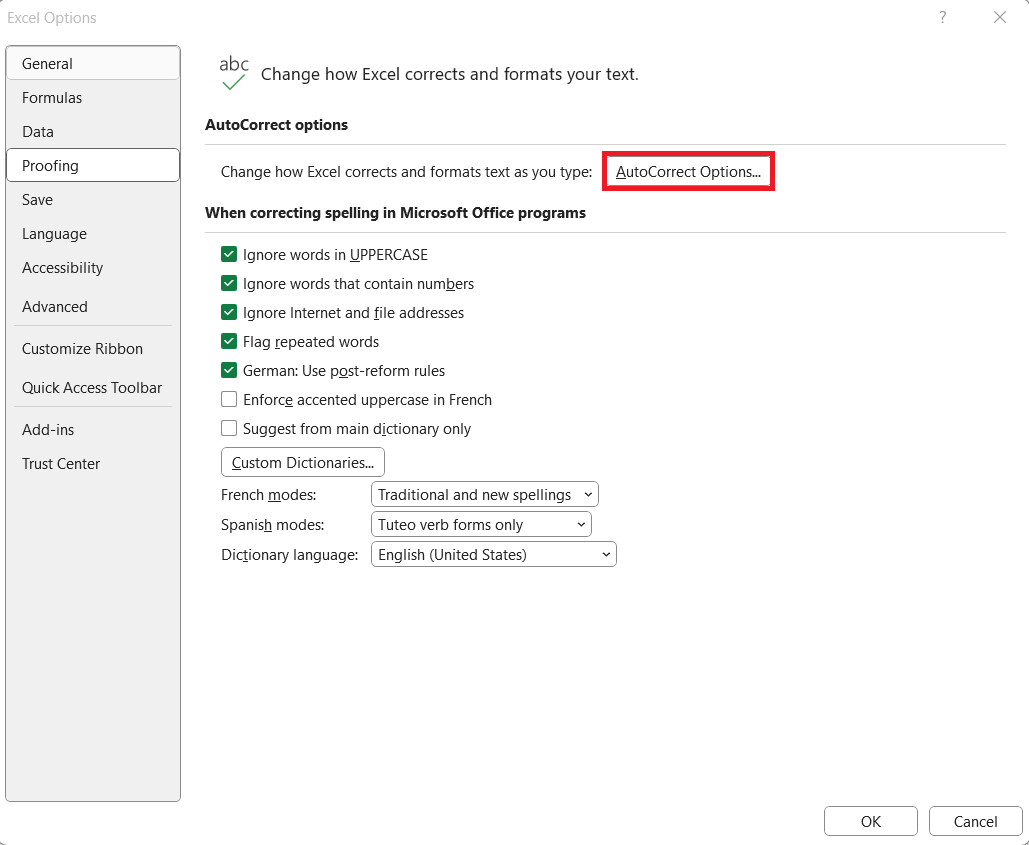
Getting to the Autocorrect settings can seem like a bit of a treasure hunt if you’re not familiar with it. In Excel 2010 and onwards, including Excel for Microsoft 365, you would typically click on ‘File’ located in the top left corner, then choose ‘Options’ to open the Excel Options dialog box.
From there, select ‘Proofing’ on the left-hand pane, and you’ll see the ‘AutoCorrect Options’ button.
Disabling Specific Autocorrect Features
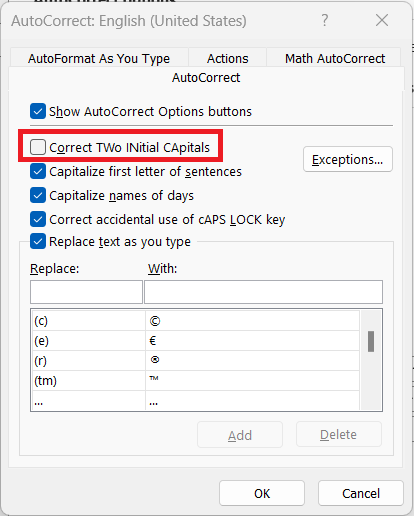
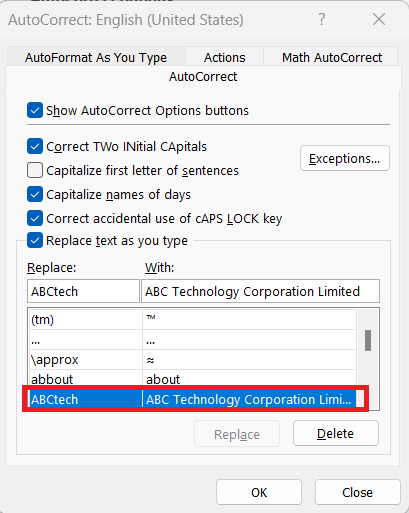
When you’ve navigated to the AutoCorrect settings, you’ll be greeted with a list of features that can be toggled on or off. Here’s how we can surgically remove the features that are more annoying than helpful. For each one, there’s a checkbox—check it to enable or uncheck to disable.
You might want to turn off the feature correcting two initial capitals if Excel keeps wrongly capitalizing your abbreviations.
Or perhaps disable the AutoCorrect for certain symbols that keep popping up when you’re working with mathematical data.
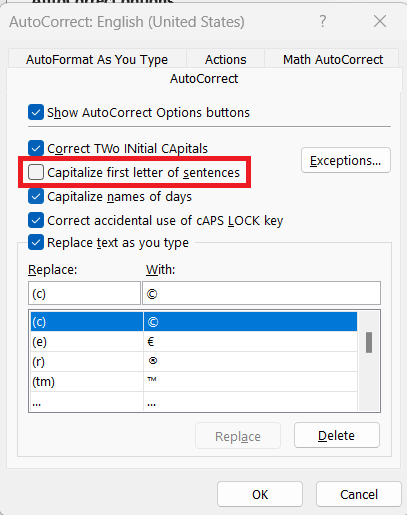
Suppose you want to stop Excel from auto-capitalizing the first letter of sentences, especially useful when listing items that don’t require capitalization. Just uncheck that box, and you’re good to go.
By selectively turning off specific Autocorrect features, we tailor the tool to suit our unique needs rather than entirely scrapping its convenience.
Customizing Your Autocorrect Experience
Removing or Editing an Existing Entry
To fine-tune your interactions with Autocorrect in Excel, you can either remove or edit an existing entry. Perhaps you’ve been down this road: an Autocorrect entry, while well-meaning, just isn’t fitting your current project, or it constantly misinterprets a specific jargon that’s crucial to your data.
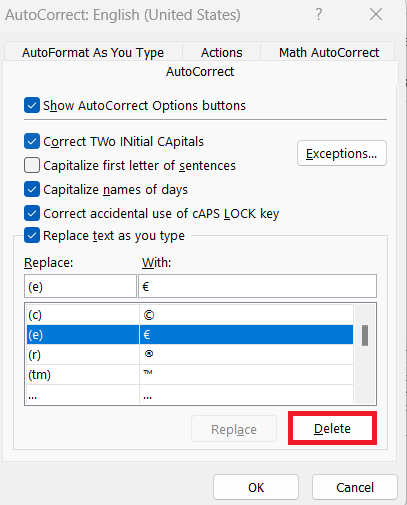
Here’s how to get this done. Open the AutoCorrect dialog box following the steps previously described. Once there, you’ll see a list of words and their corresponding ‘corrections’. Scroll through or search for the word or phrase that’s giving you trouble. Once you find it, click on it to highlight it, and press the ‘Delete’ button to remove it from the AutoCorrect repertoire.
It’s a matter of ensuring that your tools are working for you, not against you.
Advanced Tips and Tricks
Using Autocorrect to Speed Up Data Entry
Autocorrect doesn’t just need to be a defensive tool to fend off unwanted changes; it can be an offensive strategy to speed up our data entry. Let’s say I’m working for a firm, ‘ABC Technology Corporation Limited,’ and I need to enter this name numerous times throughout the day.
Typing it in full each time would be a chore. So, I tailor Autocorrect to work smarter for me: I add the abbreviation ‘ABCtech’ in the ‘Replace’ field and the full company name in the ‘With’ field. Now, every time I type in ‘ABCtech,’ Autocorrect kindly expands it to the full company title. This little hack can save humongous amounts of time and taps.
We can populate our Autocorrect with a series of abbreviations for common phrases, technical jargon, or even long-winded names that we have to use repeatedly. It’s like creating a personalized shorthand that Excel recognizes and dutifully expands.
Reversing Unwanted Autocorrect Changes
Despite our best efforts, Autocorrect can sometimes get the better of us, swooping in and altering text when we least expect it. But instead of letting frustration build up, we can swiftly reverse these changes. The immediate strategy after an unwanted change is to enact the classic undo function.
On your keyboard, simply hit Ctrl + Z, and Excel will retract its latest action, including that Autocorrect move. This is your go-to quick fix in the heat of data entry.
For a more ‘preventative’ approach, if you notice a pattern of frequent and unwanted corrections, you’d be well-served by modifying the Autocorrect entries. Remove or adjust them as I mentioned earlier. Or, if you’re in the moment and Excel hasn’t caught up with the changes you’ve made to the Autocorrect settings, remember the undo shortcut will always have your back.
FAQ: Demystifying Autocorrect in Excel
How can I completely turn off autocorrect in Excel?
To completely disable Autocorrect in Excel, access the Excel Options menu by clicking on ‘File’, then choose ‘Options’. Under ‘Proofing’, click on ‘AutoCorrect Options’. Within this dialog, you can uncheck all options, particularly ‘Replace text as you type’, to turn off Autocorrect for all words. Confirm the changes by clicking ‘OK’. Now, Excel will take your text at face value without making any automatic corrections.
What is the shortcut to undo an autocorrect change in Excel?
The shortcut to reverse an Autocorrect change in Excel is straightforward—simply press Ctrl + Z on your keyboard. This quickly undoes the most recent correction and restores your original text. Remember, it has to be done immediately after the Autocorrect occurs for the best results.
Can I customize my own autocorrect entries in Excel?
Absolutely, you can customize your Autocorrect entries in Excel. Open the Autocorrect settings via the ‘File’ and ‘Options’ menu, go to ‘Proofing’, then click ‘AutoCorrect Options’. Here’s where you can add new pairs of ‘Replace’ and ‘With’ text. This customization lets you tailor autocorrections to suit the specific needs of your data entry tasks.
Does turning off Autocorrect affect all users on a shared workbook?
No, turning off Autocorrect affects only your instance of Excel. If you disable it on your computer, it does not impact the settings of other users who might be working on the same shared workbook. Autocorrect settings are local to each user’s application preferences.
How do I stop Excel from auto correcting?
To stop Excel from auto-correcting, go to ‘File’, click ‘Options’, then ‘Proofing’, and access ‘AutoCorrect Options’. Uncheck ‘Replace text as you type’ to disable automatic text replacement. This action halts Excel’s auto-correcting behavior, allowing you to retain your data as keyed in.
John Michaloudis is a former accountant and finance analyst at General Electric, a Microsoft MVP since 2020, an Amazon #1 bestselling author of 4 Microsoft Excel books and teacher of Microsoft Excel & Office over at his flagship MyExcelOnline Academy Online Course.


